
Ask AI
— answers from the official manualAnswers from the official manual.
Common questions
Common Questions
10 totalHow do I perform a leak test on the LP gas connections?
Apply a soapy water solution using a paintbrush to all indicated areas (as shown in Figure A) and check for any bubble formation, which indicates a potential leak. If bubbles appear, do not use or move the LP cylinder and contact an LP gas supplier or fire department immediately.
What should I do if my grill's igniter does not spark but lights with a match?
Clean any build-up of grease or corrosion from the electrode tip and wipe it dry. If there is damage, replace the electrode.
How do I reset the regulator flow limiting feature if my burners are not getting hot enough?
Disconnect the hose and regulator from the propane tank; turn all BBQ control knobs to “Hi” position, wait 1-3 minutes for gas dissipates. Then reconnect and hand-tighten only; ensure a positive seal. Slowly open the propane supply valve, then ignite a selected burner.
How often should I perform cleaning and maintenance on my grill?
At the beginning of each BBQ season before removing from storage and at least twice during the season or more frequently if used often/year-round. This includes checking all connections for safety.
Why is my BBQ not reaching its temperature potential?
This could be due to several causes such as incorrect start-up and shutdown procedures, blocked venturi tubes, missing flame tamers or improper installation (for NG models). Check Troubleshooting section for corrective actions.
What should I do before storing my BBQ for the season?
Clean all components as mentioned in the care and maintenance section, oil cooking grates with vegetable shortening, and ensure igniter battery is removed if stored long-term. Store indoors or use a cover outdoors; never leave propane cylinder inside.
Full Manual
12 pages
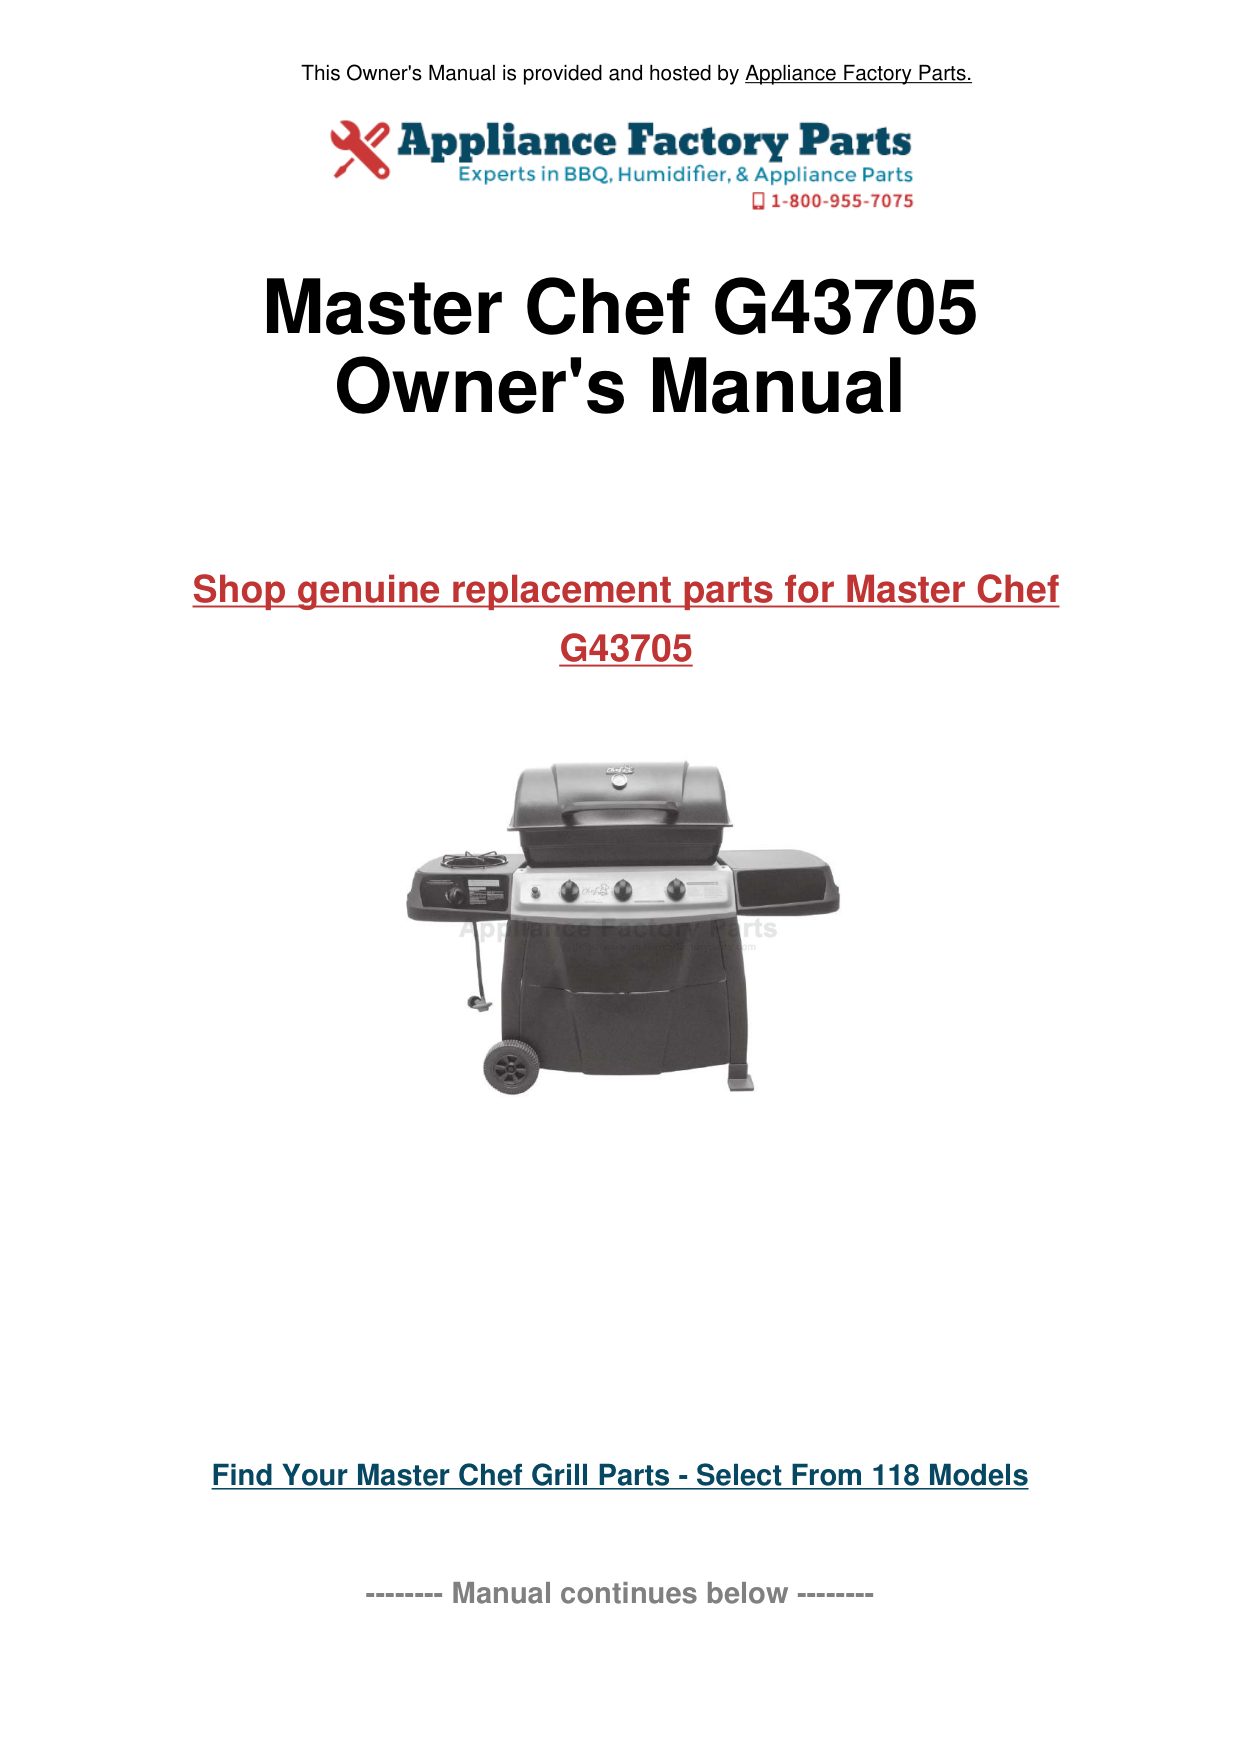
This Owner's Manual is provided and hosted by Appliance Factory Parts.

Master Chef G43705 Owner's Manual
#### Shop genuine replacement parts for Master Chef G43705

###### Find Your Master Chef Grill Parts - Select From 118 Models
-------- Manual continues below --------
WARRANTY
STOP
##### Do not return the product to the store.
|IF YOU NEED HELP OR PARTS, CALL THE MASTER CHEF HOTLINE
1-877-707-5463
HOURS: 8AM-7PM EST Mon-Fri, Close Saturday and Sunday| |---|
GET HELP FOR: MISSING/DAMAGED PARTS • ASSEMBLY • TROUBLESHOOTING • WARRANTY ASSISTANCE • PRODUCT INFORMATION TIP: ASSEMBLE YOUR GRILL IMMEDIATELY. MISSING OR DAMAGED PARTS MUST BE CLAIMED WITHIN 30 DAYS, OF PURCHASE.
GRILL SAFETY CHECK For your family’s safety, please check the following:
READ and UNDERSTAND the owner’s manual
PERFORM LEAK TEST on all connections as specified in this user manual. Leak Checks should be performed on all new BBQ’s even if assembled by an assembler or gas technician. Leak checks should be performed frequently thereafter.
INSPECT and CLEAN burner tubes to avoid flash fires caused by spider webs and other blockages. Inspect gas jets to ensure they are correctly installed in burner tubes. Never leave a lit grill unattended.
BEFORE OPENING THE GAS SUPPLY, ensure the lid is open, control knobs are in OFF position, gas is turned off, and the regulator is attached to tank correctly. Then follow the PROPER LIGHTING PROCEDURE as shown in the manual. If above steps are not followed, you may experience low flames, or other performance issues.
CHECK that the regulator nipple is centered into the LP tank valve. Do NOT cross thread this connection. Cross threading may result in a fire, or explosion at the tank connection.
AVOID dangerous grease fires by performing regular cleaning and maintenance of interior casting, the grease collection system, flame tamers and cooking grates.
CAUTION Some parts may contain sharp edges – especially as noted in the manual! Wear protective gloves if necessary. For residential use ONLY. Do not use for commercial cooking.
####### WARNING
Do not attempt to repair or alter the hose and regulator or valve assembly for any assumed defect or for any type of retro fit or conversion. Any modifications to this assembly will void your warranty and create the risk of a gas leak and fire. Use only authorized replacement parts supplied by the manufacturer, for your model.
To ensure your satisfaction and for follow-up service, register your BBQ online at www.masterchefbbqs.com.
##### TABLE OF CONTENTS
Installation and Warnings 1
L.P. Gas Cylinder
Requirements 1 Hook-ups and Warnings 2 Transportation and Storage 3
Safety Hose and Regulator 4
Leak Testing 5
Natural Gas Hook-ups and Warnings 6
Operation - Lighting Instructions 6
Cooking and Performance 9
Troubleshooting 11
Cleaning and Maintenance 14
Warranty and Service 17
##### GAS HOOK-UP’S AND WARNINGS
######## (LP) LIQUID PETROLEUM GAS
LP cylinder requirements:
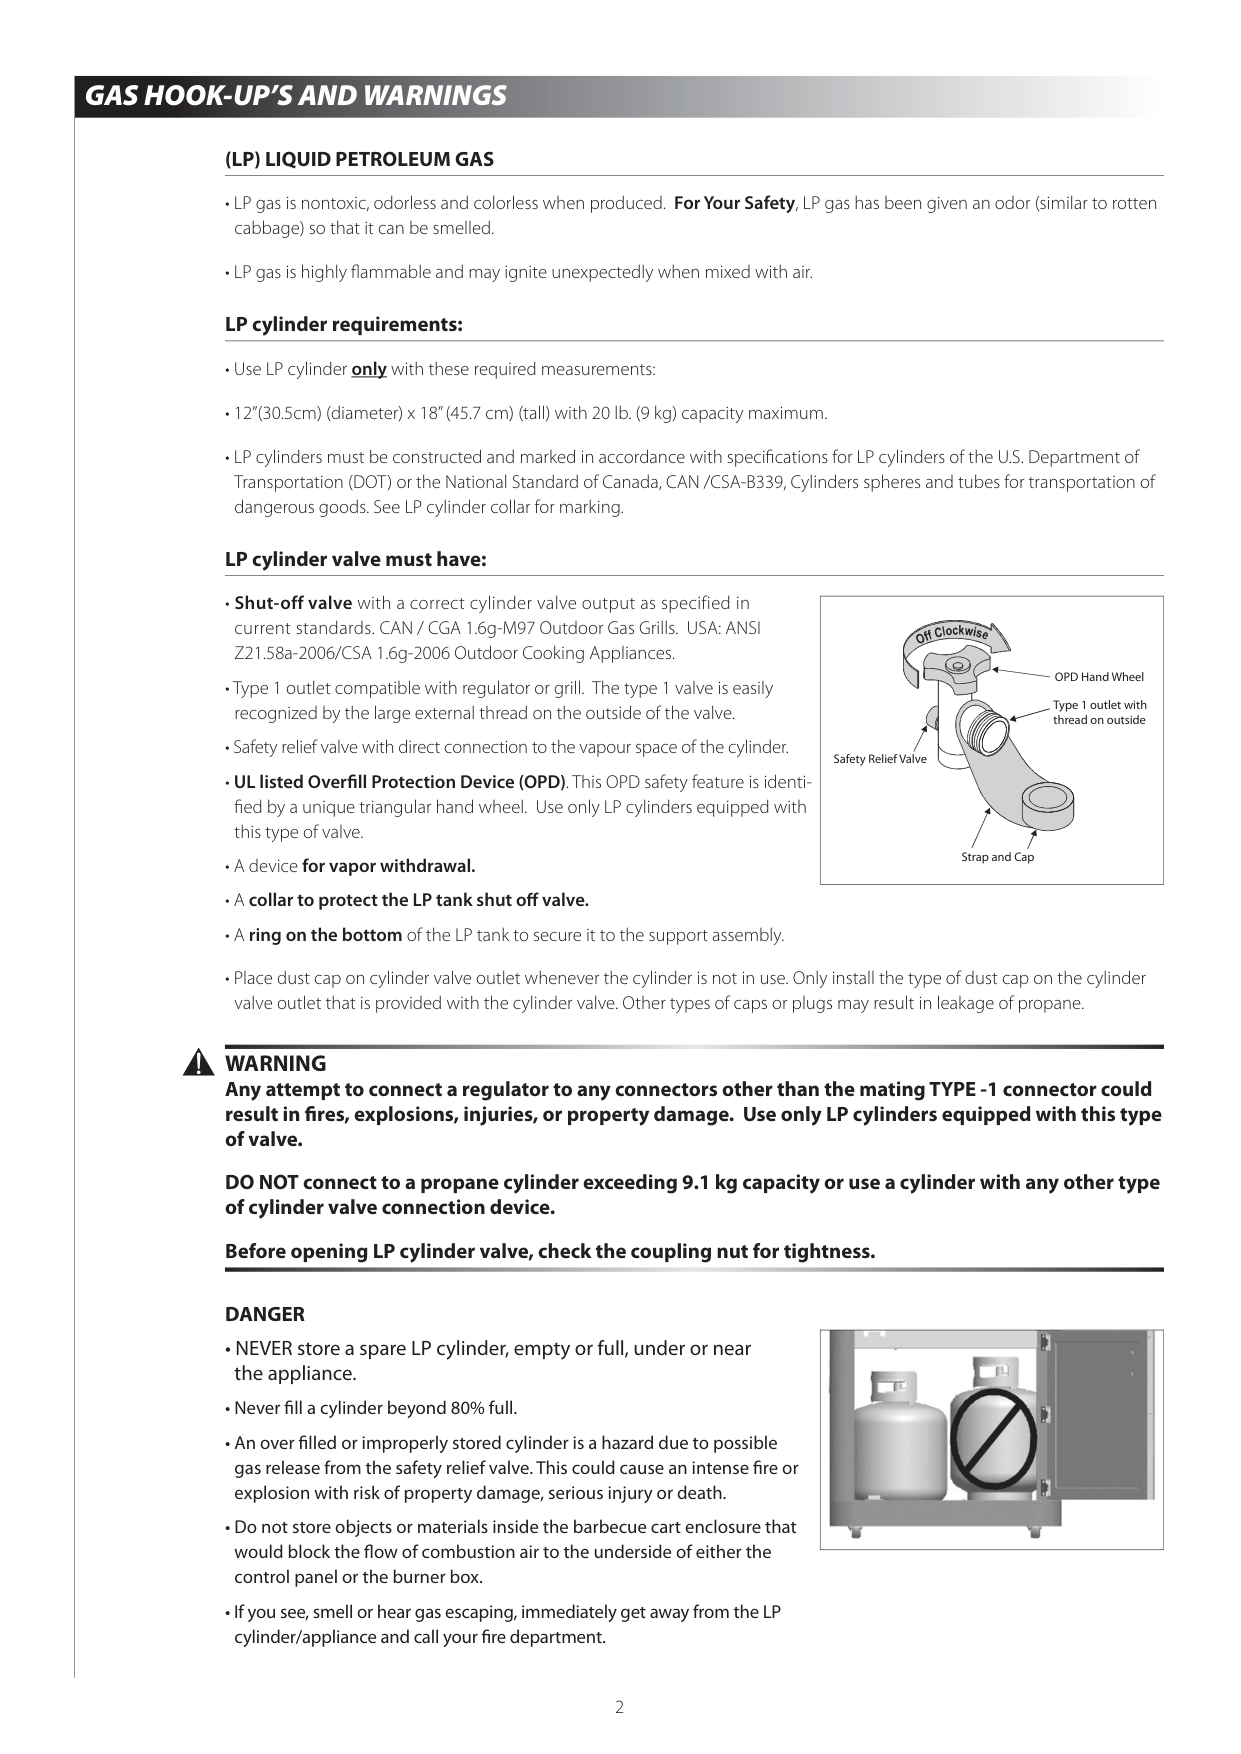
######## LP cylinder valve must have:
|Safety Relief Valve
Strap and Cap
Type 1 outlet with thread on outside
OPD Hand Wheel|
|---|
WARNING Any attempt to connect a regulator to any connectors other than the mating TYPE -1 connector could result in fires, explosions, injuries, or property damage. Use only LP cylinders equipped with this type of valve.
DO NOT connect to a propane cylinder exceeding 9.1 kg capacity or use a cylinder with any other type of cylinder valve connection device.
Before opening LP cylinder valve, check the coupling nut for tightness.
DANGER
|| |---|
2
LP Cylinder Leak Test For Your Safety ATTENTION: Leak Test must be repeated each time the LP cylinder is exchanged or refilled.
|
| |---|
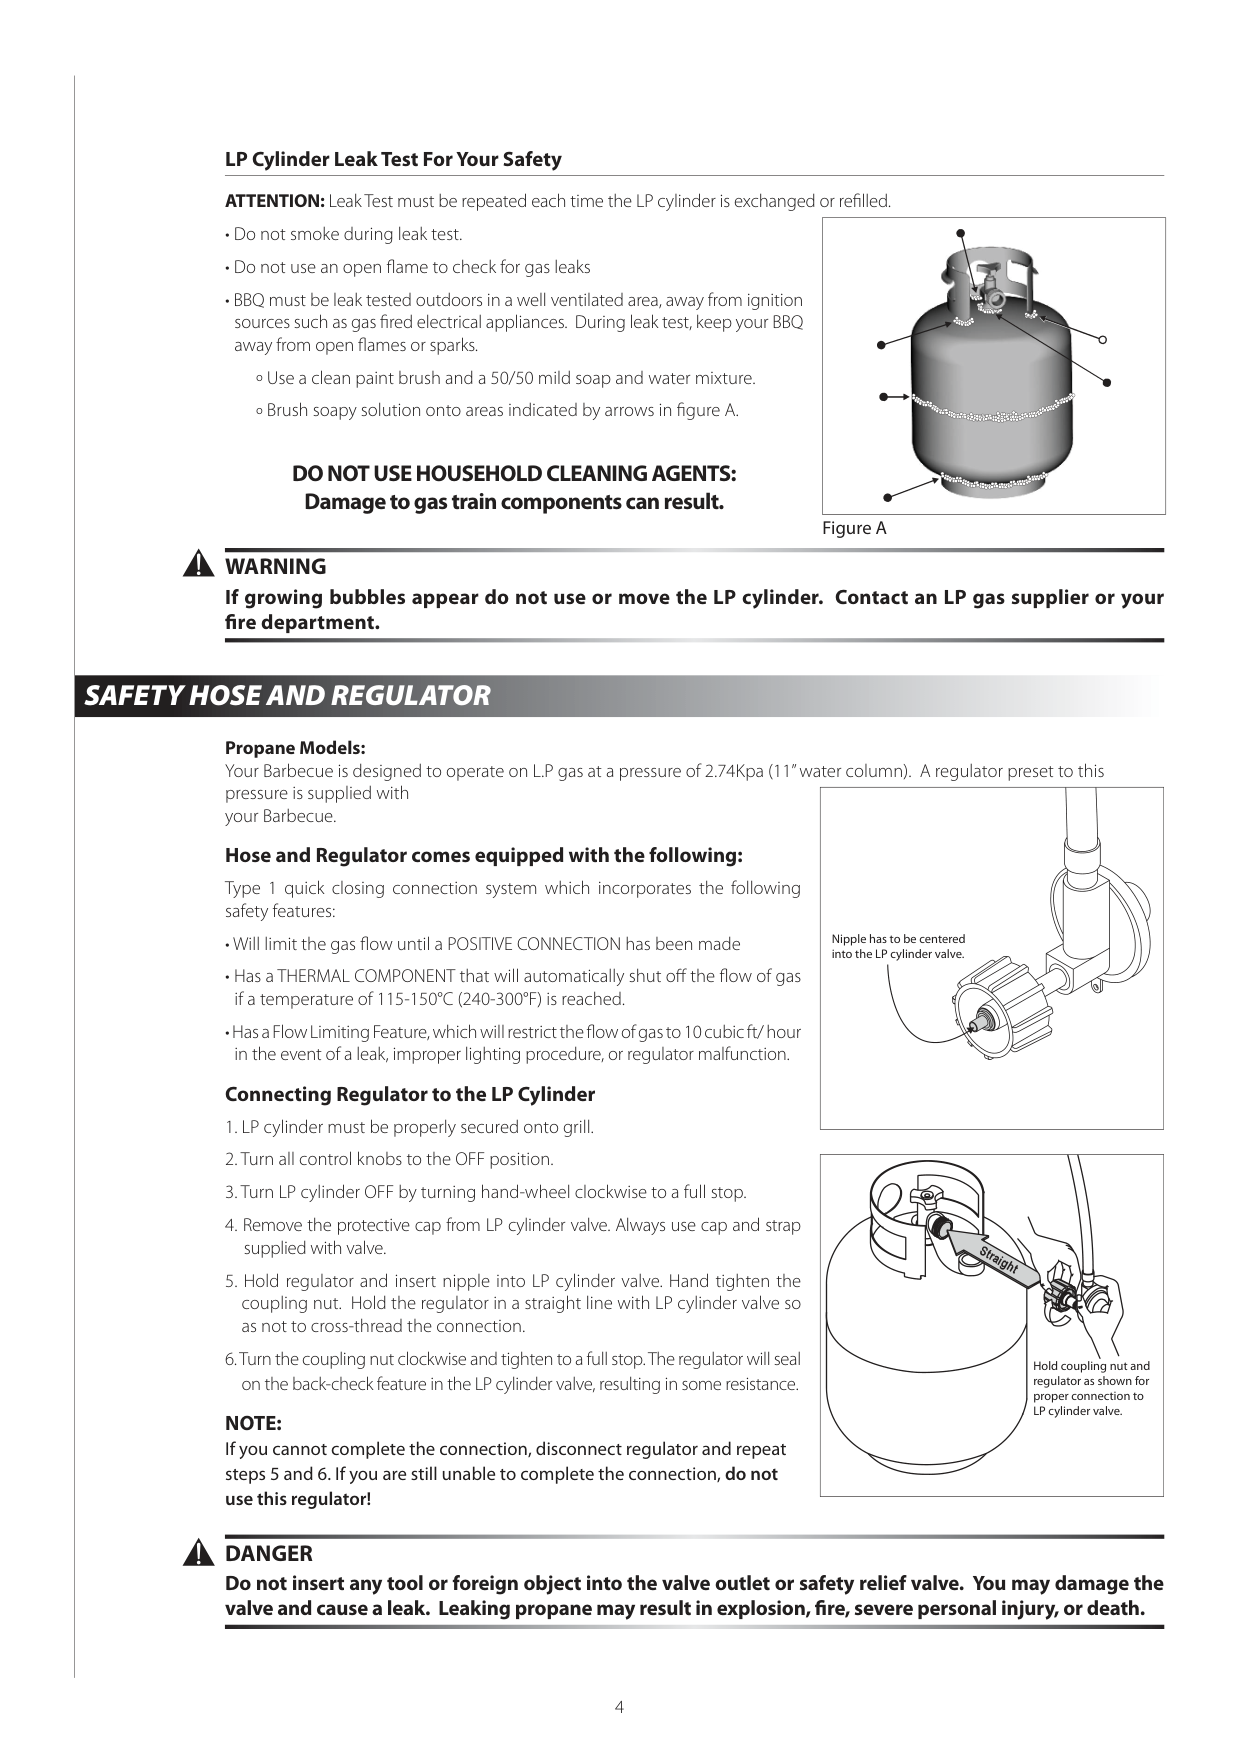
º Use a clean paint brush and a 50/50 mild soap and water mixture. º Brush soapy solution onto areas indicated by arrows in figure A.
####### DO NOT USE HOUSEHOLD CLEANING AGENTS: Damage to gas train components can result.
########## Figure A
####### WARNING If growing bubbles appear do not use or move the LP cylinder. Contact an LP gas supplier or your fire department.
##### SAFETY HOSE AND REGULATOR
Propane Models: Your Barbecue is designed to operate on L.P gas at a pressure of 2.74Kpa (11” water column). A regulator preset to this pressure is supplied with your Barbecue.
|Nipple has to be centered into the LP cylinder valve.| |---|
######## Hose and Regulator comes equipped with the following:
Type 1 quick closing connection system which incorporates the following safety features:
######## Connecting Regulator to the LP Cylinder
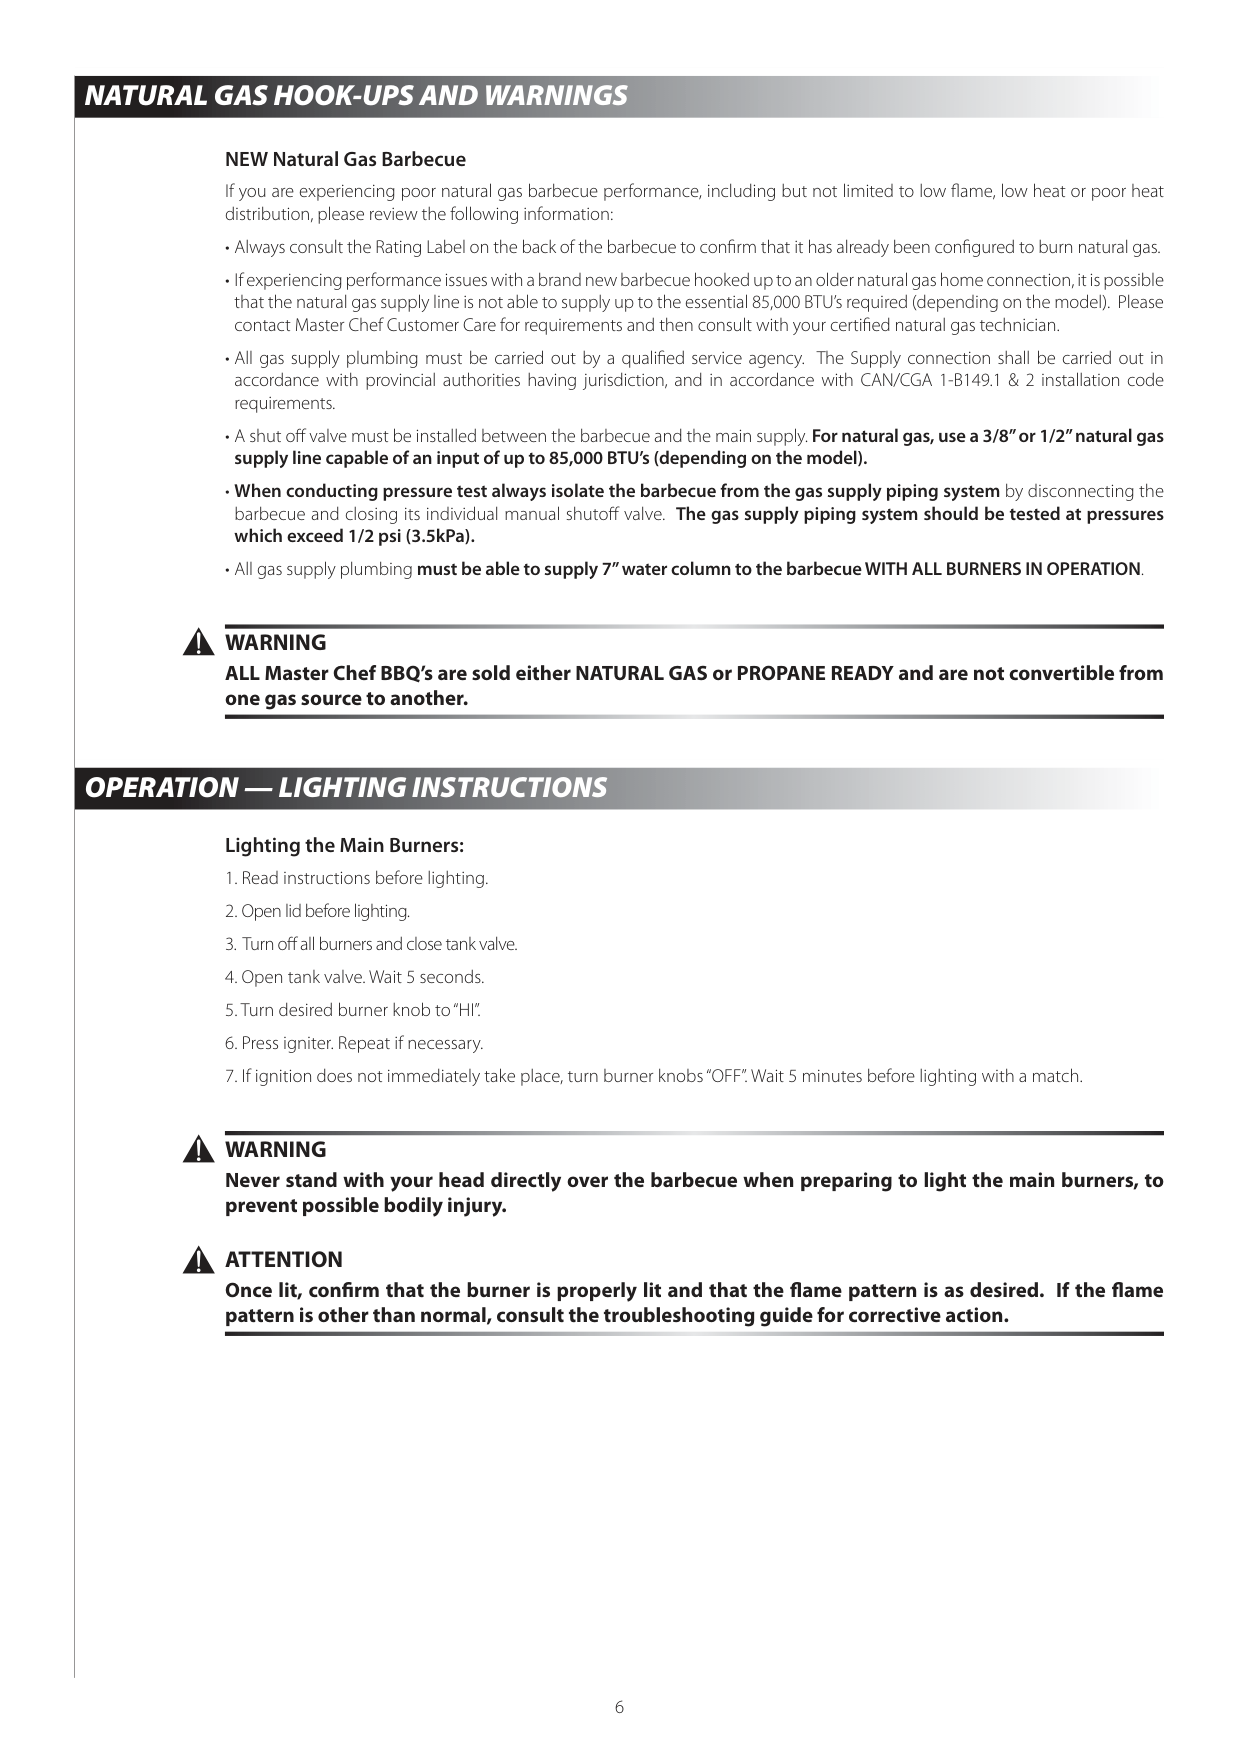
|Hold coupling nut and regulator as shown for proper connection to LP cylinder valve.| |---|
NOTE: If you cannot complete the connection, disconnect regulator and repeat steps 5 and 6. If you are still unable to complete the connection, do not use this regulator!
DANGER Do not insert any tool or foreign object into the valve outlet or safety relief valve. You may damage the valve and cause a leak. Leaking propane may result in explosion, fire, severe personal injury, or death.
4
##### NATURAL GAS HOOK-UPS AND WARNINGS
######## NEW Natural Gas Barbecue
If you are experiencing poor natural gas barbecue performance, including but not limited to low flame, low heat or poor heat distribution, please review the following information:
WARNING ALL Master Chef BBQ’s are sold either NATURAL GAS or PROPANE READY and are not convertible from one gas source to another.
##### OPERATION — LIGHTING INSTRUCTIONS
Lighting the Main Burners:
WARNING Never stand with your head directly over the barbecue when preparing to light the main burners, to prevent possible bodily injury.
ATTENTION Once lit, confirm that the burner is properly lit and that the flame pattern is as desired. If the flame pattern is other than normal, consult the troubleshooting guide for corrective action.
6
####### ATTENTION
Always preheat barbecue before starting to cook. Light all burners and adjust them to the HIGH position for 5 to 10 minutes with the lid closed. Following preheat; adjust the controls to medium setting for most cooking requirements.
Turning Grill Off
####### WARNING
If the heat output is too low, the flow control feature may have been activated by a gas leak or improper lighting procedure. If so, turn off the burner valve and cylinder valve, and perform a “Leak Test”. If there aren’t any leaks, perform a complete regulator flow limiting device reset.
8
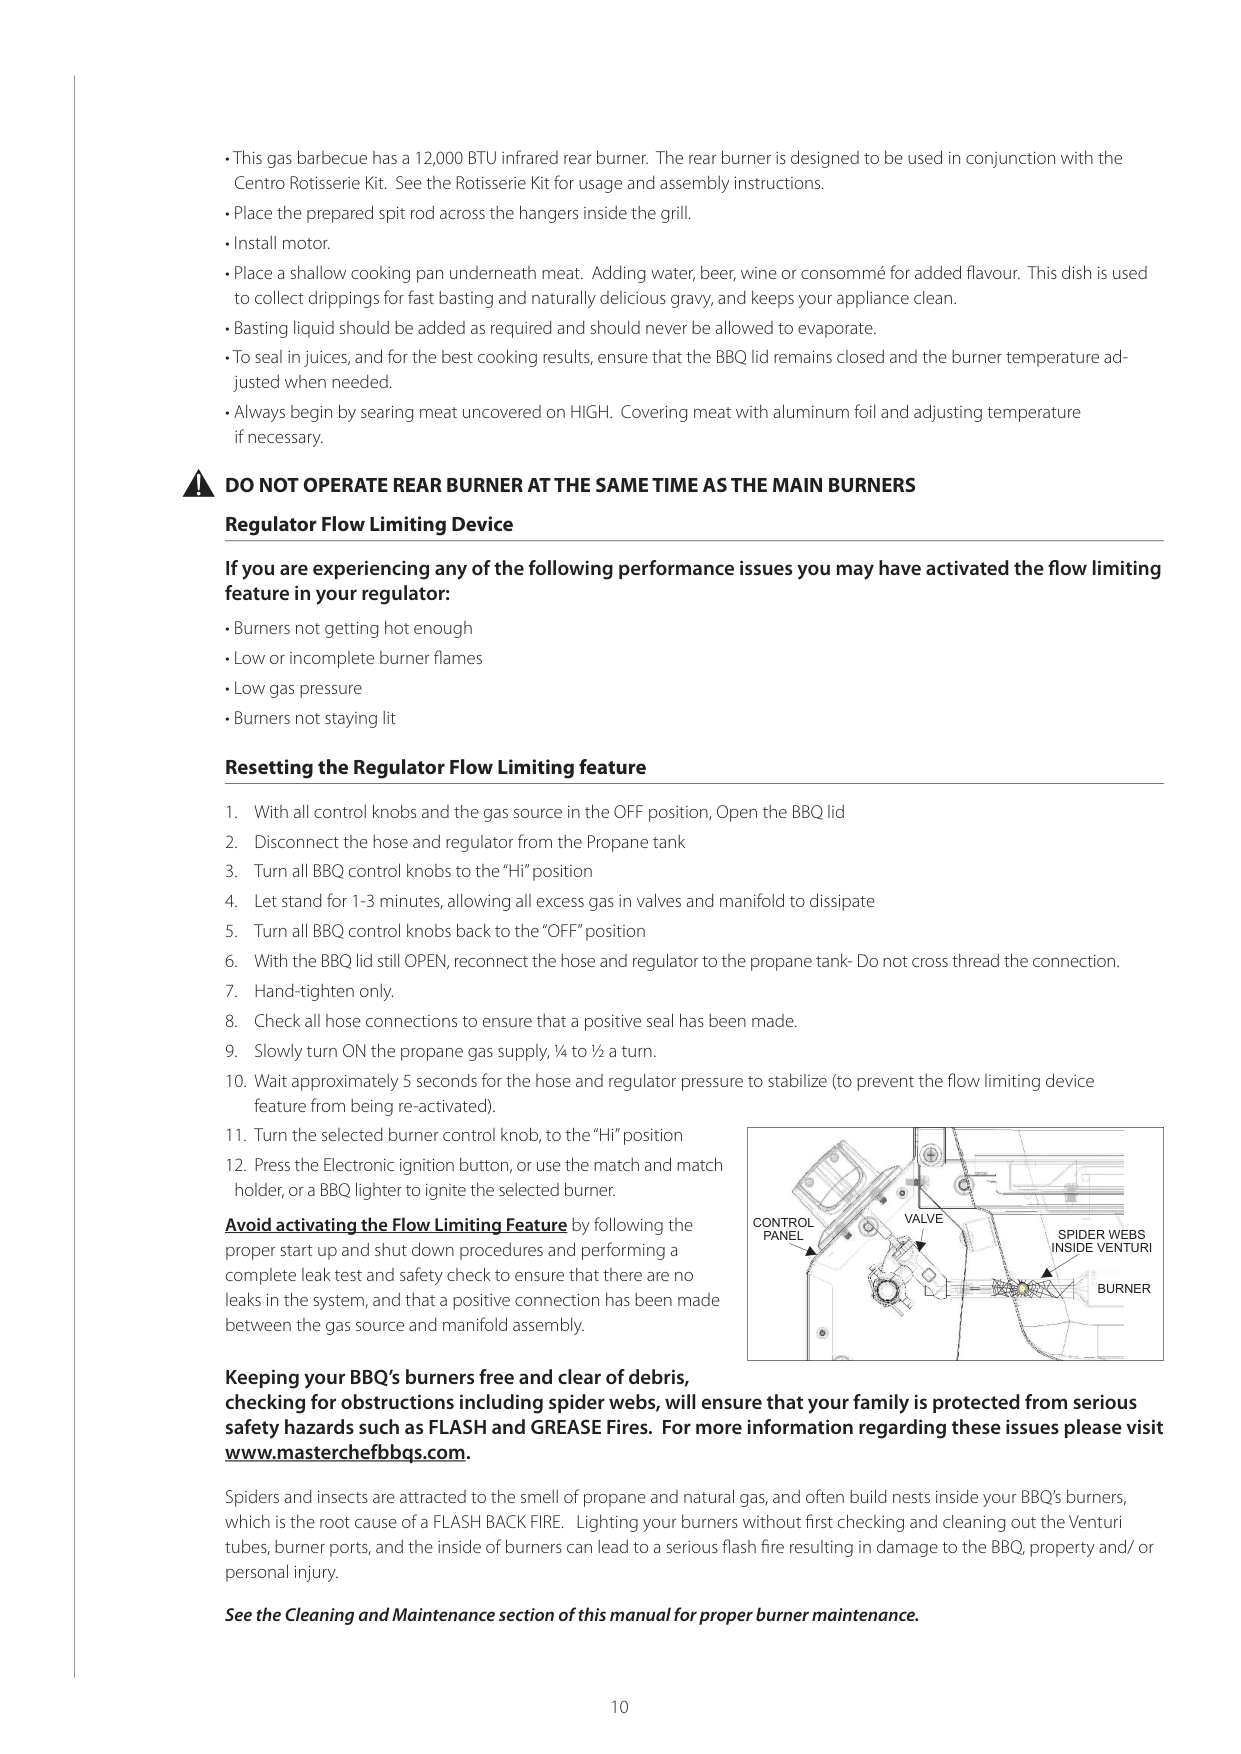
DO NOT OPERATE REAR BURNER AT THE SAME TIME AS THE MAIN BURNERS Regulator Flow Limiting Device
If you are experiencing any of the following performance issues you may have activated the flow limiting feature in your regulator:
|
CONTROL PANEL
VALVE
BURNER
SPIDER WEBS INSIDE VENTURI|
|---|
Avoid activating the Flow Limiting Feature by following the proper start up and shut down procedures and performing a complete leak test and safety check to ensure that there are no leaks in the system, and that a positive connection has been made between the gas source and manifold assembly.
######## Keeping your BBQ’s burners free and clear of debris, checking for obstructions including spider webs, will ensure that your family is protected from serious safety hazards such as FLASH and GREASE Fires. For more information regarding these issues please visit www.masterchefbbqs.com.
Spiders and insects are attracted to the smell of propane and natural gas, and often build nests inside your BBQ’s burners, which is the root cause of a FLASH BACK FIRE. Lighting your burners without first checking and cleaning out the Venturi tubes, burner ports, and the inside of burners can lead to a serious flash fire resulting in damage to the BBQ, property and/ or personal injury.
######### See the Cleaning and Maintenance section of this manual for proper burner maintenance.
10
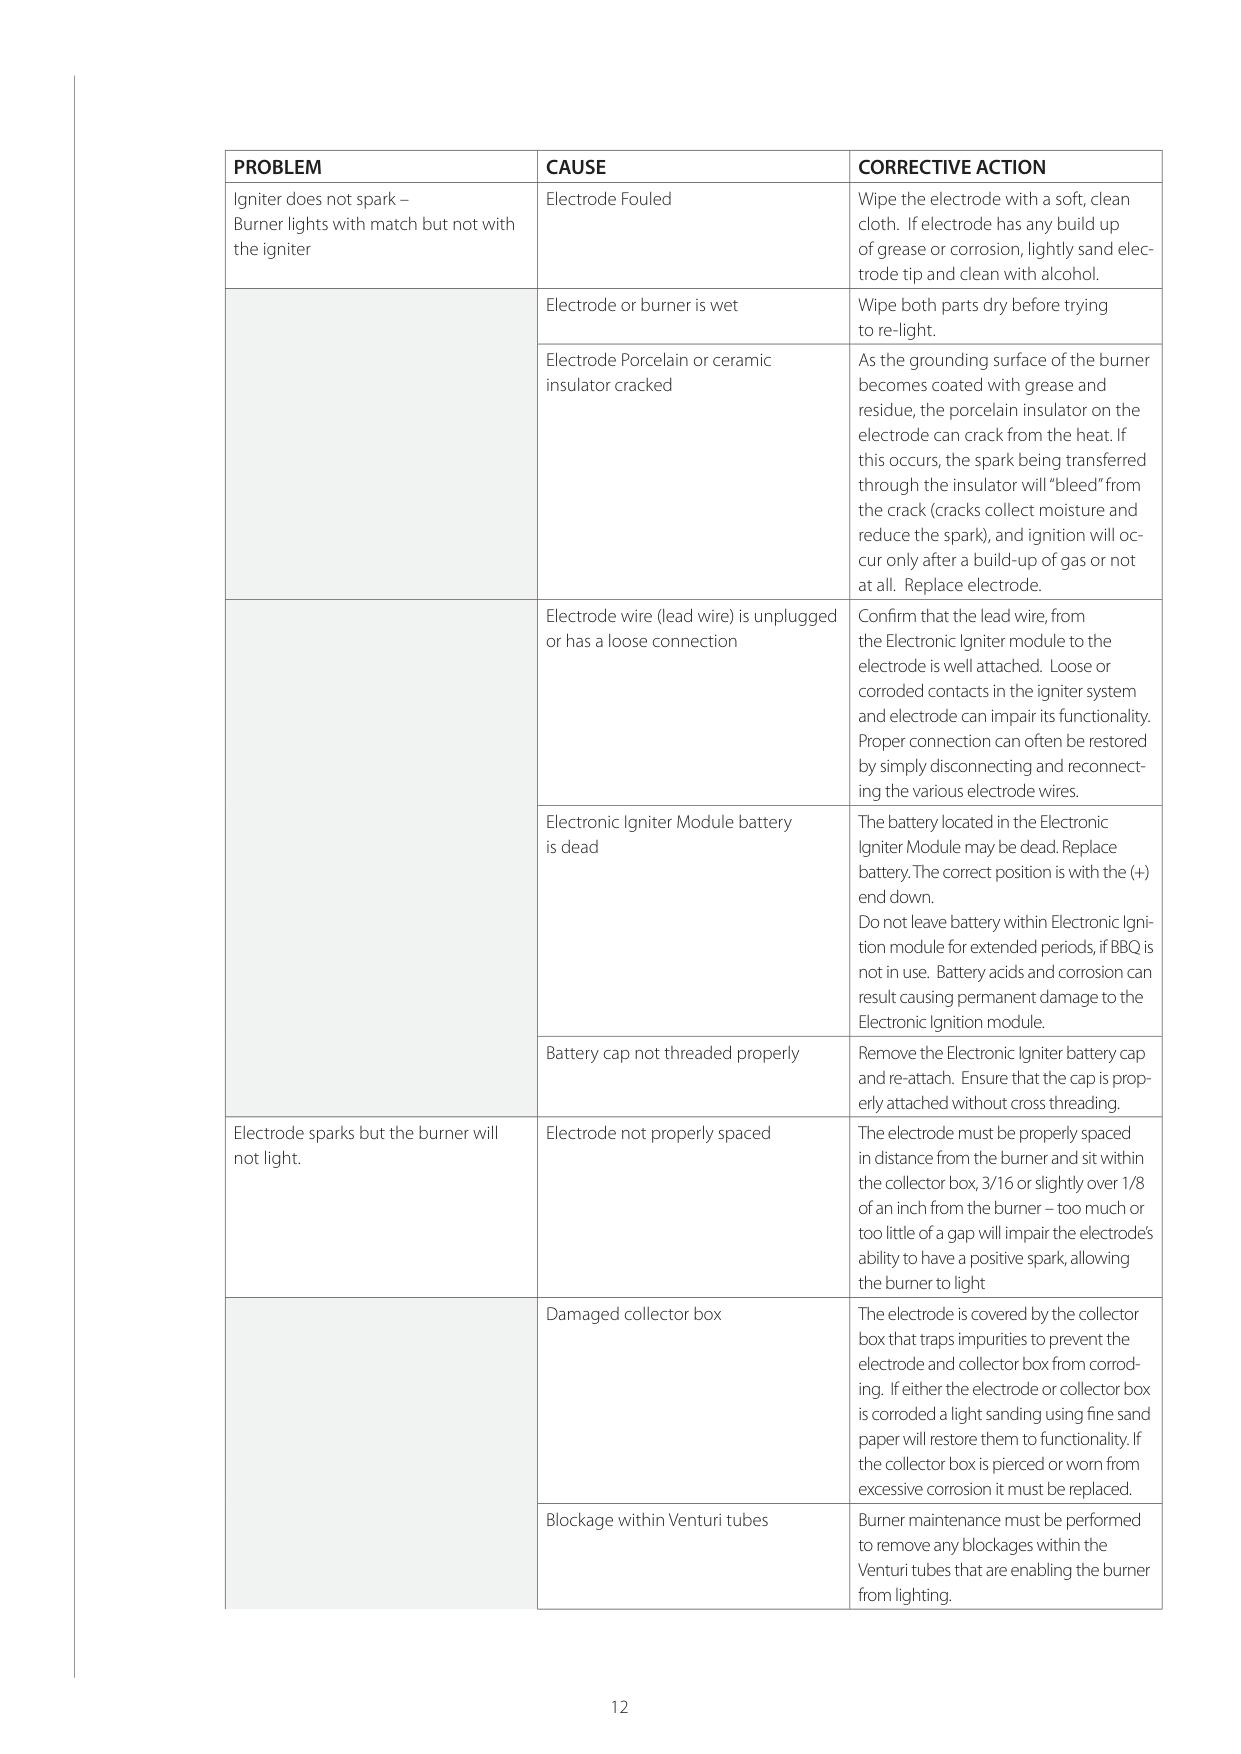
|PROBLEM|CAUSE|CORRECTIVE ACTION| |---|---|---| |Igniter does not spark – Burner lights with match but not with the igniter|Electrode Fouled|Wipe the electrode with a soft, clean cloth. If electrode has any build up of grease or corrosion, lightly sand electrode tip and clean with alcohol.| | |Electrode or burner is wet|Wipe both parts dry before trying to re-light.| | |Electrode Porcelain or ceramic insulator cracked|As the grounding surface of the burner becomes coated with grease and residue, the porcelain insulator on the electrode can crack from the heat. If this occurs, the spark being transferred through the insulator will “bleed” from the crack (cracks collect moisture and reduce the spark), and ignition will occur only after a build-up of gas or not at all. Replace electrode.| | |Electrode wire (lead wire) is unplugged or has a loose connection|Confirm that the lead wire, from the Electronic Igniter module to the electrode is well attached. Loose or corroded contacts in the igniter system and electrode can impair its functionality. Proper connection can often be restored by simply disconnecting and reconnecting the various electrode wires.| | |Electronic Igniter Module battery is dead|The battery located in the Electronic Igniter Module may be dead. Replace battery. The correct position is with the (+) end down. Do not leave battery within Electronic Ignition module for extended periods, if BBQ is not in use. Battery acids and corrosion can result causing permanent damage to the Electronic Ignition module.| | |Battery cap not threaded properly|Remove the Electronic Igniter battery cap and re-attach. Ensure that the cap is properly attached without cross threading.| |Electrode sparks but the burner will not light.|Electrode not properly spaced|The electrode must be properly spaced in distance from the burner and sit within the collector box, 3/16 or slightly over 1/8 of an inch from the burner – too much or too little of a gap will impair the electrode’s ability to have a positive spark, allowing the burner to light| | |Damaged collector box|The electrode is covered by the collector box that traps impurities to prevent the electrode and collector box from corroding. If either the electrode or collector box is corroded a light sanding using fine sand paper will restore them to functionality. If the collector box is pierced or worn from excessive corrosion it must be replaced.| | |Blockage within Venturi tubes|Burner maintenance must be performed to remove any blockages within the Venturi tubes that are enabling the burner from lighting.|
########### 12
Resolving BURNER Performance Issues
|PROBLEM|IDENTIFYING THE CAUSE:| |---|---| |Low or incomplete flame (assuming burners and Venturi tubes are free and clear of blockages)|• Proper start up and shut down procedure not followed. Flow limiting device has been activated and requires resetting
• Positive connection not made between tank and manifold.
• Positive Vapour lock at coupling nut/LP cylinder connection not made. Disconnect hose and regulator from LP Cylinder and reconnect correctly.
• Flame Tamers (heat plates) are missing or not in position
• NATURAL GAS MODELS: Installation issues related to incorrect size supply line installed and /or Water Column supply is not adequate for a BBQ BTU rating of this BBQ. Do not use a longer Natural Gas hose than is supplied with your BBQ.
|
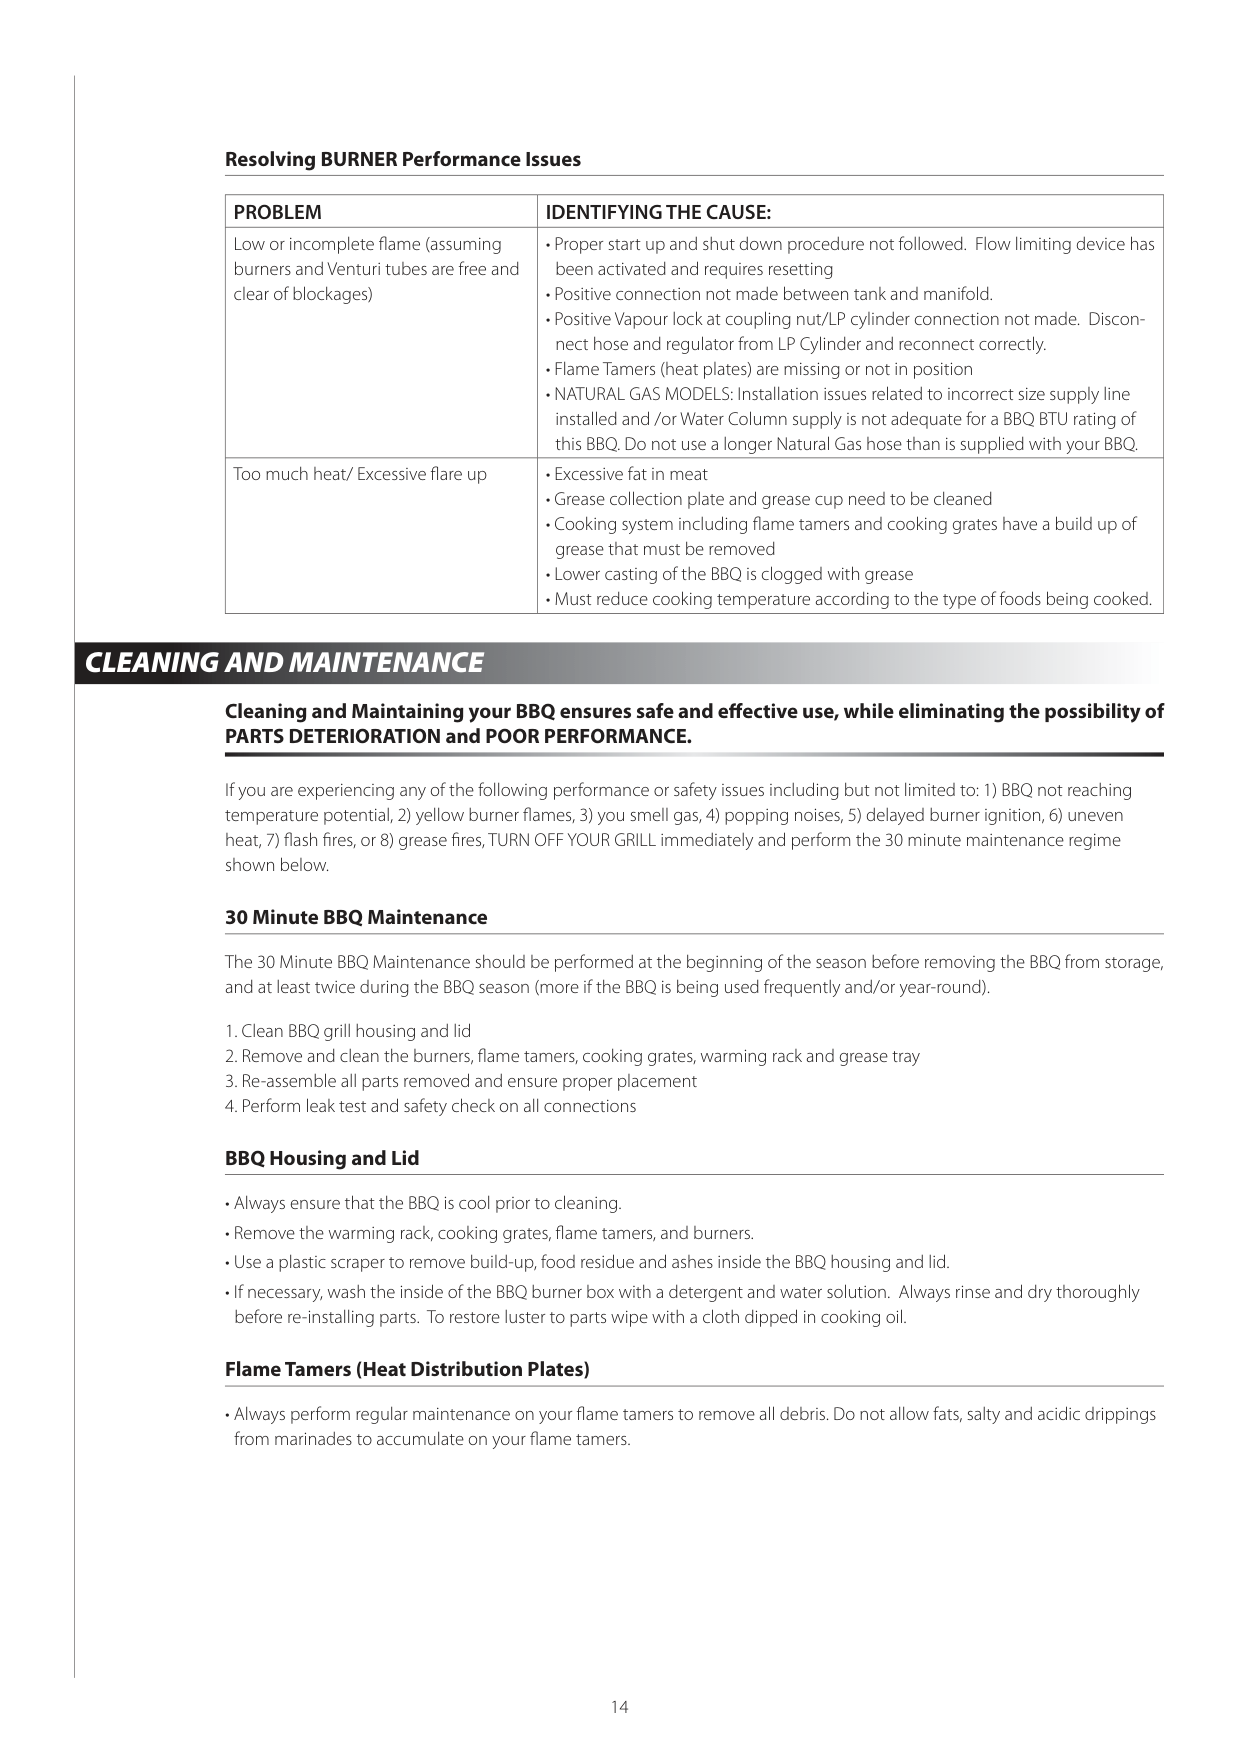
|Too much heat/ Excessive flare up|• Excessive fat in meat
• Grease collection plate and grease cup need to be cleaned
• Cooking system including flame tamers and cooking grates have a build up of grease that must be removed
• Lower casting of the BBQ is clogged with grease
• Must reduce cooking temperature according to the type of foods being cooked.
|
##### CLEANING AND MAINTENANCE
######## Cleaning and Maintaining your BBQ ensures safe and effective use, while eliminating the possibility of PARTS DETERIORATION and POOR PERFORMANCE.
If you are experiencing any of the following performance or safety issues including but not limited to: 1) BBQ not reaching temperature potential, 2) yellow burner flames, 3) you smell gas, 4) popping noises, 5) delayed burner ignition, 6) uneven heat, 7) flash fires, or 8) grease fires, TURN OFF YOUR GRILL immediately and perform the 30 minute maintenance regime shown below.
######## 30 Minute BBQ Maintenance
The 30 Minute BBQ Maintenance should be performed at the beginning of the season before removing the BBQ from storage, and at least twice during the BBQ season (more if the BBQ is being used frequently and/or year-round).
######## BBQ Housing and Lid
• Always ensure that the BBQ is cool prior to cleaning.
######## Flame Tamers (Heat Distribution Plates)
• Always perform regular maintenance on your flame tamers to remove all debris. Do not allow fats, salty and acidic drippings from marinades to accumulate on your flame tamers.
14
######## How to season Porcelain Cast iron cooking grates
######## Cleaning STAINLESS STEEL parts
To protect the appearance and integrity of Stainless Steel surfaces, routine cleaning is essential. Contaminants vary greatly in their effect on appearance, corrosivity and ease of removal. Identify the contaminant or experiment with various cleaners in order to resolve issues including the removal of free-iron contamination. It is impossible to wear out the stainless steel by excessive cleaning. But is possible to damage the stainless steel components and damage the corrosion resistance using products NOT made for a Stainless Steel outdoor appliance.
######## Cleaning Stainless steel Surfaces:
STORING YOUR BBQ To avoid BBQ deterioration and degradation of parts, please perform the following tasks, prior to storing your BBQ for the season.

16
##### WARRANTY
LIMITATION AND EXCLUSIONS Trileaf Distributions® has the following limitations to its warranty:
Trileaf Distributions® excludes from its warranty the following:
There are no other express warranties except as set forth herein and any applicable implied warranties of merchantability and fitness are limited in duration to the period of coverage of this express written limited warranty.
To ensure your satisfaction And for follow-up service, register your grill online at: www.masterchefbbqs.com
Trileaf Distribution Trifeuil Toronto, Canada M4S 2B8
Winners Canada
18