
Parkside Pbrm 53 A1 Petrol Lawnmower
Ask AI
— answers from the official manualAnswers from the official manual.
Common questions
Common Questions
10 totalHow do I adjust the height of cut on my Parkside Pbrm 53 A1 Petrol Lawnmower?
Adjust the height of cut by pushing the lever away from the gauge and lifting or lowering it to the desired setting, moving the lever forward for a lower cut (min. 25mm) and backward for a higher cut (max. 75mm). The adjustment must be done with the engine off and blade stopped.
What type of fuel should I use in my Parkside Pbrm 53 A1?
Use fresh unleaded petrol with an octane rating of 87 (91 RON) or higher, and do not mix oil with the fuel. Fresh fuel must be less than 30 days old to avoid issues.
How should I clean my lawn mower’s air filter?
Clean a foam element by washing in warm soapy water, rinsing and allowing it to dry thoroughly. Then dip the element in engine oil and squeeze out excess before reinstalling.
What should I do if my lawn mower won't start?
For a cold-start issue, ensure the fuel tank is not empty, check spark plug tightness and correct gaps between electrodes. For a flooded carburettor, remove air cleaner element, pull starter rope several times to clear excess fuel.
What safety precautions should I take while operating the mower?
Do not allow children or people unfamiliar with these instructions near the machine. Operate during daylight in well-lit areas, and never mow excessively steep slopes.
How often should I change the oil in my lawn mower?
It is recommended to drain and replace engine oil at least once a season or more frequently if operating conditions are extremely dusty and stressful. Do this when the engine is warm for better drainage.
Full Manual
44 pages

################## v

132cc Push Petrol Lawnmower
########### WER410HP
1938218001
132cc Self Propelled Petrol Lawnmower
########### WER410SP
1938219001
en - Original Instructions
ASSEMBLY REQUIRED Minimum Two Persons
Save these instructions Sales & Support: 01793 333212 Before use please read & understand this manual; paying particular attention to the safety instructions before use. Incorrect use of the product could put the operator or machine in danger. Whilst every eff ort has been made to ensure the accuracy of information contained in this manual, our policy of continuous improvement determines the right to make modifi cations without prior warning. Images are used for illustration purposes only.
14 January 21
################# Copyright Notice
Copyright © Handy Distribution Permission is granted to reproduce this publication for personal & educational use only. Commercial copying, redistribution, hiring or lending is prohibited. No part of this publication may be stored in a retrieval system or transmitted in any other form or means without written permission from Handy Distribution.
In all cases this copyright notice must remain intact.
############# CONTENTS INTENDED USE SAFETY INSTRUCTIONS SPECIFICATIONS KNOW YOUR MACHINE ASSEMBLY OPERATION MAINTENANCE, CLEANING & STORAGE TROUBLE SHOOTING PARTS DIAGRAM & LIST DECLARATION OF CONFORMITY WARRANTY
INTENDED USE This machine is to be used exclusively for cutting natural grass. Never use the mower for other purposes. Any other use can endanger for your safety and can involve damage to the mower. Persons under 16 years of age and persons who are not familiar with the user instructions must not use the mower. The user is responsible of the safety of other people in the working area. Keep children and domestic animals at a safe distance while the mower is in use. Before mowing, remove all foreign objects from the lawn which may be thrown by the machine, stay alert for any foreign objects which may have been missed. These operating instructions must be kept and referred to in order to ensure that the equipment is properly used and maintained. The instructions contain valuable information on operating, maintenance and servicing conditions.
|WARNING The equipment is to be used only for its prescribed purpose. Any other use is deemed to be a case of misuse. The user/operator and not the manufacturer will be liable for any damage or injuries of any kind caused as a result of this. Please note that our equipment has not been designed for use in commercial, trade or industrial applications. Our warranty will be 90 days from the original date of sale for commercial, trade or industrial businesses or for equivalent purposes.
| |---|
############### SAFETY INSTRUCTIONS Read and understand the owner’s manual and labels affixed to the machine. Learn its application and limitations as well as the specific potential hazards. Retain these instructions for future reference. The operator is responsible for following the warnings & instructions in this manual and on the product.
||Read & understand operator’s manual before using the machine. Failure to follow instructions could result in death or serious injury. Please keep in a safe place for future reference.||Always wear eye and ear protection| |---|---|---|---| ||Keep all bystanders & animals away from the machine during operation. If approached, stop the machine immediately.||Always wear gloves to protect your hands. SHARP ROTATING BLADES| ||Risk of Carbon Monoxide Poisoning. Ensure working area is correctly ventilated.||Wear foot protection or sensible shoes when using the machine| ||Fire Risk Fire and its vapors are extremely flammable & explosive. Fire or explosion can cause severe burns or death.||Do not expose to rain or damp conditions.| ||No smoking||Do not use near a flame, or sparks|

||Hot Surface. Running engines produce heat. Engine parts, especially the exhaust, become extremely hot. Severe thermal burns can occur on contact||Moving Parts Rotating parts can contact or entangle hands, feet, hair, clothing or accessories. Traumatic amputation or severe laceration can result| ||Keep guards in place and in working order. Replace damaged, missing or failed parts before using it.||Safety alert symbol. Used to alert you to potential personal injury hazards. Obey all safety messages that follow this symbol to avoid possible injury.| |DANGER
|Indicates an imminently hazardous situation which, if not avoided, will result in serious injury|WARNING
|Indicates a potentially hazardous situation which, if not avoided, could result in serious injury| |CAUTION
|Indicates a potentially hazardous situation which, if not avoided, may result in minor or moderate injury.|CAUTION|Used without the safety alert symbol indicates a potentially hazardous situation which, if not avoided, may result in property damage.| ||CE Marking - the product meets demand and regulations set by the EU||Noise Level - See label on machine|
GENERAL SAFETY RULES
|Before you put the machine into operation, you must read this instruction manual. When using this machine, observe the following safety instructions to exclude the risk of personal injury or material damage. Please also observe the special safety instructions in the respective chapters. Where applicable, follow the legal directives or regulations for the prevention of accidents in relation to the use of this machine.
WARNING When using petrol tools, basic safety precautions, should always be followed to reduce the risk of serious personal injury and/or damage to the unit.

| |---|
TRAINING
|The operator must receive proper training in the use, adjustment and operation of the machine, including prohibited operations.
| |---|

− Before releasing blockages, inspecting, cleaning or working on the machine. − After hitting an obstruction. Search for damage on the machine & make repairs as necessary. If the
machine starts vibrating unusually, it should be inspected by an Approved Webb Service Dealer.
#################### WORK AREA
PETROL TOOL USE AND CARE
|WARNING! Petrol is highly flammable and explosive.
| |---|
#################### PERSON PROTECTION
Put safety first in the case of fire:
############### SPECIFICATIONS
|Model|WER410HP|WER410SP| |---|---|---| |Product Number|1938218001|1938219001| |Working Width|410mm|410mm| |Drive Type|Hand Push|Self-Propelled| |Cutting Heights|25-75mm - 7 levels|25-75mm - 7 levels| |Collector Capacity|45L|45L| |Deck|Steel|Steel|
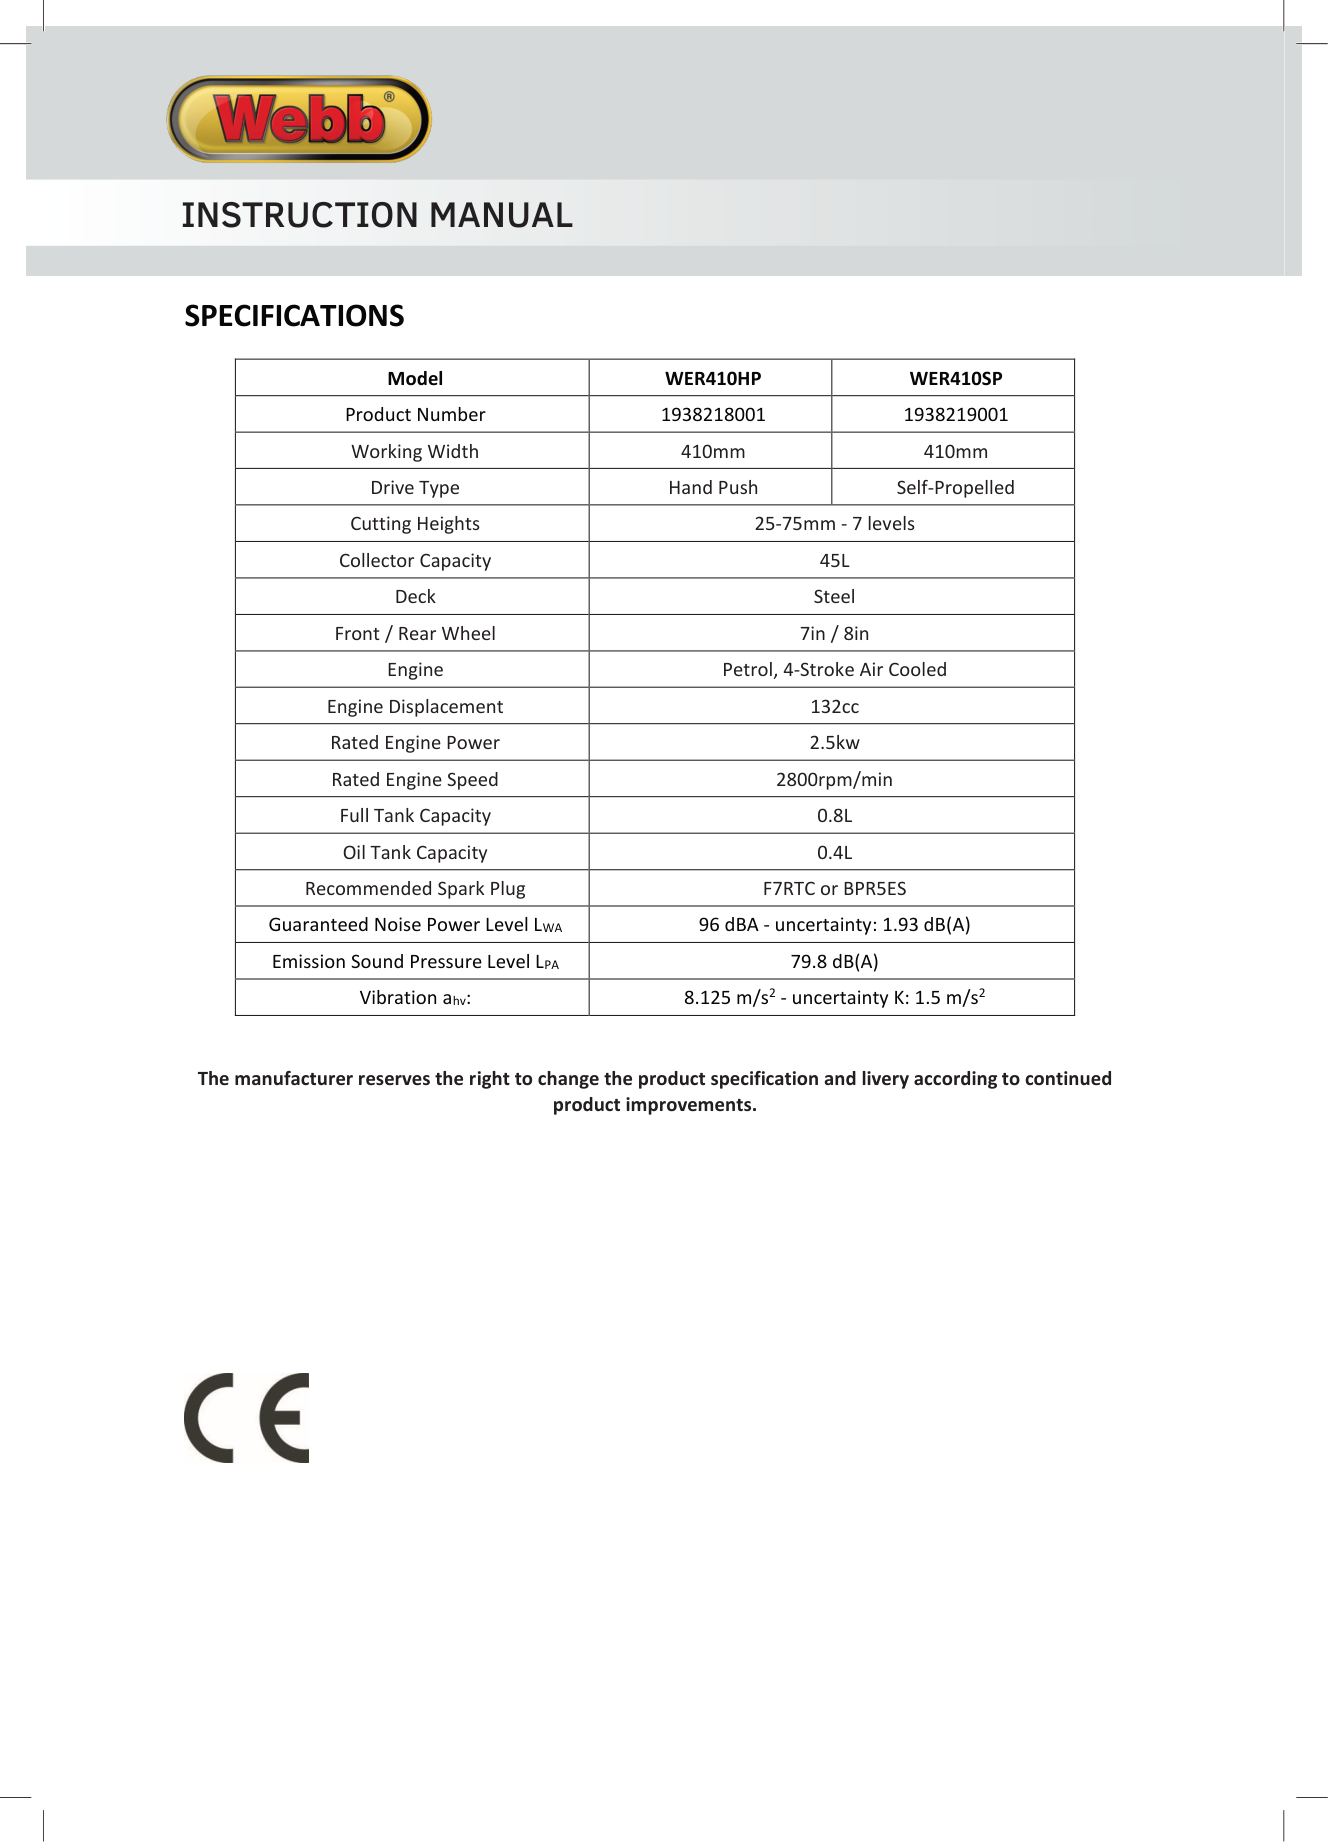
|Front / Rear Wheel|7in / 8in|7in / 8in| |Engine|Petrol, 4-Stroke Air Cooled|Petrol, 4-Stroke Air Cooled| |Engine Displacement|132cc|132cc| |Rated Engine Power|2.5kw|2.5kw| |Rated Engine Speed|2800rpm/min|2800rpm/min| |Full Tank Capacity|0.8L|0.8L| |Oil Tank Capacity|0.4L|0.4L| |Recommended Spark Plug|F7RTC or BPR5ES|F7RTC or BPR5ES| |Guaranteed Noise Power Level LWA|96 dBA - uncertainty: 1.93 dB(A)|96 dBA - uncertainty: 1.93 dB(A)| |Emission Sound Pressure Level LPA|79.8 dB(A)|79.8 dB(A)| |Vibration ahv:|8.125 m/s2 - uncertainty K: 1.5 m/s2|8.125 m/s2 - uncertainty K: 1.5 m/s2|
The manufacturer reserves the right to change the product specification and livery according to continued product improvements.

############### KNOW YOUR MACHINE
|1. OPC/Brake Lever|2. Recoil Handle| |---|---| |3. Self-Propelled Lever (WER410SP Only)|4. Upper Handle| |5. Lower Handle|6. Cable Holder|
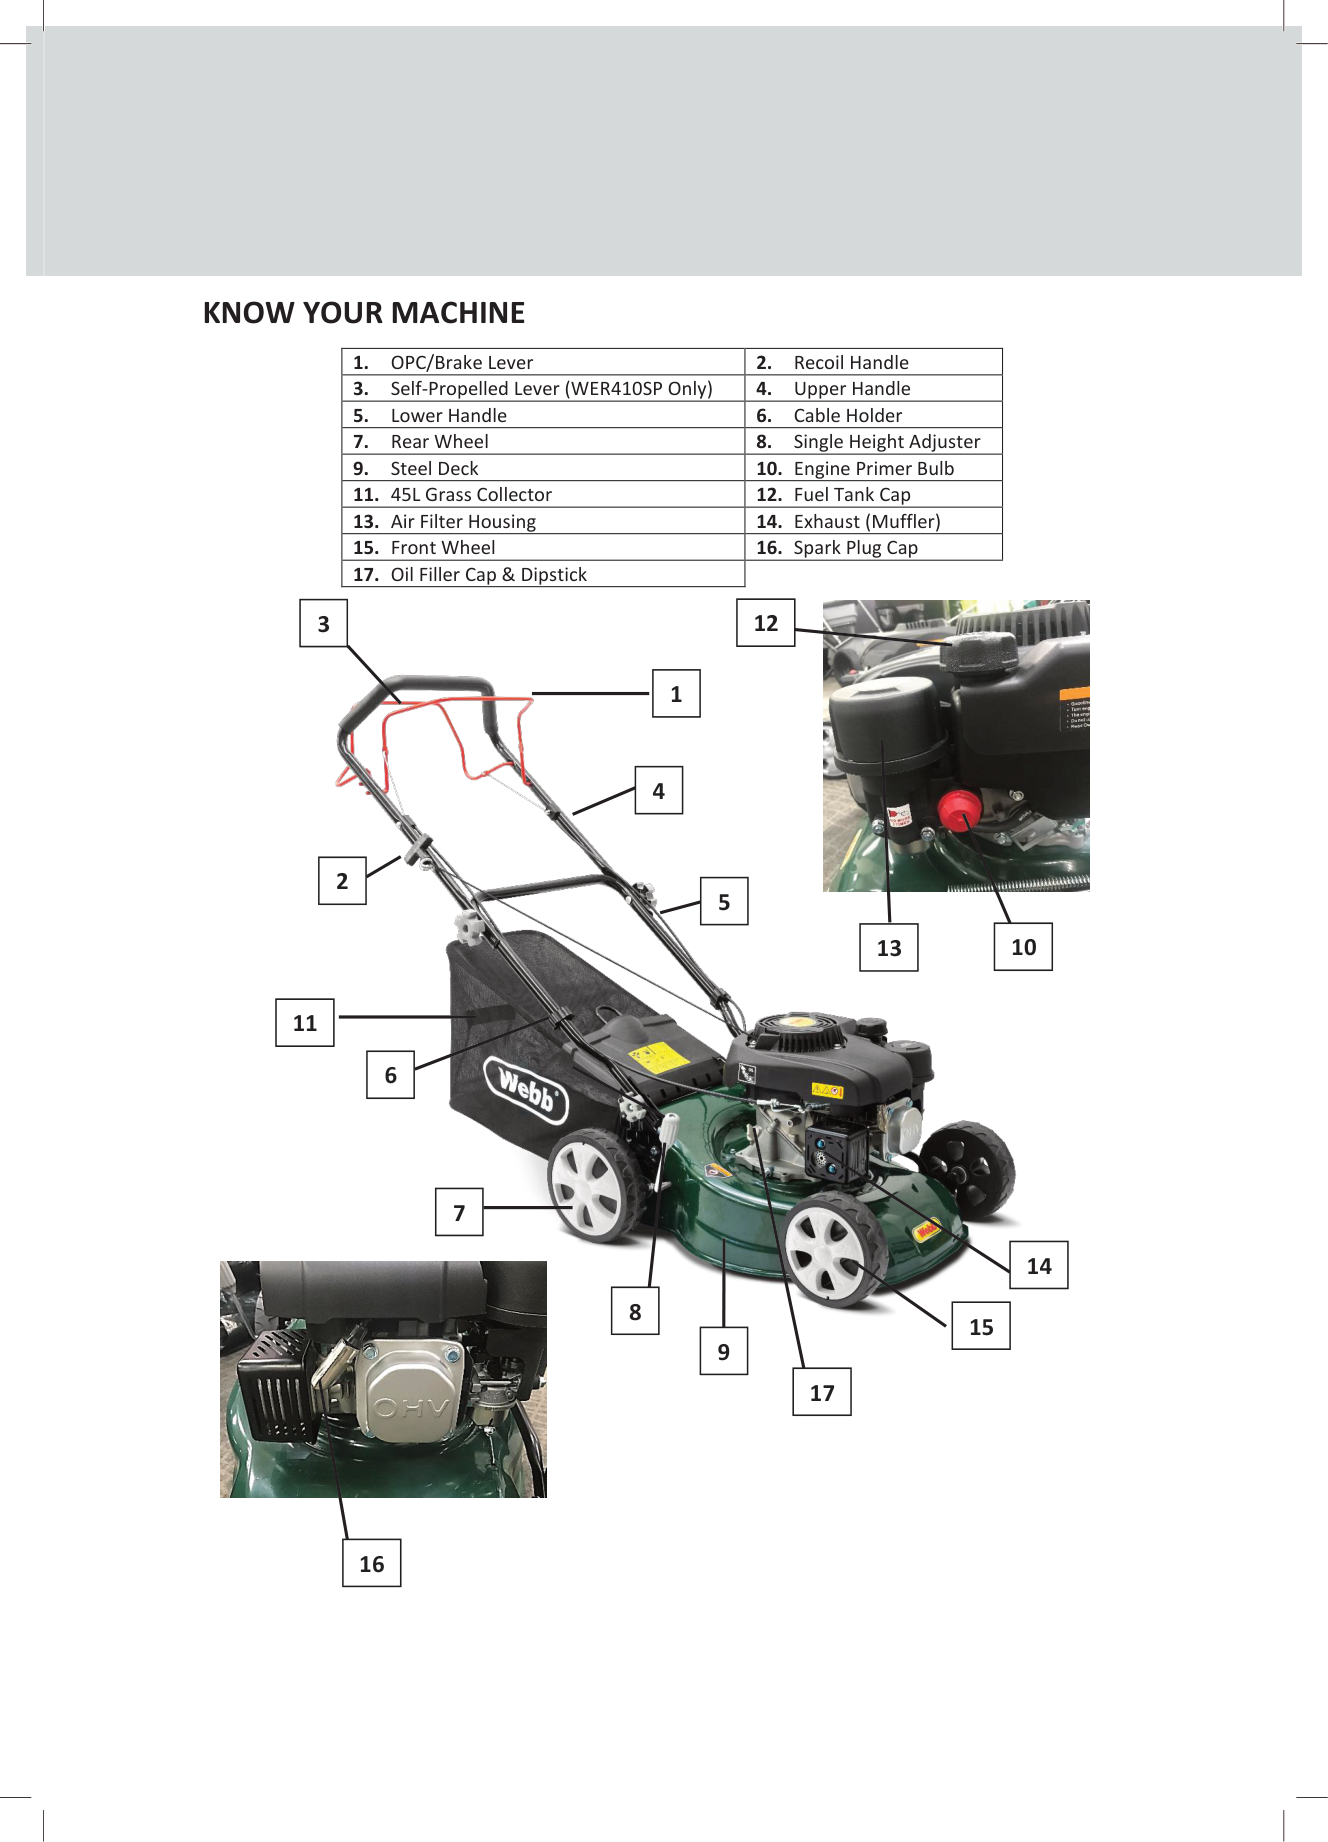
|7. Rear Wheel|8. Single Height Adjuster| |9. Steel Deck|10. Engine Primer Bulb| |11. 45L Grass Collector|12. Fuel Tank Cap| |13. Air Filter Housing|14. Exhaust (Muffler)| |15. Front Wheel|16. Spark Plug Cap| |17. Oil Filler Cap & Dipstick| |

|12| |---|
|3| |---|

|1| |---|
|4| |---|
|2| |---|
|5| |---|
|10| |---|
|13| |---|
|11| |---|
|6| |---|
|7| | |---|---| |7| |
| | | |---|---| |9|9|
|14| |---|

|8|
|---|
|15| |---|
|17| |---|
|16| |---|
ASSEMBLY Remove the machine and contents from the carton. Be sure the carton is empty before discarding. If you require any assistance with regards to the contents of the machine, contact us: Tel: 01793 333212 - Mon – Fri 8.00am – 5.30pm (excl. Bank Holidays) Email: customerservice@webbgardenpower.co.uk
|IMPORTANT INFORMATION NOTE: This product is a 4-stroke engine powered machine. The engine MUST be filled with recommended 4-stroke SAE30 or 10W/30 air cooled lawnmower engine oil BEFORE starting. Fresh unleaded petrol must be used in this unit. DO NOT use Ethanol based fuels. DO NOT mix oil with fuel.
| |---|
|WARNING Stop the engine and unplug the spark plug before any repairs or maintenance operations. DO NOT attempt to start this machine without it first being FULLY assembled. DO NOT attempt to start this mower without first adding 4-stroke SAE30 or 10W/30 air cooled lawnmower engine oil to the engine.
| |---|
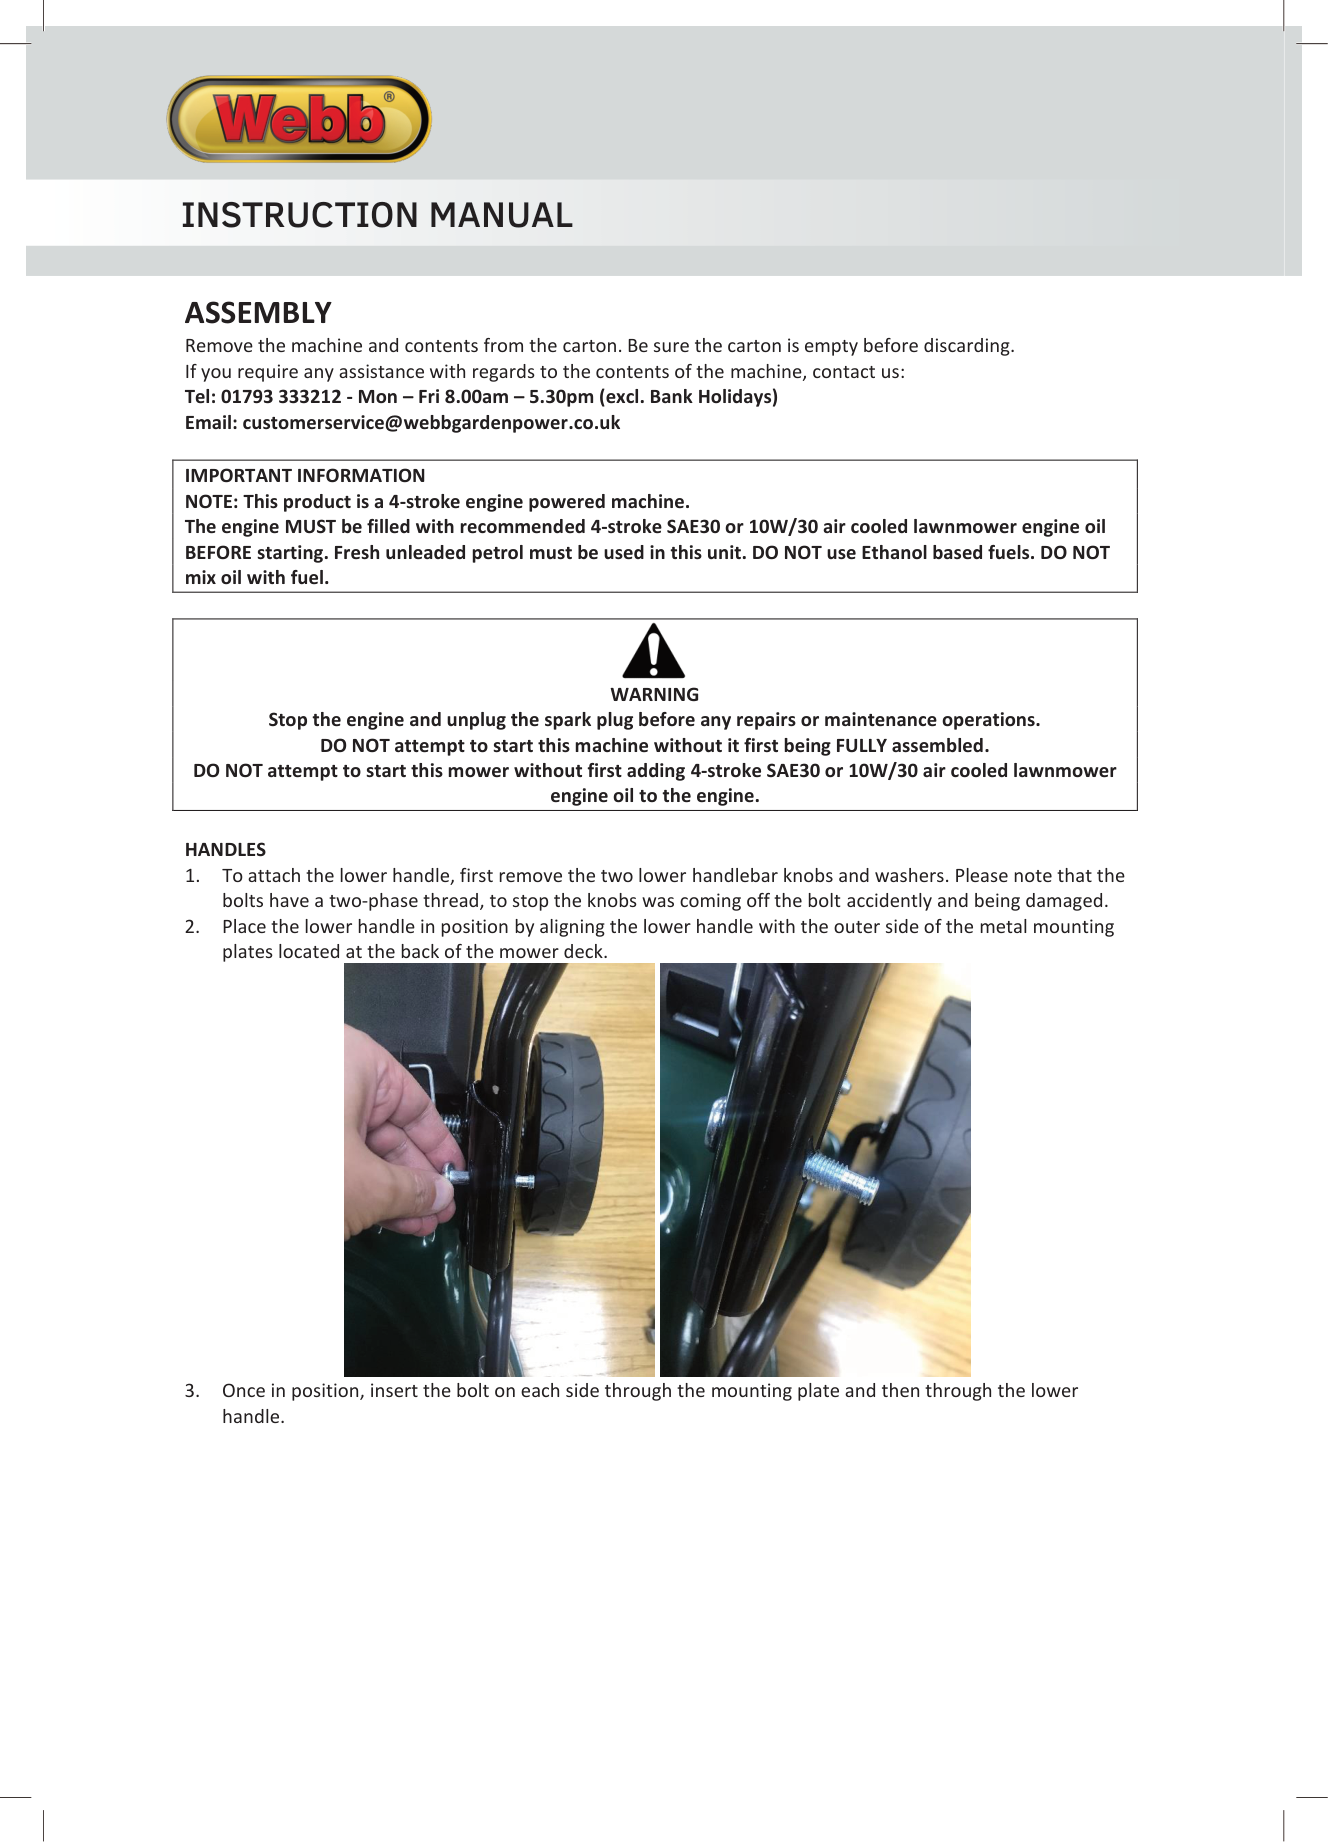
HANDLES


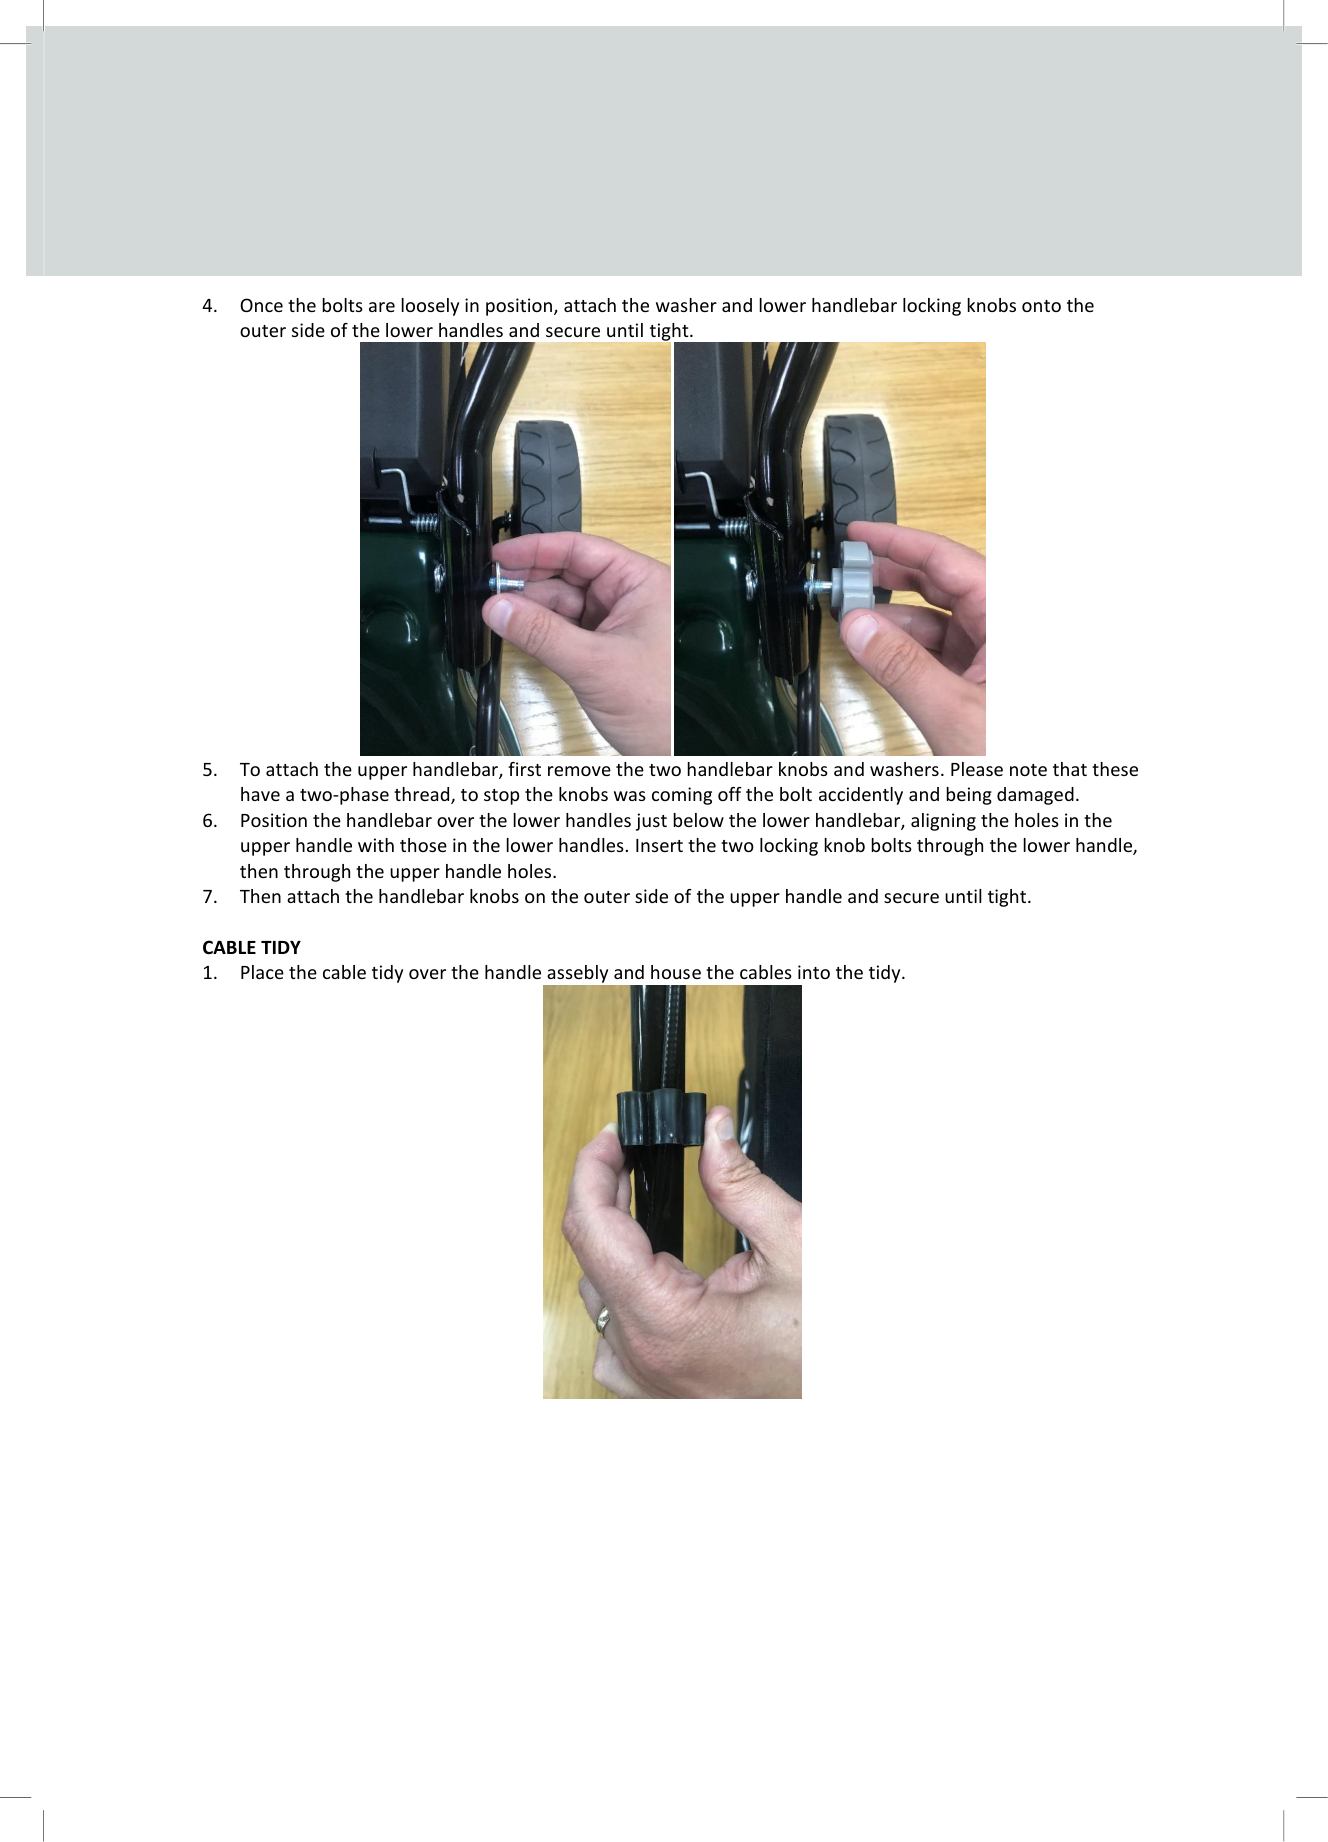
#################### CABLE TIDY

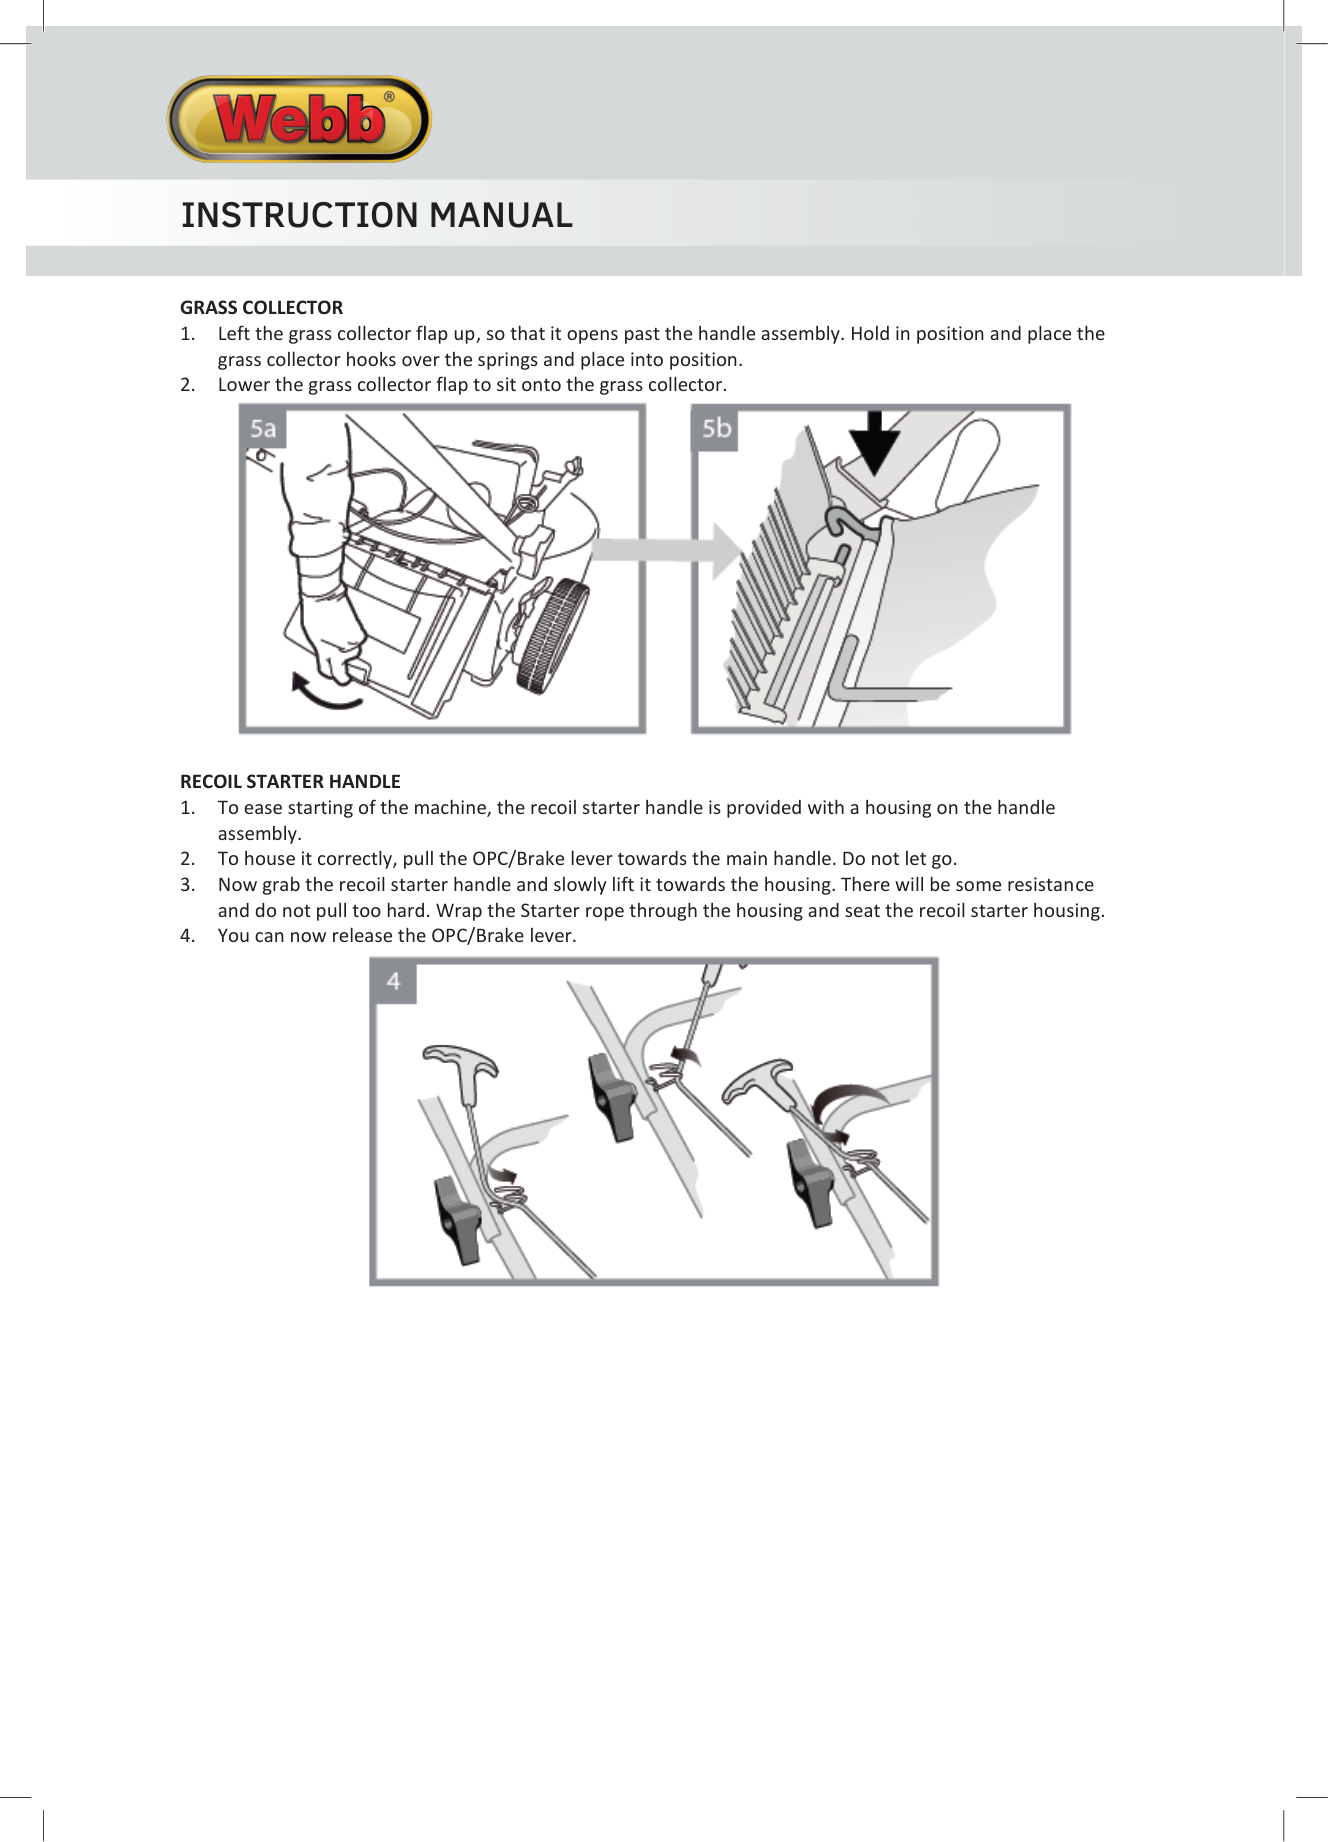
################### GRASS COLLECTOR

################### RECOIL STARTER HANDLE

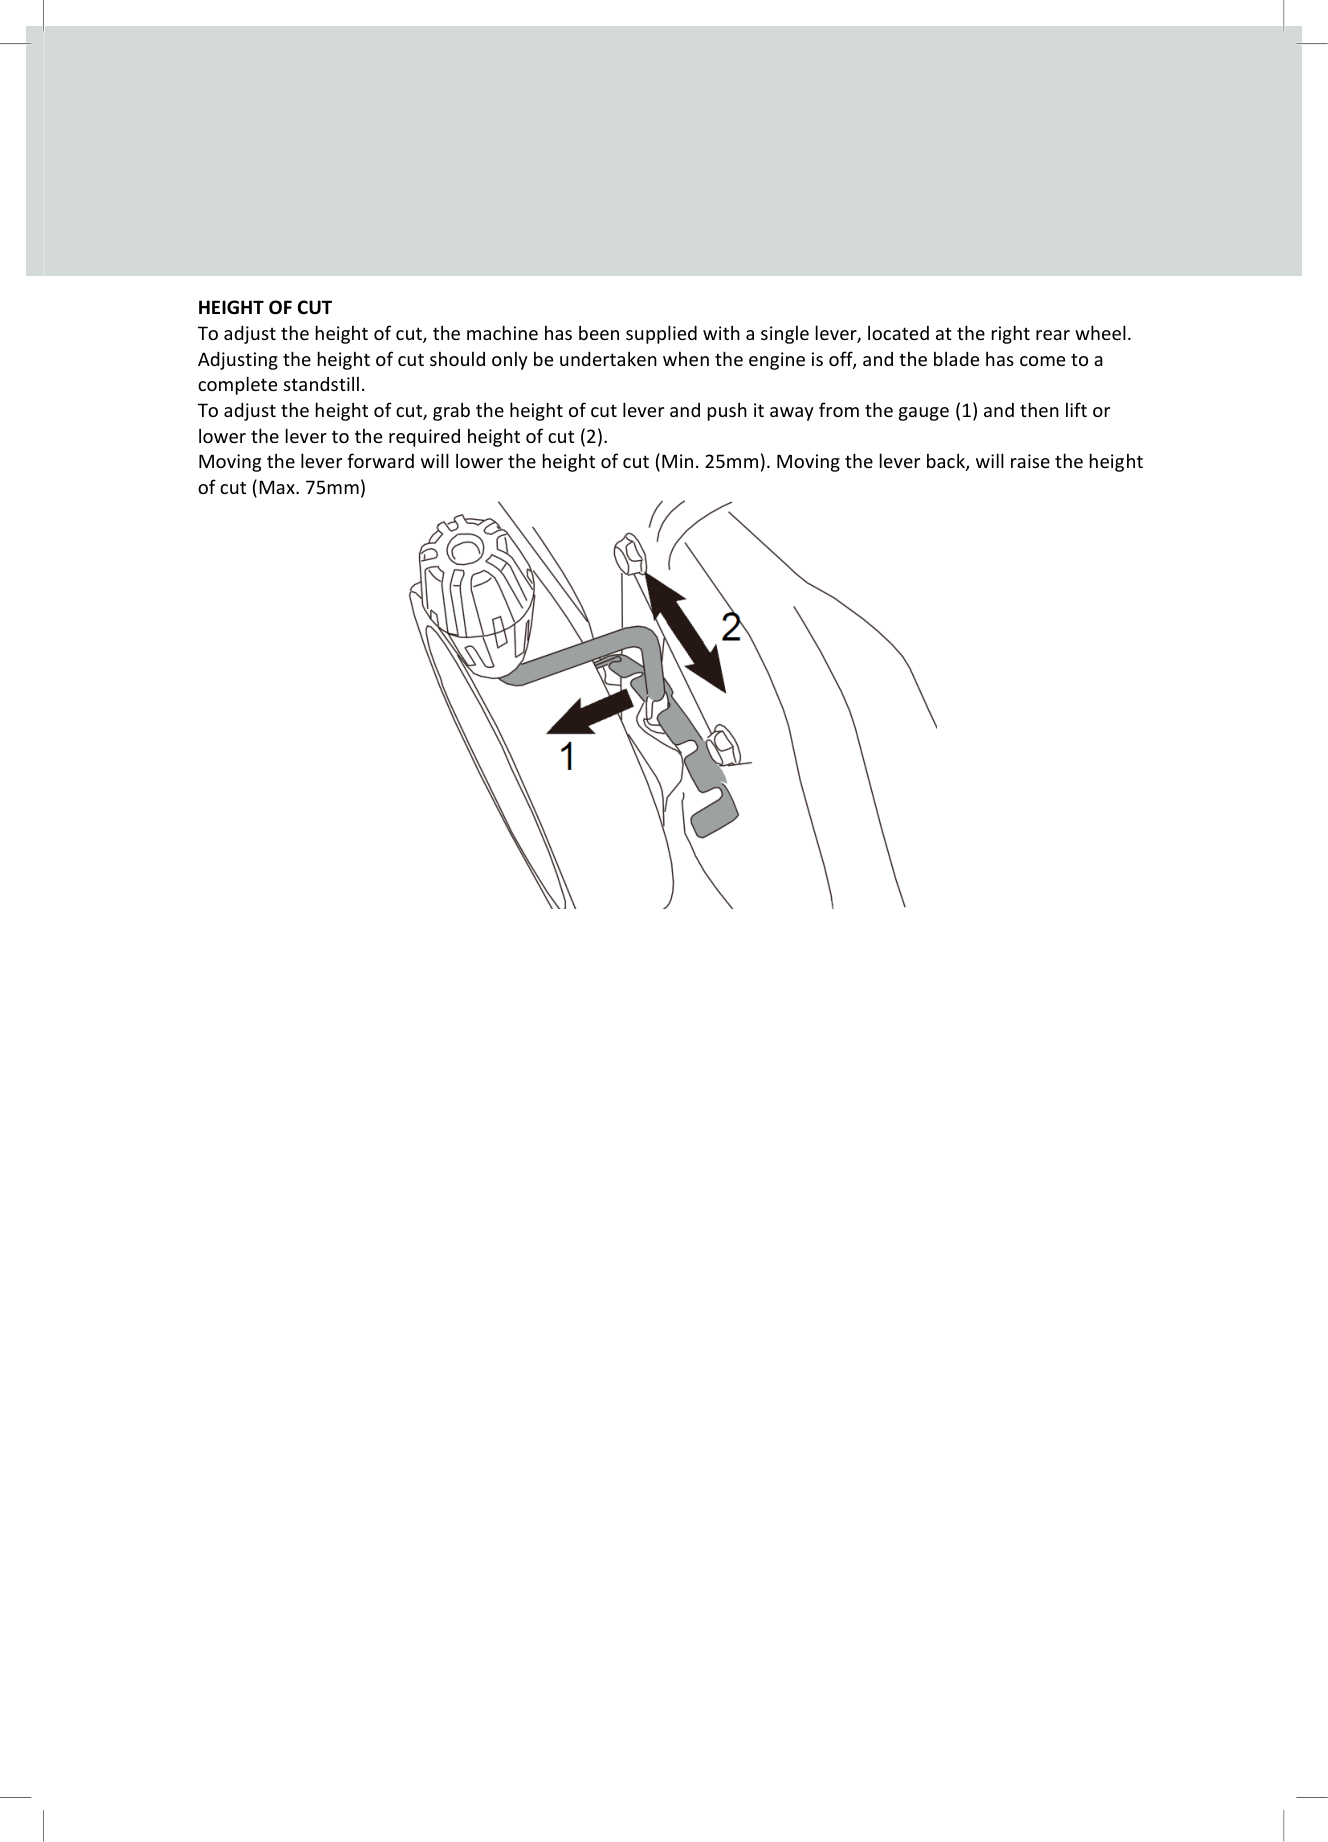
HEIGHT OF CUT To adjust the height of cut, the machine has been supplied with a single lever, located at the right rear wheel. Adjusting the height of cut should only be undertaken when the engine is off, and the blade has come to a complete standstill. To adjust the height of cut, grab the height of cut lever and push it away from the gauge (1) and then lift or lower the lever to the required height of cut (2). Moving the lever forward will lower the height of cut (Min. 25mm). Moving the lever back, will raise the height of cut (Max. 75mm)

############## OPERATION - ENGINE
FUEL & OIL
|WARNING YOUR MACHINE IS SUPPLIED WITHOUT ENGINE OIL OR PETROL Operating the engine with insufficient oil, can have catastrophic consequences. Any failure caused by insufficient oil, will not be covered by the manufacturer’s warranty. READ INSTRUCTIONS CAREFULLY.
Fuel & its vapors are very flammable. Do not use or fuel the machine near a flame, sparks or while smoking. Allow the engine to cool for more than 3 minutes, before re-fueling. Never fuel the machine with engine running. Fuel the engine at least 15 metres away from your work area. Always fuel your machine outdoors.


| |---|
IMPORTANT: Fuel which is older than 30 days old can become stale and cause acid & gum deposits in the fuel system or essential carburettor components. This could result in starting issues which would not be covered by your manufacturer’s warranty. Ensure that any stored petrol is clearly marked in a separate appropriate canister for a maximum of 30 days, if not mixed with a fuel additive. If the machine is not going to be used for a long period, drain the fuel tank, start the engine and drain the carburetor of any remaining fuel.
To keep fuel fresh, we recommend you use SURE-START FUEL ADDITIVE (HP-199) from Handy Parts. A fuel additive added to your fuel at the time of purchase, will help make your machine easier to start, extend the shelf life of your fuel mixture for up to two years, keeps the carburettor & engine clean, plus reduces emissions and increases fuel economy. A 250ml bottle of SURE-START FUEL ADDITIVE will treat 25 litres of fuel. Only use 4-stroke SAE30 or 10W/30 air cooled lawnmower engine oil. DO NOT USE automotive or marine oil.
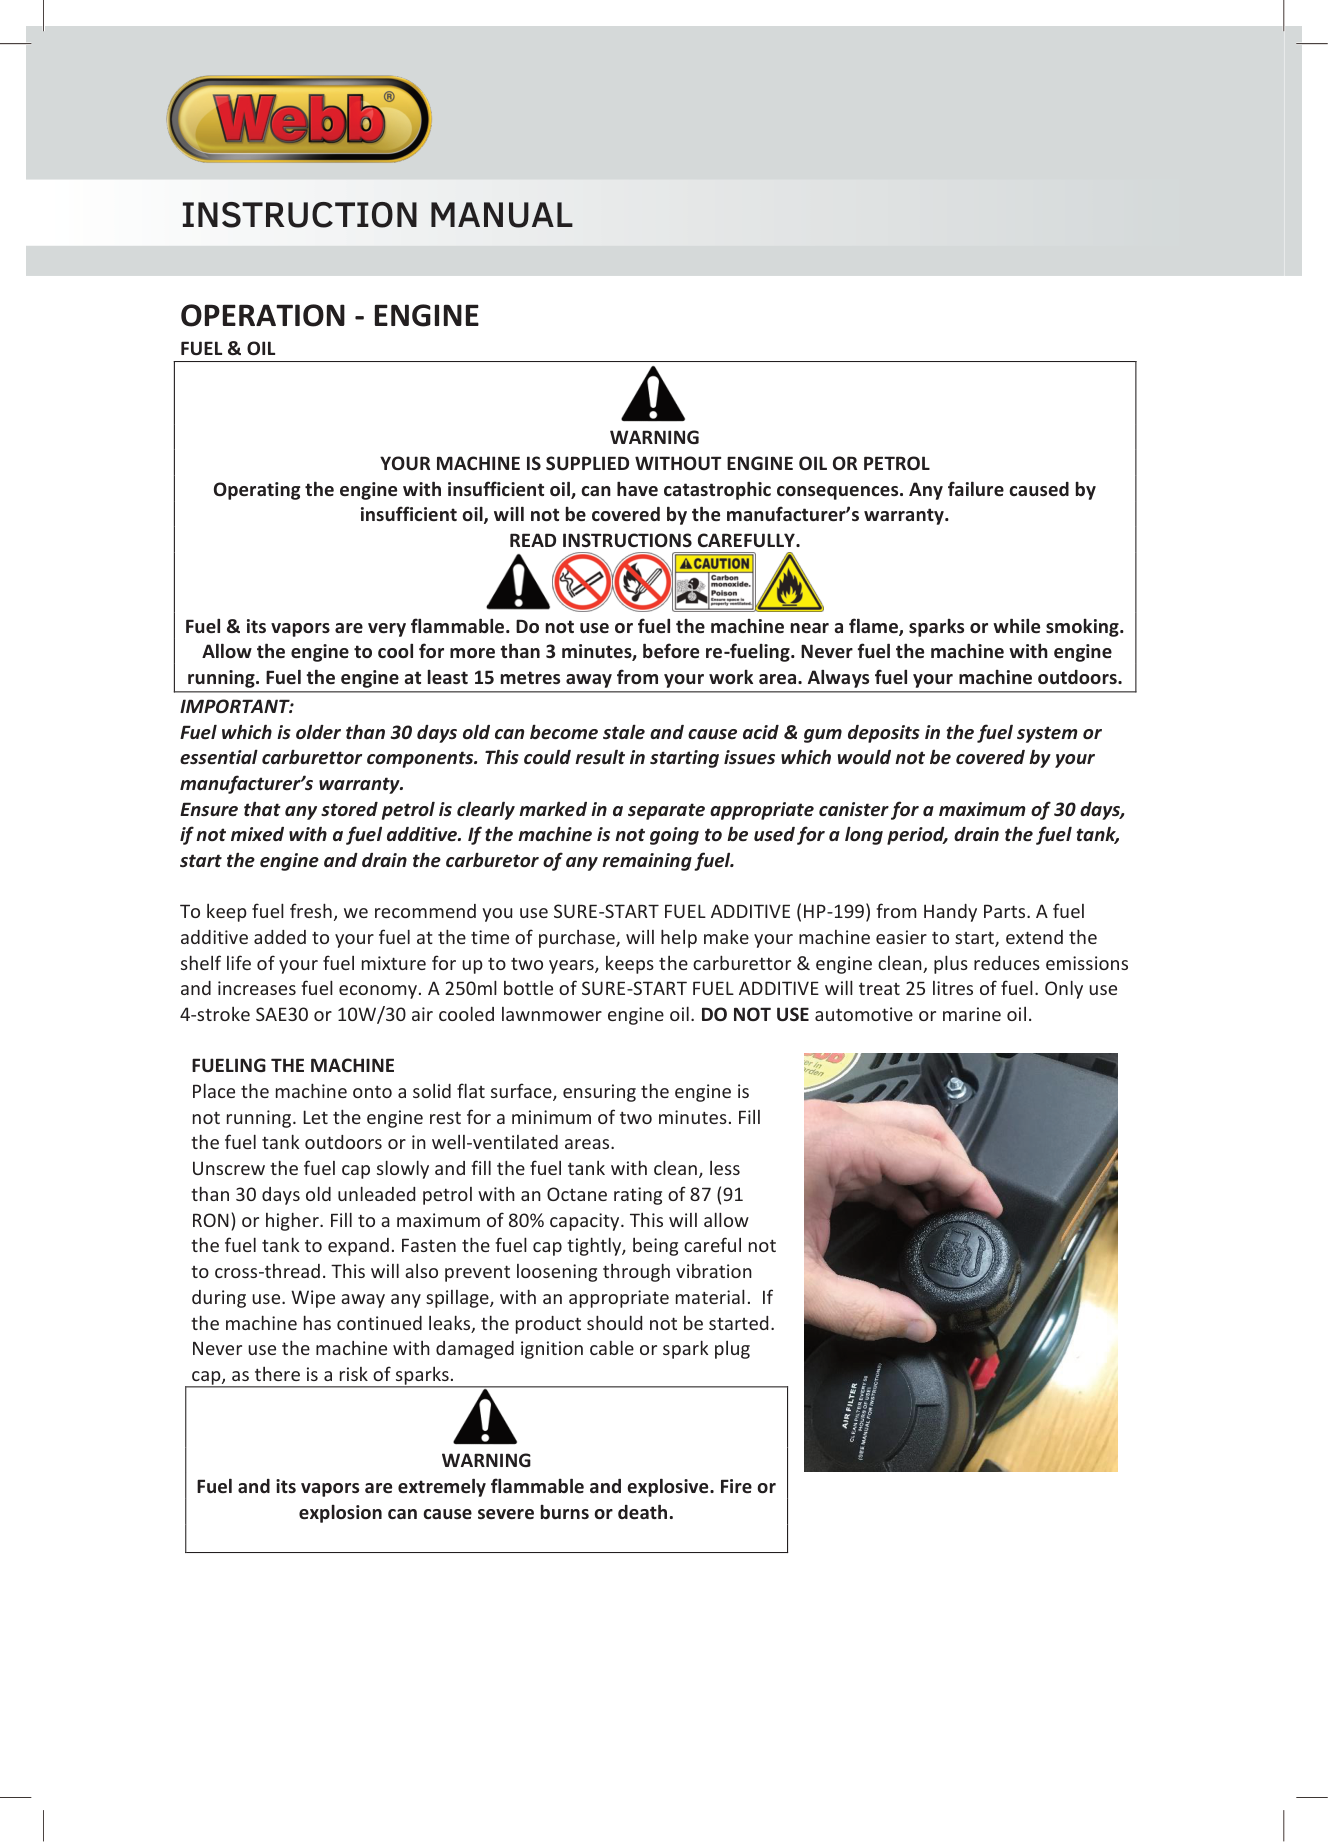
FUELING THE MACHINE Place the machine onto a solid flat surface, ensuring the engine is not running. Let the engine rest for a minimum of two minutes. Fill the fuel tank outdoors or in well-ventilated areas. Unscrew the fuel cap slowly and fill the fuel tank with clean, less than 30 days old unleaded petrol with an Octane rating of 87 (91 RON) or higher. Fill to a maximum of 80% capacity. This will allow the fuel tank to expand. Fasten the fuel cap tightly, being careful not to cross-thread. This will also prevent loosening through vibration during use. Wipe away any spillage, with an appropriate material. If the machine has continued leaks, the product should not be started. Never use the machine with damaged ignition cable or spark plug cap, as there is a risk of sparks.
|WARNING Fuel and its vapors are extremely flammable and explosive. Fire or explosion can cause severe burns or death.
| |---|

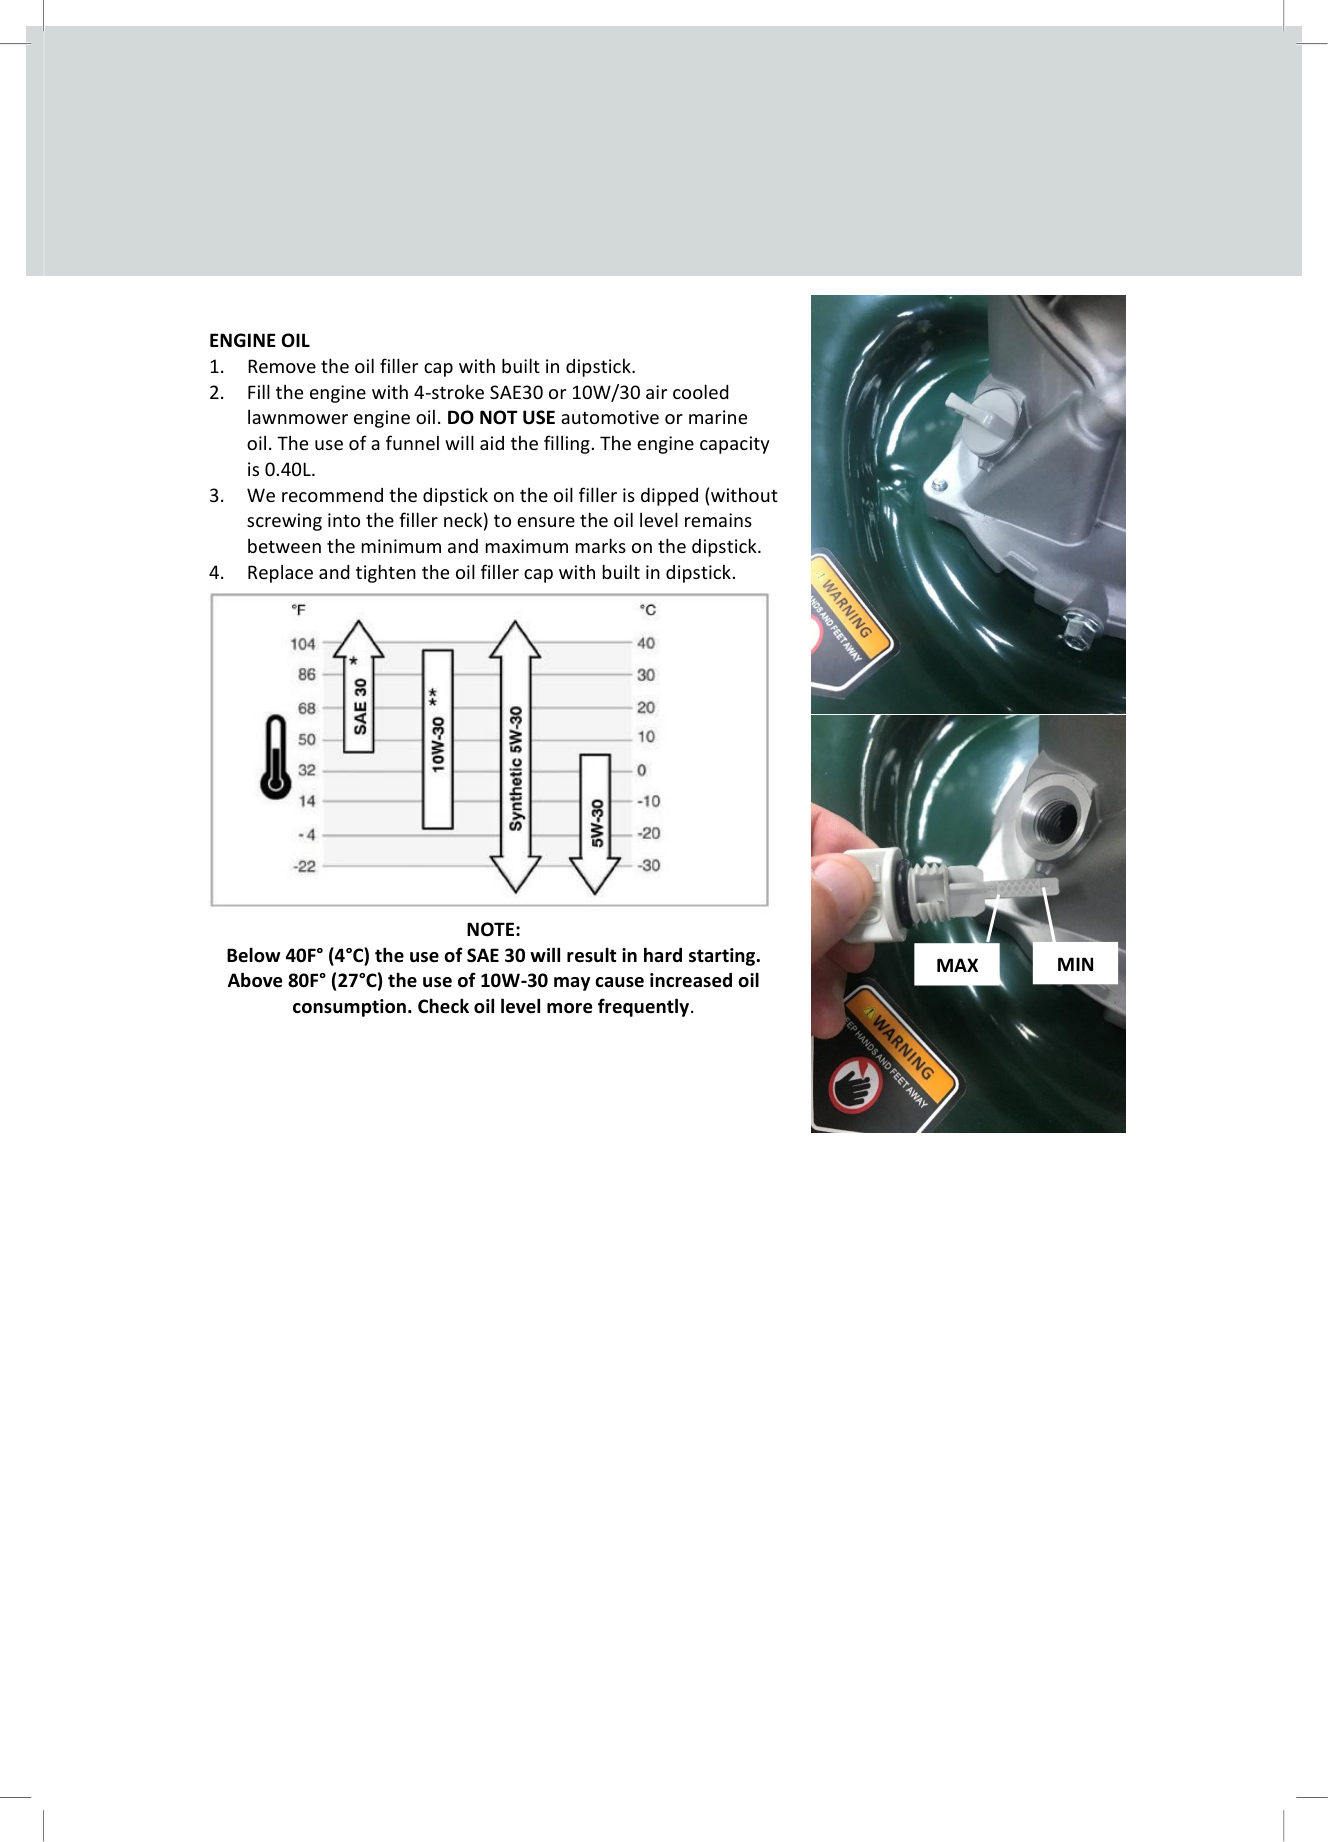
################### ENGINE OIL

NOTE: Below 40F° (4°C) the use of SAE 30 will result in hard starting. Above 80F° (27°C) the use of 10W-30 may cause increased oil consumption. Check oil level more frequently.


MAX MIN
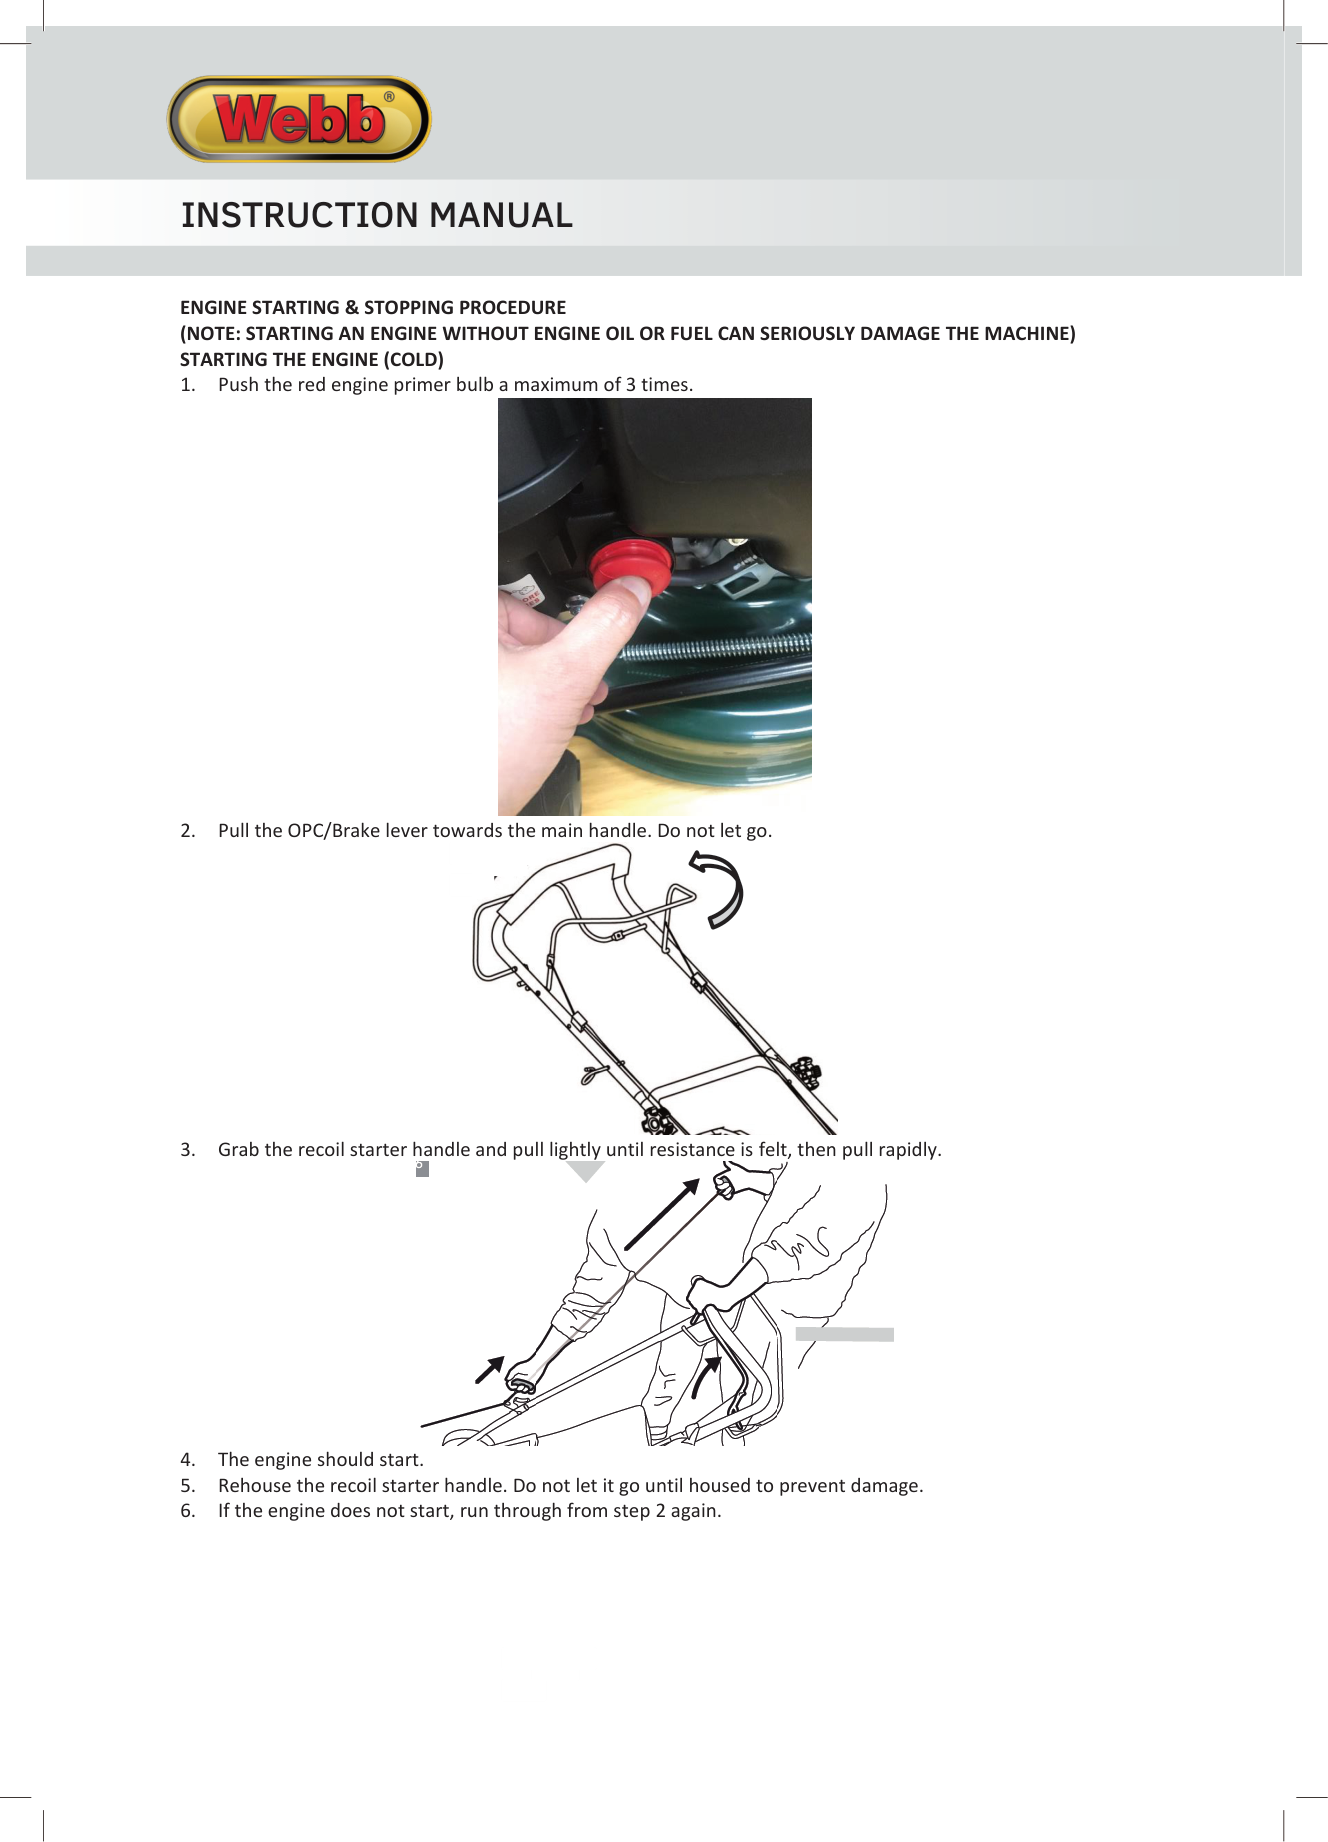
################### ENGINE STARTING & STOPPING PROCEDURE (NOTE: STARTING AN ENGINE WITHOUT ENGINE OIL OR FUEL CAN SERIOUSLY DAMAGE THE MACHINE) STARTING THE ENGINE (COLD)

| | | |---|---| | | |


| | | |---|---| | | |
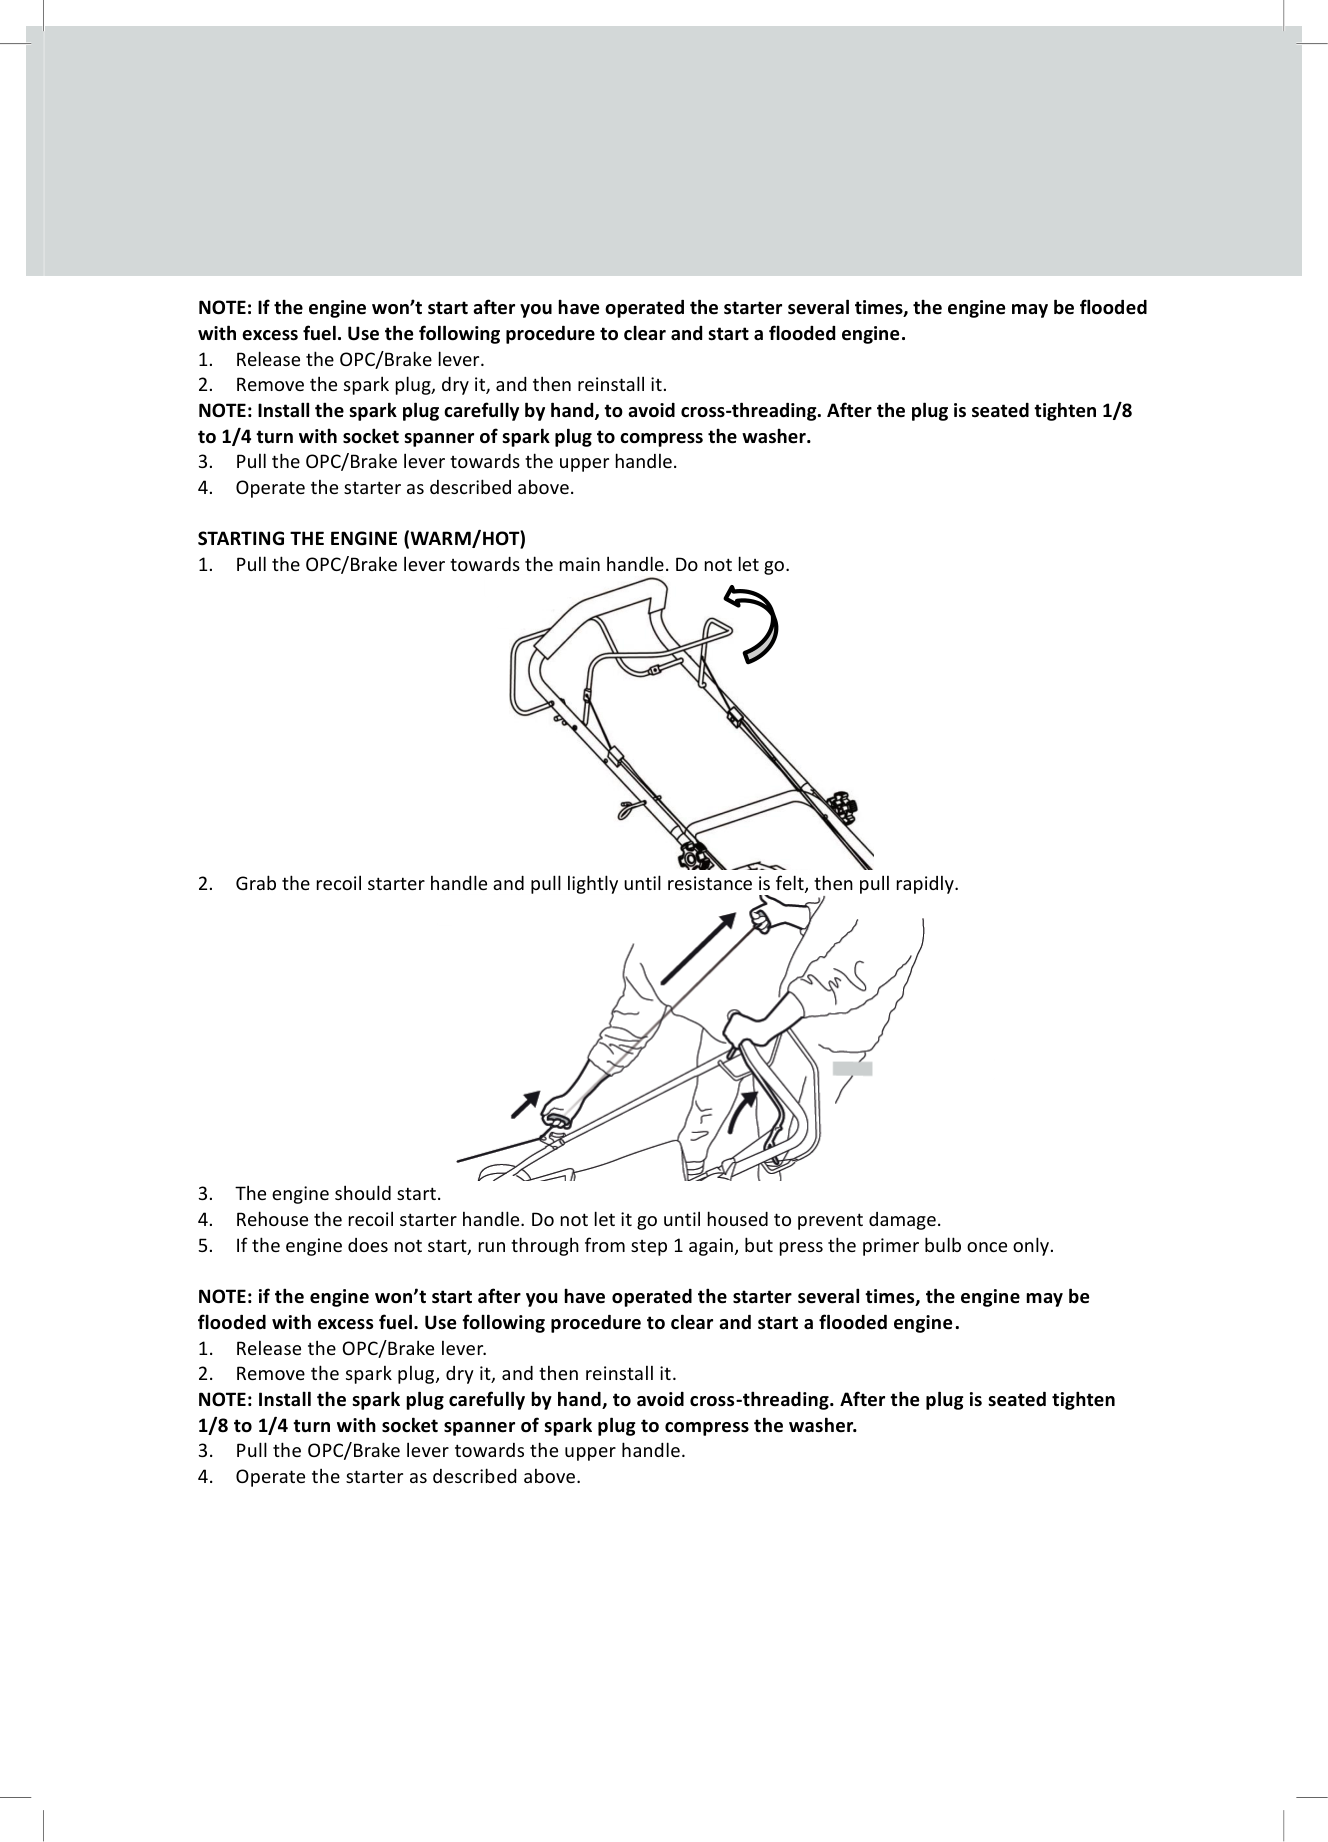
NOTE: If the engine won’t start after you have operated the starter several times, the engine may be flooded with excess fuel. Use the following procedure to clear and start a flooded engine.
| | | |---|---| | | |


NOTE: if the engine won’t start after you have operated the starter several times, the engine may be flooded with excess fuel. Use following procedure to clear and start a flooded engine.
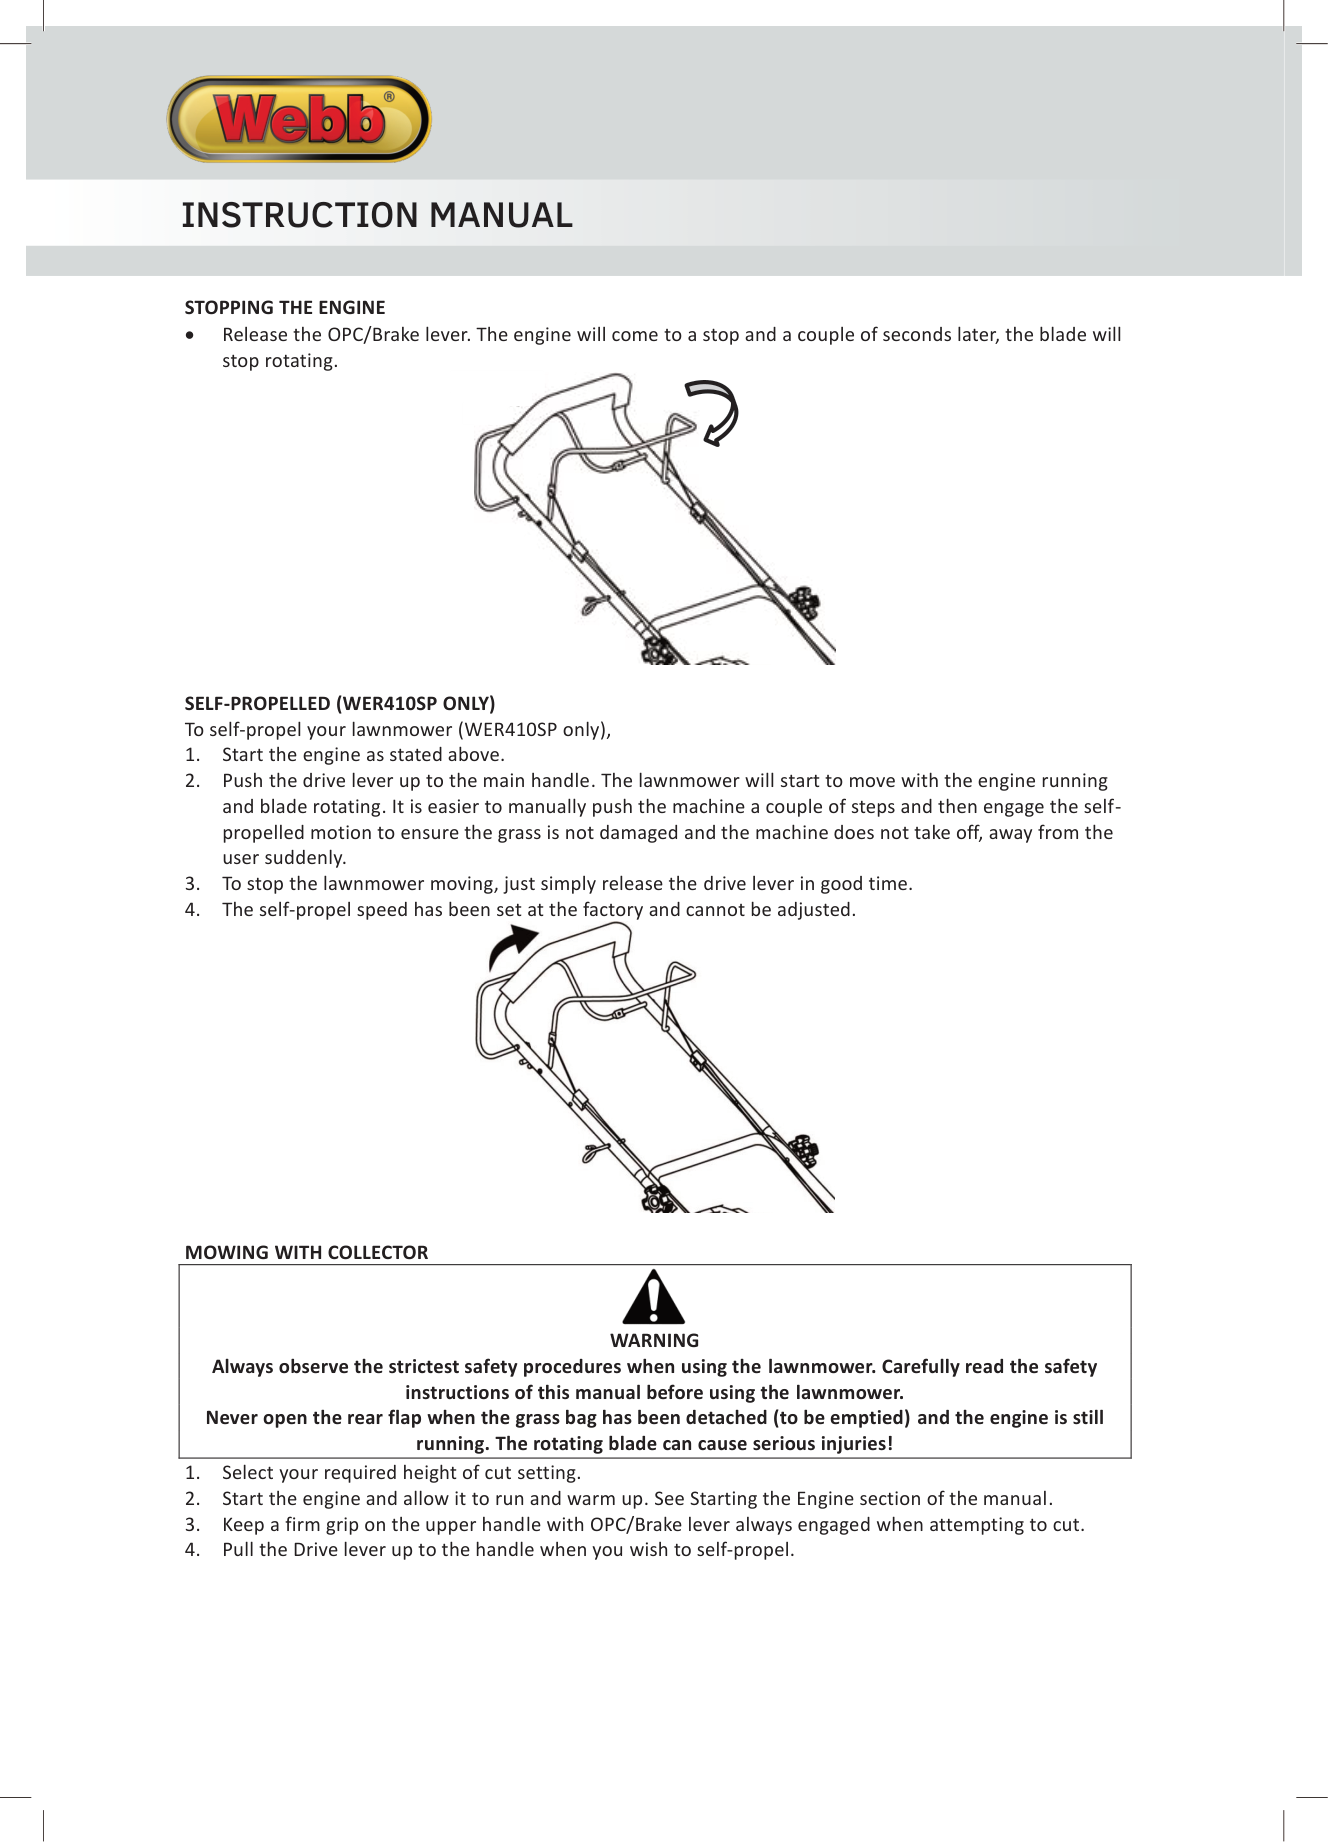
################### STOPPING THE ENGINE
• Release the OPC/Brake lever. The engine will come to a stop and a couple of seconds later, the blade will stop rotating.
| | | |---|---| | | |

SELF-PROPELLED (WER410SP ONLY) To self-propel your lawnmower (WER410SP only),

MOWING WITH COLLECTOR
|WARNING Always observe the strictest safety procedures when using the lawnmower. Carefully read the safety instructions of this manual before using the lawnmower. Never open the rear flap when the grass bag has been detached (to be emptied) and the engine is still running. The rotating blade can cause serious injuries!
| |---|
EMPTYING THE GRASS BAG As soon as grass clippings start to trail the lawnmower, it is time to empty the grass bag. NOTE: Before taking off the grass collector, switch off the engine and wait until the blade has come to a stop.
MOWING WITH REAR DISCHARGE To mow and not collect your cuttings, the machine is equipped to rear discharge.
|WARNING After the engine has stopped, the blade will still rotate a couple of seconds.
CAUTION Operating on gradients could cause the machine to tip over. Allowing anyone to operate this machine without proper instruction may result in injury. Wear sturdy, full coverage footwear. Operating this machine with bare feet, or with open toe shoes or sandals increases your risk of injury. Do not use the machine at night or in poor light. Be sure to transport the machine from one place to another with the engine off. Be sure to wear heavy gloves when cleaning underside of the deck or handling the blade. When undertaking any maintenance, cleaning or lifting of the machine, always tip the machine backwards or in the direction away from the air filter housing. Incorrect tipping of the machine can cause oil to enter area’s of the engine, which could present starting and running issues, not covered under the terms and conditions of the manufacturers warranty. To prevent damage, check the machine for any signs of damage or other faults when operated.

| |---|
############## MAINTENANCE, CLEANING & STORAGE
|WARNING Improper maintenance & storage of the machine may void your warranty. Keep the machine clean for better and safer performance. Turn off the engine before performing any maintenance. If the engine must be run, make sure the area is well ventilated. The exhaust emits dangerous carbon monoxide gases.
| |---|
MAINTENANCE Use only original equipment replacement parts. Other parts may not perform as well, may damage the unit and may result in injury. In addition, use of other parts may invalidate your warranty.
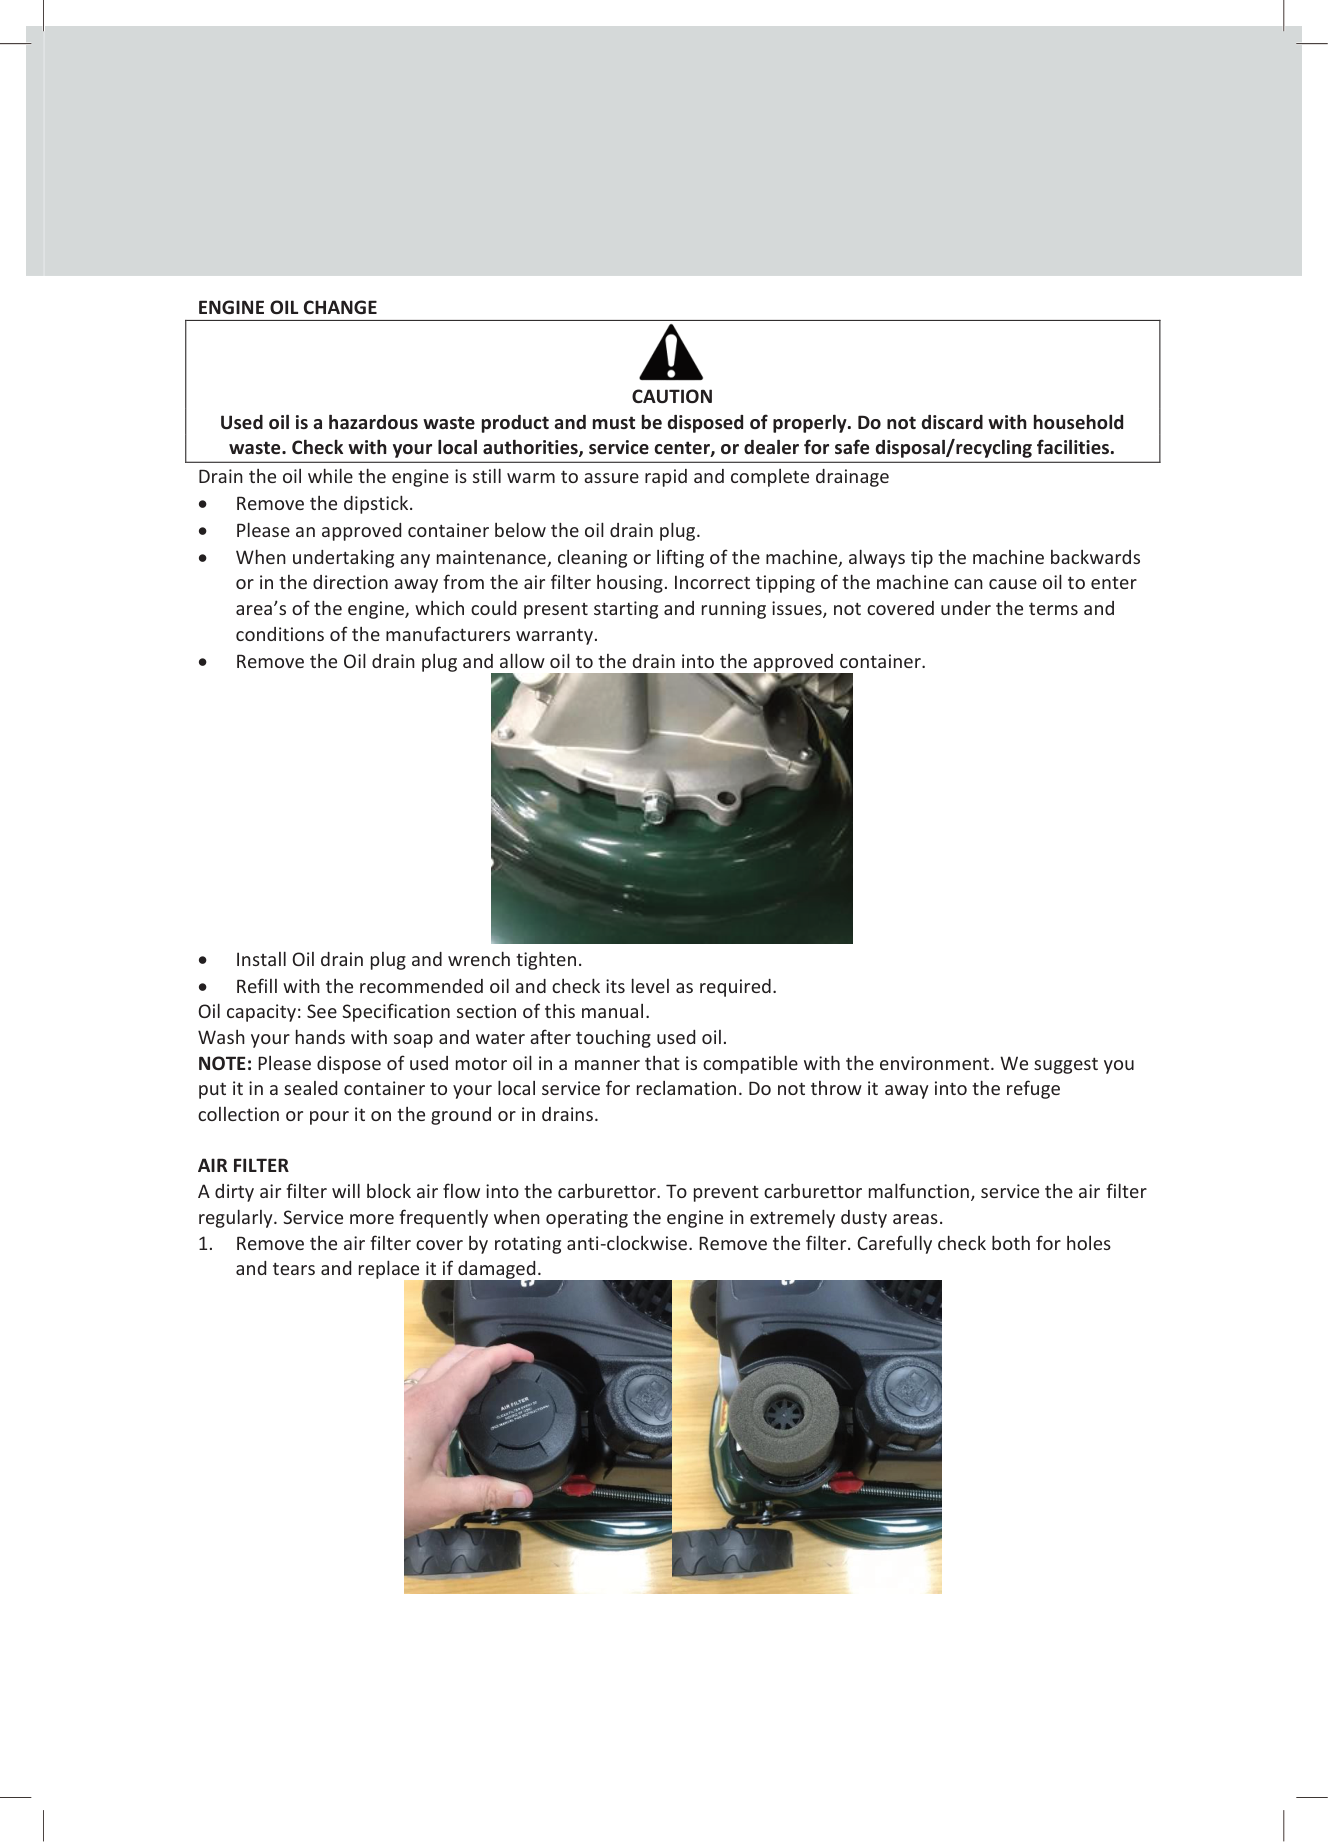
ENGINE OIL CHANGE
|CAUTION Used oil is a hazardous waste product and must be disposed of properly. Do not discard with household waste. Check with your local authorities, service center, or dealer for safe disposal/recycling facilities.
| |---|
Drain the oil while the engine is still warm to assure rapid and complete drainage

AIR FILTER A dirty air filter will block air flow into the carburettor. To prevent carburettor malfunction, service the air filter regularly. Service more frequently when operating the engine in extremely dusty areas.


|WARNING Never use gasoline or low flash point solvents to clean the air cleaner element. A fire or explosion could occur.
CAUTION Never run the engine without air filter or rapid engine wear will be the result.

|

|---|
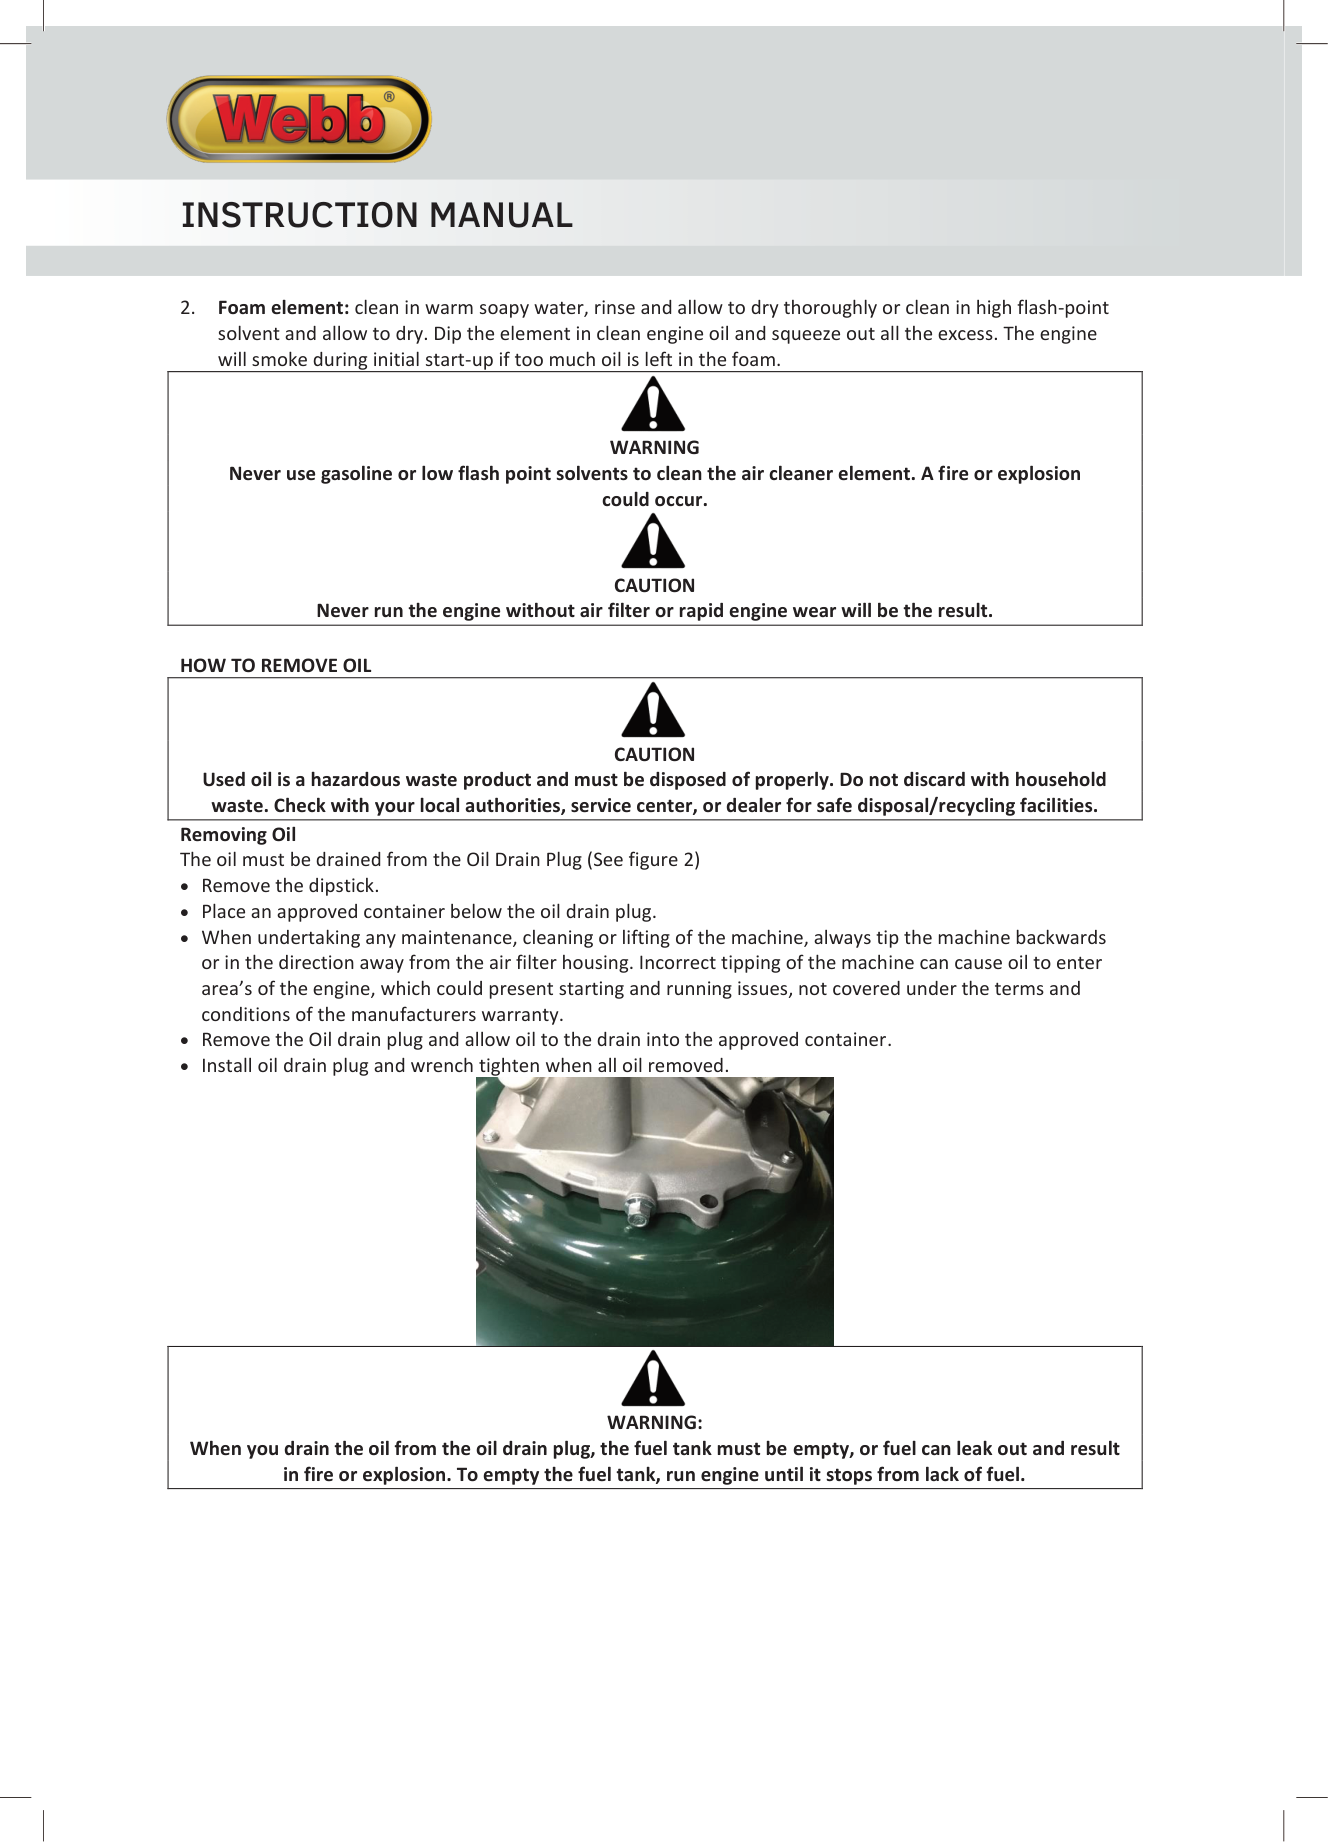
HOW TO REMOVE OIL
|CAUTION Used oil is a hazardous waste product and must be disposed of properly. Do not discard with household waste. Check with your local authorities, service center, or dealer for safe disposal/recycling facilities.
| |---|
Removing Oil The oil must be drained from the Oil Drain Plug (See figure 2)

|WARNING: When you drain the oil from the oil drain plug, the fuel tank must be empty, or fuel can leak out and result in fire or explosion. To empty the fuel tank, run engine until it stops from lack of fuel.
| |---|

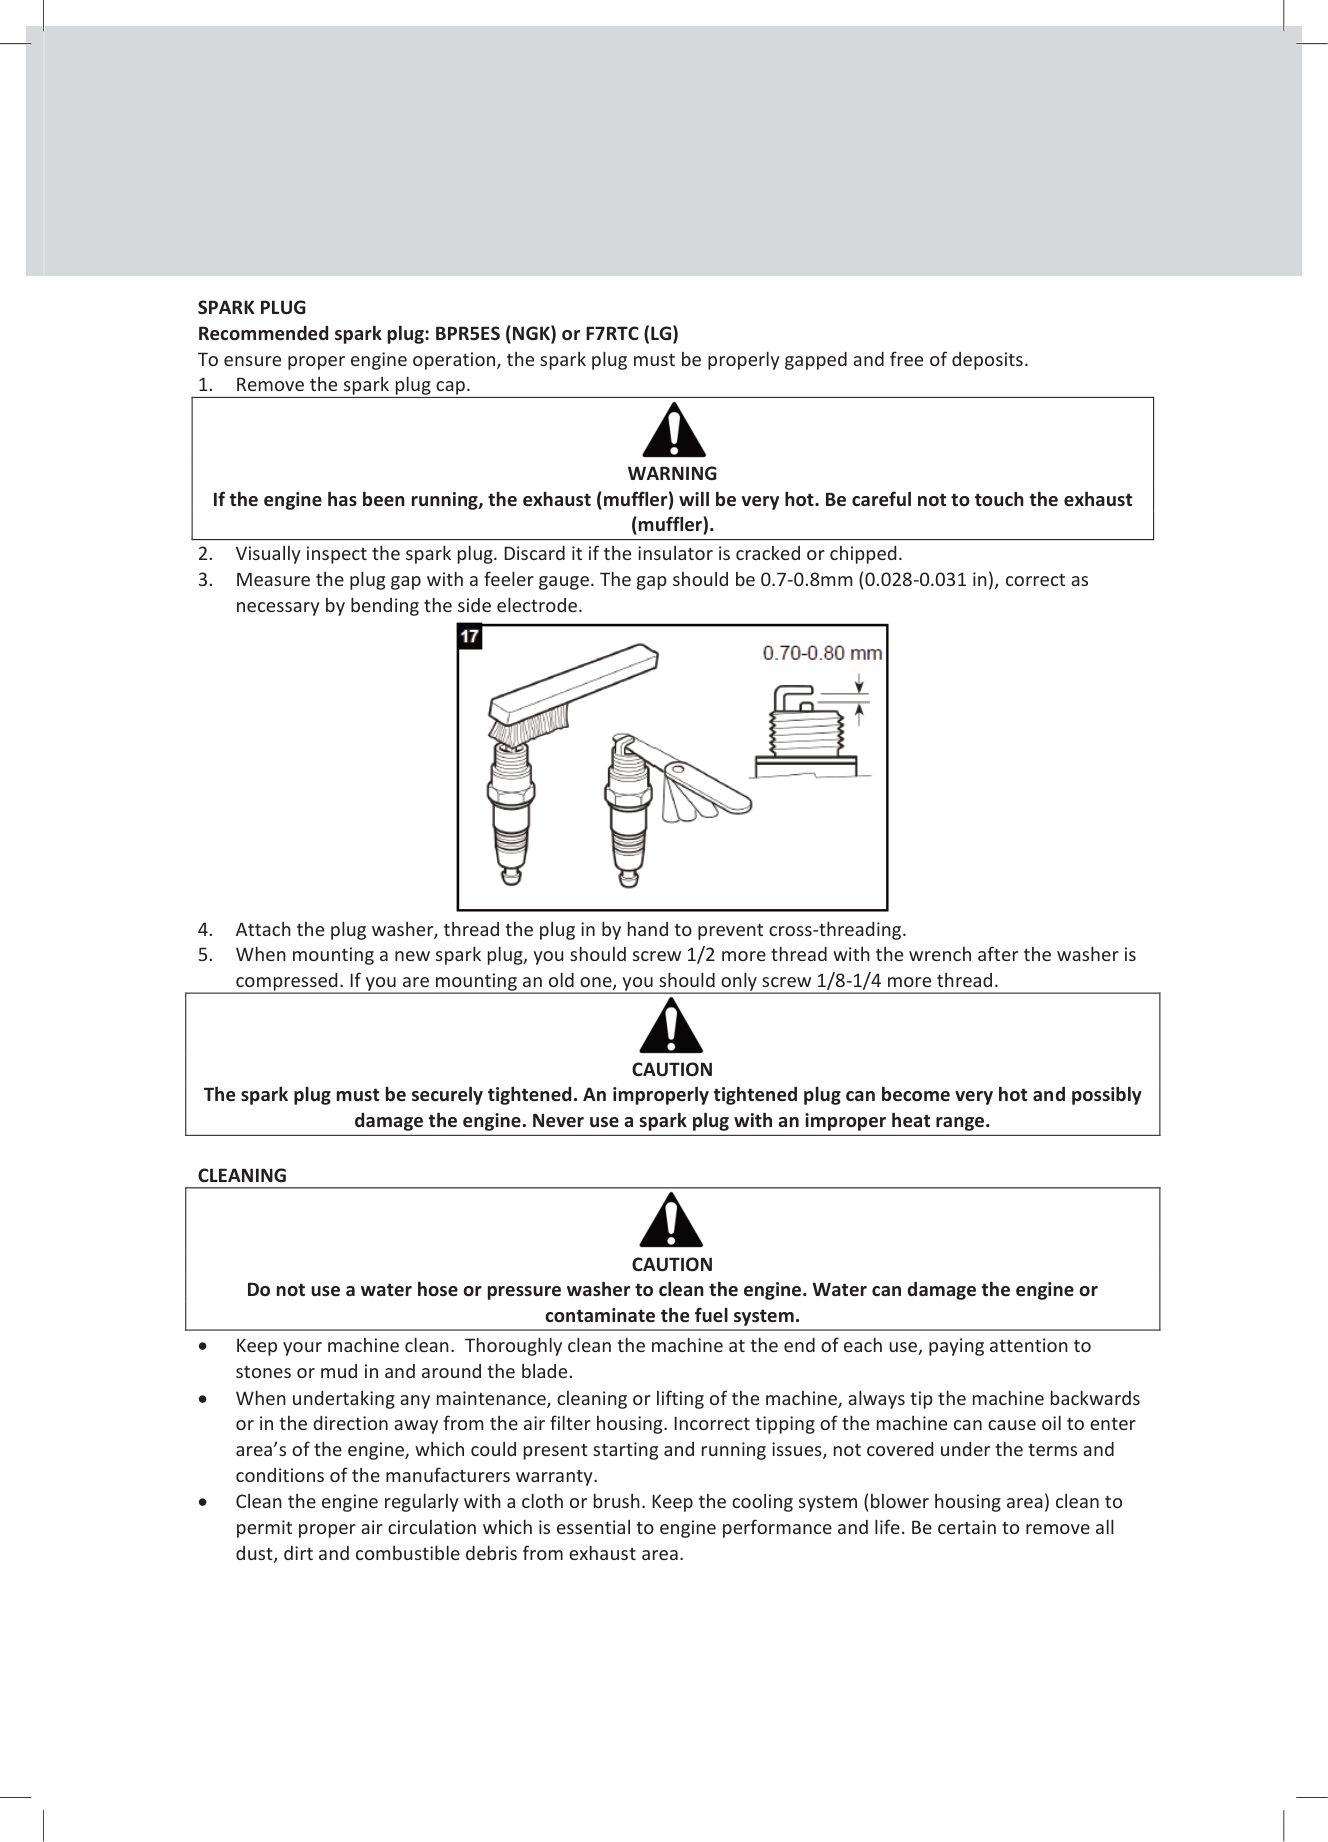
SPARK PLUG Recommended spark plug: BPR5ES (NGK) or F7RTC (LG) To ensure proper engine operation, the spark plug must be properly gapped and free of deposits.
|WARNING If the engine has been running, the exhaust (muffler) will be very hot. Be careful not to touch the exhaust (muffler).
| |---|

|CAUTION The spark plug must be securely tightened. An improperly tightened plug can become very hot and possibly damage the engine. Never use a spark plug with an improper heat range.
| |---|
CLEANING

|CAUTION Do not use a water hose or pressure washer to clean the engine. Water can damage the engine or contaminate the fuel system.
| |---|
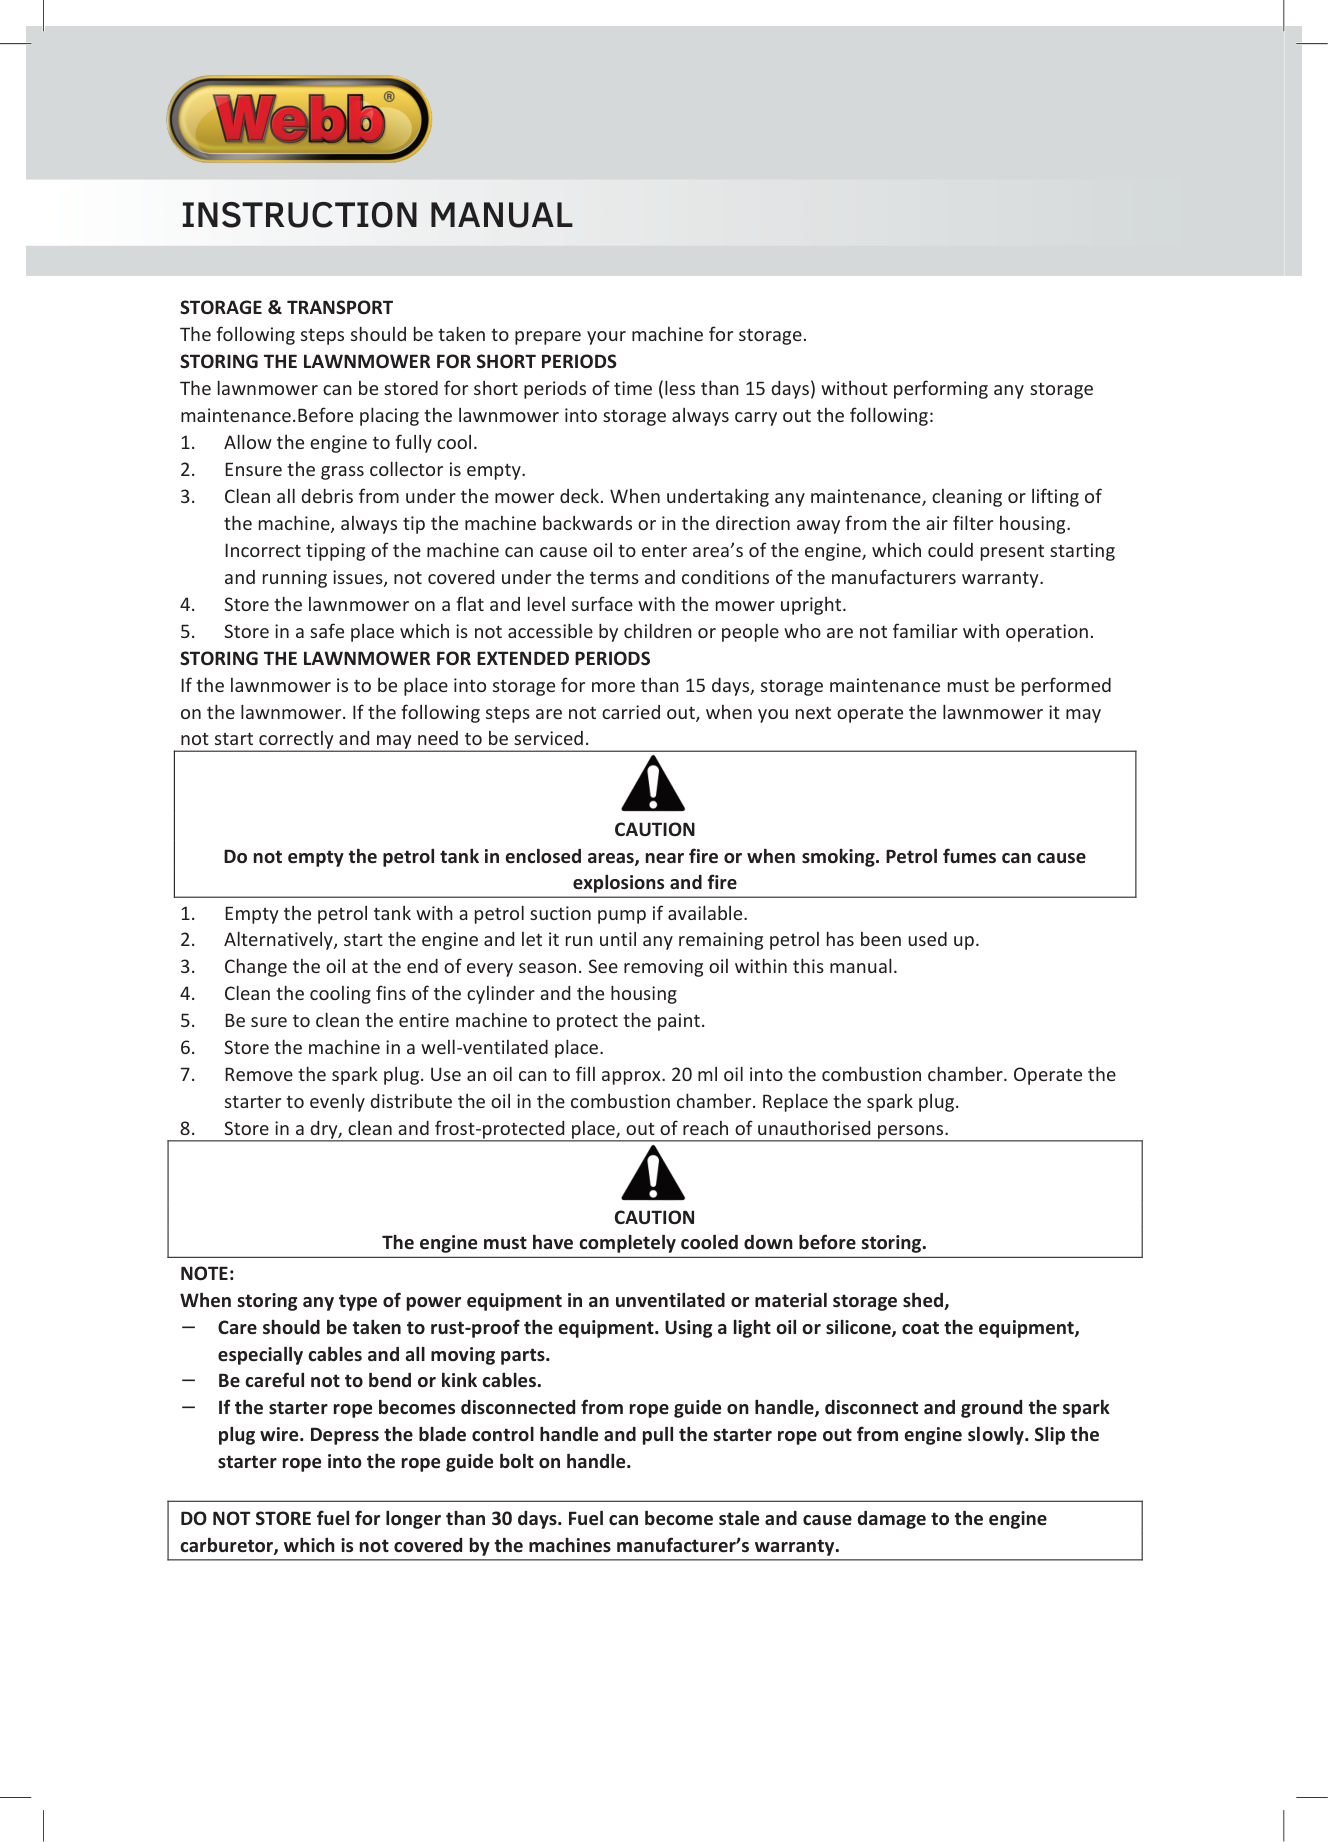
STORAGE & TRANSPORT The following steps should be taken to prepare your machine for storage. STORING THE LAWNMOWER FOR SHORT PERIODS The lawnmower can be stored for short periods of time (less than 15 days) without performing any storage maintenance.Before placing the lawnmower into storage always carry out the following:
|CAUTION Do not empty the petrol tank in enclosed areas, near fire or when smoking. Petrol fumes can cause explosions and fire
| |---|
|CAUTION The engine must have completely cooled down before storing.
| |---|
NOTE: When storing any type of power equipment in an unventilated or material storage shed, − Care should be taken to rust-proof the equipment. Using a light oil or silicone, coat the equipment,
especially cables and all moving parts. − Be careful not to bend or kink cables. − If the starter rope becomes disconnected from rope guide on handle, disconnect and ground the spark
plug wire. Depress the blade control handle and pull the starter rope out from engine slowly. Slip the starter rope into the rope guide bolt on handle.
|DO NOT STORE fuel for longer than 30 days. Fuel can become stale and cause damage to the engine carburetor, which is not covered by the machines manufacturer’s warranty.
| |---|
################### TRANSPORT
############## TROUBLE SHOOTING
|PROBLEM|POSSIBLE CAUSES|REMEDIAL ACTION| |---|---|---| |Engine does not start
|Fuel tank is empty.|Fill tank with fuel: refer to ENGINE OWNERS MANUAL.| |Engine does not start
|Spark plug loose.|Tighten spark plug.| |Engine does not start
|Spark plug wire loose or disconnected from plug.|Install spark plug wire on spark plug.| |Engine does not start
|Spark plug gap is incorrect|Set correct gap between electrodes.| |Engine does not start
|Spark plug is defective.|Install new, correctly gapped plug.| |Engine does not start
|Carburettor is flooded with fuel. Possible incorrect tipping of machine.|Remove air cleaner element and pull starter rope continuously until carburetor clears itself and install air cleaner element.| |Engine does not start
|Old Fuel|Fuel becomes stale after 30 days and causes residues to build and ‘gunk up’ the carburettor. Change fuel with fresh. If problem persists consult local Approved Service Dealer.| |Motor speed drops off|Air filter clogged|Clean air filter: refer to relevant section in manual|

############### REPLACEMENT PARTS
Please find on the following pages, parts lists and drawings for your machine. Should you require a replacement part, please visit www.webbgardenpower.co.uk or call our Spares Team on 01793 333212, option 1 for assistance.
Webb recommends the use of Handy Parts oils, fuel additives, nylon lines pre-packed parts for all our machines.


##### Notes
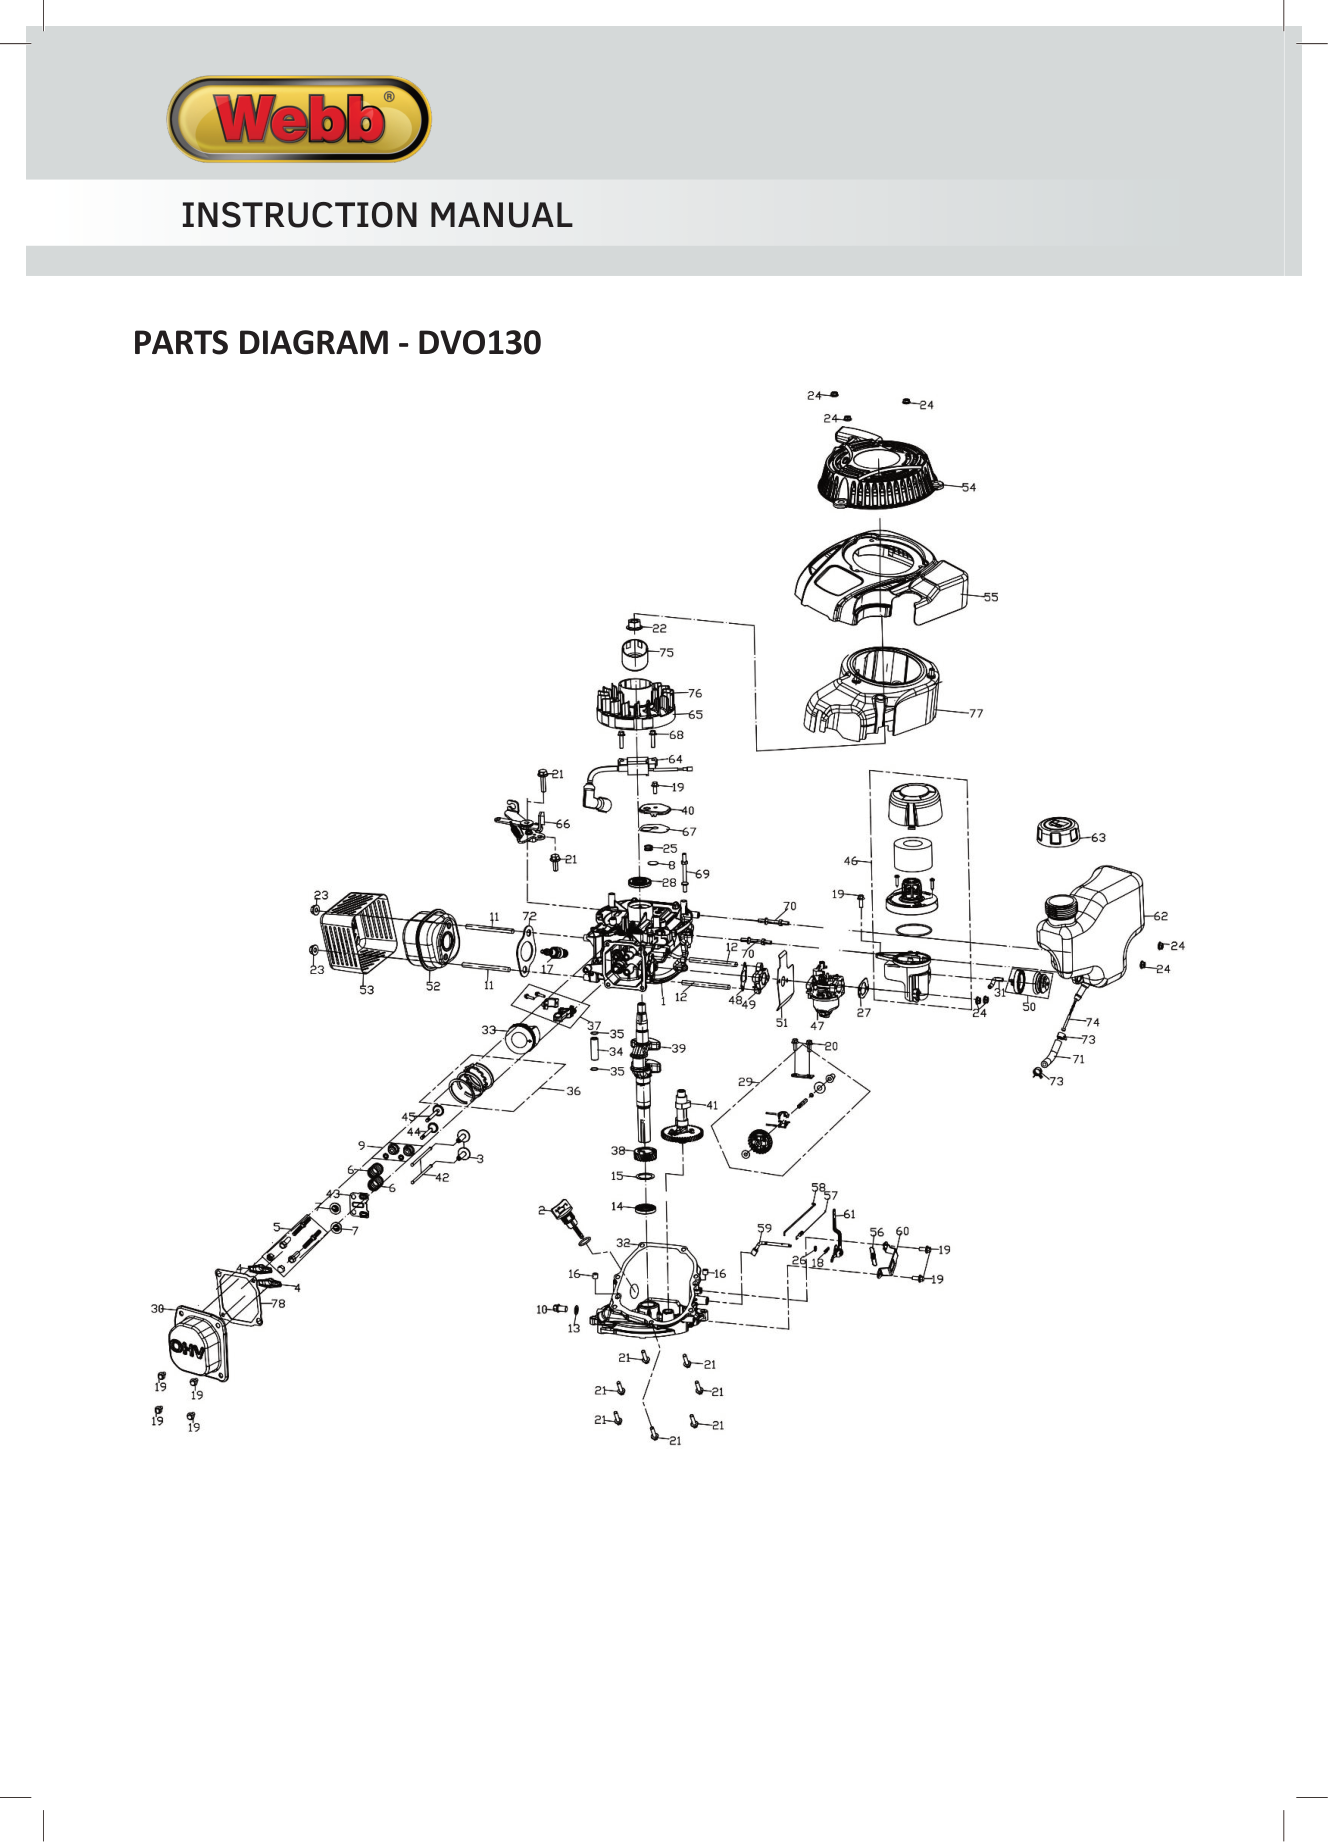
######## PARTS DIAGRAM - DVO130

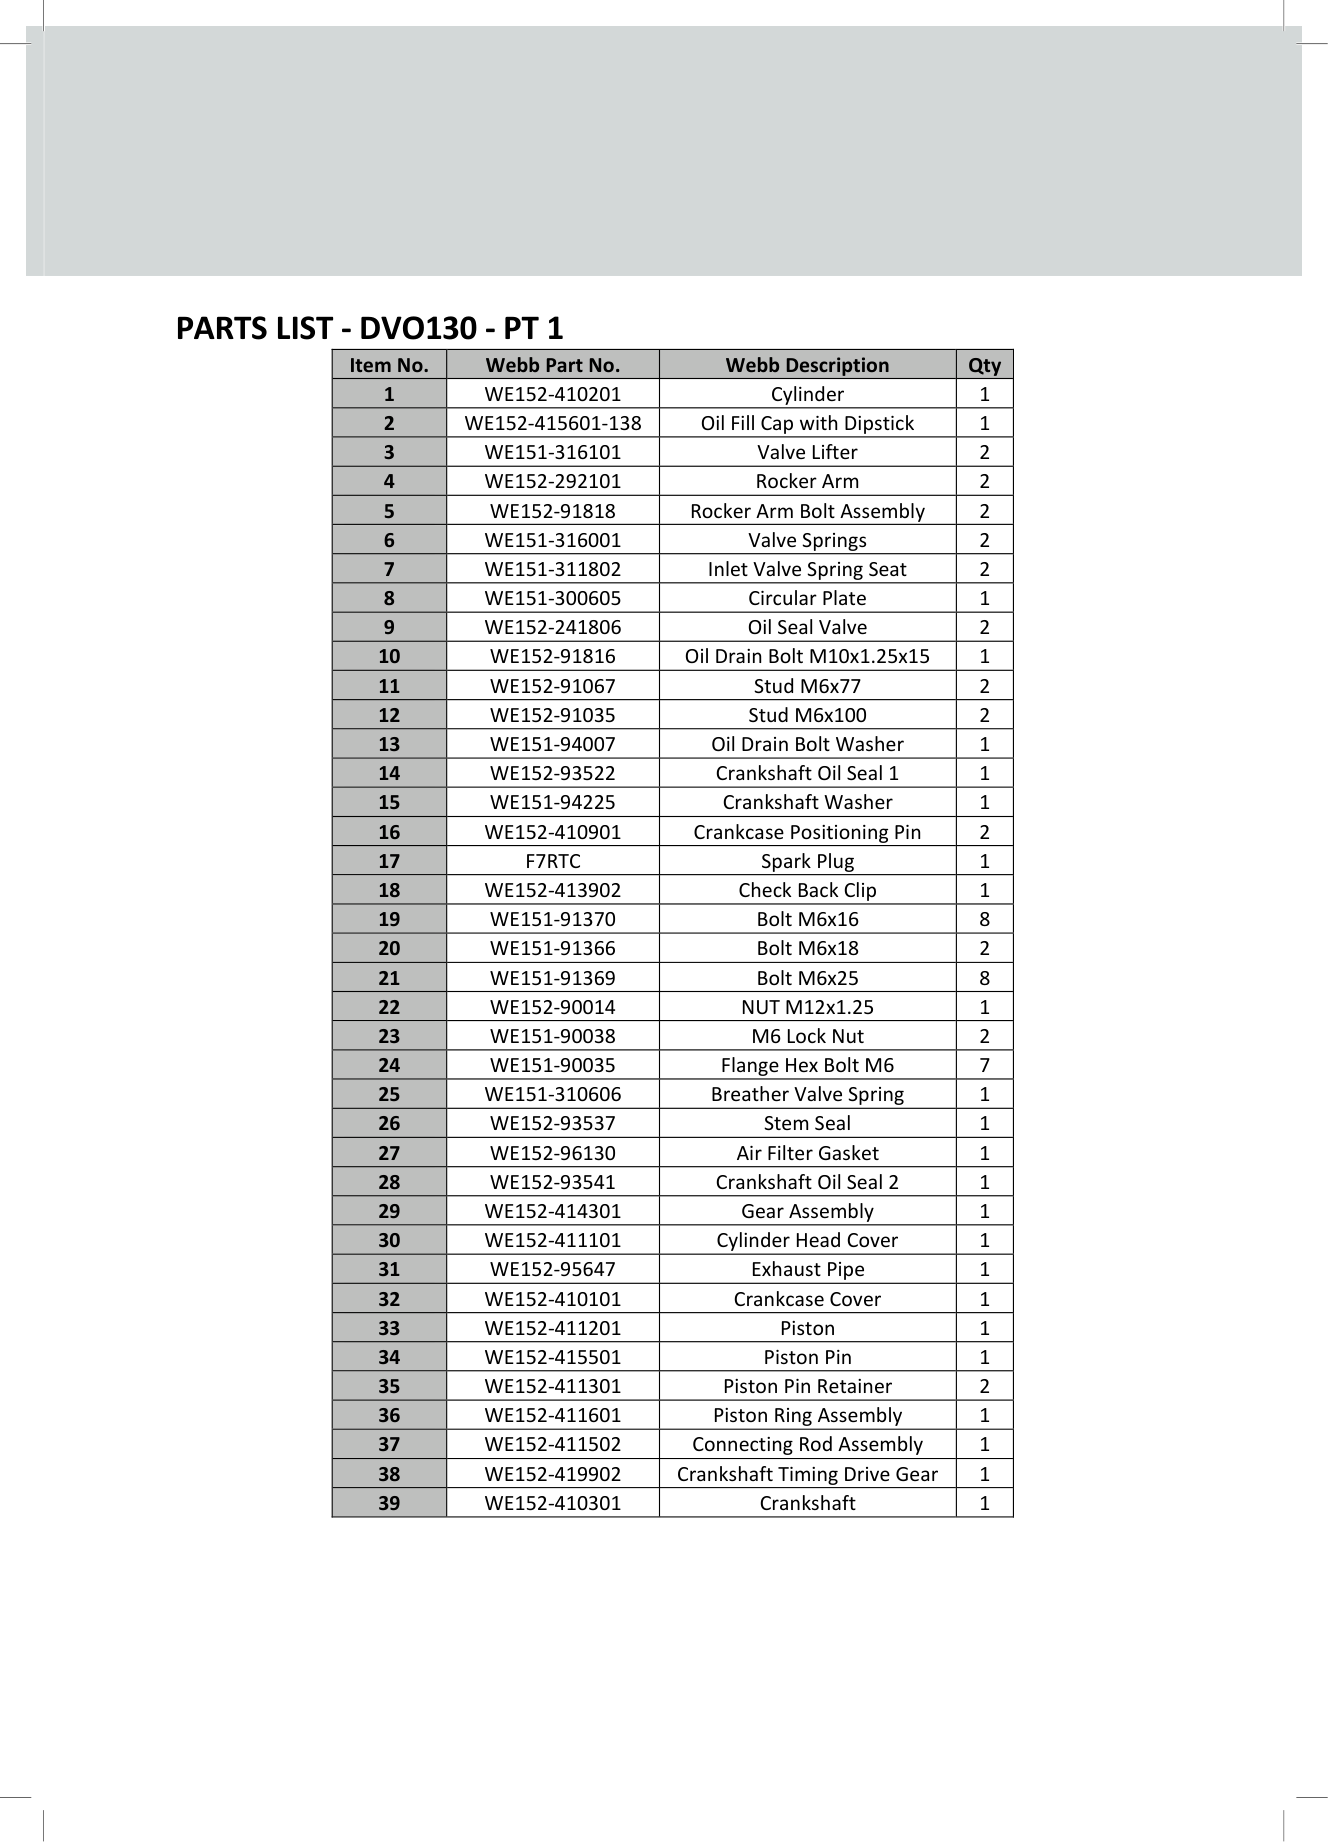
############ PARTS LIST - DVO130 - PT 1
|Item No.|Webb Part No.|Webb Description|Qty| |---|---|---|---| |1|WE152-410201|Cylinder|1| |2|WE152-415601-138|Oil Fill Cap with Dipstick|1| |3|WE151-316101|Valve Lifter|2| |4|WE152-292101|Rocker Arm|2| |5|WE152-91818|Rocker Arm Bolt Assembly|2| |6|WE151-316001|Valve Springs|2| |7|WE151-311802|Inlet Valve Spring Seat|2| |8|WE151-300605|Circular Plate|1| |9|WE152-241806|Oil Seal Valve|2| |10|WE152-91816|Oil Drain Bolt M10x1.25x15|1| |11|WE152-91067|Stud M6x77|2| |12|WE152-91035|Stud M6x100|2|
|13|WE151-94007|Oil Drain Bolt Washer|1| |14|WE152-93522|Crankshaft Oil Seal 1|1| |15|WE151-94225|Crankshaft Washer|1| |16|WE152-410901|Crankcase Positioning Pin|2| |17|F7RTC|Spark Plug|1| |18|WE152-413902|Check Back Clip|1| |19|WE151-91370|Bolt M6x16|8| |20|WE151-91366|Bolt M6x18|2| |21|WE151-91369|Bolt M6x25|8| |22|WE152-90014|NUT M12x1.25|1| |23|WE151-90038|M6 Lock Nut|2| |24|WE151-90035|Flange Hex Bolt M6|7| |25|WE151-310606|Breather Valve Spring|1| |26|WE152-93537|Stem Seal|1| |27|WE152-96130|Air Filter Gasket|1| |28|WE152-93541|Crankshaft Oil Seal 2|1| |29|WE152-414301|Gear Assembly|1| |30|WE152-411101|Cylinder Head Cover|1| |31|WE152-95647|Exhaust Pipe|1| |32|WE152-410101|Crankcase Cover|1| |33|WE152-411201|Piston|1| |34|WE152-415501|Piston Pin|1| |35|WE152-411301|Piston Pin Retainer|2|
|36|WE152-411601|Piston Ring Assembly|1| |37|WE152-411502|Connecting Rod Assembly|1| |38|WE152-419902|Crankshaft Timing Drive Gear|1| |39|WE152-410301|Crankshaft|1|
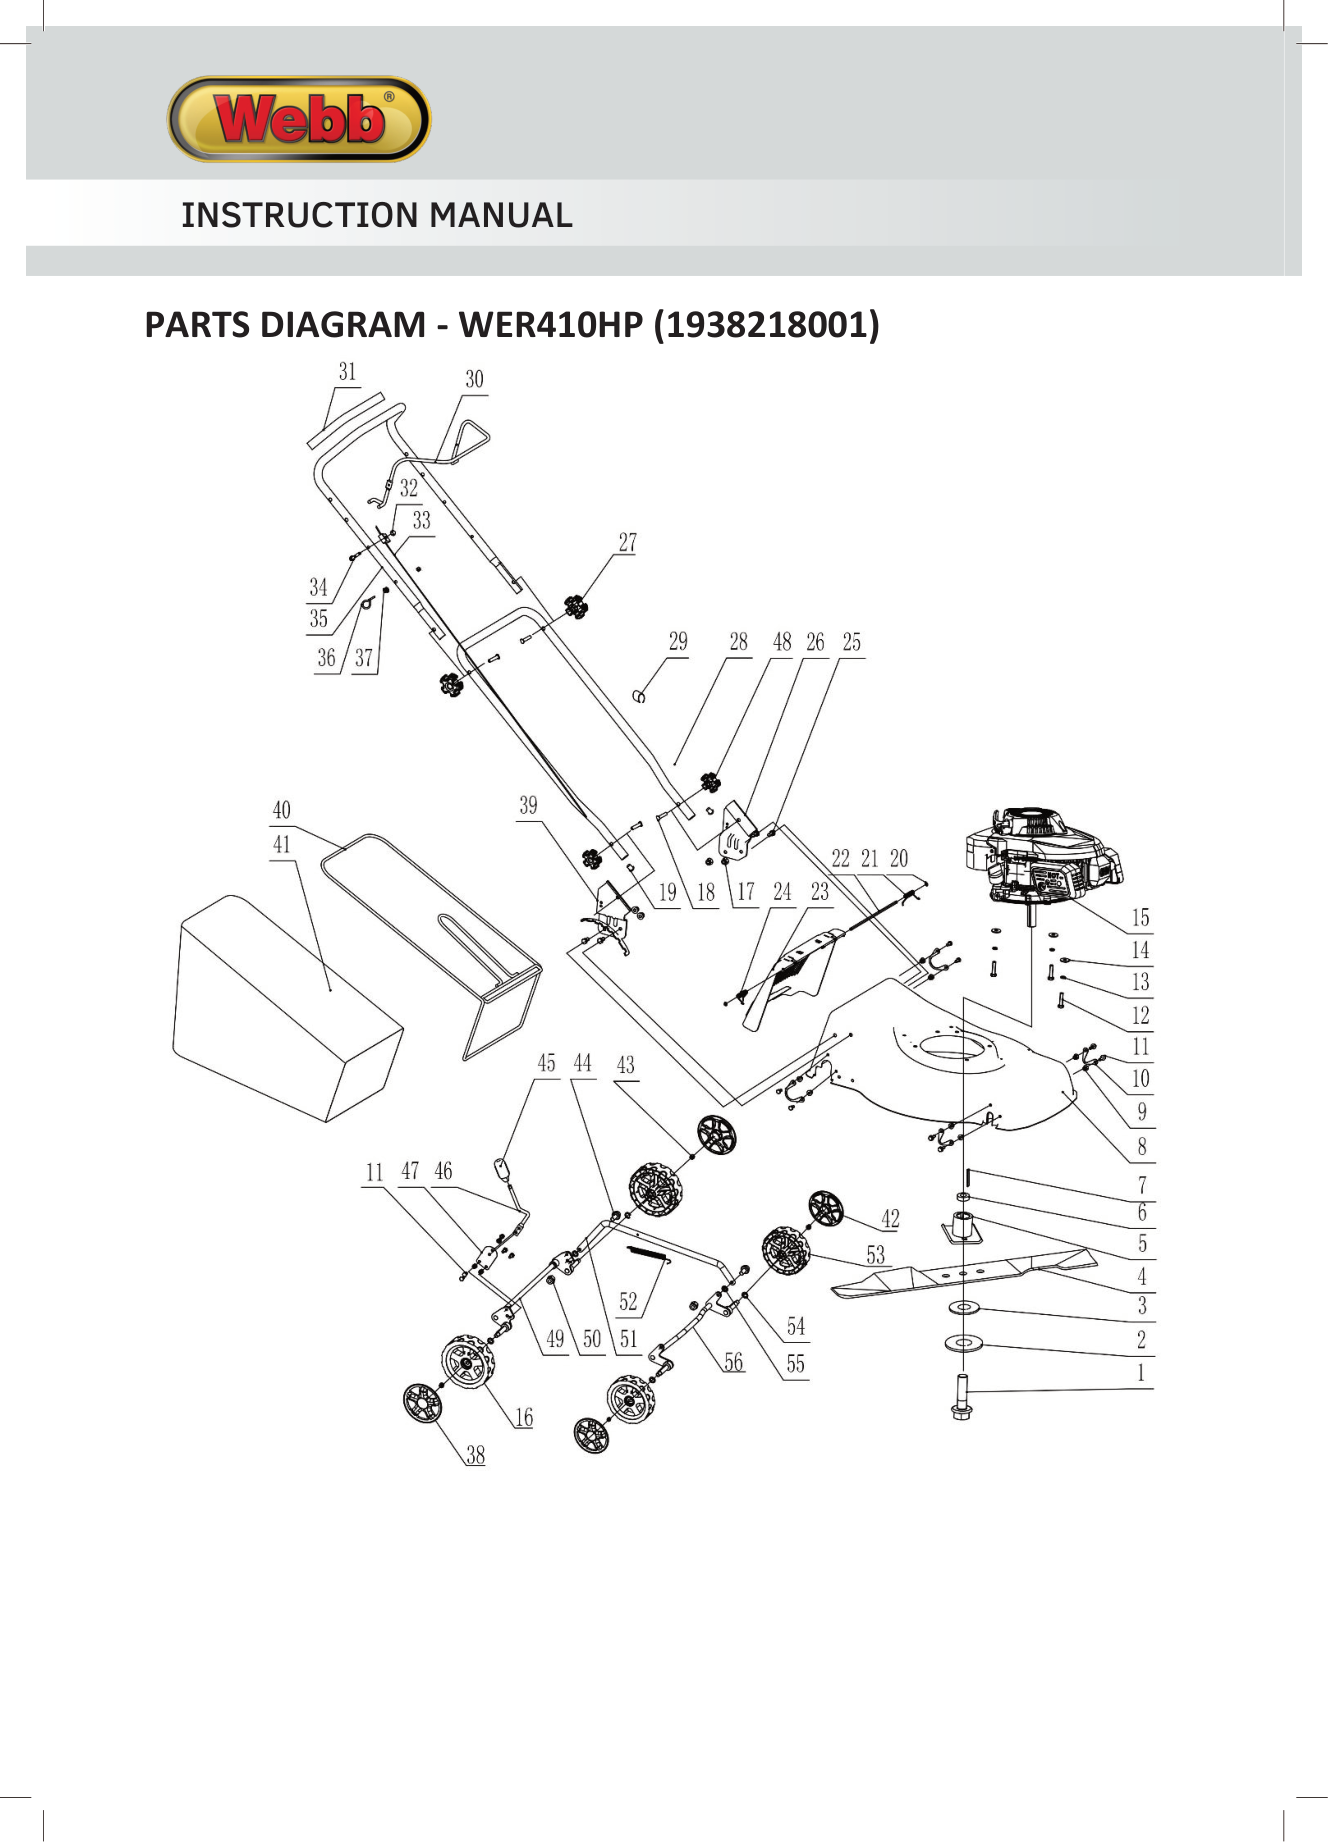
###### PARTS DIAGRAM - WER410HP (1938218001)

############### PARTS LIST - WER410HP (1938218001)
|Item No.
|Webb Part No.
|Webb Description
|Qty|Item No.
|Webb Part No.
|Webb Description
|Qty| |---|---|---|---|---|---|---|---| |1|WE153-91221|Bolt 3/8-24UNFx38
|1|29|WE153-605221|Cable Clip|1| |2|WE153-94042|Flat Washer|1|30|WE153-605010-136|OPC/Brake Lever|1| |3|WE153-602001|Blade Washer|1|31|WE153-605007-053|Soft Grip (Come's with 35)
|1| |4|WE153-602005|Blade (410mm)|1|32|WE153-90061|Nut M6|2| |5|WE153-602003|Blade Adapter|1|33|WE153-605025|Brake Cable|1| |6|WE153-602024|Blade Adapter Bush
|1|34|WE153-91870|Bolt M6x35|1| |7|WE153-296510|Key|1|35|WE153-605008|Upper Handle (Come's with 31)
|1| |8|WE153-601006-333|Cutting Deck|1|36|WE153-605009|Rope Guide Support
|1| |9|WE153-90060|M6 Nut|8|37|WE153-90016|Nut M6|1|

|10|WE153-606150|Wheel Shaft Retaining Plate
|4|38|WE153-606007-198|Rear Wheel Cover
|2| |11|WE153-91404|Bolt M6x14|12|39|WE153-601172|Right Handle Support
|1| |12|WE149-91346|Bolt M8x25|3|40|WE153-604020-010|Collector Frame|1| |13|WE149-94040|Spring Washer|3|41|WE153-604100-057|Collector Bag|1| |14|WE149-94041|Washer 8.4x24x2|4|42|WE153-606001-198|Front Wheel Cover
|2| |15| |Engine DVO130|1|43|WE149-90057|Nut M10x1.5|4| |16|WE153-606028|Front Wheel (7")|2|44|WE153-91867|Bolt|2| |17|WE149-90059|Nut M8|4|45|WE153-603003-198|Height Adjuster Handle
|1| |18|WE153-91868|Bolt M8x45|4|46|WE153-603037|Height Adjuster Lever
|1| |19|WE153-605006|Stem|2|47|WE153-603002|Height Adjuster Plate
|1| |20|WE153-94036|Circlip Φ5|2|48|WE153-605003-198|Small Handle Knob|2| |21|WE153-604016|Left Torsional Spring
|1|49|WE153-606241|Rear Axle|1| |22|WE153-604017|Rear Cover Axle
|1|50|WE153-90058|Nut M6|6| |23|WE153-604018|Rear Cover|1|51|WE153-603075|Height Adjustment Link Bar
|1| |24|WE153-604045|Right Torsional Spring
|1|52|WE153-603062|Height Adjuster Spring
|1| |25|WE153-91881|Bolt M8x16|4|53|WE153-606002|Front Wheel|2| |26|WE153-601076|Left Handle Support
|1|54|WE153-94046|Flat Washer|4| |27|WE153-605002-198|Large Handle Knob
|2|55|WE149-94057|Washer Φ8.4*20*2
|2| |28|WE153-605016|Lower Handle|1|56|WE153-606247|Front Axle|1|
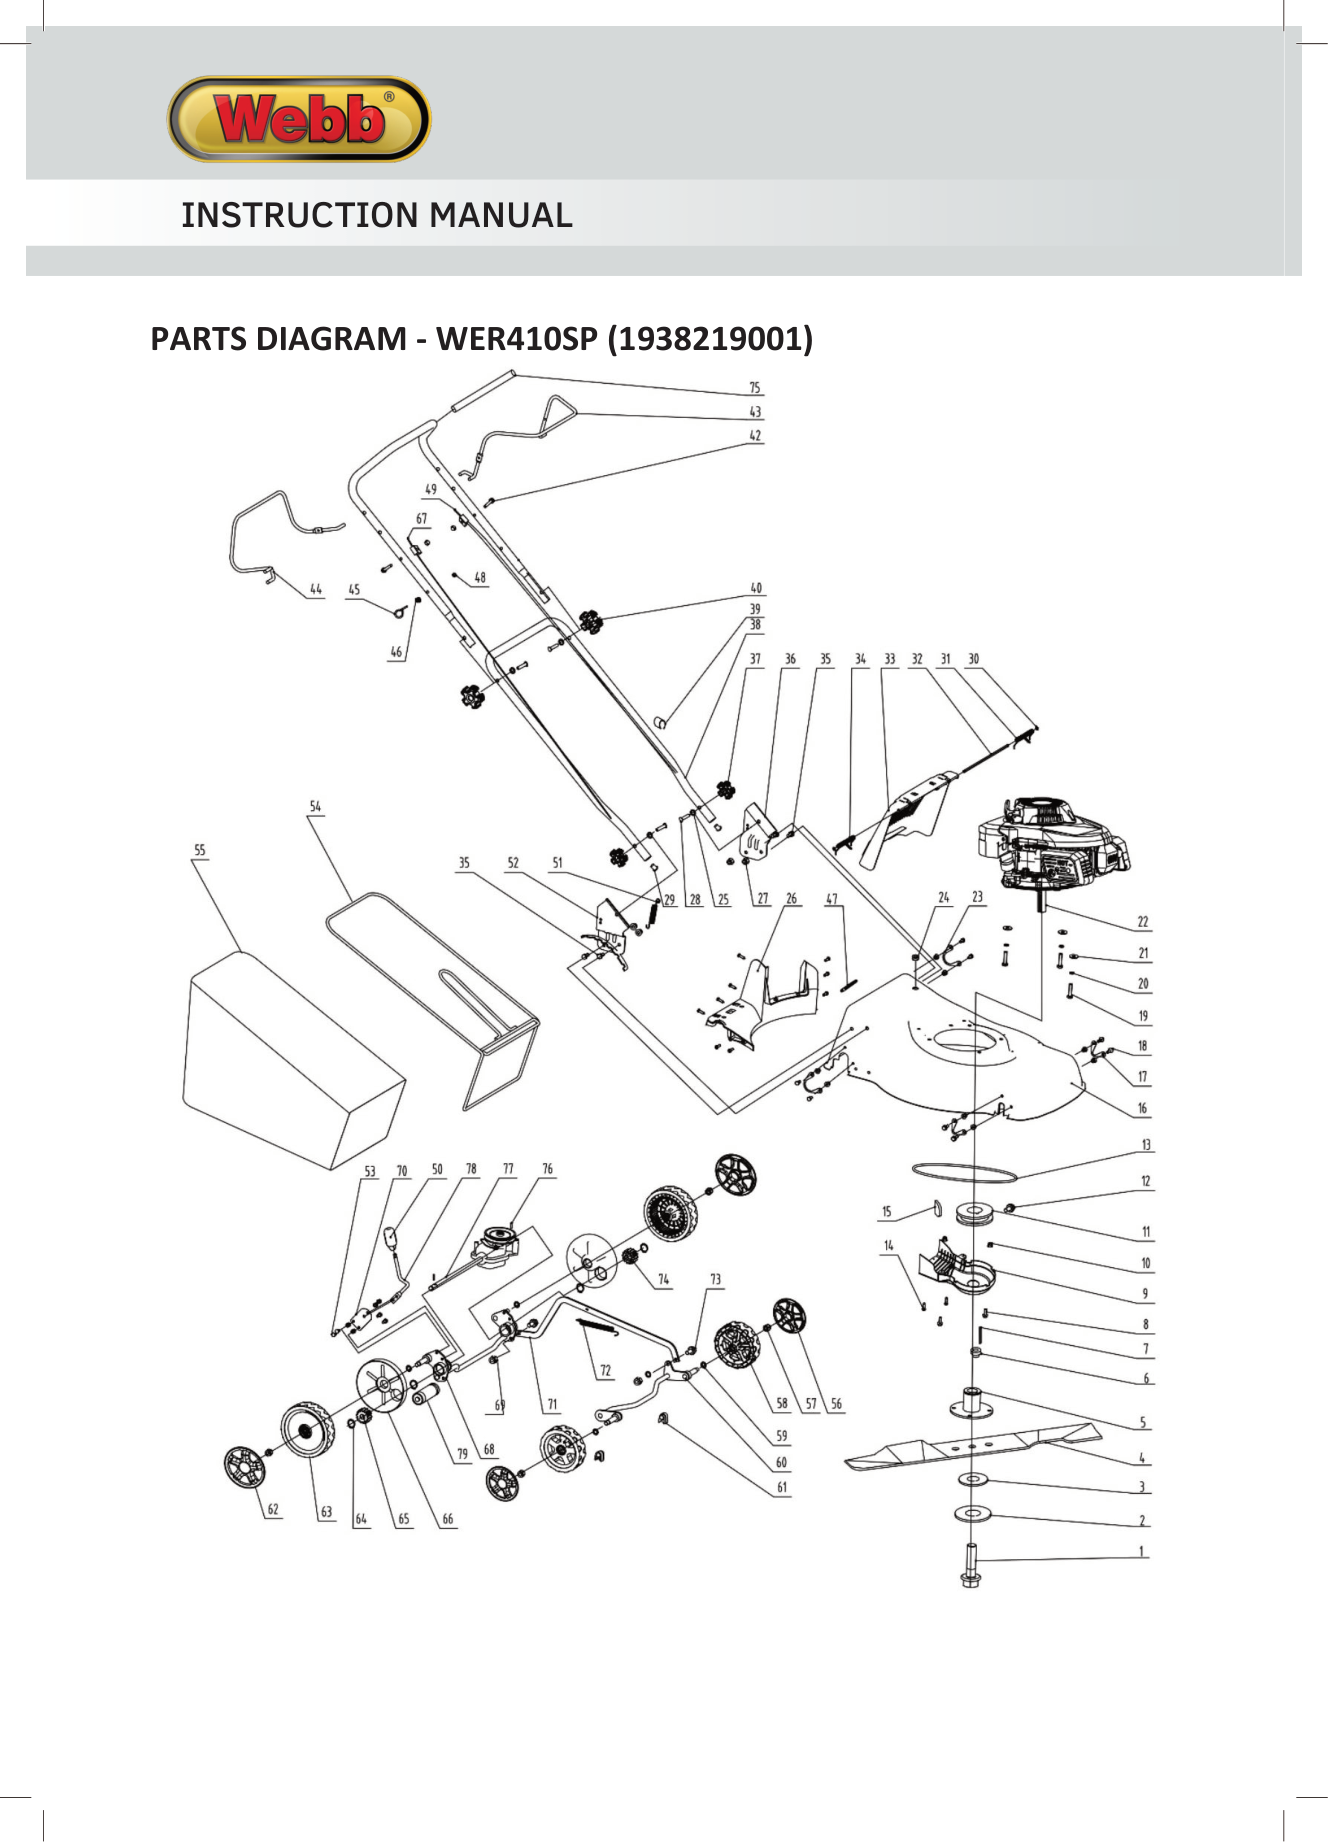
########## PARTS DIAGRAM - WER410SP (1938219001)


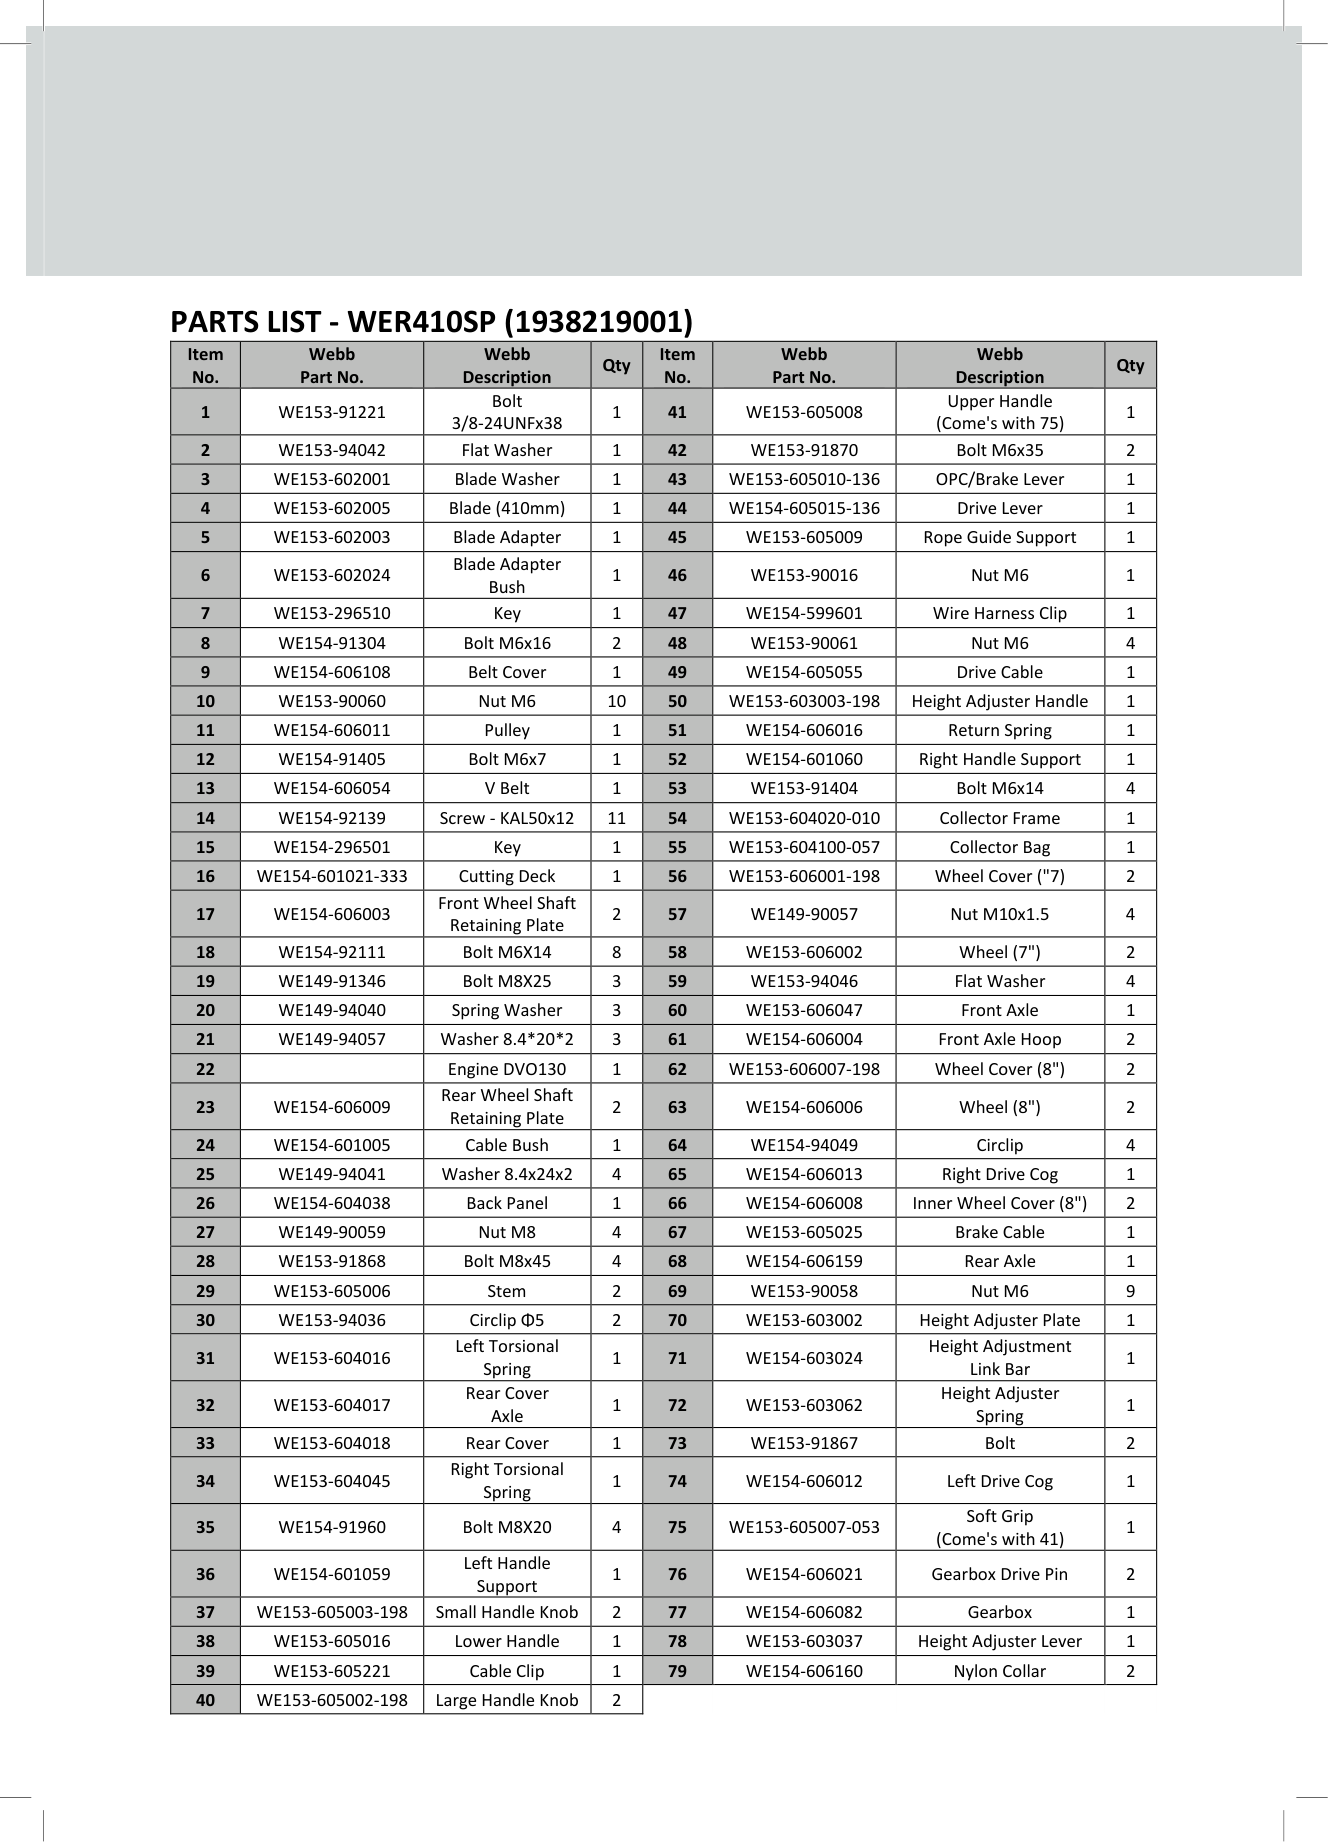
############### PARTS LIST - WER410SP (1938219001)
|Item No.
|Webb Part No.
|Webb Description
|Qty|Item No.
|Webb Part No.
|Webb Description
|Qty| |---|---|---|---|---|---|---|---| |1|WE153-91221|Bolt 3/8-24UNFx38
|1|41|WE153-605008|Upper Handle (Come's with 75)
|1| |2|WE153-94042|Flat Washer|1|42|WE153-91870|Bolt M6x35|2| |3|WE153-602001|Blade Washer|1|43|WE153-605010-136|OPC/Brake Lever|1| |4|WE153-602005|Blade (410mm)|1|44|WE154-605015-136|Drive Lever|1| |5|WE153-602003|Blade Adapter|1|45|WE153-605009|Rope Guide Support|1| |6|WE153-602024|Blade Adapter Bush
|1|46|WE153-90016|Nut M6|1| |7|WE153-296510|Key|1|47|WE154-599601|Wire Harness Clip|1| |8|WE154-91304|Bolt M6x16|2|48|WE153-90061|Nut M6|4| |9|WE154-606108|Belt Cover|1|49|WE154-605055|Drive Cable|1| |10|WE153-90060|Nut M6|10|50|WE153-603003-198|Height Adjuster Handle|1| |11|WE154-606011|Pulley|1|51|WE154-606016|Return Spring|1| |12|WE154-91405|Bolt M6x7|1|52|WE154-601060|Right Handle Support|1| |13|WE154-606054|V Belt|1|53|WE153-91404|Bolt M6x14|4| |14|WE154-92139|Screw - KAL50x12|11|54|WE153-604020-010|Collector Frame|1| |15|WE154-296501|Key|1|55|WE153-604100-057|Collector Bag|1| |16|WE154-601021-333|Cutting Deck|1|56|WE153-606001-198|Wheel Cover ("7)|2| |17|WE154-606003|Front Wheel Shaft Retaining Plate|2|57|WE149-90057|Nut M10x1.5|4|
|18|WE154-92111|Bolt M6X14|8|58|WE153-606002|Wheel (7")|2| |19|WE149-91346|Bolt M8X25|3|59|WE153-94046|Flat Washer|4| |20|WE149-94040|Spring Washer|3|60|WE153-606047|Front Axle|1| |21|WE149-94057|Washer 8.4*20*2|3|61|WE154-606004|Front Axle Hoop|2| |22| |Engine DVO130|1|62|WE153-606007-198|Wheel Cover (8")|2| |23|WE154-606009|Rear Wheel Shaft Retaining Plate|2|63|WE154-606006|Wheel (8")|2| |24|WE154-601005|Cable Bush|1|64|WE154-94049|Circlip|4| |25|WE149-94041|Washer 8.4x24x2|4|65|WE154-606013|Right Drive Cog|1| |26|WE154-604038|Back Panel|1|66|WE154-606008|Inner Wheel Cover (8")|2| |27|WE149-90059|Nut M8|4|67|WE153-605025|Brake Cable|1| |28|WE153-91868|Bolt M8x45|4|68|WE154-606159|Rear Axle|1| |29|WE153-605006|Stem|2|69|WE153-90058|Nut M6|9| |30|WE153-94036|Circlip Φ5|2|70|WE153-603002|Height Adjuster Plate|1| |31|WE153-604016|Left Torsional Spring
|1|71|WE154-603024|Height Adjustment Link Bar
|1| |32|WE153-604017|Rear Cover Axle
|1|72|WE153-603062|Height Adjuster Spring
|1| |33|WE153-604018|Rear Cover|1|73|WE153-91867|Bolt|2| |34|WE153-604045|Right Torsional Spring
|1|74|WE154-606012|Left Drive Cog|1| |35|WE154-91960|Bolt M8X20|4|75|WE153-605007-053|Soft Grip (Come's with 41)
|1| |36|WE154-601059|Left Handle Support|1|76|WE154-606021|Gearbox Drive Pin|2| |37|WE153-605003-198|Small Handle Knob|2|77|WE154-606082|Gearbox|1| |38|WE153-605016|Lower Handle|1|78|WE153-603037|Height Adjuster Lever|1| |39|WE153-605221|Cable Clip|1|79|WE154-606160|Nylon Collar|2| |40|WE153-605002-198|Large Handle Knob|2| | | | |
##### Notes
##### Notes
#################### We Handy Distribution Ltd - SN3 5HY (Importer) declare that the product:
Designation: Petrol Hand Push 410mm Lawnmower Model(s): WER410HP Product No.: 1938218001 Type/Serial No. As per rating label on machine Engine Displacement: 132 cm3 Rated Engine Power: 2.5kW Rated Engine Speed: 2800rpm/min
Complies with the following directives: Machinery Directive 2006/42/EC The conformity assessment procedure followed was in accordance with EN ISO 5395-1:2013/A1:2018; EN ISO 5395-2:2013/A2:2017
Outdoor Noise Directive 2000/14/EC & 2005/88/EC Guaranteed Noise Power Level LWA: 96 dB(A) - uncertainty: 1.93 dB(A) According to 2000/14/EC Emission Sound Pressure Level LPA: 79.8 dB(A) Vibration ahv: 8.125 m/s2 - uncertainty K: 1.5 m/s2
Electromagnetic Compatibility Directive 2014/30/EC The conformity assessment procedure followed was in accordance with EN ISO 14982:1998 6.3 and 6.6
Notified Body: TÜV SÜD Product Service GmbH Addresses: Ridlerstraße 65, 80339 Münich, Germany
#################### Authorised signatory and technical file holder Date: 12/08/2019

Signature: Name: Mr Simon Belcher Position: Chairman Company: Handy Distribution Ltd Address: Murdock Rd, Swindon, Wiltshire, SN3 5HY.


Designation: Petrol Self-Propelled 410mm Lawnmower Model(s): WER410SP Product No.: 1938219001 Type/Serial No. As per rating label on machine Engine Displacement: 132 cm3 Rated Engine Power: 2.5kW Rated Engine Speed: 2800rpm/min
Complies with the following directives: Machinery Directive 2006/42/EC The conformity assessment procedure followed was in accordance with EN ISO 5395-1:2013/A1:2018; EN ISO 5395-2:2013/A2:2017
Outdoor Noise Directive 2000/14/EC & 2005/88/EC Guaranteed Noise Power Level LWA: 96 dB(A) - uncertainty: 1.93 dB(A) According to 2000/14/EC Emission Sound Pressure Level LPA: 79.8 dB(A) Vibration ahv: 8.125 m/s2 - uncertainty K: 1.5 m/s2
Electromagnetic Compatibility Directive 2014/30/EC The conformity assessment procedure followed was in accordance with EN ISO 14982:1998 6.3 and 6.6
Notified Body: TÜV SÜD Product Service GmbH Addresses: Ridlerstraße 65, 80339 Münich, Germany
#################### Authorised signatory and technical file holder Date: 12/08/2019

Signature: Name: Mr Simon Belcher Position: Chairman Company: Handy Distribution Ltd Address: Murdock Rd, Swindon, Wiltshire, SN3 5HY.

This Service Book is provided with your Webb, to help you look after your purchase to our recommendations and enable you to take advantage of the conditional manufacturer domestic warranty*.
Present this service book to your authorised Webb repair dealer, whenever a service or a warranty appraisal is required.
The booklet is applicable to the following products, in the UK only: Ride On Lawn Tractors Cylinder Lawnmowers Petrol Rotary Lawnmowers Petrol Hand Held Range
Please register your machine using the following pages or at www.webbgardenpower.co.uk. By registering your machine, you agree to maintain the machine in accordance with the service schedules specifi ed in this manual and services duly recorded. (Not applicable for Webb electric handheld machines). You may be asked to produce this booklet as proof of servicing in the event of a claim. Proof of purchase should also be kept as a reference.
Ensure you have the following information available from your machine product label. The two examples below can be found on your machine:

################ 1
################ 2
Please complete using BLOCK CAPITALS. Sections marked* must be completed to validate Warranty.
Each new machine is warranted against defective material or assembly of material under normal usage. The warranty applies to the original purchaser, is not transferable and covers faulty parts and the labour involved in replacing and repairing those parts, which are of original manufacture.
Webb (excludes Dynamic, Legacy & Heritage), 2 year conditional warranty from the original date of sale to the fi rst domestic user. Webb (Dynamic, Legacy & Heritage) 1 year warranty from the original date of sale to the fi rst domestic user. 90 days from the original date of sale to the professional/commercial or for hire user. Engine warranty as per the engine manufacturer’s warranty, which will be supplied with the machine. 90 days from the original date of sale for Replacement Spare Parts All machines’ must be serviced within the fi rst 14 months from the original date of purchase, to qualify for a second year parts & labour warranty, details of the service must be recorded in the service record within this manual. A reduced warranty period of 90 days applies to those items which are subject to normal wear and tear and in normal use, will need replacement or adjustment. These items are chargeable after 90 days of ownership.
Filters Tyres / Wheels Drive chains and belts Brake & clutch friction components Control cable & starter cords Fluids & lubricants Spark plugs Blades (Lawnmowers & Brushcutters) Cutter bars (Hedgecutters) Drive & clutch cable surfaces Nylon Lines (Line Trimmers) Carburettor cleaning Bearings Bushes Electric cable Grass collectors

#### Protecting your machine
Maintenance Regular maintenance of your Webb machine is essential to ensure it operates, safely, effi ciently and therefore reducing the environmental impact. It is the owner’s responsibility to ensure that their Webb machine is maintained at specifi c intervals. Any approved Webb service dealer can undertake a service, which are specialised in our products and will be aware of your particular machine and any technical updates which will save valuable time & money. If you are using your machine in dry, dusty or high temperatures, you will need to service the machine more regularly.
Fuel (if applicable) Due to ongoing eff orts by fuel companies to reduce emissions, unleaded petrol will oxidize & deteriorate in storage overtime, leaving residue from detergent components. Fuel deterioration problems may occur when petrol is stored for over 30 days. If you are planning to store fuel for over 30 days, we recommend you add Handy Parts Sure-Start fuel stabilizer to fresh fuel after purchasing. SureStart cannot reconstitute stale fuel.
Storage When storing your machine for an extended period, we do recommend that you follow the instructions of engine instruction manual. Always store the fuel in a clean, approved and sealed container. If the container is steel, ensure it is not corroded. If the container is not fi lled to its recommended capacity, air can accelerate fuel deterioration. Always store fuel away from direct sunlight, in a dark, cool environment.
Your servicing Webb approved dealer will stamp & date the below relevant sections, when the correct service actions have been completed. PLEASE ENSURE THE SERVICE BOOK IS AVAILABLE FOR THE DEALER, DURING SERVICE WORK.
####### 1st Service
This must be stamped by an approved service dealer to qualify for a free second year warranty. (Excluding the Webb Electric Handheld machines)

12 Months
24 Months
Date
36 Months
Date Date
48 Months
60 Months
72 Months
Date
84 Months
Date

96 Months
Date
108 Months
Date
120 Months
Date
132 Months
Date
Date
Date
If you have registered online, this form is not necessary. PLEASE POST THIS COPY TO THE ADDRESS OVERLEAF
Product Information (* Compulsory)

|*Model No:| | |---|---| |*Product No:| | |*Serial No:| | |*Date of Purchase:| |
Personal Information (* Compulsory)
|*Title| |*Forename| |*Surname| | |---|---|---|---|---|---|
|*House Number| |*House Name| | |---|---|---|---| |*Address 1| | | | |*Address 2| | | | |*Town| | | | |*County| | | | |*Postcode| | | |
|Home Tel| |Mobile Tel| | |---|---|---|---| |Email| | | |
|Age|18 to 25| |26 to 35| |36 to 45| |46 to 60| |61 to 80| |81 & over| | |---|---|---|---|---|---|---|---|---|---|---|---|---|
|*Usage|Domestic Use| |Commercial/Professional/Hire Use| | |---|---|---|---|---|
*Dealer Stamp (if available)
*Selling Retailer (If dealer stamp not available)
|*Dealer Name| | |---|---| |*Dealer Address| | | | | | | | | | | |*Date of Purchase| |
Webb Lawnmowers privacy commitment to machine owners. The information supplied, helps us to improve the products & services we provide, including information that we believe is relevant to your and/or your machine. We value your trust by giving us this information about yourself and we are committed to protecting your privacy.
Webb, its associated companies, authorised dealers or third parties working on our behalf may wish to contact you regarding PRODUCT RECALLS specifi c to your machine. Please advise how you wish to be contacted for this specifi c reason only:
Post Telephone Email
From time to time Webb, its associated companies, authorised dealers or third parties working on our behalf may wish to contact you regarding our products, services, off ers or just opinions, which may be used for marketing, research or analysis purposes. If you wish to be contacted by any of the following methods, please tick the relevant boxes:
Post Telephone Email You may give Webb Lawnmowers notice in writing at any time that you no longer wish to receive direct marketing communications