
Silvercrest Ssr Aa1 Robot Vacuum Cleaner
Ask AI
— answers from the official manualAnswers from the official manual.
Common questions
Common Questions
10 totalHow do I set up the charging dock for my robot vacuum cleaner?
Place the charging dock flush against a wall. Keep 3.28 feet (1 meter) clear on both sides and at least 6.56 feet (2 meters) in front of it. Ensure there are no mirrors or other highly reflective objects within 5.9 inches (15 cm) of the floor around the dock. Avoid placing it near direct sunlight (Page 10).
What should I do if my robot vacuum cleaner gets stuck?
The robot vacuum cleaner will automatically try to find different solutions when it is obstructed. If it cannot resolve the issue, manually intervene by moving the obstacle or guiding the device (Page 28).
How often should I clean and replace parts of my robot vacuum cleaner?
Clean the main filter weekly, more frequently if very dirty. Clean side brushes every 4 weeks. Clean cliff sensors and front wheel every 2 weeks (Page 23).
What do I do if the robot vacuum cleaner's left wheel malfunctions?
If the display shows error code E11, it indicates a malfunction with the left wheel. Check and repair or replace the faulty component (Page 28).
How do I set up a cleaning schedule for my robot vacuum cleaner?
Press the 'Set schedule' button to enter Set Clock mode, then use the Time down/up buttons to set the current time. To program a schedule, press 'Set clock' again and follow on-screen instructions until confirming (Page 16).
How do I connect my robot vacuum cleaner to my Wi-Fi?
Press and hold the 'Spot mode/Time down' button for 4 seconds until you hear a beep. Next, add your device in the app by selecting a 2.4 GHz WiFi network with sufficient signal strength (Steps detailed on pg. 19).
Full Manual
40 pages
Roboic Vacuum cleaner
SSRA1
WARNING:
This equipment has been tested and found to comply with the limits for a Class B digital device, pursuant to part 15 of the FCC Rules. These limits are designed to provide reasonable protection against harmful interference in a residential installation. This equipment generates, uses and can radiate radio frequency energy and, if not installed and used in accordance with the instructions, may cause harmful interference to radio communications. However, there is no guarantee that interference will not occur in a particular installation. If this equipment does cause harmful interference to radio or television reception, which can be determined by turning the equipment off and on, the user is encouraged to try to correct the interference by one or more of the following measures:
—Reorient or relocate the receiving antenna.
—Increase the separation between the equipment and receiver.
—Connect the equipment into an outlet on a circuit different from that to which the receiver is connected.
—Consult the dealer or an experienced radio/TV technician for help.
MODIFICATION: Any changes or modifications not expressly approved by the grantee of this device could void the user’s authority to operate the device.
RF radiationexposure statement The Robotic Vacuum Cleaner complies with FCC RF radiation exposure limits set forth for an uncontrolled environment. Caution: To maintain the compliance with the FCC’s RF exposure guideline, install the Robotic Vacuum Cleaner at least 7.9” (20 cm) from ALL persons. The transmitter of this device must not be co-located or operating in conjunction with any other antenna or transmitter.
Description of signal words.............................................................................................Page 4 Customer service.......................................................................................................................Page 4 List of pictograms used........................................................................................................Page 4 Introduction...................................................................................................................................Page 5
Intended use ........................................................................................................................................Page 5 Trademark notice ................................................................................................................................Page 5 Parts description ..................................................................................................................................Page 5 Contents ...............................................................................................................................................Page 7 Technical data .....................................................................................................................................Page 7
Important safety instructions.........................................................................................Page 7 Safety warnings for batteries..............................................................................................................Page 10
Initial use.........................................................................................................................................Page 12 Charging the product..........................................................................................................................Page 12 Attaching the side brushes ..................................................................................................................Page 13 Turning the product on/off ................................................................................................................Page 13
Use........................................................................................................................................................Page 13 Cleaning modes ..................................................................................................................................Page 14 Virtual wall ...........................................................................................................................................Page 16 Scheduling ...........................................................................................................................................Page 16
Operation via app...................................................................................................................Page 17 Install and register ...............................................................................................................................Page 17 Connecting the product to WiFi .........................................................................................................Page 18 Connecting the product to the app ....................................................................................................Page 19 Disconnecting ......................................................................................................................................Page 19 Cleaning via app ................................................................................................................................Page 20 Scheduling ...........................................................................................................................................Page 22 Cleaning records .................................................................................................................................Page 23 Product maintenance ..........................................................................................................................Page 23 Settings ................................................................................................................................................Page 24
Operation via Alexa..............................................................................................................Page 26 Cleaning and storage...........................................................................................................Page 28 Troubleshooting........................................................................................................................Page 28 Disposal............................................................................................................................................Page 31 Three year limited warranty..........................................................................................Page 31
|DESCRIPTION OF SIGNAL WORDS
| | |---|
WARNING indicates a hazardous situation that, if not avoided, could result in death or serious injury.
| | |---|
CAUTION indicates a hazardous situation that, if not avoided, could result in minor or moderate injury.
| | |---|
NOTICE indicates information considered important, but not hazard related (e.g. messages related to property damage).| |---|
|CUSTOMER SERVICE
Call customer service at 1 (844) 543-5872
| | |---|
Visit the Website Customer Service Platform at www.lidl.com/contact-us
Visit a LIDL store for further assistance.
|IAN 309029_1901| |---|
Please have your IAN number ready.| |---|
|List of pictograms used|List of pictograms used|List of pictograms used|List of pictograms used| |---|---|---|---| | |Follow the warnings and safety notes!| |Short-circuit proof safety transformer| | |Please read the instructions!| |SMPS (Switch mode power supply unit)| | |This product is only suitable for indoor use in dry, enclosed spaces.| |Note polarity/battery pack data| | |Direct current| |Power supply polarity| | |Alternating current|b a
|Dispose of the packaging and product in an environmentallyfriendly manner!| | |Protection class III| |36 month warranty| | |Never leave children unattended with the packaging material or the product.| |Tested according Federal Communications Commission|
Robot vacuum cleaner SSRA1
Introduction
Congratulations on your purchase. You have selected a quality product. The instructions for use are a part of the product. They contain important information about the safety, use and disposal of the product. Before using the product, please learn about all the safety information and usage instructions. Only use the product as described and for the specified applications. If you lend the product to someone else, please also give all the instructions.
###### Intended use
This product is suitable for vacuuming up loose, dry dirt, e.g. dust, lint or crumbs on smooth flooring and low pile carpets. Only use the product indoors. This product is only intended for private, non-commercial use. Only use the product for the intended purpose. Any use other than previously mentioned or product modification is prohibited and can result in injuries and/or damage. The manufacturer assumes no liability for damage arising from improper use.
###### Trademark notice
· The trademark and the brand name SilverCrest are the property of their respective owners. · All other names and products may be trademarks or registered trademarks of their respective owners.
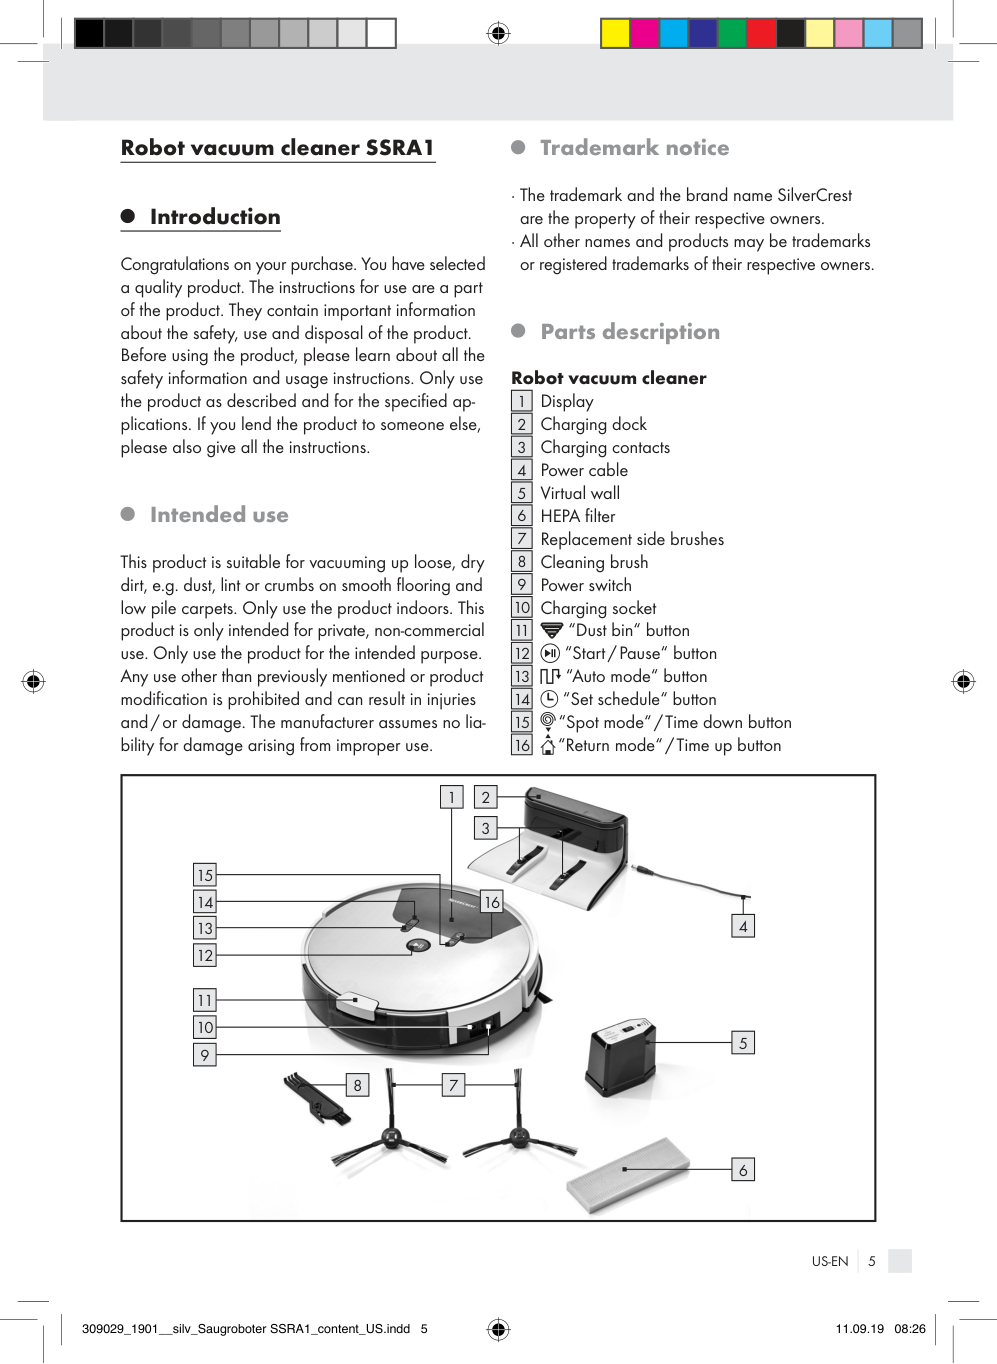
###### Parts description
Robot vacuum cleaner Display Charging dock Charging contacts Power cable Virtual wall HEPA filter Replacement side brushes Cleaning brush Power switch Charging socket
|1| |---|
|2| |---|
|3| |---|
|4| |---|
|5| |---|
|6| |---|
|7| |---|
|8| |---|
|9| |---|
|10| |---|
|11| |---|
“Dust bin“ button
|12| |---|
“Start / Pause“ button
|13|
|---|
“Auto mode“ button
|14| |---|
“Set schedule“ button
|15| |---|
“Spot mode“ / Time down button
|16| |---|
“Return mode“ / Time up button
|
9
10
|11| | |---|---| |11| |
12
13
14 16
| | | | |---|---|---| | |7| |
| | | |---|---| | |8|
2
3
1
15
| | | |---|---| | |5|
4
| | | |---|---| | |6| | |---|
|17| |---|
Dust bin Side wheel
|18| |---|
|19| |---|
Combo floor brush Side brushes
|20| |---|
|21| |---|
Cliff sensor Front wheel
|22| |---|
|23| |---|
Anti-collision sensor
|
17
18
19
20
212223
18
| |---|
|24| |---|
Dust bin cover Main filter Foam filter
|25| |---|
|26| |---|
|
25
24
26
| |---|
####### Remote control
|27| |---|
Directional buttons
|28| |---|
“Start / Pause“ button “Spot mode“ button
|29| |---|
|30| |---|
“Corner mode“ button
|31| |---|
“Find robot vacuum cleaner“ button
|32| |---|
“Max mode“ button
|33| |---|
“Return mode“ button
|34| |---|
“Auto mode“ button
|
30
3133
34
29
27
28
32| |---|
IMPORTANT SAFETY INSTRUCTIONS
###### Contents
Verify that the contents are complete and that the product is in perfect condition immediately after unpacking.
4 Side brushes 1 Remote control
1 Robot vacuum cleaner 1 Dust bin 1 Charging dock 1 Virtual wall
KEEP ALL SAFETY NOTES AND INSTRUCTIONS FOR USE FOR FUTURE REFERENCE!
| | |---|
Failure to observe the following warnings may result in death or serious injuries.
###### Technical data
Robot vacuum cleaner Model: Silvercrest SSRA1 Operating voltage: 14.8 V (direct current) Rated power: 22 W Rechargeable battery: Lithium-ion rechargeable
DANGER TO LIFE AND RISK OF ACCIDENTS
FOR INFANTS AND CHILDREN! Never leave children
battery (4 cells), 2.6Ah, 14.8 V, 38.5 Wh
unsupervised with the packaging material. Suffocation hazard. Keep children away from the product.
Run time: max. 120 minutes (varies
by mode and flooring) Charging time: 5–6 hours Charging dock Rated output voltage: 19V (direct current) Rated output current: 0.6A Remote control Model: SSRA1 Rated input voltage: 3V (direct current) Battery: 2 x 1.5V AAA (included) Power supply Input: 100–240 V∼ 0.5 A
DANGER TO LIFE! Batteries are not intended for children. Do not leave batteries lying around. Children or pets could swallow them. If swallowed, seek immediate medical attention.

This product is not intended for use by persons (including children) with reduced physical, sensory or mental capabilities or lacking experience and knowledge unless supervised or instructed in safe product use by a person responsible for their safety. Children
max. 50 / 60 Hz Output: 19 V (direct current) 0.6A Virtual wall Battery: 2 x 1.5V AA (included) App System requirements: iOS Version 9.0 and up,
Android™ Version 4.4 and up
should be supervised to ensure they do not play with the product.
Check the charging dock, power cable or power adapter for damage before every use.
Verify the line voltage matches that specified on the charging dock
To reduce the risk of electric shock – Do not use outdoors or on wet surfaces.
.
|2| |---|
Never use the charging dock if damaged.
|2| |---|
Use only manufacturer’s recommended attachments.
with care to avoid damage. Do not use the power cable
Handle the power cable
|4| |---|
Do not unplug by pulling on cord. To unplug, grasp the plug, not the cord.
to move or pull the product or charging dock
|4| |---|
. Do not allow the product to run over the power cable
Do not handle plug or appliance with wet hands.
|2| |---|
and keep it away from heat sources.
Changes or modifications to this product not expressly approved by the party responsible for compliance could void the user‘s authority to operate the product. Note: This product has been tested and complies with the limits for a Class B digital device, pursuant to Part 15 of the FCC Rules. These limits are designed to provide reasonable protection against harmful interference in a residential installation. This product generates, uses and can radiate radio frequency energy and, if not installed and used in accordance with the instructions, may cause harmful interference to radio communications.
|4| |---|
is damaged, it must be replaced by a qualified service technician to avoid dangers.
If the power cable
|4| |---|

Do not use the product in rooms with children.
Do not use the product near open fire.
Do not allow the product to vacuum up flammable materials, for example fuel or printer or copier toner.
Do not allow the product to vacuum up burning items, for example cigarettes, matches, ashes and other objects which could cause a fire.
However, there is no guarantee that interference will not occur
in a particular installation. If this product causes harmful interference to radio or television reception, which can be determined by turning the product off and on, the user is encouraged to try and correct the interference by one or more of the following measures:
| | |---|
Failure to observe the following warnings can result in injuries or property damage.
Only use the original rechargeable battery and charging dock
supplied by the manufacturer. Never use primary batteries. For more information about the battery, please see chapter “Technical data“.
|2| |---|
Do not use the product if it can‘t work properly due to
This product complies with part 15 of the FCC Rules. Operation is subject to the following two conditions:
Keep hair, clothing and fingers away from the openings or operating parts of the product.
Regularly clean the cliff sensors. If the floor sensors are dirty, the product may fall down stairs or landings.
When using the product, inform any others in the room so nobody steps on or trips over the product.
Discontinue using the product if the plastic parts are cracked or deformed. Always replace damaged parts with genuine spare parts.
Check the area being cleaned before every use and observe the safety notes and information about preparing the room.
Do not use the product on wet or damp floors.
Do not use the product in temperatures over +104°F (+40°C) or below +50 °F (+10 °C).
Regularly check and clean the filters and the dust bin to extend the life of your product.
Remove any obstacles prior to use, for example power cables, toys and other objects.
Never use the product without filters, as this will damage the motor and shorten the life of the product.
Tuck rug edges under the rug. Keep curtains and tablecloths off the floor.
Always turn the product off before transporting it.
Try to position furniture properly.
Fully charge the product at least once a month to prevent deep discharge, which will damage the battery.
Test the product in areas with stairs. This allows you to verify the product detects the edge of the drop off.
Do not cover or tape off the cliff sensors on the product. Otherwise the product will be unable to navigate.
Do not stand in the way of the robot vacuum cleaner. Otherwise the robot vacuum cleaner will be unable to clean these areas.
Only use the product with the remote control when it is within sight.
Do not allow the product to vacuum up items which could clog the product, for example stones, paper waste, etc.
##### Safety warnings for batteries
Do not use the product if the suction opening is blocked. Remove dust, hair, cotton balls, etc., to allow air to flow freely in the suction opening.
When used correctly, cells and batteries provide a safe and dependable source of portable power. However, if they are misused or abused, this may result in leakage, burns, fire, or explosion.
and the filters
Verify the dust bin
|17| |---|
are installed correctly before use.
,
,
|6| |---|
|25| |---|
|26| |---|
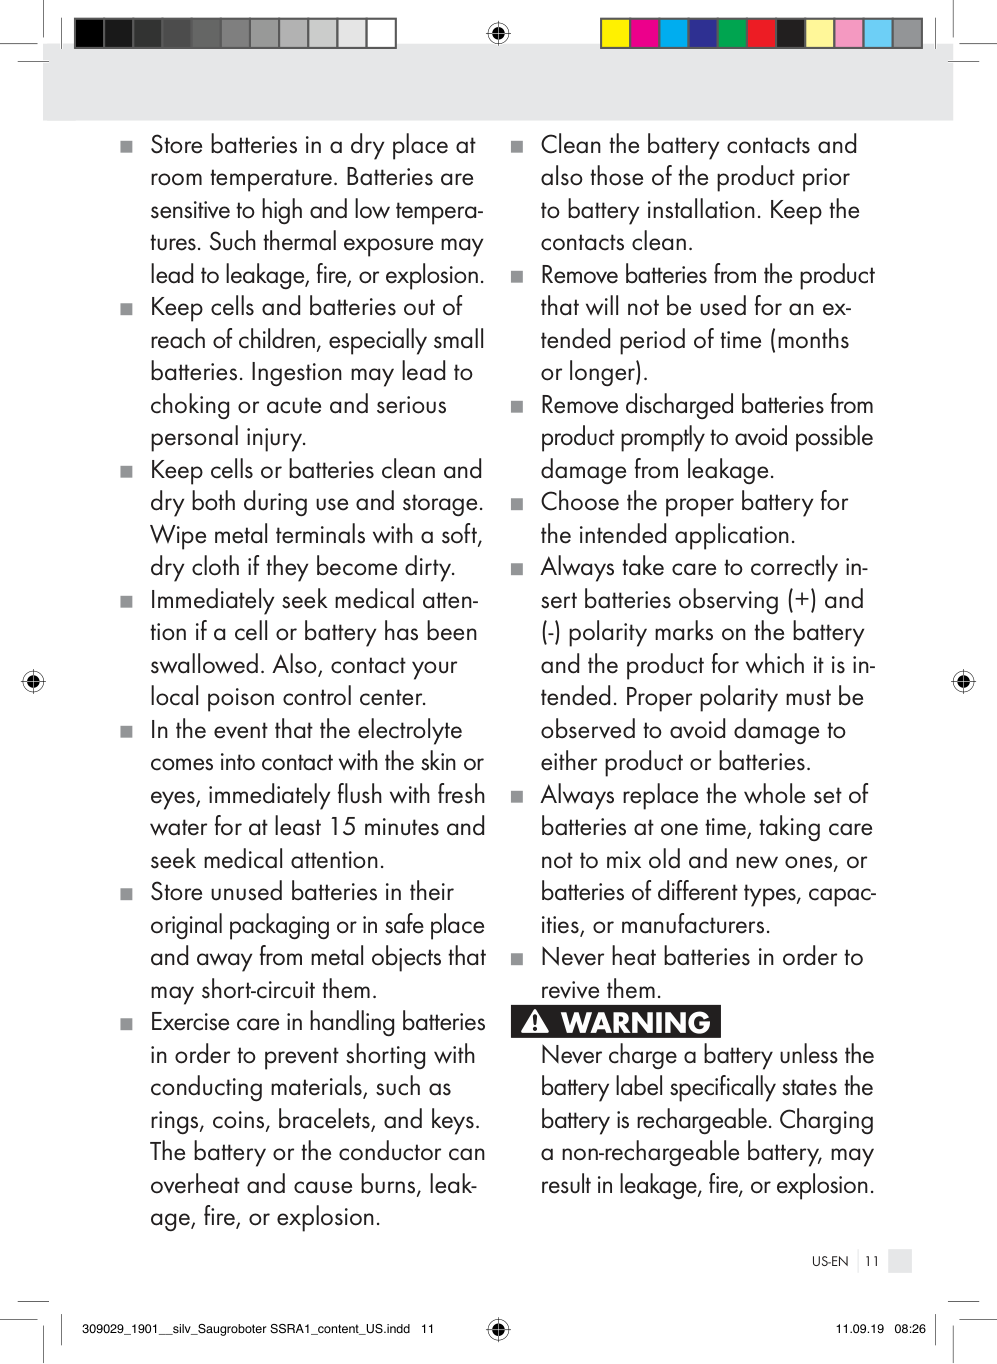
Store batteries in a dry place at room temperature. Batteries are sensitive to high and low temperatures. Such thermal exposure may lead to leakage, fire, or explosion. Keep cells and batteries out of reach of children, especially small batteries. Ingestion may lead to choking or acute and serious personal injury.
Clean the battery contacts and also those of the product prior to battery installation. Keep the contacts clean.
Remove batteries from the product that will not be used for an extended period of time (months or longer).
Remove discharged batteries from product promptly to avoid possible damage from leakage.
Keep cells or batteries clean and dry both during use and storage. Wipe metal terminals with a soft, dry cloth if they become dirty.
Choose the proper battery for the intended application.
Always take care to correctly insert batteries observing (+) and (-) polarity marks on the battery and the product for which it is intended. Proper polarity must be observed to avoid damage to either product or batteries.
Immediately seek medical attention if a cell or battery has been swallowed. Also, contact your local poison control center.
In the event that the electrolyte comes into contact with the skin or eyes, immediately flush with fresh water for at least 15 minutes and seek medical attention.
Always replace the whole set of batteries at one time, taking care not to mix old and new ones, or batteries of different types, capacities, or manufacturers.
Store unused batteries in their original packaging or in safe place and away from metal objects that may short-circuit them.
Never heat batteries in order to revive them.
| | |---|
Exercise care in handling batteries in order to prevent shorting with conducting materials, such as rings, coins, bracelets, and keys. The battery or the conductor can overheat and cause burns, leakage, fire, or explosion.
Never charge a battery unless the battery label specifically states the battery is rechargeable. Charging a non-rechargeable battery, may result in leakage, fire, or explosion.
Use only the power cord supplied with the product. The use of other cords may result in the batteries inside the product being charged. Do not open or mutilate a battery or cell. Electrolyte from the cell is corrosive and can cause damage to the eyes or skin. The cell contents can also be hazardous if ingested. Do not drop or subject the cell or battery to strong mechanical shock.
Do not open or mutilate products with integrated batteries or cells. Electrolyte from the cell is corrosive and can cause damage to the eyes or skin. The cell contents can also be hazardous if ingested.
Do not drop or subject products with integrated batteries or cells to strong mechanical shock.
Do not dispose of products with integrated batteries or cells in a fire. Failure to observe this precaution may result in an explosion.
Batteries should not be disassembled, crushed, punctured, or otherwise mutilated. Such abuses may result in leakage, fire, or explosion.
Dispose of products with integrated batteries or cells properly and in accordance with government regulations.
Do not dispose of the battery in a fire. Failure to observe this precaution may result in an explosion.
SAVE THESE INSTRUCTIONS
Dispose of batteries properly and in accordance with government regulations.
Initial use
Charging the product
Fully charge the product before using it for the first time. The charging time is 5 to 6 hours. The charging process is also indicated in the display
Only for robot vacuum cleaner
|1| |---|
.
Store products with integrated batteries or cells in a dry place at room temperature. Batteries are sensitive to high and low temperatures. Such thermal exposure may lead to leakage, fire, or explosion.
|2| |---|
and connect the power cable
Set up the charging dock
|4| |---|
.
|2| |---|
Place the charging dock
flush against a wall. Note: keep 3.28ft (1 m) from the left/right side and 6.56ft (2 m) from the front clear.
|9| |---|
on the product (position “–“) before charging.
Turn on the power switch
|2| |---|
and line it up with the charging contacts
Place the product on the charging dock
|3| |---|
.
|4| |---|
You can alternatively plug the power cable directly into the charging socket
|10| |---|
on the
product. Note: the product sometimes corrects the position on the charging dock.
###### Attaching the side brushes
|20| |---|
according to the slot color, pressing the brushes onto the color pins.
Install the side brushes
|20| |---|
Verify the side brushes
are secure.
“Start / Pause“ button blinking orange: charging green: fully charged off: Sleep mode Note: the area around the charging dock
|12| |---|
|2| |---|
must not have mirrors or other highly reflective objects within 5.9in (15cm) of the floor. If necessary, cover these.
CAUTION! Avoid exposing the charging dock
|2| |---|
to direct sunlight.
CAUTION! Change the position of the charging dock
|2| |---|
as little as possible.
###### Turning the product on/off
|9| |---|
on the side of the product. “–“ means on, “O“ means off. If the „Start / Pause“ button
Press the power switch
|12| |---|
lights up green, the product is on.
Note: do not turn the product off after it has finished cleaning. Keep the product in the charging dock so it will be ready for the next vacuuming. Note: pressing the power switch
|2| |---|
|9| |---|
will erase the date, time and schedule.
###### Use
| | |---|
| | |---|
| | |---|
| | |---|
Due to the complexity of domestic environments, the product may skip some areas when cleaning. For better cleaning results we recommend using the product daily.
Remove obstacles before use, for example power cables, toys and other objects.
Tuck rug edges under the rug. Keep curtains and tablecloths off the floor.
Try to position furniture properly.
Test the product in areas with stairs. This allows you to verify the product detects the edge of the drop off.
Do not stand in the way of the robot vacuum cleaner. Otherwise the robot vacuum cleaner will be unable to clean these areas.
####### Find robot vacuum cleaner
A beep will sound after pushing the “Find robot vacuum cleaner” button
|31| |---|
on the remote control. You can then locate your robot vacuum cleaner.
###### Cleaning modes
The product has different cleaning modes for better results. You can select the modes by pressing the button on the control panel, the remote control or in the app.
To start the following modes, ensure the product is “awake“. If it has entered Sleep mode, press the “Start/Pause“ button on the robot vacuum cleaner
|12| |---|
|28| |---|
to exit Sleep mode.
or on the remote control
####### Cleaning
Press the “Start/Pause“ button on the robot vacuum cleaner
|12| |---|
|28| |---|
. The “Start/Pause“ button on the robot vacuum cleaner
or the remote control
|12| |---|
will light up.
|12| |---|
flashes, the robot vacuum cleaner will start in “Classic mode”.
If the “Start/Pause“ button

####### Pausing
Press the “Start/Pause“ button on the robot vacuum cleaner
|12| |---|
|28| |---|
or the remote control during cleaning to pause the cleaning mode.
While the robot vacuum cleaner is paused, you can push the directional buttons
|27| |---|
on the remote control to have it move left / right / forward / backward.
With the robot vacuum cleaner paused you can press the directional buttons
|27| |---|
on the remote control to have it move left/right.
Note: if paused more than 10 minutes, the robot vacuum cleaner will enter Sleep mode and the “Start/Pause“ button
|12| |---|
will go off.
Press the “Start/Pause“ button on the robot vacuum cleaner
|12| |---|
|28| |---|
or the remote control again to exit Sleep mode. Then push the button with the desired mode to resume cleaning.
Note: when the product resumes after being paused, it recalculates the area and may clean areas it has already cleaned. Note: if you have two robot vacuum cleaners, you can control both with one remote.
####### Classic mode
|| |---|
In this mode the product moves in all directions. This mode is recommended for vacuuming carpets.
Press the “Start/Pause“ button on the robot vacuum cleaner
|12| |---|

|28| |---|
or on the remote control to start “Classic mode“.
####### Auto mode
|| |---|
In this mode the product uses parallel, overlapping lanes. It will first vacuum along the edges of the room for guidance and to measure the room.
Press the “Auto mode“ button on the robot vacuum cleaner
|13| |---|
|34| |---|
or on the remote control to start this mode.
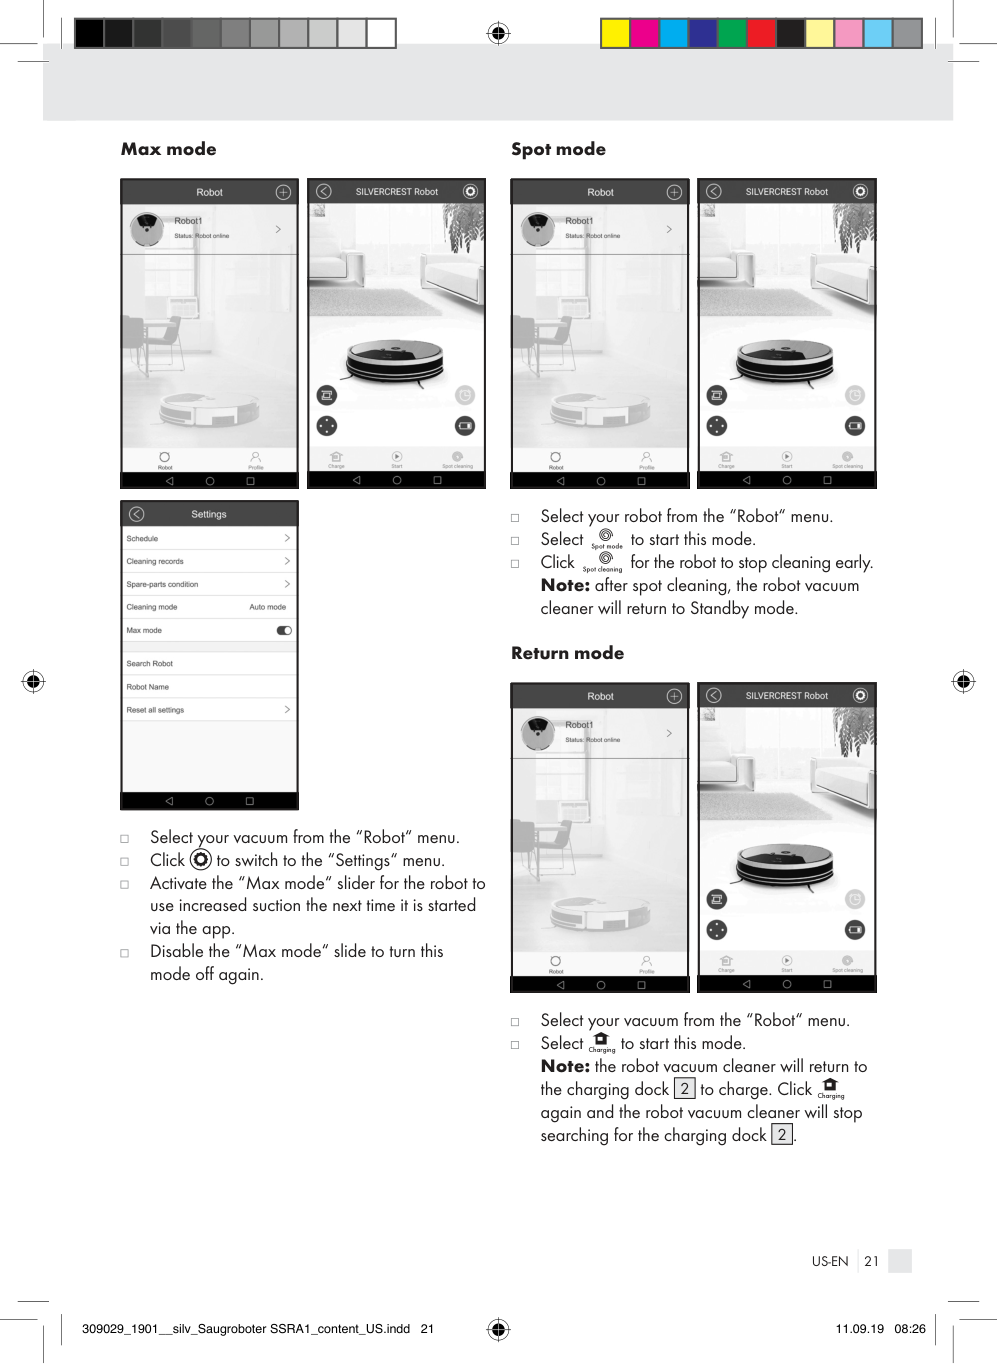
####### Spot mode
|| |---|
This mode is suitable for very dirty or very dusty areas. In Spot-cleaning mode the product will focus on one area to clean.
Press the “Spot mode“ button on the robot vacuum cleaner
|15| |---|
|29| |---|
or on the remote control to start this mode.
Note: the product will vacuum a 19.7in (50cm) radius.
####### Max mode
|| |---|
This mode is suitable if the floor is very dirty or dusty.
In Classic, Auto or Corner mode, press the “Max mode“ button on the remote control
|32| |---|
. Suction will increase for a deeper cleaning.
|32| |---|
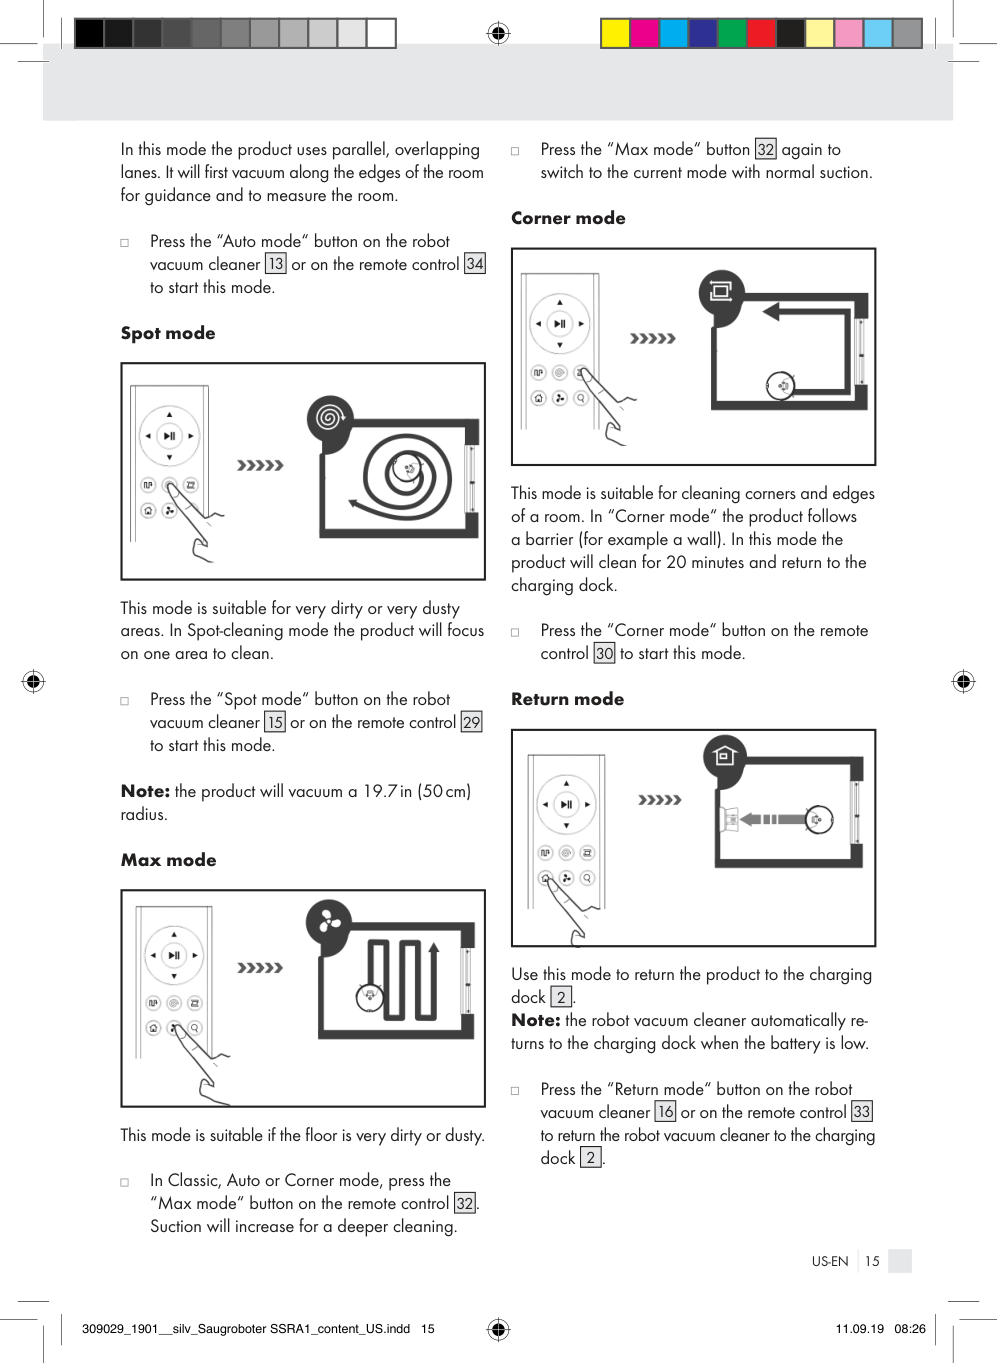
Press the “Max mode“ button
again to
switch to the current mode with normal suction. Corner mode
|| |---|
This mode is suitable for cleaning corners and edges of a room. In “Corner mode“ the product follows a barrier (for example a wall). In this mode the product will clean for 20 minutes and return to the charging dock.
Press the “Corner mode“ button on the remote control
|30| |---|
to start this mode. Return mode
|| |---|
Use this mode to return the product to the charging dock
|2| |---|
.
Note: the robot vacuum cleaner automatically returns to the charging dock when the battery is low.
Press the “Return mode“ button on the robot vacuum cleaner
|16| |---|
|33| |---|
or on the remote control to return the robot vacuum cleaner to the charging dock
|2| |---|
.
###### Virtual wall
| | |---|
| | |---|
Area : outside work area Area : work area
|5| |---|
divides your home into separate areas to improve the cleaning efficiency of the product. For better performance, place the virtual wall at a door or in front of a passage less than 9.84ft (3 m) wide.
The virtual wall
|5| |---|
|5| |---|
creates an invisible barrier which blocks the product across a length of up to 9.84 ft (3 m).
The virtual wall
|5| |---|
you need to install 2 AA batteries (included). Open the battery cover and insert the batteries. Please note the indicated polarity.
Before using the virtual wall
|5| |---|
to “ON“ to turn it on.
Slide the switch on the virtual wall
|5| |---|
must be positioned so the laser is parallel to the floor and battery compartment on the bottom.
The virtual wall
|5| |---|
to “OFF“ when it is not in use.
Slide the switch on the virtual wall
Position your robot vacuum cleaner in the “cleaning area“ as shown.
###### Scheduling
For easy cleaning you can program the time and a schedule for future cleaning on the robot vacuum cleaner or in the app.
####### Setting the time
|14| |---|
for 2 seconds with the robot vacuum cleaner “awake“. The robot vacuum cleaner will beep, the display will flash and the robot vacuum cleaner will enter Set Clock mode.
Hold the “Set schedule“ button
|1|
|---|
|15| |---|
|16| |---|
Press the “Time down/up“ buttons
,
to
|14| |---|
set the current time. Use the “Set schedule“ button to switch between minute, hour and day.
|13| |---|
or Time down / up
Press the “Auto mode“ button
|15| |---|
|16| |---|
to switch between 12 and 24 hour mode.
,
After setting the time, press the “Start/Pause“ button
|12| |---|
to save. Note: if no buttons are pressed within 15 seconds, the robot vacuum cleaner will exit Set Time mode and the setting will be lost.
####### Programming the schedule
|14| |---|
with the robot vacuum cleaner “awake“. The robot vacuum cleaner will beep and “Symbol“ and “MON“ will flash. The robot vacuum cleaner will enter “Set schedule mode“.
Press the “Set schedule“ button
|15| |---|
|16| |---|
to set the desired cleaning time. Use the “Set
Press the “Time down/up“ buttons
,
|14| |---|
button to switch between minute, hour and day.
schedule“
After setting the schedule, press the “Start/ Pause“ button
|12| |---|
to save. The robot vacuum cleaner will start cleaning according to the schedule.
####### Deleting the schedule
|14| |---|
with the robot vacuum cleaner “awake“. The robot vacuum cleaner will beep and “Symbol“ and “MON“ will flash. The robot vacuum cleaner will enter “Set schedule mode“.
Press the “Set schedule“ button
|13| |---|
to delete the stored schedule; the display
Press the “Auto mode“ button
|1| |---|
will read “--:--“.
|13| |---|
again to reactivate the schedule. The display
Press the “Auto mode“ button
|1| |---|
will show the last schedule programmed. After setting the schedule, press the “Start/Pause“ button to save.
|12| |---|
###### Operation via app
The product can be operated remotely via app.
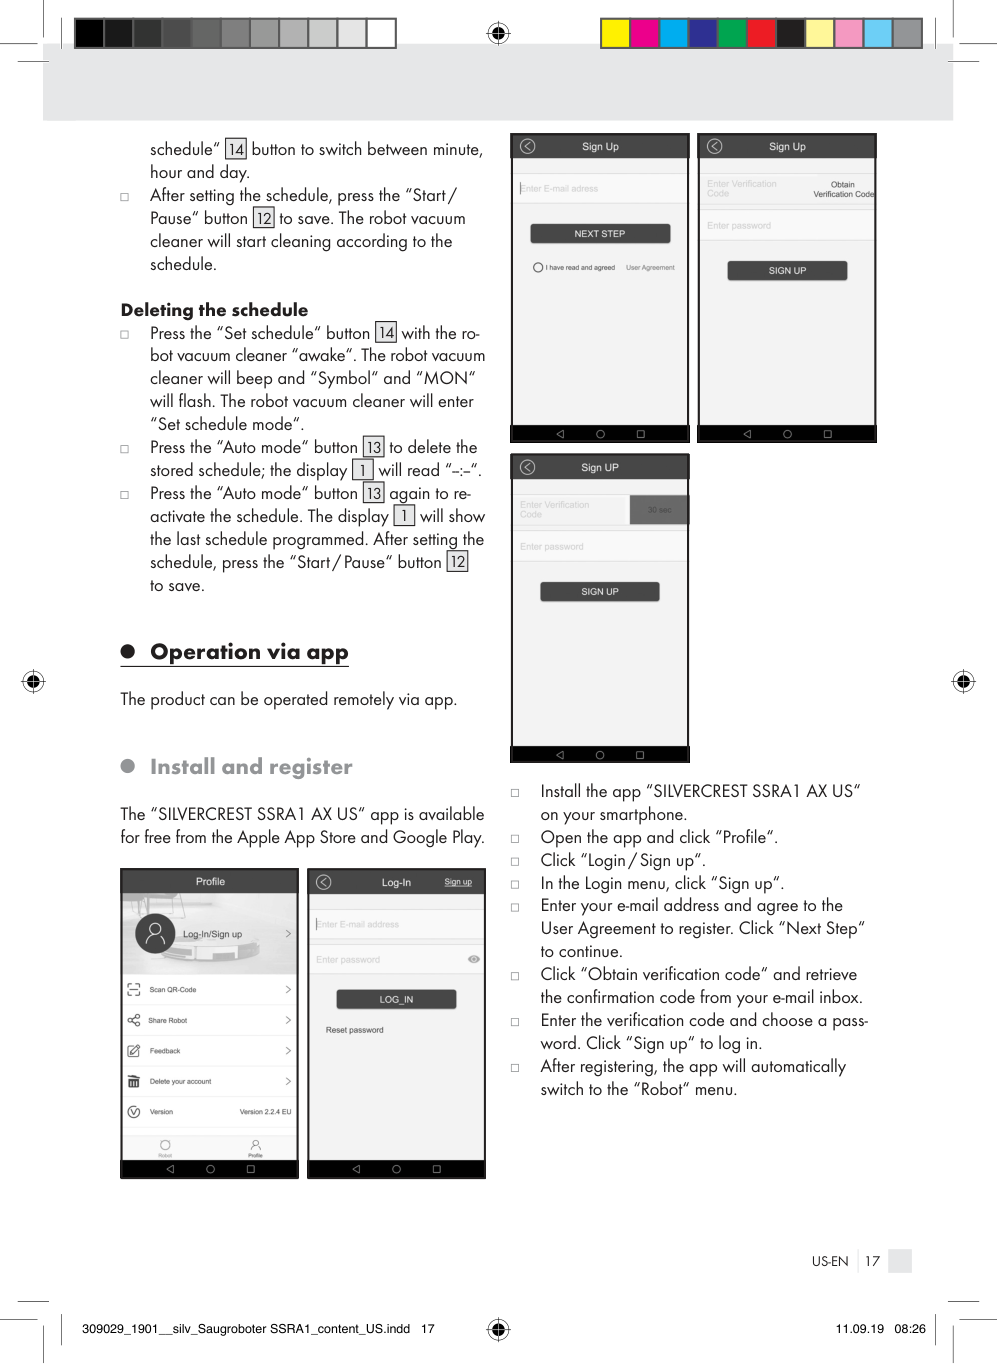
###### Install and register
The “SILVERCREST SSRA1 AX US“ app is available for free from the Apple App Store and Google Play.
|| |---|
|| |---|
|| |---|
|| |---|
|| |---|
Install the app “SILVERCREST SSRA1 AX US“ on your smartphone.
Open the app and click “Profile“.
Click “Login / Sign up“.
In the Login menu, click “Sign up“.
Enter your e-mail address and agree to the User Agreement to register. Click “Next Step“ to continue.
Click “Obtain verification code“ and retrieve the confirmation code from your e-mail inbox.
Enter the verification code and choose a password. Click “Sign up“ to log in.
After registering, the app will automatically switch to the “Robot“ menu.
|| |---|
|| |---|
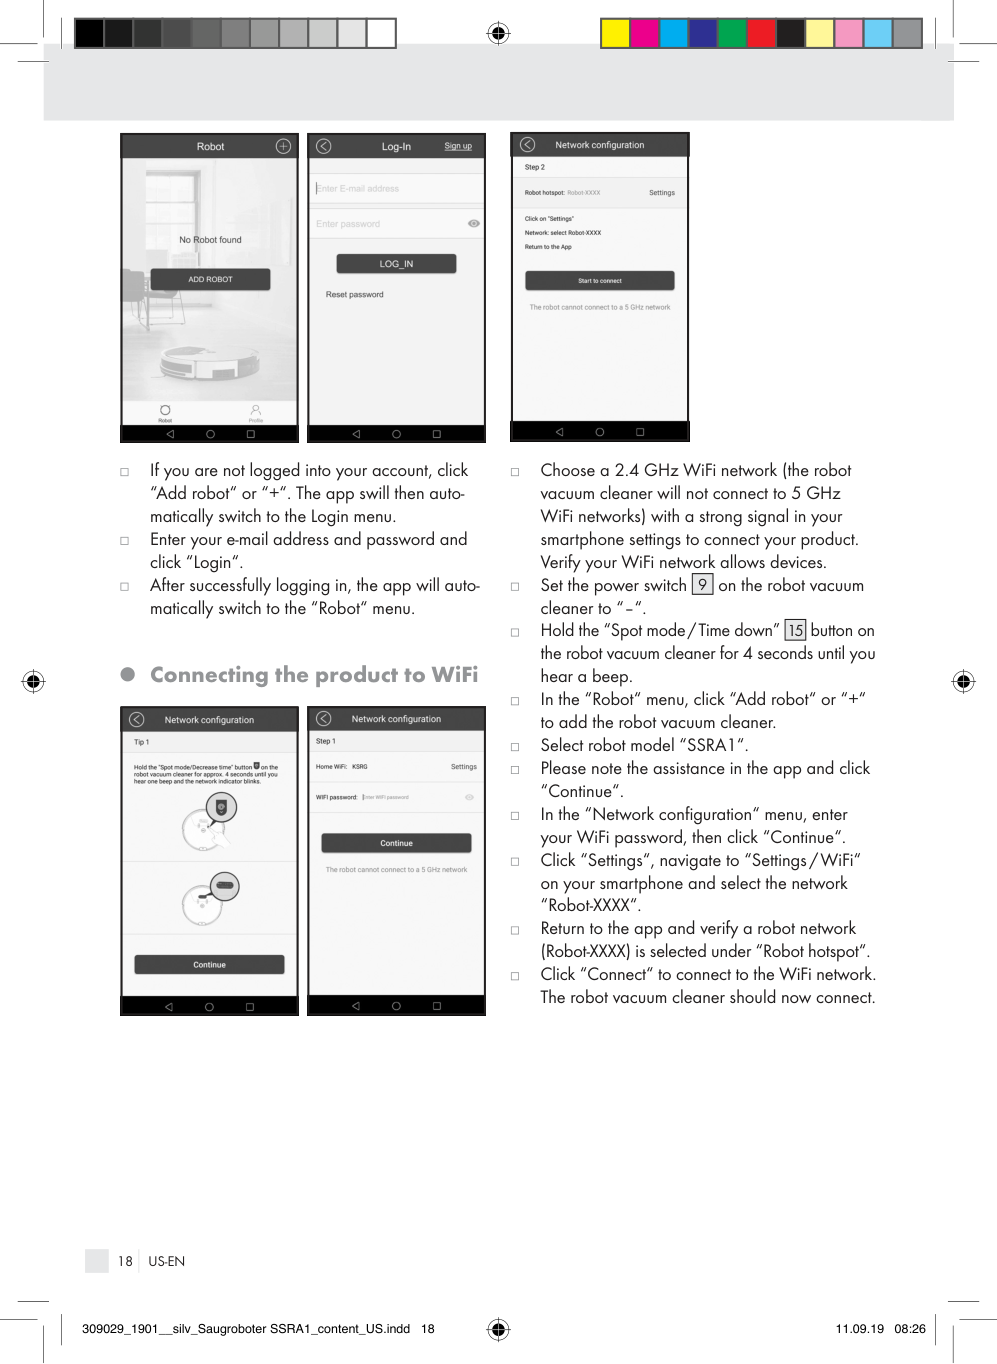
If you are not logged into your account, click “Add robot“ or “+“. The app swill then automatically switch to the Login menu.
Enter your e-mail address and password and click “Login“.
After successfully logging in, the app will automatically switch to the “Robot“ menu.
Connecting the product to WiFi
|| |---|
|| |---|
|| |---|
Choose a 2.4 GHz WiFi network (the robot vacuum cleaner will not connect to 5 GHz WiFi networks) with a strong signal in your smartphone settings to connect your product. Verify your WiFi network allows devices.
|9| |---|
on the robot vacuum cleaner to “–“.
Set the power switch
|15| |---|
Hold the “Spot mode/Time down”
button on the robot vacuum cleaner for 4 seconds until you hear a beep.
In the “Robot“ menu, click “Add robot“ or “+“ to add the robot vacuum cleaner.
Select robot model “SSRA1“.
Please note the assistance in the app and click “Continue“.
In the “Network configuration“ menu, enter your WiFi password, then click “Continue“. Click “Settings“, navigate to “Settings/WiFi“ on your smartphone and select the network “Robot-XXXX“.
Return to the app and verify a robot network (Robot-XXXX) is selected under “Robot hotspot“.
Click “Connect“ to connect to the WiFi network. The robot vacuum cleaner should now connect.
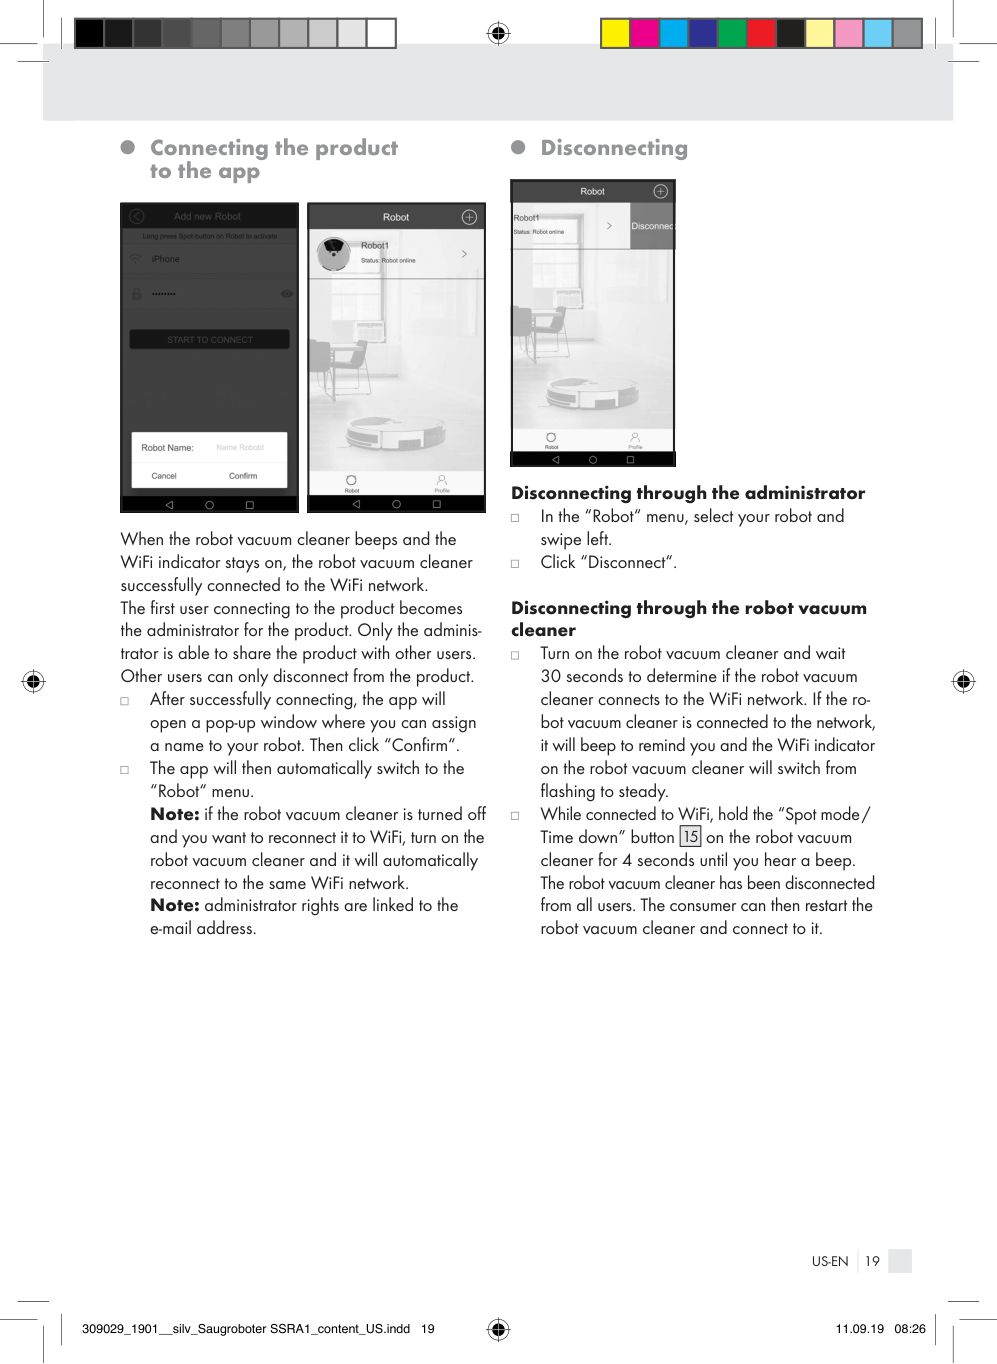
###### Connecting the product to the app
|| |---|
|| |---|
When the robot vacuum cleaner beeps and the WiFi indicator stays on, the robot vacuum cleaner successfully connected to the WiFi network. The first user connecting to the product becomes the administrator for the product. Only the administrator is able to share the product with other users. Other users can only disconnect from the product. After successfully connecting, the app will open a pop-up window where you can assign a name to your robot. Then click “Confirm“.
The app will then automatically switch to the “Robot“ menu. Note: if the robot vacuum cleaner is turned off and you want to reconnect it to WiFi, turn on the robot vacuum cleaner and it will automatically reconnect to the same WiFi network. Note: administrator rights are linked to the e-mail address.
###### Disconnecting
|| |---|
####### Disconnecting through the administrator
In the “Robot“ menu, select your robot and swipe left.
Click “Disconnect“.
Disconnecting through the robot vacuum cleaner
Turn on the robot vacuum cleaner and wait 30 seconds to determine if the robot vacuum cleaner connects to the WiFi network. If the robot vacuum cleaner is connected to the network, it will beep to remind you and the WiFi indicator on the robot vacuum cleaner will switch from flashing to steady.
While connected to WiFi, hold the “Spot mode/ Time down” button
|15|
|---|
on the robot vacuum cleaner for 4 seconds until you hear a beep. The robot vacuum cleaner has been disconnected from all users. The consumer can then restart the robot vacuum cleaner and connect to it.
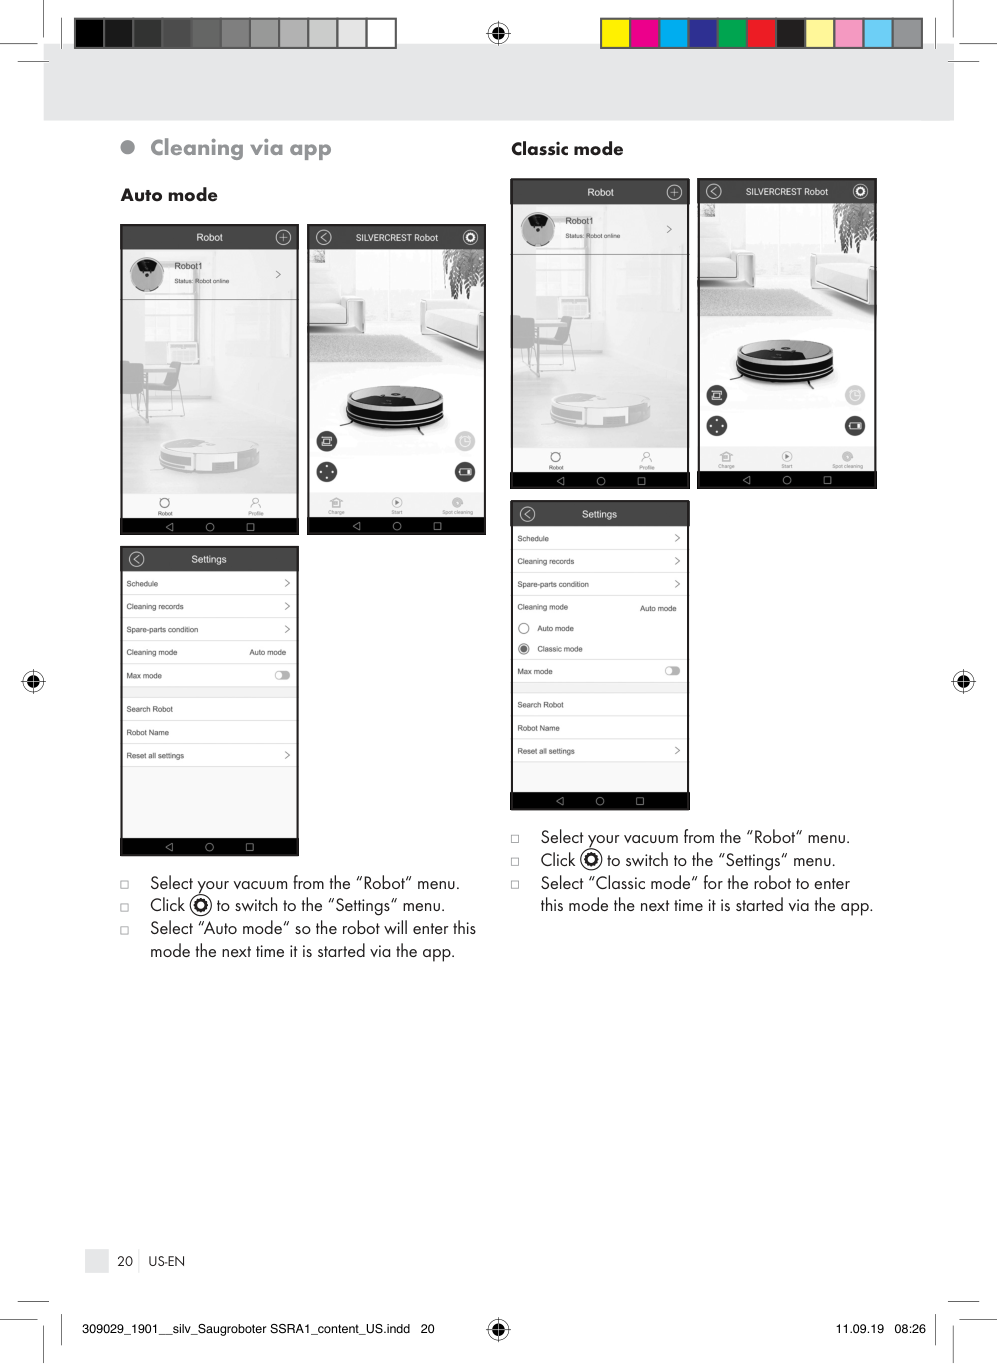
###### Cleaning via app Auto mode
|| |---|
|| |---|
|| |---|
Select your vacuum from the “Robot“ menu.
Click to switch to the “Settings“ menu.
Select “Auto mode“ so the robot will enter this mode the next time it is started via the app.
####### Classic mode
|| |---|
|| |---|
|| |---|
Select your vacuum from the “Robot“ menu.
Click to switch to the “Settings“ menu.
Select “Classic mode“ for the robot to enter this mode the next time it is started via the app.
####### Max mode
####### Spot mode
|| |---|
|| |---|
|| |---|
Select your vacuum from the “Robot“ menu.
Click to switch to the “Settings“ menu.
Activate the “Max mode“ slider for the robot to use increased suction the next time it is started via the app.
Disable the “Max mode“ slide to turn this mode off again.
|| |---|
|| |---|
Select your robot from the “Robot“ menu.
Select
to start this mode.
Spot mode
for the robot to stop cleaning early. Note: after spot cleaning, the robot vacuum cleaner will return to Standby mode.
Click
Spot cleaning
####### Return mode
|| |---|
|| |---|
Select your vacuum from the “Robot“ menu.
Select
to start this mode. Note: the robot vacuum cleaner will return to the charging dock
Charging
|2| |---|
to charge. Click
Charging again and the robot vacuum cleaner will stop searching for the charging dock
|2| |---|
.
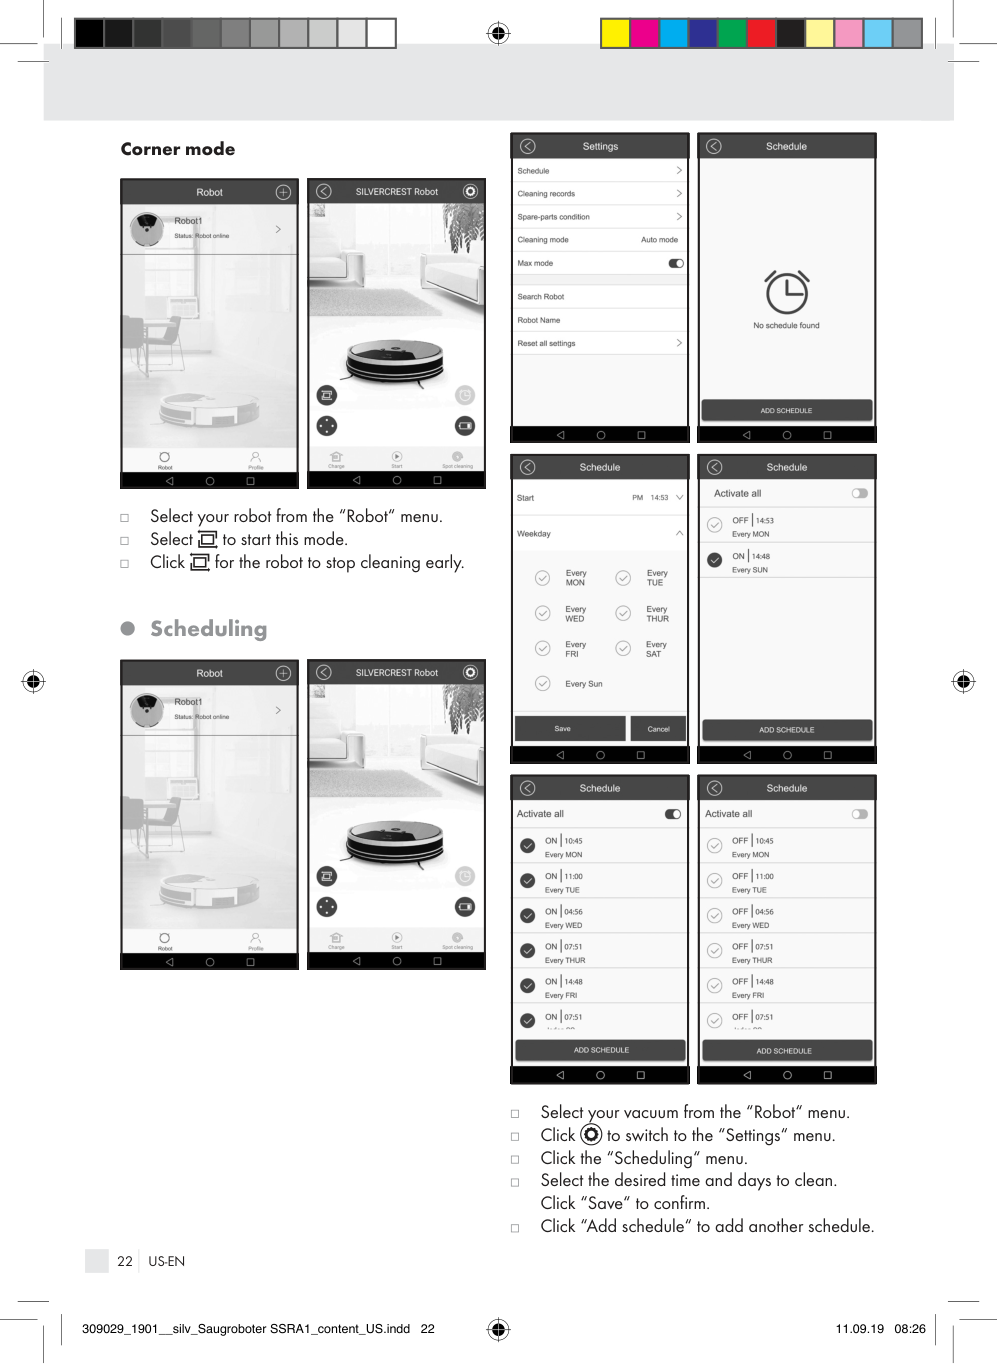
####### Corner mode
|| |---|
|| |---|
Select your robot from the “Robot“ menu.
Select to start this mode.
Click for the robot to stop cleaning early.
###### Scheduling
|| |---|
|| |---|
|| |---|
|| |---|
|| |---|

|| |---|
|| |---|
Select your vacuum from the “Robot“ menu.
Click to switch to the “Settings“ menu.
Click the “Scheduling“ menu.
Select the desired time and days to clean. Click “Save“ to confirm.
Click “Add schedule“ to add another schedule.
Click “Activate all“ to activate and disable all vacuuming schedules.
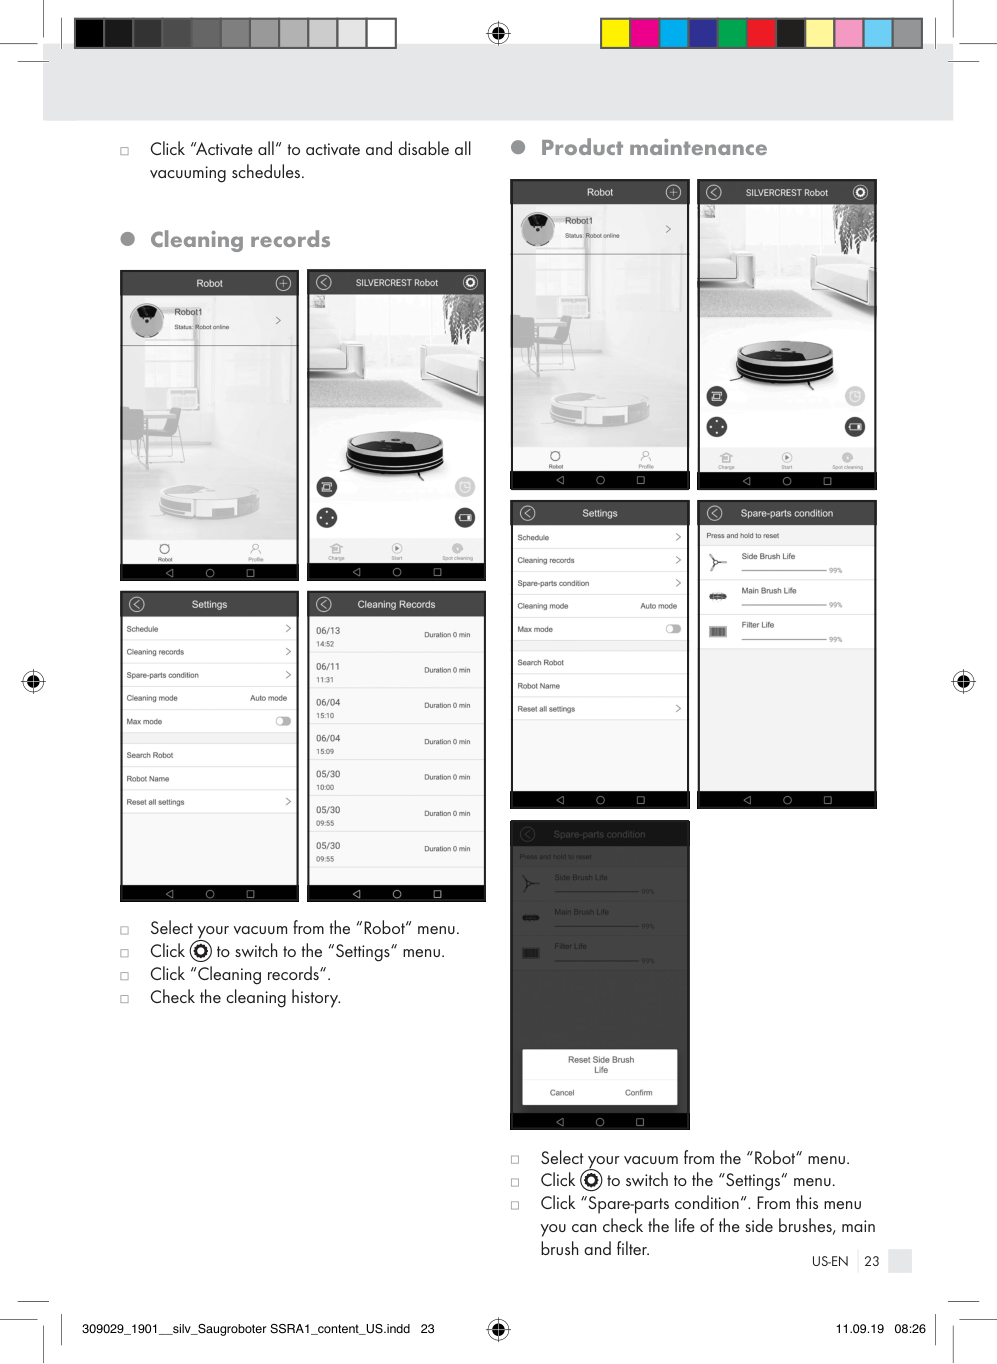
###### Cleaning records
|| |---|
|| |---|
|| |---|
|| |---|
Select your vacuum from the “Robot“ menu.
Click to switch to the “Settings“ menu.
Click “Cleaning records“.
Check the cleaning history.
###### Product maintenance
|| |---|
|| |---|
|| |---|
|| |---|
|| |---|
Select your vacuum from the “Robot“ menu.
Click to switch to the “Settings“ menu.
Click “Spare-parts condition“. From this menu you can check the life of the side brushes, main brush and filter.
Hold the button for 2 seconds to reset the life of the replaced part. Click “Confirm“ to reset.
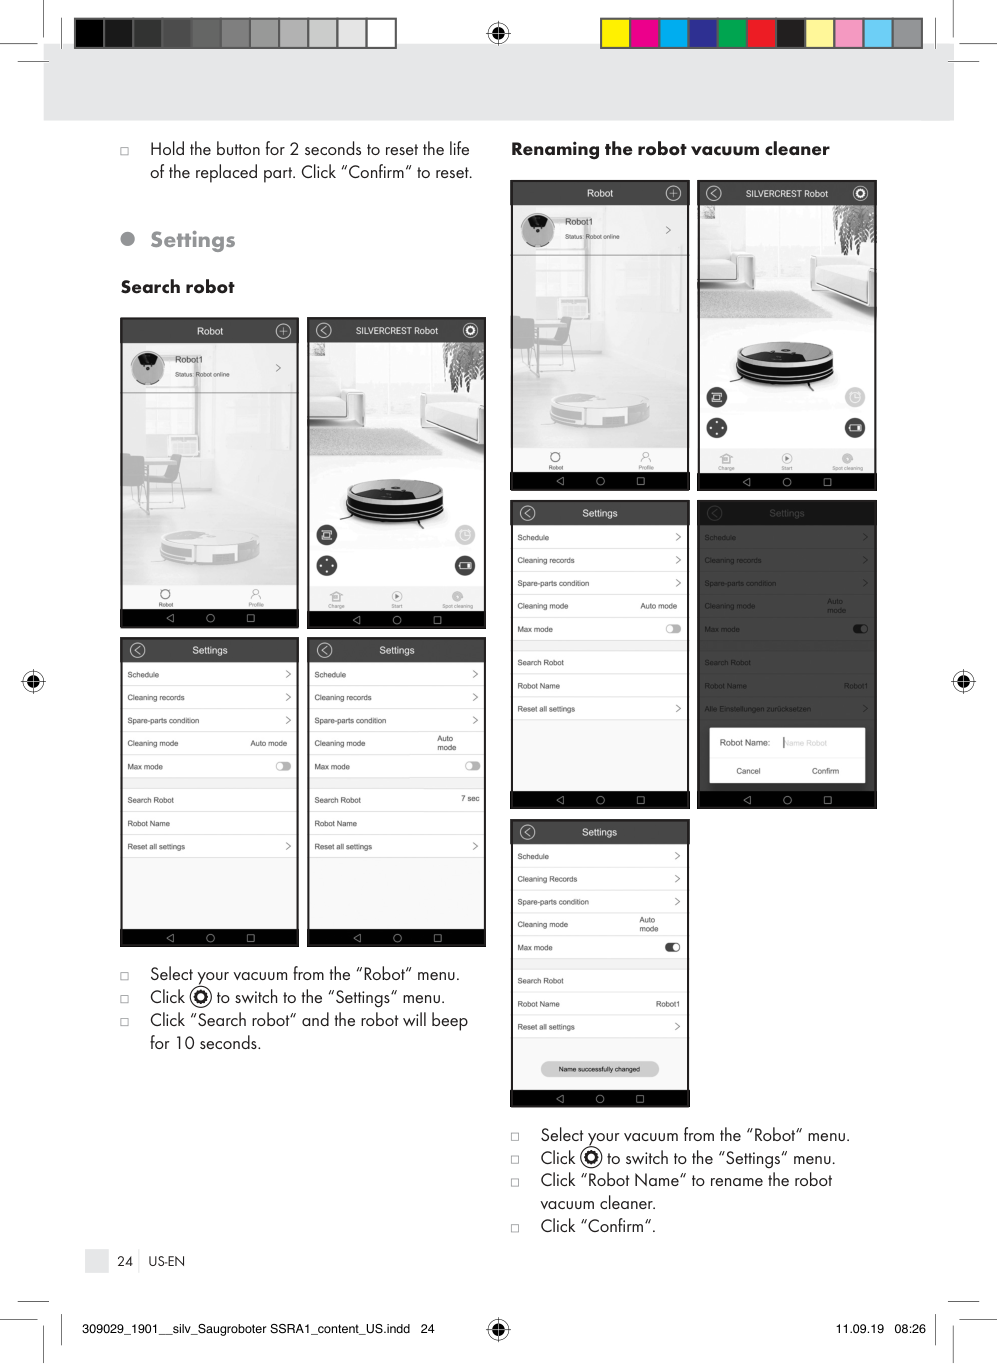
###### Settings Search robot
|| |---|
|| |---|
|| |---|
|| |---|
Select your vacuum from the “Robot“ menu.
Click to switch to the “Settings“ menu.
Click “Search robot“ and the robot will beep for 10 seconds.
####### Renaming the robot vacuum cleaner
|| |---|
|| |---|
|| |---|
|| |---|
|| |---|
Select your vacuum from the “Robot“ menu.
Click to switch to the “Settings“ menu.
Click “Robot Name“ to rename the robot vacuum cleaner. Click “Confirm“.
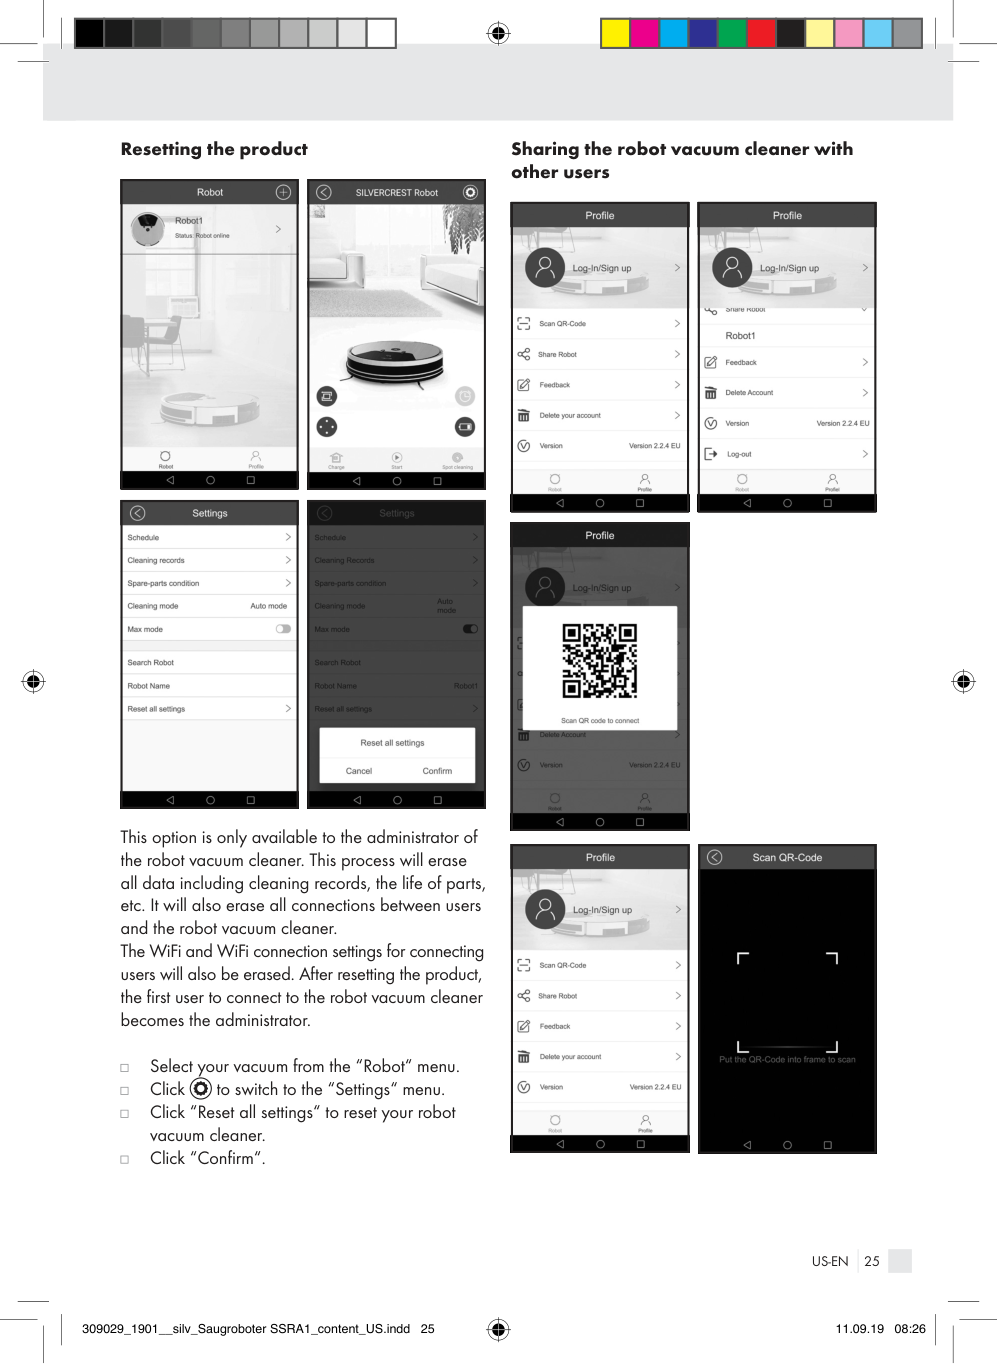
####### Resetting the product
|| |---|
|| |---|
|| |---|
|| |---|
This option is only available to the administrator of the robot vacuum cleaner. This process will erase all data including cleaning records, the life of parts, etc. It will also erase all connections between users and the robot vacuum cleaner. The WiFi and WiFi connection settings for connecting users will also be erased. After resetting the product, the first user to connect to the robot vacuum cleaner becomes the administrator.
Select your vacuum from the “Robot“ menu.
Click to switch to the “Settings“ menu.
Click “Reset all settings“ to reset your robot vacuum cleaner. Click “Confirm“.
####### Sharing the robot vacuum cleaner with other users
|| |---|
|| |---|
|| |---|
|| |---|
|| |---|
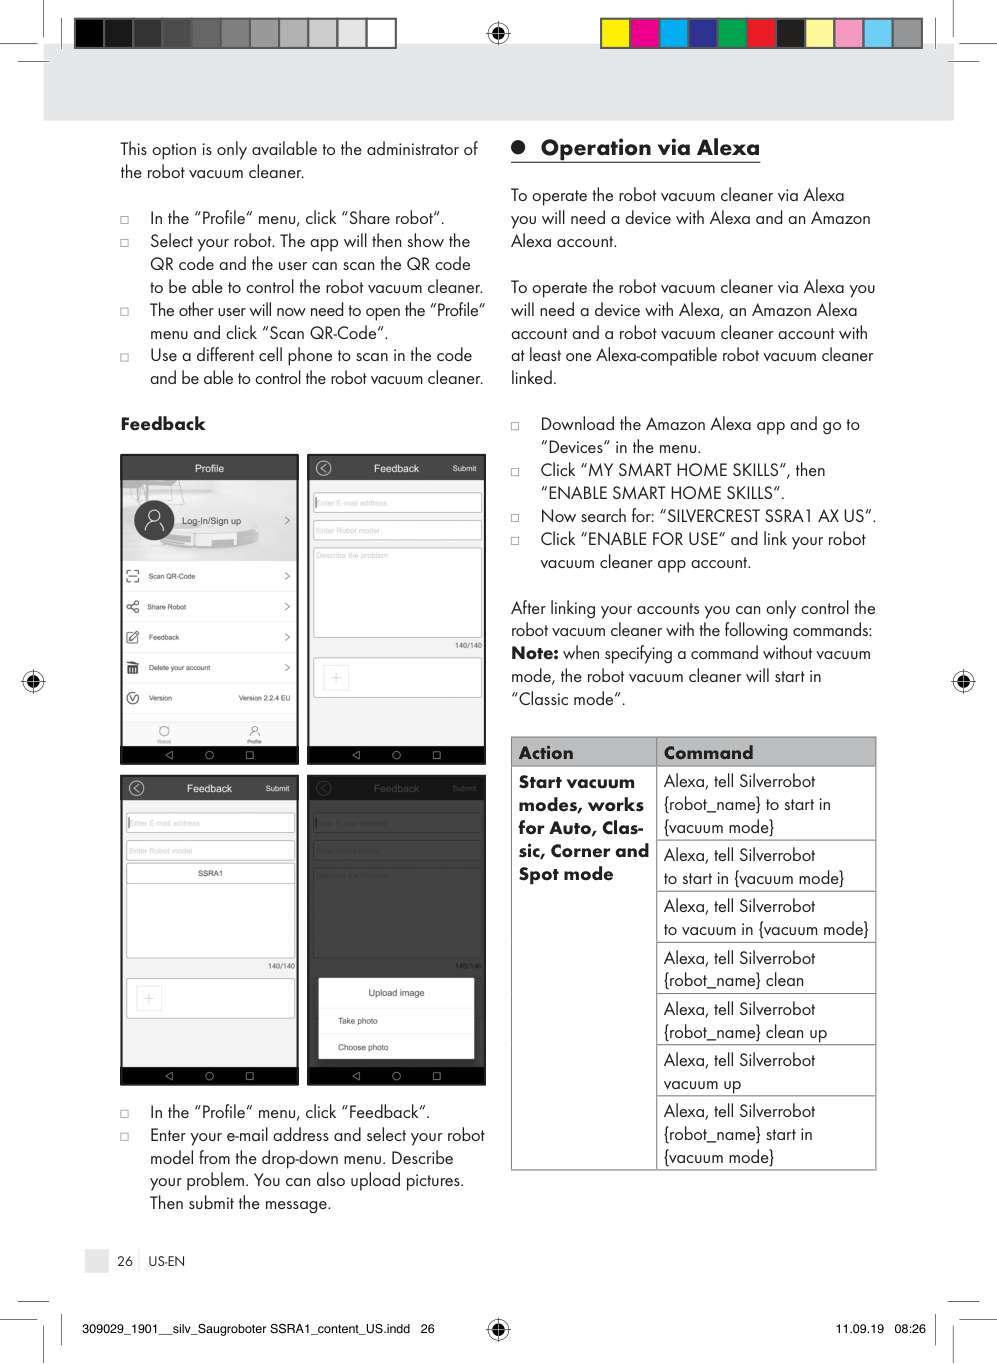
This option is only available to the administrator of the robot vacuum cleaner.
In the “Profile“ menu, click “Share robot“.
Select your robot. The app will then show the QR code and the user can scan the QR code to be able to control the robot vacuum cleaner. The other user will now need to open the “Profile“ menu and click “Scan QR-Code“.
Use a different cell phone to scan in the code and be able to control the robot vacuum cleaner.
###### Operation via Alexa
To operate the robot vacuum cleaner via Alexa you will need a device with Alexa and an Amazon Alexa account.
To operate the robot vacuum cleaner via Alexa you will need a device with Alexa, an Amazon Alexa account and a robot vacuum cleaner account with at least one Alexa-compatible robot vacuum cleaner linked.
####### Feedback
|| |---|
|| |---|
|| |---|
|| |---|
In the “Profile“ menu, click “Feedback“.
Enter your e-mail address and select your robot model from the drop-down menu. Describe your problem. You can also upload pictures. Then submit the message.
Download the Amazon Alexa app and go to “Devices“ in the menu.
Click “MY SMART HOME SKILLS“, then “ENABLE SMART HOME SKILLS“.
Now search for: “SILVERCREST SSRA1 AX US“.
Click “ENABLE FOR USE“ and link your robot vacuum cleaner app account.
After linking your accounts you can only control the robot vacuum cleaner with the following commands: Note: when specifying a command without vacuum mode, the robot vacuum cleaner will start in “Classic mode“.
|Action|Command| |---|---| |Start vacuum modes, works for Auto, Classic, Corner and Spot mode|Alexa, tell Silverrobot {robot_name} to start in {vacuum mode}| |Start vacuum modes, works for Auto, Classic, Corner and Spot mode|Alexa, tell Silverrobot to start in {vacuum mode}| |Start vacuum modes, works for Auto, Classic, Corner and Spot mode|Alexa, tell Silverrobot to vacuum in {vacuum mode}| |Start vacuum modes, works for Auto, Classic, Corner and Spot mode|Alexa, tell Silverrobot {robot_name} clean| |Start vacuum modes, works for Auto, Classic, Corner and Spot mode|Alexa, tell Silverrobot {robot_name} clean up| |Start vacuum modes, works for Auto, Classic, Corner and Spot mode|Alexa, tell Silverrobot vacuum up| |Start vacuum modes, works for Auto, Classic, Corner and Spot mode|Alexa, tell Silverrobot {robot_name} start in {vacuum mode}|
|Action|Command| |---|---| |Start vacuum modes, works for Auto, Classic, Corner and Spot mode|Alexa, tell Silverrobot {robot_name} vacuum in {vacuum mode}| |Start vacuum modes, works for Auto, Classic, Corner and Spot mode|Alexa, tell Silverrobot vacuum in {vacuum mode}| |Start vacuum modes, works for Auto, Classic, Corner and Spot mode|Alexa, tell Silverrobot start in {vacuum mode}| | | |
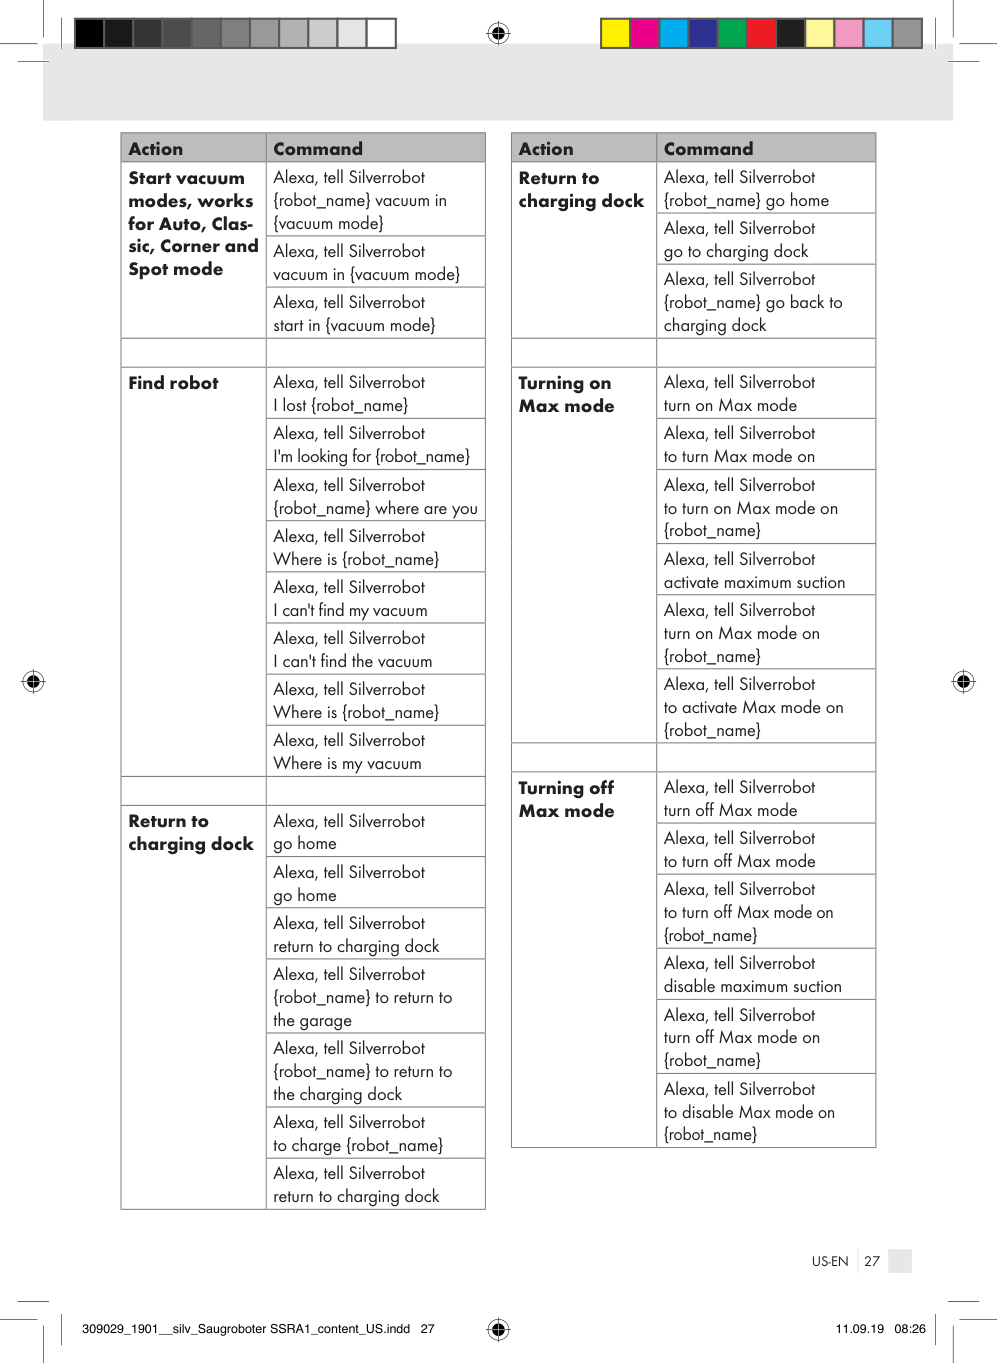
|Find robot|Alexa, tell Silverrobot I lost {robot_name}| |Find robot|Alexa, tell Silverrobot I'm looking for {robot_name}| |Find robot|Alexa, tell Silverrobot {robot_name} where are you| |Find robot|Alexa, tell Silverrobot Where is {robot_name}| |Find robot|Alexa, tell Silverrobot I can't find my vacuum| |Find robot|Alexa, tell Silverrobot I can't find the vacuum| |Find robot|Alexa, tell Silverrobot Where is {robot_name}| |Find robot|Alexa, tell Silverrobot Where is my vacuum| | | | |Return to charging dock|Alexa, tell Silverrobot go home| |Return to charging dock|Alexa, tell Silverrobot go home| |Return to charging dock|Alexa, tell Silverrobot return to charging dock| |Return to charging dock|Alexa, tell Silverrobot {robot_name} to return to the garage| |Return to charging dock|Alexa, tell Silverrobot {robot_name} to return to the charging dock| |Return to charging dock|Alexa, tell Silverrobot to charge {robot_name}| |Return to charging dock|Alexa, tell Silverrobot return to charging dock|
|Action|Command| |---|---| |Return to charging dock|Alexa, tell Silverrobot {robot_name} go home| |Return to charging dock|Alexa, tell Silverrobot go to charging dock| |Return to charging dock|Alexa, tell Silverrobot {robot_name} go back to charging dock| | | | |Turning on Max mode|Alexa, tell Silverrobot turn on Max mode| |Turning on Max mode|Alexa, tell Silverrobot to turn Max mode on| |Turning on Max mode|Alexa, tell Silverrobot to turn on Max mode on {robot_name}| |Turning on Max mode|Alexa, tell Silverrobot activate maximum suction| |Turning on Max mode|Alexa, tell Silverrobot turn on Max mode on {robot_name}| |Turning on Max mode|Alexa, tell Silverrobot to activate Max mode on {robot_name}| | | | |Turning off Max mode|Alexa, tell Silverrobot turn off Max mode| |Turning off Max mode|Alexa, tell Silverrobot to turn off Max mode| |Turning off Max mode|Alexa, tell Silverrobot to turn off Max mode on {robot_name}| |Turning off Max mode|Alexa, tell Silverrobot disable maximum suction| |Turning off Max mode|Alexa, tell Silverrobot turn off Max mode on {robot_name}| |Turning off Max mode|Alexa, tell Silverrobot to disable Max mode on {robot_name}|
###### Cleaning and storage
|9| |---|
to position “O“ before cleaning the product.
Set the power button
|4| |---|
from the outlet before cleaning the product.
Unplug the power cable
Do not rinse the product directly with water.
Do not wipe the product with a soaking cloth.
Disconnect the power supply if the product will not be used for an extended period.
|Part|Cleaning intervals| |---|---| |Dust bin
|17| |---|
|Varies by use| |Primary, HEPA filter
|6| |---| |Weekly, 2 x weekly if very dirty| |Side brushes
|20| |---| |Every 4 weeks| |Combo floor brush
|19| |---| |Weekly, 2 x weekly if very dirty| |Cliff sensors
|21| |---| |Every 2 weeks| |Front wheel
|22| |---| |Every 4 weeks|
####### Cleaning the dust bin
|17| |---|
Remove and empty the dust bin
.
|6| |---|
|25| |---|
|26| |---|
|6| |---|
. The HEPA filter can be tapped to clean. Do not wash with water.
Remove the filters
,
,
|17| |---|
|25| |---|
####### . Cleaning the brushes
Rinse the dust bin
and the main filter
|19|
|---|
and remove any hair or dirt.
Remove the combo floor brush
|20| |---|
and remove any hair or dirt.
Remove the side brushes
####### Cleaning the main housing
|22| |---|
to remove any hair tangled in it.
Clean the front wheel
|21| |---|
to maintain their sensitivity.
Clean the 3 cliff sensors
|23| |---|
to maintain its sensitivity.
Clean the anti-collision sensor
####### Cleaning the charging dock
|3| |---|
on the bottom of the robot vacuum cleaner and the charging dock with a dry cloth.
Clean the charging contacts
####### Cleaning the dust bin and filter
|11| |---|
Hold the “Dust bin“ button
und pull the dust bin
|17| |---|
out of the product.
|17| |---|
by pushing the tab and open the cover
Open the dust bin
|24| |---|
upwards.
You can now empty the contents into a garbage can.
|25| |---|
. It has two tabs to pull it out.
Then first remove the main filter
|6| |---|
|26| |---|
and the foam filter together by pulling the HEPA filter
Remove the HEPA filter
|6| |---|
out by the tab.
|17| |---|
and the main filter
You can now clean the dust bin
|25| |---|
with water.
|6| |---|
|26| |---|
can be tapped to clean them. Do not wash these with water.
The HEPA filter
and the foam filter
|6| |---|
|25| |---|
|26| |---|
Reinstall the filters
and the dust bin in the reverse order.
,
,
|17| |---|
Please note, all parts must be completely dry before installing them.
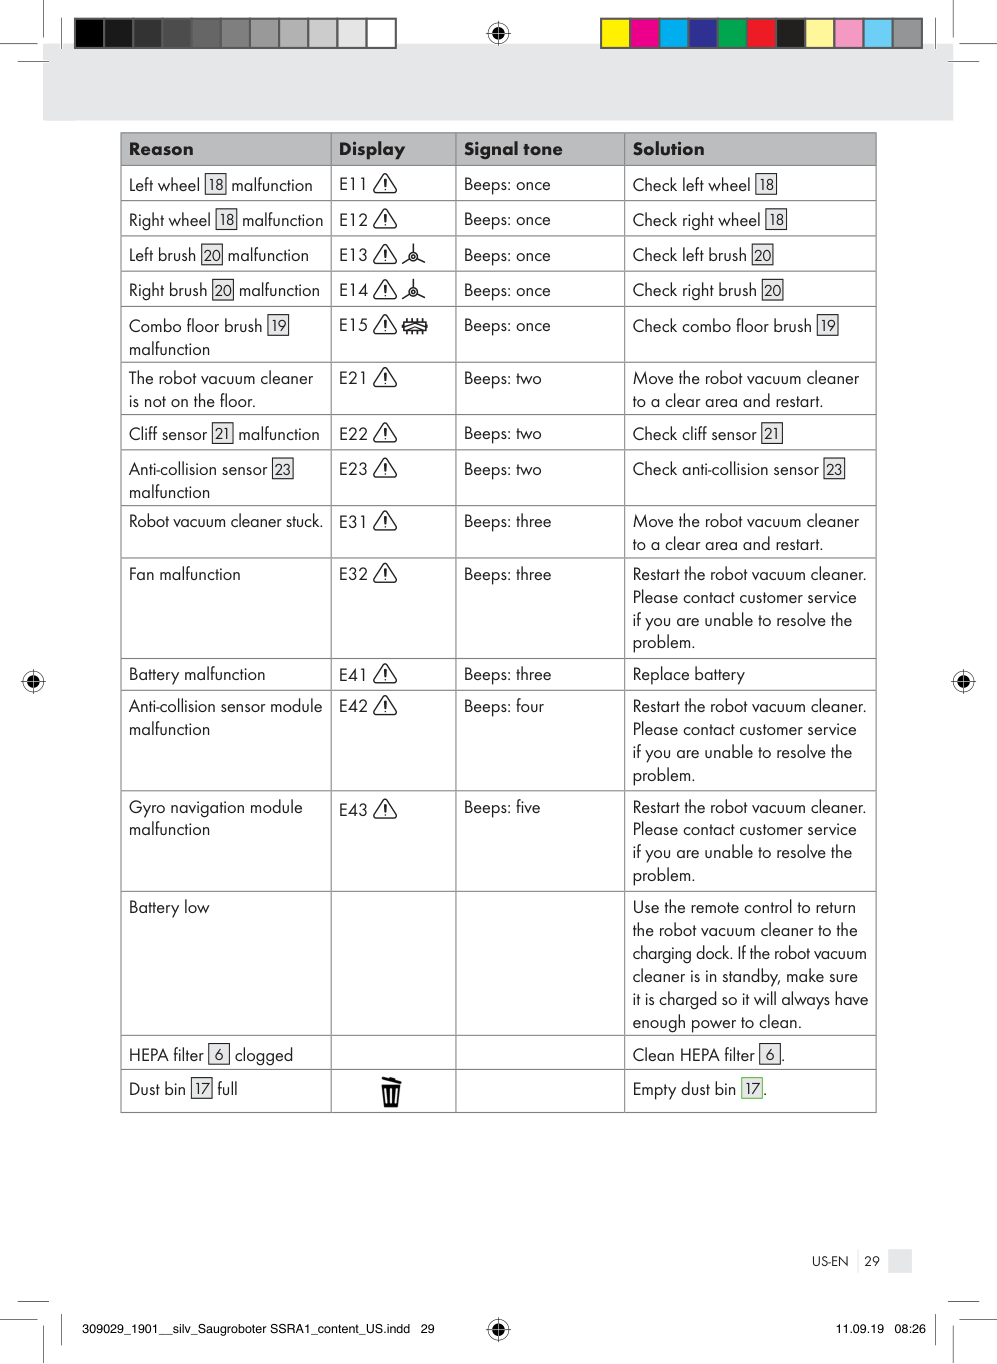
###### Troubleshooting
|1| |---|
If the product is not working correctly, the display will show various error codes and emit different length beeps. Please refer to the table below for troubleshooting:
|Reason|Display|Signal tone|Solution| |---|---|---|---| |Left wheel
|18| |---|
malfunction|E11
|Beeps: once|Check left wheel
|18| |---| | |Right wheel
|18| |---|
malfunction|E12
|Beeps: once|Check right wheel
|18| |---| | |Left brush
|20| |---|
malfunction|E13
|Beeps: once|Check left brush
|20| |---| | |Right brush
|20| |---|
malfunction|E14
|Beeps: once|Check right brush
|20| |---| | |Combo floor brush malfunction
|19| |---| |E15
|Beeps: once|Check combo floor brush
|19| |---| | |The robot vacuum cleaner is not on the floor.|E21
|Beeps: two|Move the robot vacuum cleaner to a clear area and restart.| |Cliff sensor
|21| |---|
malfunction|E22
|Beeps: two|Check cliff sensor
|21| |---| | |Anti-collision sensor malfunction
|23| |---| |E23
|Beeps: two|Check anti-collision sensor
|23| |---| | |Robot vacuum cleaner stuck.|E31
|Beeps: three|Move the robot vacuum cleaner to a clear area and restart.| |Fan malfunction|E32
|Beeps: three|Restart the robot vacuum cleaner. Please contact customer service if you are unable to resolve the problem.| |Battery malfunction|E41
|Beeps: three|Replace battery| |Anti-collision sensor module malfunction|E42
|Beeps: four|Restart the robot vacuum cleaner. Please contact customer service if you are unable to resolve the problem.| |Gyro navigation module malfunction|E43
|Beeps: five|Restart the robot vacuum cleaner. Please contact customer service if you are unable to resolve the problem.| |Battery low| | |Use the remote control to return the robot vacuum cleaner to the charging dock. If the robot vacuum cleaner is in standby, make sure it is charged so it will always have enough power to clean.| |HEPA filter
|6| |---|
clogged| | |Clean HEPA filter
|6| |---|
.| |Dust bin
|17| |---|
full|| |Empty dust bin
|17| |---|
.|
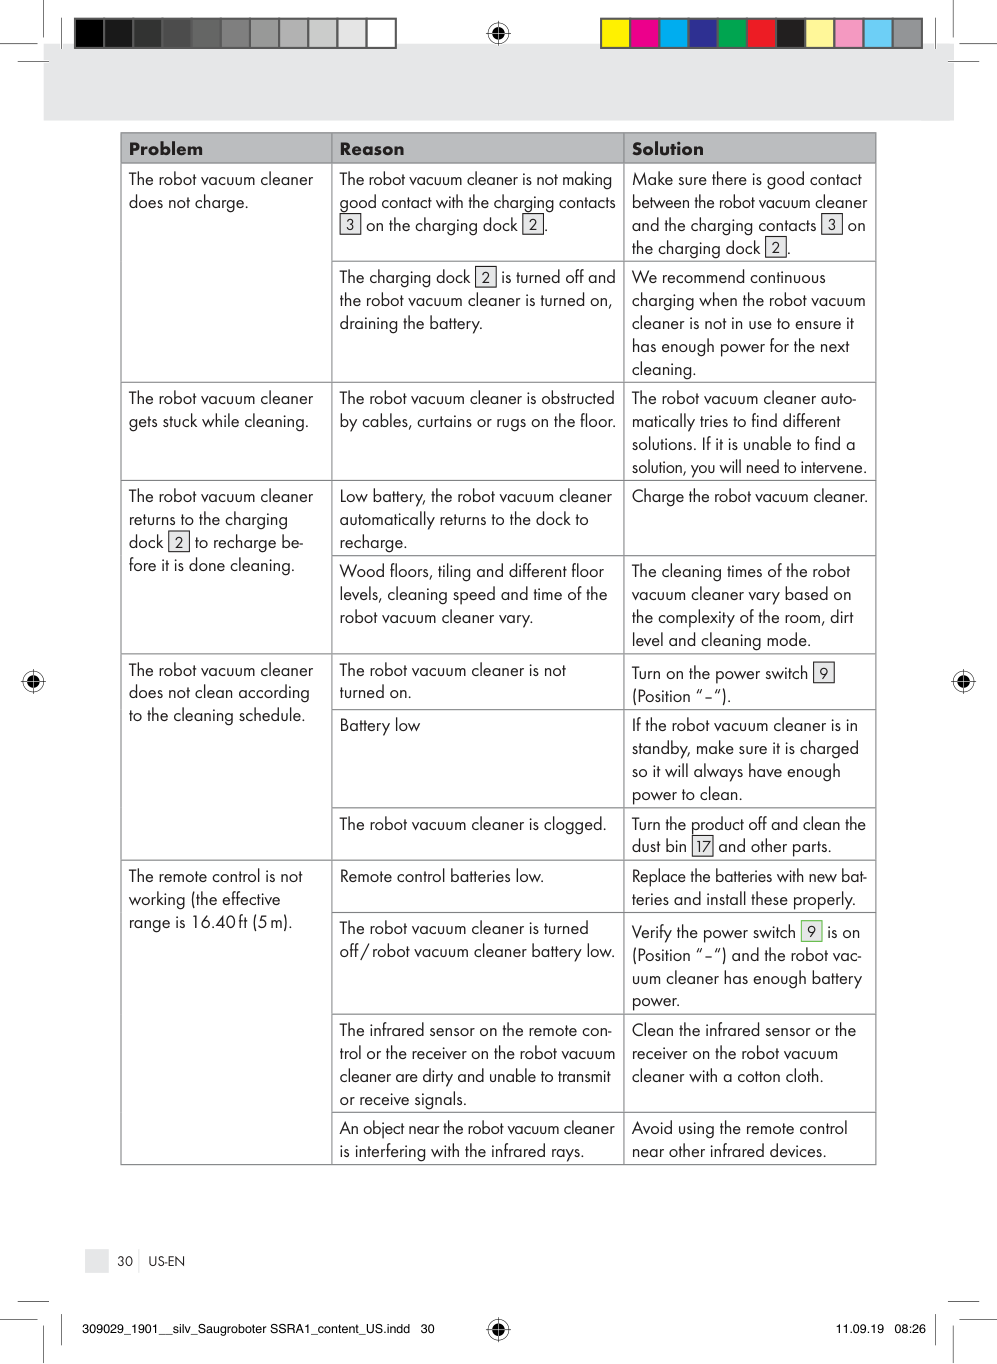
|Problem|Reason|Solution| |---|---|---| |The robot vacuum cleaner does not charge.|The robot vacuum cleaner is not making good contact with the charging contacts
|3| |---|
on the charging dock
|2| |---|
.|Make sure there is good contact between the robot vacuum cleaner and the charging contacts
|3| |---|
on the charging dock
|2| |---|
.| |The robot vacuum cleaner does not charge.|The charging dock
|2| |---|
is turned off and the robot vacuum cleaner is turned on, draining the battery.|We recommend continuous charging when the robot vacuum cleaner is not in use to ensure it has enough power for the next cleaning.| |The robot vacuum cleaner gets stuck while cleaning.|The robot vacuum cleaner is obstructed by cables, curtains or rugs on the floor.|The robot vacuum cleaner automatically tries to find different solutions. If it is unable to find a solution, you will need to intervene.| |The robot vacuum cleaner returns to the charging dock
|2| |---|
to recharge before it is done cleaning.|Low battery, the robot vacuum cleaner automatically returns to the dock to recharge.|Charge the robot vacuum cleaner.| |The robot vacuum cleaner returns to the charging dock
|2| |---|
to recharge before it is done cleaning.|Wood floors, tiling and different floor levels, cleaning speed and time of the robot vacuum cleaner vary.|The cleaning times of the robot vacuum cleaner vary based on the complexity of the room, dirt level and cleaning mode.| |The robot vacuum cleaner does not clean according to the cleaning schedule.|The robot vacuum cleaner is not turned on.|Turn on the power switch (Position “–“).
|9| |---| | |The robot vacuum cleaner does not clean according to the cleaning schedule.|Battery low|If the robot vacuum cleaner is in standby, make sure it is charged so it will always have enough power to clean.| |The robot vacuum cleaner does not clean according to the cleaning schedule.|The robot vacuum cleaner is clogged.|Turn the product off and clean the dust bin
|17| |---|
and other parts.| |The remote control is not working (the effective range is 16.40ft (5m).|Remote control batteries low.|Replace the batteries with new batteries and install these properly.| |The remote control is not working (the effective range is 16.40ft (5m).|The robot vacuum cleaner is turned off/robot vacuum cleaner battery low.|Verify the power switch
|9| |---|
is on (Position “–“) and the robot vacuum cleaner has enough battery power.| |The remote control is not working (the effective range is 16.40ft (5m).|The infrared sensor on the remote control or the receiver on the robot vacuum cleaner are dirty and unable to transmit or receive signals.|Clean the infrared sensor or the receiver on the robot vacuum cleaner with a cotton cloth.| |The remote control is not working (the effective range is 16.40ft (5m).|An object near the robot vacuum cleaner is interfering with the infrared rays.|Avoid using the remote control near other infrared devices.|
###### Disposal
####### What is not covered by the warranty?
The warranty does not cover damage caused by: · Normal wear and tear of the product, including
Dispose of the packaging through your local recycling facilities and in compliance with all federal, state and local regulations.
fragile parts (such as switches, glass, etc.); · Improper use or transport; · Disregarding safety and maintenance instructions; · Accidents or acts of nature (e.g. lightning, fire,
Please note the package markings regarding waste separation, indicated by abbreviations (a) and numbers (b), meaning: 1–7: plastics/20–22: paper and cardboard / 80–98: composite materials.
water, etc.); · Tampering with the product (such as removing cover, unscrewing screws etc.).
b a
Consequential and incidental damages are also not covered under this warranty. However, some states do not allow the exclusion or limitation of incidental or consequential damages, so this limitation or exclusion may not apply to you.
Contact your local waste management authority for additional information on how to dispose of the used product.
To help protect the environment, please dispose of the product properly when it has reached the end of its useful life, do not throw in the garbage. Information on collection sites and their opening hours is available from your local authority.
What is the period of coverage and warranty resolution?
The warranty is for 3 years from the date of purchase. At our discretion, product will either be refunded or replaced.
Improper disposal of rechargeable batteries can damage the environment!
What will we not do? We will not: · Start a new warranty period upon product
exchange; · Repair product. How to process the warranty? To initiate, please: · Call customer service at 1 (844) 543-5872 · Visit the Website Customer Service Platform at
Never throw rechargeable batteries in the garbage. They may contain toxic heavy metals and must be handled as special waste. The chemical symbols of heavy metals are: Cd = cadmium, Hg = mercury, Pb = lead. Used rechargeable batteries should therefore be disposed of through a local collection point.
Only for robot vacuum cleaner This product contains an integrated battery which cannot be replaced by the user. The battery may only be removed or replaced by the manufacturer or his customer service or by a similarly qualified person in order to avoid hazards.
www.lidl.com/contact-us or
· Visit a LIDL store for further assistance To ensure the quickest warranty return process, please have the following available: · The original sales receipt that includes the date
purchased; · The product and manual in the original package; · A statement of the problem.
###### Three year limited warranty
What does this warranty cover? The warranty covers: · Damage, breakage or inoperability due to defect. · Damage not caused by normal wear and tear
What must you do to keep the warranty in effect? · Retain the original receipt; · Follow all product instructions; · Do not repair or modify the product.
or failure to follow the safety and maintenance instructions provided in the user manual.
How does state law relate to this warranty? This warranty gives you specific legal rights, and you may also have other rights which vary from state to state. All implied warranties are limited by the duration and terms of this warranty. Some states do not allow limitations on how long an implied warranty lasts, so the above limitation may not apply to you.
Descripción de las palabras de advertencia.................................................Página 34 Servicio al cliente..................................................................................................................Página 34 Lista de pictogramas utilizados...............................................................................Página 34 Introducción..............................................................................................................................Página 34
Uso previsto ..................................................................................................................................... Página 35 Aviso sobre marca registrada ........................................................................................................ Página 35 Descripción de las piezas .............................................................................................................. Página 35 Contenido ........................................................................................................................................ Página 37 Información técnica ........................................................................................................................ Página 37
Instrucciones importantes de seguridad..........................................................Página 37 Advertencias de seguridad para baterías ..................................................................................... Página 41
Uso inicial....................................................................................................................................Página 43 Cargar el producto ......................................................................................................................... Página 43 Colocar los cepillos laterales ......................................................................................................... Página 44 Encender / apagar el producto ...................................................................................................... Página 44
Uso....................................................................................................................................................Página 44 Modos de limpieza ......................................................................................................................... Página 45 Pared virtual .................................................................................................................................... Página 47 Programación .................................................................................................................................. Página 47
Operación mediante aplicación...............................................................................Página 48 Instalar y registrar ........................................................................................................................... Página 48 Conectar el producto a WiFi ......................................................................................................... Página 49 Conectar el producto a la aplicación ............................................................................................ Página 50 Desconectarse ................................................................................................................................. Página 50 Limpiar mediante aplicación .......................................................................................................... Página 51 Programación .................................................................................................................................. Página 53 Historial de limpieza ....................................................................................................................... Página 54 Mantenimiento del producto .......................................................................................................... Página 54 Configuración .................................................................................................................................. Página 55
Operación mediante Alexa.........................................................................................Página 57 Limpieza y almacenamiento.......................................................................................Página 59 Resolución de problemas..............................................................................................Página 60 Eliminación.................................................................................................................................Página 62 Garantía limitada de 3 años.......................................................................................Página 62
|DESCRIPCIÓN DE LAS PALABRAS DE ADVERTENCIA
| | |---|
ADVERTENCIA indica una situación peligrosa, que puede provocar la muerte o lesiones graves si no se evita.
| | |---|
PRECAUCIÓN indica una situación peligrosa, que puede provocar lesiones leves o moderadas si no se evita.
| | |---|
AVISO indica información que se considera importante, pero que no implica un peligro (p. ej. mensajes relacionados con daños materiales).| |---|
|SERVICIO AL CLIENTE
Llame al Servicio de atención al cliente al 1 (844) 543-5872
| | |---|
Visite el Portal de atención al cliente en www.lidl.com/contact-us
Visite una de nuestras tiendas LIDL en caso de cualquier inquietud.
|IAN 309029_1901| |---|
Por favor tenga su número IAN a la mano.| |---|
|Lista de pictogramas utilizados|Lista de pictogramas utilizados|Lista de pictogramas utilizados|Lista de pictogramas utilizados| |---|---|---|---| | |¡Siga las advertencias y los avisos de seguridad!| |Transformador de seguridad a prueba de cortocircuito| | |¡Lea las instrucciones!| |SMPS (Fuente conmutada)| | |Este producto solo es apto para usarse en interiores, en habitaciones secas y cerradas.| |Tenga en cuenta los datos de la polaridad / batería| | |Corriente directa| |Polaridad de la fuente de alimentación| | |Corriente alterna|b a
|¡Elimine el empaque y el producto de forma ecológica!| | |Clase de protección III| |Garantía de 36 meses| | |Nunca deje a los niños sin supervisión con el material de empaque o el producto.| |Probado de acuerdo con la Comisión Federal de Comunicaciones|
Aspiradora robótica SSRA1
Introducción
Felicidades por la compra de su nuevo producto. Usted ha seleccionado un producto de calidad. Las instrucciones de uso son parte del producto.
Contienen información importante respecto a la seguridad, el uso y la eliminación. Antes de usar el producto, familiarícese con toda la información de seguridad y las instrucciones de uso. Utilice la unidad únicamente como se describe y para las aplicaciones indicadas. Si traspasa el producto a alquien más, por favor asegúrese de incluir toda la documentación con él.
###### Uso previsto
###### Descripción de las piezas
Este producto está diseñado para aspirar suciedad suelta y seca, como polvo, pelusa o migajas sobre pisos lisos y alfombras de pelos cortos. Use el producto solo en interiores. Este producto está diseñado sólo para uso privado y no comercial. Use el producto solo para su uso previsto. Se prohíbe cualquier otro uso distinto al que se ha mencionado o cualquier modificación al producto, ya que puede provocar lesiones o daños. El fabricante se deslinda de cualquier responsabilidad por daños debidos al uso inadecuado.
###### Aviso sobre marca registrada
· La marca registrada y nombre comercial SilverCrest son propiedad de sus correspondientes dueños.
· Cualquier otro nombre y producto puede ser marca comercial o marca comercial registrada de sus respectivos dueños.
Robot aspirador Pantalla Estación de carga Contactos de carga Cable de alimentación Pared virtual Filtro HEPA Cepillos laterales de repuesto Cepillo de limpieza Botón de encendido Enchufe de carga
|1| |---|
|2| |---|
|3| |---|
|4| |---|
|5| |---|
|6| |---|
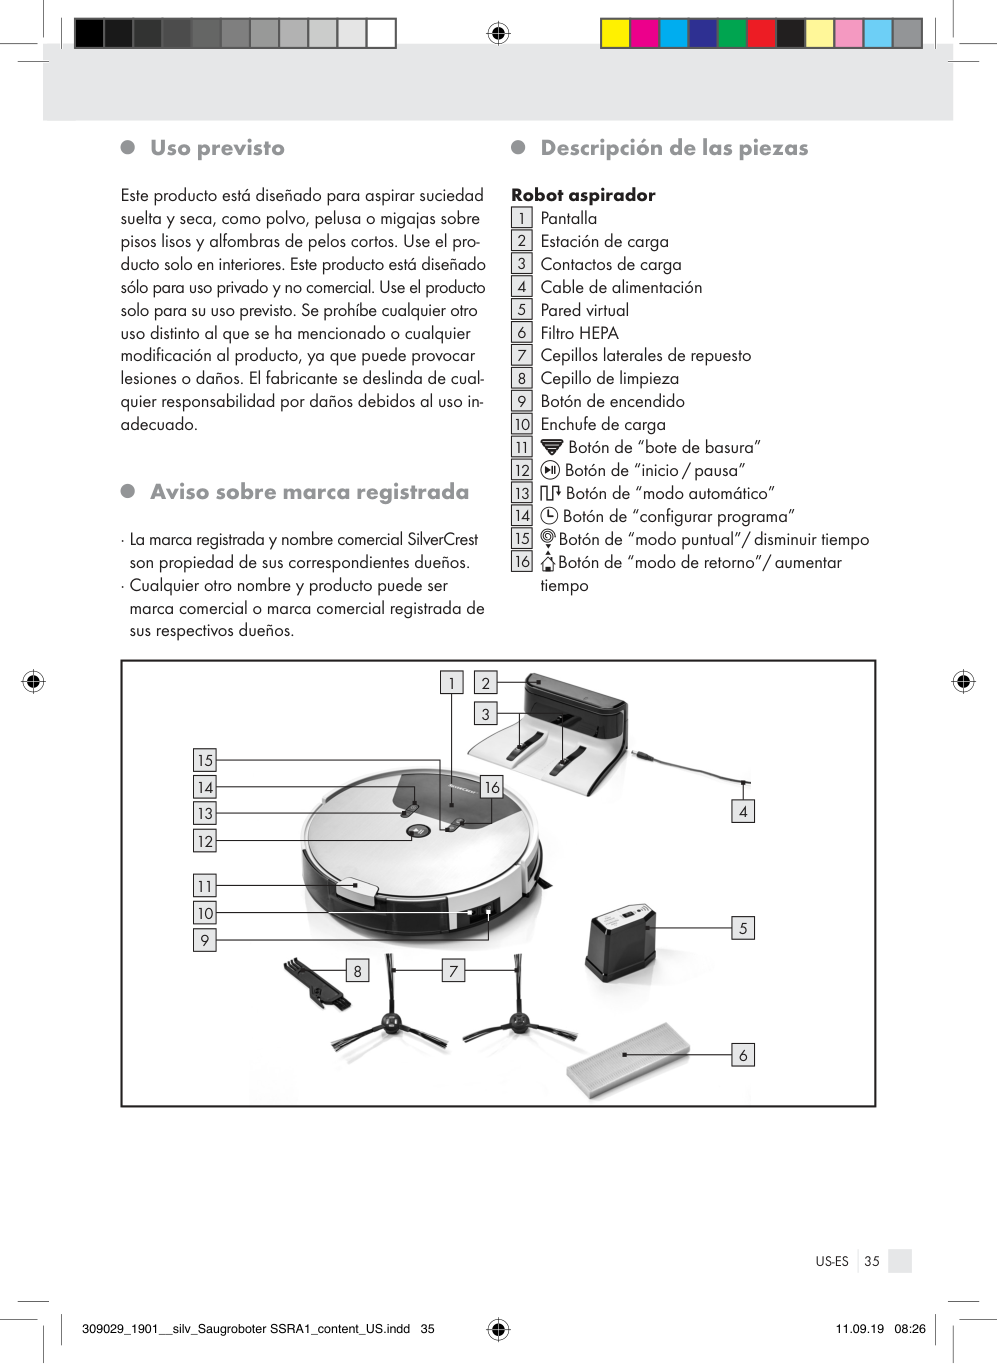
|7| |---|
|8| |---|
|9| |---|
|10| |---|
|11| |---|
Botón de “bote de basura”
|12| |---|
Botón de “inicio / pausa”
|13| |---|
Botón de “modo automático”
|14| |---|
Botón de “configurar programa”
|15| |---|
Botón de “modo puntual”/ disminuir tiempo
|16| |---|
Botón de “modo de retorno”/ aumentar tiempo
|
9
10
|11| | |---|---| |11| |
12
13
14 16
| | | | |---|---|---| | |7| |
| | | |---|---| | |8|
2
3
1
15
| | | |---|---| | |5|
4
| | |
|---|---| | |6| | |---|
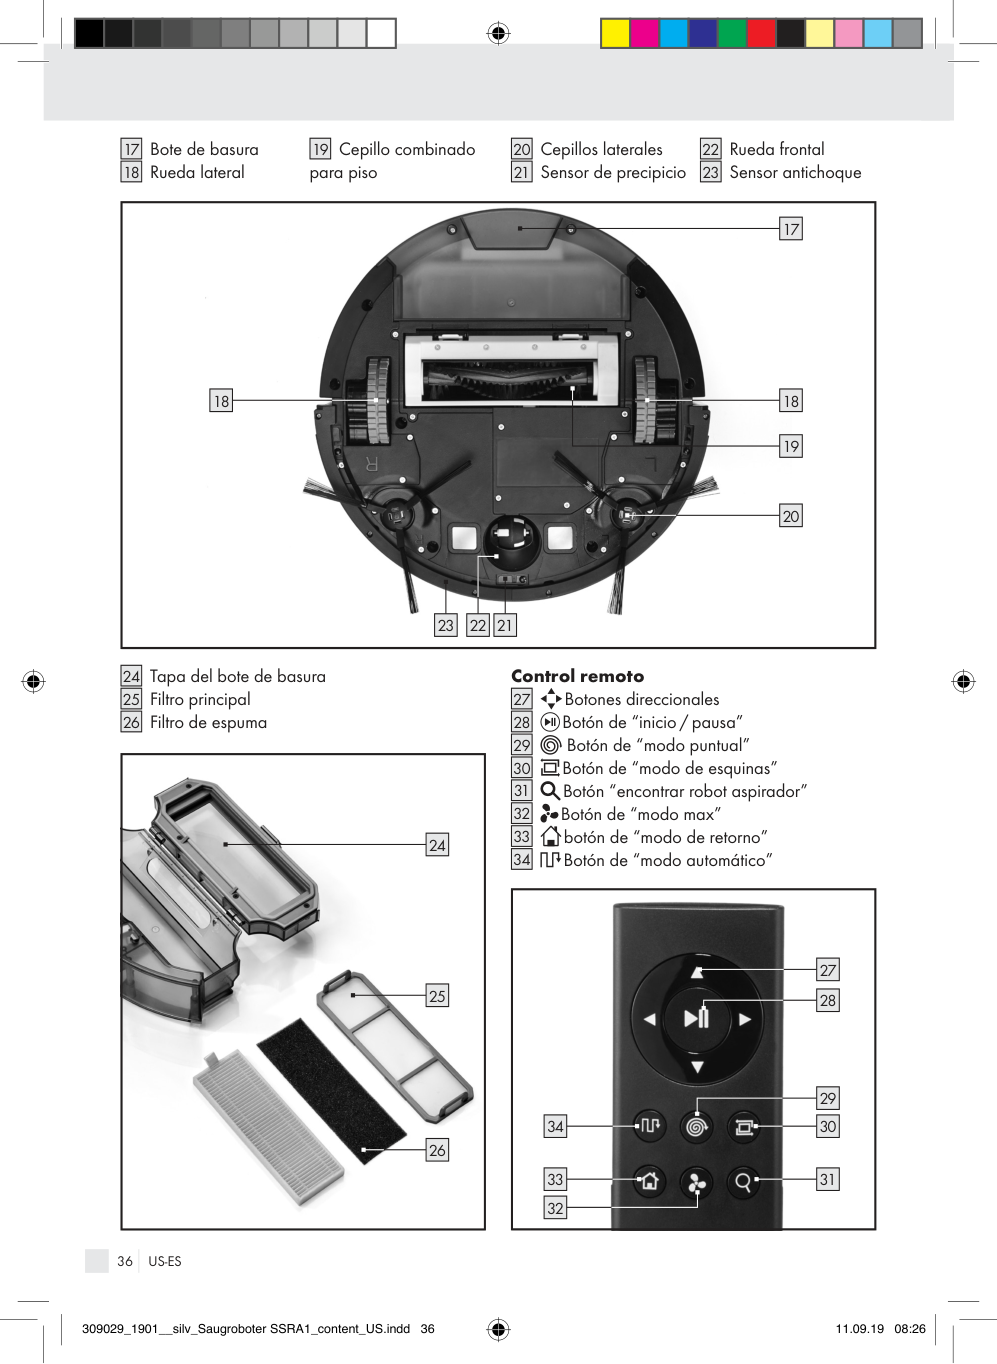
|17| |---|
Bote de basura Rueda lateral
|18| |---|
|19| |---|
Cepillo combinado para piso
|20| |---|
Cepillos laterales Sensor de precipicio
|21| |---|
|22| |---|
Rueda frontal Sensor antichoque
|23| |---|
|
17
18
19
20
212223
18
| |---|
|24| |---|
Tapa del bote de basura Filtro principal Filtro de espuma
|25| |---|
|26| |---|
|
25
24
26
| |---|
####### Control remoto
|27|
|---|
Botones direccionales
|28| |---|
Botón de “inicio / pausa”
|29| |---|
Botón de “modo puntual”
|30| |---|
Botón de “modo de esquinas”
|31| |---|
Botón “encontrar robot aspirador”
|32| |---|
Botón de “modo max”
|33| |---|
botón de “modo de retorno”
|34| |---|
Botón de “modo automático”
|
30
3133
34
29
27
28
32| |---|
###### Contenido
Inmediatamente después de desempacar, verifique que el contenido esté completo y que el producto esté en perfecto estado.
1 Aspiradora robótica 1 Bote de basura 1 Estación de carga 1 Pared virtual 1 Cepillo combinado
principal para piso con cerdas y golpeadores flexible
2 Filtros HEPA 4 Cepillos laterales 1 Control remoto
###### Información técnica
Aspiradora robótica Modelo: Silvercrest SSRA1 Voltaje de operación: 14.8V (corriente directa) Potencia nominal: 22 W Batería recargable: batería recargable de iones
de litio (4 celdas), 2.6Ah, 14.8 V, 38.5 Wh
Tiempo de funcionamiento: máx. 120 minutos (depen-
diendo del modo y el piso) Tiempo de carga: 5–6 horas Estación de carga Voltaje nominal de salida: 19V (corriente directa) Corriente nominal de salida: 0.6 A Control remoto Modelo: SSRA1 Voltaje nominal de entrada: 3 V (corriente directa) Batería: 2 x 1.5V AAA (incluida) Suministro eléctrico Entrada: 100–240 V∼ 0.5 A
máx. 50 / 60 Hz Salida: 19V (corriente directa) 0.6 A
Pared virtual Batería: 2 x 1.5V AA (incluida)
Aplicación Requisitos del sistema: iOS versión 9.0 y superior,
Android™ versión 4.4 y superior
INSTRUCCIONES IMPORTANTES DE SEGURIDAD
¡CONSERVE TODAS LAS NOTAS DE SEGURIDAD Y LAS INSTRUCCIONES DE USO PARA SU FUTURA CONSULTA!
| | |---|
El incumplimiento de las siguientes advertencias puede provocar lesiones graves o la muerte.
¡PELIGRO DE MUERTE O ACCIDENTE PARA
BEBÉS Y NIÑOS! Nunca deje a los niños solos y sin supervisión con el material de empaque. Peligro de asfixia. Mantenga el producto alejado de los niños. ¡PELIGRO DE MUERTE! No deje que los niños jueguen con las baterías. No deje al alcance
las baterías. Los niños o las mascotas podrías tragarlas. En caso de ser tragadas, busque inmediatamente atención médica.
No use el producto en habitaciones con niños.
No utilice este producto cerca de llamas abiertas.
Este producto no debe ser usado por personas (incluso niños) con capacidades físicas, sensoriales
No permita que el producto aspire materiales inflamables, por ejemplo combustible o tóner de impresora o copiadora.
No permita que el producto aspire objetos en combustión, por ejemplo cigarros, cerillos, cenizas y otros objetos que pudieran provocar un incendio.
Verifique que la estación de carga, el cable de alimentación o el adaptador de corriente estén intactos antes de cada uso.
Verifique que el voltaje de línea concuerda con el que se especifica en la estación de carga
Para reducir el riesgo de descarga eléctrica, no lo use en exteriores o en superficies húmedas.
. Nunca use la estación de carga
|2| |---|
si está dañada.
|2| |---|
Maneje el cable de alimentación
Use solo los accesorios recomendados por el fabricante. No desconecte jalando el cable. Para desconectar, tome el enchufe, no el cable.
con cuidado para evitar daños. No use el cable de alimentación
|4| |---|
para mover o jalar el producto o la estación de carga
|4| |---|
. No deje que el producto pase sobre el cable de alimentación
No toque el enchufe o el aparato con las manos mojadas.
|2| |---|
y manténgalo alejado de fuentes de calor.
Los cambios o las modificaciones a este producto que no sean expresamente aprobados por la parte responsable del cumplimiento podrían anular la
|4| |---|
Si se daña el cable de alimentación
, deberá ser remplazado por un técnico de servicio cualificado para evitar peligros.
|4| |---|
autorización al usuario para operar el producto. Nota: este producto ha sido probado y cumple con los límites para un dispositivo digital clase B, de acuerdo con el apartado 15 de las normas de la FCC. Estos límites están diseñados para proveer protección razonable contra interferencias perjudiciales en una instalación residencial. Este producto genera, usa y puede emitir energía de radiofrecuencia y en caso de no ser instalado y utilizado de acuerdo a las instrucciones puede causar interferencias perjudiciales a las radiocomunicaciones.
Este producto cumple con la parte 15 del reglamento de la FCC. La operación está sujeta a las siguientes dos condiciones:
Sin embargo, no existe ninguna garantía de que no se produzcan interferencias en una instalación en particular. Si este producto causa una interferencia dañina a la recepción de radio o televisión, la cual puede ser determinada encendiendo y apagando el producto, se alienta al usuario a intentar corregir las interferencias siguiendo las siguientes medidas:
| | |---|
El incumplimiento de las siguientes advertencias puede provocar lesiones o daños materiales.
Use solo la batería recargable original y la estación de carga
suministradas por el fabricante. Nunca use baterías primarias. Para más información acerca de la batería, consulte el capítulo “Información técnica”.
|2|
|---|
No use el producto si no funciona adecuadamente debido a
cables de alimentación, juguetes y otros objetos.
Esconda los bordes de la alfombra debajo de ella. Mantenga las cortinas y manteles por arriba del piso.
Mantenga el cabello, las prendas y los dedos alejados de las aberturas y las partes operativas del producto.
Intente colocar correctamente los muebles.
Pruebe el producto en áreas con escaleras. Esto le permite verificar que el producto detecta el borde de una caída.
Limpie con frecuencia los sensores de precipicio. Si los sensores de piso están sucios, el producto puede llegar a caer de escaleras o descansos.
No se pare en el camino del robot aspirador. De lo contrario, el robot aspirador no podrá limpiar esas áreas.
Cuando use el producto, informe a los demás en la habitación para que nadie pise o tropiece con el producto.
No permita que el producto aspire cosas que puedan atascarlo, como por ejemplo, piedras, papel de desperdicio, etc.
Deje de usar el producto si las piezas de plástico están fracturadas o deformadas. Siempre reemplace las piezas dañadas con piezas originales de reemplazo.
No use el producto si la abertura de aspiración está bloqueada. Retire polvo, cabellos, bolas de algodón, etc., para permitir que el aire fluya libremente en la abertura de aspiración.
Verifique que el bote de basura y los filtros
No use el producto sobre pisos mojados o húmedos.
estén instalados correctamente antes de usarlos.
,
,
|17| |---|
|6| |---|
|25| |---|
|26| |---|
No use el producto con temperaturas superiores a +104°F (+40°C) o inferiores a +50°F (+10 °C).
Verifique el área que se va a limpiar antes de cada uso y acate las notas y la información
Retire todos los obstáculos antes de usarlo, como por ejemplo