
Ask AI
— answers from the official manualAnswers from the official manual.
Common questions
Common Questions
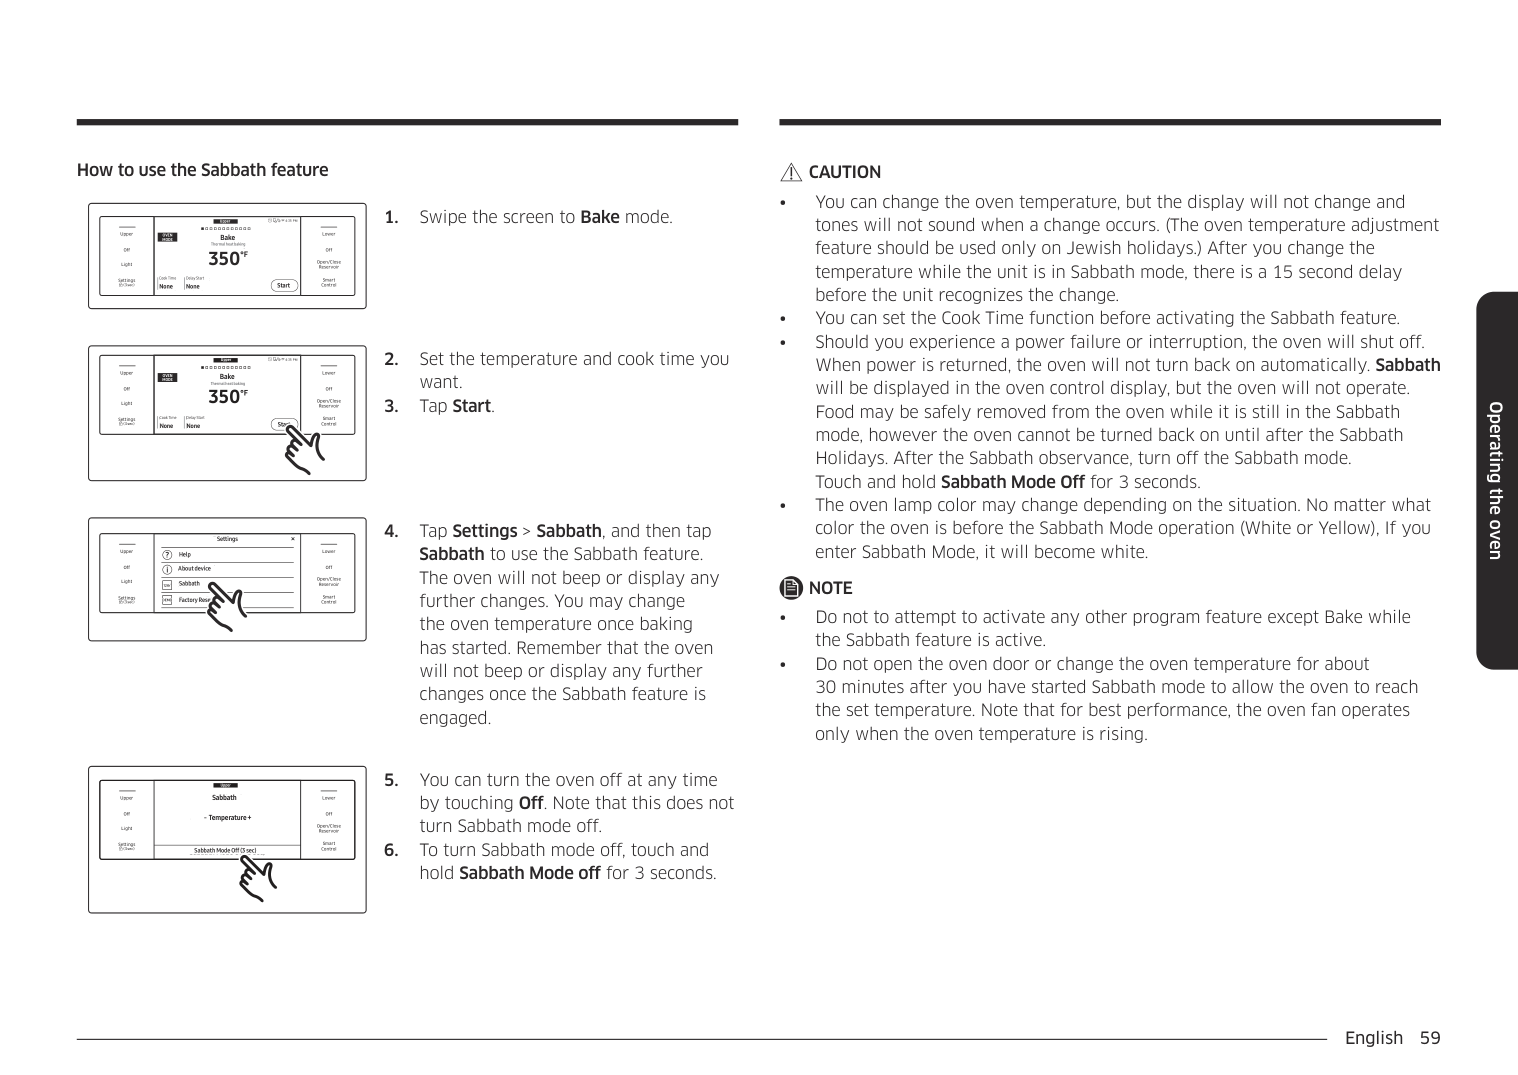
9 totalHow do I set the oven to a timed cooking mode?
To set up timed cooking, first swipe to select the desired cooking operation such as Bake or Convection Bake. Then tap 'Cook Time' and input the cooking duration using the numeric pad. For example, you can cook for 1 to 9 hours and 59 minutes total time.
What are the safety precautions when cleaning or maintaining my oven?
Avoid using harsh chemicals like benzene, thinner, or alcohol as they can cause discoloration, deformation, damage, electric shock, or fire. Do not clean with steam cleaners to prevent corrosion.
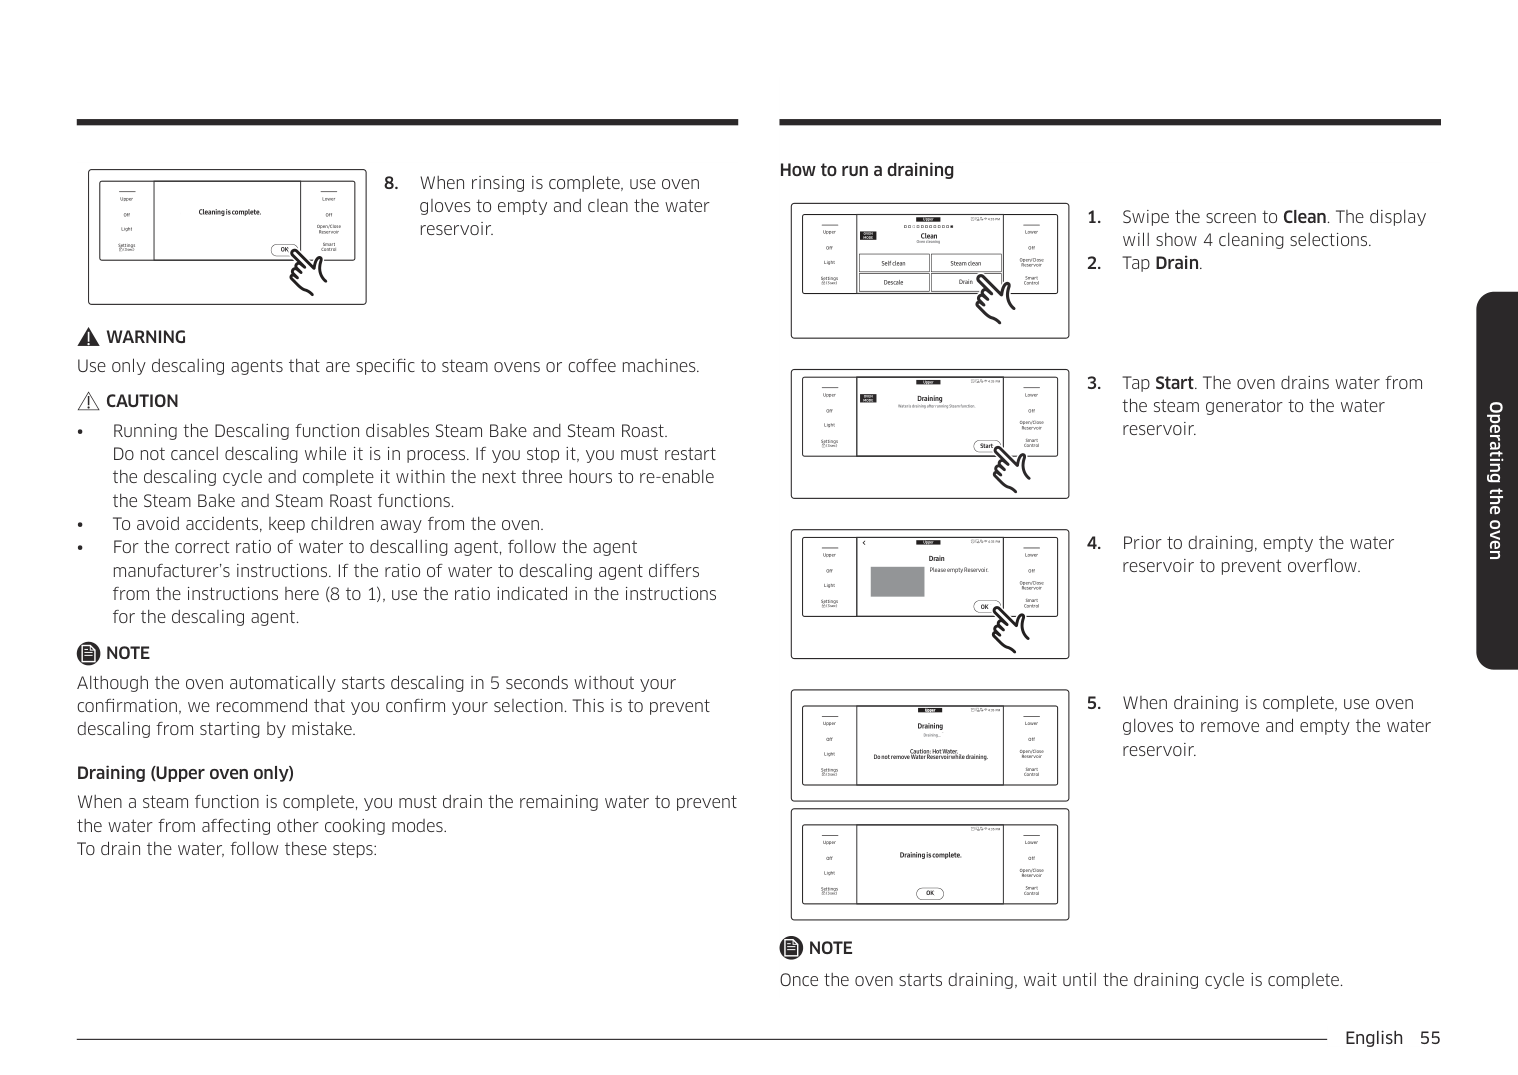
Can I use the oven for baking without preheating?
Yes, if you select Convection Bake or Convection Roast modes, tap 'No Preheat' which, when activated, will start cooking immediately. However, we recommend preheating especially for bakery products that rely on rising.
How do I operate the steam functions in my oven?
For Steam Bake or Steam Roast modes, after selecting your desired function and setting temperature, adjust the steam level by tapping 'Steam'. Set it to Low, Medium, or High for optimal cooking conditions.
What is a common troubleshooting method when an error code appears on my oven display?
Check the Information codes section in your manual. Follow steps provided by the codes to determine and resolve issues like checking power supply or cleaning elements.
What are critical safety warnings when using the self-cleaning function?
Before starting a self-clean cycle, ensure oven racks, utensils, and food debris are removed to avoid smoke damage. Do not use commercial cleaners or protective coating inside the oven during cycles.
Full Manual
74 pages

Built-In Electric Wall Oven
User manual
NV51**700D*
####### 1. FCC Notice
CAUTION FCC CAUTION: Any changes or modifications not expressly approved by the party responsible for compliance could void the user’s authority to operate the equipment. This device complies with Part 15 of FCC Rules. Operation is Subject to following two conditions:
###### For products sold in the US and Canadian markets, only channels 1~11 are available. You cannot select any other channels.
FCC STATEMENT: This equipment has been tested and found to comply within the limits for a Class B digital device, pursuant to part 15 of the FCC Rules. These limits are designed to provide reasonable protection against harmful interference in a residential installation. This equipment generates, uses, and can radiate radio frequency energy and, if not installed and used in accordance with the instructions, may cause harmful interference to radio communications. However, there is no guarantee that interference will not occur in a particular installation. If this equipment does cause harmful interference to radio or television reception, which can be determined by turning the equipment off and on, the user is encouraged to try to correct the interference by one or more of the following measures:
FCC RADIATION EXPOSURE STATEMENT: This equipment complies with FCC radiation exposure limits set forth for an uncontrolled environment. This equipment should be installed and operated so there is at least 8 inches (20 cm) between the radiator and your body. This device and its antenna(s) must not be co-located or operated in conjunction with any other antenna or transmitter.
channels 1~11 are available. You cannot select any other channels.
IC RADIATION EXPOSURE STATEMENT: This equipment complies with IC RSS-102 radiation exposure limits set forth for an uncontrolled environment. This equipment should be installed and operated so there is at least 8 inches (20 cm) between the radiator and your body. This device and its antenna(s) must not be co-located or operated in conjunction with any other antenna or transmitter.
Contents
#### Contents
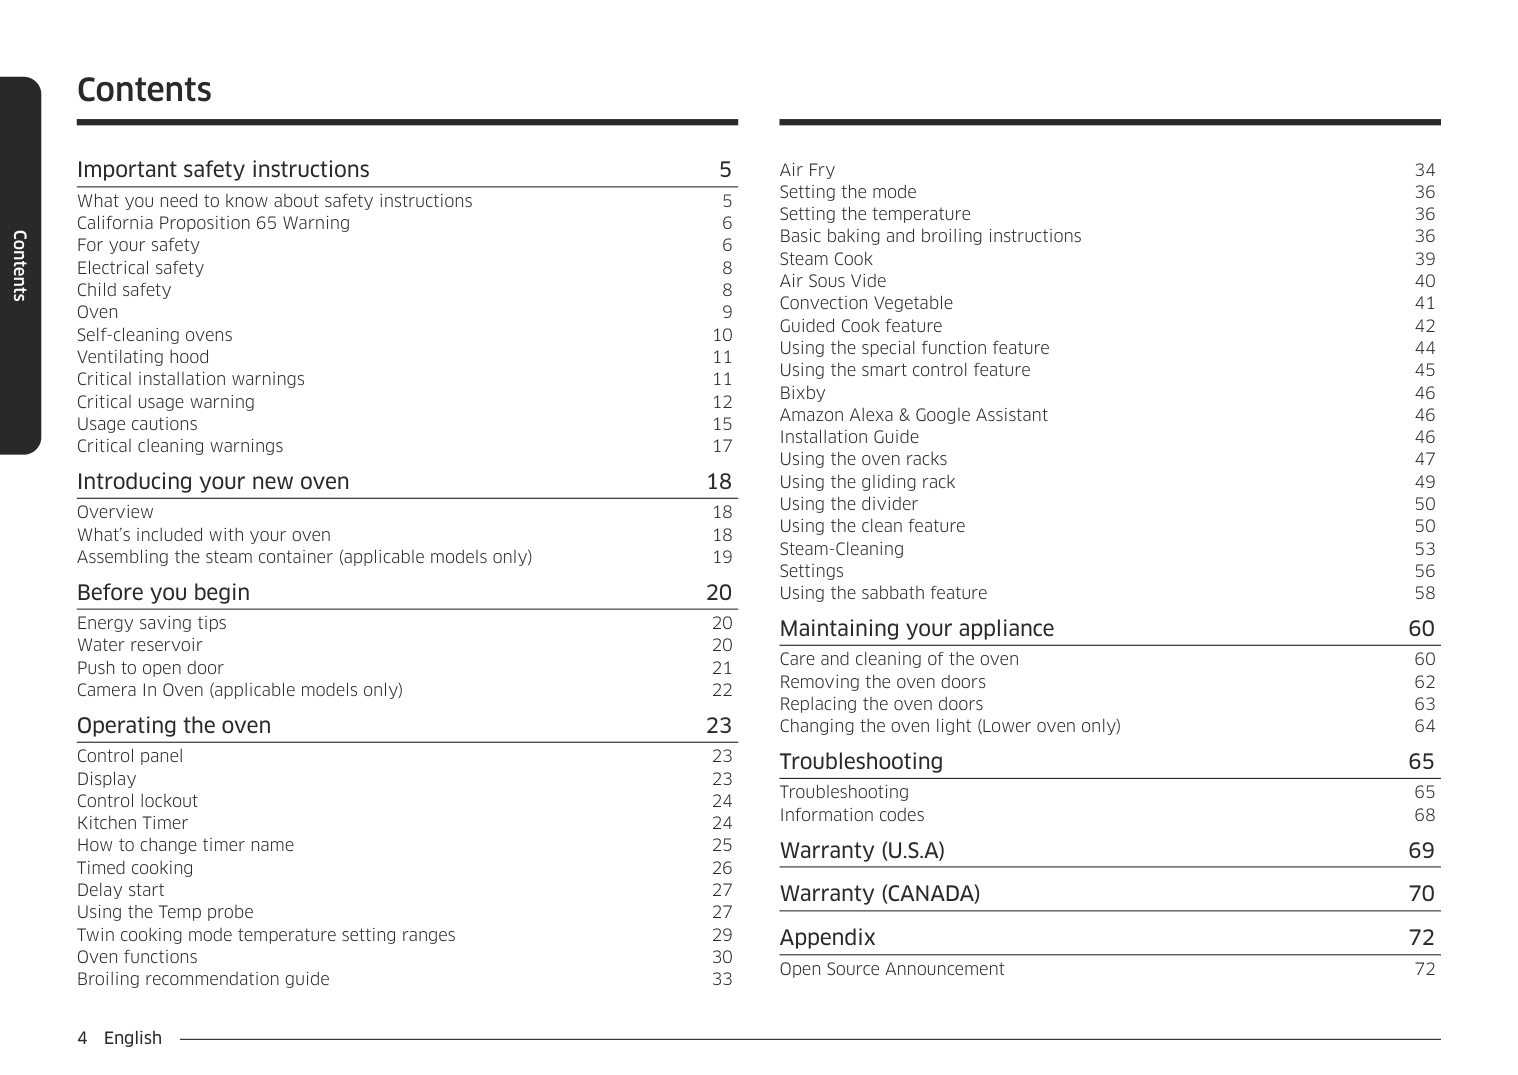
Important safety instructions 5 What you need to know about safety instructions 5 California Proposition 65 Warning 6 For your safety 6 Electrical safety 8 Child safety 8 Oven 9 Self-cleaning ovens 10 Ventilating hood 11 Critical installation warnings 11 Critical usage warning 12 Usage cautions 15 Critical cleaning warnings 17 Introducing your new oven 18 Overview 18 What’s included with your oven 18 Assembling the steam container (applicable models only) 19 Before you begin 20 Energy saving tips 20 Water reservoir 20 Push to open door 21 Camera In Oven (applicable models only) 22 Operating the oven 23 Control panel 23 Display 23 Control lockout 24 Kitchen Timer 24 How to change timer name 25 Timed cooking 26 Delay start 27 Using the Temp probe 27 Twin cooking mode temperature setting ranges 29 Oven functions 30 Broiling recommendation guide 33
Air Fry 34 Setting the mode 36 Setting the temperature 36 Basic baking and broiling instructions 36 Steam Cook 39 Air Sous Vide 40 Convection Vegetable 41 Guided Cook feature 42 Using the special function feature 44 Using the smart control feature 45 Bixby 46 Amazon Alexa & Google Assistant 46 Installation Guide 46 Using the oven racks 47 Using the gliding rack 49 Using the divider 50 Using the clean feature 50 Steam-Cleaning 53 Settings 56 Using the sabbath feature 58
Maintaining your appliance 60 Care and cleaning of the oven 60 Removing the oven doors 62 Replacing the oven doors 63 Changing the oven light (Lower oven only) 64 Troubleshooting 65 Troubleshooting 65 Information codes 68 Warranty (U.S.A) 69 Warranty (CANADA) 70 Appendix 72 Open Source Announcement 72
Read and follow all instructions before using your oven to prevent the risk of fire, electric shock, personal injury, or damage when using the oven. This guide does not cover all possible conditions that may occur. Always contact your service agent or the manufacturer about problems that you do not understand.
CAUTION To reduce the risk of fire, explosion, electric shock, or personal injury when using your oven, follow these basic safety precautions.
Do NOT attempt.
Do NOT disassemble.
##### WHAT YOU NEED TO KNOW ABOUT SAFETY INSTRUCTIONS
Do NOT touch.
Warnings and important safety instructions in this manual do not cover all possible conditions and situations that may occur. It is your responsibility to use common sense, caution, and care when installing, maintaining, and operating your oven.
Follow directions explicitly.
Unplug the power plug from the wall socket.
Make sure the machine is grounded to prevent electric shock.
#### Important safety symbols and precautions What the icons and signs in this user manual mean:
Call a Samsung service center for help.
Note
WARNING Hazards or unsafe practices that may result in severe personal injury or death.
These warning signs are here to prevent injury to you and others. Please follow them explicitly. After reading this section, keep it in a safe place for future reference.
##### CAUTION Hazards or unsafe practices that may result in minor personal injury or property damage.
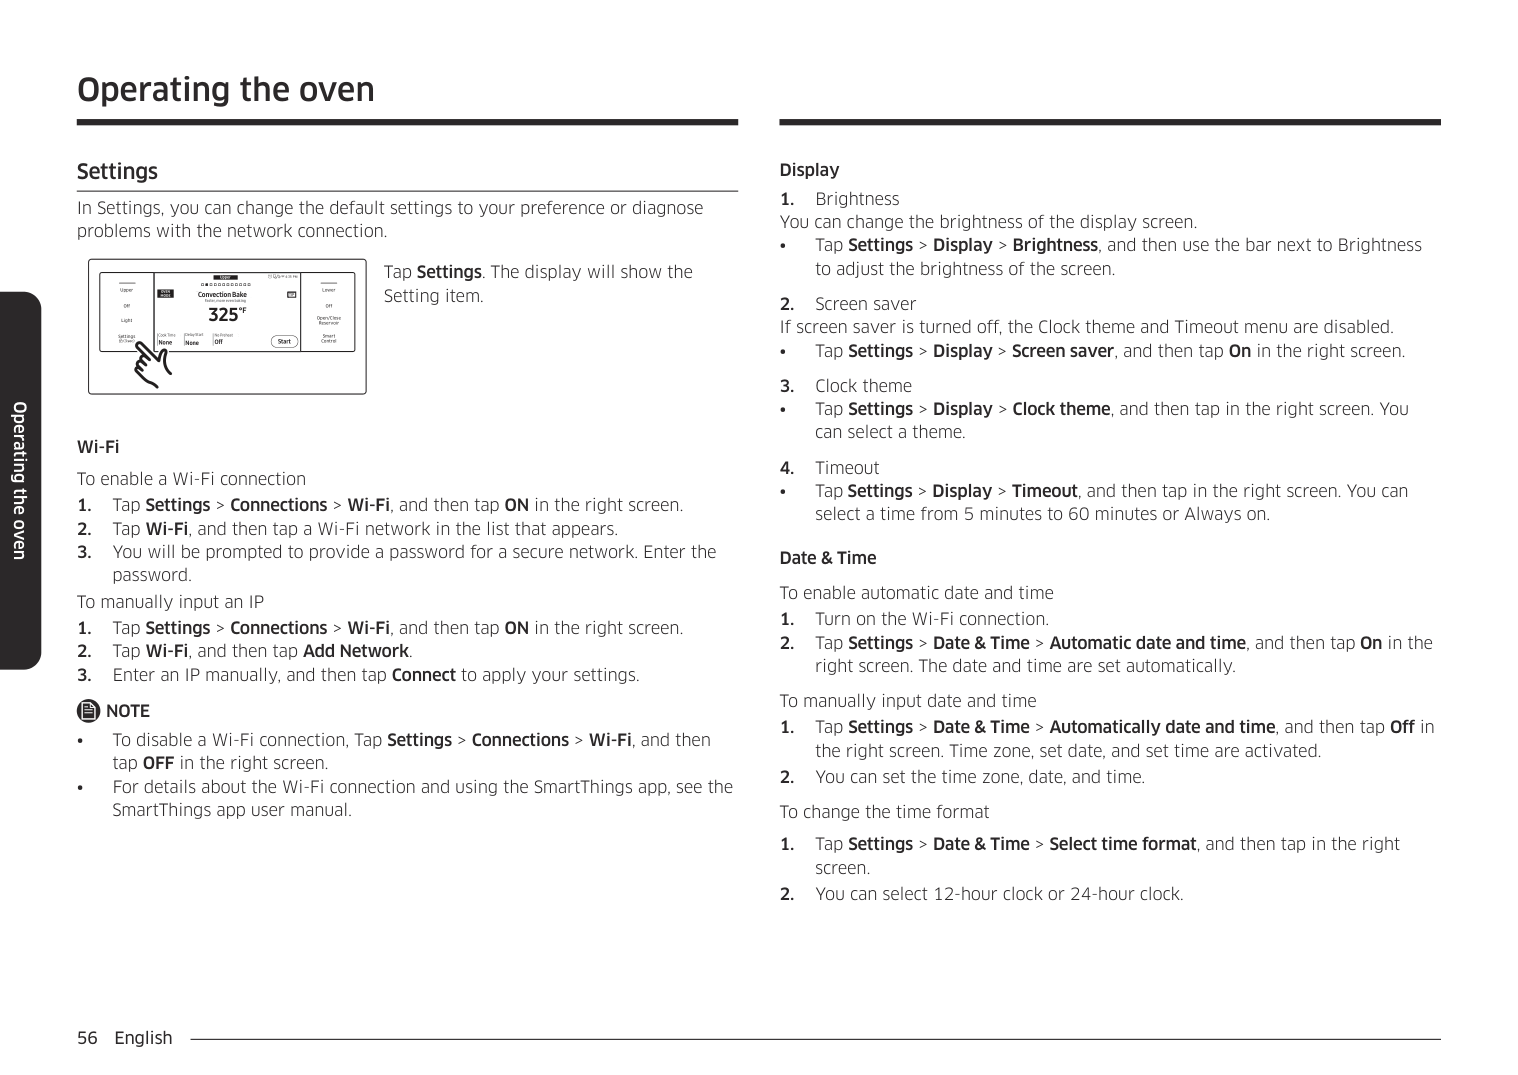
Important safety instructions
Important safety instructions
CALIFORNIA PROPOSITION 65 WARNING
WARNING
Cancer and Reproductive Harm - www.P65Warnings.ca.gov.
FOR YOUR SAFETY When using electrical appliances, you should follow basic safety precautions, including the following:
##### CAUTION
Proper Installation - Be sure your appliance is properly installed and grounded by a qualified technician.
User servicing - Do not repair or replace any part of the appliance unless specifically recommended in this manual. All other servicing should be referred to a qualified technician.
Always disconnect the power to the appliance before servicing by removing the fuse or switching off the circuit breaker.
Important safety instructions
Important safety instructions
##### ELECTRICAL SAFETY
WARNING Ensure that the appliance is switched off before replacing the lamp to avoid possibility of an electric shock.
CHILD SAFETY
WARNING
WARNING Accessible parts may become hot during use. To avoid burns, young children should be kept away.
##### OVEN
Important safety instructions
Important safety instructions
CAUTION Do not attempt to operate the oven during a power failure. If the power fails, always turn the oven off. If the oven is not turned off and the power returns, the oven may begin to operate again. Food left unattended could catch fire or spoil.
##### SELF-CLEANING OVENS
Do not clean the door gasket. The door gasket is essential for a good seal. Care should be taken not to rub, damage, or move the gasket.
##### VENTILATING HOOD
CRITICAL INSTALLATION WARNINGS
WARNING
Important safety instructions
Important safety instructions
If the power cord is damaged, contact your nearest Samsung service center.
CRITICAL USAGE WARNING
CAUTION
Important safety instructions
Important safety instructions
USAGE CAUTIONS
CAUTION
Important safety instructions
Important safety instructions
CRITICAL CLEANING WARNINGS
CAUTION
Important safety instructions
#### Introducing your new oven
Introducing your new oven
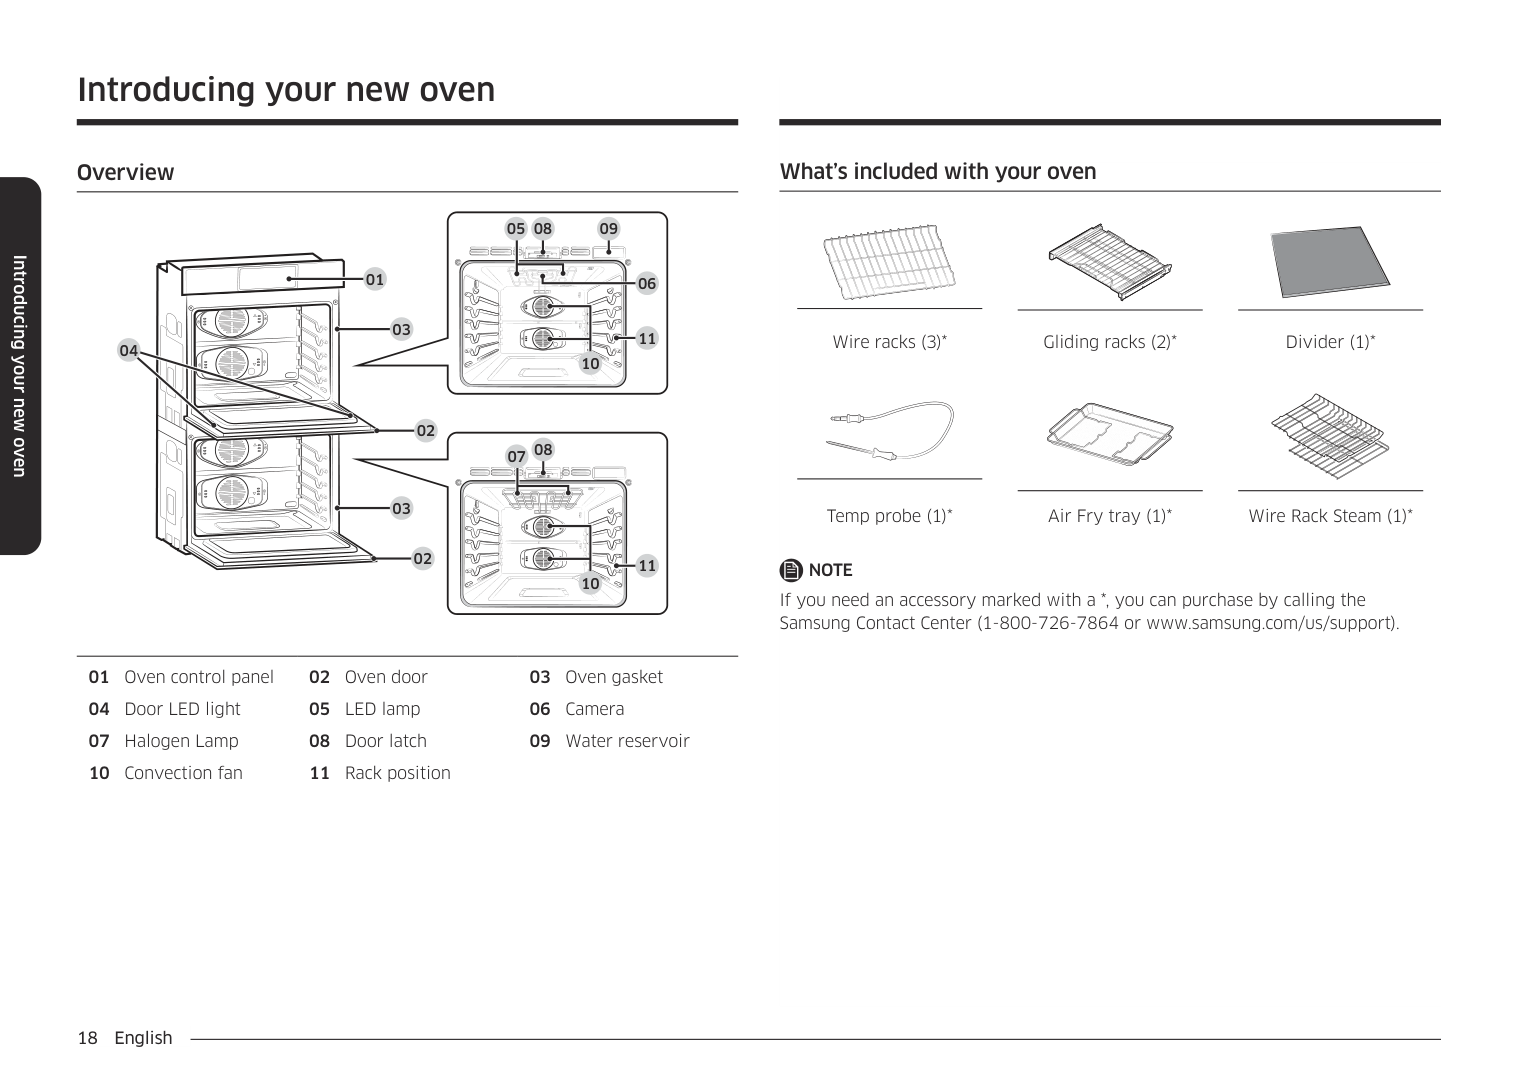
######## Overview
0905
08
01
06
03
11
04
10
02
08
07
03
02
11
10
01 Oven control panel 02 Oven door 03 Oven gasket 04 Door LED light 05 LED lamp 06 Camera 07 Halogen Lamp 08 Door latch 09 Water reservoir 10 Convection fan 11 Rack position
######## What’s included with your oven
Wire racks (3)* Gliding racks (2)* Divider (1)*
Temp probe (1)* Air Fry tray (1)* Wire Rack Steam (1)*
NOTE If you need an accessory marked with a *, you can purchase by calling the Samsung Contact Center (1-800-726-7864 or www.samsung.com/us/support).
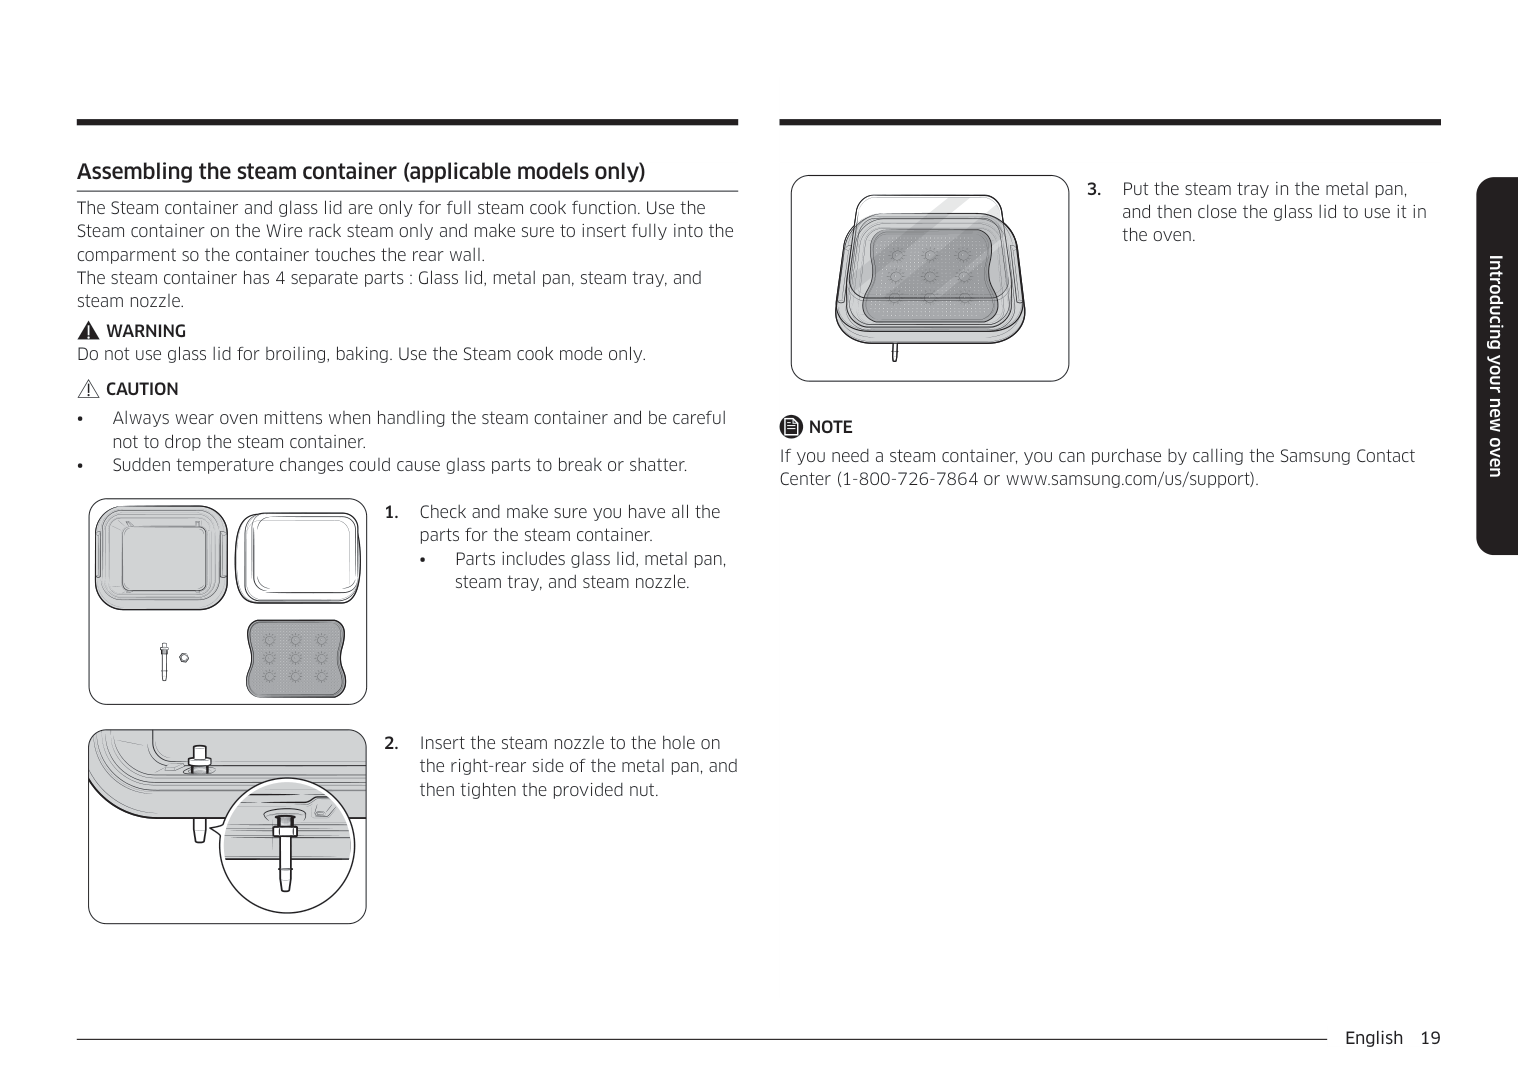
######## Assembling the steam container (applicable models only)
The Steam container and glass lid are only for full steam cook function. Use the Steam container on the Wire rack steam only and make sure to insert fully into the comparment so the container touches the rear wall. The steam container has 4 separate parts : Glass lid, metal pan, steam tray, and steam nozzle.
################ WARNING
Do not use glass lid for broiling, baking. Use the Steam cook mode only.
################ CAUTION
• Parts includes glass lid, metal pan, steam tray, and steam nozzle.
NOTE If you need a steam container, you can purchase by calling the Samsung Contact Center (1-800-726-7864 or www.samsung.com/us/support).
Introducing your new oven
Before you begin
Clean the oven thoroughly before using it for the first time. Then, remove the accessories, set the oven to Bake, and then run the oven at 400 °F for 1 hour. There will be a distinctive odor. This is normal. Ensure your kitchen is well ventilated during this conditioning period.
######## Energy saving tips
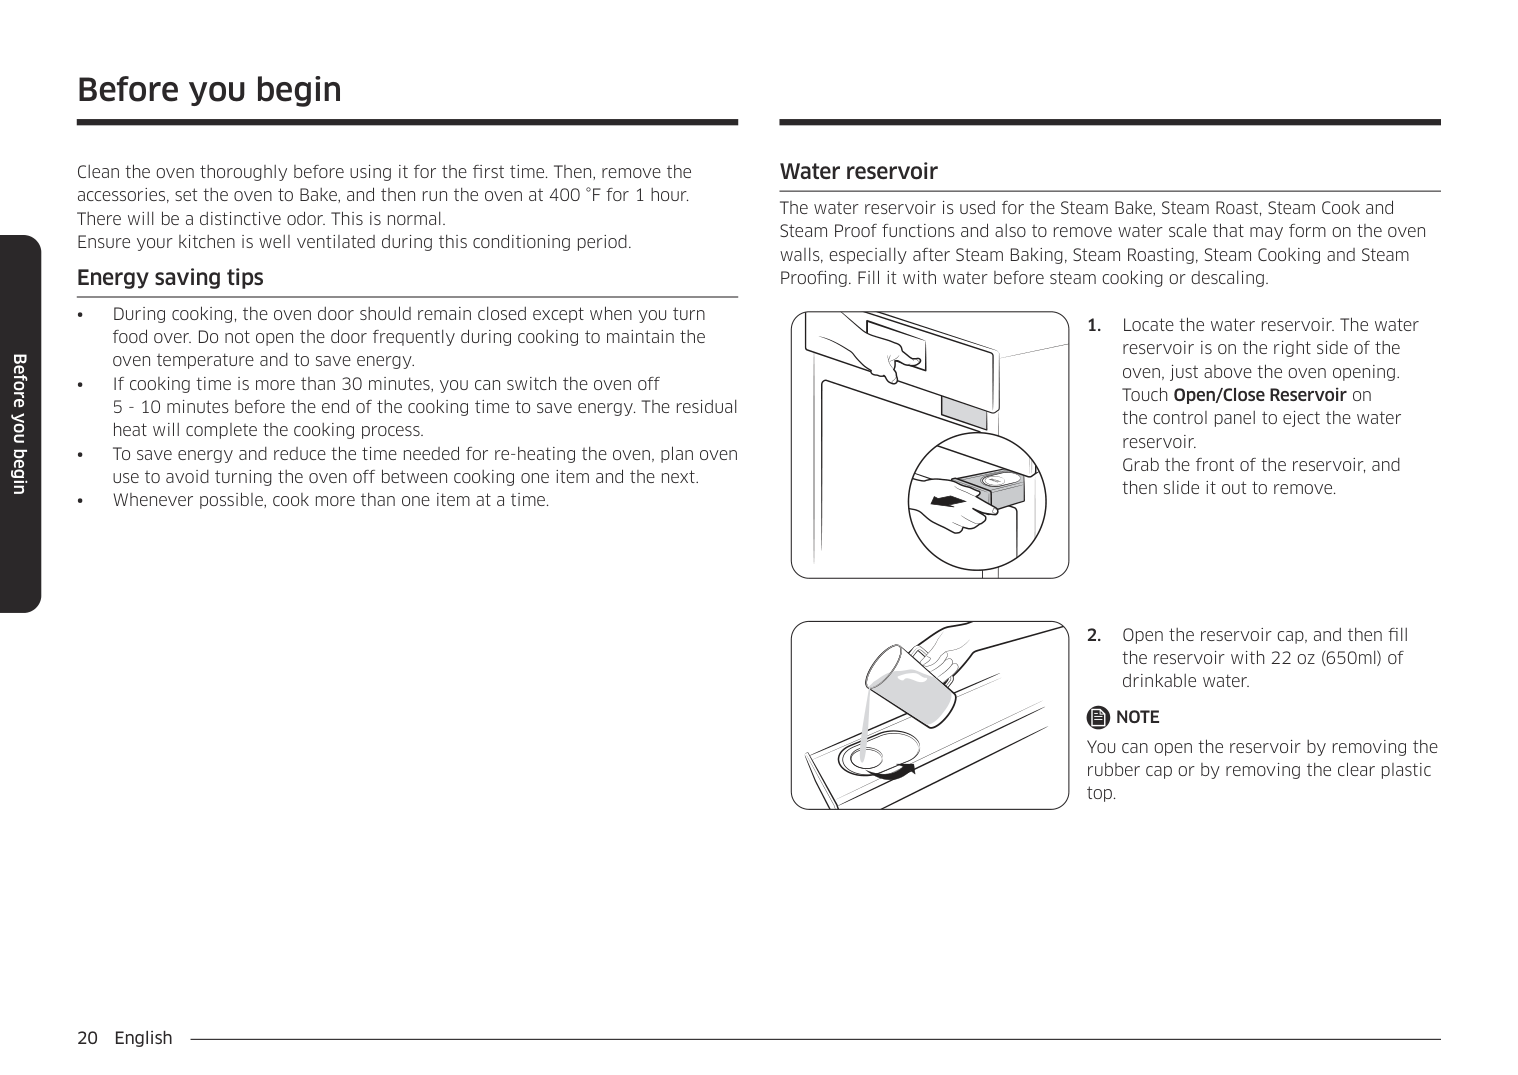
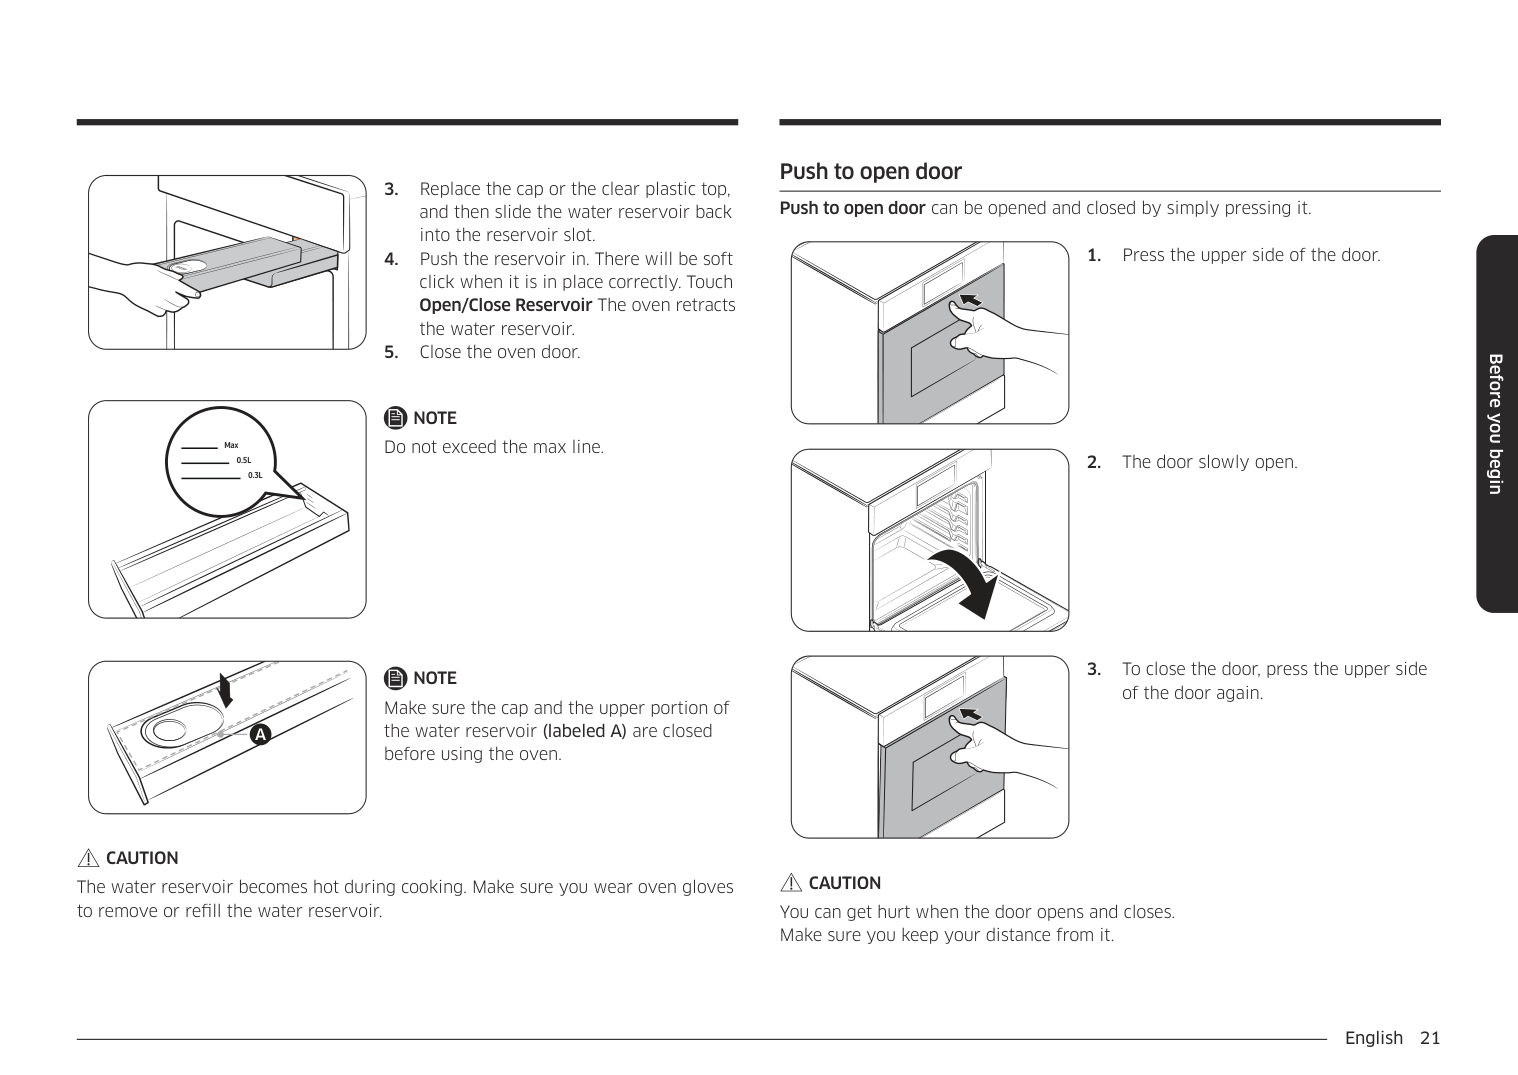
######## Water reservoir
The water reservoir is used for the Steam Bake, Steam Roast, Steam Cook and Steam Proof functions and also to remove water scale that may form on the oven walls, especially after Steam Baking, Steam Roasting, Steam Cooking and Steam Proofing. Fill it with water before steam cooking or descaling.
NOTE You can open the reservoir by removing the rubber cap or by removing the clear plastic top.
Max
Max
0.5L
0.5L 0.3L
0.3L
A
################ NOTE
Do not exceed the max line.
NOTE Make sure the cap and the upper portion of the water reservoir (labeled A) are closed before using the oven.
CAUTION The water reservoir becomes hot during cooking. Make sure you wear oven gloves to remove or refill the water reservoir.
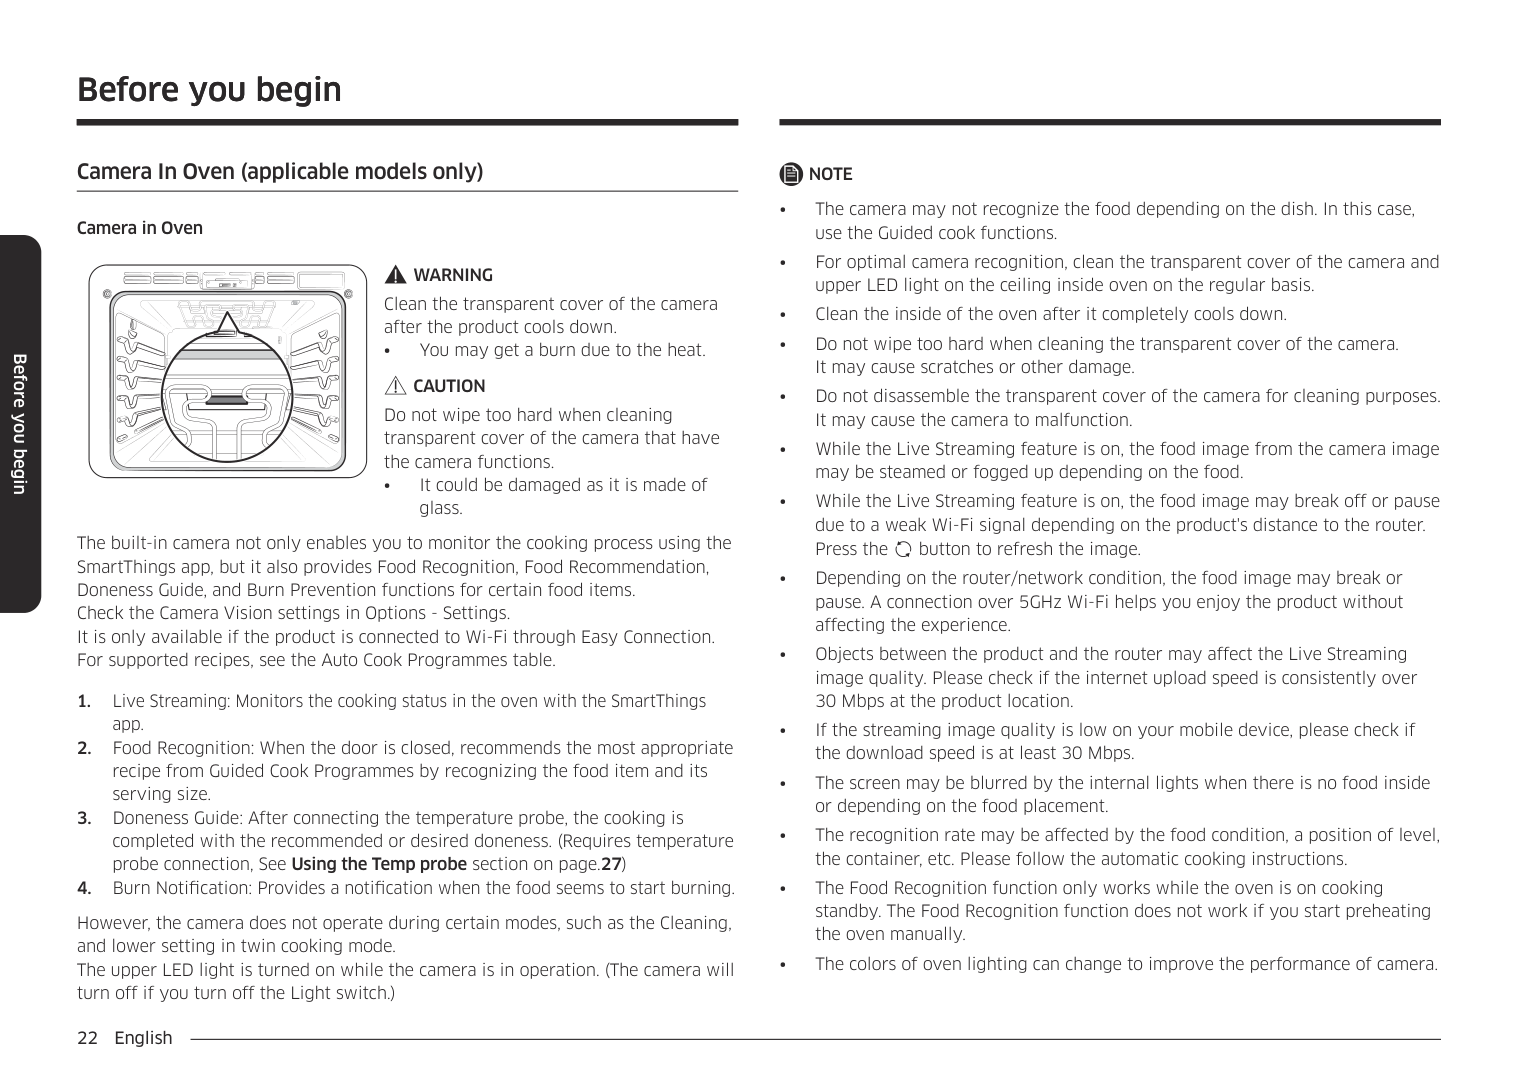
Push to open door Push to open door can be opened and closed by simply pressing it.
Before you begin
CAUTION You can get hurt when the door opens and closes. Make sure you keep your distance from it.
Before you begin
######## Camera In Oven (applicable models only)
################ Camera in Oven
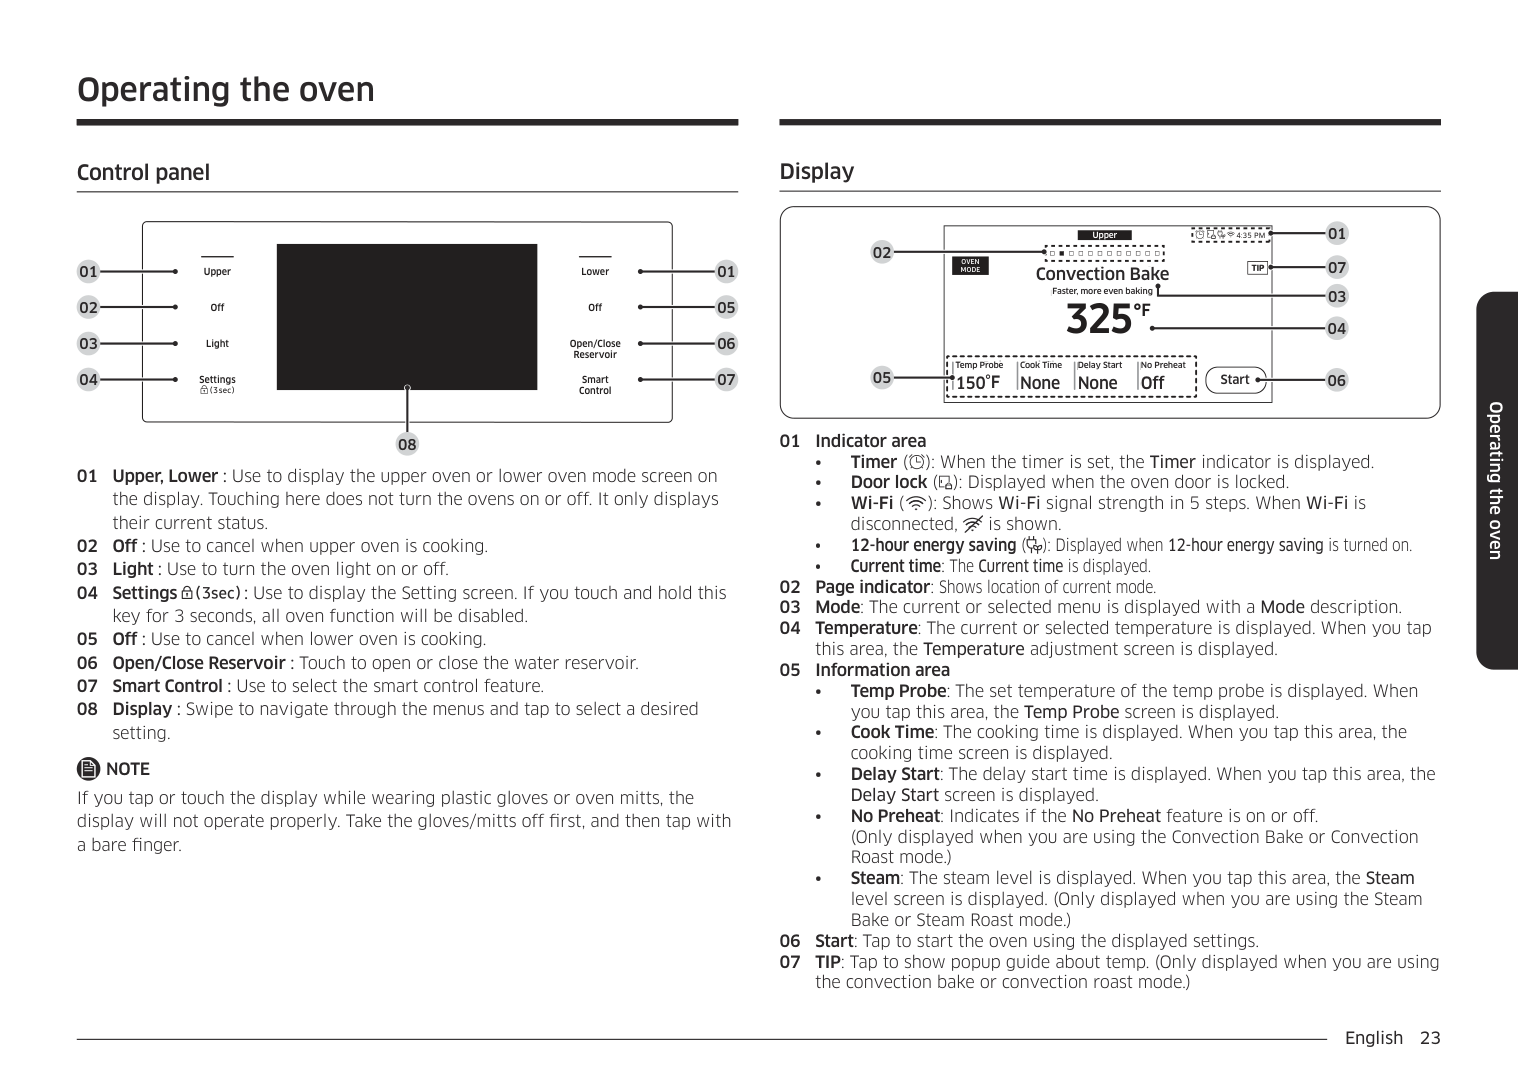
WARNING Clean the transparent cover of the camera after the product cools down.
• You may get a burn due to the heat.
CAUTION Do not wipe too hard when cleaning transparent cover of the camera that have the camera functions.
• It could be damaged as it is made of
glass.
The built-in camera not only enables you to monitor the cooking process using the SmartThings app, but it also provides Food Recognition, Food Recommendation, Doneness Guide, and Burn Prevention functions for certain food items. Check the Camera Vision settings in Options - Settings. It is only available if the product is connected to Wi-Fi through Easy Connection. For supported recipes, see the Auto Cook Programmes table.
However, the camera does not operate during certain modes, such as the Cleaning, and lower setting in twin cooking mode. The upper LED light is turned on while the camera is in operation. (The camera will turn off if you turn off the Light switch.)
################ NOTE
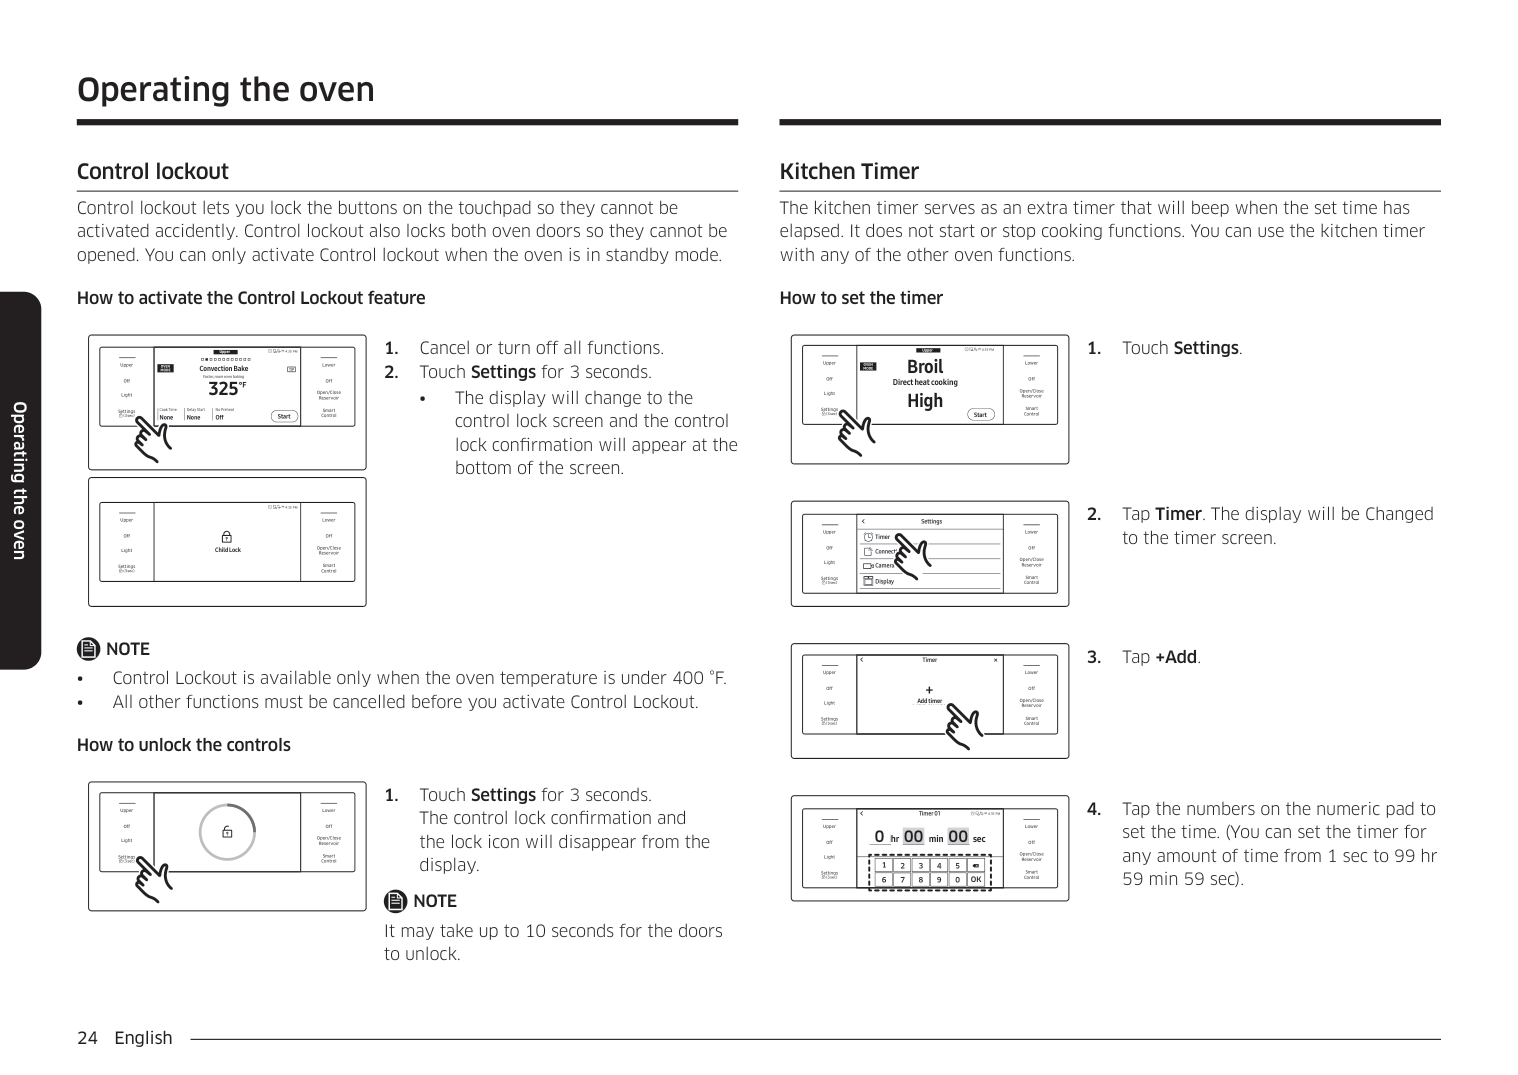
Display
######## Control panel
| | | |---|---| | | | | | | | | | | | |
| | | |---|---| | | | | | | | | | | | |
01
Upper
Lower
Off
Off
Light
Open/Close Reservoir
Settings
Smart Control
08
NOTE If you tap or touch the display while wearing plastic gloves or oven mitts, the display will not operate properly. Take the gloves/mitts off first, and then tap with a bare finger.
4:35 PM 01 07
Upper
OVEN MODE
|TIPTIP| |---|
################ Convection Bake
Convection Bake
Faster, more even baking
Faster, more even baking
02
325
############### °F
Cook Time None Temp Probe Delay Start
Cook Time Delay Start No Preheat
No Preheat Off
Temp Probe
05 06
150°F None None Off Start
150°F
None Start
Operating the oven
Operating the oven
######## Control lockout
Control lockout lets you lock the buttons on the touchpad so they cannot be activated accidently. Control lockout also locks both oven doors so they cannot be opened. You can only activate Control lockout when the oven is in standby mode.
How to activate the Control Lockout feature
Upper
4:35 PM
LowerUpper
OVEN MODE
Convection Bake Faster, more even baking
View Summary
############################################# TIP
325
Off
Off
°F
Open/Close Reservoir
Light
Cook Time None None Off Start
Delay Start No Preheat
Smart Control
Settings
4:35 PM
LowerUpper
Off
Off
Open/Close Reservoir
Child Lock
Child Lock
Light
Smart Control
Settings
• The display will change to the control lock screen and the control lock confirmation will appear at the bottom of the screen.
################ NOTE
################ How to unlock the controls
LowerUpper
Off
Off
Open/Close Reservoir
Light
Smart Control
Settings
NOTE It may take up to 10 seconds for the doors to unlock.
######## Kitchen Timer
The kitchen timer serves as an extra timer that will beep when the set time has elapsed. It does not start or stop cooking functions. You can use the kitchen timer with any of the other oven functions.
################ How to set the timer
Upper Broil High Direct heat cooking
4:35 PM
############## Broil
LowerUpper
OVEN MODE
Off
Off
Direct heat cooking
Open/Close Reservoir
High
Light
Smart Control
Settings
Start
Start
################ 1. Touch Settings.
|Off
Light
Upper
Settings|SettingsSettings
|Off
Open/Close Reservoir
Smart Control
Lower|
|---|---|---| |Off
Light
Upper
Settings|Timer Connections Camera Vision Display
|Off
Open/Close Reservoir
Smart Control
Lower|
################## 2. Tap Timer. The display will be Changedto the timer screen.
TimerTimer
LowerUpper
+ Add timer
Off
Off
Add timer
Open/Close Reservoir
Light
Smart Control
Settings
################ 3. Tap +Add.
|Off
Light
Upper
Settings|Timer 01
hr 00 min 00 sec0
4:35 PM
hr min sec
Timer 01|Timer 01
hr 00 min 00 sec0
4:35 PM
hr min sec
Timer 01|Timer 01
hr 00 min 00 sec0
4:35 PM
hr min sec
Timer 01|Off
Open/Close Reservoir
Smart Control
Lower| |---|---|---|---|---| |Off
Light
Upper
Settings| ||1| |---|
|6| |---|
|7| |---|
|8| |---|
|9| |---|
|0| |---|
|2| |---|
|3| |---|
|4| |---|
|5| |---|
|OK| |---| | |Off
Open/Close Reservoir
Smart Control
Lower|
################## 4. Tap the numbers on the numeric pad toset the time. (You can set the timer forany amount of time from 1 sec to 99 hr59 min 59 sec).
|Off
Light
Upper
Settings|Timer 01
hr 53 min 00 sec1
4:35 PM
hr min sec
Timer 01|Off
Open/Close Reservoir
Smart Control
Lower| |---|---|---| |Off
Light
Upper
Settings||1| |---|
|6| |---|
|7| |---|
|8| |---|
|9| |---|
|0| |---|
|2| |---|
|3| |---|
|4| |---|
|5| |---|
|OK| |---| |Off
Open/Close Reservoir
Smart Control
Lower|
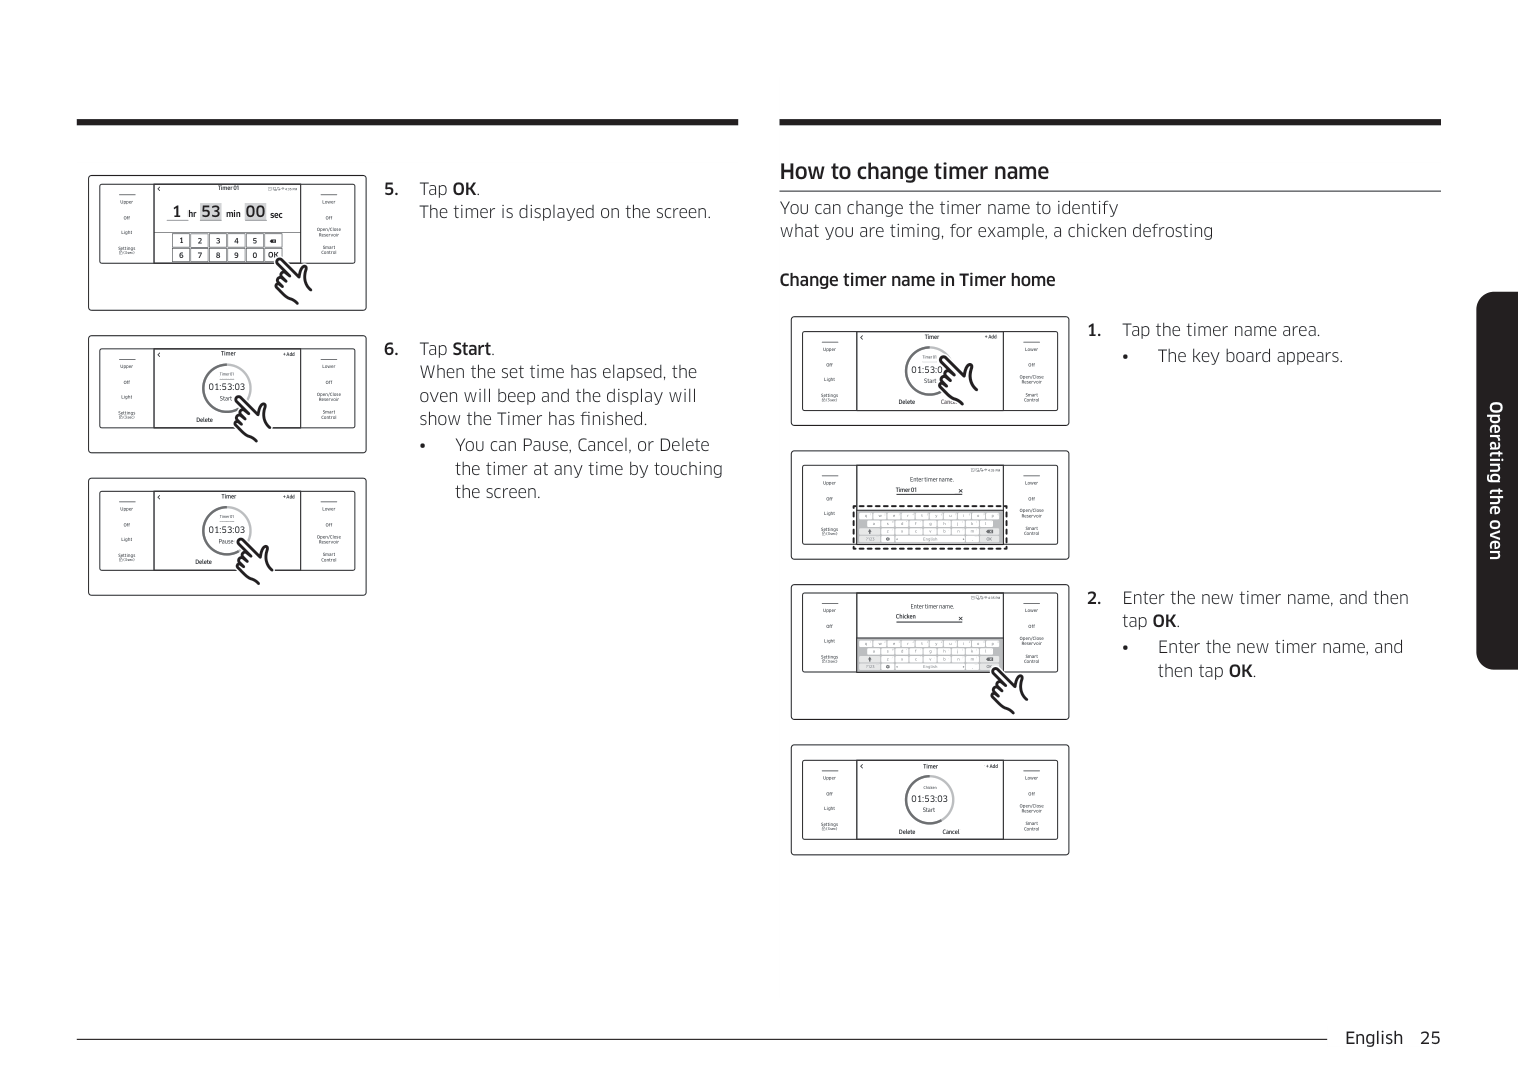
################ 5. Tap OK.
################## The timer is displayed on the screen.
####################################### TimerTimer + Add
LowerUpper
Timer 01
Timer 01 01:53:03 Start
Off
Off
Open/Close Reservoir
Light
Start
Smart Control
Settings
Delete
Delete Cancel
####################################### TimerTimer
+ Add
LowerUpper
Timer 01
Timer 01 01:53:03 Pause
Off
Off
Open/Close Reservoir
Light
Pause
Smart Control
Settings
Delete
Delete Cancel
################ 6. Tap Start.
When the set time has elapsed, the oven will beep and the display will show the Timer has finished.
• You can Pause, Cancel, or Delete the timer at any time by touching the screen.
######## How to change timer name
You can change the timer name to identify what you are timing, for example, a chicken defrosting
################ Change timer name in Timer home
####################################### + ADDTimer
+ Add
LowerUpper
Timer 01
Off
Off
01:53:03
Open/Close Reservoir
Light
Start
Smart Control
Settings
Delete Cancel
• The key board appears.
|Off
Light
Upper
Settings|Timer 01
Enter timer name.
4:35 PM Enter timer name.
Timer 01|Off
Open/Close Reservoir
Smart Control
Lower| |---|---|---| |Off
Light
Upper
Settings|OKEnglish?123
sa d f g h j k l
wq e r t y u i o p
z x c v b n m
.
... ...
1 2 3 4 5 6 7 8 9 0
- @ * ^ : ; ( )
/ ‘ “ : , ? !
~|Off
Open/Close Reservoir
Smart Control
Lower|
|Off
Light
Upper
Settings
|Chicken
Enter timer name.
4:35 PM Enter timer name.
Chicken|Off
Open/Close Reservoir
Smart Control
Lower| |---|---|---| |Off
Light
Upper
Settings
|OKEnglish?123
sa d f g h j k l
wq e r t y i o p
z x b n m
.
... ...
1 2 3 4 5 6 7 8 9 0
- @ * ^ : ; ( )
/ ‘ “ : , ? !
~|Off
Open/Close Reservoir
Smart Control
Lower|
• Enter the new timer name, and
then tap OK.
Operating the oven
####################################### TimerTimer
+ Add
########################################### + ADD
LowerUpper
Chicken
Chicken 01:53:03 Start
Off
Off
Open/Close Reservoir
Light
Start
Smart Control
Settings
Delete Cancel
Delete Cancel
Operating the oven
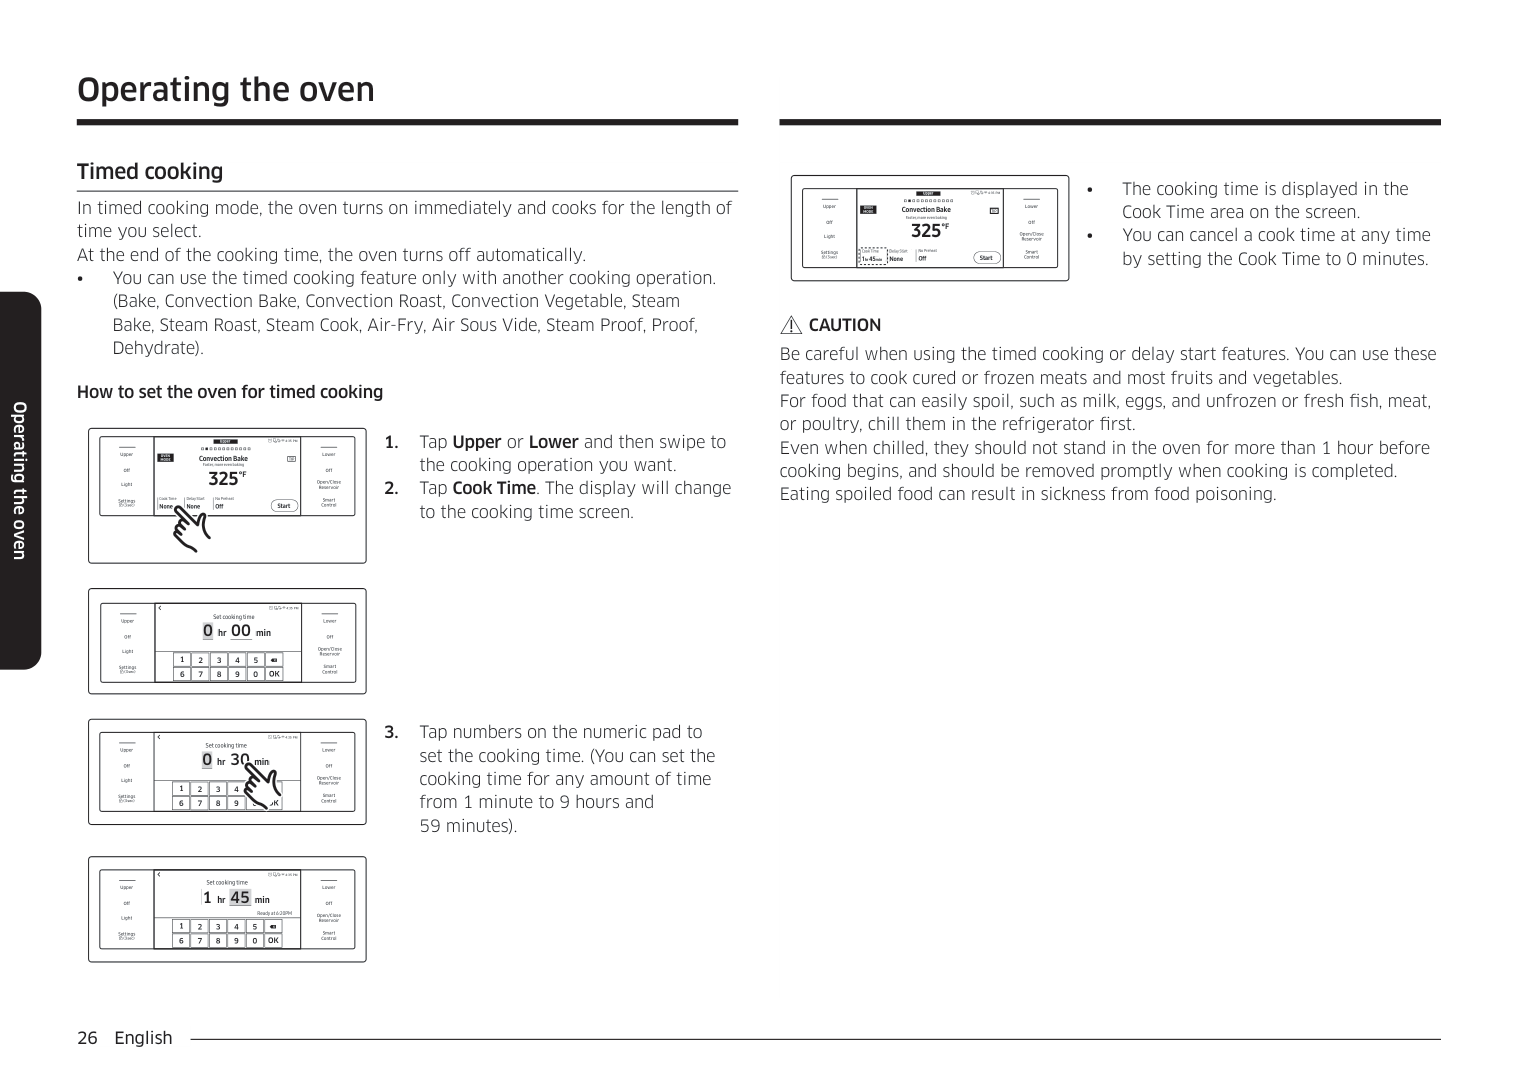
######## Timed cooking
In timed cooking mode, the oven turns on immediately and cooks for the length of time you select. At the end of the cooking time, the oven turns off automatically.
• You can use the timed cooking feature only with another cooking operation. (Bake, Convection Bake, Convection Roast, Convection Vegetable, Steam Bake, Steam Roast, Steam Cook, Air-Fry, Air Sous Vide, Steam Proof, Proof, Dehydrate).
How to set the oven for timed cooking
Upper 1. Tap Upper or Lower and then swipe to
4:35 PM
LowerUpper
OVEN MODE
Convection Bake Faster, more even baking
the cooking operation you want.
############################################# TIP
325
Off
Off
°F
|Off
Light
Upper
Settings
|0 hr 00 min
Set cooking time
4:35 PM
hr min
Set cooking time|Off
Open/Close Reservoir
Smart Control
Lower| |---|---|---| |Off
Light
Upper
Settings
||1| |---|
|6| |---|
|7| |---|
|8|
|---|
|9| |---|
|0| |---|
|2| |---|
|3| |---|
|4| |---|
|5| |---|
|OK| |---| |Off
Open/Close Reservoir
Smart Control
Lower|
|Off
Light
Upper
Settings|0 hr 30 min
Set cooking time
4:35 PM Set cooking time
hr min
|Off
Open/Close Reservoir
Smart Control
Lower| |---|---|---| |Off
Light
Upper
Settings||1| |---|
|6| |---|
|7| |---|
|8| |---|
|9| |---|
|0| |---|
|2| |---|
|3| |---|
|4| |---|
|5| |---|
|OK| |---| |Off
Open/Close Reservoir
Smart Control
Lower|
Open/Close Reservoir
Light
Cook Time None None Off Start
Delay Start No Preheat
Smart Control
Settings
|Off
Light
Upper
Settings
|1 hr 45 min
Set cooking time
Ready at 6:20PM
4:35 PM Set cooking time
hr min
Ready at 6:20PM|Off
Open/Close Reservoir
Smart Control
Lower| |---|---|---| |Off
Light
Upper
Settings
||1| |---|
|6| |---|
|7| |---|
|8|
|---|
|9| |---|
|0| |---|
|2| |---|
|3| |---|
|4| |---|
|5| |---|
|OK| |---| |Off
Open/Close Reservoir
Smart Control
Lower|
Upper • The cooking time is displayed in the
4:35 PM Convection Bake Faster, more even baking 325
Cook Time area on the screen.
LowerUpper
#################################### Convection Bake Faster, more even baking
################################################ OVEN MODE TIP
View Summary
TIP
Off
Off
################################# °F
• You can cancel a cook time at any time by setting the Cook Time to 0 minutes.
Open/Close Reservoir
Light
Delay Start No Preheat
Cook Time 1hr45min None Off Start
Cook Time 1hr 45min
Delay Start None
No Preheat Off
Smart Control
Settings
Start
CAUTION Be careful when using the timed cooking or delay start features. You can use these features to cook cured or frozen meats and most fruits and vegetables. For food that can easily spoil, such as milk, eggs, and unfrozen or fresh fish, meat, or poultry, chill them in the refrigerator first. Even when chilled, they should not stand in the oven for more than 1 hour before cooking begins, and should be removed promptly when cooking is completed. Eating spoiled food can result in sickness from food poisoning.
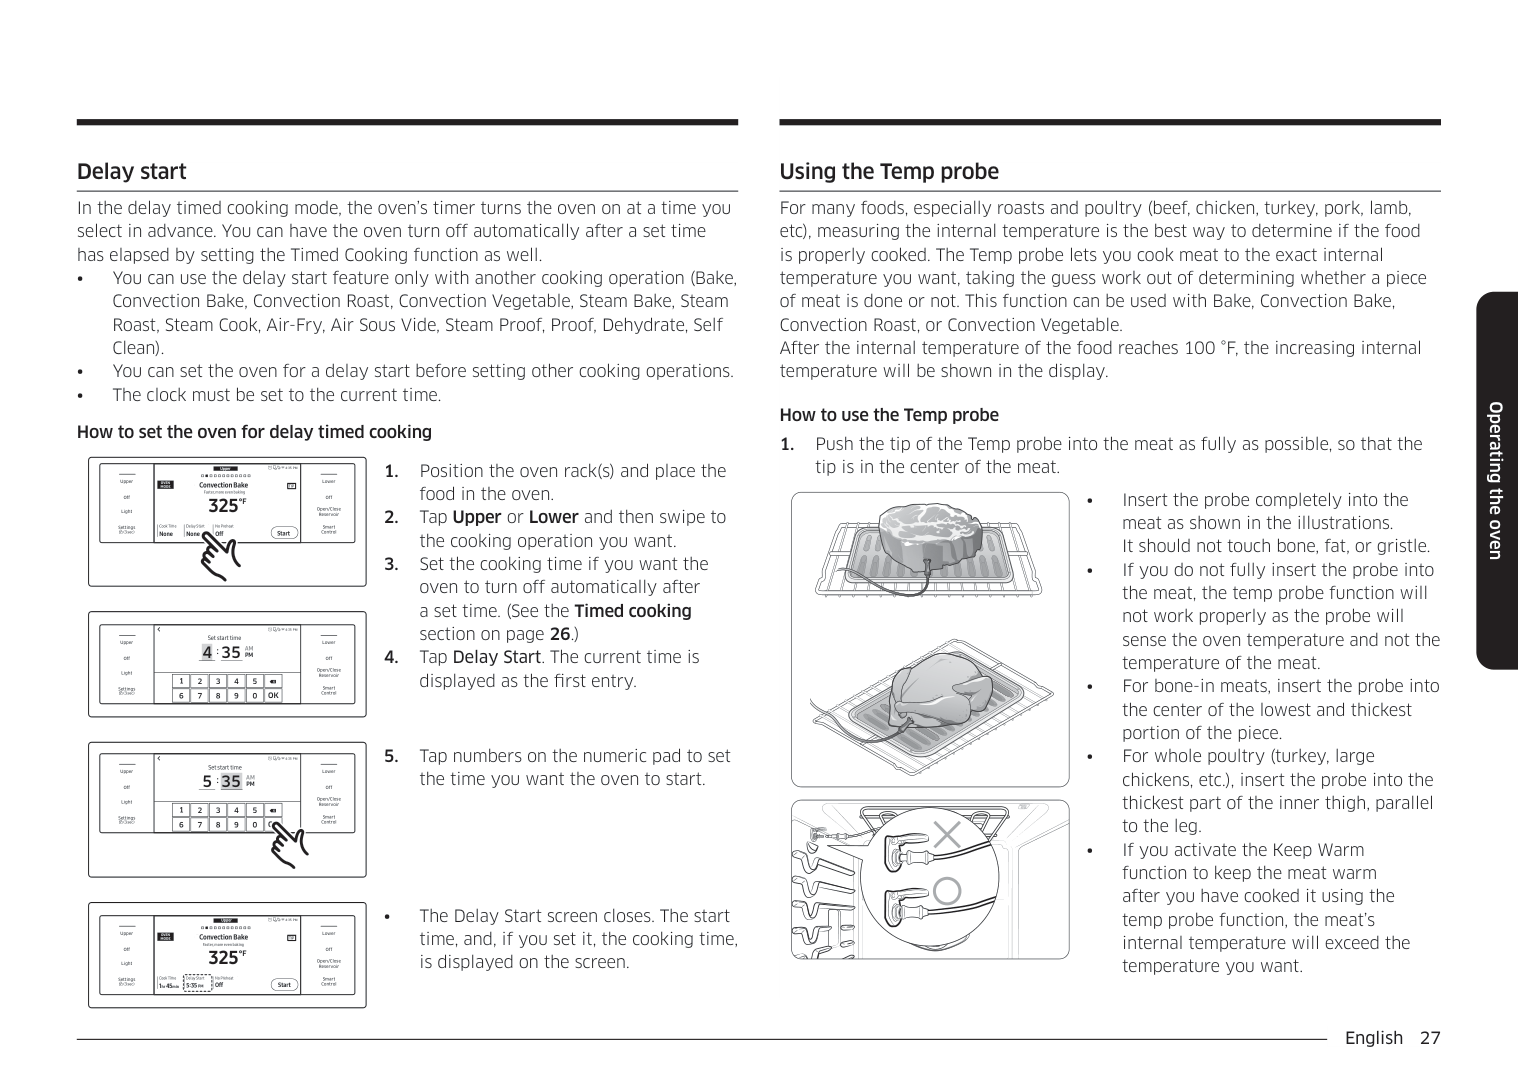
######## Delay start
######## Using the Temp probe
In the delay timed cooking mode, the oven’s timer turns the oven on at a time you select in advance. You can have the oven turn off automatically after a set time has elapsed by setting the Timed Cooking function as well.
For many foods, especially roasts and poultry (beef, chicken, turkey, pork, lamb, etc), measuring the internal temperature is the best way to determine if the food is properly cooked. The Temp probe lets you cook meat to the exact internal temperature you want, taking the guess work out of determining whether a piece of meat is done or not. This function can be used with Bake, Convection Bake, Convection Roast, or Convection Vegetable. After the internal temperature of the food reaches 100 °F, the increasing internal temperature will be shown in the display.
How to use the Temp probe
tip is in the center of the meat.
|Off
Light
Upper
Settings|4 :35
AM PM
Set start time
4:35 PM
AM
Set start time
PM|Off
Open/Close Reservoir
Smart Control
Lower| |---|---|---| |Off
Light
Upper
Settings||1| |---|
|6| |---|
|7| |---|
|8| |---|
|9| |---|
|0| |---|
|2| |---|
|3| |---|
|4| |---|
|5| |---|
|OK| |---| |Off
Open/Close Reservoir
Smart Control
Lower|
|Off
Light
Upper
Settings|5 :35
AM PM
Set start time
4:35 PM
AM
Set start time
PM|Off
Open/Close Reservoir
Smart Control
Lower| |---|---|---| |Off
Light
Upper
Settings||1| |---|
|6| |---|
|7| |---|
|8| |---|
|9| |---|
|0| |---|
|2| |---|
|3| |---|
|4| |---|
|5| |---|
|OK|
|---| |Off
Open/Close Reservoir
Smart Control
Lower|
############################################ Upper
4:35 PM Convection Bake Faster, more even baking 325
LowerUpper
############################################## OVEN MODE TIP
#################################### Convection Bake Faster, more even baking
View Summary
############################################# TIP
Off
Off
############################## °F
Open/Close Reservoir
Light
Delay Start No Preheat
Cook Time None
Delay Start None
No Preheat Off
Cook Time None
Smart Control
Settings
Start
None Off Start
• The Delay Start screen closes. The start time, and, if you set it, the cooking time, is displayed on the screen.
############################################ Upper
4:35 PM Convection Bake Faster, more even baking 325
LowerUpper
#################################### OVEN MODE TIPConvection Bake
View Summary
TIP
Faster, more even baking
Off
Off
################################# °F
Open/Close Reservoir
Light
No Preheat Off Start
Cook Time 1 45min
Delay Start No Preheat
Cook Time 1 45min 5:35PM Off
Delay Start 5:35 PM
Smart Control
Settings
Start
Operating the oven
Operating the oven
|Available temperatures|100 °F to 200 °F| |---|---|
CAUTION To protect the Temp probe’s tip, be careful not to insert the probe so that the tip protrudes through the surface of the meat. Make sure that the tip is in or near the center of the meat.
################ CAUTION
NOTE
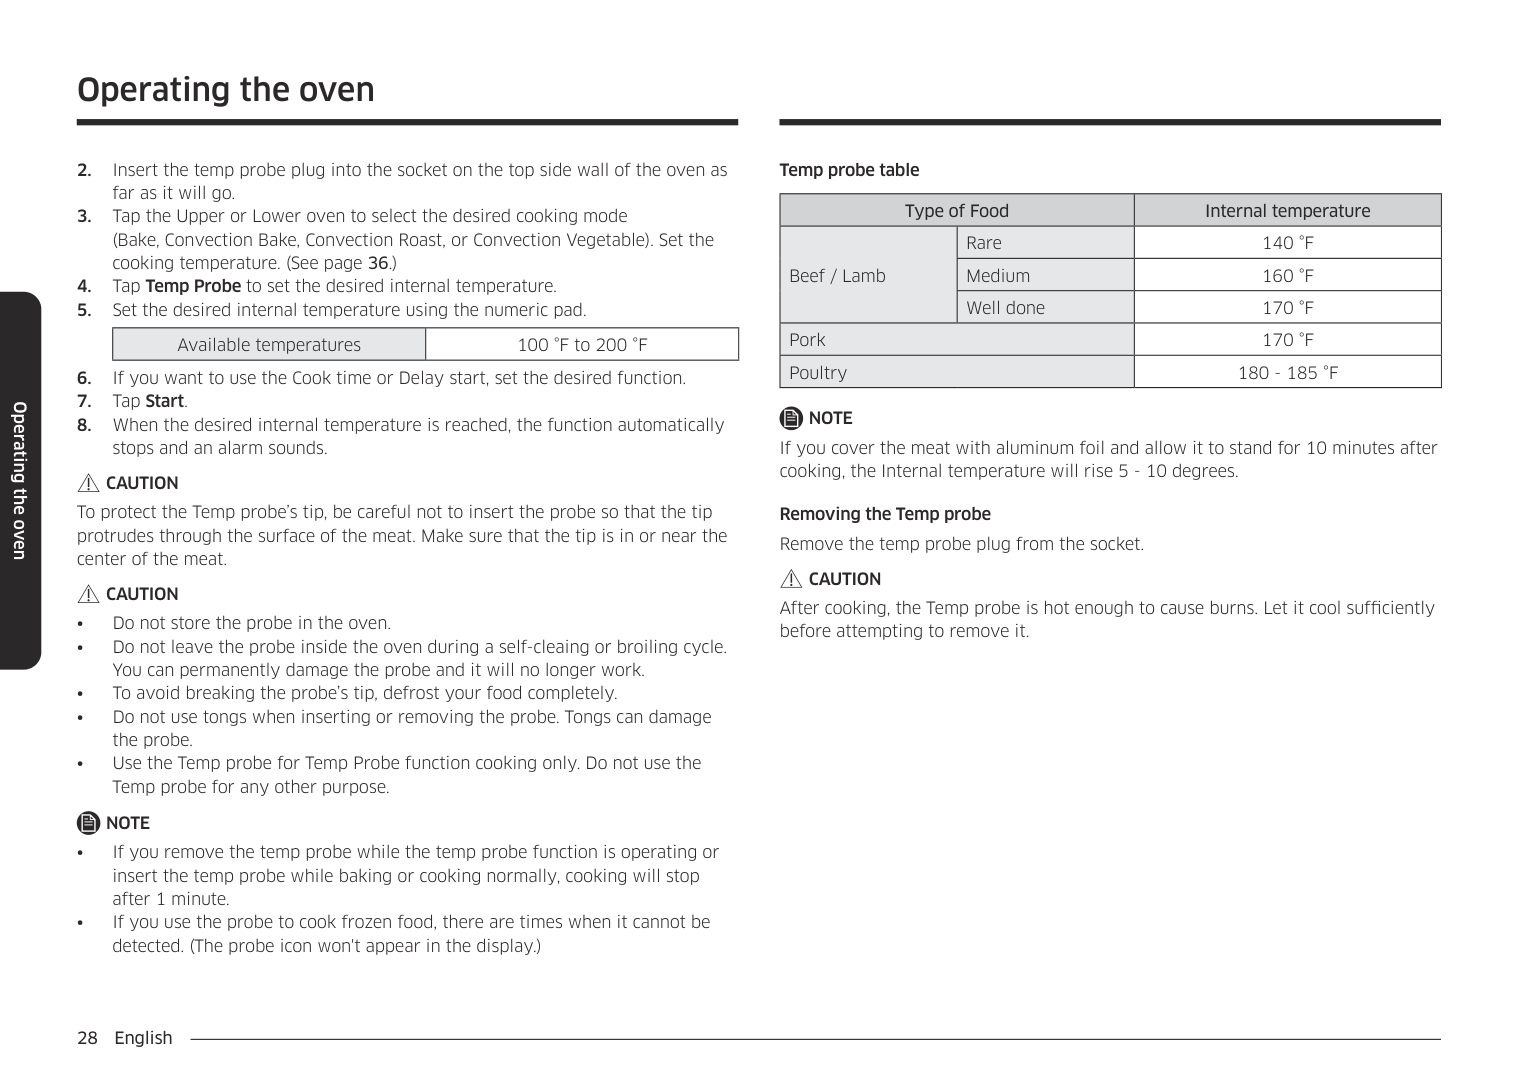
################ Temp probe table
|Type of Food|Type of Food|Internal temperature| |---|---|---| |Beef / Lamb|Rare|140 °F| |Beef / Lamb|Medium|160 °F|
|Beef / Lamb|Well done|170 °F| |Pork|Pork|170 °F| |Poultry|Poultry|180 - 185 °F|
NOTE If you cover the meat with aluminum foil and allow it to stand for 10 minutes after cooking, the Internal temperature will rise 5 - 10 degrees.
Removing the Temp probe Remove the temp probe plug from the socket.
CAUTION After cooking, the Temp probe is hot enough to cause burns. Let it cool sufficiently before attempting to remove it.
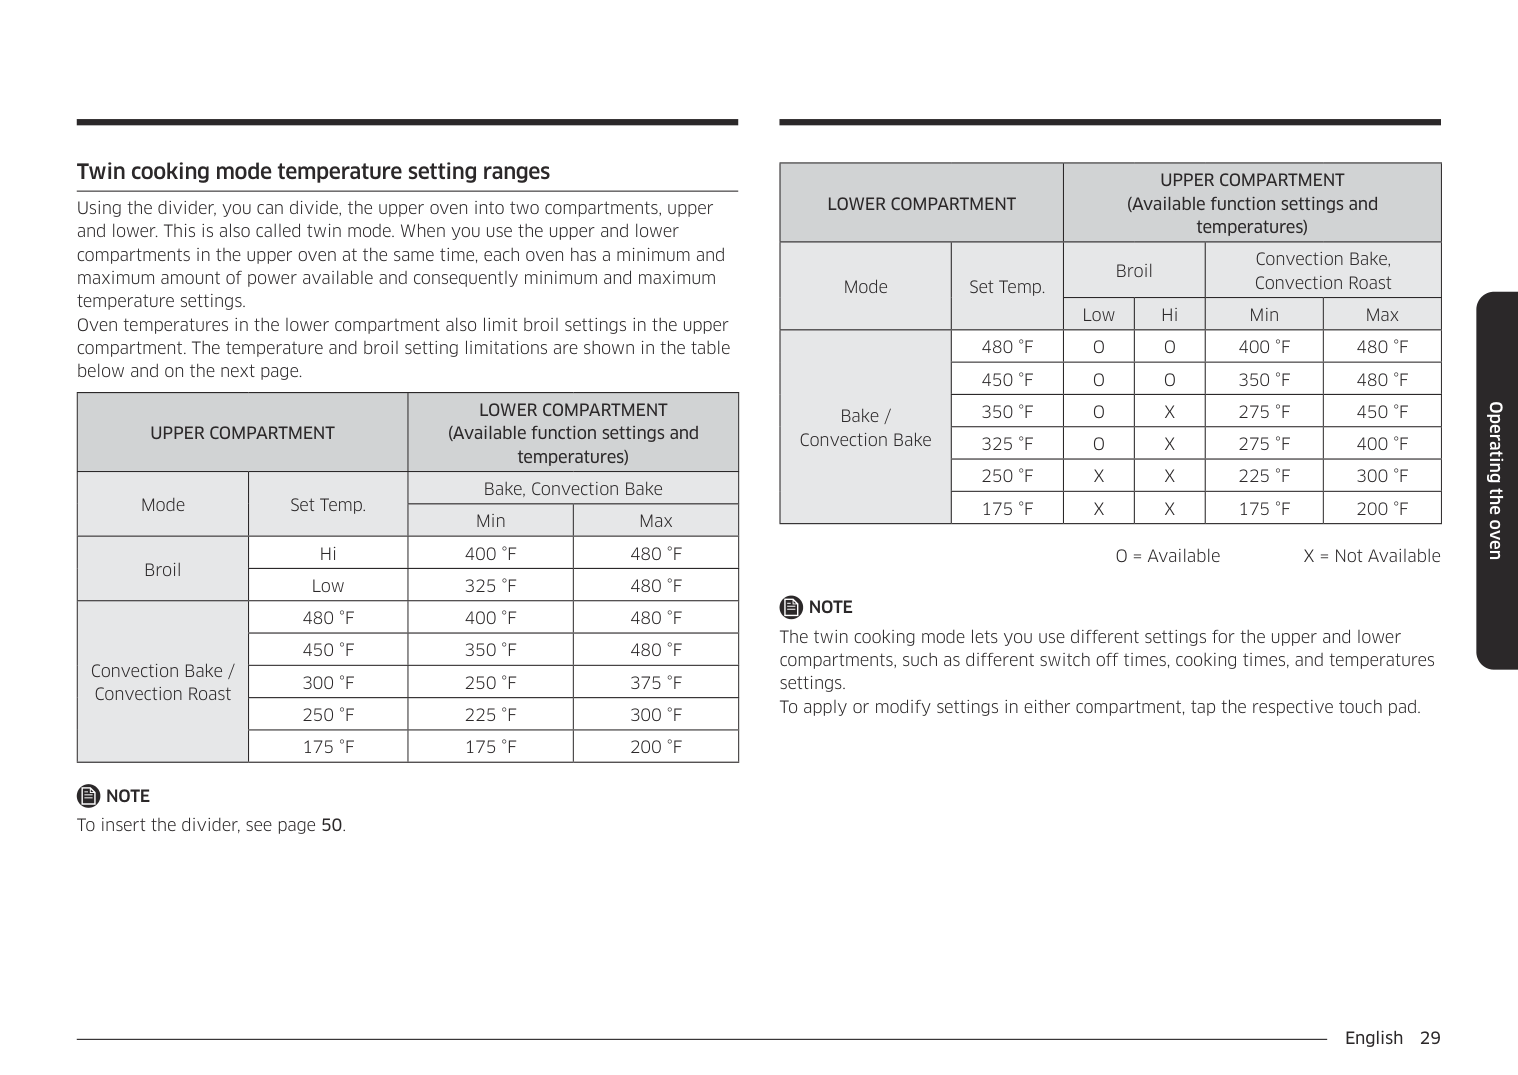
######## Twin cooking mode temperature setting ranges
Using the divider, you can divide, the upper oven into two compartments, upper and lower. This is also called twin mode. When you use the upper and lower compartments in the upper oven at the same time, each oven has a minimum and maximum amount of power available and consequently minimum and maximum temperature settings. Oven temperatures in the lower compartment also limit broil settings in the upper compartment. The temperature and broil setting limitations are shown in the table below and on the next page.
|UPPER COMPARTMENT|UPPER COMPARTMENT|LOWER COMPARTMENT (Available function settings and temperatures)|LOWER COMPARTMENT (Available function settings and temperatures)| |---|---|---|---| |Mode|Set Temp.|Bake, Convection Bake|Bake, Convection Bake| |Mode|Set Temp.|Min|Max| |Broil|Hi|400 °F|480 °F| |Broil|Low|325 °F|480 °F| |Convection Bake / Convection Roast|480 °F|400 °F|480 °F| |Convection Bake / Convection Roast|450 °F|350 °F|480 °F| |Convection Bake / Convection Roast|300 °F|250 °F|375 °F| |Convection Bake / Convection Roast|250 °F|225 °F|300 °F| |Convection Bake / Convection Roast|175 °F|175 °F|200 °F|
################ NOTE
To insert the divider, see page 50.
|LOWER COMPARTMENT|LOWER COMPARTMENT|UPPER COMPARTMENT (Available function settings and temperatures)|UPPER COMPARTMENT (Available function settings and temperatures)|UPPER COMPARTMENT (Available function settings and temperatures)|UPPER COMPARTMENT (Available function settings and temperatures)| |---|---|---|---|---|---| |Mode|Set Temp.|Broil|Broil|Convection Bake, Convection Roast|Convection Bake, Convection Roast| |Mode|Set Temp.|Low|Hi|Min|Max| |Bake / Convection Bake|480 °F|O|O|400 °F|480 °F| |Bake / Convection Bake|450 °F|O|O|350 °F|480 °F| |Bake / Convection Bake|350 °F|O|X|275 °F|450 °F| |Bake / Convection Bake|325 °F|O|X|275 °F|400 °F| |Bake / Convection Bake|250 °F|X|X|225 °F|300 °F| |Bake / Convection Bake|175 °F|X|X|175 °F|200 °F|
O = Available X = Not Available
NOTE The twin cooking mode lets you use different settings for the upper and lower compartments, such as different switch off times, cooking times, and temperatures settings. To apply or modify settings in either compartment, tap the respective touch pad.
Operating the oven
Operating the oven
######## Oven functions
|Premium Plus _ Oven|Premium Plus _ Oven|Premium Plus _ Oven|Oven Functions| |---|---|---|---| |Single Lower
Single Upper
Without a divider|Single oven|Upper|Bake, Broil, Convection Bake, Convection Roast, Convection Vegetable, Steam Bake, Steam Roast, Air-Fry, Air Sous Vide, Steam Cook , Guided Cook. Keep Warm, Steam Proof, Proof, Dehydrate, Smart Control, Clean| |Single Lower
Single Upper
Without a divider|Single oven|Lower|Bake, Broil, Convection Bake, Convection Roast, Convection Vegetable, Air-Fry, Air Sous Vide, Keep Warm, Proof, Dehydrate, Smart Control, Clean| |Single Lower
Flex Lower
Flex Upper
With a divider|*Twin oven|Flex Upper|Broil, Convection Bake, Convection Roast, Smart Control| |Single Lower
Flex Lower
Flex Upper
With a divider|*Twin oven|Flex Lower|Bake, Convection Bake, Smart Controll|
Cooking mode Tap the Upper or Lower oven on the screen to select the cooking mode. Set the temperature using the numeric pad or the wheel picker. See Setting the Temperature on page 36 and Basic Baking and Broiling Instructions starting on page 36.
|Mode|Temperature range|Temperature range|Single oven|Single oven|*Twin oven|*Twin oven|Temp probe|No preheat| |---|---|---|---|---|---|---|---|---|
|Mode|Single oven|*Twin oven|Upper|Lower|Upper|Lower|Temp probe|No preheat| |Bake|175 °F (80 °C) 550 °F (285 °C)|175 °F (80 °C) 480 °F (250 °C)|O|O|-|O|O|-| |Broil|L0 / HI|L0 / HI|O|O|O| | | | |Convection Bake|175 °F (80 °C) 550 °F (285 °C)|175 °F (80 °C) 480 °F (250 °C)|O|O|O|O|O|O| |Convection Roast|175 °F (80 °C) 550 °F (285 °C)|175 °F (80 °C) 480 °F (250 °C)|O|O|O|-|O|O| |Convection Vegetable|350 °F (175 °C) 450 °F (230 °C)| |O|O| | |O| | |Steam Bake|230 °F (110 °C) 550 °F (285 °C)|-|O|-|-|-|-|-| |Steam Roast|230 °F (110 °C) 550 °F (285 °C)|-|O|-|-|-|-|-| |Steam Cook|O|-|O|-|-|-|-|-| |Air fry|350 °F (175 °C) 500 °F (260 °C)| |O|O| | | | | |Air Sous Vide|100 °F (40 °C) 205 °F (95 °C)|-|O|O|-|-|-|-| |Dehydrate|100 °F (40 °C) 225 °F (105 °C)|-|O|O|-|-|-|-| |Proof|95°F (35°C) / 105°F(40°C)|-|O|O|-|-|-|-| |Steam Proof|95°F (35°C) / 105°F(40°C)|-|O|-|-|-|-|-| |Keep Warm|175°F (80°C)|-|O|O|-|-|-|-|
O = Available - = Not Available
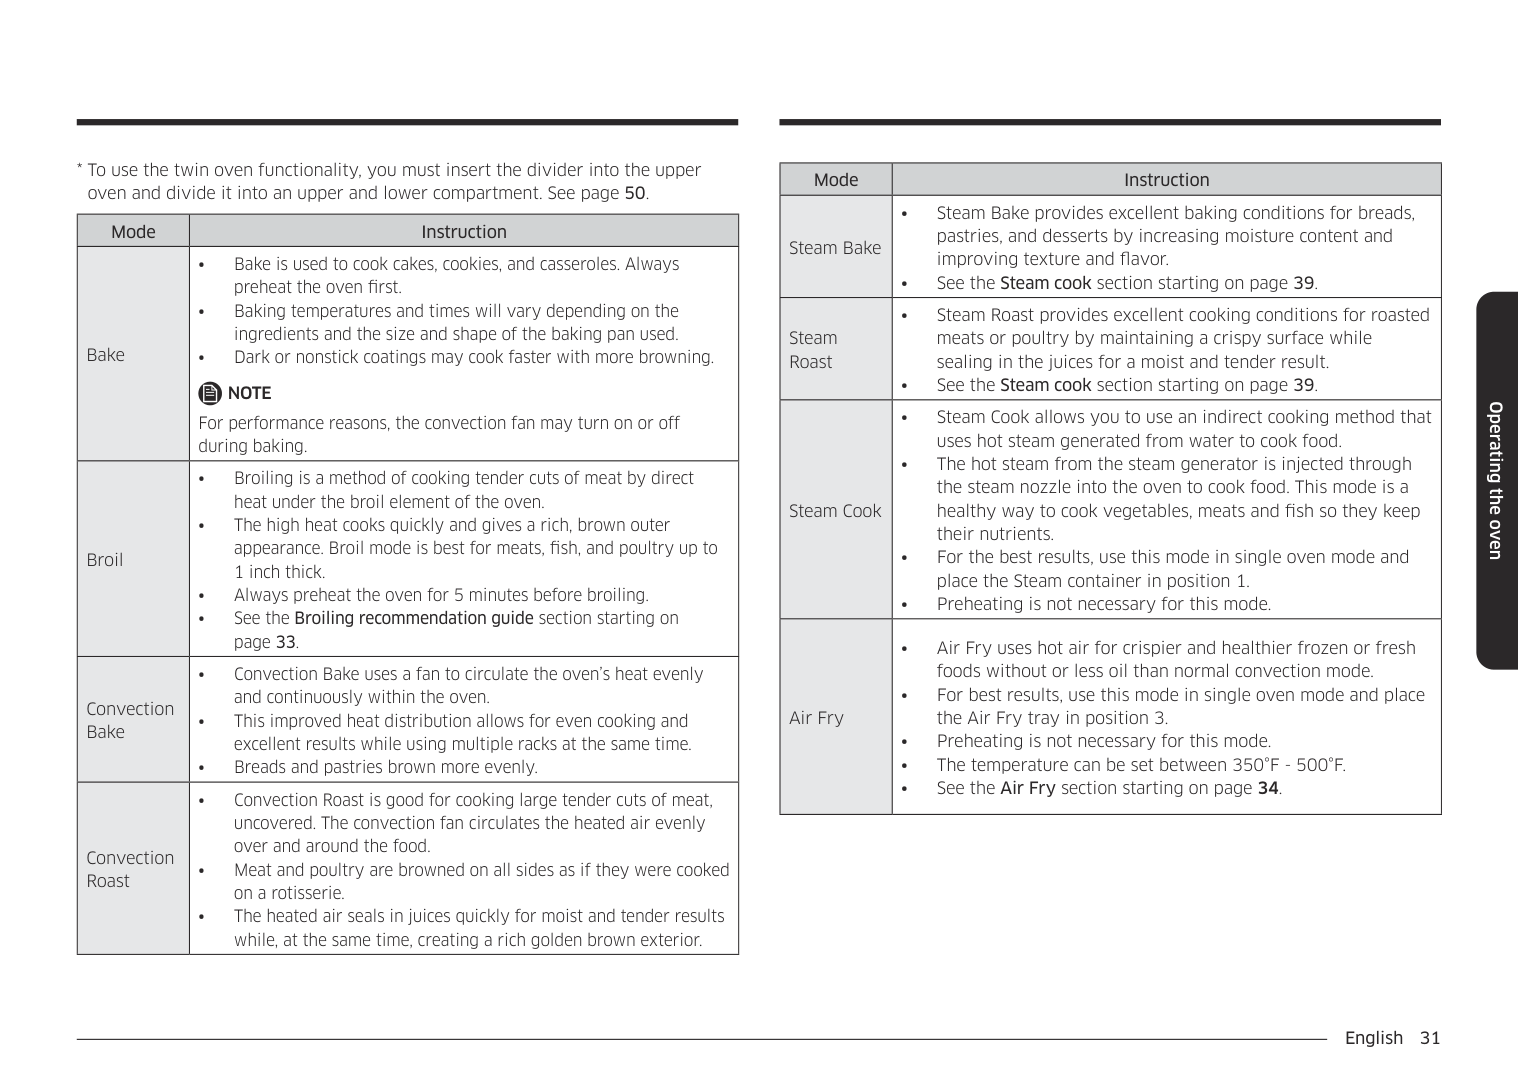
|Mode|Instruction| |---|---| |Bake|• Bake is used to cook cakes, cookies, and casseroles. Always preheat the oven first.
• Baking temperatures and times will vary depending on the ingredients and the size and shape of the baking pan used.
• Dark or nonstick coatings may cook faster with more browning.
NOTE For performance reasons, the convection fan may turn on or off during baking.| |Broil|• Broiling is a method of cooking tender cuts of meat by direct heat under the broil element of the oven.
• The high heat cooks quickly and gives a rich, brown outer appearance. Broil mode is best for meats, fish, and poultry up to 1 inch thick.
• Always preheat the oven for 5 minutes before broiling.
• See the Broiling recommendation guide section starting on page 33.
| |Convection Bake|• Convection Bake uses a fan to circulate the oven’s heat evenly and continuously within the oven.
• This improved heat distribution allows for even cooking and excellent results while using multiple racks at the same time.
• Breads and pastries brown more evenly.
| |Convection Roast|• Convection Roast is good for cooking large tender cuts of meat, uncovered. The convection fan circulates the heated air evenly over and around the food.
• Meat and poultry are browned on all sides as if they were cooked on a rotisserie.
• The heated air seals in juices quickly for moist and tender results while, at the same time, creating a rich golden brown exterior.
|
|Mode|Instruction| |---|---| |Steam Bake|• Steam Bake provides excellent baking conditions for breads, pastries, and desserts by increasing moisture content and improving texture and flavor.
• See the Steam cook section starting on page 39.
| |Steam Roast|• Steam Roast provides excellent cooking conditions for roasted meats or poultry by maintaining a crispy surface while sealing in the juices for a moist and tender result.
• See the Steam cook section starting on page 39.
| |Steam Cook|• Steam Cook allows you to use an indirect cooking method that uses hot steam generated from water to cook food.
• The hot steam from the steam generator is injected through the steam nozzle into the oven to cook food. This mode is a healthy way to cook vegetables, meats and fish so they keep their nutrients.
• For the best results, use this mode in single oven mode and place the Steam container in position 1.
• Preheating is not necessary for this mode.
| |Air Fry|• Air Fry uses hot air for crispier and healthier frozen or fresh foods without or less oil than normal convection mode.
• For best results, use this mode in single oven mode and place the Air Fry tray in position 3.
• Preheating is not necessary for this mode.
• The temperature can be set between 350°F - 500°F.
• See the Air Fry section starting on page 34.
|
Operating the oven
################ Operating the oven
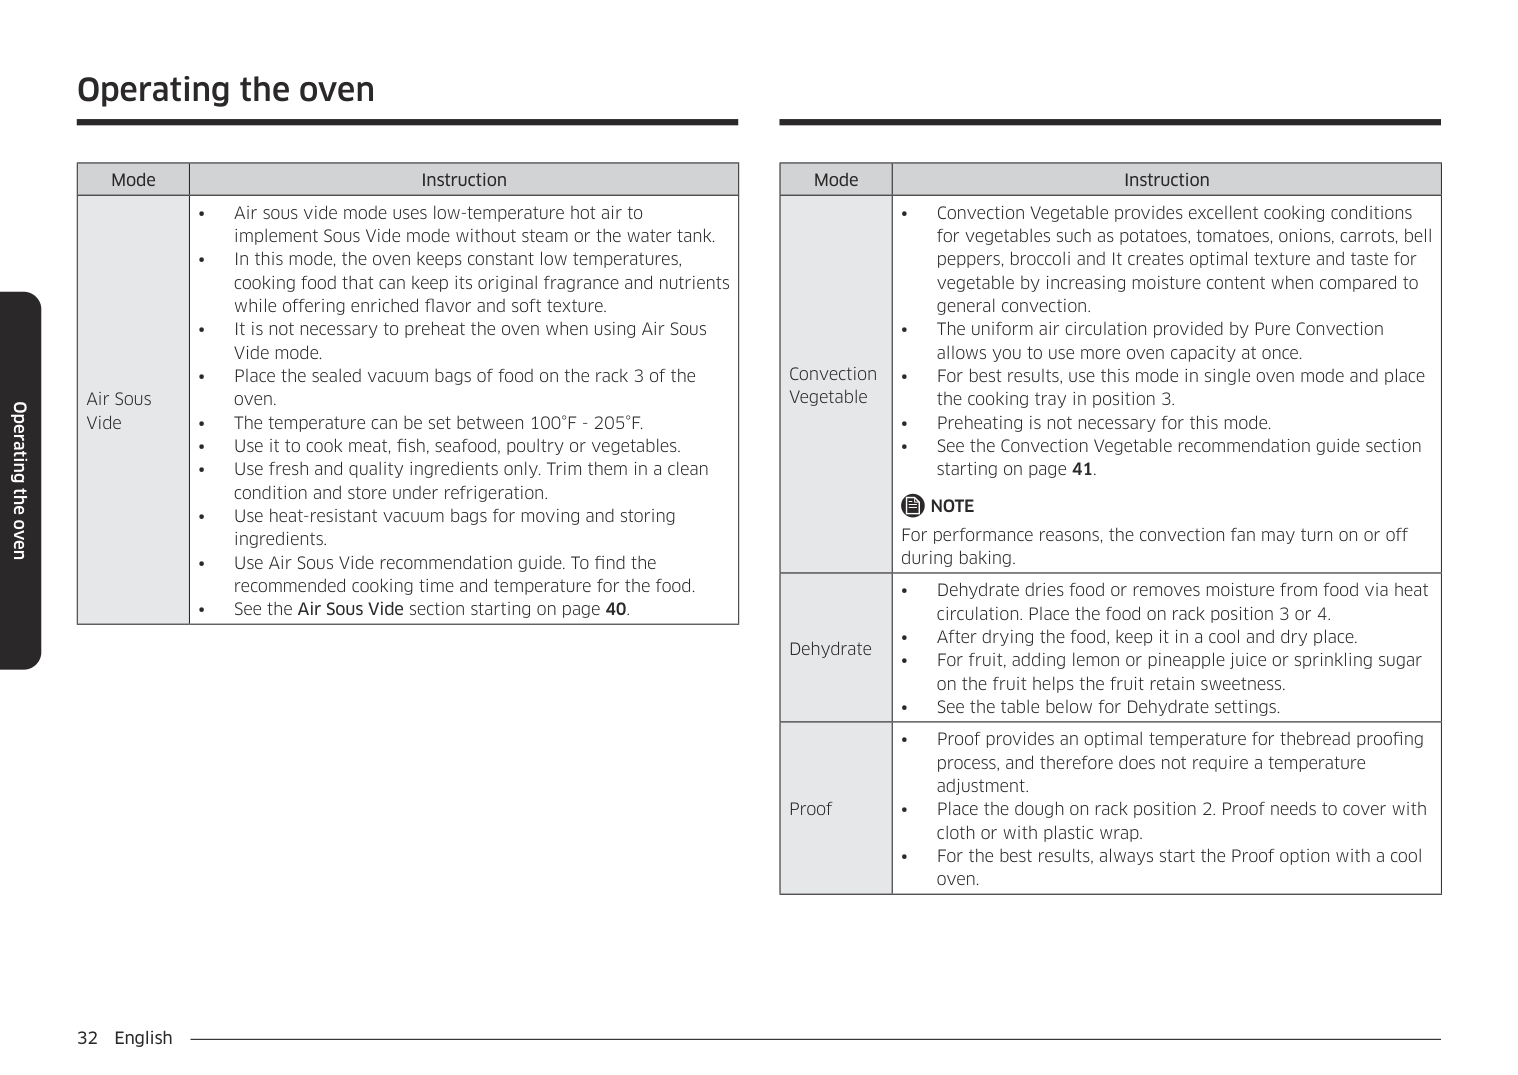
|Mode|Instruction| |---|---| |Air Sous Vide|• Air sous vide mode uses low-temperature hot air to implement Sous Vide mode without steam or the water tank.
• In this mode, the oven keeps constant low temperatures, cooking food that can keep its original fragrance and nutrients while offering enriched flavor and soft texture.
• It is not necessary to preheat the oven when using Air Sous Vide mode.
• Place the sealed vacuum bags of food on the rack 3 of the oven.
• The temperature can be set between 100°F - 205°F.
• Use it to cook meat, fish, seafood, poultry or vegetables.
• Use fresh and quality ingredients only. Trim them in a clean condition and store under refrigeration.
• Use heat-resistant vacuum bags for moving and storing ingredients.
• Use Air Sous Vide recommendation guide. To find the recommended cooking time and temperature for the food.
• See the Air Sous Vide section starting on page 40.
|
|Mode|Instruction| |---|---| |Convection Vegetable|• Convection Vegetable provides excellent cooking conditions for vegetables such as potatoes, tomatoes, onions, carrots, bell peppers, broccoli and It creates optimal texture and taste for vegetable by increasing moisture content when compared to general convection.
• The uniform air circulation provided by Pure Convection allows you to use more oven capacity at once.
• For best results, use this mode in single oven mode and place the cooking tray in position 3.
• Preheating is not necessary for this mode.
• See the Convection Vegetable recommendation guide section starting on page 41.
NOTE For performance reasons, the convection fan may turn on or off during baking.| |Dehydrate|• Dehydrate dries food or removes moisture from food via heat circulation. Place the food on rack position 3 or 4.
• After drying the food, keep it in a cool and dry place.
• For fruit, adding lemon or pineapple juice or sprinkling sugar on the fruit helps the fruit retain sweetness.
• See the table below for Dehydrate settings.
| |Proof|• Proof provides an optimal temperature for thebread proofing process, and therefore does not require a temperature adjustment.
• Place the dough on rack position 2. Proof needs to cover with cloth or with plastic wrap.
• For the best results, always start the Proof option with a cool oven.
|
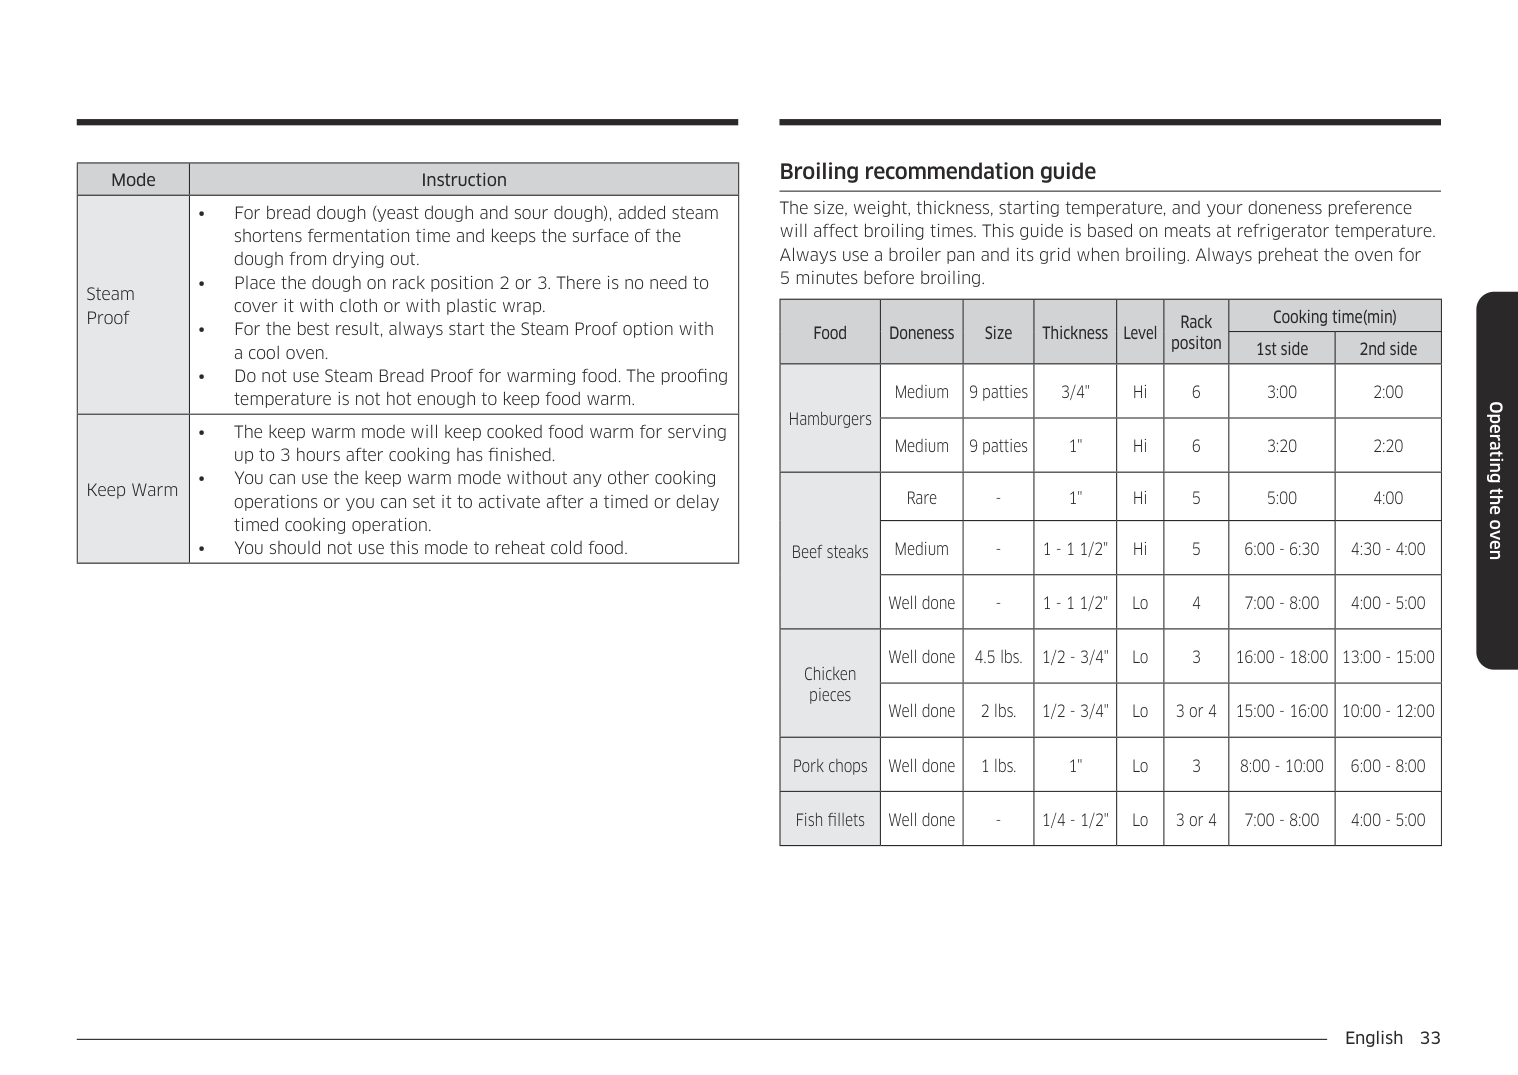
|Mode|Instruction| |---|---| |Steam Proof|• For bread dough (yeast dough and sour dough), added steam shortens fermentation time and keeps the surface of the dough from drying out.
• Place the dough on rack position 2 or 3. There is no need to cover it with cloth or with plastic wrap.
• For the best result, always start the Steam Proof option with a cool oven.
• Do not use Steam Bread Proof for warming food. The proofing temperature is not hot enough to keep food warm.
| |Keep Warm|• The keep warm mode will keep cooked food warm for serving up to 3 hours after cooking has finished.
• You can use the keep warm mode without any other cooking operations or you can set it to activate after a timed or delay timed cooking operation.
• You should not use this mode to reheat cold food.
|
######## Broiling recommendation guide
The size, weight, thickness, starting temperature, and your doneness preference will affect broiling times. This guide is based on meats at refrigerator temperature. Always use a broiler pan and its grid when broiling. Always preheat the oven for 5 minutes before broiling.
|Food|Doneness|Size|Thickness|Level|Rack positon|Cooking time(min)|Cooking time(min)| |---|---|---|---|---|---|---|---| |Food|Doneness|Size|Thickness|Level|Rack positon|1st side|2nd side| |Hamburgers|Medium|9 patties|3/4"|Hi|6|3:00|2:00| |Hamburgers|Medium|9 patties|1"|Hi|6|3:20|2:20|
|Beef steaks|Rare|-|1"|Hi|5|5:00|4:00| |Beef steaks|Medium|-|1 - 1 1/2"|Hi|5|6:00 - 6:30|4:30 - 4:00| |Beef steaks|Well done|-|1 - 1 1/2"|Lo|4|7:00 - 8:00|4:00 - 5:00| |Chicken pieces|Well done|4.5 lbs.|1/2 - 3/4"|Lo|3|16:00 - 18:00|13:00 - 15:00| |Chicken pieces|Well done|2 lbs.|1/2 - 3/4"|Lo|3 or 4|15:00 - 16:00|10:00 - 12:00| |Pork chops|Well done|1 lbs.|1"|Lo|3|8:00 - 10:00|6:00 - 8:00| |Fish fillets|Well done|-|1/4 - 1/2"|Lo|3 or 4|7:00 - 8:00|4:00 - 5:00|
Operating the oven
Operating the oven
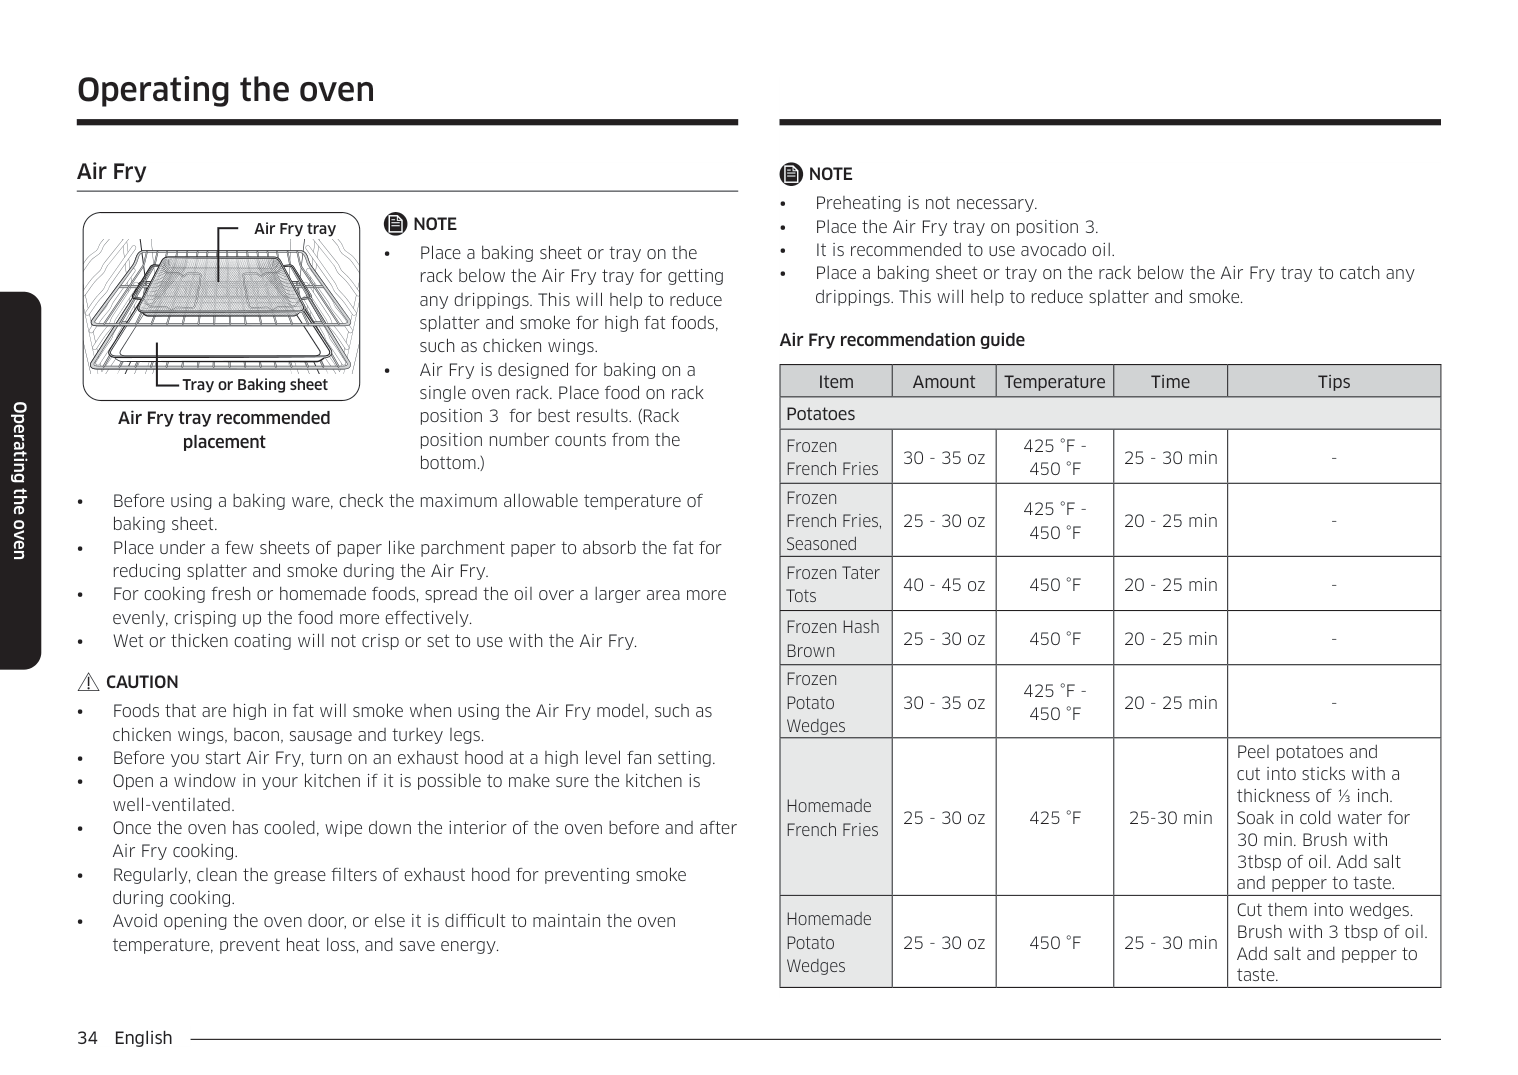
######## Air Fry
################ NOTE
Air Fry tray
| | | |---|---| | | |
CAUTION
| | | |---|---| | | |
Tray or Baking sheet
Air Fry tray recommended placement
################ NOTE
################ Air Fry recommendation guide
|Item|Amount|Temperature|Time|Tips| |---|---|---|---|---| |Potatoes|Potatoes|Potatoes|Potatoes|Potatoes| |Frozen French Fries|30 - 35 oz|425 °F 450 °F|25 - 30 min| | |Frozen French Fries, Seasoned|25 - 30 oz|425 °F 450 °F|20 - 25 min| | |Frozen Tater Tots|40 - 45 oz|450 °F|20 - 25 min|-| |Frozen Hash Brown|25 - 30 oz|450 °F|20 - 25 min|-| |Frozen Potato Wedges|30 - 35 oz|425 °F 450 °F|20 - 25 min|-| |Homemade French Fries|25 - 30 oz|425 °F|25-30 min|Peel potatoes and cut into sticks with a thickness of ⅓ inch. Soak in cold water for 30 min. Brush with 3tbsp of oil. Add salt and pepper to taste.|
|Homemade Potato Wedges|25 - 30 oz|450 °F|25 - 30 min|Cut them into wedges. Brush with 3 tbsp of oil. Add salt and pepper to taste.|
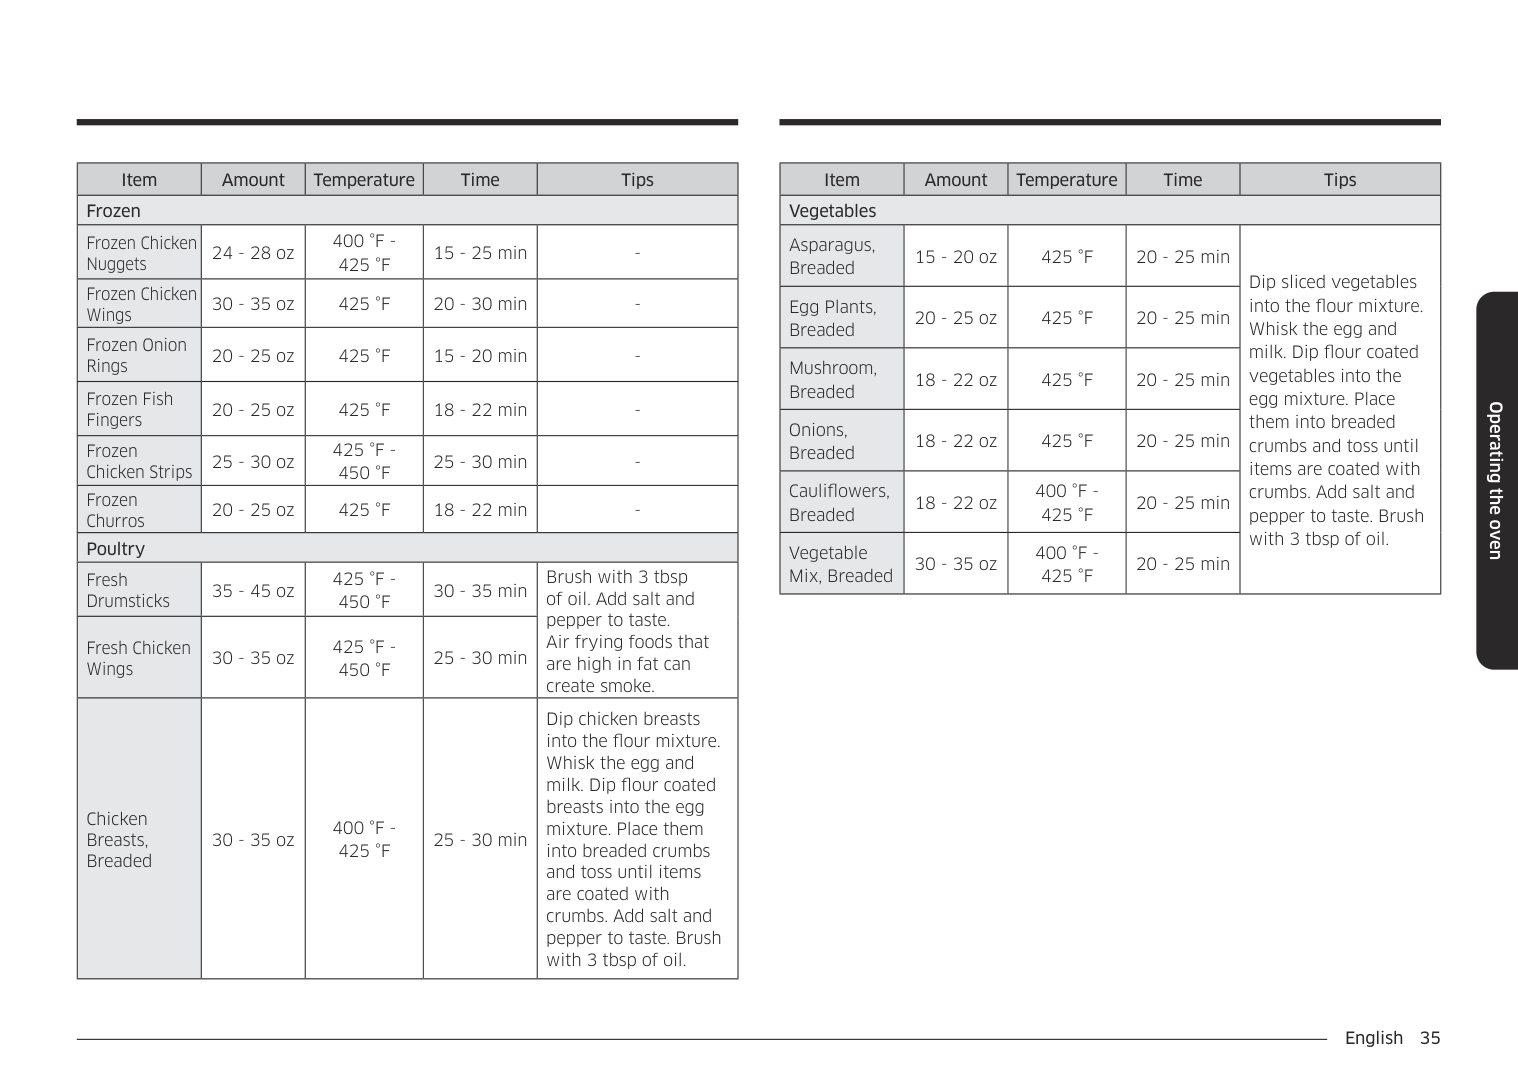
|Item|Amount|Temperature|Time|Tips| |---|---|---|---|---| |Frozen|Frozen|Frozen|Frozen|Frozen| |Frozen Chicken Nuggets|24 - 28 oz|400 °F 425 °F|15 - 25 min|-| |Frozen Chicken Wings|30 - 35 oz|425 °F|20 - 30 min| | |Frozen Onion Rings|20 - 25 oz|425 °F|15 - 20 min|-| |Frozen Fish Fingers|20 - 25 oz|425 °F|18 - 22 min|-| |Frozen Chicken Strips|25 - 30 oz|425 °F 450 °F|25 - 30 min|-| |Frozen Churros|20 - 25 oz|425 °F|18 - 22 min|-| |Poultry|Poultry|Poultry|Poultry|Poultry| |Fresh Drumsticks|35 - 45 oz|425 °F 450 °F|30 - 35 min|Brush with 3 tbsp of oil. Add salt and pepper to taste. Air frying foods that are high in fat can create smoke.| |Fresh Chicken Wings|30 - 35 oz|425 °F 450 °F|25 - 30 min|Brush with 3 tbsp of oil. Add salt and pepper to taste. Air frying foods that are high in fat can create smoke.| |Chicken Breasts, Breaded|30 - 35 oz|400 °F 425 °F|25 - 30 min|Dip chicken breasts into the flour mixture. Whisk the egg and milk. Dip flour coated breasts into the egg mixture. Place them into breaded crumbs and toss until items are coated with crumbs. Add salt and pepper to taste. Brush with 3 tbsp of oil.|
|Item|Amount|Temperature|Time|Tips| |---|---|---|---|---| |Vegetables|Vegetables|Vegetables|Vegetables|Vegetables| |Asparagus, Breaded|15 - 20 oz|425 °F|20 - 25 min|Dip sliced vegetables into the flour mixture. Whisk the egg and milk. Dip flour coated vegetables into the egg mixture. Place them into breaded crumbs and toss until items are coated with crumbs. Add salt and pepper to taste. Brush with 3 tbsp of oil.| |Egg Plants, Breaded|20 - 25 oz|425 °F|20 - 25 min|Dip sliced vegetables into the flour mixture. Whisk the egg and milk. Dip flour coated vegetables into the egg mixture. Place them into breaded crumbs and toss until items are coated with crumbs. Add salt and pepper to taste. Brush with 3 tbsp of oil.| |Mushroom, Breaded|18 - 22 oz|425 °F|20 - 25 min|Dip sliced vegetables into the flour mixture. Whisk the egg and milk. Dip flour coated vegetables into the egg mixture. Place them into breaded crumbs and toss until items are coated with crumbs. Add salt and pepper to taste. Brush with 3 tbsp of oil.| |Onions, Breaded|18 - 22 oz|425 °F|20 - 25 min|Dip sliced vegetables into the flour mixture. Whisk the egg and milk. Dip flour coated vegetables into the egg mixture. Place them into breaded crumbs and toss until items are coated with crumbs. Add salt and pepper to taste. Brush with 3 tbsp of oil.| |Cauliflowers, Breaded|18 - 22 oz|400 °F 425 °F|20 - 25 min|Dip sliced vegetables into the flour mixture. Whisk the egg and milk. Dip flour coated vegetables into the egg mixture. Place them into breaded crumbs and toss until items are coated with crumbs. Add salt and pepper to taste. Brush with 3 tbsp of oil.| |Vegetable Mix, Breaded|30 - 35 oz|400 °F 425 °F|20 - 25 min|Dip sliced vegetables into the flour mixture. Whisk the egg and milk. Dip flour coated vegetables into the egg mixture. Place them into breaded crumbs and toss until items are coated with crumbs. Add salt and pepper to taste. Brush with 3 tbsp of oil.|
################ Operating the oven
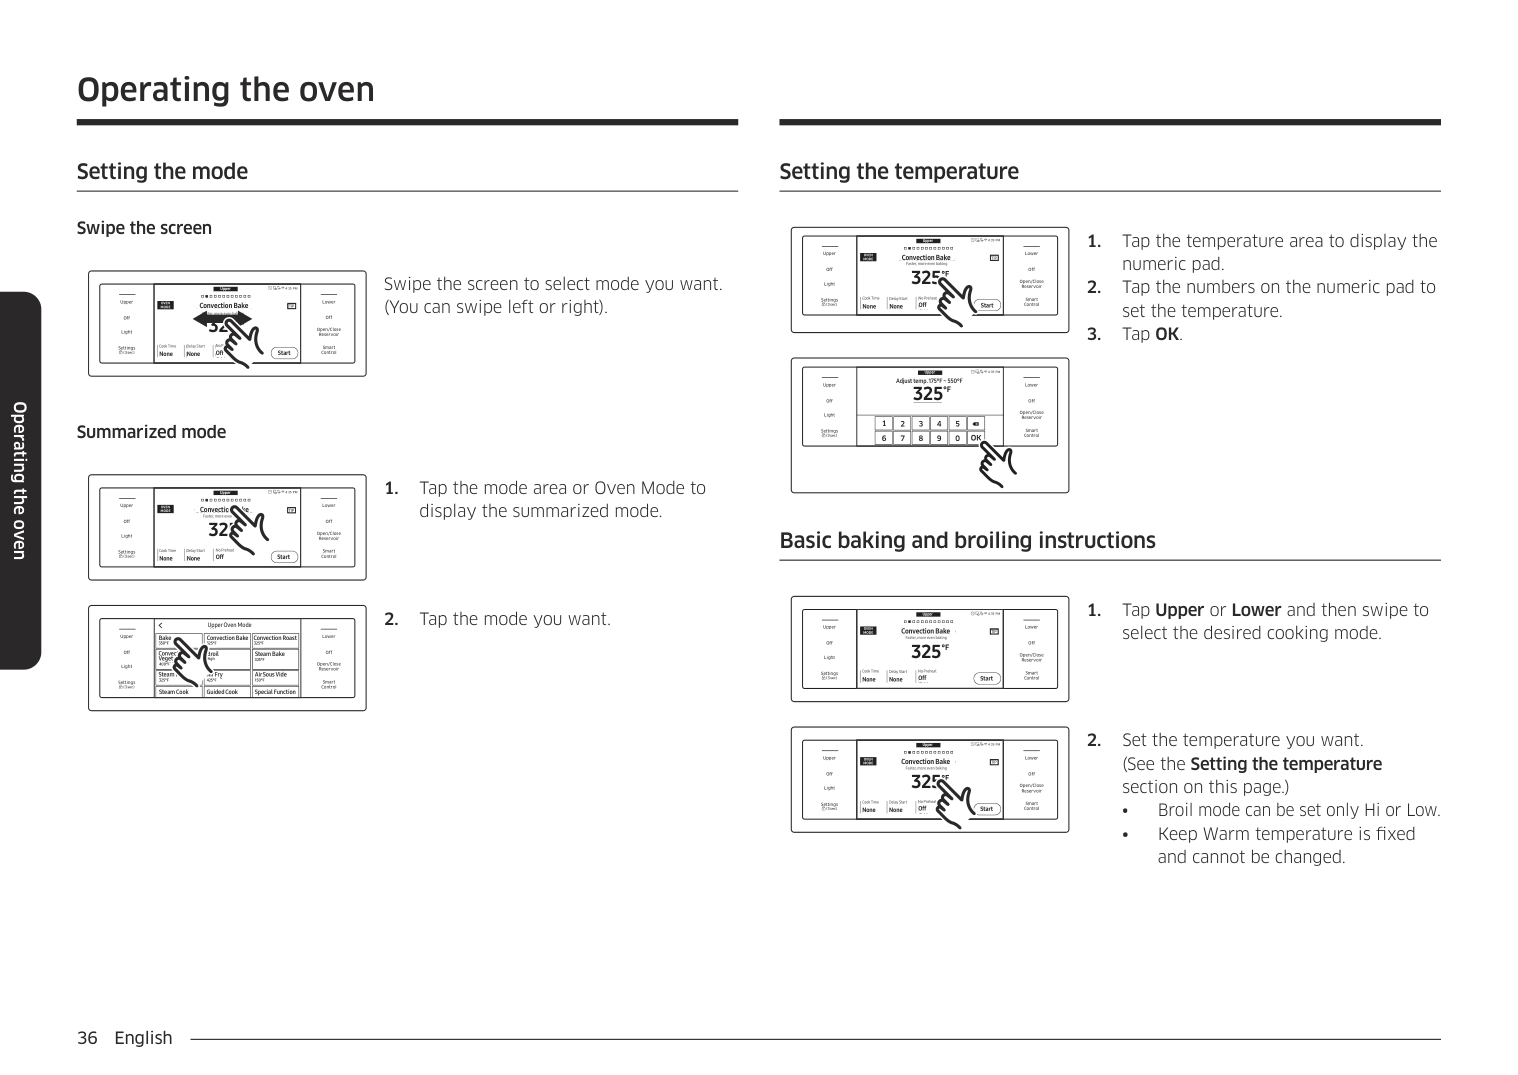
######## Setting the mode
Operating the oven
################ Swipe the screen
Upper
4:35 PM Convection Bake Faster, more even baking 325
LowerUpper
################################################ OVEN MODE TIP
#################################### Convection Bake Faster, more even baking
TIP
Off
Off
################################ °F
Open/Close Reservoir
Light
Delay Start No Preheat
Cook Time None None Start
Cook Time None
Delay Start None
No Preheat Off
Smart Control
Settings
Off
Start
Swipe the screen to select mode you want. (You can swipe left or right).
################ Summarized mode
Upper
4:35 PM Convection Bake Faster, more even baking 325
LowerUpper
################################################ OVEN MODE TIP
#################################### Convection Bake Faster, more even baking
TIP
Off
Off
################################# °F
Open/Close Reservoir
Light
Delay Start No Preheat
Cook Time None
Delay Start None
No Preheat Off
Cook Time None None Start
Smart Control
Settings
Off
Start
display the summarized mode.
Upper Oven Mode
Upper Oven Mode
|Bake 350°F Bake 350°F
| |---|
| | |---|
LowerUpper
Convection Bake Convection Roast
Convection Bake 325°F
Convection Roast 325°F
325°F 325°F
|Convection Vegetable 400°F400°F
Convection Vegetable| |---|
| | |---|
Off
Off
Broil
Steam Bake
Broil
Steam Bake 325°F
High
325°F
Open/Close Reservoir
Light
|Steam Roast 325°F325°F Steam Roast
| |---|
|Air Fry 425°F425°F Air Fry
| |---|
Air Sous Vide
Air Sous Vide 150°F
150°F
Smart Control
Settings
Steam Cook
Special FunctionGuided Cook
Steam Cook
Guided Cook
Special Function
######## Setting the temperature
Upper
4:35 PM Convection Bake Faster, more even baking 325
LowerUpper
#################################### Convection Bake Faster, more even baking
################################################ OVEN MODE TIP
View Summary
TIP
Off
Off
################################ °F
Open/Close Reservoir
Light
Delay Start No Preheat
Cook Time None None
Cook Time None
Delay Start None
No Preheat Off
Smart Control
Settings
Off Start
Start
######################### 4:35 PM Convection Bake Faster, more even baking
Upper
4:35 PMUpper Adjust temp. 175°F ~ 550°F
Adjust temp. 175°F ~ 550°F
LowerUpper
325
| | |---|
°F
325
Off
°F
Off
Off

Open/Close Reservoir
Open/Close Reservoir
Light
Light
|1| |---|
|3| |---|
|4| |---|
|5| |---|
|Delay Start2| |---|
Cook Time None
No Preheat Off
Smart Control
Smart Control
Settings
None Start
OK
6 7 8 9 0
Basic baking and broiling instructions
Upper
4:35 PM Convection Bake Faster, more even baking 325
LowerUpper
################################################ OVEN MODE TIP
#################################### Convection Bake Faster, more even baking
TIP
Off
Off
################################# °F
Open/Close Reservoir
Light
Delay Start No Preheat
Cook Time None None
Cook Time None
Delay Start None
No Preheat Off
Smart Control
Settings
Off Start
Start
select the desired cooking mode.
Upper
4:35 PM Convection Bake Faster, more even baking 325
LowerUpper
################################################ OVEN MODE TIP
#################################### Convection Bake Faster, more even baking
TIP
Off
Off
################################# °F
Open/Close Reservoir
Light
Delay Start No Preheat
Cook Time None None
Cook Time None
Delay Start None
No Preheat Off
Smart Control
Settings
Off Start
Start
Upper
4:35 PM Convection Bake Faster, more even baking 325
LowerUpper
#################################### Convection Bake Faster, more even baking
################################################ OVEN MODE TIP
View Summary
TIP
Off
Off
################################ °F
Open/Close Reservoir
Light
Delay Start No Preheat
Cook Time None None
Cook Time None
Delay Start None
No Preheat Off
Smart Control
Settings
Off Start
Start
Upper
4:35 PM Convection Bake Faster, more even baking 325
LowerUpper
#################################### Convection Bake Faster, more even baking
################################################ OVEN MODE TIP
View Summary
TIP
Off
Off
################################ °F
Open/Close Reservoir
Light
###################################### Cook Time None None
Cook Time None
Delay Start None
No Preheat On
Delay Start No Preheat
Smart Control
Settings
On Start
Start
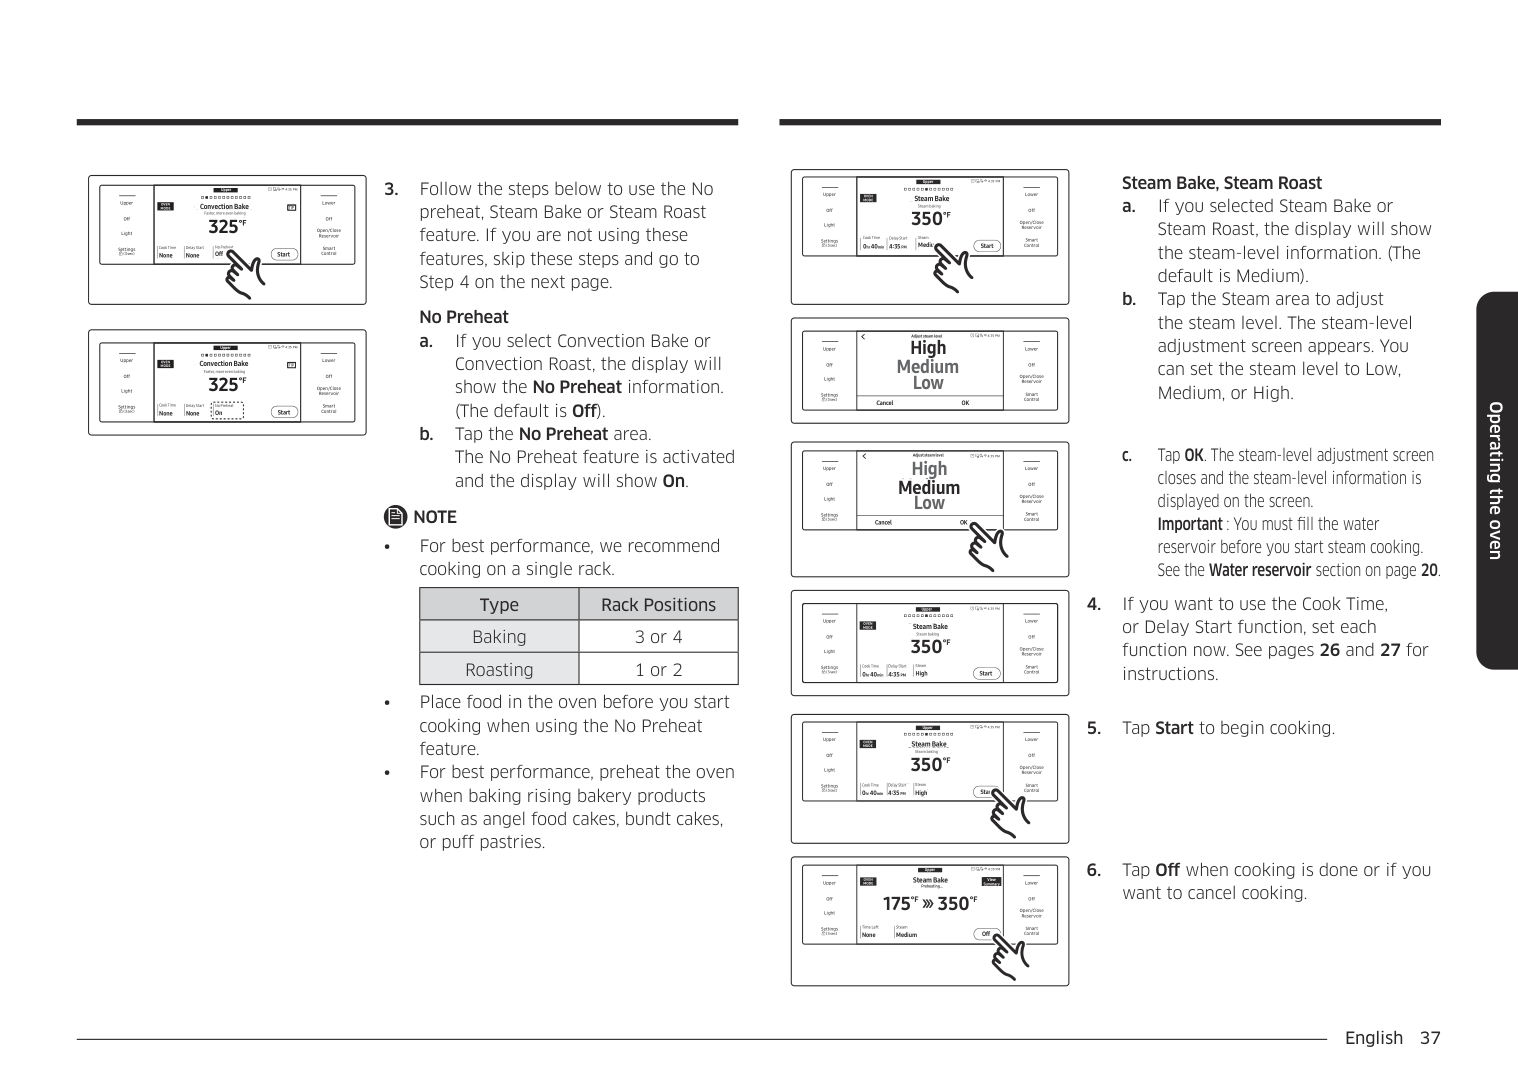
No Preheat
################ NOTE
|Type|Rack Positions| |---|---| |Baking|3 or 4| |Roasting|1 or 2|
Upper
4:35 PM Steam Bake Steam baking
LowerUpper
OVEN MODE
#################################### Steam Bake
View Summary
Steam baking
350
Off
Off
°F
Open/Close Reservoir
Light
Delay Start Steam
Cook Time 0hr40min 4:35PM
Delay Start 4:35PM
Cook Time 0hr40min
Steam Medium
Smart Control
Settings
Medium Start
Start
Upper
4:35 PM Steam Bake Steam baking
LowerUpper
OVEN MODE
#################################### Steam Bake
View Summary
Steam baking
Off
Off
350
°F
Open/Close Reservoir
Light
Delay Start Steam
Cook Time 0 40 4:35PM
Delay Start 4:35PM
######################### Steam High
Settings Cook Time
Smart Control
High Start
Start
0 40
Steam Bake, Steam Roast
|Off
Light
Upper
Settings
|Low
High Medium
4:35 PMAdjust steam levelAdjust steam level
High Medium Low
|Off
Open/Close Reservoir
Smart Control
Lower| |---|---|---| |Off
Light
Upper
Settings
|Cancel OKCancelOK
|Off
Open/Close Reservoir
Smart Control
Lower|
|Off
Light
Upper
Settings
|Low
High Medium
4:35 PMAdjust steam levelAdjust steam level
High Medium Low
|Off
Open/Close Reservoir
Smart Control
Lower| |---|---|---| |Off
Light
Upper
Settings
|Cancel OKCancelOK
|Off
Open/Close Reservoir
Smart Control
Lower|
Upper Steam Bake
4:35 PM Steam Bake Steam baking
LowerUpper
OVEN MODE
Steam baking
Off
Off
350
°F
Open/Close Reservoir
Light
Delay Start Steam
Delay Start 4:35PM
######################### Steam High
Settings Cook Time
Cook Time 0 40min 4:35PM
Smart Control
High Start
Start
0 40min
#################################### Upper Steam Bake
4:35 PM
######################### Steam Bake
View Summary
OVEN MODE
View Summary
LowerUpper
Preheating...
Preheating...
175
########### 350
°F
°F
Off
Off
Open/Close Reservoir
Light
SteamTime Left MediumNone Off
Steam Medium
Time Left None
Smart Control
Settings
Off
################## 5. Tap Start to begin cooking.
want to cancel cooking.
Operating the oven
Operating the oven
################ CAUTION
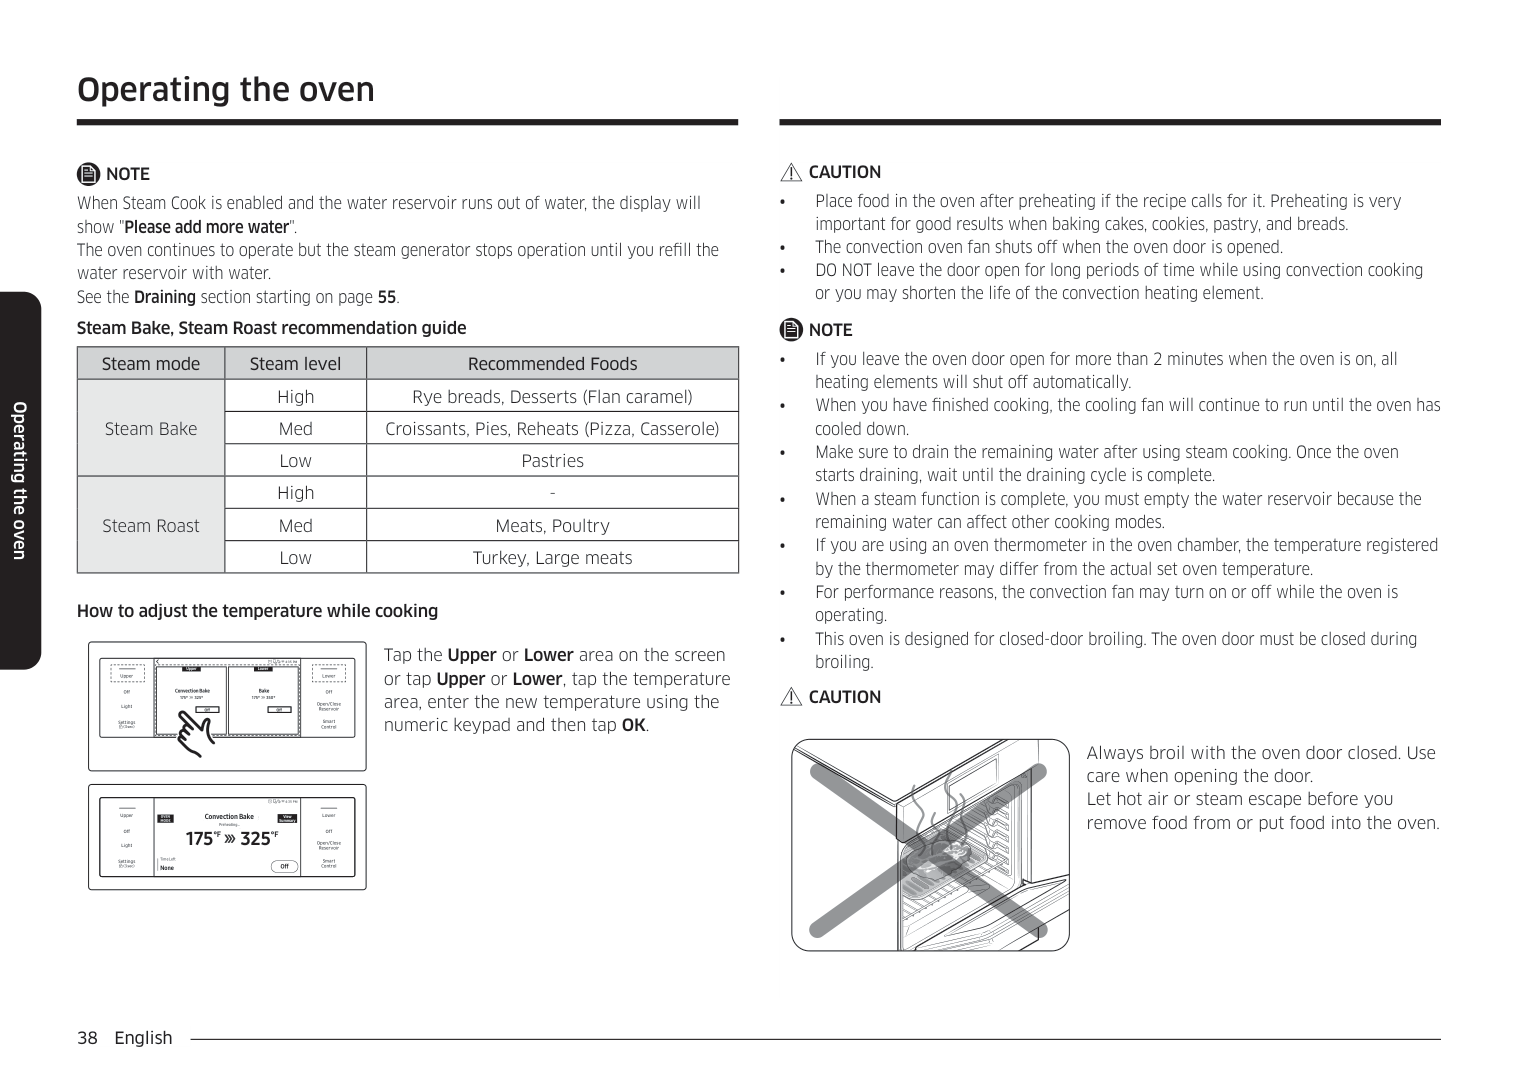
NOTE When Steam Cook is enabled and the water reservoir runs out of water, the display will show "Please add more water". The oven continues to operate but the steam generator stops operation until you refill the water reservoir with water. See the Draining section starting on page 55.
NOTE
Steam Bake, Steam Roast recommendation guide
|Steam mode|Steam level|Recommended Foods| |---|---|---| |Steam Bake|High|Rye breads, Desserts (Flan caramel)| |Steam Bake|Med|Croissants, Pies, Reheats (Pizza, Casserole)| |Steam Bake|Low|Pastries| |Steam Roast|High|-| |Steam Roast|Med|Meats, Poultry| |Steam Roast|Low|Turkey, Large meats|
How to adjust the temperature while cooking
4:35 PM Tap the Upper or Lower area on the screen or tap Upper or Lower, tap the temperature area, enter the new temperature using the numeric keypad and then tap OK.
|Convection Bake 175° 325°
|OffOff
| |---|
Upper
Convection Bake| |---|
|175° 350°
Bake
|OffOff
| |---|
Bake
Lower
| |---|
LowerUpper
################ CAUTION
Off
Off
Open/Close Reservoir
Light
Smart Control
Settings
Always broil with the oven door closed. Use care when opening the door. Let hot air or steam escape before you remove food from or put food into the oven.
4:35 PM
Convection Bake Preheating...
########################## Convection Bake Preheating...
LowerUpper
############################################ View Summary
OVEN MODE
175
325
Off
Off
°F
°F
Open/Close Reservoir
Light
Time Left None Off
Time Left None
Smart Control
Settings
Off
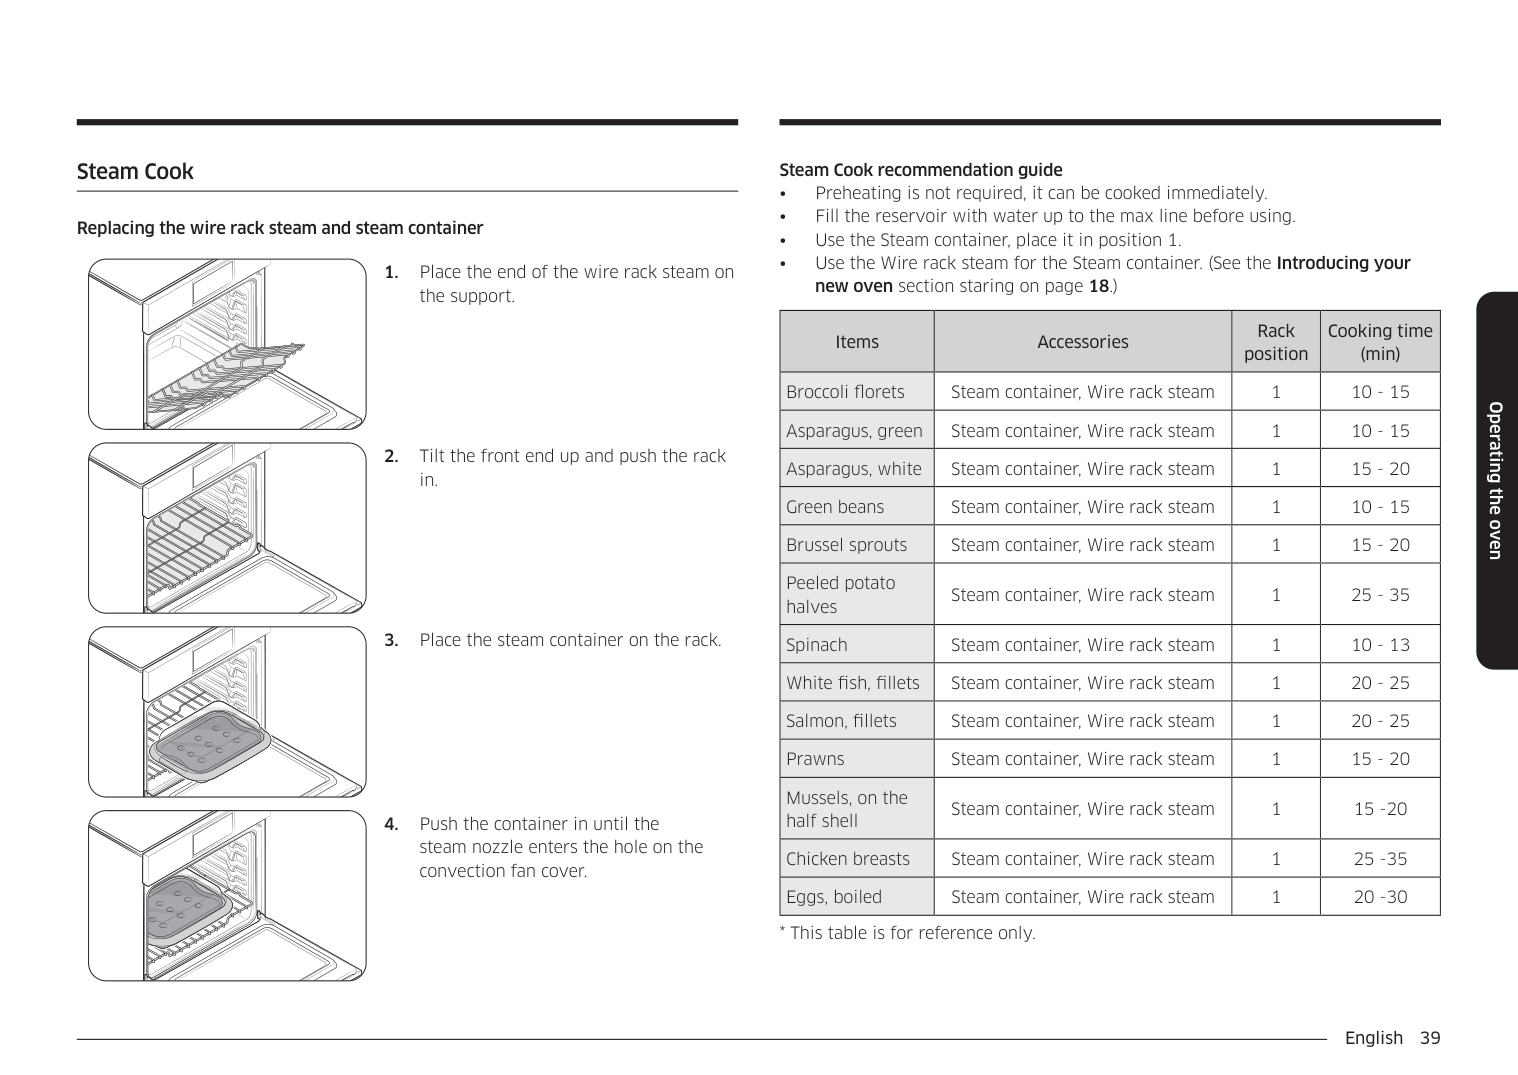
######## Steam Cook
################ Replacing the wire rack steam and steam container
Steam Cook recommendation guide
|Items|Accessories|Rack position|Cooking time (min)| |---|---|---|---| |Broccoli florets|Steam container, Wire rack steam|1|10 - 15| |Asparagus, green|Steam container, Wire rack steam|1|10 - 15| |Asparagus, white|Steam container, Wire rack steam|1|15 - 20| |Green beans|Steam container, Wire rack steam|1|10 - 15| |Brussel sprouts|Steam container, Wire rack steam|1|15 - 20| |Peeled potato halves|Steam container, Wire rack steam|1|25 - 35| |Spinach|Steam container, Wire rack steam|1|10 - 13| |White fish, fillets|Steam container, Wire rack steam|1|20 - 25| |Salmon, fillets|Steam container, Wire rack steam|1|20 - 25| |Prawns|Steam container, Wire rack steam|1|15 - 20| |Mussels, on the half shell|Steam container, Wire rack steam|1|15 -20| |Chicken breasts|Steam container, Wire rack steam|1|25 -35| |Eggs, boiled|Steam container, Wire rack steam|1|20 -30|
Operating the oven
Operating the oven
################ CAUTION
NOTE
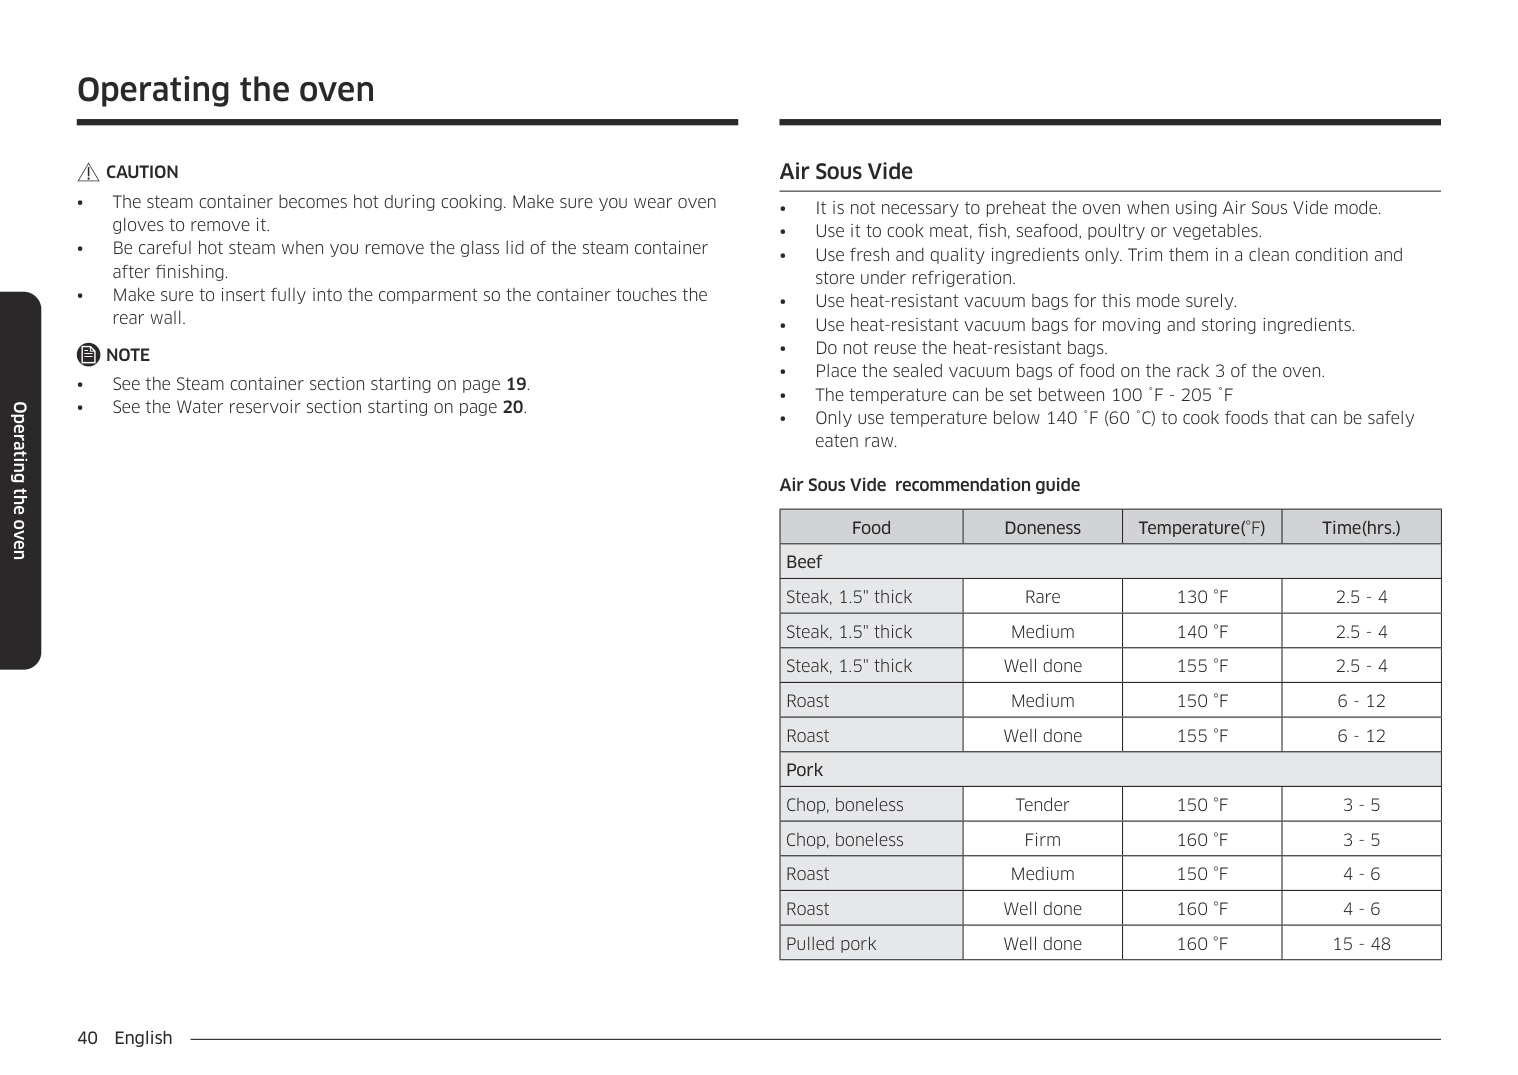
######## Air Sous Vide
Air Sous Vide recommendation guide
|Food|Doneness|Temperature(°F)|Time(hrs.)| |---|---|---|---| |Beef|Beef|Beef|Beef| |Steak, 1.5" thick|Rare|130 °F|2.5 - 4| |Steak, 1.5" thick|Medium|140 °F|2.5 - 4| |Steak, 1.5" thick|Well done|155 °F|2.5 - 4| |Roast|Medium|150 °F|6 - 12| |Roast|Well done|155 °F|6 - 12| |Pork|Pork|Pork|Pork| |Chop, boneless|Tender|150 °F|3 - 5| |Chop, boneless|Firm|160 °F|3 - 5| |Roast|Medium|150 °F|4 - 6| |Roast|Well done|160 °F|4 - 6| |Pulled pork|Well done|160 °F|15 - 48|
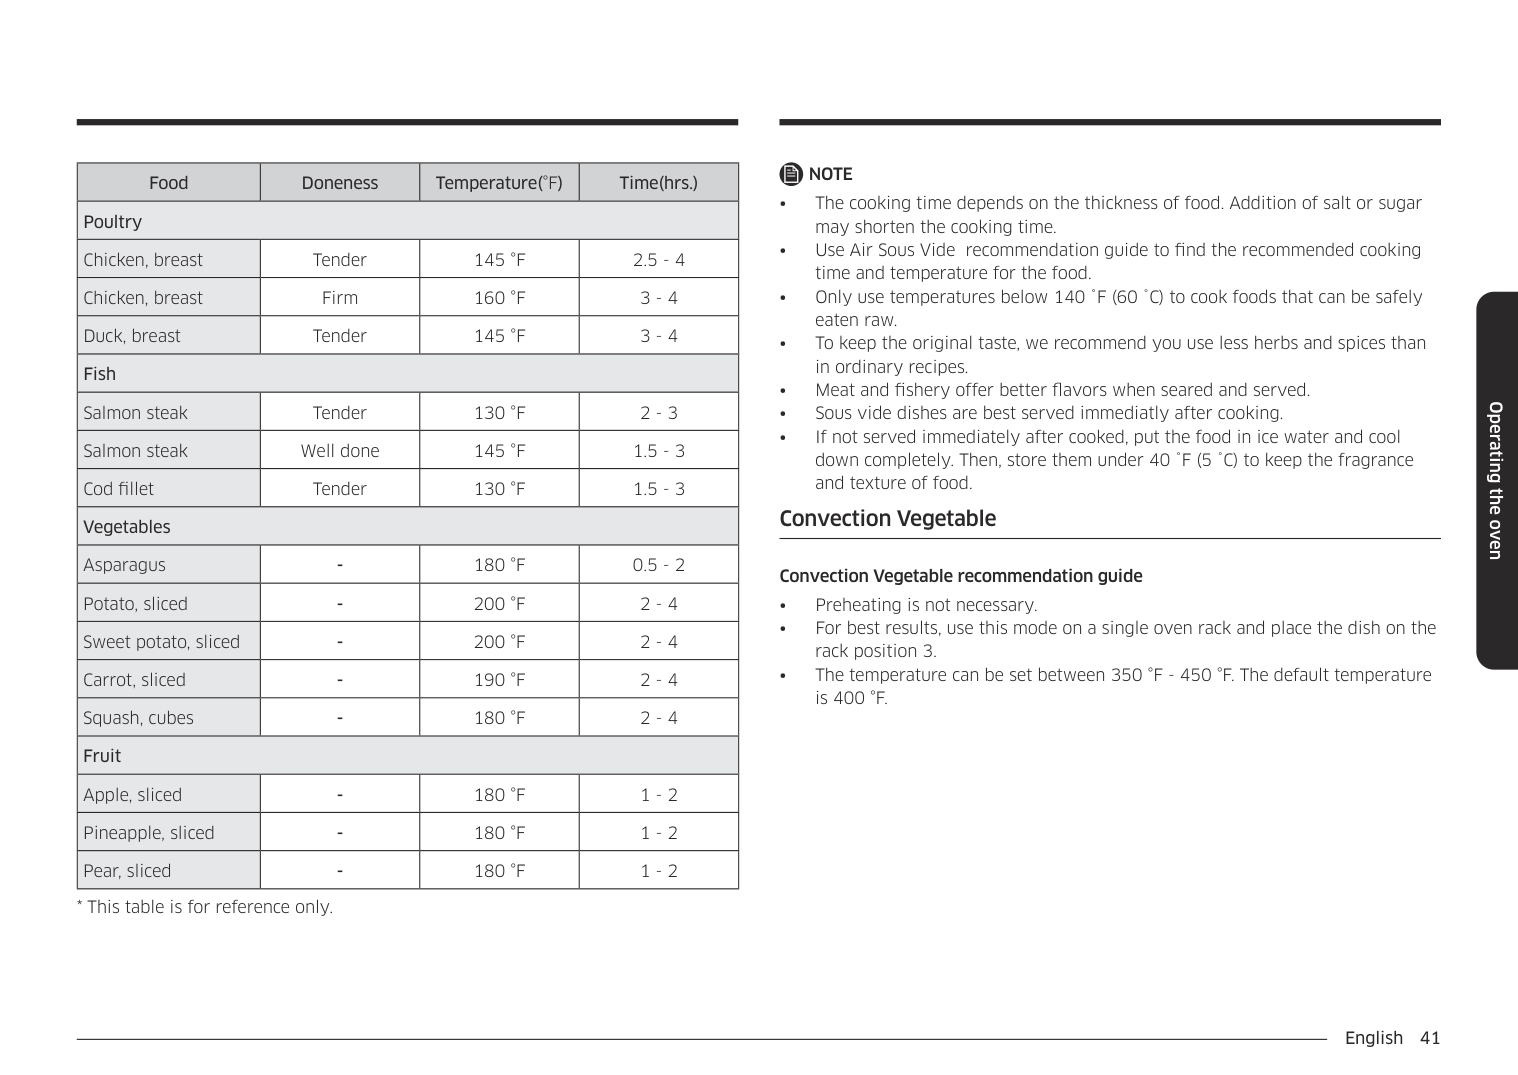
|Food|Doneness|Temperature(°F)|Time(hrs.)| |---|---|---|---| |Poultry|Poultry|Poultry|Poultry| |Chicken, breast|Tender|145 °F|2.5 - 4| |Chicken, breast|Firm|160 °F|3 - 4| |Duck, breast|Tender|145 °F|3 - 4| |Fish|Fish|Fish|Fish| |Salmon steak|Tender|130 °F|2 - 3| |Salmon steak|Well done|145 °F|1.5 - 3| |Cod fillet|Tender|130 °F|1.5 - 3| |Vegetables|Vegetables|Vegetables|Vegetables| |Asparagus|-|180 °F|0.5 - 2| |Potato, sliced|-|200 °F|2 - 4| |Sweet potato, sliced|-|200 °F|2 - 4| |Carrot, sliced|-|190 °F|2 - 4| |Squash, cubes|-|180 °F|2 - 4| |Fruit|Fruit|Fruit|Fruit| |Apple, sliced|-|180 °F|1 - 2| |Pineapple, sliced|-|180 °F|1 - 2| |Pear, sliced|-|180 °F|1 - 2|
################ NOTE
######## Convection Vegetable
################ Convection Vegetable recommendation guide
################ Operating the oven
################ Operating the oven
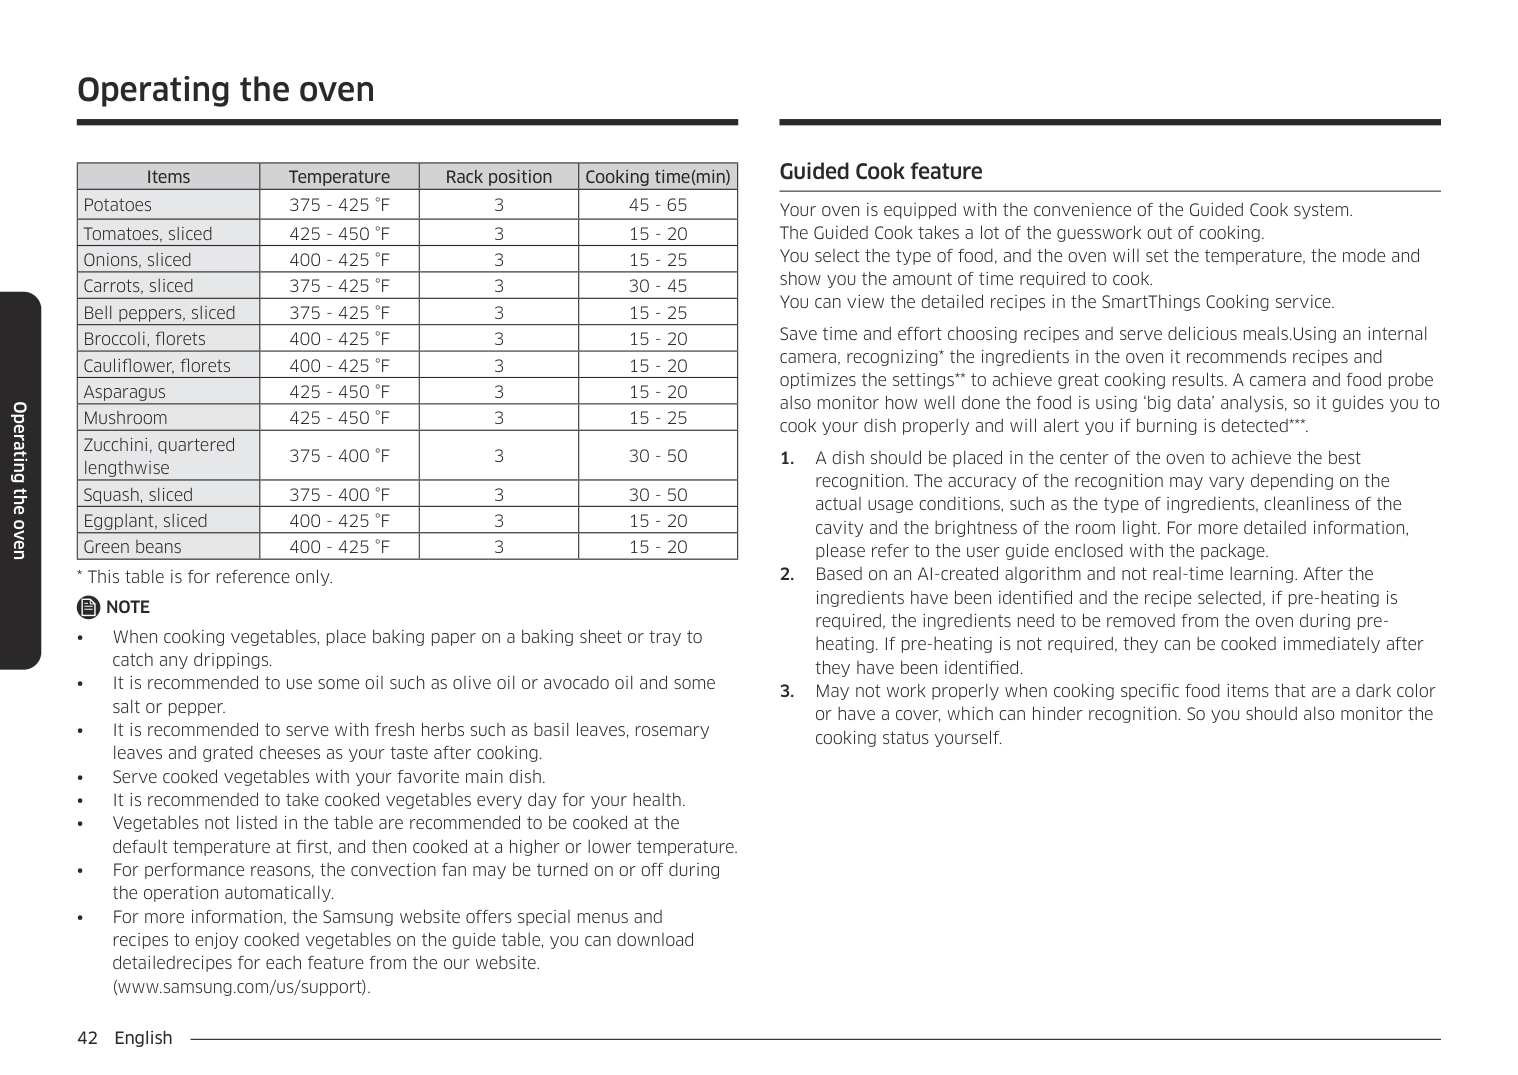
|Items|Temperature|Rack position|Cooking time(min)| |---|---|---|---| |Potatoes|375 - 425 °F|3|45 - 65| |Tomatoes, sliced|425 - 450 °F|3|15 - 20| |Onions, sliced|400 - 425 °F|3|15 - 25| |Carrots, sliced|375 - 425 °F|3|30 - 45| |Bell peppers, sliced|375 - 425 °F|3|15 - 25| |Broccoli, florets|400 - 425 °F|3|15 - 20| |Cauliflower, florets|400 - 425 °F|3|15 - 20| |Asparagus|425 - 450 °F|3|15 - 20| |Mushroom|425 - 450 °F|3|15 - 25| |Zucchini, quartered lengthwise|375 - 400 °F|3|30 - 50| |Squash, sliced|375 - 400 °F|3|30 - 50| |Eggplant, sliced|400 - 425 °F|3|15 - 20| |Green beans|400 - 425 °F|3|15 - 20|
################ NOTE
######## Guided Cook feature
Your oven is equipped with the convenience of the Guided Cook system. The Guided Cook takes a lot of the guesswork out of cooking. You select the type of food, and the oven will set the temperature, the mode and show you the amount of time required to cook. You can view the detailed recipes in the SmartThings Cooking service.
Save time and effort choosing recipes and serve delicious meals.Using an internal camera, recognizing* the ingredients in the oven it recommends recipes and optimizes the settings to achieve great cooking results. A camera and food probe also monitor how well done the food is using ‘big data’ analysis, so it guides you to cook your dish properly and will alert you if burning is detected*.
Upper Convection Bake Faster, more even baking
4:35 PM Convection Bake Faster, more even baking 325
LowerUpper
################################################ OVEN MODE TIP
TIP
Off
Off
################################ °F
Open/Close Reservoir
Light
Delay Start No Preheat
Cook Time None
Delay Start None
No Preheat Off
Cook Time None None
Smart Control
Settings
Off Start
Start
|Off
Light
Upper
Settings
|SettingsSettings
|Off
Open/Close Reservoir
Smart Control
Lower| |---|---|---| |Off
Light
Upper
Settings
|Connections
Camera Vision
Display
TimerTimer Connections Camera Vision Display
|Off
Open/Close Reservoir
Smart Control
Lower|
|Off
Light
Upper
Settings|Camera VisionCamera Vision
|Off
Open/Close Reservoir
Smart Control
Lower
| |---|---|---| |Off
Light
Upper
Settings|Recipe RecommendationRecipe Recommendation
|Off
Open/Close Reservoir
Smart Control
Lower
| |Off
Light
Upper
Settings|Burn Notification offoffBurn Notification
|Off
Open/Close Reservoir
Smart Control
Lower
| |Off
Light
Upper
Settings|The colors of oven lighting can change to improve the performance of camera.
*The colors of oven lighting can change to improve the performance of camera.
|Off
Open/Close Reservoir
Smart Control
Lower
|
|Recognizing foodRecognizing food| |---|
LowerUpper
Off
Off
Open/Close Reservoir
Light
Smart Control
Settings
Cook manually
Cook manually
|Cook manually
Which recipe do you want to cook?
Whole chicken Butter y chicken
Cook manually
Which recipe do you want to cook?
Whole chicken Butterfly chicken
| |---|
LowerUpper
Off
Off
Open/Close Reservoir
Light
Smart Control
Settings
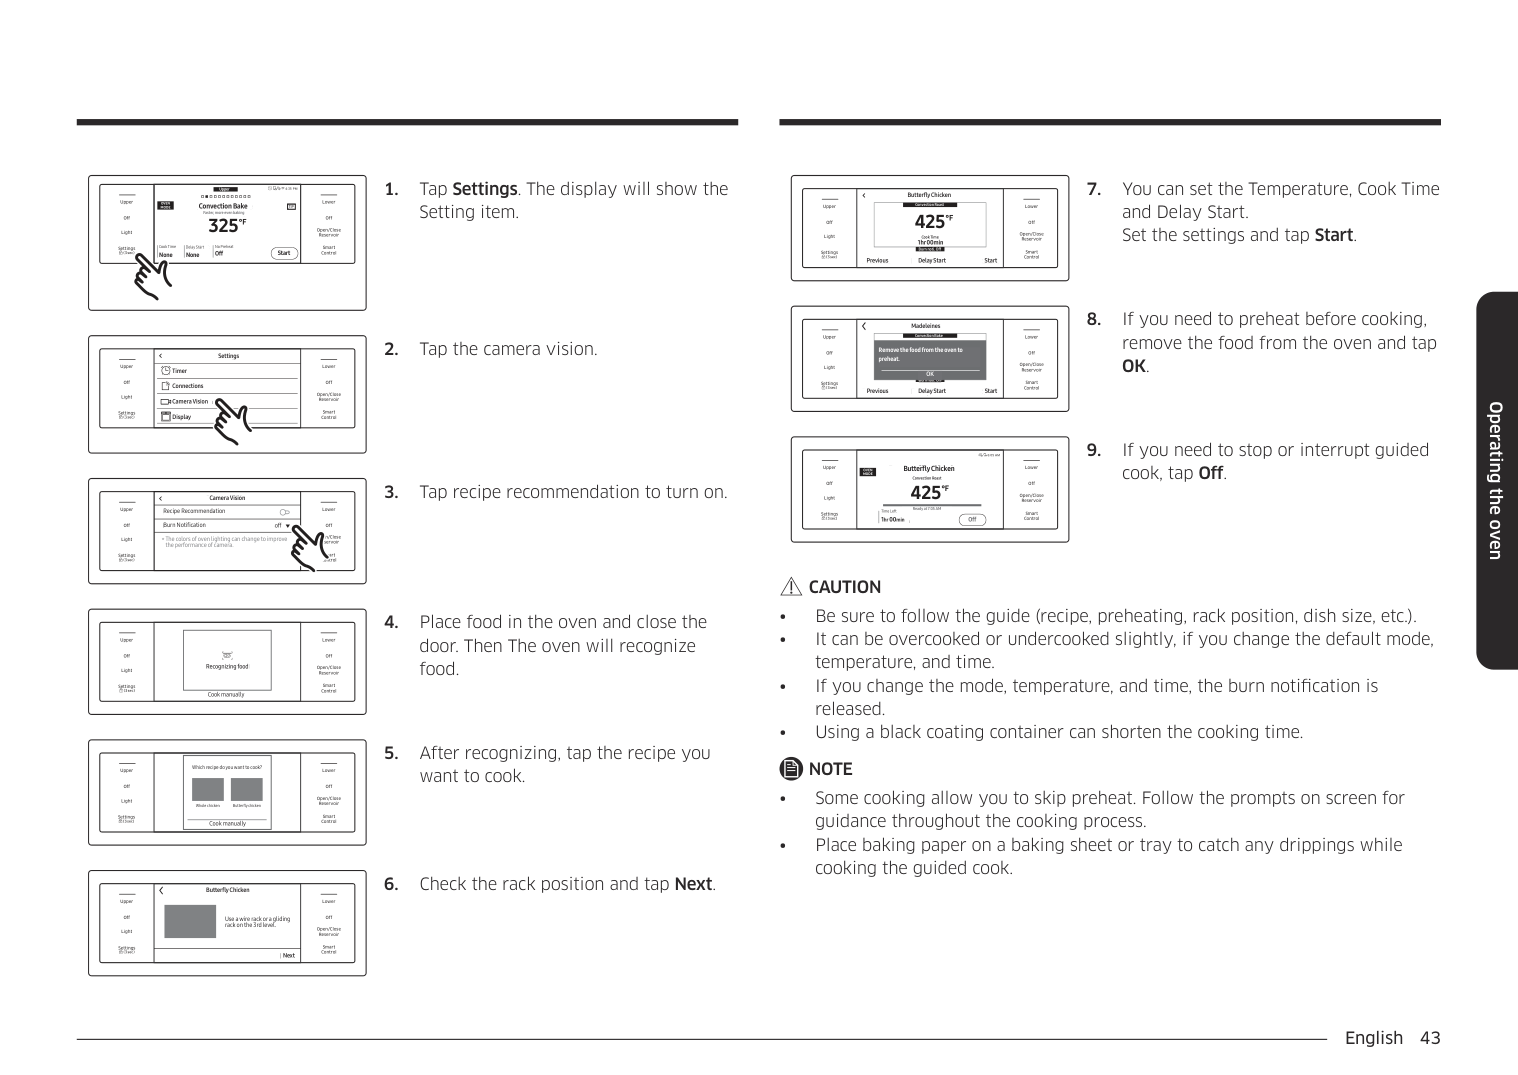
################## 5. After recognizing, tap the recipe youwant to cook.
|Off
Light
Upper
Settings
|Use a wire rack or a gliding rack on the 3rd level.
Butterfly ChickenButterfly Chicken
Use a wire rack or a gliding rack on the 3rd level.|Off
Open/Close Reservoir
Smart Control
Lower| |---|---|---| |Off
Light
Upper
Settings
|NextNext
|Off
Open/Close Reservoir
Smart Control
Lower|
################## 6. Check the rack position and tap Next.
####################################### Butterfly Chicken
Butterfly Chicken
|Cook Time 1hr 00min
425
°F
Convection Roast
Cook Time 1hr 00min
| |---|
LowerUpper
Off
Off
Open/Close Reservoir
Light
Burn noti. Off
Smart Control
Settings
Previous Delay Start Start
Previous Delay Start Start
####################################### Madeleines
|Remove the food from the oven to preheat.
OK
Convection Bake
Remove the food from the oven to preheat.
OK| |---|
LowerUpper
Off
Off
Open/Close Reservoir
Light
Burn noti. Off
################################### Burn noti. Off Previous StartDelay Start
Smart Control
Settings
Previous Delay Start Start
################### 6:05 AM Butterfly Chicken Convection Roast
#################################### Butterfly Chicken
LowerUpper
################################################### OVEN MODE
Convection Roast
Off
Off
425
°F
Open/Close Reservoir
Light
Ready at 7:05 AM
Ready at 7:05 AM
Time Left 1hr00min Off
Time Left 1hr00min
Smart Control
Settings
Off
cook, tap Off.
################ CAUTION
NOTE
Operating the oven
Operating the oven
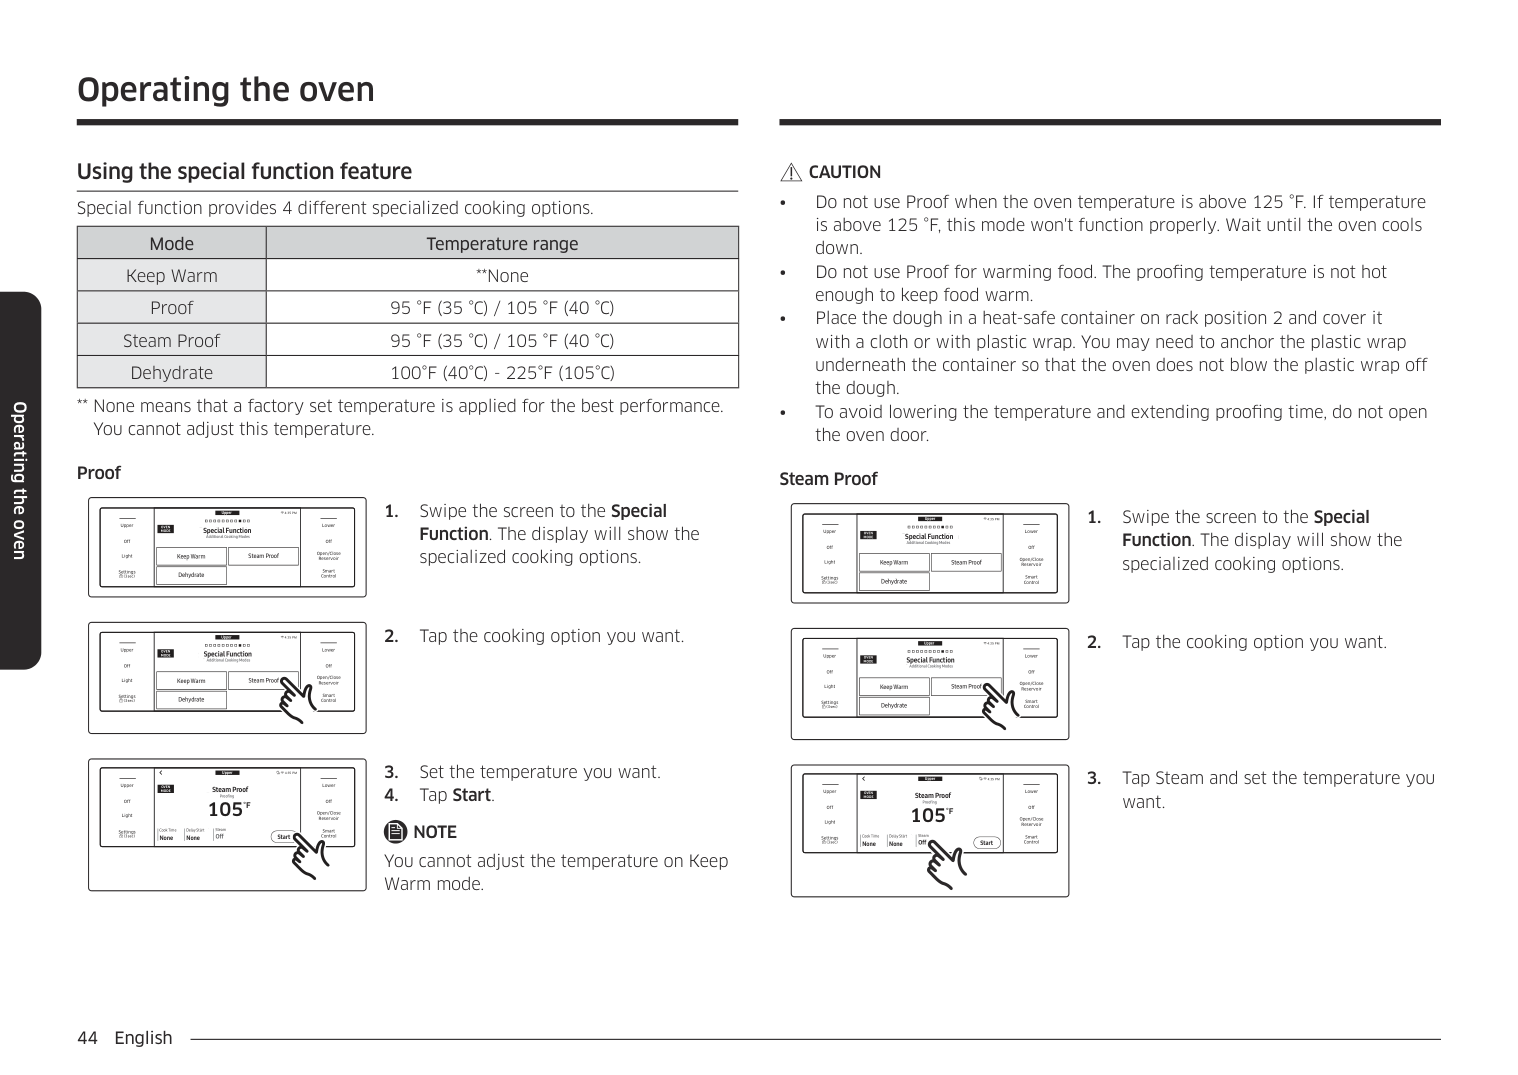
Using the special function feature Special function provides 4 different specialized cooking options.
|Mode|Temperature range| |---|---| |Keep Warm|**None| |Proof|95 °F (35 °C) / 105 °F (40 °C)| |Steam Proof|95 °F (35 °C) / 105 °F (40 °C)| |Dehydrate|100°F (40°C) - 225°F (105°C)|
** None means that a factory set temperature is applied for the best performance. You cannot adjust this temperature.
Proof
Upper
############################# 4:35 PM Special Function Additional Cooking Modes
LowerUpper
OVEN MODE
Special Function Additional Cooking Modes
Off
Off
|Keep WarmKeep Warm
| |---|
|Steam ProofSteam Proof
| |---|
Open/Close Reservoir
Light
|DehydrateDehydrate
| |---|
Smart Control
Settings
Upper
############################# 4:35 PM Special Function Additional Cooking Modes
LowerUpper
OVEN MODE
Special Function Additional Cooking Modes
Off
Off
|Keep WarmKeep Warm
| |---|
|Steam ProofSteam Proof
| |---|
Open/Close Reservoir
Light
|DehydrateDehydrate
| |---|
Smart Control
Settings
Upper
4:35 PM Steam Proof
LowerUpper
###################################################### OVEN MODE
#################################### Steam Proof
Proofing
Proofing
105
Off
Off
°F
Open/Close Reservoir
Light
Delay Start Steam
Cook Time None None
Cook Time None
Delay Start None
Steam Off
Smart Control
Settings
Off Start
Start
NOTE You cannot adjust the temperature on Keep Warm mode.
################ CAUTION
Steam Proof
Upper
############################# 4:35 PM Special Function Additional Cooking Modes
LowerUpper
OVEN MODE
Special Function Additional Cooking Modes
Off
Off
|Keep WarmKeep Warm
| |---|
|Steam ProofSteam Proof
| |---|
Open/Close Reservoir
Light
|DehydrateDehydrate
| |---|
Smart Control
Settings
Upper
############################# 4:35 PM Special Function Additional Cooking Modes
LowerUpper
OVEN MODE
Special Function Additional Cooking Modes
Off
|Keep WarmKeep Warm
| |---|
|Steam ProofSteam Proof
| |---|
Open/Close Reservoir
Light
|DehydrateDehydrate
| |---|
Smart Control
Settings
Upper
4:35 PM Steam Proof
LowerUpper
###################################################### OVEN MODE
#################################### Steam Proof
Proofing
Proofing
105
Off
Off
°F
Open/Close Reservoir
Light
Delay Start Steam
Cook Time None None
Cook Time None
Delay Start None
Steam Off
Smart Control
Settings
Off Start
Start
want.
Upper
4:35 PM Steam Proof
LowerUpper
###################################################### OVEN MODE
#################################### Steam Proof
Proofing
Proofing
105
Off
Off
°F
Open/Close Reservoir
Light
Delay Start Steam
Cook Time None None
Cook Time None
Delay Start None
Steam On
Smart Control
Settings
On Start
Start
CAUTION
NOTE
################ Rack position chart for special cooking options
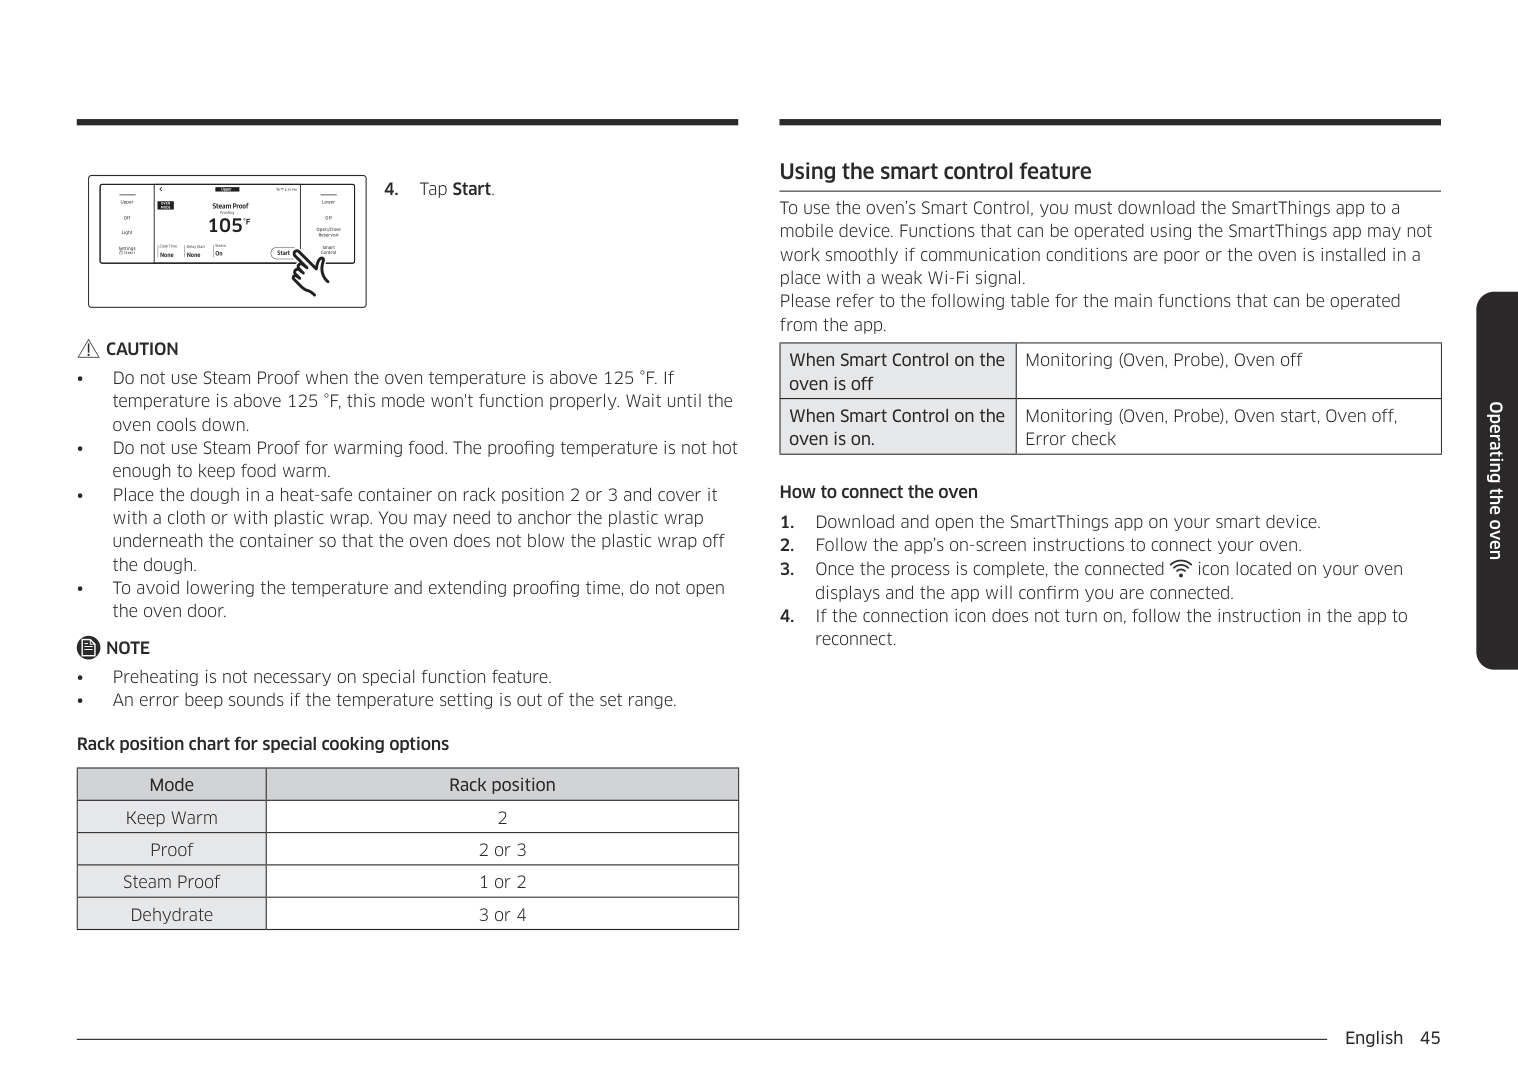
|Mode|Rack position| |---|---| |Keep Warm|2| |Proof|2 or 3| |Steam Proof|1 or 2| |Dehydrate|3 or 4|
######## Using the smart control feature
To use the oven’s Smart Control, you must download the SmartThings app to a mobile device. Functions that can be operated using the SmartThings app may not work smoothly if communication conditions are poor or the oven is installed in a place with a weak Wi-Fi signal. Please refer to the following table for the main functions that can be operated from the app.
|When Smart Control on the oven is off|Monitoring (Oven, Probe), Oven off| |---|---| |When Smart Control on the oven is on.|Monitoring (Oven, Probe), Oven start, Oven off, Error check|
How to connect the oven
Operating the oven
Operating the oven
To start the oven remotely
|Off
Light
Upper
Settings
|Smart ControlSmart Control|Off
Open/Close Reservoir
Smart Control
Lower| |---|---|---| |Off
Light
Upper
Settings
|||On
UpperUpper On
| |---|
|Off
LowerLower Off
| |---| | |---| |Off
Open/Close Reservoir
Smart Control
Lower|
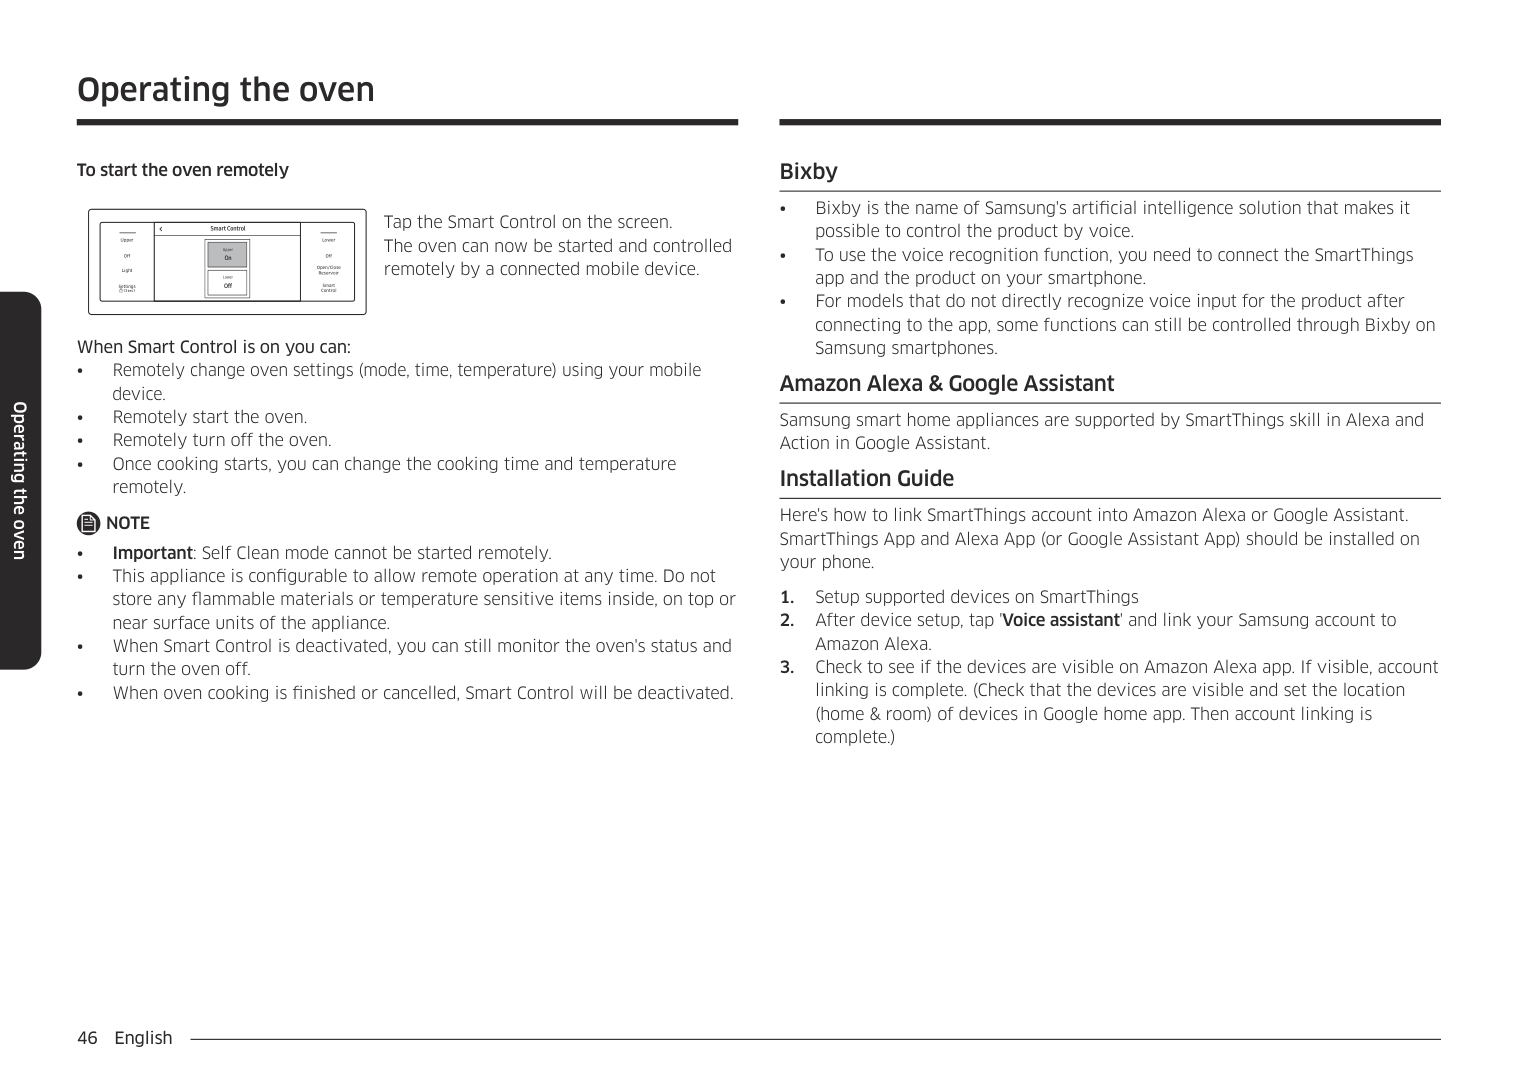
Tap the Smart Control on the screen. The oven can now be started and controlled remotely by a connected mobile device.
When Smart Control is on you can:
NOTE
######## Bixby
######## Amazon Alexa & Google Assistant
Samsung smart home appliances are supported by SmartThings skill in Alexa and Action in Google Assistant.
######## Installation Guide
Here's how to link SmartThings account into Amazon Alexa or Google Assistant. SmartThings App and Alexa App (or Google Assistant App) should be installed on your phone.
######## Using the oven racks
################ Upper and lower oven rack positions (single mode)
02
04
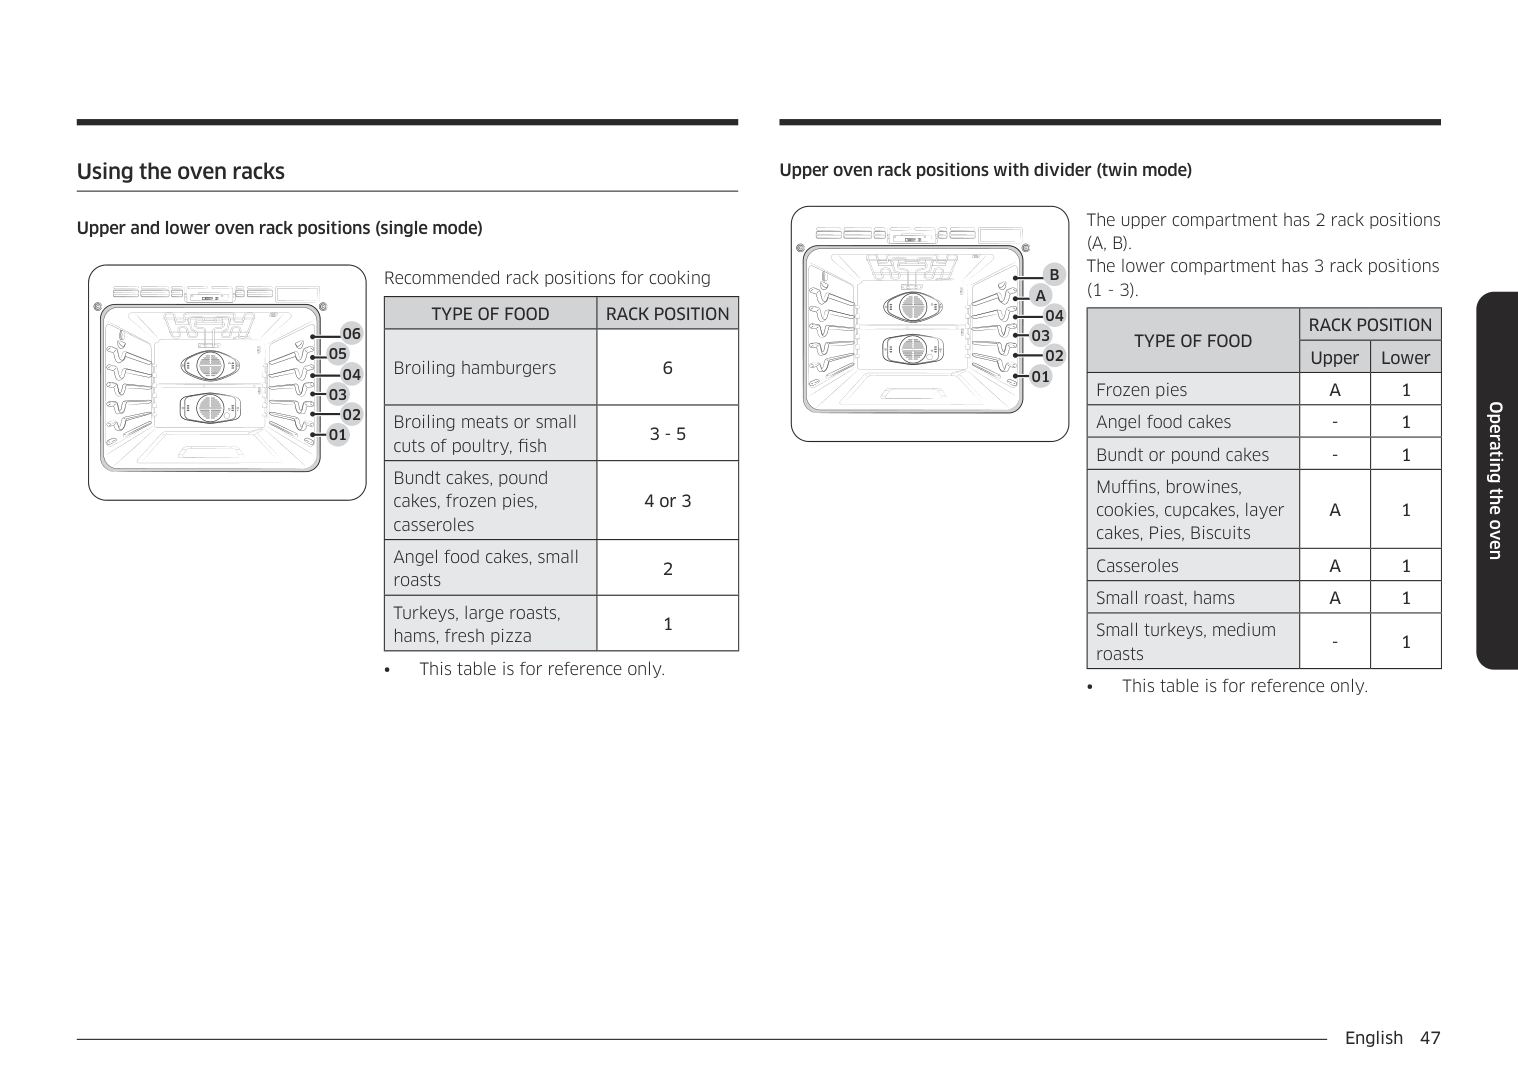
Recommended rack positions for cooking
|TYPE OF FOOD|RACK POSITION| |---|---| |Broiling hamburgers|6| |Broiling meats or small cuts of poultry, fish|3 - 5| |Bundt cakes, pound cakes, frozen pies, casseroles|4 or 3| |Angel food cakes, small roasts|2| |Turkeys, large roasts, hams, fresh pizza|1|
• This table is for reference only.
################ Upper oven rack positions with divider (twin mode)
02
04
01
The upper compartment has 2 rack positions (A, B). The lower compartment has 3 rack positions (1 - 3).
|TYPE OF FOOD|RACK POSITION|RACK POSITION| |---|---|---| |TYPE OF FOOD|Upper|Lower| |Frozen pies|A|1| |Angel food cakes|-|1| |Bundt or pound cakes|-|1| |Muffins, browines, cookies, cupcakes, layer cakes, Pies, Biscuits|A|1| |Casseroles|A|1| |Small roast, hams|A|1| |Small turkeys, medium roasts|-|1|
• This table is for reference only.
Operating the oven
Operating the oven
Rack and Pan placement
3 4
Single Oven Rack
5
3
Multiple Oven Racks
5
3
Multiple Oven Racks
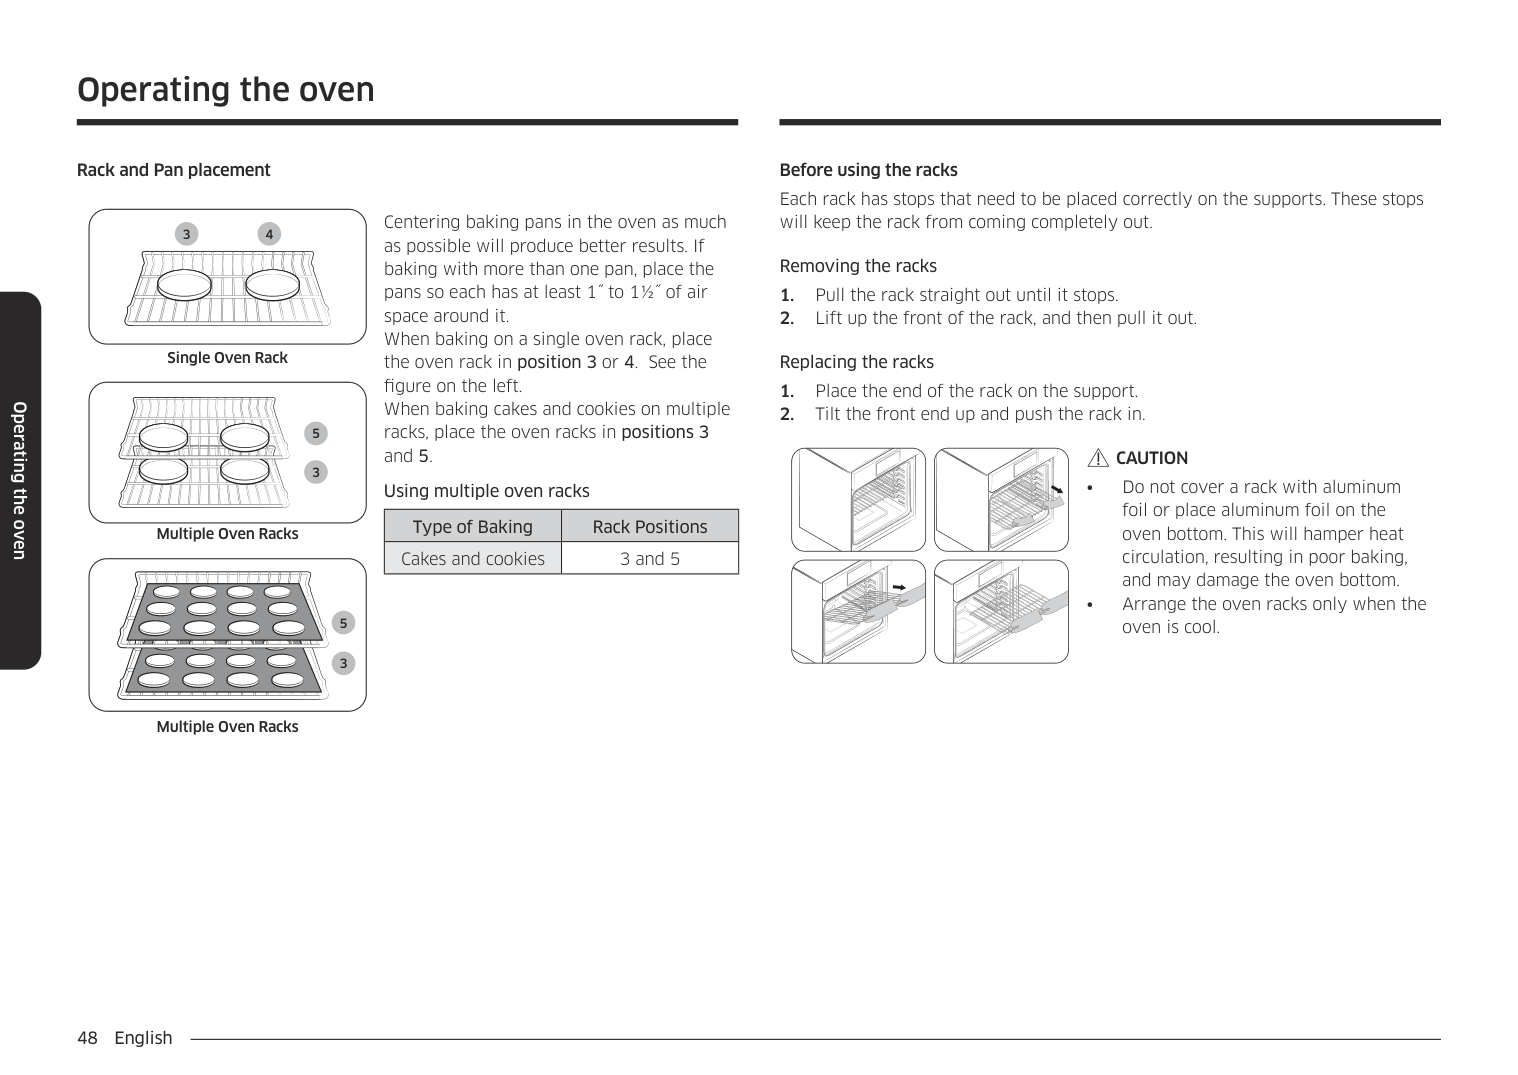
Centering baking pans in the oven as much as possible will produce better results. If baking with more than one pan, place the pans so each has at least 1˝ to 1½˝ of air space around it. When baking on a single oven rack, place the oven rack in position 3 or 4. See the figure on the left. When baking cakes and cookies on multiple racks, place the oven racks in positions 3 and 5
Using multiple oven racks
|Type of Baking|Rack Positions| |---|---| |Cakes and cookies|3 and 5|
Before using the racks Each rack has stops that need to be placed correctly on the supports. These stops will keep the rack from coming completely out.
Removing the racks
Replacing the racks
################ CAUTION
######## Using the gliding rack
################ Removing the Gliding rack
| | | |---|---| | | |
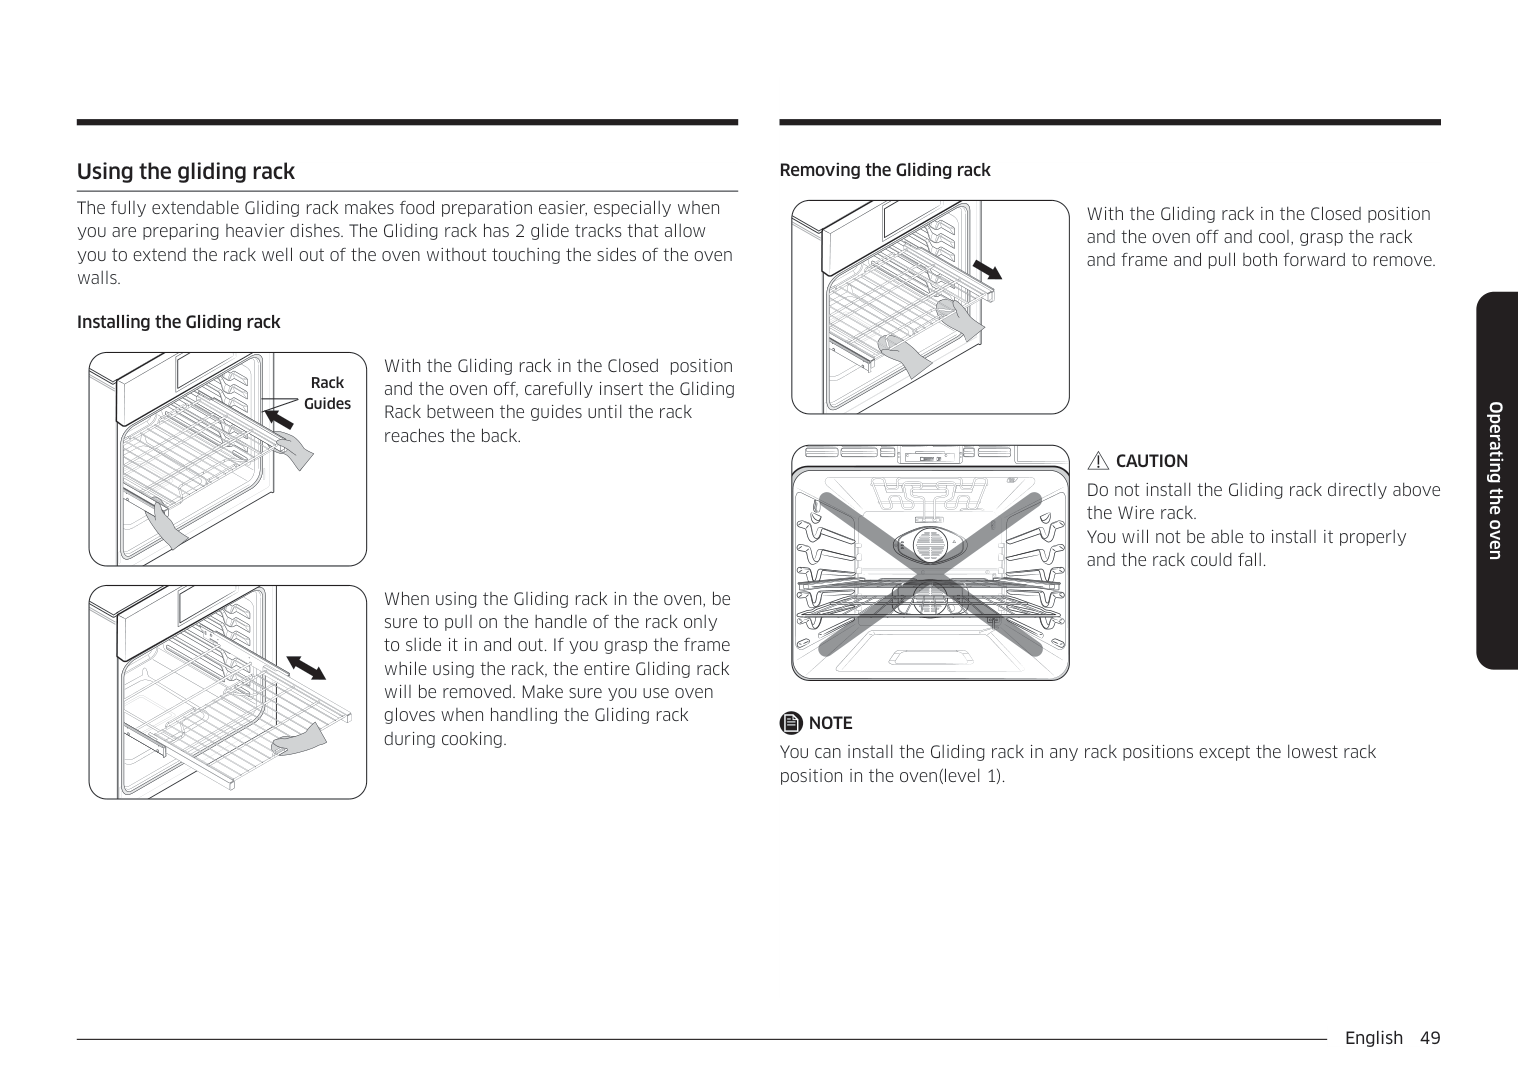
The fully extendable Gliding rack makes food preparation easier, especially when you are preparing heavier dishes. The Gliding rack has 2 glide tracks that allow you to extend the rack well out of the oven without touching the sides of the oven walls.
With the Gliding rack in the Closed position and the oven off and cool, grasp the rack and frame and pull both forward to remove.
| | | |---|---| | | |
################ Installing the Gliding rack
With the Gliding rack in the Closed position and the oven off, carefully insert the Gliding Rack between the guides until the rack reaches the back.
Rack Guides
| | | |---|---| | | |
CAUTION Do not install the Gliding rack directly above the Wire rack. You will not be able to install it properly and the rack could fall.
| | | |---|---| | | |
When using the Gliding rack in the oven, be sure to pull on the handle of the rack only to slide it in and out. If you grasp the frame while using the rack, the entire Gliding rack will be removed. Make sure you use oven gloves when handling the Gliding rack during cooking.
| | | |---|---|
| | |
NOTE You can install the Gliding rack in any rack positions except the lowest rack position in the oven(level 1).
Operating the oven
Operating the oven
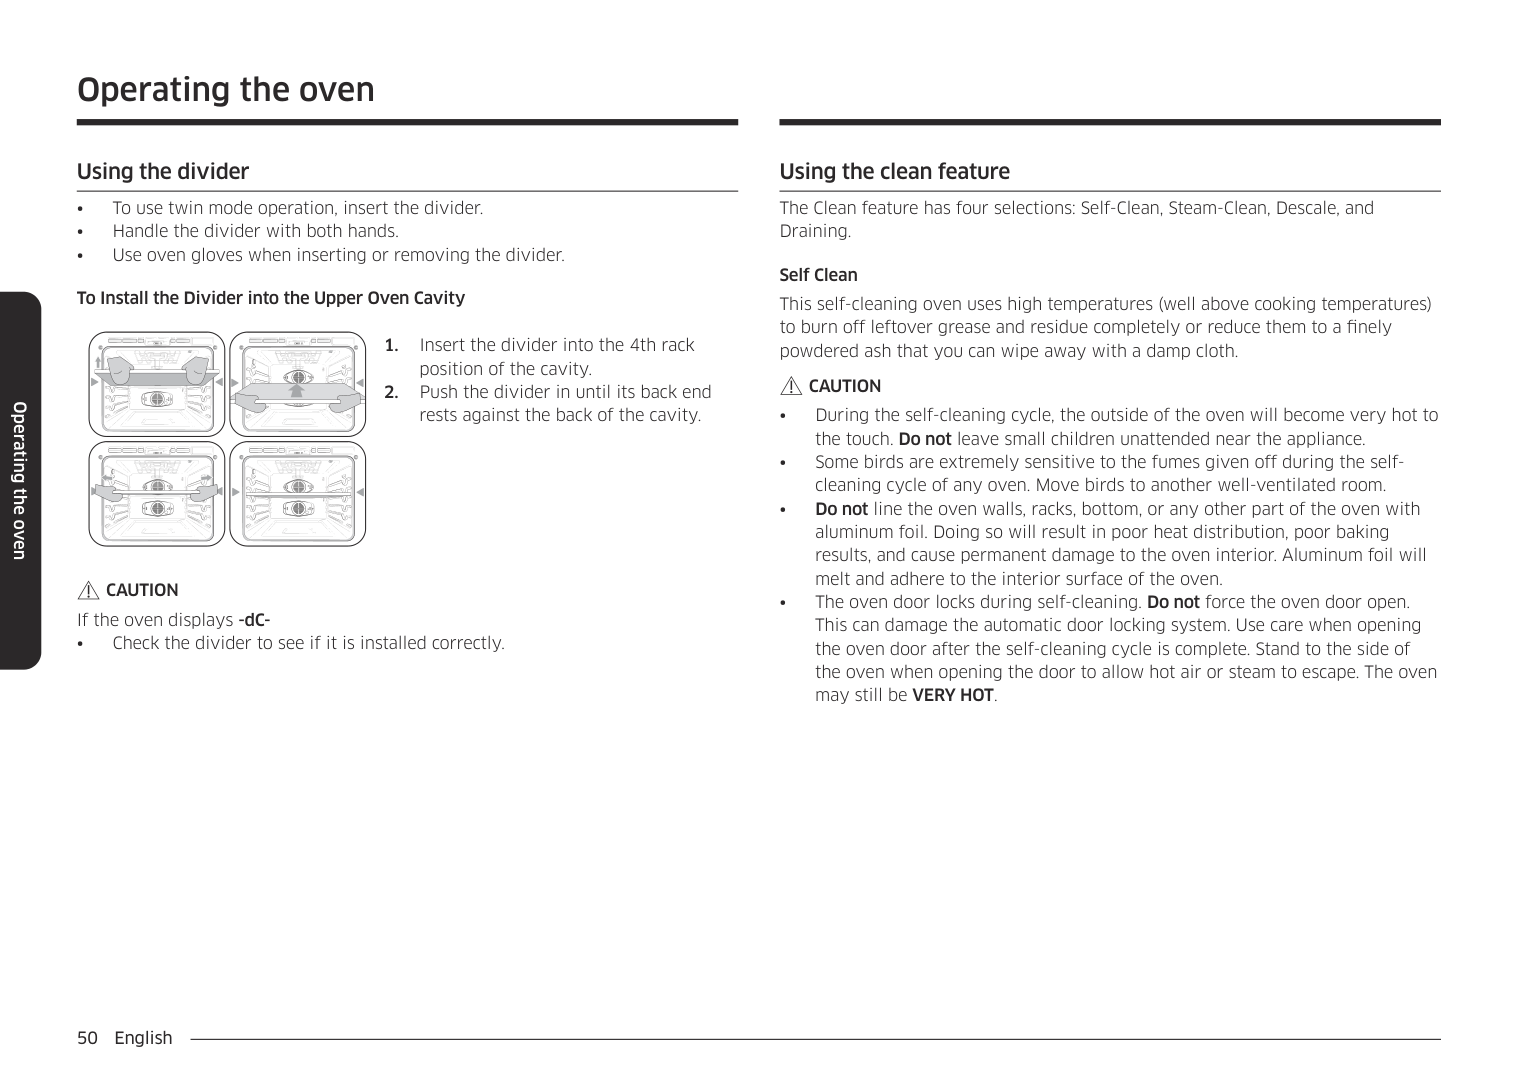
################ To Install the Divider into the Upper Oven Cavity
################ CAUTION
If the oven displays -dC-
• Check the divider to see if it is installed correctly.
######## Using the clean feature
The Clean feature has four selections: Self-Clean, Steam-Clean, Descale, and Draining.
Self Clean This self-cleaning oven uses high temperatures (well above cooking temperatures) to burn off leftover grease and residue completely or reduce them to a finely powdered ash that you can wipe away with a damp cloth.
################ CAUTION
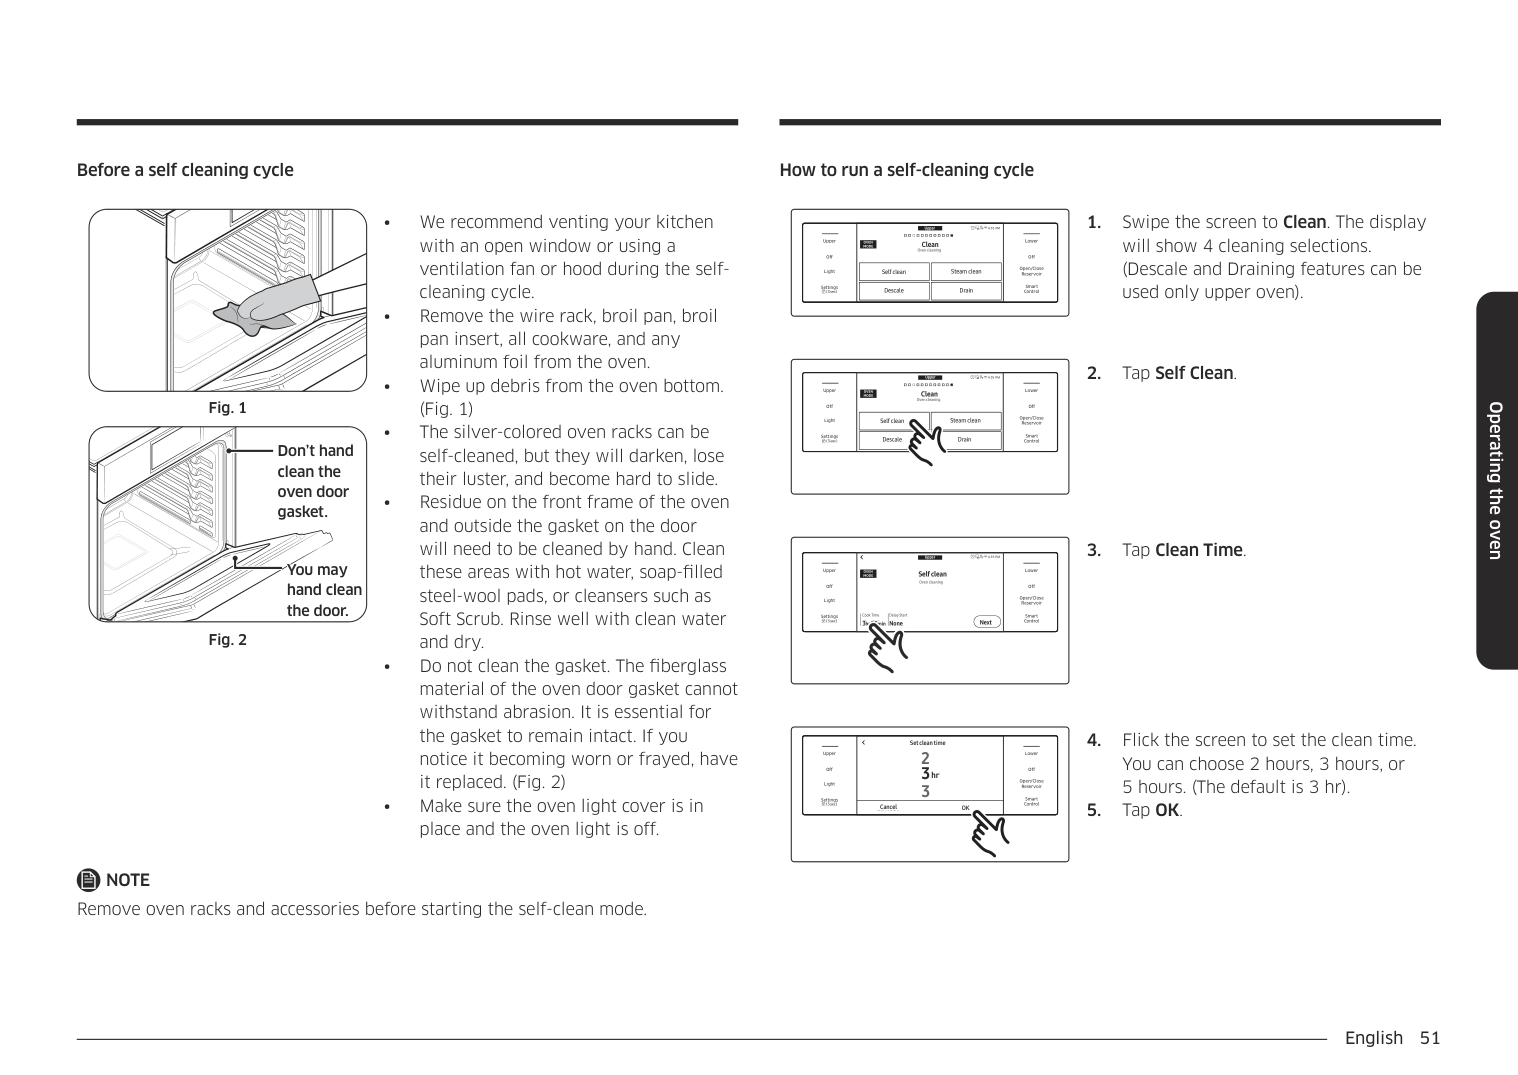
Before a self cleaning cycle
Don’t hand clean the oven door gasket.
You may hand clean the door.
################ NOTE
Remove oven racks and accessories before starting the self-clean mode.
How to run a self-cleaning cycle
Upper Clean Oven cleaning
4:35 PM
LowerUpper
OVEN MODE
Clean Oven cleaning
Off
Off
|Self cleanSelf clean
| |---|
|Steam cleanSteam clean
| |---|
Open/Close Reservoir
Light
|DescaleDescale
| |---|
|DrainDrain
| |---|
Smart Control
Settings
4:35 PMUpper Clean Oven cleaning
LowerUpper
##################################################### OVEN MODE
Clean Oven cleaning
Off
Off
|Self cleanSelf clean
| |---|
|Steam cleanSteam clean
| |---|
Open/Close Reservoir
Light
|DescaleDescale
| |---|
|DrainDrain
| |---|

Smart Control
Settings
Upper
4:35 PM
LowerUpper
#################################### Self clean Oven cleaning
############################ OVEN MODE Self clean
################################################## Oven cleaning
Off
Off
Open/Close Reservoir
Light
###################################### Cook Time 3hr00min None
Delay Start None
Delay Start
Clean Time 3hr 00min
Smart Control
Settings
Next
Next
|Off
Light
Upper
Settings|5
2
3hr
Set clean timeSet clean time
2
3hr 3
|Off
Open/Close Reservoir
Smart Control
Lower| |---|---|---| |Off
Light
Upper
Settings|Cancel OKOKCancel
|Off
Open/Close Reservoir
Smart Control
Lower|
Operating the oven
Operating the oven
#################################### Upper Self clean
4:35 PM
LowerUpper
########################### OVEN MODE Self clean
Oven cleaning
################################################# Oven cleaning
Off
Off
Open/Close Reservoir
Light
###################################### Clean Time 3hr00min None
Delay Start
Delay Start None
Clean Time 3hr 00min
Smart Control
Settings
Next
Next
|Off
Light
Upper
Settings|4 :35
Set start time
End at 12:38PM
AM PM
4:35 PM
AM
Set start time
PM
End at 12:38PM|Off
Open/Close Reservoir
Smart Control
Lower| |---|---|---| |Off
Light
Upper
Settings||1| |---|
|6| |---|
|7| |---|
|8| |---|
|9| |---|
|0| |---|
|2| |---|
|3| |---|
|4| |---|
|5| |---|
|OK| |---| |Off
Open/Close Reservoir
Smart Control
Lower|
Upper
4:35 PM
LowerUpper
#################################### Self clean Oven cleaning
########################### OVEN MODE Self clean
################################################# Oven cleaning
Off
Off
Open/Close Reservoir
Light
###################################### Clean Time 3hr00min None
Delay Start
Delay Start None
Clean Time 3hr 00min
Smart Control
Settings
Next
Next
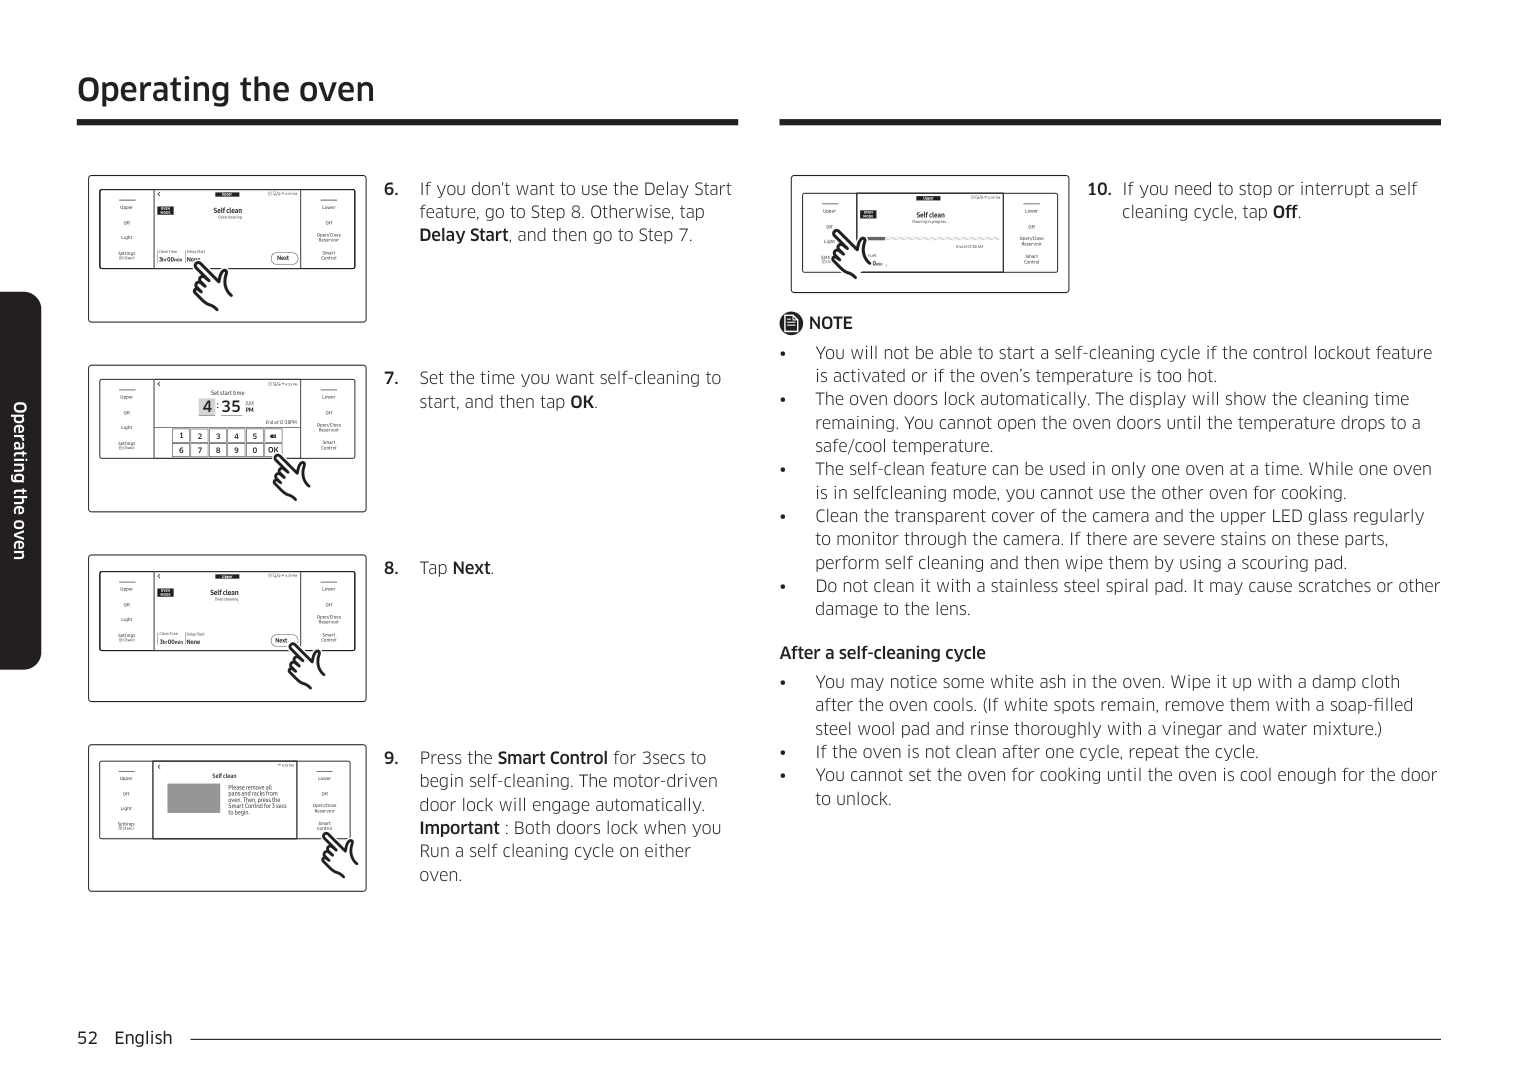
################ 8. Tap Next.
4:35 PM Self clean
################################## Self clean
LowerUpper
Please remove all pans and racks from oven. Then, press the Smart Control for 3 secs to begin.
Please remove all pans and racks from oven. Then, press the Smart Control for 3 secs to begin.
Off
Off
Open/Close Reservoir
Light
Smart Control
Settings
Upper
4:35 PM
LowerUpper
OVEN MODE
######################## Self clean Cleaning in progress...
Self clean Cleaning in progress...
View Summary
Off
Off
Open/Close Reservoir
Light
End at 07:48 AM
End at 07:48 AM
Time Left
Time Left 3hr 00
Smart Control
Settings
hr 00min
cleaning cycle, tap Off.
################ NOTE
After a self-cleaning cycle
######## Steam-Cleaning
|Off
Light
Upper
Settings
|Steam clean
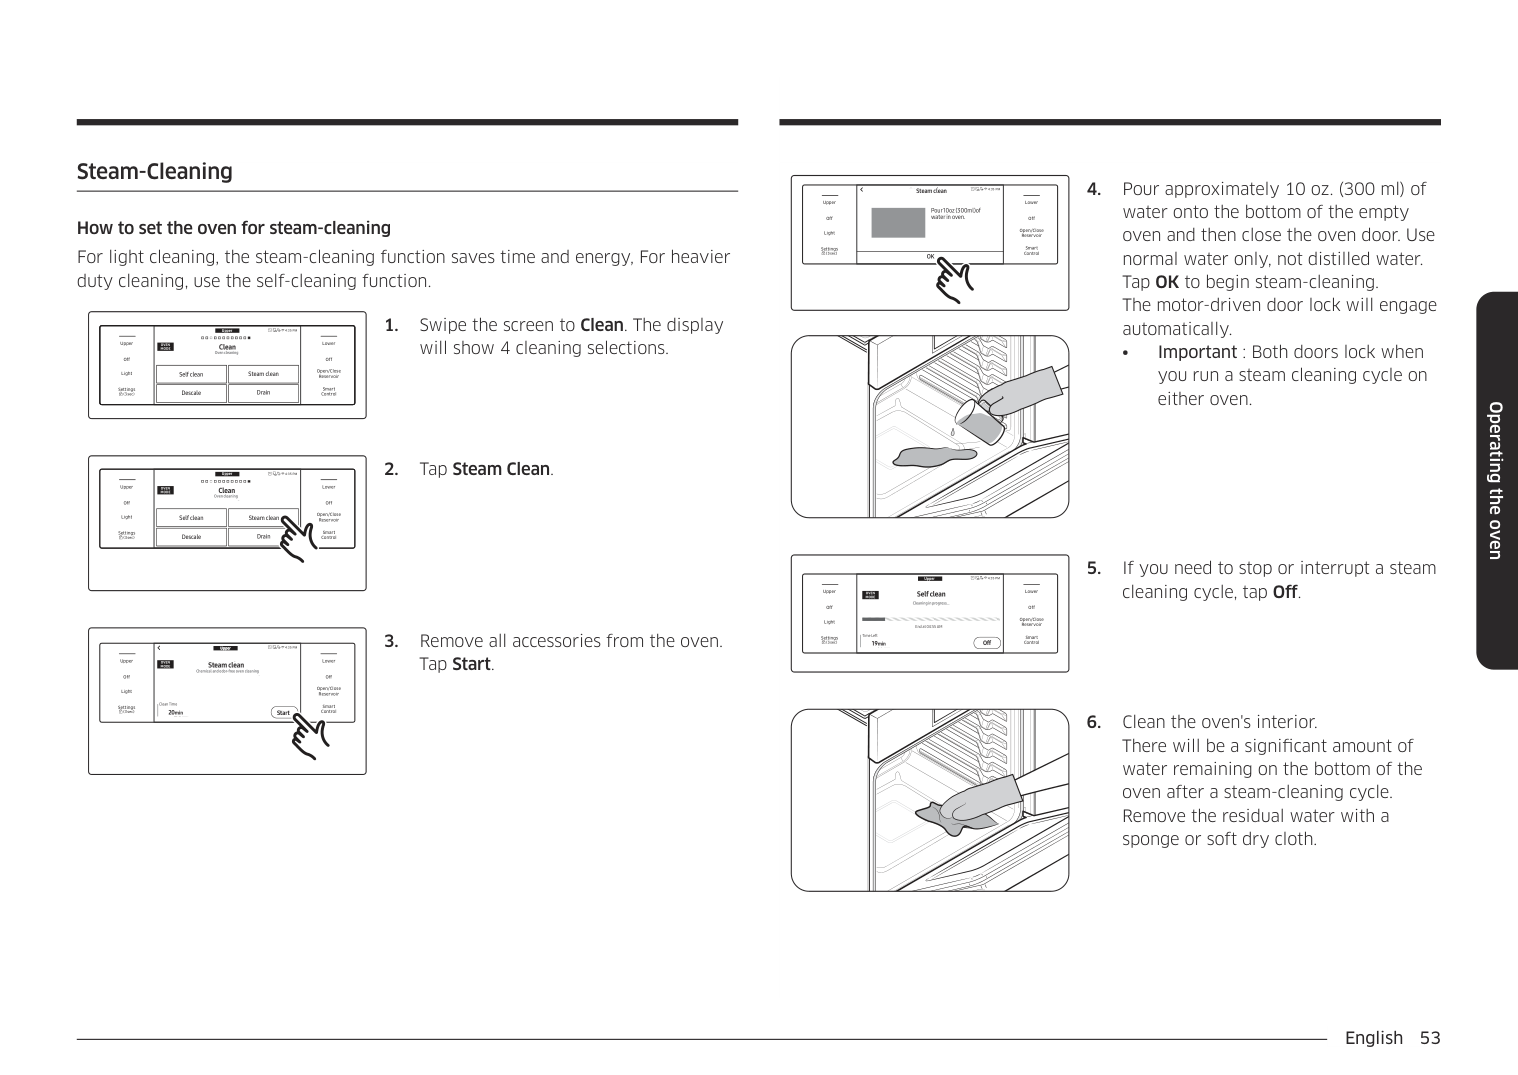
Pour 10oz (300ml) of water in oven.
4:35 PM
Steam clean
Pour 10oz (300ml) of water in oven.|Off
Open/Close Reservoir
Smart Control
Lower| |---|---|---| |Off
Light
Upper
Settings
|OKOK
|Off
Open/Close Reservoir
Smart Control
Lower|
How to set the oven for steam-cleaning For light cleaning, the steam-cleaning function saves time and energy, For heavier duty cleaning, use the self-cleaning function.
Upper Clean Oven cleaning
4:35 PM
will show 4 cleaning selections.
LowerUpper
• Important : Both doors lock when you run a steam cleaning cycle on either oven.
OVEN MODE
Clean Oven cleaning
Off
Off
|Self cleanSelf clean
| |---|
|Steam cleanSteam clean
| |---|
Open/Close Reservoir
Light
|DescaleDescale
| |---|
|DrainDrain
| |---|
Smart Control
Settings
4:35 PMUpper Clean Oven cleaning
LowerUpper
#################################################### OVEN MODE
Clean Oven cleaning
Off
Off
|Self cleanSelf clean
| |---|
|Steam cleanSteam clean
| |---|
Open/Close Reservoir
Light
|DescaleDescale
| |---|
|DrainDrain
| |---|
Smart Control
Settings
Upper
4:35 PM
LowerUpper
Self clean Cleaning in progress...
OVEN MODE
####################### Steam clean Cleaning in progress...
Off
Off
Open/Close Reservoir
Light
End at 04:55 AM
End at 04:55 AM
Time Left
Time Left
Smart Control
Settings
Off
19min
Off
19min
Upper Steam clean Chemical and odor-free oven cleaning
4:35 PM
############################################### Upper
Tap Start.
LowerUpper
OVEN MODE
######################## Steam clean Chemical and odor-free oven cleaning
Off
Off
Open/Close Reservoir
Light
Clean Time
Clean Time
Smart Control
Settings
20min Start
Start
hr 20min
Operating the oven
Operating the oven
CAUTION Wear gloves during cleaning. After a steam-cleaning cycle
Descale (Upper oven only) If you use Steam Bake or Steam Roast functions frequently, we recommend descaling regularly to remove minerals from the oven that may affect the taste or quality of food cooked. When running a descaling cycle, use only descaling agents that are specific to steam ovens or coffee machines.
NOTE If you use Steam Bake or Steam Roast functions for more than a total of 12 hours, the Descale indicator turns on. You can still enable the Steam Bake or Steam Roast functions for the next two hours without descaling. However, after those two hours are up, the Steam Bake or Steam Roast functions will be disabled until you run a descaling cycle.
How to run a descale cycle
Upper
4:35 PM
LowerUpper
OVEN MODE
Clean Oven cleaning
Clean Oven cleaning
Off
Off
|Self cleanSelf clean
| |---|
|Steam cleanSteam clean
| |---|
Open/Close Reservoir
Light
|DescaleDescale
| |---|
|DrainDrain
| |---|
Smart Control
Settings
will show 4 cleaning selections.
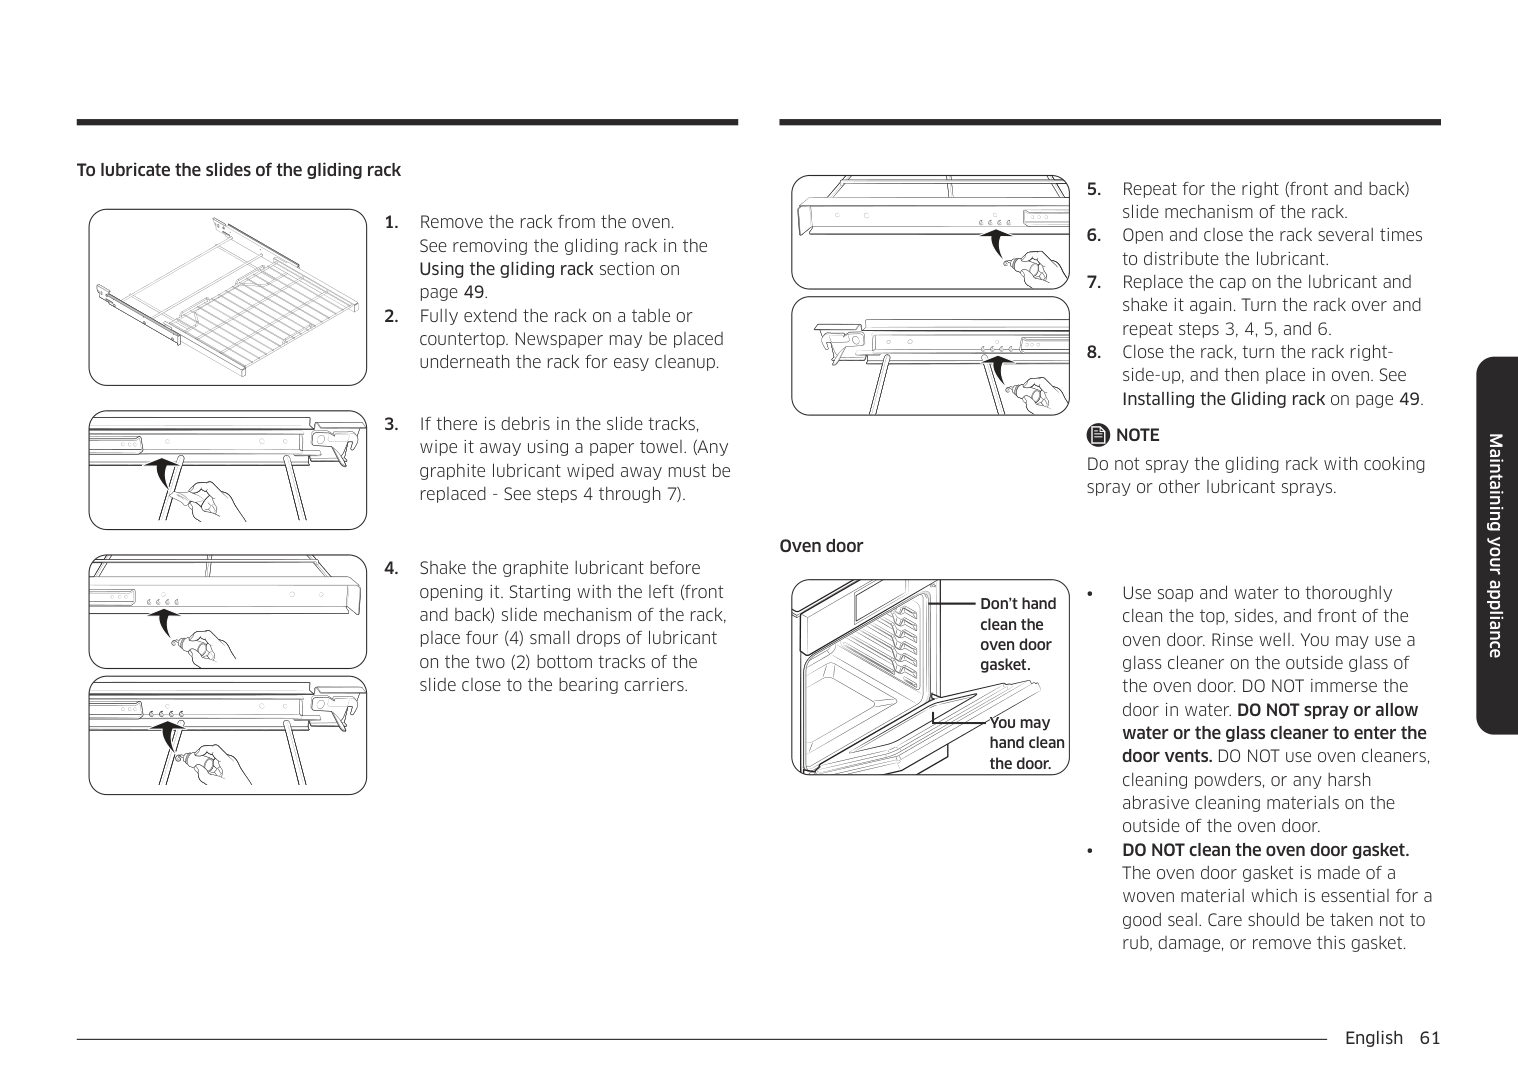
UpperUpper
4:35 PM
LowerUpper
#################################### Descale
OVEN MODE
Descale Please descale Water Reservoir to improve quality.
Please descale Water Reservoir to improve quality.
Off
Off
Open/Close Reservoir
Light
Clean Time 3hr 00min
Clean Time 3hr 00min
Smart Control
Settings
Start
Start
################ 3. Tap Start.
|Off
Light
Upper
Settings
|Descale
Pour 13.5oz (400ml) water and 1.7oz (50ml) descaling solution into Water Reservoir.
4:35 PMDescale
Pour 13.5oz (400ml) waterand 1.7oz (50ml) descaling solution into WaterReservoir.|Off
Open/Close Reservoir
Smart Control
Lower| |---|---|---| |Off
Light
Upper
Settings
|OKOK
|Off
Open/Close Reservoir
Smart Control
Lower|
################## 4. Follow the on-screen instructions.It takes 3 hours to complete the cycle.
################## • Empty and clean the water reservoir, and then fill it with 1.7 oz (50 ml) of descaling agent and 13.5 oz (400 ml) of drinkable water.
4:35 PMUpper
LowerUpper
#################################### Descale Draining…
######################## Descale Draining…
Off
Off
Caution: Hot Water. Do not remove Water Reservoir while draining.
Caution: Hot Water. Do not remove Water Reservoir while draining.
Open/Close Reservoir
Light
Smart Control
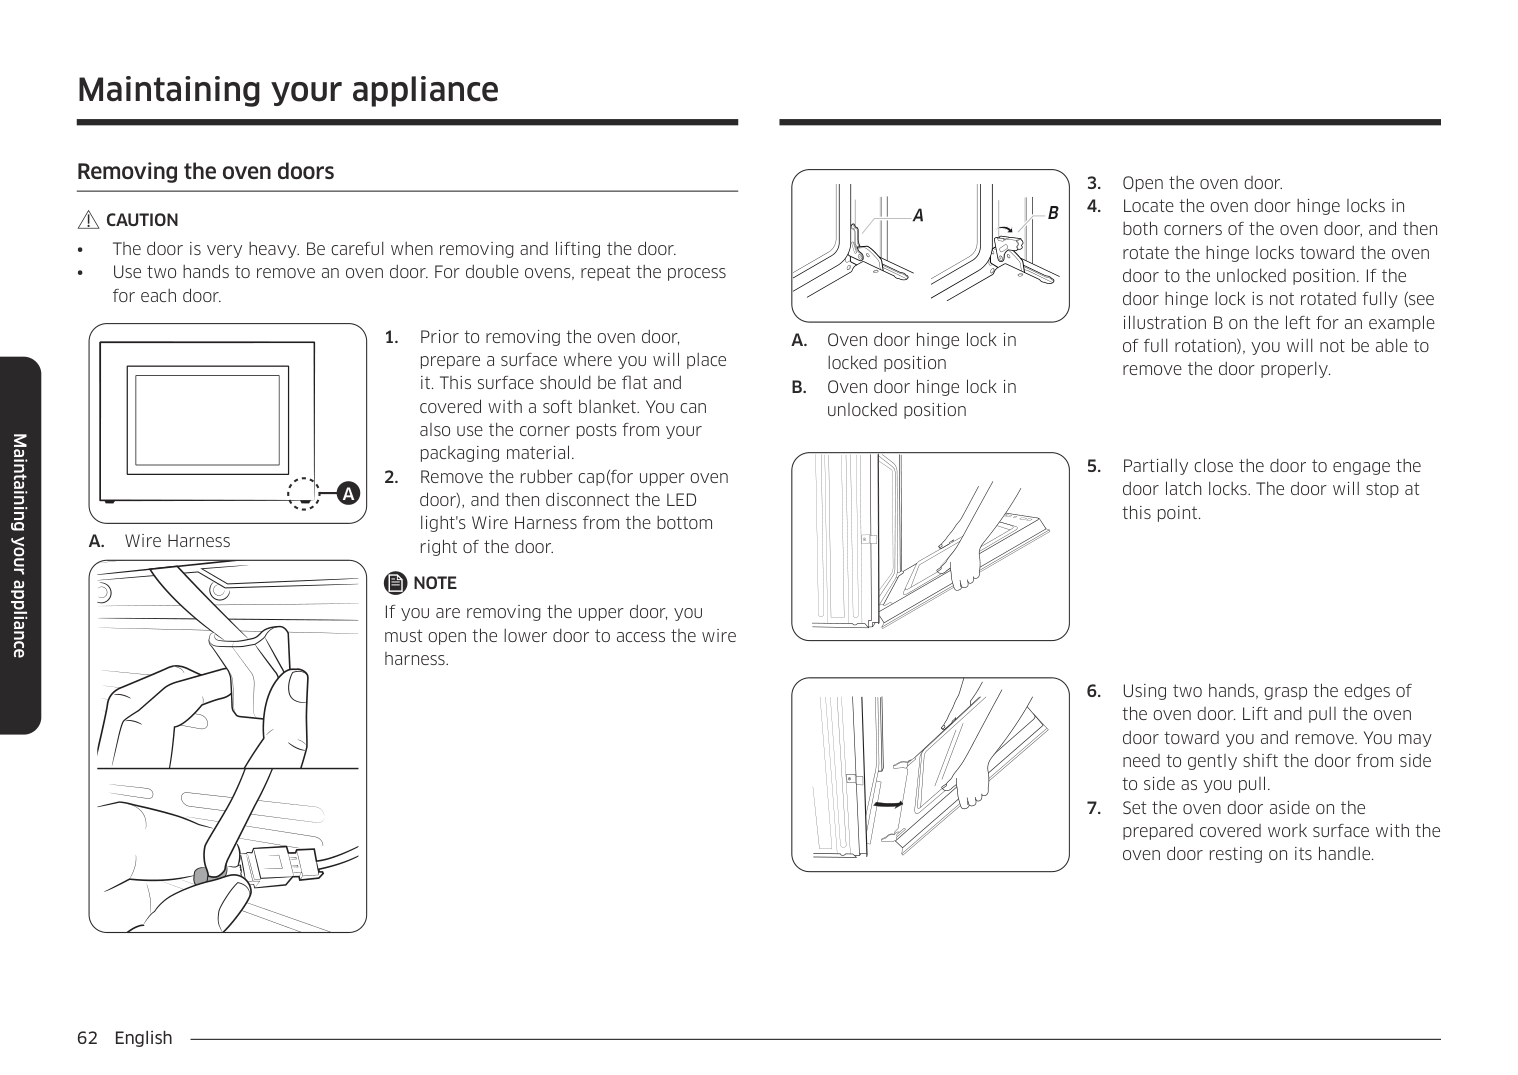
Settings
####################################### Descale
####################### Descale
4:35 PM
LowerUpper
Pour 22oz (650ml) of water into Water Reservoir to rinse.
Pour 22oz (650ml) of water into Water Reservoir to rinse.
Off
Off
Open/Close Reservoir
Light
Smart Control
Settings
then tap OK to start rinsing.
LowerUpper
##################### Cleaning is complete.
#################################### Cleaning is complete.
Off
Off
Open/Close Reservoir
Light
Smart Control
Settings
OK
OK
################ WARNING
Use only descaling agents that are specific to steam ovens or coffee machines.
################ CAUTION
NOTE Although the oven automatically starts descaling in 5 seconds without your confirmation, we recommend that you confirm your selection. This is to prevent descaling from starting by mistake.
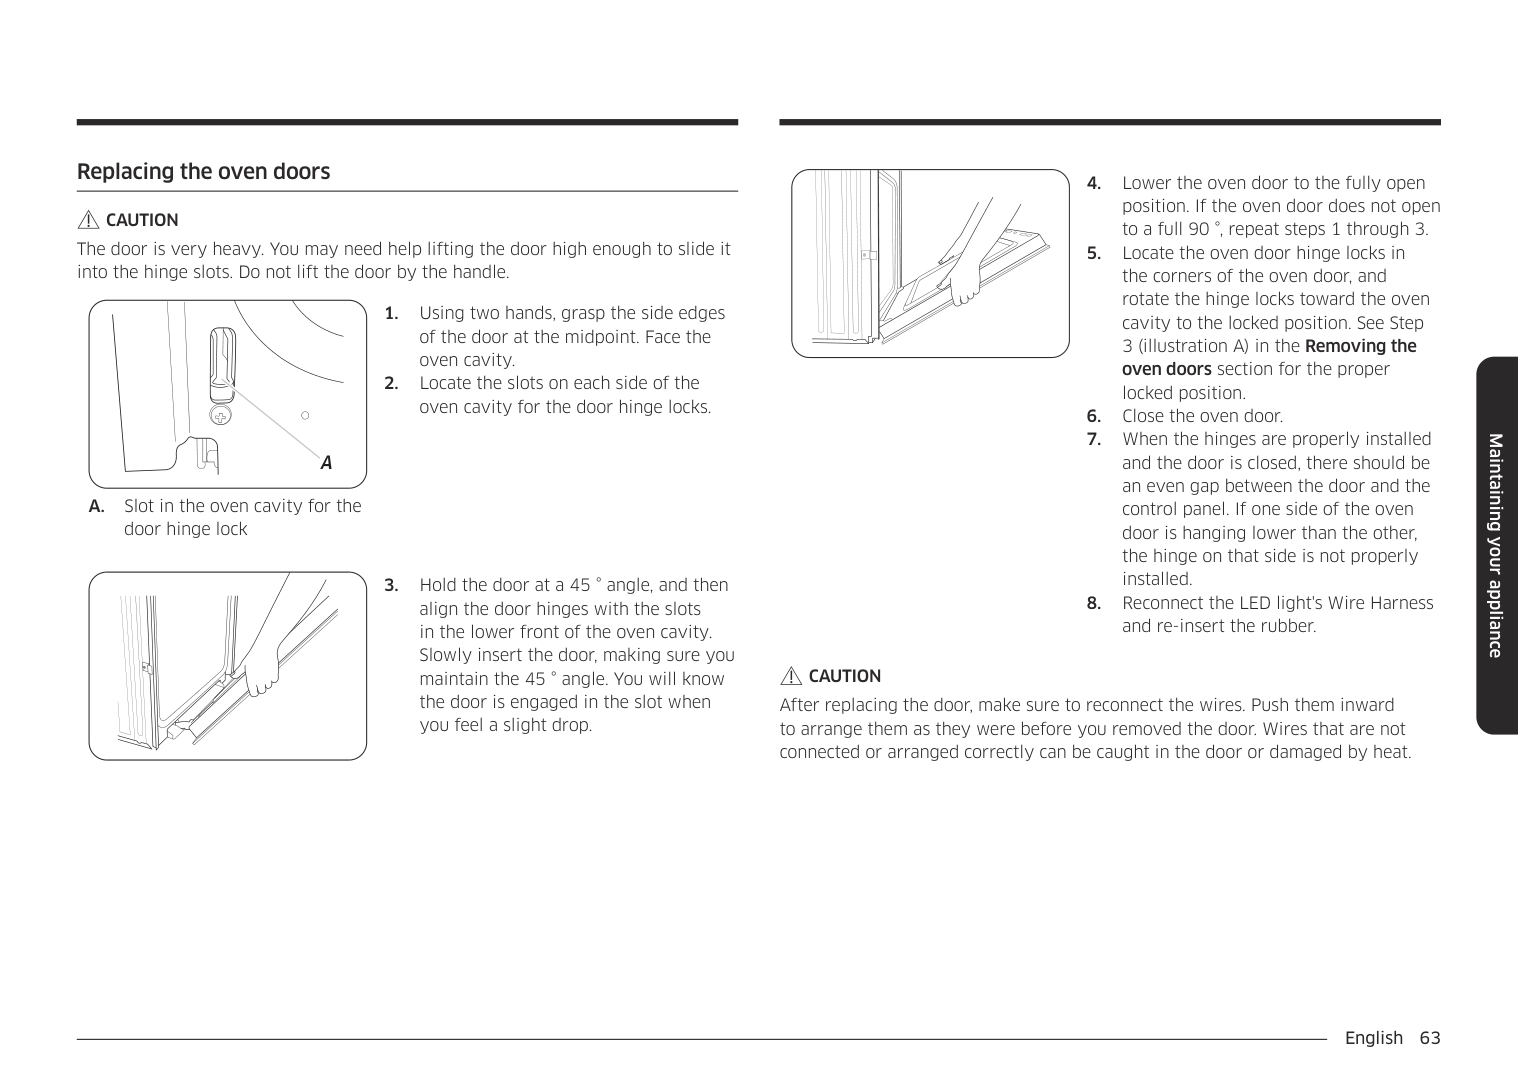
Draining (Upper oven only) When a steam function is complete, you must drain the remaining water to prevent the water from affecting other cooking modes. To drain the water, follow these steps:
How to run a draining
4:35 PMUpper Clean Oven cleaning
LowerUpper
################################################### OVEN MODE
Clean Oven cleaning
Off
Off
|Self cleanSelf clean
| |---|
|Steam cleanSteam clean
| |---|
Open/Close Reservoir
Light
|DescaleDescale
| |---|
|DrainDrain
| |---|
Smart Control
Settings
Upper
4:35 PM
LowerUpper
OVEN MODE
Draining Water is draining after running Steam function.
#################################### Draining
View Summary
Water is draining after running Steam function.
Off
Off
Open/Close Reservoir
Light
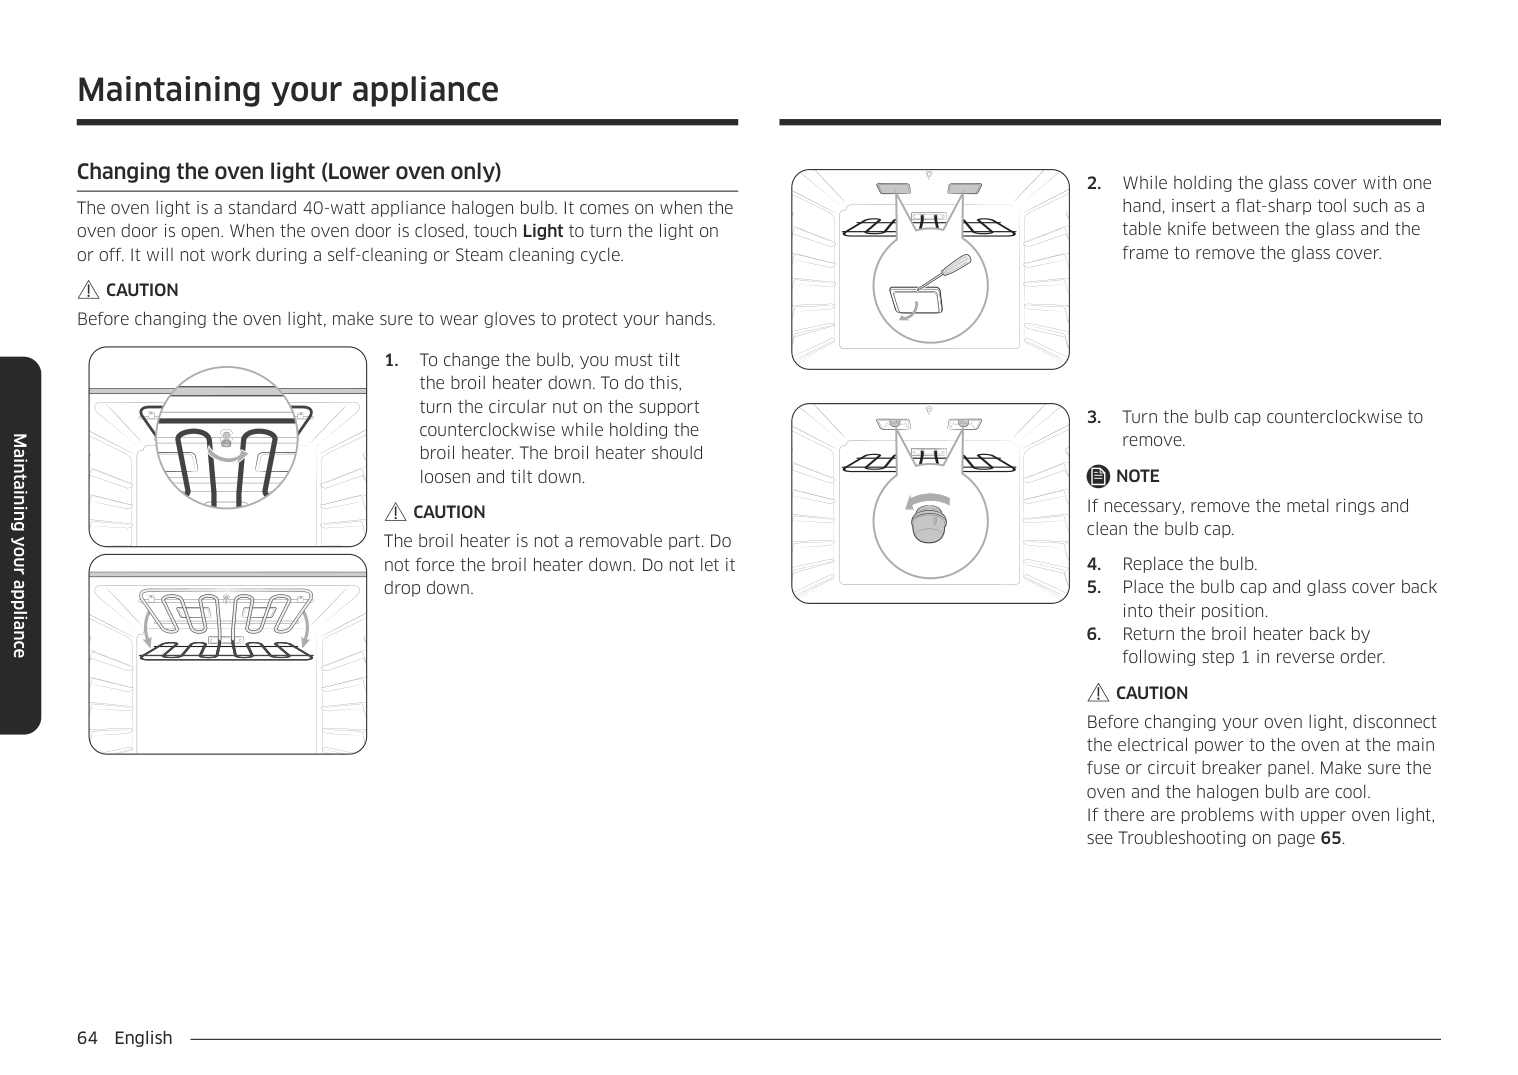
Smart Control
Settings
Start
Start
Upper
4:35 PM
LowerUpper
#################################### Drain
Drain
Please empty Reservoir.
Off
Please empty Reservoir. Off
Open/Close Reservoir
Light
Smart Control
Settings
OK
OK
#################################### Upper 4:35 PMUpper Draining
LowerUpper
######################## Draining Draining…
Draining…
Off
Off
####################################### Caution: Hot Water. Do not remove Water Reservoir while draining.
Caution: Hot Water. Do not remove Water Reservoir while draining.
Open/Close Reservoir
Light
Smart Control
Settings
4:35 PM
LowerUpper
#################################### Draining is complete.
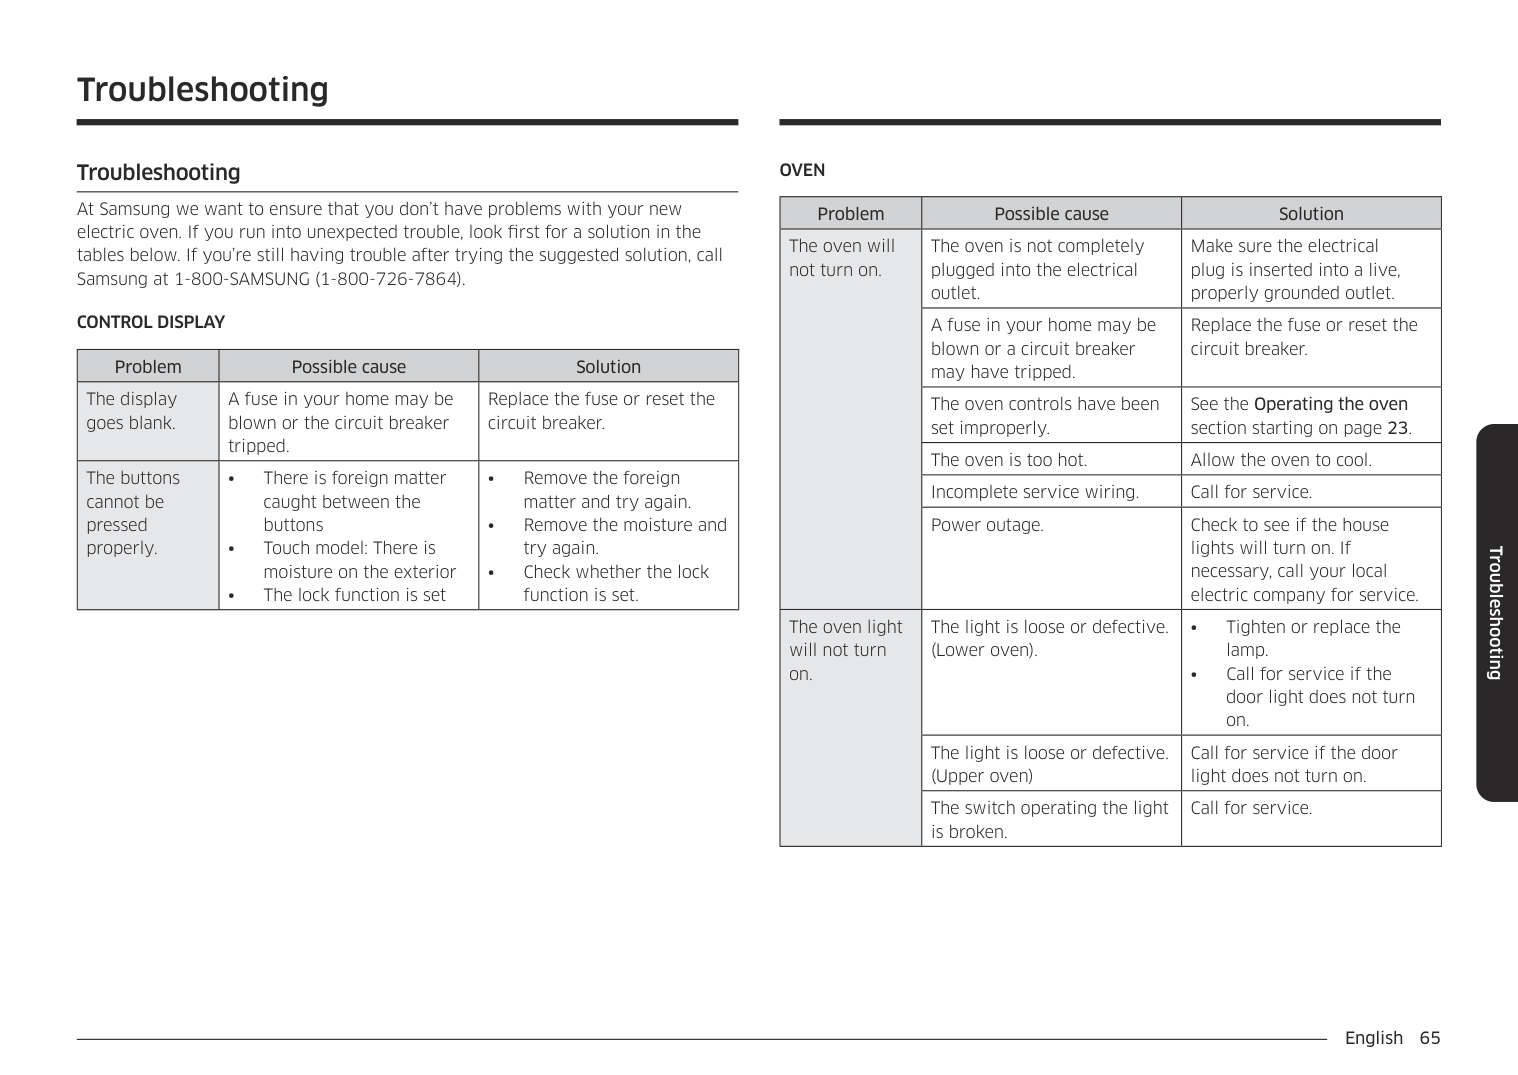
#################### Draining is complete.
Off
Off
Open/Close Reservoir
Light
Smart Control
Settings
OK
OK
################ NOTE
Once the oven starts draining, wait until the draining cycle is complete.
Operating the oven
Operating the oven
######## Settings
################## In Settings, you can change the default settings to your preference or diagnose problems with the network connection.
Upper
4:35 PM Convection Bake Faster, more even baking 325
LowerUpper
############################################### OVEN MODE TIP
#################################### Convection Bake Faster, more even baking
View Summary
TIP
Off
Off
############################### °F
Open/Close Reservoir
Light
Delay Start No Preheat
Cook Time None None
Cook Time None
Delay Start None
No Preheat Off
Smart Control
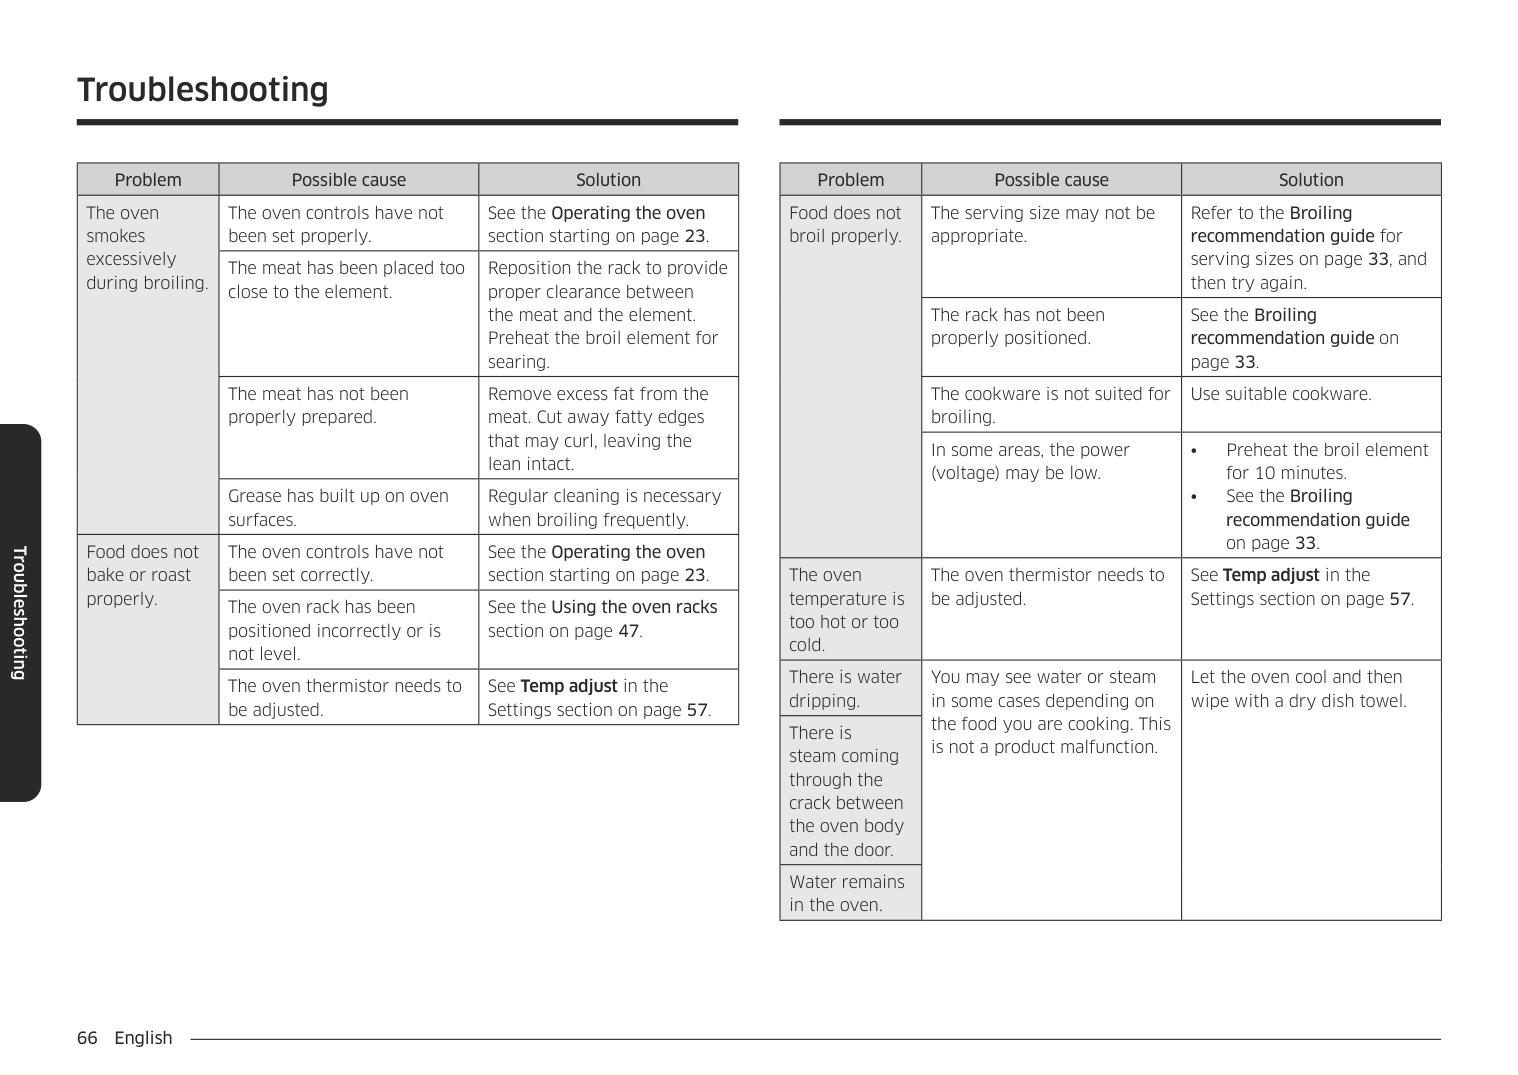
Settings
Off Start
Start
Tap Settings. The display will show the Setting item.
Wi-Fi To enable a Wi-Fi connection
To manually input an IP
################ NOTE
Display
• Tap Settings > Display > Brightness, and then use the bar next to Brightness
to adjust the brightness of the screen.
• Tap Settings > Display > Screen saver, and then tap On in the right screen.
• Tap Settings > Display > Clock theme, and then tap in the right screen. You
can select a theme.
• Tap Settings > Display > Timeout, and then tap in the right screen. You can
select a time from 5 minutes to 60 minutes or Always on. Date & Time To enable automatic date and time
To manually input date and time
Language Choose a display language.

12 hour energy Saving If you accidently leave the oven on, this feature will automatically turn off the oven after 12 hours during baking functions or after 3 hours during a broil function.
Volume Adjust the volume level for beeps and melodies.
Easy connection Easy connection enables you to easily configure the network settings including the authentication procedure.
• Tap Settings > Volume, and then use the bar next to Volume to adjust the
volume.
################ Temp
################ • Tap Settings > Connections > Easy Connection, and then tap Connect.
You can program the oven control to display the temperature in Fahrenheit or Celsius. The oven has been preset at the factory to display in Fahrenheit.
• Tap Settings > Temperature > Temperature Unit, and then tap in the right
screen. You can select °C or °F.
Help Help provides useful tips and explanations on a specific item that you select.
• Tap a checkpoint directly on the screen, and try the suggestions.
• Provides simple instructions on the basic use of the oven.
The temperature in the oven has been calibrated at the factory. When first using the oven, be sure to follow recipe times and temperatures. If you think the oven is too hot or too cool, you can correct the temperature in the oven. Before correcting, test a recipe by using a temperature setting that is higher or lower than the recommended temperature. The baking results should help you to decide how much of an adjustment is needed. The oven temperature can be adjusted ±35 °F (±19 °C).
About device You can see information about the oven and do a software update. To update the software:
NOTE
Sabbath You can set Sabbath mode. See the Using the sabbath feature section on the next page.
Operating the oven
Operating the oven
Demo mode This option is for use by retail establishments for display purposes only. (The heating element does not operate.)
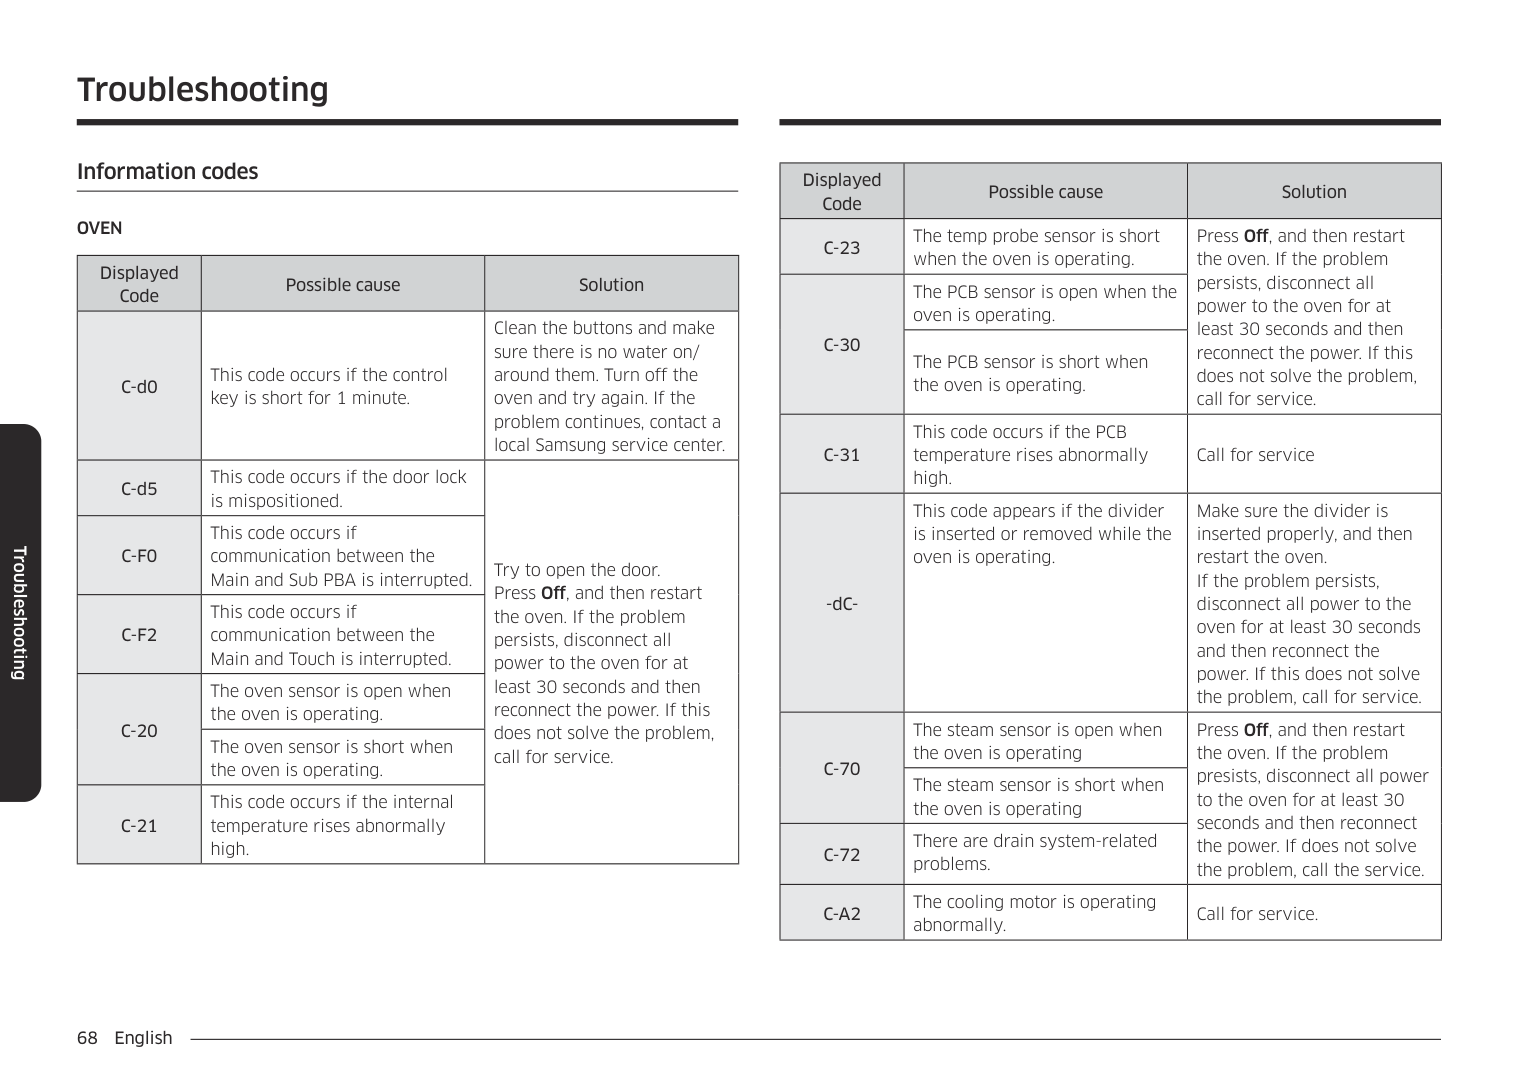
Factory reset You can reset your oven setting.
################ CAUTION
Before reset the oven settings, turn off all oven functions.
Remote Management The call center will access your product remotely to check internal when you have some problems.
################ • Tap Settings > Connections > Remote management, and then tap Acticate.
Using the sabbath feature (For use on the Jewish Sabbath & Holidays)
K
For further assistance, guidelines for proper usage, and a complete list of models with the Sabbath feature, please visit the web at http:\\www.star-k.org.
You can use the Sabbath feature with baking only. The oven temperature may be set higher or lower after you set the Sabbath feature. (The oven temperature adjustment feature should be used only during Jewish holidays.) The display, however, will not change and tones will not sound when a change occurs. Once the oven is properly set for baking with the Sabbath feature active, the oven will remain on continuously until the Sabbath feature is cancelled. This will override the factory preset 12 hour energy saving feature. If the oven light is needed during the Sabbath, touch Light before activating the Sabbath feature. Once the oven light is turned on and the Sabbath feature is active, the oven interior light will remain on until the Sabbath feature is turned off. If the oven light needs to be off, be sure to turn the oven light off before activating the Sabbath feature.
################ How to use the Sabbath feature
################ CAUTION
NOTE
Upper Bake Thermal heat baking
########## 4:35 PM Bake 350
LowerUpper
OVEN MODE
Thermal heat baking
Off
Off
############################### °F
Open/Close Reservoir
Light
###################################### Cook Time None None
Delay Start
Cook Time None
Delay Start None
Smart Control
Settings
Start
Start
Upper Bake Thermal heat baking
########## 4:35 PM Bake 350
LowerUpper
################################################### OVEN MODE
OVEN MODE
View Summary
Thermal heat baking
Off
Off
################################ °F
Open/Close Reservoir
Light
###################################### Cook Time None None
Cook Time None
Delay Start None
Delay Start
Smart Control
Settings
Start
Start
|Off
Light
Upper
Settings|Sabbath - Temperature +
Upper Sabbath
- Temperature +|Off
Open/Close Reservoir
Smart Control
Lower| |---|---|---| |Off
Light
Upper
Settings|Sabbath Mode Off (3 sec)Sabbath Mode Off (3 sec)
|Off
Open/Close Reservoir
Smart Control
Lower|
Settings
Settings
LowerUpper
Help? i
Help About device Sabbath Factory Reset
About device Sabbath Factory Reset
Off
Off
Open/Close Reservoir
Light
|12th| |---|
+
Smart Control
Settings
DEMO
Operating the oven
Maintaining your appliance
######## Care and cleaning of the oven
################ Cleaning painted parts and decorative trim
################ Cleaning stainless steel surfaces
NOTE
Air Fry tray To keep the Air Fry tray clean, remove them from the cavity, and soak them in Lukewarm soapy water. Then, scour soil off of the Air Fry tray using a plastic scouring pad. NOTE
The Air Fry tray is dishwasher-safe.
CAUTION Do not leave the Air Fry tray in the oven during the self-cleaning cycle. The extreme heat generated in this cycle can permanently peel off the air fry coating, their color will turn slightly blue and finish will be dull.
Oven racks
NOTE
################ To lubricate the slides of the gliding rack
NOTE Do not spray the gliding rack with cooking spray or other lubricant sprays.
################ Oven door
Don’t hand clean the oven door gasket.
You may hand clean the door.
Maintaining your appliance
Maintaining your appliance
######## Removing the oven doors
################ CAUTION
for each door.
################ A
A. Wire Harness
NOTE If you are removing the upper door, you must open the lower door to access the wire harness.
############# A B
######## Replacing the oven doors
CAUTION The door is very heavy. You may need help lifting the door high enough to slide it into the hinge slots. Do not lift the door by the handle.
############ A
A. Slot in the oven cavity for the
door hinge lock
CAUTION After replacing the door, make sure to reconnect the wires. Push them inward to arrange them as they were before you removed the door. Wires that are not connected or arranged correctly can be caught in the door or damaged by heat.
Maintaining your appliance
######## Changing the oven light (Lower oven only)
NOTE If necessary, remove the metal rings and clean the bulb cap.
The oven light is a standard 40-watt appliance halogen bulb. It comes on when the oven door is open. When the oven door is closed, touch Light to turn the light on or off. It will not work during a self-cleaning or Steam cleaning cycle.
################ CAUTION
Before changing the oven light, make sure to wear gloves to protect your hands.
| | | | |---|---|---| | | | | | | | |
Maintaining your appliance
CAUTION The broil heater is not a removable part. Do not force the broil heater down. Do not let it drop down.
CAUTION Before changing your oven light, disconnect the electrical power to the oven at the main fuse or circuit breaker panel. Make sure the oven and the halogen bulb are cool. If there are problems with upper oven light, see Troubleshooting on page 65.
######## Troubleshooting
At Samsung we want to ensure that you don’t have problems with your new electric oven. If you run into unexpected trouble, look first for a solution in the tables below. If you’re still having trouble after trying the suggested solution, call Samsung at 1-800-SAMSUNG (1-800-726-7864).
CONTROL DISPLAY

|Problem|Possible cause|Solution| |---|---|---| |The display goes blank.|A fuse in your home may be blown or the circuit breaker tripped.|Replace the fuse or reset the circuit breaker.| |The buttons cannot be pressed properly.|• There is foreign matter caught between the buttons
• Touch model: There is moisture on the exterior
• The lock function is set
|• Remove the foreign matter and try again.
• Remove the moisture and try again.
• Check whether the lock function is set.
|
OVEN
|Problem|Possible cause|Solution| |---|---|---| |The oven will not turn on.|The oven is not completely plugged into the electrical outlet.|Make sure the electrical plug is inserted into a live, properly grounded outlet.| |The oven will not turn on.|A fuse in your home may be blown or a circuit breaker may have tripped.|Replace the fuse or reset the circuit breaker.| |The oven will not turn on.|The oven controls have been set improperly.|See the Operating the oven section starting on page 23.| |The oven will not turn on.|The oven is too hot.|Allow the oven to cool.| |The oven will not turn on.|Incomplete service wiring.|Call for service.| |The oven will not turn on.|Power outage.|Check to see if the house lights will turn on. If necessary, call your local electric company for service.| |The oven light will not turn on.|The light is loose or defective. (Lower oven).|• Tighten or replace the lamp.
• Call for service if the door light does not turn on.
| |The oven light will not turn on.|The light is loose or defective. (Upper oven)|Call for service if the door light does not turn on.| |The oven light will not turn on.|The switch operating the light is broken.|Call for service.|
Troubleshooting
################ Troubleshooting
|Problem|Possible cause|Solution| |---|---|---| |The oven smokes excessively during broiling.|The oven controls have not been set properly.|See the Operating the oven section starting on page 23.| |The oven smokes excessively during broiling.|The meat has been placed too close to the element.|Reposition the rack to provide proper clearance between the meat and the element. Preheat the broil element for searing.| |The oven smokes excessively during broiling.|The meat has not been properly prepared.|Remove excess fat from the meat. Cut away fatty edges that may curl, leaving the lean intact.| |The oven smokes excessively during broiling.|Grease has built up on oven surfaces.|Regular cleaning is necessary when broiling frequently.| |Food does not bake or roast properly.|The oven controls have not been set correctly.|See the Operating the oven section starting on page 23.| |Food does not bake or roast properly.|The oven rack has been positioned incorrectly or is not level.|See the Using the oven racks section on page 47.| |Food does not bake or roast properly.|The oven thermistor needs to be adjusted.|See Temp adjust in the Settings section on page 57.|
|Problem|Possible cause|Solution| |---|---|---| |Food does not broil properly.|The serving size may not be appropriate.|Refer to the Broiling recommendation guide for serving sizes on page 33, and then try again.| |Food does not broil properly.|The rack has not been properly positioned.|See the Broiling recommendation guide on page 33.| |Food does not broil properly.|The cookware is not suited for broiling.|Use suitable cookware.| |Food does not broil properly.|In some areas, the power (voltage) may be low.|• Preheat the broil element for 10 minutes.
• See the Broiling recommendation guide on page 33.
| |The oven temperature is too hot or too cold.|The oven thermistor needs to be adjusted.|See Temp adjust in the Settings section on page 57.| |There is water dripping.|You may see water or steam in some cases depending on the food you are cooking. This is not a product malfunction.|Let the oven cool and then wipe with a dry dish towel.| |There is steam coming through the crack between the oven body and the door.|You may see water or steam in some cases depending on the food you are cooking. This is not a product malfunction.|Let the oven cool and then wipe with a dry dish towel.| |Water remains in the oven.|You may see water or steam in some cases depending on the food you are cooking. This is not a product malfunction.|Let the oven cool and then wipe with a dry dish towel.|
|Problem|Possible cause|Solution| |---|---|---| |I can hear water boiling during steam cooking.|Water is being heated by the steam heater.`|This is not a product malfunction.| |The oven will not self-clean.|The oven temperature is too high to start a self-clean operation.|Allow the oven to cool and then reset the controls.| |The oven will not self-clean.|The oven controls have been set incorrectly.|See the Self Clean section on page 50.| |The oven will not self-clean.|A self-cleaning cycle cannot be started if the oven lockout feature has been activated.|Deactivate the oven lockout (see page 24).| |Excessive smoking during a self-cleaning cycle.|There is excessive soiling in the oven.|Press Off. Open the windows to rid the room of smoke. Wait until the self-cleaning cycle is cancelled. Wipe up the excessive soil and then start the self-cleaning cycle again.| |The oven door will not open after a selfcleaning cycle.|The oven is too hot.|Allow the oven to cool.| |The oven is not clean after a self-cleaning cycle.|The oven controls were not set correctly.|See the Self Clean section on page 50.| |The oven is not clean after a self-cleaning cycle.|The oven was heavily soiled.|Wipe up heavy spillovers before starting the selfcleaning cycle. Heavily soiled ovens may need to be selfcleaned again or for a longer period of time.|
|Problem|Possible cause|Solution| |---|---|---| |Steam is coming out of the vent.|When using the convection feature, it is normal to see steam coming out of the oven vent.|This is normal operation and not a system failure. Use the oven as usual.| |Steam is coming out of the vent.|As the number of racks or amount of food being cooked increases, the amount of visible steam will increase.|This is normal operation and not a system failure. Use the oven as usual.| |A burning or oily odor is coming from the vent.|This is normal for a new oven and will disappear in time.|• To speed the process, set a self-cleaning cycle for a minimum of 3 hours.
• See the Self Clean section on page 50.
| |Strong odor.|An odor coming from the insulation around the inside of the oven is normal for the first few times the oven is used.|Operate the oven empty on the bake setting at 400 °F for 1 hour.| |Fan noise.|A convection fan may automatically turn on and off.|This is not a system failure but normal operation.| |The oven racks are difficult to slide.|The shiny, silver-colored racks were cleaned in a selfcleaning cycle.|Apply a small amount of vegetable oil to a paper towel, and then wipe the edges of the oven racks with the paper towel.|
|The oven door is locked.|The circuit breaker has been tripped or there was a power failure while the oven door was locked.|Activate Control Lockout, and then unlock the control. See the Control Lockout section on page 24.|
################ Troubleshooting
Troubleshooting
######## Information codes
OVEN
|Displayed Code|Possible cause|Solution| |---|---|---| |C-d0|This code occurs if the control key is short for 1 minute.|Clean the buttons and make sure there is no water on/ around them. Turn off the oven and try again. If the problem continues, contact a local Samsung service center.| |C-d5|This code occurs if the door lock is mispositioned.|Try to open the door. Press Off, and then restart the oven. If the problem persists, disconnect all power to the oven for at least 30 seconds and then reconnect the power. If this does not solve the problem, call for service.| |C-F0|This code occurs if communication between the Main and Sub PBA is interrupted.|Try to open the door. Press Off, and then restart the oven. If the problem persists, disconnect all power to the oven for at least 30 seconds and then reconnect the power. If this does not solve the problem, call for service.| |C-F2|This code occurs if communication between the Main and Touch is interrupted.|Try to open the door. Press Off, and then restart the oven. If the problem persists, disconnect all power to the oven for at least 30 seconds and then reconnect the power. If this does not solve the problem, call for service.| |C-20|The oven sensor is open when the oven is operating.|Try to open the door. Press Off, and then restart the oven. If the problem persists, disconnect all power to the oven for at least 30 seconds and then reconnect the power. If this does not solve the problem, call for service.| |C-20|The oven sensor is short when the oven is operating.|Try to open the door. Press Off, and then restart the oven. If the problem persists, disconnect all power to the oven for at least 30 seconds and then reconnect the power. If this does not solve the problem, call for service.| |C-21|This code occurs if the internal temperature rises abnormally high.|Try to open the door. Press Off, and then restart the oven. If the problem persists, disconnect all power to the oven for at least 30 seconds and then reconnect the power. If this does not solve the problem, call for service.|
|Displayed Code|Possible cause|Solution| |---|---|---| |C-23|The temp probe sensor is short when the oven is operating.|Press Off, and then restart the oven. If the problem persists, disconnect all power to the oven for at least 30 seconds and then reconnect the power. If this does not solve the problem, call for service.| |C-30|The PCB sensor is open when the oven is operating.|Press Off, and then restart the oven. If the problem persists, disconnect all power to the oven for at least 30 seconds and then reconnect the power. If this does not solve the problem, call for service.| |C-30|The PCB sensor is short when the oven is operating.|Press Off, and then restart the oven. If the problem persists, disconnect all power to the oven for at least 30 seconds and then reconnect the power. If this does not solve the problem, call for service.| |C-31|This code occurs if the PCB temperature rises abnormally high.|Call for service| |-dC-|This code appears if the divider is inserted or removed while the oven is operating.|Make sure the divider is inserted properly, and then restart the oven. If the problem persists, disconnect all power to the oven for at least 30 seconds and then reconnect the power. If this does not solve the problem, call for service.| |C-70|The steam sensor is open when the oven is operating|Press Off, and then restart the oven. If the problem presists, disconnect all power to the oven for at least 30 seconds and then reconnect the power. If does not solve the problem, call the service.| |C-70|The steam sensor is short when the oven is operating|Press Off, and then restart the oven. If the problem presists, disconnect all power to the oven for at least 30 seconds and then reconnect the power. If does not solve the problem, call the service.| |C-72|There are drain system-related problems.|Press Off, and then restart the oven. If the problem presists, disconnect all power to the oven for at least 30 seconds and then reconnect the power. If does not solve the problem, call the service.| |C-A2|The cooling motor is operating abnormally.|Call for service.|
PLEASE DO NOT DISCARD. THIS PAGE REPLACES THE WARRANTY PAGE IN THE USE & CARE GUIDE
SAMSUNG ELECTRIC OVEN
|LIMITED WARRANTY TO ORIGINAL PURCHASER WITH PROOF OF PURCHASE| |---|
This SAMSUNG brand product, as supplied and distributed by SAMSUNG ELECTRONICS AMERICA, INC. (SAMSUNG) and delivered new, in the original carton to the original consumer purchaser, is warranted by SAMSUNG against manufacturing defects in materials or workmanship for the limited warranty period, starting from the date of original purchase, of:
One (1) Year Parts and Labor This limited warranty is valid only on products purchased and used in the United States that have been installed, operated, and maintained according to the instructions attached to or furnished with the product. To receive warranty service, the purchaser must contact SAMSUNG at the address or phone number provided below for problem determination and service procedures. Warranty service can only be performed by a SAMSUNG authorized service center. The original dated bill of sale must be presented upon request as proof of purchase to SAMSUNG or SAMSUNG’s authorized service center to receive warranty service. SAMSUNG will provide in-home service within the contiguous United States during the warranty period at no charge, subject to availability of SAMSUNG authorized servicers within the customer’s geographic area. If in-home service is not available, SAMSUNG may elect, at its option, to provide transportation of the product to and from an authorized service center. If the product is located in an area where service by a SAMSUNG authorized servicer is not available, you may be responsible for a trip charge or required to bring the product to a SAMSUNG authorized service center for service. To receive in-home service, product must be unobstructed and accessible to the service agent.
During the applicable warranty period, a product will be repaired, replaced, or the purchase price refunded, at the sole option of SAMSUNG. SAMSUNG may use new or reconditioned parts in repairing a product, or replace the product with a new or reconditioned product. Replacement parts and products are warranted for the remaining portion of the original product’s warranty or ninety (90) days, whichever is longer. All replaced parts and products are the property of SAMSUNG and you must return them to SAMSUNG. This limited warranty covers manufacturing defects in materials or workmanship encountered in normal household, noncommercial use of this product and shall not cover the following: damage that occurs in shipment, delivery, installation, and uses for which this product was not intended; damage caused by unauthorized modification or alteration of the product; product where the original factory serial numbers have been removed, defaced, changed in any way, or cannot be readily determined; cosmetic damage including scratches, dents, chips, and other damage to the product’s finishes; damage caused by abuse, misuse, overheating due to overcooking, glass tray or turntable, pest infestations, accident, fire, floods, or other acts of nature or God; damage caused by use of equipment, utilities, services, parts, supplies, accessories, applications, installations, repairs, external wiring or connectors not supplied or authorized by SAMSUNG; damage caused by incorrect electrical line current, voltage, fluctuations and surges; damage caused by failure to operate and maintain the product according to instructions; in-home instruction on how to use your product; service to correct installation not in accordance with electrical or plumbing codes or correction of household electrical or plumbing (i.e., house wiring, fuses, or water inlet hoses). In addition, damage to the glass cooktop caused by (i) use of cleaners other than the recommended cleaners and pads or (ii) hardened spills of sugary materials or melted plastic that are not cleaned according to the directions in the use and care guide are not covered by this limited warranty. The cost of repair or replacement under these excluded circumstances shall be the customer’s responsibility. Visits by an authorized servicer to explain product functions, maintenance or installation are not covered by this limited warranty. Please contact SAMSUNG at the number below for assistance with any of these issues.
Warranty (U.S.A)
Warranty (CANADA)
################ EXCLUSION OF IMPLIED WARRANTIES
IMPLIED WARRANTIES, INCLUDING THE IMPLIED WARRANTIES OF MERCHANTABILITY OR FITNESS FOR A PARTICULAR PURPOSE, ARE LIMITED TO ONE YEAR OR THE SHORTEST PERIOD ALLOWED BY LAW. Some states do not allow limitations on how long an implied warranty lasts, so the above limitations or exclusions may not apply to you. This warranty gives you specific rights, and you may also have other rights, which vary from state to state.
LIMITATION OF REMEDIES YOUR SOLE AND EXCLUSIVE REMEDY IS PRODUCT REPAIR, PRODUCT REPLACEMENT, OR REFUND OF THE PURCHASE PRICE AT SAMSUNG’S OPTION, AS PROVIDED IN THIS LIMITED WARRANTY. SAMSUNG SHALL NOT BE LIABLE FOR SPECIAL, INCIDENTAL OR CONSEQUENTIAL DAMAGES, INCLUDING BUT NOT LIMITED TO TIME WAY FROM WORK, HOTELS AND/OR RESTAURANT MEALS, REMODELING EXPENSES, LOSS OF REVENUE OR PROFITS, FAILURE TO REALIZE SAVINGS OR OTHER BENEFITS REGARDLESS OF THE LEGAL THEORY ON WHICH THE CLAIM IS BASED, AND EVEN IF SAMSUNG HAS BEEN ADVISED OF THE POSSIBILITY OF SUCH DAMAGES. Some states do not allow exclusion or limitation of incidental or consequential damages, so the above limitations or exclusions may not apply to you. This warranty gives you specific rights, and you may also have other rights, which vary from state to state. SAMSUNG does not warrant uninterrupted or error-free operation of the product. No warranty or guarantee given by any other person, firm, or corporation with respect to this product shall be binding on SAMSUNG. To obtain warranty service, please contact SAMSUNG at:
|Samsung Electronics America, Inc. 85 Challenger Road Ridgefield Park, NJ 07660 1-800-SAMSUNG (726-7864) and www.samsung.com/us/support| |---|
#### Warranty (CANADA)
PLEASE DO NOT DISCARD. THIS PAGE REPLACES THE WARRANTY PAGE IN THE USE & CARE GUIDE
SAMSUNG ELECTRIC OVEN
|LIMITED WARRANTY TO ORIGINAL PURCHASER| |---|
This SAMSUNG brand product, as supplied and distributed by SAMSUNG ELECTRONICS CANADA, INC. (SAMSUNG) and delivered new, in the original carton to the original consumer purchaser, is warranted by SAMSUNG against manufacturing defects in materials and workmanship for a limited warranty period of:
One (1) Year Parts and Labor This limited warranty begins on the original date of purchase, and is valid only on products purchased and used in the CANADA. To receive warranty service, the purchaser must contact SAMSUNG for problem determination and service procedures. Warranty service can only be performed by a SAMSUNG authorized service center. The original dated bill of sale must be presented upon request as proof of purchase to SAMSUNG or SAMSUNG’s authorized service center. Samsung will provide in-home service during the warranty period at no charge subject to availability within the contiguous CANADA. In home service is not available in all areas. To receive in home service, the product must be unobstructed and accessible to the service agent. If service is not available Samsung may elect to provide transportation of the product to and from an authorized service center.
SAMSUNG will repair or replace this product, at our option and at no charge as stipulated herein, with new or reconditioned parts or products if found to be defective during the limited warranty period specified above. All replaced parts and products become the property of SAMSUNG and must be returned to SAMSUNG. Replacement parts and products assume the remaining original warranty, or ninety (90) days, whichever is longer. This limited warranty covers manufacturing defects in materials and workmanship encountered in normal, noncommercial use of this product and shall not apply to the following: damage which occurs in shipment; delivery and installation; applications and uses for which this product was not intended; altered product or serial numbers; cosmetic damage or exterior finish; accidents, abuse, neglect, fire, water, lightning or other acts of nature; use of products, equipment, systems, utilities, services, parts, supplies, accessories, applications, installations, repairs, external wiring or connectors not supplied or authorized by SAMSUNG which damage this product or result in service problems; incorrect electrical line voltage, fluctuations and surges; customer adjustments and failure to follow operating instructions, maintenance and environmental instructions that are covered and prescribed in the instruction book; product removal and reinstallation; problems caused by pest infestations, and overheating or overcooking by user. This limited warranty shall not cover cases of incorrect electric current, voltage or supply, light bulbs, house fuses, house wiring, cost of a service call for instructions, or fixing installation errors. SAMSUNG does not warrant uninterrupted or error-free operation of the product.
EXCEPT AS SET FORTH HEREIN THERE ARE NO WARRANTIES ON THIS PRODUCT EITHER EXPRESS OR IMPLIED AND SAMSUNG DISCLAIMS ALL WARRANTIES INCLUDING, BUT NOT LIMITED TO, ANY IMPLIED WARRANTIES OF MERCHANTABILITY, INFRINGEMENT OR FITNESS FOR A PARTICULAR PURPOSE. NO WARRANTY OR GUARANTY GIVEN BY ANY PERSON, FIRM OR CORPORATION WITH RESPECT TO THIS PRODUCT SHALL BE BINDING ON SAMSUNG. SAMSUNG SHALL NOT BE LIABLE FOR LOSS OF REVENUE OR PROFITS, FAILURE TO REALIZE SAVINGS OR OTHER BENEFITS, OR ANY OTHER SPECIAL, INCIDENTAL OR CONSEQUENTIAL DAMAGES CAUSED BY THE USE, MISUSE OR INABILITY TO USE THIS PRODUCT, REGARDLESS OF THE LEGAL THEORY ON WHICH THE CLAIM IS BASED, AND EVEN IF SAMSUNG HAS BEEN ADVISED OF THE POSSIBILITY OF SUCH DAMAGES. NOR SHALL RECOVERY OF ANY KIND AGAINST SAMSUNG BE GREATER IN AMOUNT THAN THE PURCHASE PRICE OF THE PRODUCT SOLD BY SAMSUNG AND CAUSING THE ALLEGED DAMAGE. WITHOUT LIMITING THE FOREGOING, PURCHASER ASSUMES ALL RISK AND LIABILITY FOR LOSS, DAMAGE OR INJURY TO PURCHASER AND PURCHASER’S PROPERTY AND TO OTHERS AND THEIR PROPERTY ARISING OUT OF THE USE, MISUSE OR INABILITY TO USE THIS PRODUCT. THIS LIMITED WARRANTY SHALL NOT EXTEND TO ANYONE OTHER THAN THE ORIGINAL PURCHASER OF THIS PRODUCT, IS NONTRANSFERABLE AND STATES YOUR EXCLUSIVE REMEDY. Some states do not allow limitations on how long an implied warranty lasts, or the exclusion or limitation of incidental or consequential damages, so the above limitations or exclusions may not apply to you. This warranty gives you specific legal rights, and you may also have other rights which vary from state to state. To obtain warranty service, please contact SAMSUNG at:
|Samsung Electronics Canada Inc. 2050 Derry Road West, Mississauga, Ontario L5N 0B9 Canada 1-800-SAMSUNG (726-7864) and www.samsung.com/ca/support (English) www.samsung.com/ca_fr/support (French)| |---|
Warranty (CANADA)
Appendix
#### Appendix
######## Open Source Announcement
The software included in this product contains open source software. You may obtain the complete corresponding source code for a period of three years after the last shipment of this product by contacting our support team via http:// opensource.samsung.com (Please use the “Inquiry” menu.) It is also possible to obtain the complete corresponding source code in a physical medium such as a CD-ROM; a minimal charge will be required. The following URL http://opensource.samsung.com/opensource/COMMON_TZ6_0/ seq/0 leads to the open source license information as related to this product. This offer is valid to anyone in receipt of this information.

#### Memo
Scan the QR code* or visit www.samsung.com/spsn to view our helpful How-to Videos and Live Shows
Please be advised that the Samsung warranty does NOT cover service calls to explain product operation, correct improper installation, or perform normal cleaning or maintenance. QUESTIONS OR COMMENTS?
|COUNTRY|CALL|OR VISIT US ONLINE AT| |---|---|---| |U.S.A Consumer Electronics|1-800-SAMSUNG (726-7864)|www.samsung.com/us/support| |CANADA|1-800-SAMSUNG(726-7864)|www.samsung.com/ca/support (English) www.samsung.com/ca_fr/support (French)|
################## NV51CG700D_AA-00