
Ask AI
— answers from the official manualAnswers from the official manual.
Common questions
Common Questions
4 total Full Manual
94 pages
| | | |---|---| | | | | | | | | | | | | | | | | | | | | | | | | | | | | | | | | | | | | | | | | | | | | |
Language

1English
15Deutsch
30Français
45Italiano
60Español
75日本語
Foreword
Thank you for purchasing Victure Hunting Camera. This product is a multipurpose and versatile camera for outdoor hunting. It can be used for outdoor hunting , animals monitoring and home security. The waterproof design allows the camera to detect animals and take pictures / videos 24 hours outdoors automatically.
This user's manual will explain in detail how to use and install this product and provide you with technical specifications and other information. Please read this manual carefully before use so that you can make better use of this product.
We hope this product can meet your needs and serve you for a long time!

Content
FAQ
Product Introduction
Product structure
Product accessories
Preparations before Using
Product Operations and Settings
Product operations
Settings
Connect to the Computer

Specification
Warranty
FAQ
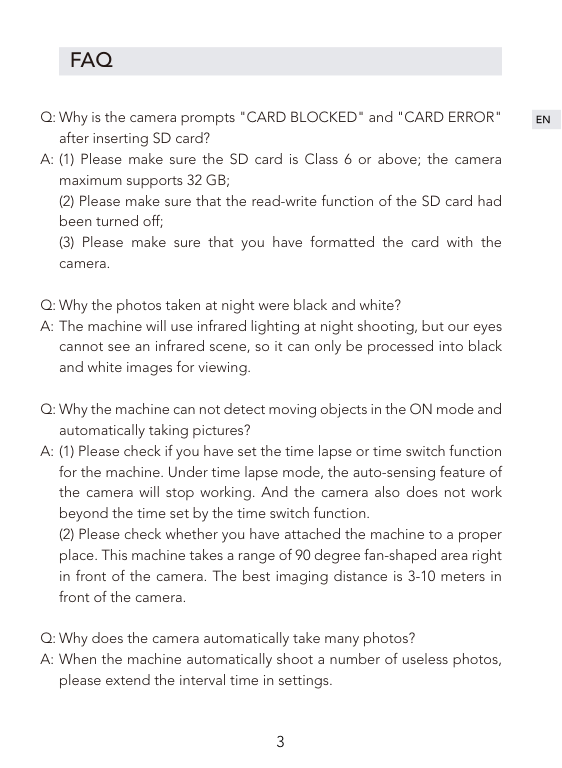
Why is the camera prompts "CARD BLOCKED" and "CARD ERROR" after inserting SD card?
Q:
A:
Why the photos taken at night were black and white? The machine will use infrared lighting at night shooting, but our eyes cannot see an infrared scene, so it can only be processed into black and white images for viewing.
Q: A:
Why the machine can not detect moving objects in the ON mode and automatically taking pictures?
Q:

A:
Why does the camera automatically take many photos? When the machine automatically shoot a number of useless photos, please extend the interval time in settings.
Q: A:
Product Introduction
Product structure
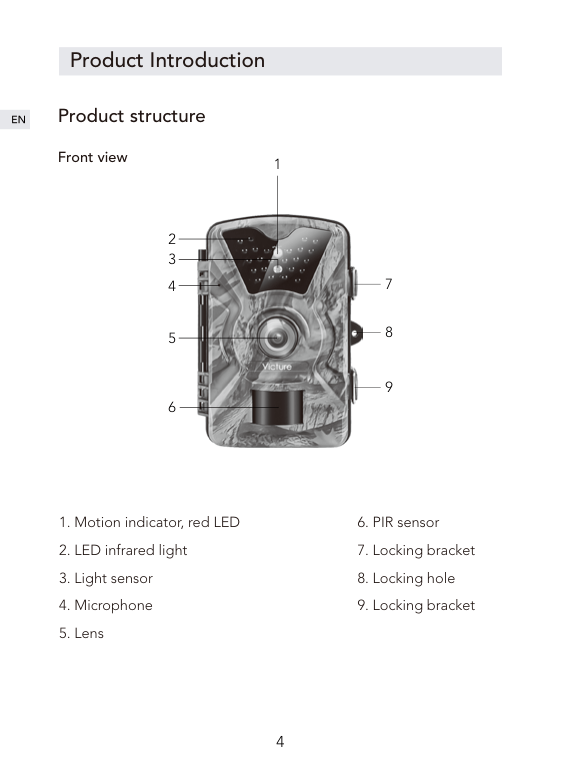
##### Front view
1

Inside view
1

4 5 6
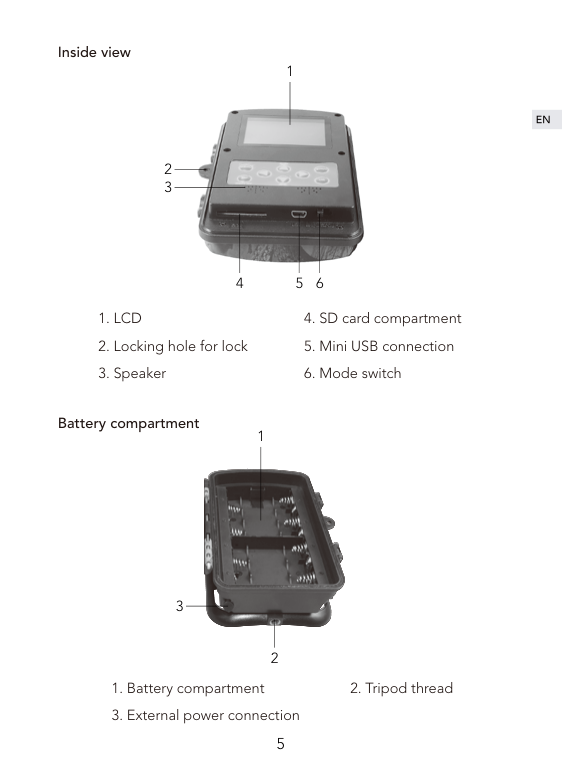

Battery compartment
3
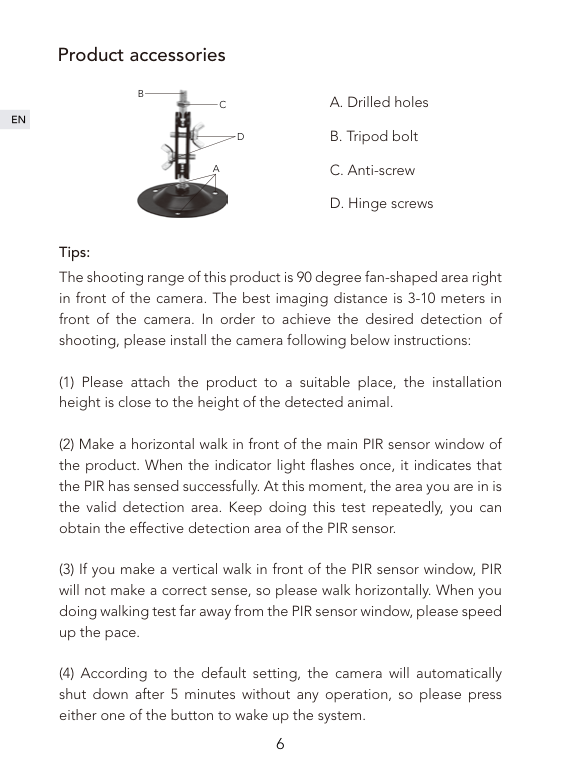
Product accessories
B

C
D
A

Tips:
The shooting range of this product is 90 degree fan-shaped area right in front of the camera. The best imaging distance is 3-10 meters in front of the camera. In order to achieve the desired detection of shooting, please install the camera following below instructions:
Preparations before Using


Step1 Step2 Step3 Step4
Open the battery compartment located on the right side of the camera as shown above; Insert 8 AA LR6 batteries in the correct direction; Turn off the read-write protection of the SD card, which located in the left of the card, so that the camera can recognize the card. Insert the SD card and then toggle the mode switch into TEST. After the machine is turned on, enter the settings interface to format the card with the camera's format function.
Tip: This machine supports SD card which is Class 6 or above. The camera maximum support 32 GB SD card.
Product Operations and Settings


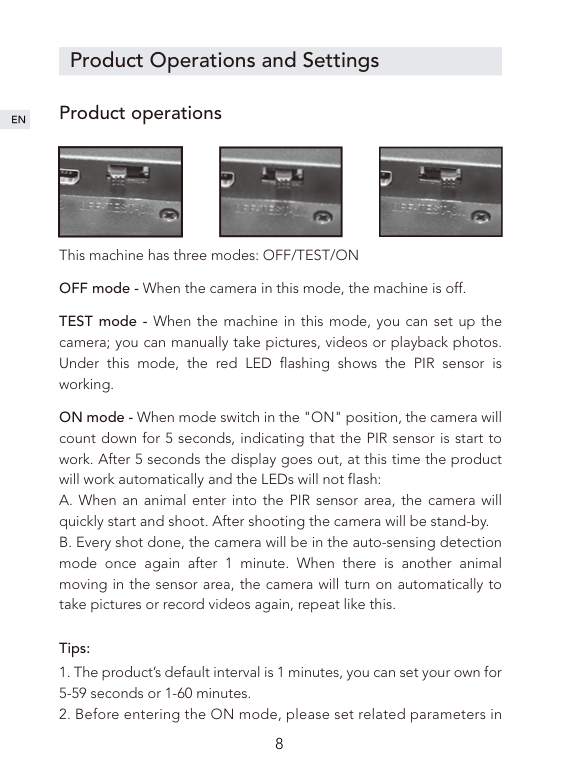
Product operations
| | |---|
| | |---|
| | |---|
This machine has three modes: OFF/TEST/ON OFF mode - When the camera in this mode, the machine is off.
TEST mode - When the machine in this mode, you can set up the camera; you can manually take pictures, videos or playback photos. Under this mode, the red LED flashing shows the PIR sensor is working.
ON mode - When mode switch in the "ON" position, the camera will count down for 5 seconds, indicating that the PIR sensor is start to work. After 5 seconds the display goes out, at this time the product will work automatically and the LEDs will not flash:
##### Tips:
TEST mode.
Settings
Camera mode Camera; Video; Camera + Video When you choose Camera mode or Video mode, the machine will automatically start taking pictures or videos after monitoring the movement. When you choose Camera+ Video mode, the machine will take photos firstly and then record videos after monitoring the movement. The system defaults to camera mode.
Photo size 1M; 3M; 5M; 8M; 12M, the system defaults to 5M
Video size 1080P; 720P; WVGA; VGA, the system defaults to 1080P.
Picture No. Photo number setting, optional 1P, 2P and 3P, the system defaults to 1P. When set to 3P, three pictures are taken in succession. Tip: 3 continuous shooting only supports 5M resolution.
##### Video length
The length of the recording time can be set from 1 to 60 seconds, 3 minutes, 5 minutes and 10 minutes, the default setting is 10 seconds. This setting only works in ON mode and does not affect the recording time in test mode.
##### Interval
The system defaults to 1 minute, and the user can set it as 5 secondsto 59 seconds or 1 minute to 60 minutes as needed. During the interval, the camera will stop working. This function needs to be set in TEST mode to ensure that the setting is run in ON mode.
Time stamp Time stamp on video or photo, select ON to print the time on each photo.
Time switch Use this function to set the product to work for a predetermined period of time and standby for other periods of time. Tip: In this mode, the PIR sensor function will continue working.
##### Time lapse

This function can be used for long-term observation of special scenes. The camera will taken photo after certain period. The default setting is OFF. When ON is selected, users can set the interval time.
Tip: In this mode, the PIR sensor function will stop working.
Password set This function can prevents others from entering TEST mode and modifying the product's system parameters. This function defaults to OFF. When ON is selected, the four-digit password can be set. After successful setting, you should put in the
password to enter into TEST mode. Please keep your password in mind .
##### Serial NO. set
The default setting is OFF. When ON is selected, the four-digit machine number can be set. After successful setting, the machine number will be printed on the photo.
##### Format
This function can help you format your SD card. Select YES, then click OK to confirm, the SD card will be formatted, the files in the card will be deleted. Please archive the files you need before proceeding this.
##### Set clock
System time settings, the specific operations are as follows: short press the left and right keys to move to the position you want then adjust the time, from left to right are:the year, month, day, hour and minute, short press the up and down keys to adjust the corresponding settings.
Default set This function will restore all settings of the machine to the default state.
##### Auto power off
Under the TEST mode, when you don’t operate the camera for a certain period of time, the machine will automatically shut down to save power.
Tip: The camera can be switched on again by pressing any button.
Connect the Computer
Please pull the mode switch to the OFF state, connect the product to the computer via USB cable, the screen will display "MSDC" prompt means the PC has been connected successfully.
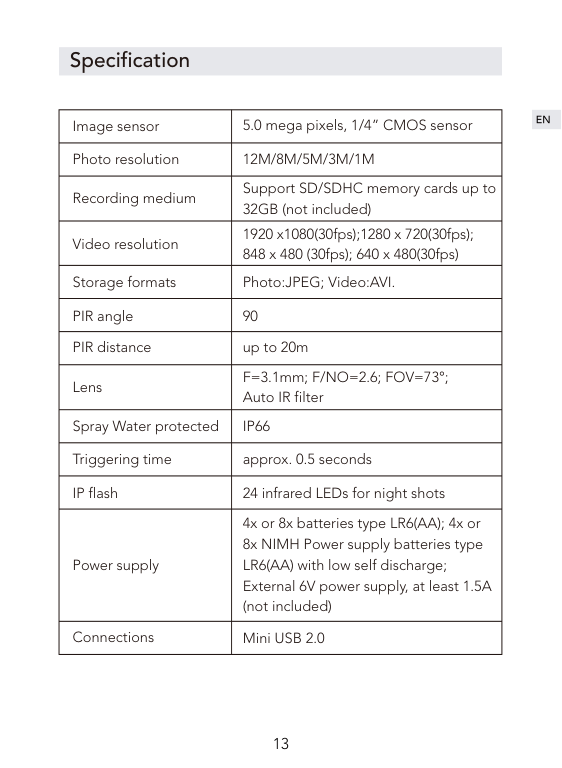
Specification
|Image sensor|5.0 mega pixels, 1/4” CMOS sensor| |---|---| |Photo resolution|12M/8M/5M/3M/1M| |Recording medium|Support SD/SDHC memory cards up to 32GB (not included)| |Video resolution|1920 x1080(30fps);1280 x 720(30fps); 848 x 480 (30fps); 640 x 480(30fps)|

|Storage formats|Photo:JPEG; Video:AVI.| |PIR angle|90| |PIR distance|up to 20m| |Lens|F=3.1mm; F/NO=2.6; FOV=73°; Auto IR filter| |Spray Water protected|IP66| |Triggering time|approx. 0.5 seconds| |IP flash|24 infrared LEDs for night shots| |Power supply|4x or 8x batteries type LR6(AA); 4x or 8x NIMH Power supply batteries type LR6(AA) with low self discharge; External 6V power supply, at least 1.5A (not included)| |Connections|Mini USB 2.0|
Warranty
This product has a 12-month warranty from the date of purchase.
If you have any questions about this product, you can contact us through the following email: support@govicture.com
There will be seller support reaching you as soon as possible.
Vorwort
Vielen Dank für Ihren Einkauf der Visture Jagd Kamera. Dieses Produkt ist eine vielseitige und allgewaltige Kamera für Freien Jagd, Tierbeobachtung und Heimsicherheit. Sein subtiles, wasserdichtes und staubdichtes Design ermöglicht es Ihnen, 24 Stunden am Tag im Freien Tiere zu erkennen und Bilder / Videos automatisch aufzunehmen, um den Aufenthaltsort von Tieren zu erfassen.
In diesem Benutzerhandbuch wird beschrieben, wie dieses Produkt verwendet und installiert wird und Ihnen technische Spezifikationen und andere Informationen zur Verfügung gestellt werden. Bitte lesen Sie vor der Verwendung sorgfältig dieses Handbuch durch, damit Sie dieses Produkt besser nutzen können.
Wir hoffen, dass dieses Produkt Ihre Bedürfnisse erfüllen und einen langen Dienst für Sie anbieten kann!
Inhaltsverzeichnis
FAQ
Produkteinführung
Produktstruktur
Produktzubehör
Vorbereitung der Produktverwendung
Produktbedienung und Einstellungen

Produktbedienung
Einstellungen
Anschließen des Computers
Systemparameter
After-Sales-Services
FAQ
Warum bekomme ich nach dem Einlegen der SD-Karte "AUTO BLOCKED" oder "CARD ERROR"?
F:
A:
Warum ist das Foto in der Nacht schwarz und weiß? Die Kamera wird bei Aufnahmen in der Nacht mit Infrarotlicht beleuchtet, aber das menschliche Auge kann die Szene unter Infrarotlicht nicht sehen und kann nur zu einem Schwarz-Weiß-Bild zur Betrachtung verarbeitet werden.
F: A:
Warum kann die Kamera im ON Modus nicht überwachen und automatisch Bilder aufnehmen?
F:
A:
Warum macht die Kamera automatisch viele Fotos? Wenn die Kamera automatisch eine Anzahl nutzloser Fotos aufnimmt, verlängern Sie bitte den Zeitabstand.
F: A:
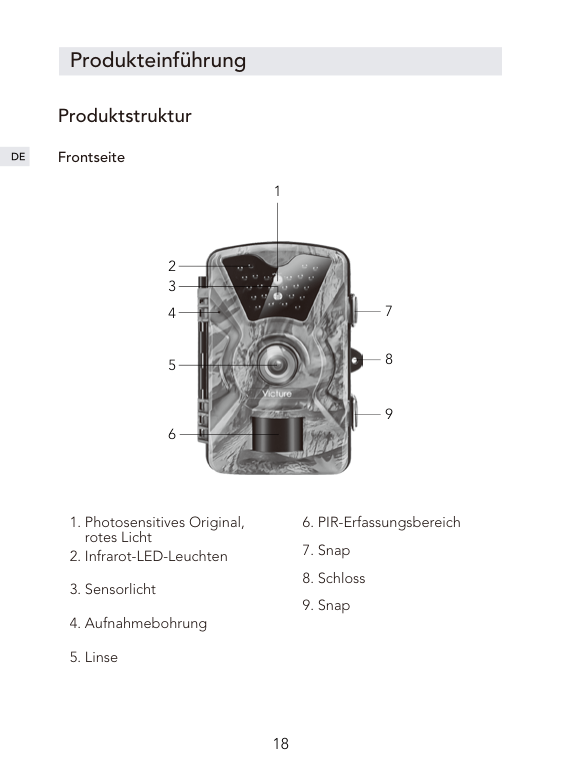
Produkteinführung
Produktstruktur
##### Frontseite

1

Innenteil
1

4 5 6

Batteriefach
1
3
2
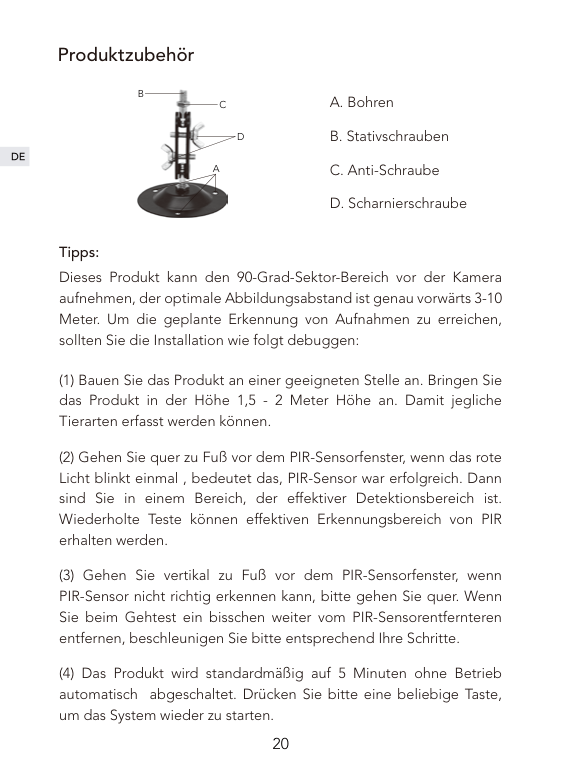
Produktzubehör
B

C
D
A
A. Bohren B. Stativschrauben C. Anti-Schraube D. Scharnierschraube
Tipps:
Dieses Produkt kann den 90-Grad-Sektor-Bereich vor der Kamera aufnehmen, der optimale Abbildungsabstand ist genau vorwärts 3-10 Meter. Um die geplante Erkennung von Aufnahmen zu erreichen, sollten Sie die Installation wie folgt debuggen:
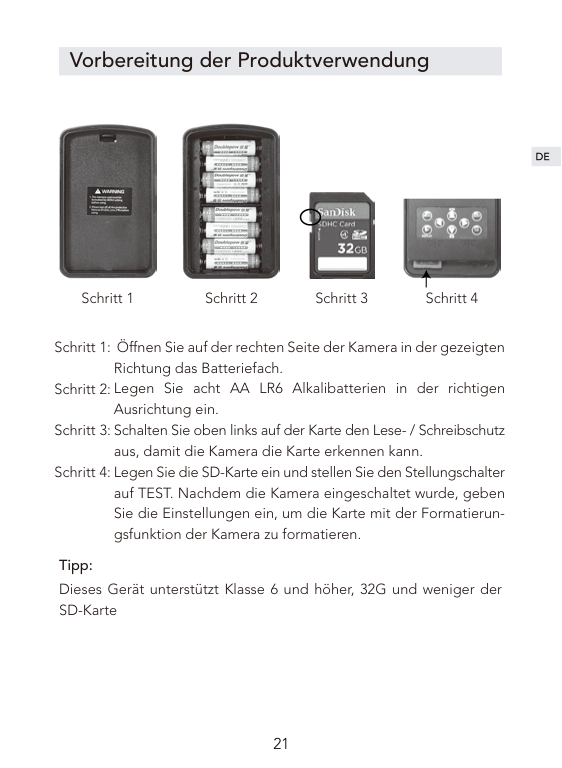
Vorbereitung der Produktverwendung


Schritt 1 Schritt 2 Schritt 3 Schritt 4
Öffnen Sie auf der rechten Seite der Kamera in der gezeigten Richtung das Batteriefach. Legen Sie acht AA LR6 Alkalibatterien in der richtigen Ausrichtung ein. Schalten Sie oben links auf der Karte den Lese- / Schreibschutz aus, damit die Kamera die Karte erkennen kann. Legen Sie die SD-Karte ein und stellen Sie den Stellungschalter auf TEST. Nachdem die Kamera eingeschaltet wurde, geben Sie die Einstellungen ein, um die Karte mit der Formatierungsfunktion der Kamera zu formatieren.
Tipp: Dieses Gerät unterstützt Klasse 6 und höher, 32G und weniger der SD-Karte


Produktbedienung und Einstellungen
Produktbedienung
| | |---|
| | |---|
| | |---|
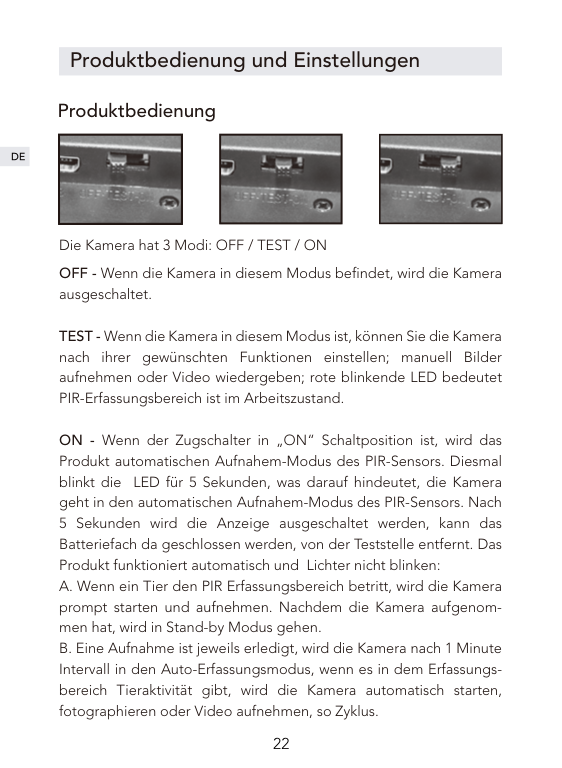
Die Kamera hat 3 Modi: OFF / TEST / ON OFF - Wenn die Kamera in diesem Modus befindet, wird die Kamera ausgeschaltet.
TEST - Wenn die Kamera in diesem Modus ist, können Sie die Kamera nach ihrer gewünschten Funktionen einstellen; manuell Bilder aufnehmen oder Video wiedergeben; rote blinkende LED bedeutet PIR-Erfassungsbereich ist im Arbeitszustand.
ON - Wenn der Zugschalter in „ON“ Schaltposition ist, wird das Produkt automatischen Aufnahem-Modus des PIR-Sensors. Diesmal blinkt die LED für 5 Sekunden, was darauf hindeutet, die Kamera geht in den automatischen Aufnahem-Modus des PIR-Sensors. Nach 5 Sekunden wird die Anzeige ausgeschaltet werden, kann das Batteriefach da geschlossen werden, von der Teststelle entfernt. Das Produkt funktioniert automatisch und Lichter nicht blinken:
##### Tipps:
AufnahmeStellung: Kamera, Video, Kamera + Video Wenn Sie den Kamera- und Videomodus wählen, beginnt das Gerät nach der Überwachung der Bewegung automatisch mit der Aufnahme von Fotos oder Videos. Wenn Sie den Kamera + Video-Modus wählen, nimmt die Kamera ein Bild auf und geht nach der Überwachung der Bewegung in den Aufnahmemodus über. Das System wählt standardmäßig den Kameramodus.

Fotopixel 1M; 3M; 5M; 8M; 12M, das System ist standardmäßig auf 5 M eingestellt. Video-und Video-Spezifikationen 1080P, 720P, WVGA, VGA, das System standardmäßig auf 1080P. Fotonummer eingestellt optional 1P, 2P und 3P, das System ist standardmäßig auf 1P eingestellt. Bei 3P werden drei Bilder nacheinander aufgenommen. Tipp: 3 Serienaufnahmen sind nur für die 5M Auflösung unterstützt.
##### Die Länge der Aufnahmezeit
Die Länge der Aufzeichnungszeit kann auf 1 bis 60 Sekunden, 3 Minuten, 5 Minuten und 10 Minuten eingestellt werden. Die Standardeinstellung ist 10 Sekunden. Diese Einstellung funktioniert nur im ON-Modus und beeinflusst im Testmodus keine Aufnahmezeit.
##### Aufnahmeintervall
Das System ist standardmäßig auf 1 Minute eingestellt und der Benutzer kann bei Bedarf 5 Sekunden bis 59 Sekunden oder 1 Minute bis 60 Minuten einstellen. Während des Intervalls wird die Kamera nicht mehr funktionieren. Diese Funktion muss im TEST-Modus eingestellt werden, um sicherzustellen, dass die Einstellung im ON-Modus ausgeführt wird.
Zeitwasserzeichen Wasserzeichen für Video oder Photo, ON ist an, OFF ist aus, die Systemeinstellung ist aktiviert.
Zeitschalter Verwenden Sie diese Funktion, um das Produkt für einen bestimmten Zeitraum und für andere Zeiträume in Standby zu versetzen. Tipp: In diesem Modus funktioniert die PIR-Sensorfunktion weiterhin.
##### Zeitraffer
Diese Funktion kann zur Langzeitbeobachtung spezieller Szenen verwendet werden. Die Kamera wird nach einer gewissen Zeit fotografiert. Die Standardeinstellung ist AUS. Wenn ON ausgewählt ist, können Benutzer die Intervallzeit einstellen.
Tipp: In diesem Modus funktioniert die PIR-Sensorfunktion nicht mehr.
Passworteinstellung der Kamera Diese Funktion verhindert, dass andere in den TEST-Modus wechseln oder die Systemparameter des Produkts ändern. Diese Funktion ist standardmäßig auf OFF(AUS). Wenn ON ausgewählt ist, können Sie die vierstellige PIN einstellen. Nach erfolgreicher Einstellung müssen Sie beim Tritt des TEST-Modus das Passwort eingeben, beherzigen Sie bitte Ihr Passwort.
##### Maschinennummereinstellung
Vorgabe ist OFF(AUS). Wenn ON ausgewählt ist, können Sie die vierstellige PIN einstellen. Nach erfolgreicher Einstellung wird die Kamerannummer auf der Fotografie gedruckt werden. Man kann bei der gleichzeitig Verwendung mehrerer Geräte über die Nummer den Fotographierort erkennen.
##### Formatierung
Formatierung der SD-Karte. Wenn Sie diese Option wählen, wählen Sie JA und bestätigen Sie mit OK. Das Gerät formatiert die SD-Karte, die Kartendateien werden gelöscht. Bitte bedienen Sie vorsichtig.
Systemzeiteinstellung Systemzeiteinstellung ist wie folgt: Kurz klicken Sie auf Links-, Rechts-Taste, um die Position der Zeit einzustellen, von links nach rechts: Jahr, Monat, Tag, Stunde und Minute. Dann drücken Sie kurz auf Oben-, Unten-Taste um die entsprechenden Einstellungen vorzunehmen.
Wiederherstellen der Standardeinstellung Diese Funktion setzt alle Einstellungen des Geräts auf den Standardzustand zurück.
##### Automatische Abschaltung
Diese Einstellung befindet sich im Testmodus. Wenn das Produkt für eine bestimmte Zeit nicht in Betrieb ist, schaltet sich die Kamera automatisch aus, um Energie zu sparen. Spezifische Einstellungen: 3 Minuten, 5 Minuten, 10 Minuten, OFF. Davon ist OFF aus. Wenn die automatische Abschaltung nicht eingestellt wird, ist die Standardeinstellung standardmäßig 5 Minuten.
Tipp: Wenn der Benutzer nach der automatischen Abschaltung wieder die Taste in Betrieb nimmt, kann das System aufgeweckt werden.

Anschließen des Computer
Wenn OFF ausgewählt ist, wird das Produkt über ein USB-Kabel an
Systemparameter
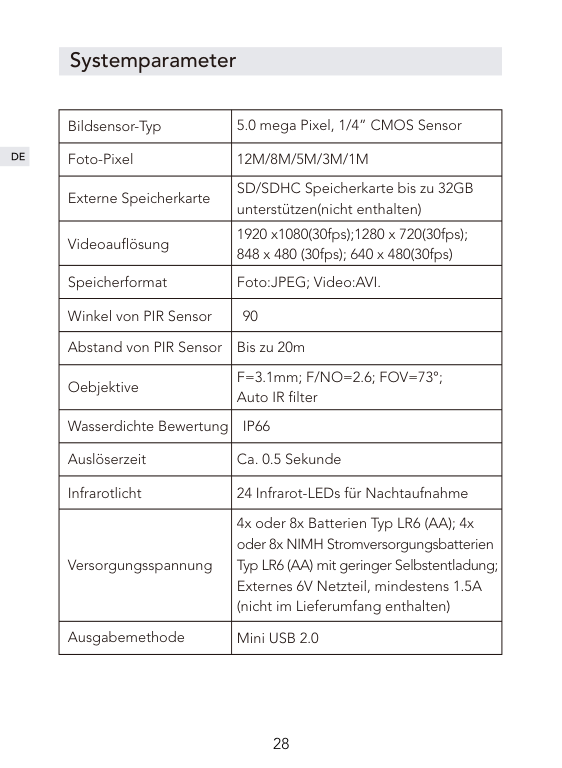
|Bildsensor-Typ|5.0 mega Pixel, 1/4” CMOS Sensor| |---|---| |Foto-Pixel|12M/8M/5M/3M/1M| |Externe Speicherkarte|SD/SDHC Speicherkarte bis zu 32GB unterstützen(nicht enthalten)| |Videoauflösung|1920 x1080(30fps);1280 x 720(30fps); 848 x 480 (30fps); 640 x 480(30fps)| |Speicherformat|Foto:JPEG; Video:AVI.| |Winkel von PIR Sensor|90| |Abstand von PIR Sensor|Bis zu 20m| |Oebjektive|F=3.1mm; F/NO=2.6; FOV=73°; Auto IR filter| |Wasserdichte Bewertung|IP66|
|Auslöserzeit|Ca. 0.5 Sekunde| |Infrarotlicht|24 Infrarot-LEDs für Nachtaufnahme| |Versorgungsspannung|4x oder 8x Batterien Typ LR6 (AA); 4x oder 8x NIMH Stromversorgungsbatterien Typ LR6 (AA) mit geringer Selbstentladung; Externes 6V Netzteil, mindestens 1.5A (nicht im Lieferumfang enthalten)| |Ausgabemethode|Mini USB 2.0|
After-Sales-Services
Seit dem Kauf dieses Produkts bieten wir Ihnen eine 12-monatige Garantie.
Wenn Sie irgende Fragen über diesen Artikel haben, können Sie uns über die E-Mail Adresse „support@govicture.com“ kontaktieren.
Wir werden Ihnen so schnell wie möglich eine befriedigende Antwort anbieten.
Avant-propos
Merci d'avoir acheté la caméra de chasse chez Victure. Ce produit est un appareil photo multifonctionnel, qui peut être utilisé pour la chasse en plein air, la surveillance des animaux et aussi de la sécurité à votre domicile. Sa conception subtile, imperméable à l'eau et à la poussière vous permet de détecter les animaux 24 heures à l'extérieur et enregistrer les allées et venues en prenant des photos / vidéos automatiquement.
Ce manuel d'utilisation explique en détail comment utiliser et installer ce produit, en même temps vous fournit des spécifications techniques et d'autres informations. Veuillez le lire attentivement avant afin de pouvoir mieux l'utiliser.

Nous espérons que ce produit peut répondre à vos besoins, et nous sommes toujours ici pour vous aider.
Catalogue
FAQ
Introduction du produit
Structure du produit
Accessoires et méthodes d'utilisation
Préparation avant l’utilisation
Fonctionnement et paramètres du produit
Camera mode
Paramètres
Connexion à l'ordinateur
Spécifications
Garantie
FAQ
Pourquoi-t-il apparaît « Carte verrouillée » et « Erreur de carte » après avoir inséré la carte SD ?
Q :
A :
Pourquoi la photo prise dans la nuit est-elle en noir et blanc ? La machine prend des photos et vidéos par une lumière infrarouge dans la nuit, mais l'œil humain ne peut pas voir la scène sous la lumière infrarouge. La machine donc traite l'image en noir et blanc pour la visualisation.
Q : A :
Pourquoi la machine ne peut pas surveiller les objets et prendre automatiquement des photos en mode ON ?
Q :
A :
Pourquoi l'appareil photo prend-il automatiquement plusieurs photos ? Lorsque la machine tire automatiquement un certain nombre de photos inutiles, s'il vous plaît définir intervalle plus long.
Q : A :
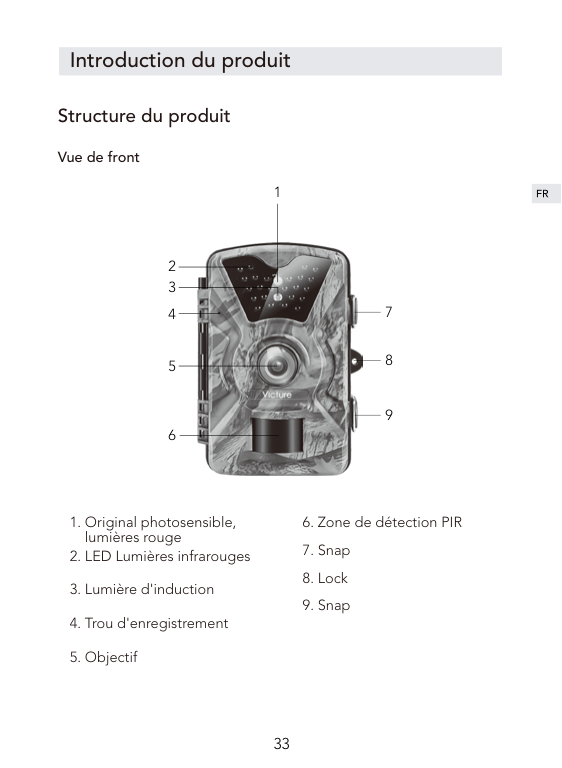
Introduction du produit
Structure du produit
##### Vue de front
1

2 3
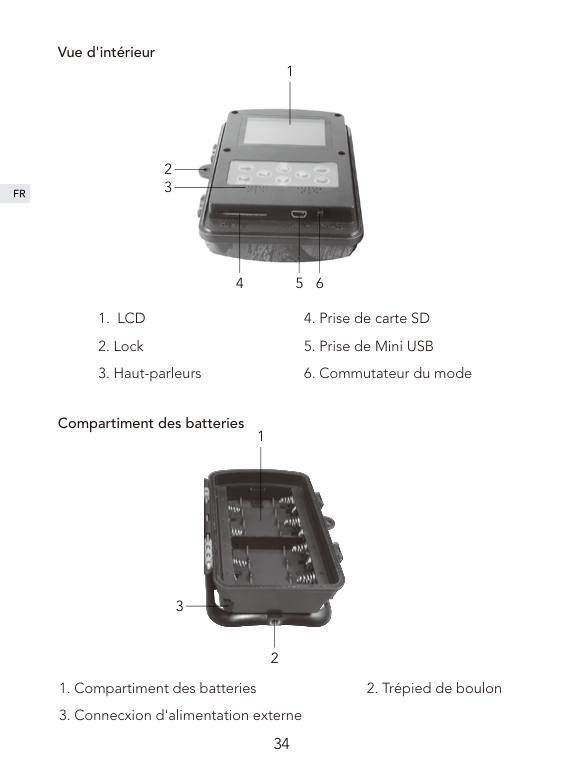
Vue d'intérieur
1

2 3
4 5 6

Compartiment des batteries
1
3
2
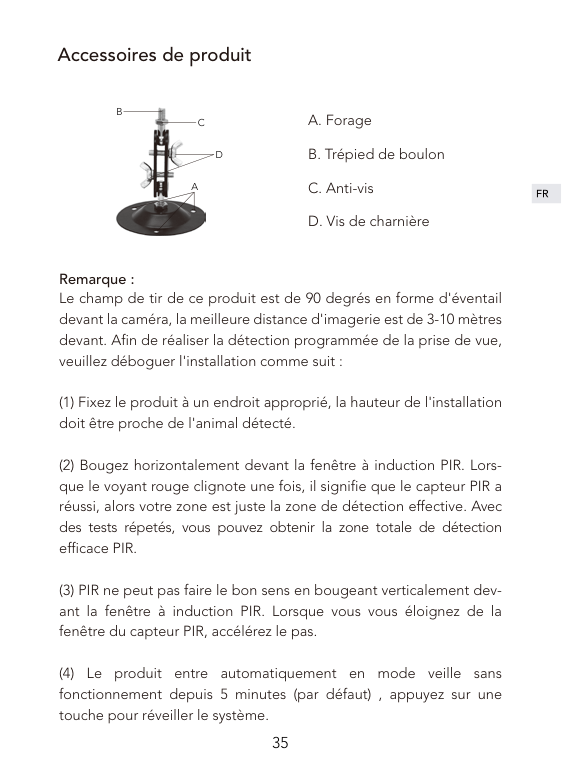
Accessoires de produit
B

C
D
A
A. Forage B. Trépied de boulon C. Anti-vis D. Vis de charnière
Remarque :
Le champ de tir de ce produit est de 90 degrés en forme d'éventail devant la caméra, la meilleure distance d'imagerie est de 3-10 mètres devant. Afin de réaliser la détection programmée de la prise de vue, veuillez déboguer l'installation comme suit :
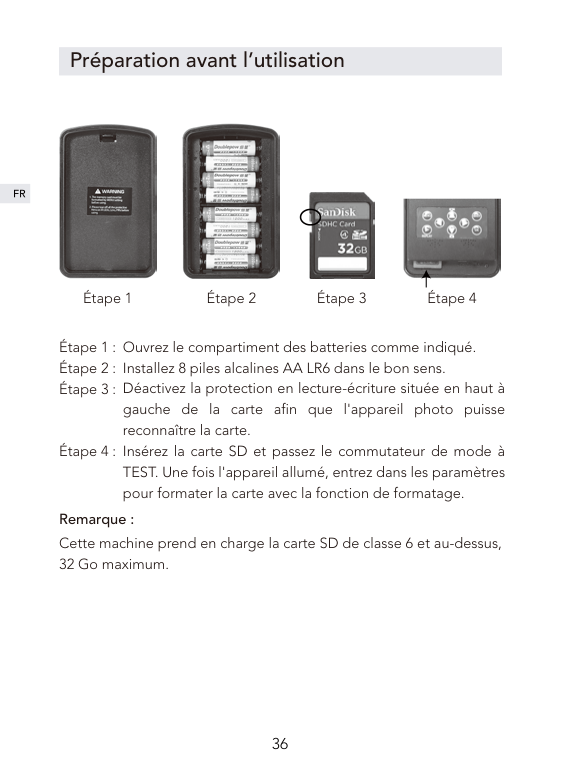
Préparation avant l’utilisation


Étape 1 Étape 2 Étape 3 Étape 4
Ouvrez le compartiment des batteries comme indiqué. Installez 8 piles alcalines AA LR6 dans le bon sens. Déactivez la protection en lecture-écriture située en haut à gauche de la carte afin que l'appareil photo puisse reconnaître la carte. Insérez la carte SD et passez le commutateur de mode à TEST. Une fois l'appareil allumé, entrez dans les paramètres pour formater la carte avec la fonction de formatage.
Remarque : Cette machine prend en charge la carte SD de classe 6 et au-dessus, 32 Go maximum.
Fonctionnement et paramètres du produit


Camera mode
| | |---|
| | |---|
| | |---|
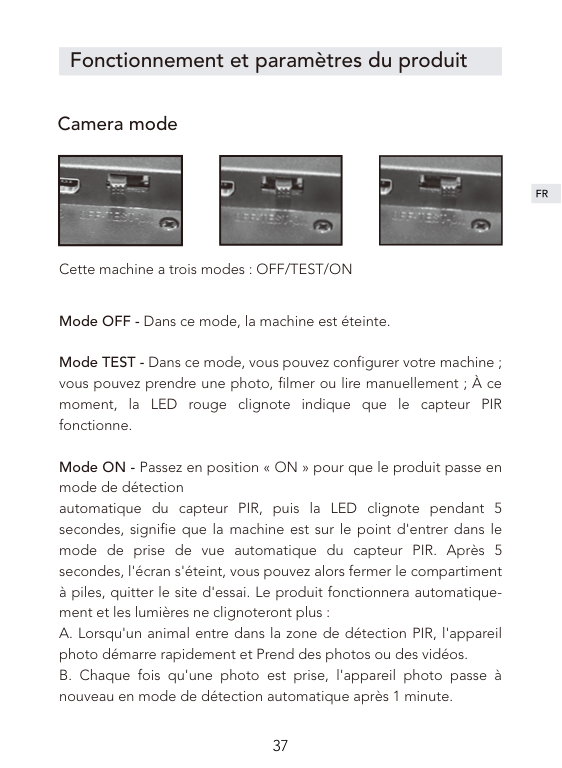
Cette machine a trois modes : OFF/TEST/ON
Mode OFF - Dans ce mode, la machine est éteinte.
Mode TEST - Dans ce mode, vous pouvez configurer votre machine ; vous pouvez prendre une photo, filmer ou lire manuellement ; À ce moment, la LED rouge clignote indique que le capteur PIR fonctionne.
Mode ON - Passez en position « ON » pour que le produit passe en mode de détection automatique du capteur PIR, puis la LED clignote pendant 5 secondes, signifie que la machine est sur le point d'entrer dans le mode de prise de vue automatique du capteur PIR. Après 5 secondes, l'écran s'éteint, vous pouvez alors fermer le compartiment à piles, quitter le site d'essai. Le produit fonctionnera automatiquement et les lumières ne clignoteront plus :
##### Remarque :

Paramètres Mode : Caméra ; Vidéo ; Caméra + Vidéo Lorsque vous sélectionnez le mode Caméra ou Vidéo, la machine commencera automatiquement à prendre des photos ou des vidéos après avoir surveillé le mouvement. Lorsque vous sélectionnez le mode Caméra + Vidéo, l'appareil photo prendra une photo, puis prendra une vidéo après avoir surveillé le mouvement. Le système utilise par défaut le mode Caméra. Photo Taille 1M; 3M; 5M; 8M; 12M, le système par défaut est 5M. Vidéo Taille 1080P, 720P, WVGA, VGA, le système par défaut est 1080P. Nombre de photo
Réglage de numéro de photo, optionnel 1P, 2P et 3P, le système affiche 1P par défaut. Lorsqu'il est réglé sur 3P, trois photos sont prises successivement.
Remarque : 3 prises de vues en continu ne prennent en charge que dans la résolution 5M.
##### Longeur vidéo
La durée de vidéo peut être réglée de 1 à 60 secondes, 3 minutes, 5 minutes et 10 minutes, la longeur par défaut est de 10 secondes. Ce réglage ne fonctionne qu'en mode ON et n'affecte pas la durée d'enregistrement en mode TSET.
##### Intervalle
Le système prend par défaut 1 minute, et l'utilisateur peut le définir de 5 secondes à 59 secondes ou de 1 minute à 60 minutes selon les besoins. Pendant l'intervalle, la caméra cessera de fonctionner. Cette fonction doit être réglée en mode TEST pour s'assurer que le réglage est exécuté en mode ON.
Reglage date La fonction de filigrane sur vidéo ou photo, il est activée par défaut du système.
##### Minuteur
Utilisez cette fonction pour que le produit fonctionne pendant une période de temps prédéterminée et entre en état de veille pendant d'autres périodes. il est OFF par défaut. Lorsque ON est sélectionné, des heures de travail spécifiques peuvent être définies.
Remarque: Dans ce mode, la détection automatique PIR rester de fonctionner.
##### Accéléré
Cette fonctionnalité peut être utilisée pour l'observation et l'enregistrement à long terme de scènes fixes. L'appareil photo prend des photos à intervalles réguliers. Le réglage par défaut est OFF. Lorsque ON est sélectionné, les utilisateurs peuvent définir l'intervalle.
Remarque : Dans ce mode, la fonction de détection automatique PIR cessera de fonctionner, l'appareil photo passera en mode de prise par minuterie et ne fonctionnera pas pendant chaque intervalle de temps défini.
Mot de passe Cette fonction empêche d'autres personnes de passer en mode TEST ou de modifier les paramètres du système. Cette fonction est OFF par défaut. Lorsque ON est sélectionné, le mot de passe à quatre chiffres peut être défini. Une fois le réglage réussi, vous devrez entrer le mot de passe en mode TEST.
##### N° de série. Set
Il est OFF par défaut. Lorsque ON est sélectionné, le numéro de machine à quatre chiffres peut être réglé. Une fois le réglage réussi, le numéro de machine sera imprimé sur la photo. Cela permet à l'utilisateur d'identifier différents numéros en utilisant des numéros lors de l'utilisation de plusieurs machines en même temps lieu de tournage.
##### Format
Pour l'opération de formatage de la carte SD. Lorsque vous sélectionnez cette option, les fichiers de la carte seront supprimés. Soyez prudent de cette option.

Régler l'heure Paramètres d'heure système, les paramètres spécifiques sont les suivants : Appuyez sur les touches gauche et droite pour vous déplacer vers la position que vous souhaitez régler, de gauche à droite, l'année, le mois, le jour, l'heure et les minutes, appuyez sur les touches haut et bas pour régler les paramètres correspondants.
Réini. Syst Cette fonction restaurera tous les paramètres de la machine à l'état
Arrêt auto Ce paramètre est en mode TEST. Lorsque le produit ne fonctionne
Connexion à l'ordinateur
Passez à mode OFF. Le caméra est connecté à l'ordinateur par le câble USB, l'écran affiche « MSDC », suggérant que le PC a été connecté avec succès. Vous pouvez lire la carte SD à l'ordinateur, copier, supprimer et faire autres opérations.
Spécifications
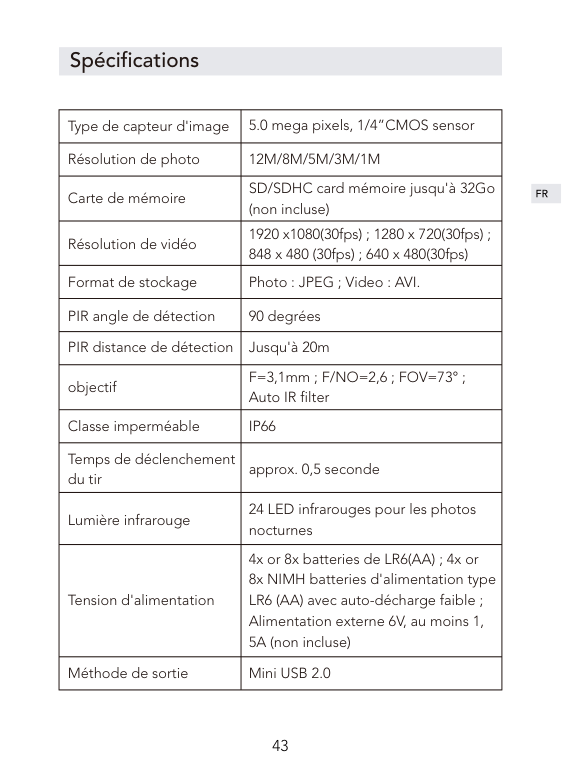
|Type de capteur d'image|5.0 mega pixels, 1/4”CMOS sensor| |---|---| |Résolution de photo|12M/8M/5M/3M/1M|
|Carte de mémoire|SD/SDHC card mémoire jusqu'à 32Go (non incluse)| |Résolution de vidéo|1920 x1080(30fps) ; 1280 x 720(30fps) ; 848 x 480 (30fps) ; 640 x 480(30fps)| |Format de stockage|Photo : JPEG ; Video : AVI.| |PIR angle de détection|90 degrées| |PIR distance de détection|Jusqu'à 20m| |objectif|F=3,1mm ; F/NO=2,6 ; FOV=73° ; Auto IR filter| |Classe imperméable|IP66| |Temps de déclenchement du tir|approx. 0,5 seconde| |Lumière infrarouge|24 LED infrarouges pour les photos nocturnes| |Tension d'alimentation|4x or 8x batteries de LR6(AA) ; 4x or 8x NIMH batteries d'alimentation type LR6 (AA) avec auto-décharge faible ; Alimentation externe 6V, au moins 1, 5A (non incluse)| |Méthode de sortie|Mini USB 2.0|
Garantie
À partir de l'achat, vous jouissez d'une garantie de 12 mois pour ce produit de Victure.
Si vous avez des questions ou des conseils à propos de ce produit, veuillez nous contacter par e-mail : support@govicture.com
Nous vous remercions de votre confiance et votre soutien!

Prefazione
Grazie per aver acquistato la fotocamera da caccia di Victure. Questo prodotto è una macchina fotografica multiuso e versatile per la caccia all'aperto, il monitoraggio degli animali e la sicurezza domestica. Disegni nascosti, impermeabile e antipolvere lo rendono adatto per rilevare gli animali e scattare foto e video automaticamente per tutto il giorno all'aperto in modo da registrare la posizione degli animali.
Questo manuale dell'utente spiegherà dettagliatamente come usare ed installare questo prodotto e fornirvi le specifiche tecniche ed altre informazioni. Si prega di leggere attentamente questo manuale prima dell'uso, in modo da poter utilizzare al meglio questo prodotto.
Speriamo che questo prodotto possa soddisfare le vostre esigenze e servirvi per lungo tempo.
Elenco
FAQ
Introduzione del prodotto
Struttura del prodotto
Accessori e metodi d'uso
Preparazione all'uso del prodotto

Funzionamento e impostazioni del prodotto
La modalità OFF/TEST/ON
Impostazioni
Collegare il computer
Parametri di sistema
Protezione post-vendita
FAQ
Perché ottengo "CARD BLOCKED" e "CARD ERROR" dopo aver inserito la scheda SD?
Q:
A:
Perché la foto scattata di notte è in bianco e nero? La macchina sarà illuminata con luce a infrarossi quando si scatta di notte, ma l'occhio umano non può vedere la scena sotto la luce a infrarossi e può essere trasformata solo in un'immagine in bianco e nero per la visualizzazione.
Q: A:
Perché la macchina non può monitorare gli oggetti in modalità ON e scattare foto automaticamente?
Q:
A:
Perché la fotocamera scatta automaticamente molte foto? Quando la macchina scatta automaticamente un numero di foto inutili, si prega di impostare nell'intervallo di tempo di ripresa.
Q: A:
Introduzione del prodotto
Struttura del prodotto
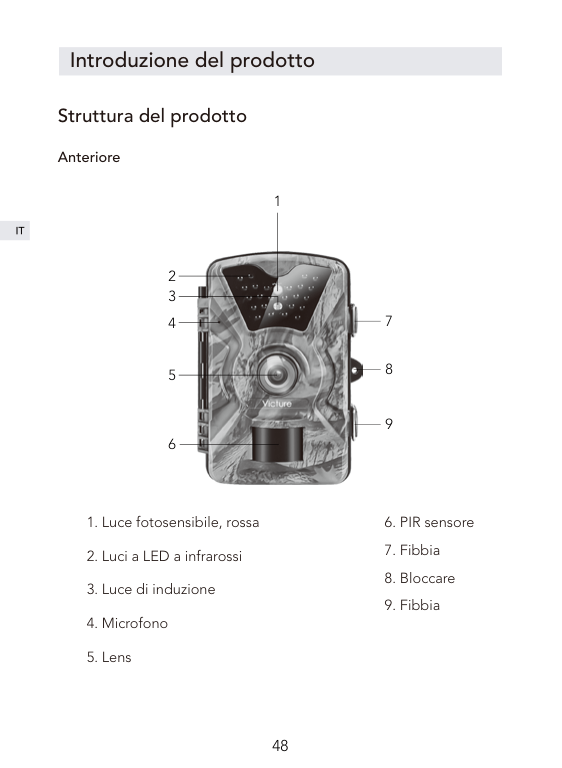
##### Anteriore
1

2 3
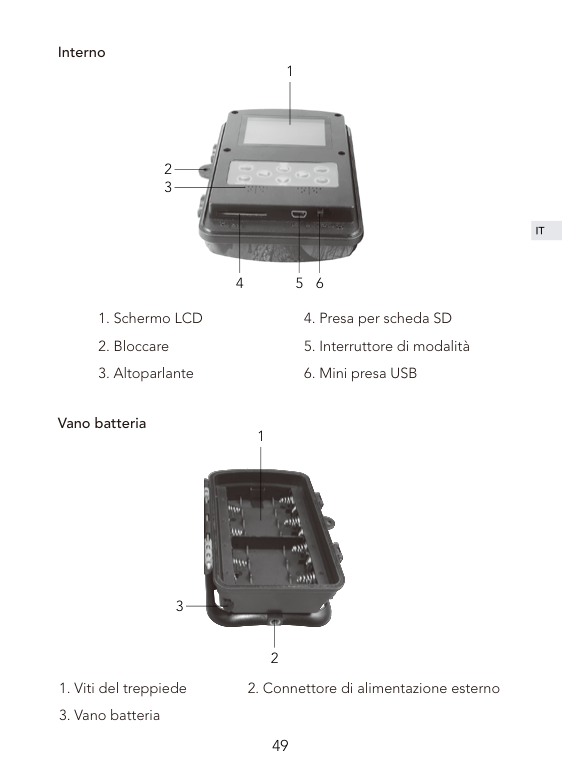
Interno
1

2 3
4 5 6

Vano batteria
1
3
2
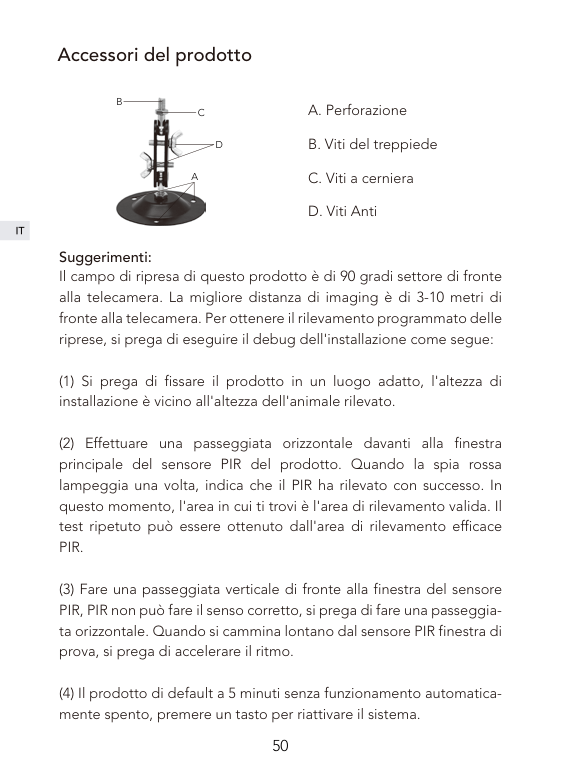
Accessori del prodotto
B

C
D
A
A. Perforazione B. Viti del treppiede C. Viti a cerniera D. Viti Anti
Suggerimenti:
Il campo di ripresa di questo prodotto è di 90 gradi settore di fronte alla telecamera. La migliore distanza di imaging è di 3-10 metri di fronte alla telecamera. Per ottenere il rilevamento programmato delle riprese, si prega di eseguire il debug dell'installazione come segue:
Preparazione all'uso del prodotto


Passaggio 1 Passaggio 2 Passaggio 3 Passaggio 4
Aprire lo scomparto della batteria posto sul lato destro della videocamera nella direzione indicata Caricare otto batterie alcaline AA LR6 nell'orientamento corretto Disattiva la protezione in lettura-scrittura nella parte superiore sinistra della scheda in modo che la fotocamera possa riconoscere la scheda Inserire la scheda SD e quindi commutare il selettore di modalità su TEST. Dopo aver acceso la macchina, immettere le impostazioni per formattare la scheda con la funzione di formattazione della fotocamera.
Suggerimenti: Questa macchina supporta la Classe 6 e superiore, 32G e sotto la scheda SD.
Funzionamento e impostazioni del prodotto


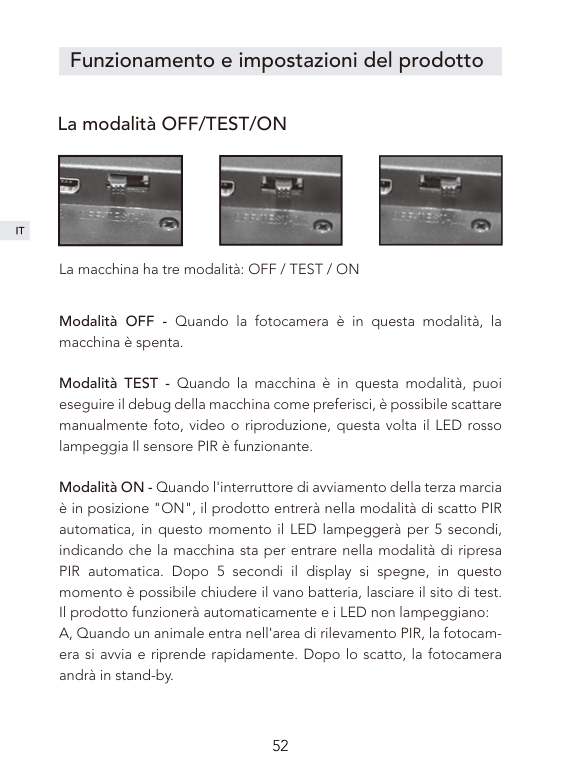
La modalità OFF/TEST/ON
| | |---|
| | |---|
| | |---|
La macchina ha tre modalità: OFF / TEST / ON
Modalità OFF - Quando la fotocamera è in questa modalità, la macchina è spenta.
Modalità TEST - Quando la macchina è in questa modalità, puoi eseguire il debug della macchina come preferisci, è possibile scattare manualmente foto, video o riproduzione, questa volta il LED rosso lampeggia Il sensore PIR è funzionante.

Modalità ON - Quando l'interruttore di avviamento della terza marcia è in posizione "ON", il prodotto entrerà nella modalità di scatto PIR automatica, in questo momento il LED lampeggerà per 5 secondi, indicando che la macchina sta per entrare nella modalità di ripresa PIR automatica. Dopo 5 secondi il display si spegne, in questo momento è possibile chiudere il vano batteria, lasciare il sito di test. Il prodotto funzionerà automaticamente e i LED non lampeggiano:
Suggerimenti:
1, L'intervallo di default del prodotto di 1 minuti, è possibile impostare il proprio a 5-59 secondi o 1-60 minuti. 2, Prima di entrare in modalità ON, prima impostare i relativi parametri in modalità TEST. 3, Dopo essere entrati in modalità ON, è possibile fare clic su qualsiasi tasto sotto il display a cristalli liquidi per riattivare il prodotto, al fine di controllare la carica della batteria e le condizioni di memoria. 4, Quando la batteria è bassa, il prodotto sarà intelligente nella modalità di risparmio energetico, nella notte in cui le riprese saranno automaticamente Ridurre la luminosità della lampada IR. La qualità delle riprese sarà leggermente ridotta.
Impostazioni Modalità fotocamera: foto, video, foto + video Quando si seleziona la modalità foto o Video, la macchina inizierà automaticamente a scattare foto o video dopo aver monitorato il movimento. Quando si seleziona la modalità foto + Video, la fotocamera scatterà una foto e quindi entrerà nella modalità di registrazione dopo aver monitorato il movimento. L'impostazione default del sistema è la modalità foto. Risoluzione della foto 5M; 8M; 12M. Il sistema ha un valore predefinito di 5M.
Risoluzione del video 1080P; 720P; WVGA; VGA. Il sistema ha un valore predefinito di 1080P.
##### Numero di immagini
Numero di foto impostato, opzionale 1P, 2P e 3P. Il sistema passa automaticamente a 1P. Se impostato su 3P, vengono scattate tre foto in successione.
Suggerimenti: 3 scatti continui supporta solo una risoluzione di 5M.
##### Durata della registrazione video
La durata del tempo di registrazione può essere impostata da 1 a 60 secondi, 3 minuti, 5 minuti e 10 minuti, il valore predefinito è 10 secondi. Questa impostazione funziona solo in modalità ON e non influisce sul tempo di registrazione in modalità test.
##### Intervallo
Il sistema ha un valore predefinito di 1 minuto e l'utente può impostarlo da 5 secondi a 59 secondi o da 1 minuto a 60 minuti secondo necessità. Durante l'intervallo, la fotocamera smetterà di funzionare. Questa funzione deve essere impostata in modalità TEST per garantire che l'impostazione venga eseguita in modalità ON.
Timbro ora La funzione timbro ora su video o foto, il default del sistema è "on".
##### Timer
Utilizzare questa funzione per impostare il prodotto a lavorare per un periodo di tempo predeterminato e dormire per altri periodi di tempo.
Suggerimenti: In questa modalità, la funzione del sensore PIR continuerà a funzionare.
##### Time Lapse

Questa funzione può essere utilizzata per l'osservazione a lungo termine di scene speciali. La fotocamera sarà scattata foto dopo certo periodo. L'impostazione predefinita è OFF. Quando è selezionato on, gli utenti possono impostare l'intervallo di tempo.
Suggerimenti: In questa modalità, la funzione del sensore PIR smetterà di funzionare.
Impostazione della password Questa funzione impedisce ad altri di entrare in modalità TEST o di modificare i parametri di sistema del prodotto. Questa funzione è impostata su OFF. Quando è selezionato ACCEN.RE, è possibile impostare la password di quattro cifre. Dopo aver impostato correttamente, la password verrà immessa quando si accede alla modalità TEST. Si prega di tenere presente la password.
##### Impostazione del numero di macchina
L'impostazione predefinita è OFF. Quando si seleziona ON, è possibile impostare il numero di quattro cifre. Dopo aver impostato correttamente, il numero della macchina verrà stampato sulla foto, il che rende facile per gli utenti identificare numeri diversi usando i numeri quando si usano più macchine contemporaneamente Posizione di tiro
##### Formattazione
Quando si accede a questa opzione, selezionare SÌ e quindi fare clic su OK per confermare. La macchina formatta la scheda SD. I file sulla scheda saranno cancellati. Per favore presta attenzione.
Impostazione dell'ora di sistema Le impostazioni specifiche sono le seguenti: Premere brevemente i tasti sinistra e destra per spostarsi nella posizione in cui si desidera regolare l'ora, da sinistra a destra, anno,
mese, giorno, ora, minuti, premere i tasti su e giù per regolare le impostazioni corrispondenti.
Ripristinare le impostazioni predefinite Questa funzione ripristinerà tutte le impostazioni della macchina allo stato predefinito.
##### Spegnimento automatico
In modalità test, quando il prodotto non funziona per un certo periodo di tempo, la macchina si spegne automaticamente per risparmiare energia. Impostazioni specifiche: 3 minuti, 5 minuti, 10 minuti. Il default del sistema è 5 minuti.
Suggerimenti: Spegnimento automatico, quando l'utente preme di nuovo il pulsante, è possibile riattivare il sistema.
Collegare il computer
Si prega di portare l'interruttore della terza marcia in posizione OFF. Il prodotto è collegato al computer tramite il cavo USB. Lo schermo visualizzerà il messaggio "MSDC", suggerendo che il PC è stato collegato correttamente. Quindi è possibile leggere la scheda SD all'interno della macchina, Copia, elimina e altre operazioni.
Parametri di sistema
|Sensore di immagine|5,0 mega pixel, sensore CMOS da 1 / 4 "| |---|---| |Risoluzione della foto|12M/8M/5M/3M/1M| |Scheda di memoria esterna|Supporta schede di memoria SD / SDHC fino a 32 GB (non incluse)| |Risoluzione del video|1920 x1080(30fps);1280 x 720(30fps); 848 x 480 (30fps); 640 x 480(30fps)| |Formato di archiviazione|Foto: JPEG; Video: AVI.| |Angolo di PIR|90°| |Distanza di PIR|Fino a 20m|
|Lente|F=3.1mm; F/NO=2.6; FOV=73°; Filtro IR automatico| |Valutazione impermeabile|IP66| |Tempo di innesco|Circa 0,5 secondi| |Leds IR|24 LEDs a infrarossi per riprese notturne| |Alimentatore|Batterie 4x o 8x tipo LR6 (AA); batterie NIMH 4x o 8x tipo LR6 (AA) con autoscarica bassa; Alimentazione esterna 6V, almeno 1,5 A (non inclusa)| |Interfaccia USB|Mini USB 2.0|
Protezione post-vendita
Questo prodotto ha una garanzia di 12 mesi dalla data di acquisto.
Se avete domande su questo prodotto, potete contattarci attraverso la seguente email: support@govicture.com
Ti daremo una risposta soddisfacente il prima possibile.
Introducción
Gracias por comprar Victure Cámara de Caza. Este producto es una cámara versátil y omnipotente, puede ser utilizado para la caza al exterior, monitorear animales y la seguridad en el hogar. Su diseño oculto, a prueba de agua y de polvo. Le permite en diversas condiciones al aire libre, darse cuenta de la detección de todo tipo de clima del animal y tomar fotografías / videos automáticamente para registrar el paradero de los animales.
Este manual del usuario detallará cómo usar e instalar este producto, y le proporcionará especificaciones técnicas y otra información. Leea este manual detenidamente antes de usarlo para que pueda hacer un mejor uso.
Esperamos que este producto pueda satisfacer sus necesidades y ofercer un largo servicio para usted.
Catálogo
FAQ
Introducción del producto
Estructura del producto
Accesorios de productos
Preparación del uso del producto
Operación y configuración del producto
Operación del producto
Configuración
Conecta el ordenador
Parámetros del sistema
Servicios después de la venta
FAQ
¿Por qué aparece "Tarjeta Bloqueada" y "Tarjeta Incorrecta" después de insertar la tarjeta SD?
Q:
A:
¿Por qué la foto tomada por la noche es en blanco y negro? Cuando la máquina está disparando por la noche utilizará iluminación con luz infrarroja, pero los ojos de personas no pueden ver la escena bajo la luz infrarroja,solo se puede procesar en imágenes en blanco y negro para ver.
Q: A:
¿Por qué la máquina no puede monitorear objetos en el modo ON y tomar fotografías automáticamente?
Q:
A:
¿Por qué la cámara toma automáticamente muchas fotos? Cuando la máquina dispara automáticamente varias fotos inútiles, Por favor, ajuste el intervalo de disparo en la configuración
Q: A:
Introducción del producto
Estructura del producto
##### Frente
1


2 3
Interior
1

2 3
4 5 6

Compartimento de la batería
1
3
2

Accesorios de productos
B

C
D
A
A. perforación B. Tornillos de trípode C. Anti-tornillo D. Tornillos de bisagra
Consejos:
Este producto ocupa en el área forma de abanico 90 grados frente a la cámara, la mejor distancia de tomar foto es de 3-10 metros en frente de la cámara. Para lograr la detección programada de disparos, ajusta la instalación de las siguientes:
Preparación del uso del producto


Paso 1 Paso 2 Paso 3 Paso 4
Abra el tapa de la batería ubicado en el lado derecho de la cámara en la dirección que se muestra Cargue 8 pilas alcalinas AA LR6 en la orientación correcta Desactive la protección de lectura y escritura en la parte superior izquierda de la tarjeta para que la cámara pueda reconocerla Inserte la tarjeta SD y luego cambie el mode de interruptor a TEST. Después de encender la máquina, ingrese la configuración para formatear la tarjeta con la función de formateo de la cámara.
Paso 4:
Consejos: Esta máquina admite la tarjeta SD de Clase 6 y superior, maximo 32G
Operación y configuración del producto


Operación del producto
| | |---|

| | |---|
| | |---|
Esta máquina tiene tres modos:OFF/TEST/ON
Modo de OFF - Cuando la cámara está en este modo, la máquina está apagada.
Modo de TEST - Cuando la cámara está en este modo, Puede configurar la máquina según sus propias necesidades; Puedes tomar fotos, videos o reproducir manualmente; En este caso, el LED rojo parpadea para indicar que el área de detección PIR está en estado de funcionamiento.
Modo de ON - Cuando tire del interruptor de extracción del tercer engranaje en la posición "ON", el producto ingresará al modo de disparo automático PIR, el LED parpadeará durante 5 segundos, lo que indica que la máquina está a punto de ingresar al modo de disparo automático PIR. Después de 5 segundos, la pantalla se apaga, en este momento puede cerrar la tapa de la batería, salir del sitio de prueba. El producto funcionará automáticamente y los LED no parpadearán:
cámara se volverá al estado de dormir.
Consejos:
1, El intervalo predeterminado del producto es 1 minuto, puede establecer en 5-59 segundos o 1-60 minutos. 2, Antes de entrar en el modo ON, configure primero en el modo de TEST establezca el modo de trabajo y los parámetros relacionados. 3, Ingrese al modo ON, puede despertar el producto por presionar cualquier tecla debajo de la pantalla LCD para ver la energía de la batería y la situación de memoria. 4, Cuando la energia de la batería es baja, el producto se va a entrar en el modo de ahorro de energía automáticamente, fotografiar por la noche reducirá automáticamente el brillo de la lámpara IR. Efecto de fotografiar será efectado un poco por eso..
Configuración Modo : Cámara; Video; Cámara + Video Cuando selecciona el modo Cámara y Video, la máquina automáticamente comenzará a tomar fotos o videos después de monitorear el movimiento. Cuando selecciona el modo de cámara + video, la máquina tomará una foto antes de monitorear el movimiento y luego ingresará el estado de grabación. El sistema se predetermina al modo de cámara. Píxel de foto 1M; 3M; 5M; 8M; 12M, el sistema predeterminado es 5M
Especificación de video 1080P; 720P; WVGA; VGA, el sistema predeterminado es 1080.
##### Número de tomar imagenes
Número de foto configurado, opcional 1P, 2P y 3P, el sistema predeterminado es 1P. Cuando se establece en 3P, se toman tres imágenes en continuación.
Consejos: 3 disparos continuos solo admiten una resolución de 5M.
##### Duración del video

La duración del tiempo de grabación se puede configurar de 1 a 60 segundos, 3 minutos, 5 minutos y 10 minutos, el valor predeterminado es 10 segundos. Esta configuración solo funciona en el modo ON y no afecta el tiempo de grabación en el modo de prueba.
##### Intervalo de disparo
El sistema predeterminado es de 1 minuto y el usuario según necesario puede configurarlo de 5 segundos a 59 segundos o de 1 minuto a 60 minutos. Durante el intervalo, la cámara dejará de funcionar. Esta función debe establecerse en el modo de TEST para garantizar que la configuración se ejecute en el modo ON.
Marcas de agua Función de marca de video o foto, ON está encendido, OFF está desactivado, el sistema está encendido por defecto.
##### Temporizador
Utilice esta función para configurar el producto para que funcione durante un período de tiempo predeterminado y para que duerma durante otros períodos de tiempo.
Consejos: en este modo, la función del sensor PIR continuará funcionando.
##### Lapso de tiempo
Esta función se puede usar para la observación a largo plazo de escenas especiales. La cámara tomará la foto después de cierto período. La configuración predeterminada es OFF. Cuando se selecciona ON, los usuarios pueden configurar el intervalo de tiempo.
Consejos: En este modo, la función de autodetección PIR dejará de funcionar.
Contraseña Esta característica evita que otros entren al modo PRUEBA o modifiquen los parámetros del sistema del producto. Esta función está predeterminada en OFF. Cuando se selecciona ON, se puede configurar la contraseña de cuatro dígitos. Después de la configuración correcta, se ingresará la contraseña al ingresar al modo de TEST. Tenga en cuenta su contraseña.
##### Configuración del número de máquina
El valor predeterminado es OFF, cuando se selecciona como ON, puede establecer el número de máquina de cuatro dígitos, después de que la configuración sea exitosa, el número de la máquina se imprimirá en la fotografía, lo que facilita que los usuarios identifiquen diferentes ubicaciones de disparo utilizando números cuando se usan varias máquinas al mismo tiempo.
##### Formatearse
Operación de formateo de la tarjeta SD, cuando ingrese esta opción, seleccione la tecla YES, luego haga clic en el botón OK para confirmar, la máquina formateará la tarjeta SD utilizada, todos los archivos de la tarjeta serán eliminados. Por favor, tenga cuidado por esta operaión.
Tiempo ajustes Configuraciones de tiempo del sistema, las configuraciones específicas son las siguientes: Presione brevemente las teclas izquierdas y derechas para moverse a la posición en la que desea ajustar la hora, de izquierda a derecha son el año, el mes, el día, la hora y el minuto, presione brevemente las teclas hacia arriba a abajo para ajustar la configuración correspondiente.
Restaurar la configuración predeterminada Esta función restaurará todas las configuraciones de la máquina al estado predeterminado.
##### Apagado automático
Esta configuración está en el modo de prueba, cuando el producto no funciona durante un cierto período de tiempo, la máquina se apagará automáticamente para ahorrar energía. Configuración específica: 3 minutos, 5 minutos, 10 minutos, OFF, OFF es se apaga, la máquina no se apaga automáticamente para el procesamiento, el sistema predeterminado es 5 minutos.
Consejos: Después de apagar automáticamente, cuando el usuario presiona el botón nuevamente, puede reactivar el sistema.

Conecta el ordenador
Coloque el interruptor de la tercera marcha en OFF, conecta el producto a la computadora a través del cable USB, la pantalla mostrará el mensaje "MSDC", sugiriendo que la PC se ha conectado correctamente, luego su ordenador puede leer la tarjeta SD Copiar, eliminar y otras operaciones.
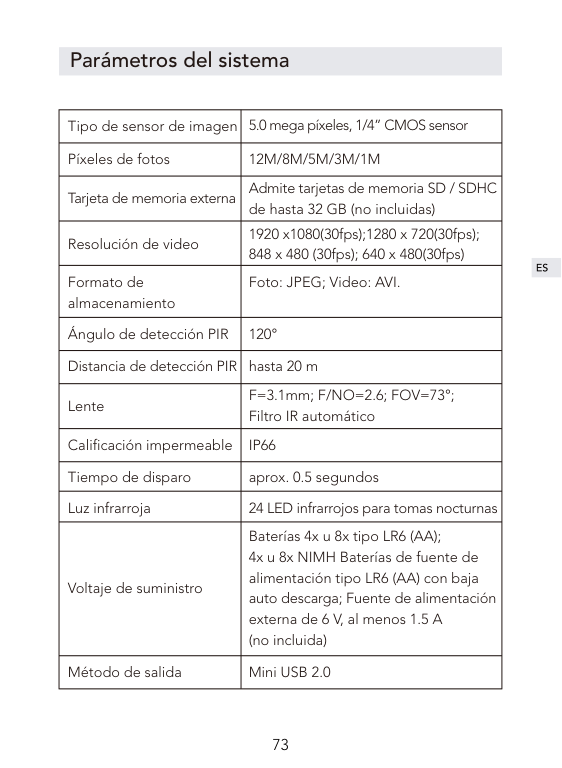
Parámetros del sistema
|Tipo de sensor de imagen|5.0 mega píxeles, 1/4” CMOS sensor| |---|---| |Píxeles de fotos|12M/8M/5M/3M/1M| |Tarjeta de memoria externa|Admite tarjetas de memoria SD / SDHC de hasta 32 GB (no incluidas)| |Resolución de video|1920 x1080(30fps);1280 x 720(30fps); 848 x 480 (30fps); 640 x 480(30fps)| |Formato de almacenamiento|Foto: JPEG; Video: AVI.| |Ángulo de detección PIR|120°| |Distancia de detección PIR|hasta 20 m| |Lente|F=3.1mm; F/NO=2.6; FOV=73°; Filtro IR automático| |Calificación impermeable|IP66| |Tiempo de disparo|aprox. 0.5 segundos| |Luz infrarroja|24 LED infrarrojos para tomas nocturnas| |Voltaje de suministro|Baterías 4x u 8x tipo LR6 (AA); 4x u 8x NIMH Baterías de fuente de alimentación tipo LR6 (AA) con baja auto descarga; Fuente de alimentación externa de 6 V, al menos 1.5 A (no incluida)| |Método de salida|Mini USB 2.0|
Servicios después de la venta
Este producto tiene una garantía de 12 meses a partir de la fecha de compra.
Si tiene alguna pregunta sobre este producto, puede contactarnos a través del siguiente correo electrónico: support@govicture.com
Le daremos una respuesta satisfactoria tan pronto como sea posible.
前書き
この度はVictureトレイルカメラをお買い上げいただき、ありがとう ございます。本製品は軒先や駐車場で監視カメラとして、農場や畑 の被害防止に防犯カメラとして、野外で野生生物の監視にトレイル カメラとして使用可能な多機能カメラです。雨の中でも使用できる 防水、防塵および防錆規格IP66を取得しているので、屋外でも安心 に使用できます。高感度な人体・動体センサー(PIRセンサー)は広 範囲の人や動物の動きを検知することができ、自動的に録画を行い ます。
Victure製品を正しく理解し、ご使用いただくために、ご使用の前に 必ずこの取扱説明書をよくお読みください。お読みになった後は、い つでも見られるところに保存してください。
目次
FAQ

製品情報
各部の名称
付属品と取付方法
使用前のご準備
カメラの操作と設定
モード
設定
パソコンと接続する
製品仕樣
保証及びアフターサービス
FAQ
SDカードを挿入した後、カメラの起動時にモニターに「カードがロ ックされています」または「SDカードエラー」と表示されます。 1.SDカードはClass6(または以上)の32GB(またはそれ以下)のSDカ ードであるかどうかをご確認ください。 2.SDカードを挿入する前に、カードが書き込み禁止になっていない ことをご確認ください。 3.ご使用の前にカメラ本体でSDカードをフォーマットしてください。
Q:
A:
夜間になると、どうして「白黒」でしか撮影が記録されないのでしょ うか。 本製品は不可視赤外線LEDライトが搭載され、カラーフィルタにあ えて赤外線カットフィルタを付けないことで、昼はカラーで、夜は 赤外線ランプで照射して白黒で、という使い分けをします。赤外線 には色が無いので、白黒の濃淡で表現します。
Q:
A:
ONモードで動く物体が検出されません。自動的に撮影できません。 1.カメラのタイムラプスまたはタイマー機能が設定されているかど うかをご確認ください。タイムラプスモードでは、カメラの自動検 知機能が停止します。また、タイマーで設定した時間以外カメラは 動作しません。 2.カメラを適切な場所に設置したかどうかをご確認ください。カメ ラの検知範囲は直前90度の扇形範囲です。最高の撮影距離は、カメ ラの前の3〜10メートルです。
Q: A:
カメラは自動的に数多くの無駄な写真を撮りました。 カメラが自動的に無駄な写真を撮る場合は、インターバル時間を延 長してみてください。
Q: A:
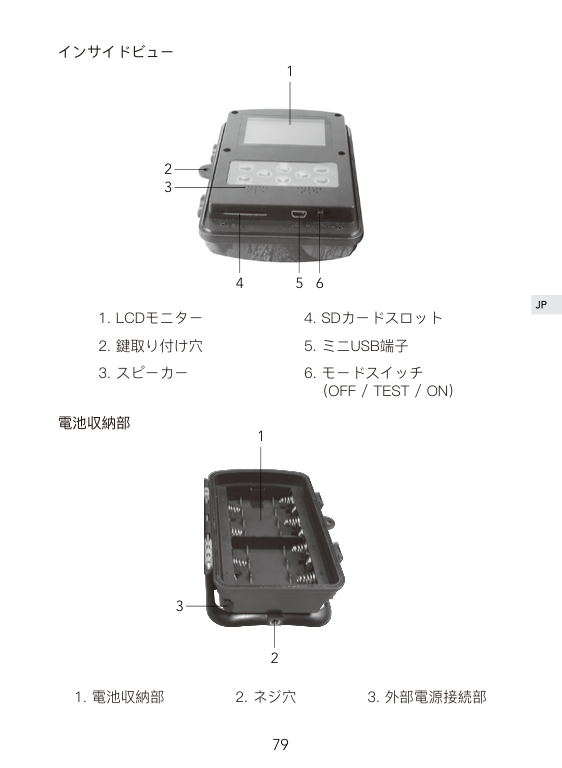
製品情報
各部の名称
正面図
1

2 3
インサイドビュー
1

2 3
4 5 6
電池収納部

1
3
2
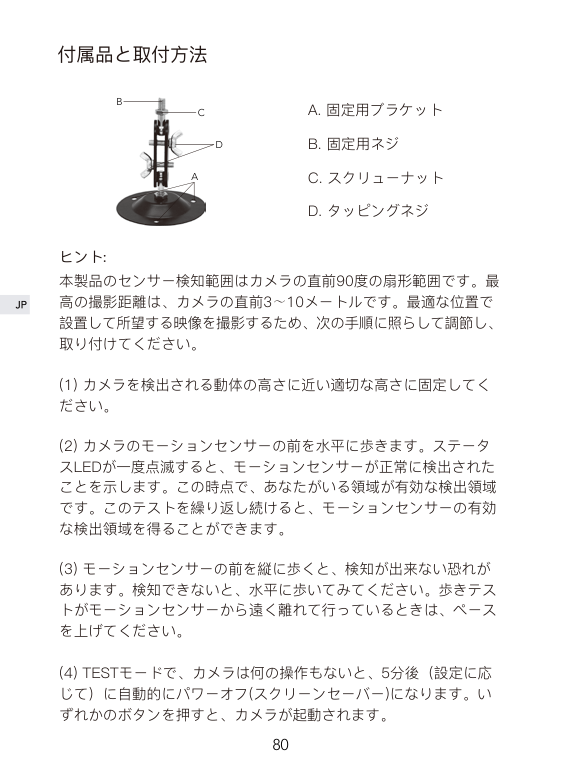
付属品と取付方法
B

C
D
A
A. 固定用ブラケット B. 固定用ネジ C. スクリューナット D. タッピングネジ
ヒント:
本製品のセンサー検知範囲はカメラの直前90度の扇形範囲です。最 高の撮影距離は、カメラの直前3~10メートルです。最適な位置で 設置して所望する映像を撮影するため、次の手順に照らして調節し、 取り付けてください。
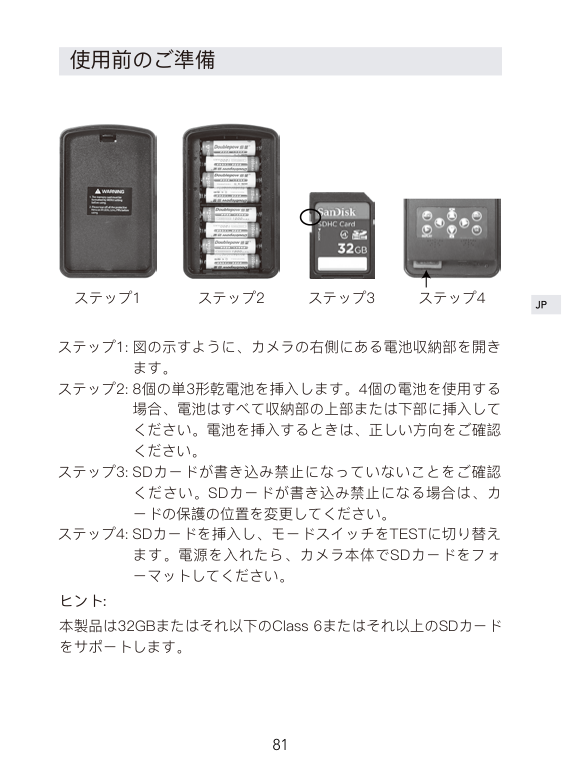
使用前のご準備


ステップ1 ステップ2 ステップ3 ステップ4
図の示すように、カメラの右側にある電池収納部を開き ます。 8個の単3形乾電池を挿入します。4個の電池を使用する 場合、電池はすべて収納部の上部または下部に挿入して ください。電池を挿入するときは、正しい方向をご確認 ください。 SDカードが書き込み禁止になっていないことをご確認 ください。SDカードが書き込み禁止になる場合は、カ ードの保護の位置を変更してください。 SDカードを挿入し、モードスイッチをTESTに切り替え ます。電源を入れたら、カメラ本体でSDカードをフォ ーマットしてください。

ヒント: 本製品は32GBまたはそれ以下のClass 6またはそれ以上のSDカード をサポートします。
カメラの操作と設定


モード
| | |---|
| |
|---|
| | |---|
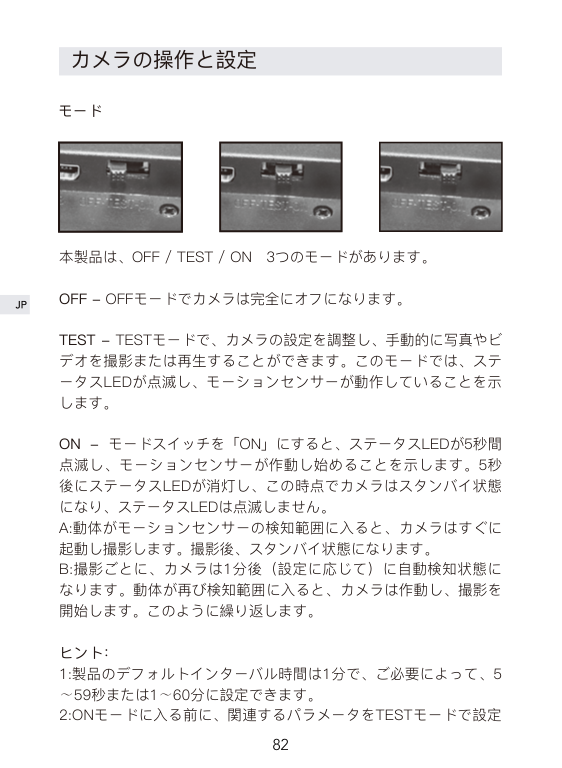
本製品は、OFF / TEST / ON 3つのモードがあります。
OFF - OFFモードでカメラは完全にオフになります。
TEST - TESTモードで、カメラの設定を調整し、手動的に写真やビ デオを撮影または再生することができます。このモードでは、ステ ータスLEDが点滅し、モーションセンサーが動作していることを示 します。
ON - モードスイッチを「ON」にすると、ステータスLEDが5秒間 点滅し、モーションセンサーが作動し始めることを示します。5秒 後にステータスLEDが消灯し、この時点でカメラはスタンバイ状態 になり、ステータスLEDは点滅しません。 A:動体がモーションセンサーの検知範囲に入ると、カメラはすぐに 起動し撮影します。撮影後、スタンバイ状態になります。 B:撮影ごとに、カメラは1分後(設定に応じて)に自動検知状態に なります。動体が再び検知範囲に入ると、カメラは作動し、撮影を 開始します。このように繰り返します。
ヒント:
しておいてください。
設定
カメラモード: 写真(デフォルト)、ビデオ、 写真 + ビデオ 写真モードまたはビデオモードを選択すると、動きを検知した後、 自動的に写真またはビデオを撮影します。 写真 + ビデオを選択すると、動きを検知した後、カメラはビデオを 録画する前に一定数の写真を撮影します。
画像サイズ:1M、3M、5M(デフォルト)、8M、12M
ビデオ解像度:1080P(デフォルト)、720P、WVGA、VGA
写真枚数:1枚(デフォルト)、2枚、3枚 2枚/3枚を設定すると、カメラは2枚/3枚連写できます。3枚連写は 5M解像度のみをサポートします。
ビデオの長さ
ビデオの長さは1秒~60秒、3分、5分、10分に設定できます。デフ ォルト設定は10秒です。この設定はONモードでのみ役に立ちます。 TESTモードには影響しません。

インターバル
インターバル時間は5秒~59秒、1分~60分に設定できます。デフォ ルト設定は1分です。インターバル時間内カメラは作動しません。イ ンターバル時間はご必要によって、TESTモードで設定しておいて ください。
タイムスタンプ 「オン」を選択すると、写真で日付、時刻、気温、月相が表示され ます。(写真のみ表示され、ビデオでは表示されません)
タイマー
タイマーを「オン」を選択すると、カメラの作動開始時間と終了時 間を設定でき、特定の時間内のみカメラを起動させることができま す。例えば:開始時間が18:35に設定され、終了時間が8:25に設定 されている場合、カメラは現在の午後6時35分から翌日の午前8時 25分まで使用可能になります。カメラはこの期間以外に写真やビデ オを撮影することはありません。
ヒント:タイマー時間内、モーションセンサーは動きを検知した後、 自動的に写真やビデオを撮影します。
タイムラプス
この機能は、特定な場面の長期間観察に使用します。「オン」を選 択すると、時間間隔を設定できます。カメラは自動的に選択した時 間間隔で写真やビデオを撮影します。これは冷血動物/植物(ヘビ や植物が開くなど)を観察するのに役に立ちます。
ヒント:このモードで、モーションセンサーは動きを検出すること ができません。
パスワード この機能により、他人がTESTモードに入り、製品のシステムパラ メータを変更することを防ぐことができます。 デフォルト設定は「オフ」です。「オン」を選択すると、4桁のパ スワードを設定できます。 設定したら、TESTモードに入るたびに、 パスワードを入力する必要があります。パスワードをしっかり覚え てください。

シリアル番号
デフォルト設定は「オフ」です。「オン」を選択すると、場所を写 真にエンコードすることができます。複数のカメラを使用する場合、 写真を見ているとき、この機能は場所を簡単に識別することができ ます。
フォーマット
この機能でSDカードをフォーマットできます。SDカードをフォー マットすると、カード内のファイルは全て削除されます。SDカー ドをフォーマットする前に、ファイルをコピーしておいてください。
日付設定
システム時間を設定できます。左/右ボタンを利用してオプション を移動します。左から右へは年、月、日、時と分です。上/下ボタ ンを利用して設定値を調整します。
デフォルト カメラの設定を全てデフォルト値にリセットします。
オートパワーオフ
この機能を使用すると、TESTモードで、何の操作もないと、カメ ラは自動的にパワーオフします。3分、5分(デフォルト)、10分に設 定できます。
ヒント:いずれかのボタンを押すと、カメラが起動されます。
パソコンと接続する
モードスイッチをOFFに切り替え、付属のUSBケーブルでカメラを パソコンと接続して、モニタに「MSDC」と表示されると、パソコ ンと接続されたことを示します。そして、SDカードにあるファイル を再生、コピー、削除できます。
ヒント:パソコンと接続する時は、バッテリーを取り外すことをお 勧めいたします。
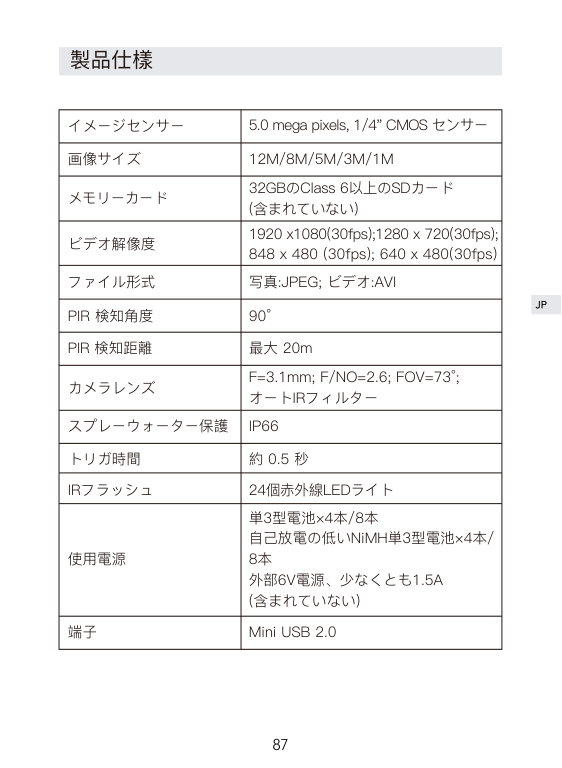
製品仕樣
|イメージセンサー|5.0 mega pixels, 1/4" CMOS センサー| |---|---| |画像サイズ|12M/8M/5M/3M/1M| |メモリーカード|32GBのClass 6以上のSDカード (含まれていない)| |ビデオ解像度|1920 x1080(30fps);1280 x 720(30fps); 848 x 480 (30fps); 640 x 480(30fps)| |ファイル形式|写真:JPEG; ビデオ:AVI| |PIR 検知角度|90°| |PIR 検知距離|最大 20m| |カメラレンズ|F=3.1mm; F/NO=2.6; FOV=73°; オートIRフィルター| |スプレーウォーター保護|IP66| |トリガ時間|約 0.5 秒| |IRフラッシュ|24個赤外線LEDライト| |使用電源|単3型電池×4本/8本 自己放電の低いNiMH単3型電池×4本/ 8本 外部6V電源、少なくとも1.5A (含まれていない)| |端子|Mini USB 2.0|
保証及びアフターサービス
ご購入後12ヶ月のメーカー保証が付いております。
ご不明な点があるまたは商品に不具合がある場合は、アマゾン購入 履歴或いはVictureカスタマーサービスより弊社までご連絡ください。 Victureは、カスタマーに対し、最高水準のカスタマーサービスを提 供することをお約束いたします。
Victureカスタマーサービス:support@govicture.com
| | | |---|---| | | | | | | | | | | | | | | |