
Ask AI
— answers from the official manualAnswers from the official manual.
Common questions
Common Questions
9 totalHow can I adjust the height of my HP Elitedisplay E232 monitor?
To adjust the height of the monitor, hold down on the display head from its base position to unlock it. Once unlocked, pull up on the display head to raise it to a desired level or push down to lower it.
How do I connect my computer to the HP Elitedisplay E232 monitor using a VGA cable?
Connect one end of the provided VGA signal cable to your PC's analog output port and attach the other end to the rear panel of the monitor. Ensure that both ends are tightly fastened.
Can I use this HP Elitedisplay E232 for applications with static images running for prolonged periods, like camera surveillance?
This IPS model is not suitable for continuous display of static images due to potential image retention issues. Always activate screen savers or turn off the monitor if it remains unused for extended periods.
What should I do if my HP Elitedisplay E232 monitor's image appears blurred or indistinct?
If the image on your monitor is blurry, check that the correct input is selected. Press the Input button to cycle through different video signals. Ensure the video cable is properly connected and secure.
How can I clean my HP Elitedisplay E232 monitor?
To clean your monitor, turn it off and unplug it from the power source. Use a soft, dry cloth to wipe the screen and cabinet. For tougher stains, prepare a mixture of 50/50 water and Isopropyl alcohol and spray this onto a separate cloth before wiping down the surface.
What are the safety guidelines I should follow when setting up my HP Elitedisplay E232 monitor?
When setting up your LCD monitor, ensure it does not get damaged by avoiding pressure on its display panel and using correctly sized furniture. Adjust the tilt, swivel, and height according to guidance provided in Appendixes 2 and 3 to prevent personal injury or equipment damage.
Full Manual
40 pages

User Guide
© 2013, 2014, 2015 Hewlett-Packard Development Company, L.P.
Microsoft and Windows are U.S. registered trademarks of the Microsoft group of companies.
The information contained herein is subject to change without notice. The only warranties for HP products and services are set forth in the express warranty statements accompanying such products and services. Nothing herein should be construed as constituting an additional warranty. HP shall not be liable for technical or editorial errors or omissions contained herein.
Sixth Edition: April 2015 Document Part Number: 714157-006
###### Product notice
This guide describes features that are common to most models. Some features may not be available on your product.
To access the latest user guide, go to http://www.hp.com/support and select your country. Select Drivers & Downloads, and then follow the on-screen instructions.
About This Guide This guide provides information on monitor features, setting up the monitor, and technical specifications. WARNING! Text set off in this manner indicates that failure to follow directions could result in bodily harm or loss of life. CAUTION: Text set off in this manner indicates that failure to follow directions could result in damage to equipment or loss of information. NOTE: Text set off in this manner provides important supplemental information.
| | |---|
iii
##### iv About This Guide

Table of contents
Cleaning the monitor ........................................................................................................................... 4 Shipping the monitor ........................................................................................................................... 4
Installing from the disc ..................................................................................................................... 19 Downloading from the Web .............................................................................................................. 19
v
E231i/E231e models ........................................................................................................................................... 26 E241i/E241e models ........................................................................................................................................... 26 E271i model ......................................................................................................................................................... 27 Recognizing preset display resolutions .............................................................................................................. 29
E201 model ....................................................................................................................................... 29 E221 Model ........................................................................................................................................ 29 E221i model ...................................................................................................................................... 30 E231 model ....................................................................................................................................... 31 E231i/E231e models ......................................................................................................................... 31 E241i/E241e models ......................................................................................................................... 32 E271i model ...................................................................................................................................... 33
Entering user modes ........................................................................................................................................... 33

vi
1 Product features
HP LCD monitors
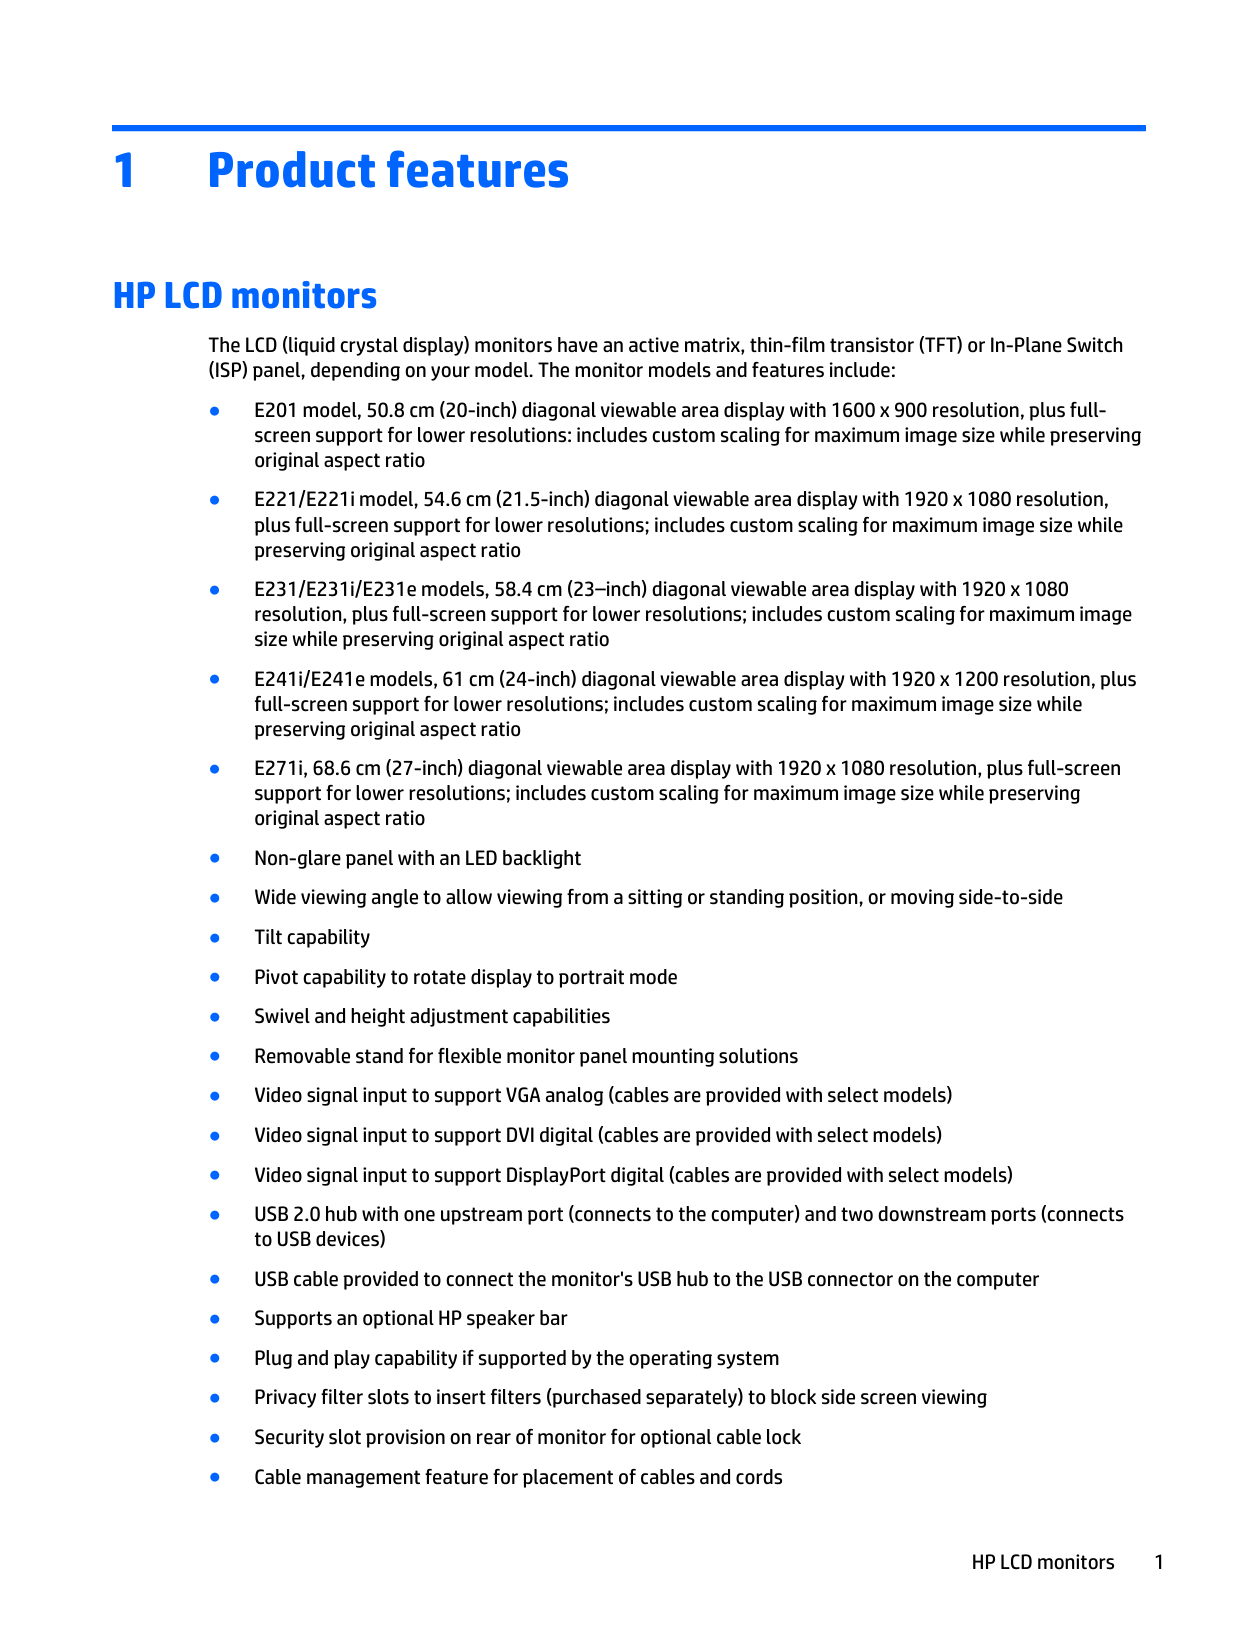
The LCD (liquid crystal display) monitors have an active matrix, thin-film transistor (TFT) or In-Plane Switch (ISP) panel, depending on your model. The monitor models and features include:

HP LCD monitors 1
| | |---|
NOTE: For safety and regulatory information, refer to the Product Notices provided on your media disc, if one is included, or in your documentation kit. To locate updates to the user guide for your product, go to http://www.hp.com/support, and select your country. Select Drivers & Downloads, and then follow the onscreen instructions.
2 Chapter 1 Product features
2 Safety and maintenance guidelines
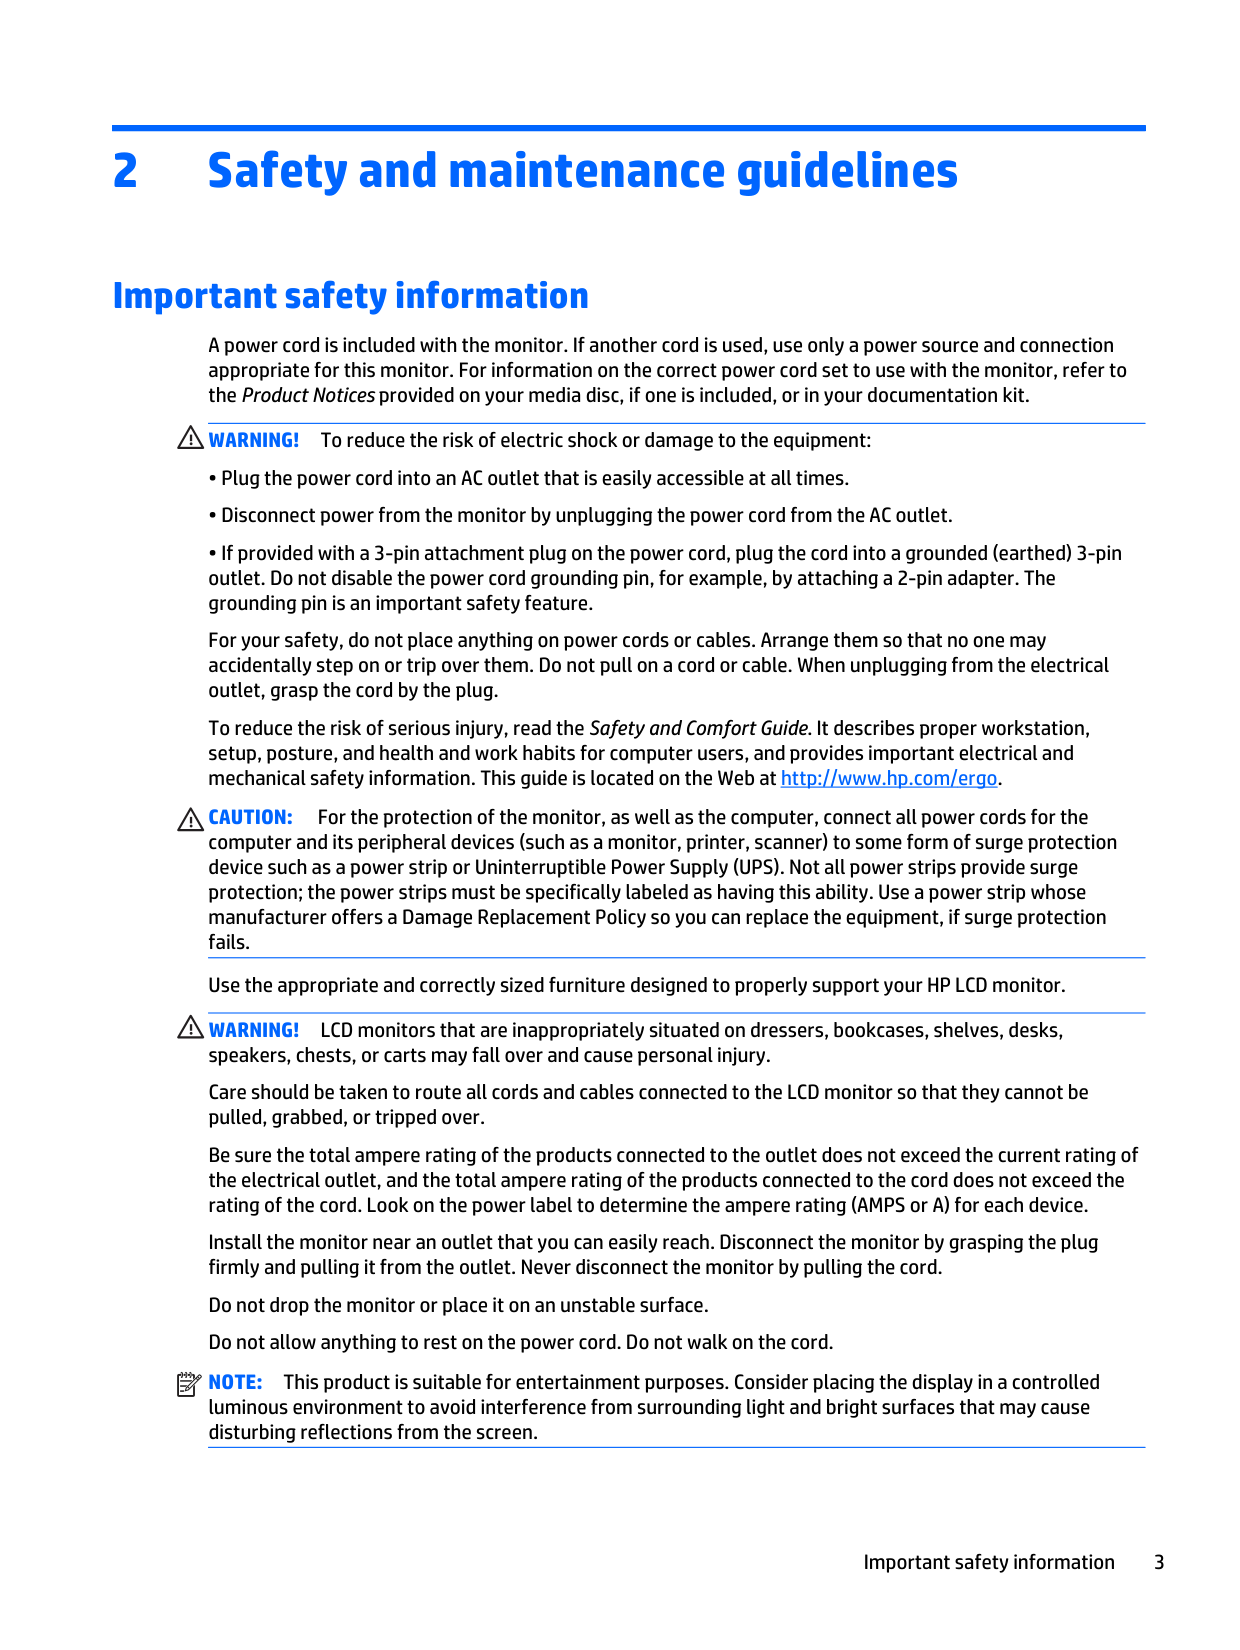
Important safety information
A power cord is included with the monitor. If another cord is used, use only a power source and connection appropriate for this monitor. For information on the correct power cord set to use with the monitor, refer to the Product Notices provided on your media disc, if one is included, or in your documentation kit.
WARNING! To reduce the risk of electric shock or damage to the equipment:
For your safety, do not place anything on power cords or cables. Arrange them so that no one may accidentally step on or trip over them. Do not pull on a cord or cable. When unplugging from the electrical outlet, grasp the cord by the plug.
To reduce the risk of serious injury, read the Safety and Comfort Guide. It describes proper workstation, setup, posture, and health and work habits for computer users, and provides important electrical and mechanical safety information. This guide is located on the Web at http://www.hp.com/ergo.
CAUTION: For the protection of the monitor, as well as the computer, connect all power cords for the computer and its peripheral devices (such as a monitor, printer, scanner) to some form of surge protection device such as a power strip or Uninterruptible Power Supply (UPS). Not all power strips provide surge protection; the power strips must be specifically labeled as having this ability. Use a power strip whose manufacturer offers a Damage Replacement Policy so you can replace the equipment, if surge protection fails.
Use the appropriate and correctly sized furniture designed to properly support your HP LCD monitor. WARNING! LCD monitors that are inappropriately situated on dressers, bookcases, shelves, desks, speakers, chests, or carts may fall over and cause personal injury. Care should be taken to route all cords and cables connected to the LCD monitor so that they cannot be pulled, grabbed, or tripped over. Be sure the total ampere rating of the products connected to the outlet does not exceed the current rating of the electrical outlet, and the total ampere rating of the products connected to the cord does not exceed the rating of the cord. Look on the power label to determine the ampere rating (AMPS or A) for each device. Install the monitor near an outlet that you can easily reach. Disconnect the monitor by grasping the plug firmly and pulling it from the outlet. Never disconnect the monitor by pulling the cord. Do not drop the monitor or place it on an unstable surface. Do not allow anything to rest on the power cord. Do not walk on the cord. NOTE: This product is suitable for entertainment purposes. Consider placing the display in a controlled luminous environment to avoid interference from surrounding light and bright surfaces that may cause disturbing reflections from the screen.
| | |---|
Important safety information 3
Maintenance guidelines
To enhance the performance and extend the life of the monitor:
| | |---|
#### Cleaning the monitor
CAUTION: Spray the cleaner onto a cloth and use the damp cloth to gently wipe the screen surface. Never spray the cleaner directly on the screen surface. It may run behind the bezel and damage the electronics.
CAUTION: Do not use cleaners that contain any petroleum based materials such as benzene, thinner, or any volatile substance to clean the monitor screen or cabinet. These chemicals may damage the monitor.
#### Shipping the monitor
Keep the original packing box in a storage area. You may need it later if you move or ship the monitor.
4 Chapter 2 Safety and maintenance guidelines
3 Setting up the monitor
To set up the monitor, ensure that the power is turned off to the monitor, computer system, and other attached devices, then follow the instructions below.
| | |---|
NOTE: Monitor models in a lighter color are available in select countries or regions. Your model may be a different color than the monitor images provided in this guide.
Use caution when setting up the monitor
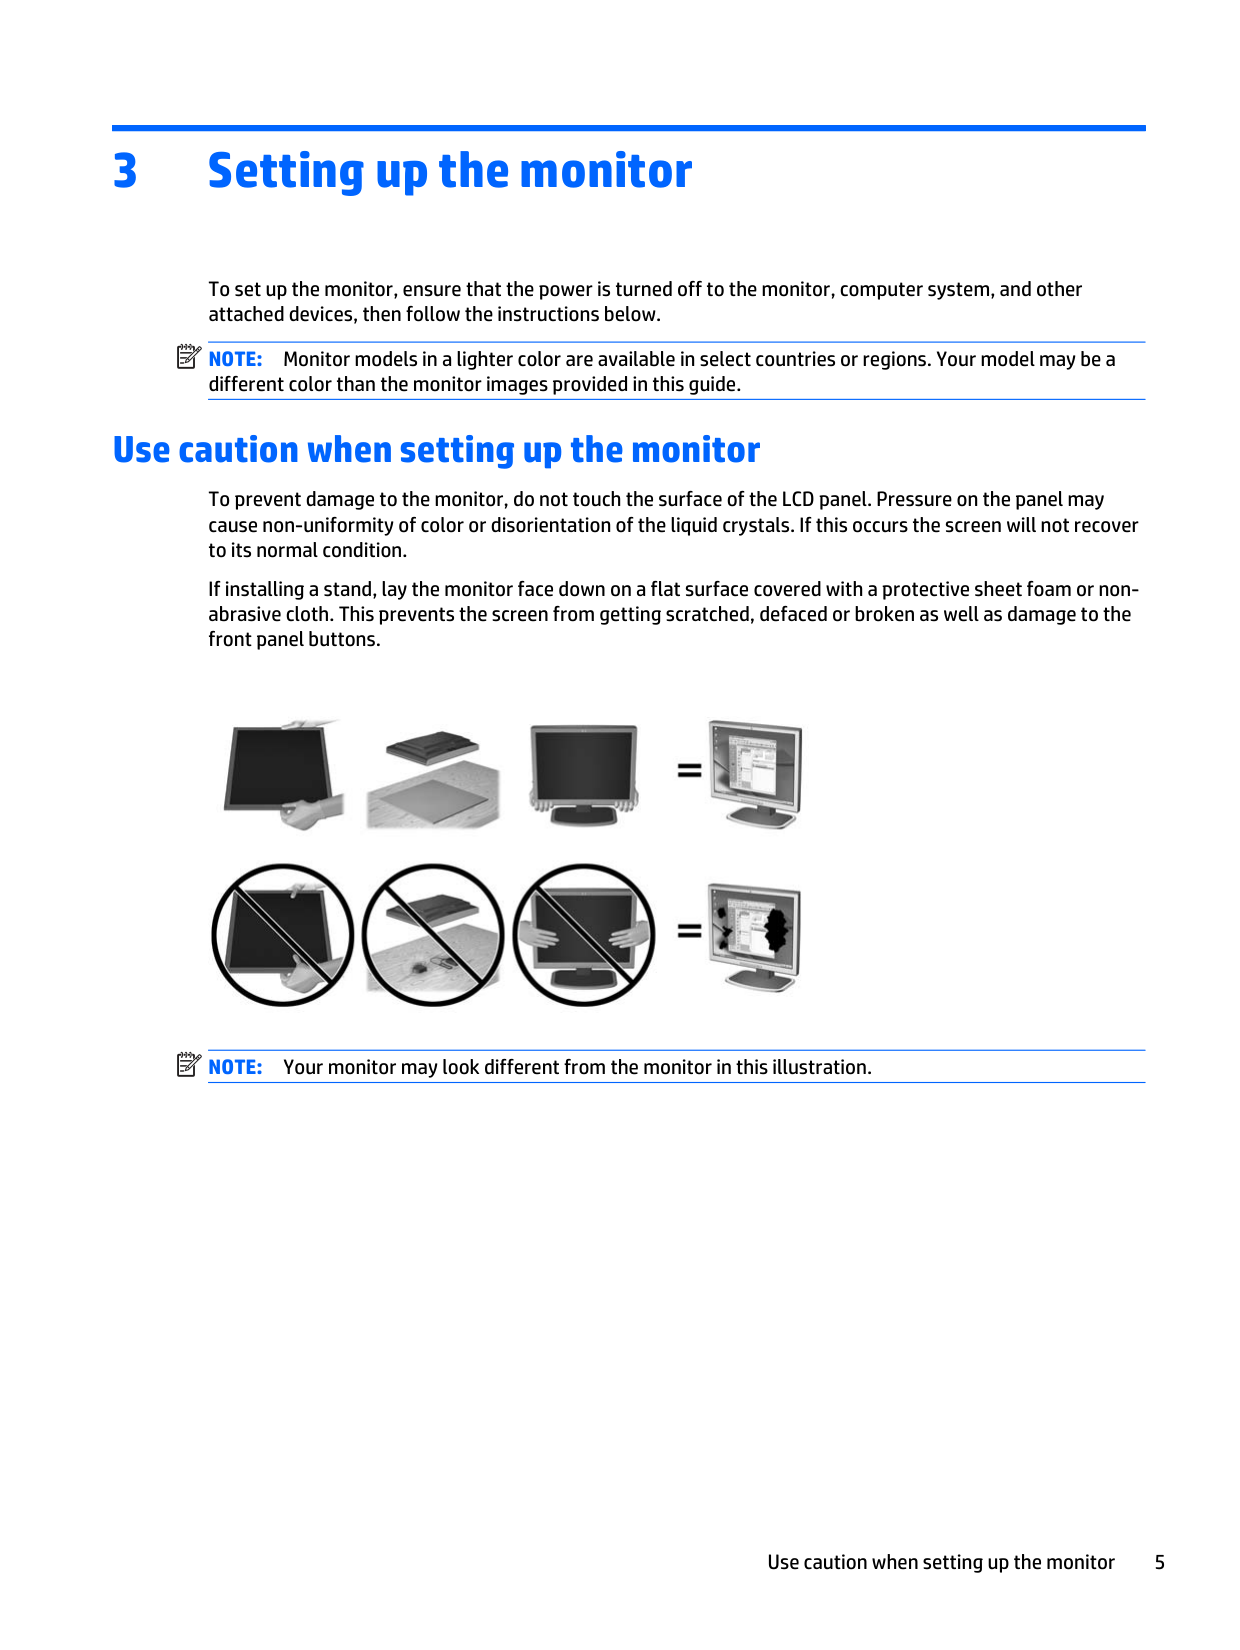
To prevent damage to the monitor, do not touch the surface of the LCD panel. Pressure on the panel may cause non-uniformity of color or disorientation of the liquid crystals. If this occurs the screen will not recover to its normal condition.
If installing a stand, lay the monitor face down on a flat surface covered with a protective sheet foam or nonabrasive cloth. This prevents the screen from getting scratched, defaced or broken as well as damage to the front panel buttons.
| | |---|


NOTE: Your monitor may look different from the monitor in this illustration.
Use caution when setting up the monitor 5
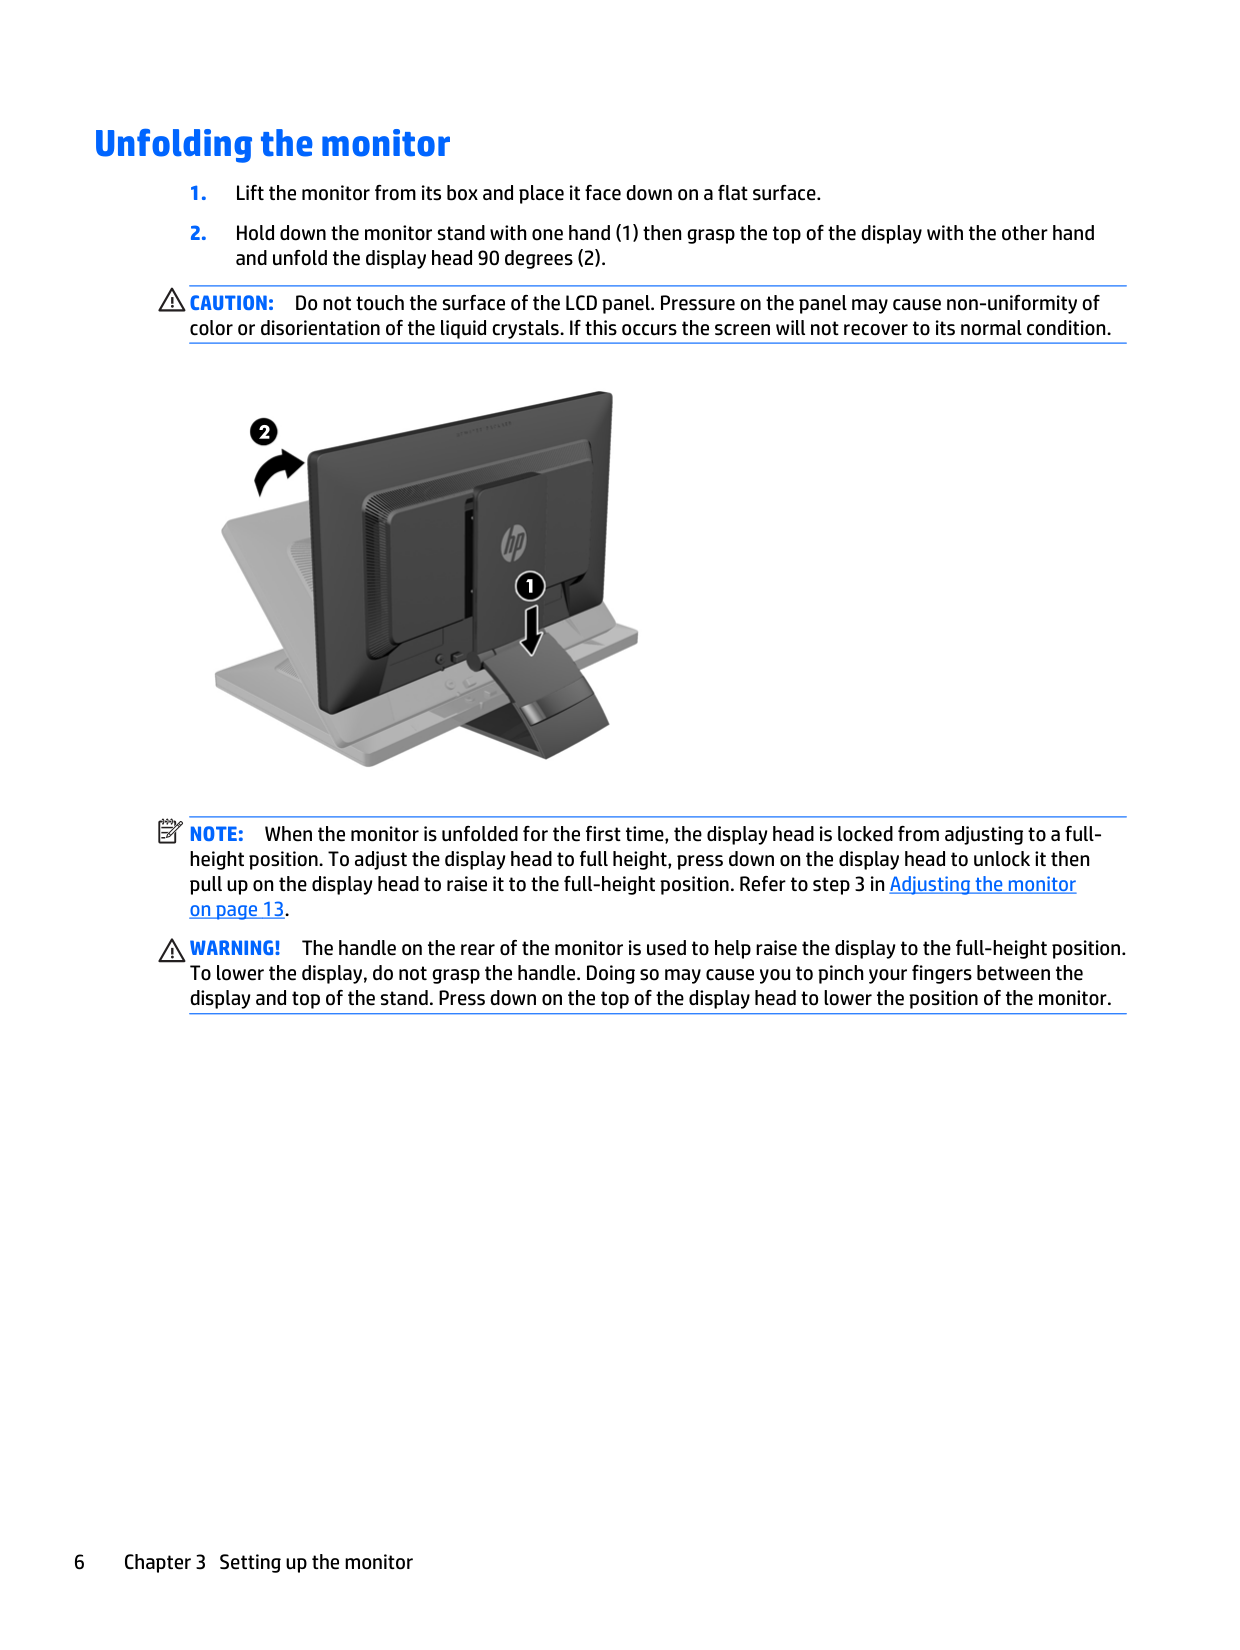
Unfolding the monitor
CAUTION: Do not touch the surface of the LCD panel. Pressure on the panel may cause non-uniformity of color or disorientation of the liquid crystals. If this occurs the screen will not recover to its normal condition.
| | |---|


NOTE: When the monitor is unfolded for the first time, the display head is locked from adjusting to a fullheight position. To adjust the display head to full height, press down on the display head to unlock it then pull up on the display head to raise it to the full-height position. Refer to step 3 in Adjusting the monitor on page 13.
WARNING! The handle on the rear of the monitor is used to help raise the display to the full-height position. To lower the display, do not grasp the handle. Doing so may cause you to pinch your fingers between the display and top of the stand. Press down on the top of the display head to lower the position of the monitor.
Rear components


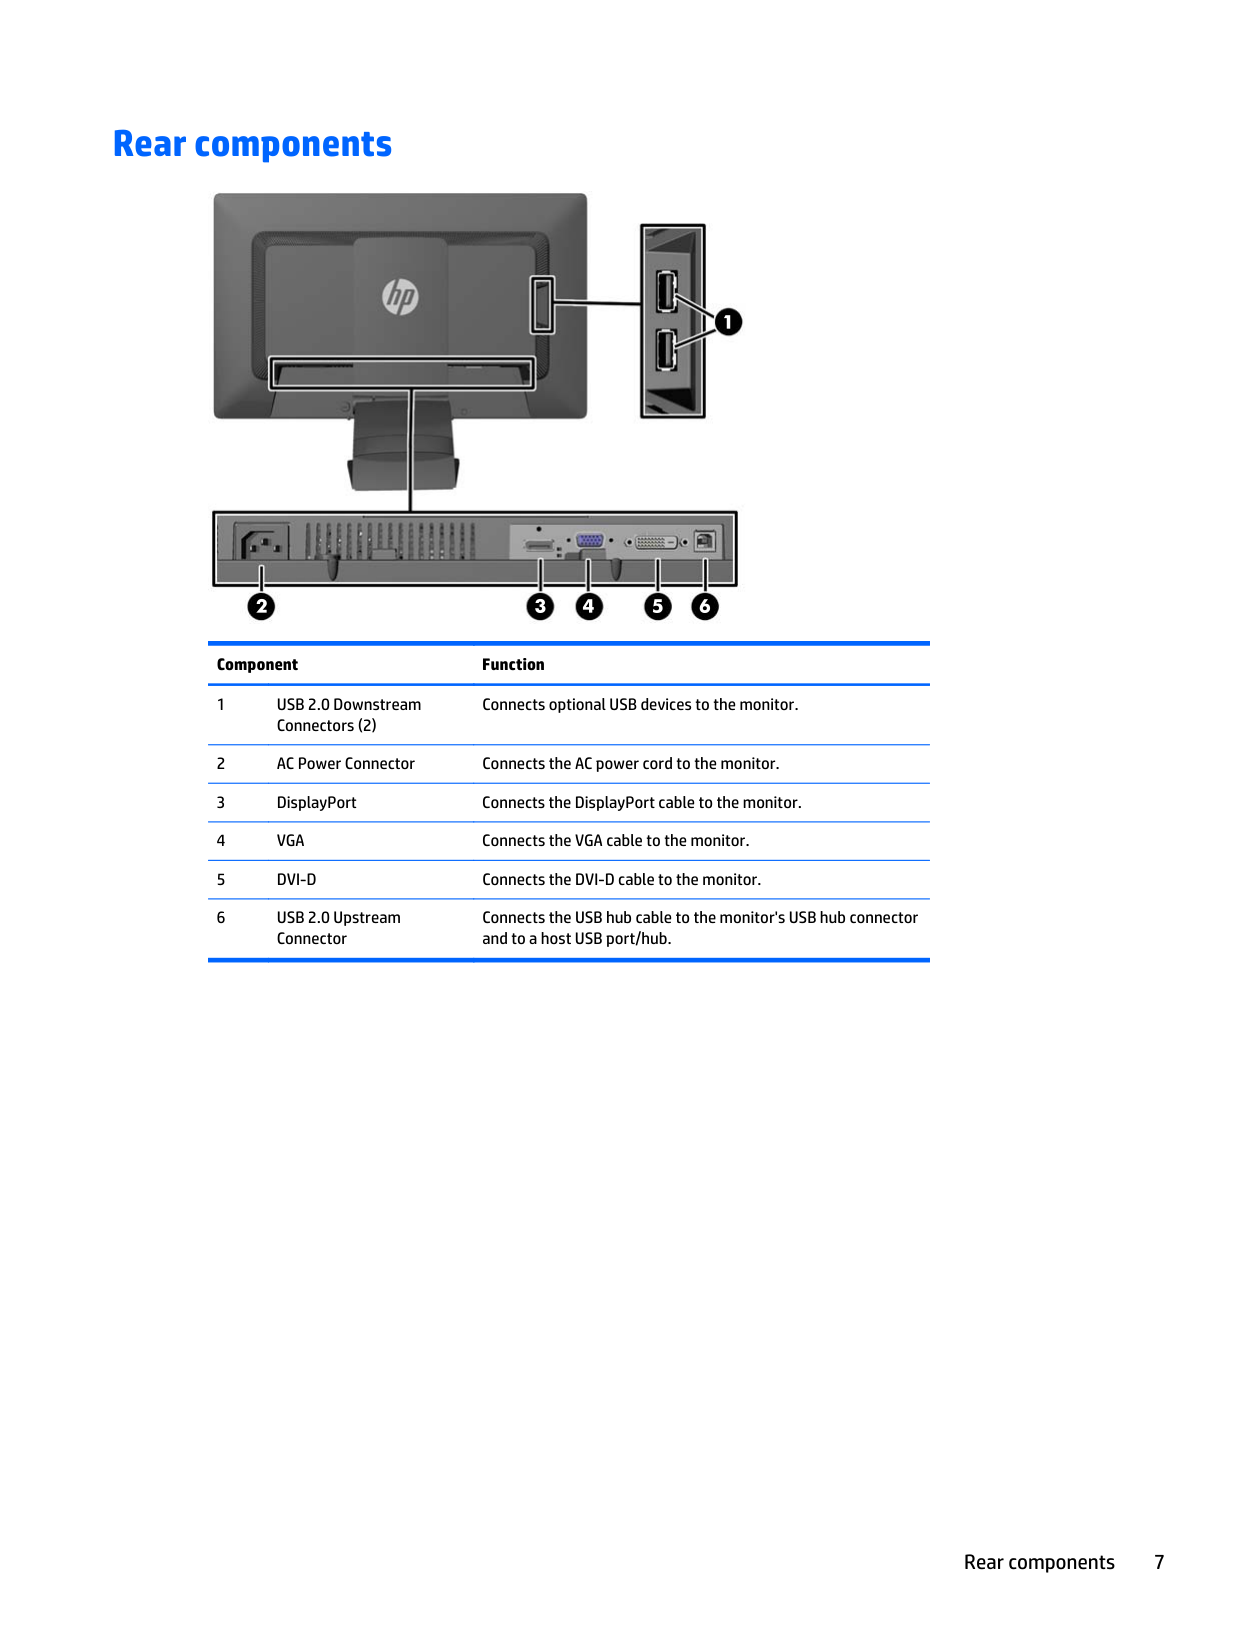
Component Function 1USB 2.0 Downstream
Connects optional USB devices to the monitor.
Connectors (2)
6USB 2.0 Upstream Connector
Connects the USB hub cable to the monitor's USB hub connector and to a host USB port/hub.
Rear components 7
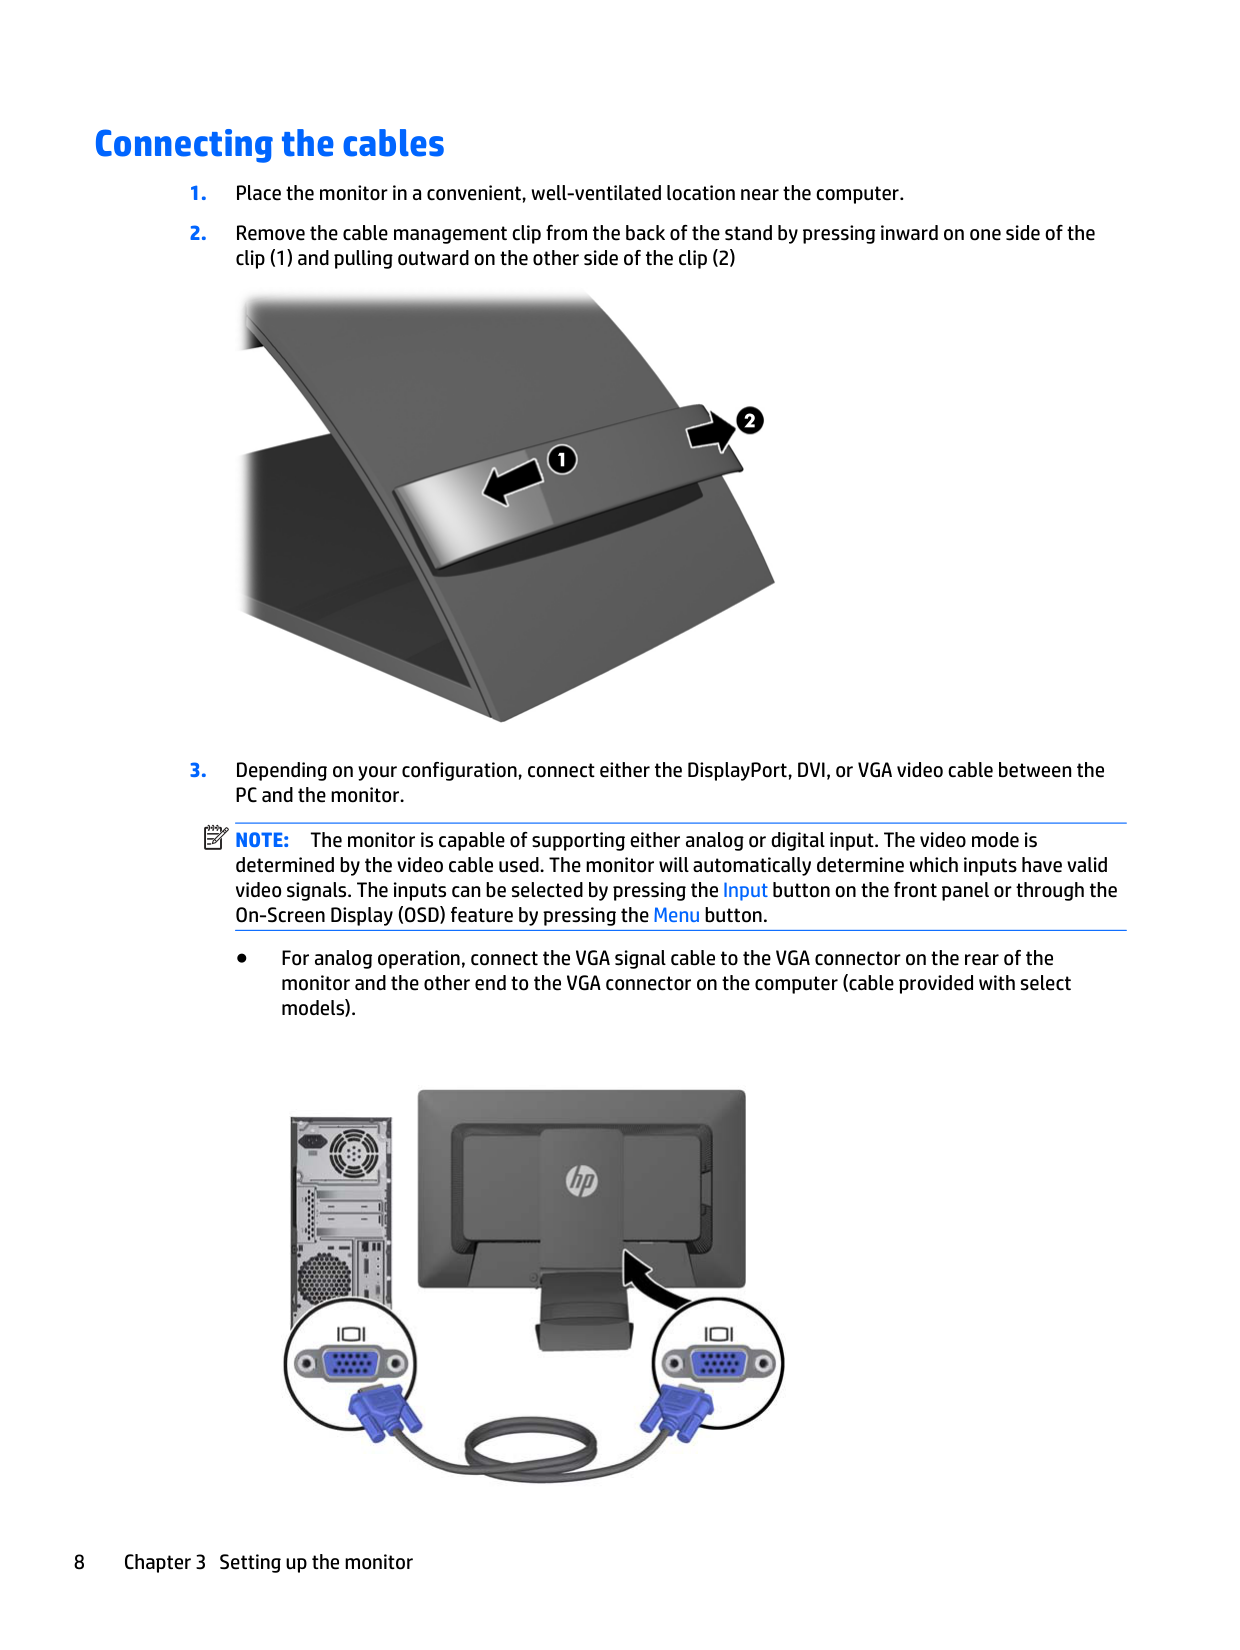
Connecting the cables


| | |---|
NOTE: The monitor is capable of supporting either analog or digital input. The video mode is determined by the video cable used. The monitor will automatically determine which inputs have valid video signals. The inputs can be selected by pressing the Input button on the front panel or through the On-Screen Display (OSD) feature by pressing the Menu button.

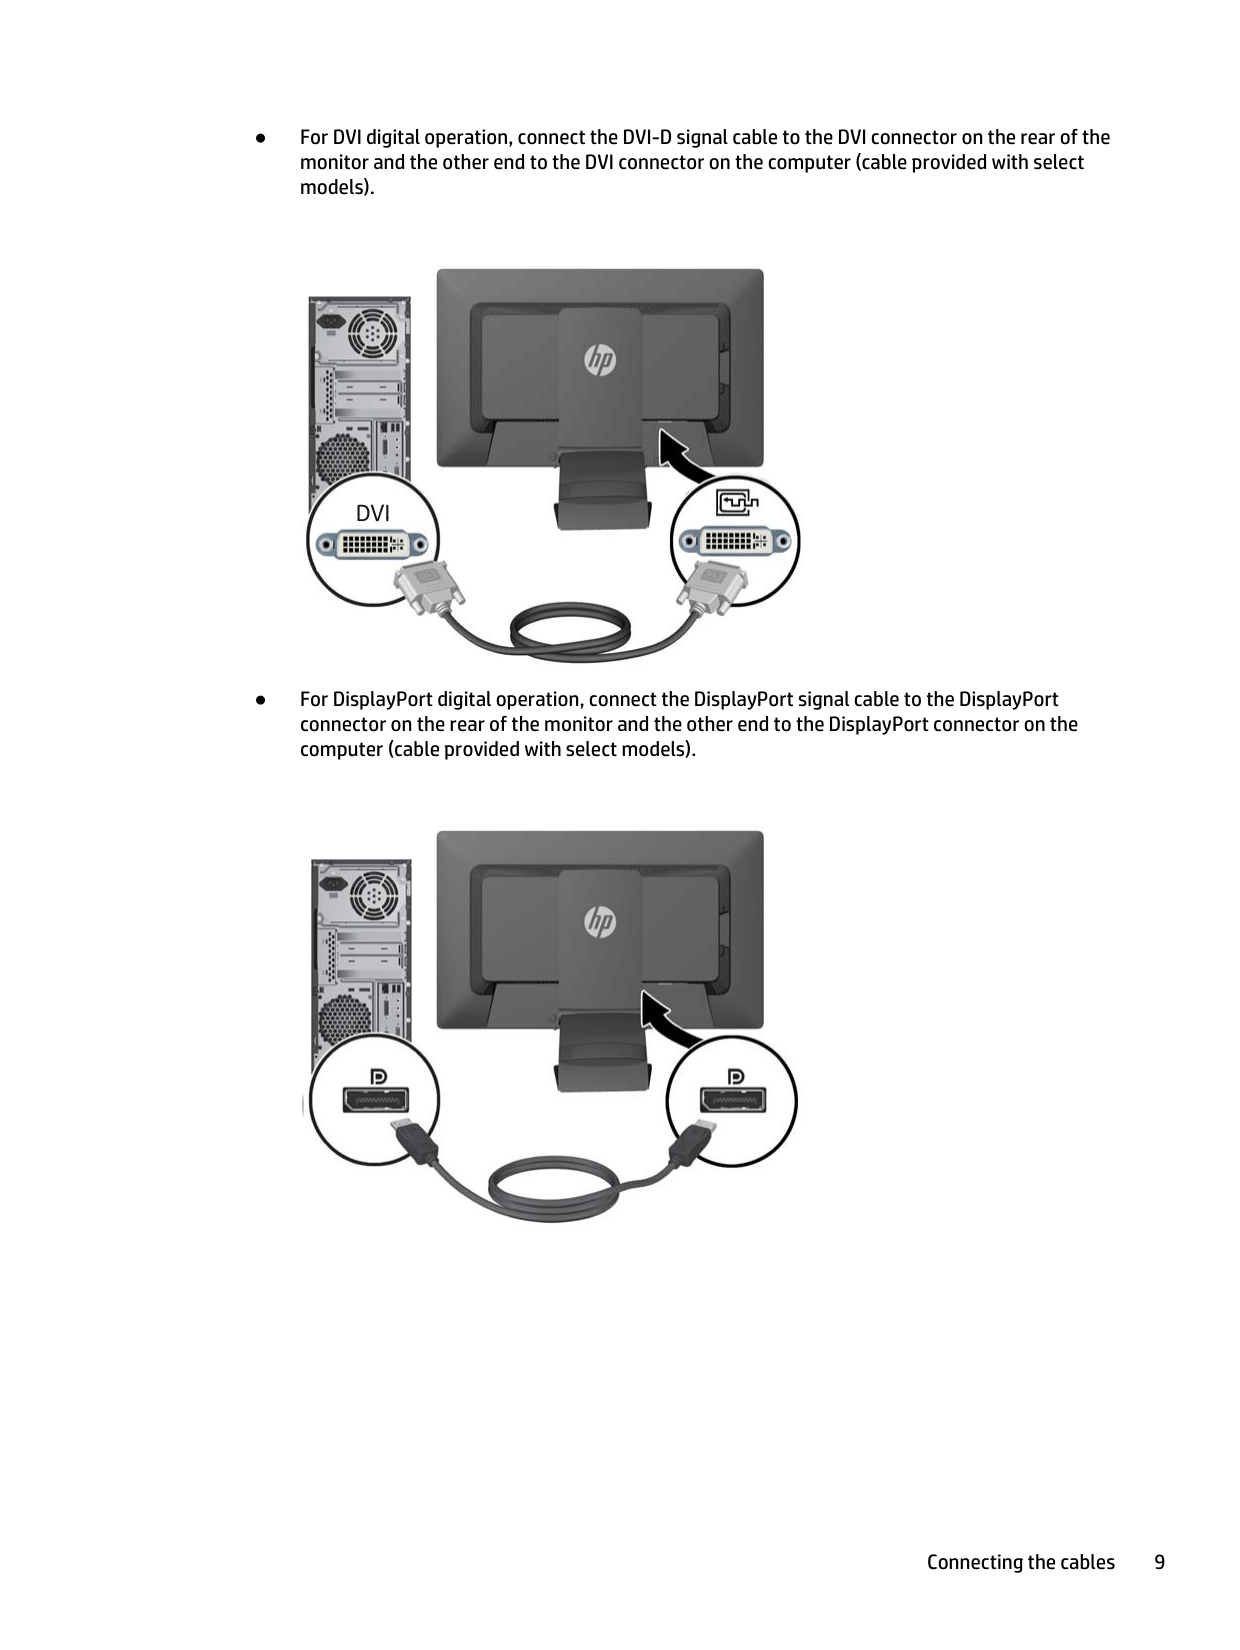
##### ● For DVI digital operation, connect the DVI-D signal cable to the DVI connector on the rear of themonitor and the other end to the DVI connector on the computer (cable provided with selectmodels).


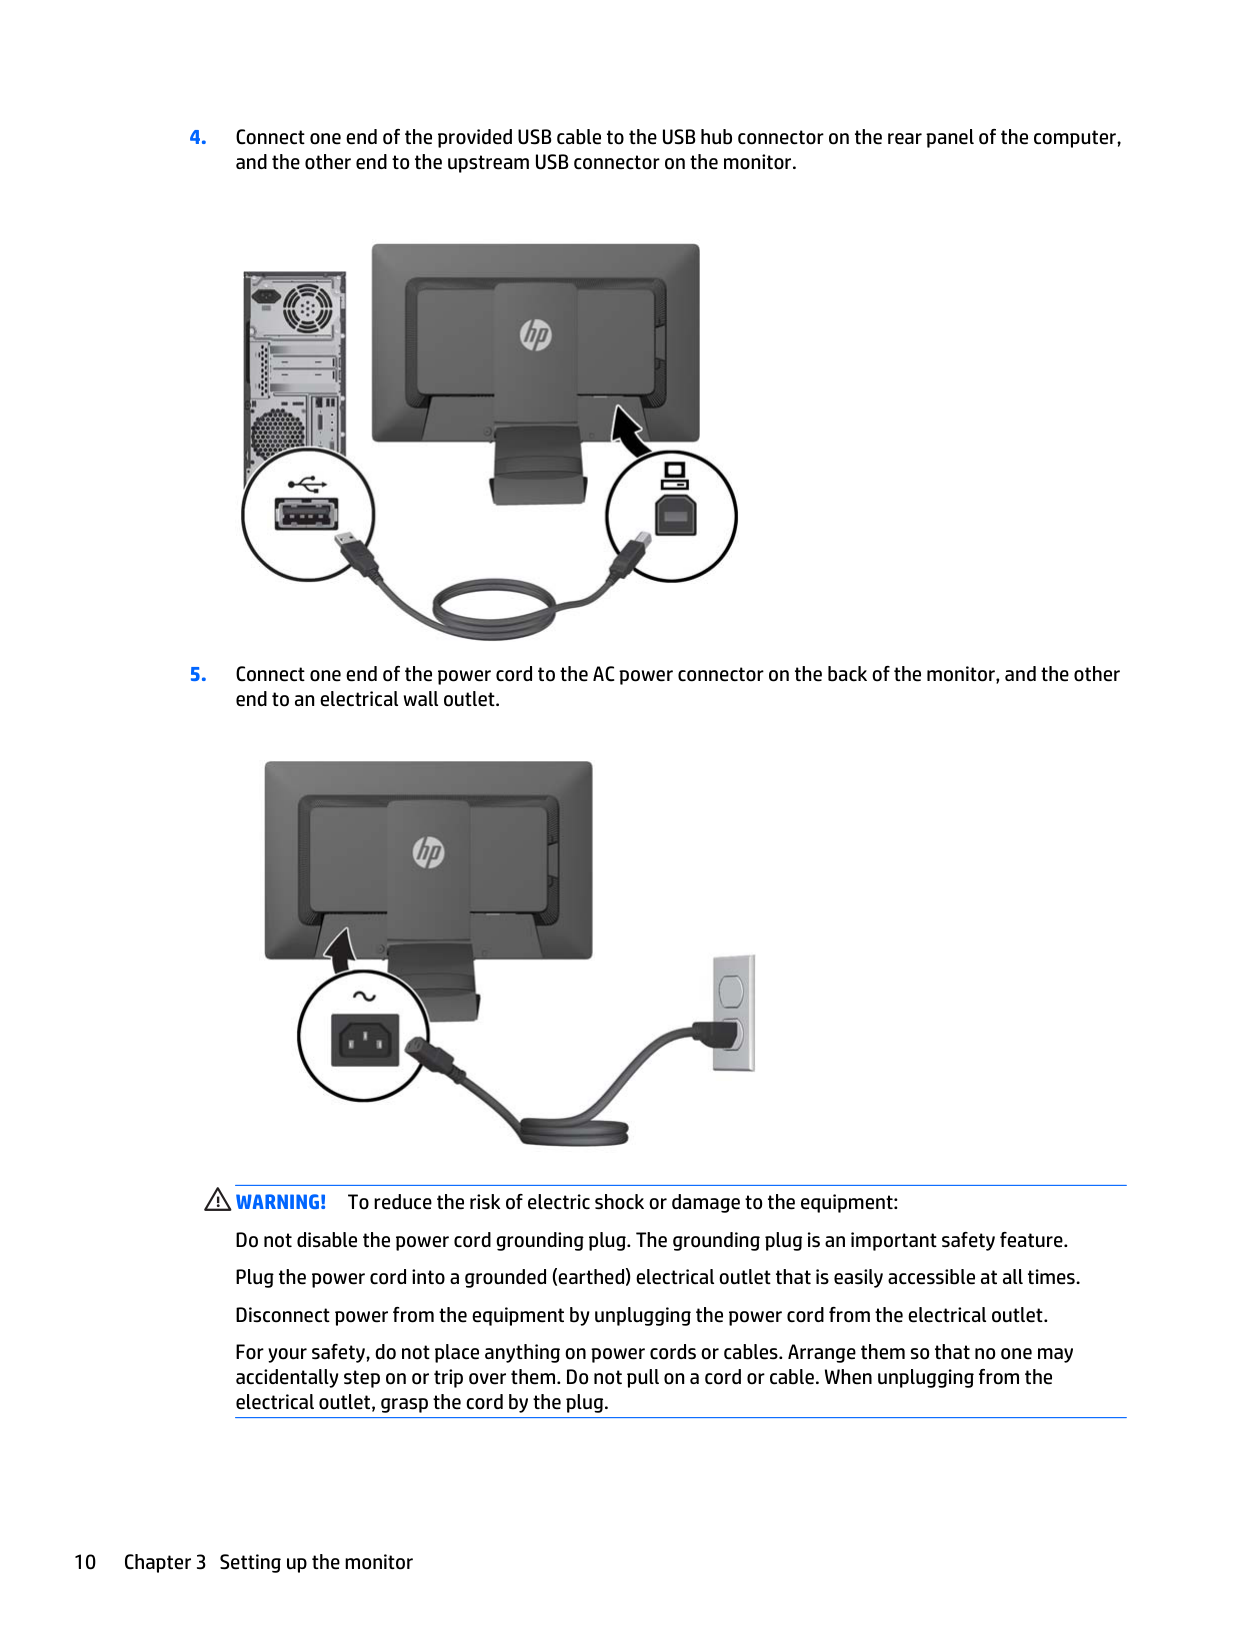
##### ● For DisplayPort digital operation, connect the DisplayPort signal cable to the DisplayPortconnector on the rear of the monitor and the other end to the DisplayPort connector on thecomputer (cable provided with select models).


WARNING! To reduce the risk of electric shock or damage to the equipment: Do not disable the power cord grounding plug. The grounding plug is an important safety feature. Plug the power cord into a grounded (earthed) electrical outlet that is easily accessible at all times. Disconnect power from the equipment by unplugging the power cord from the electrical outlet. For your safety, do not place anything on power cords or cables. Arrange them so that no one may accidentally step on or trip over them. Do not pull on a cord or cable. When unplugging from the electrical outlet, grasp the cord by the plug.
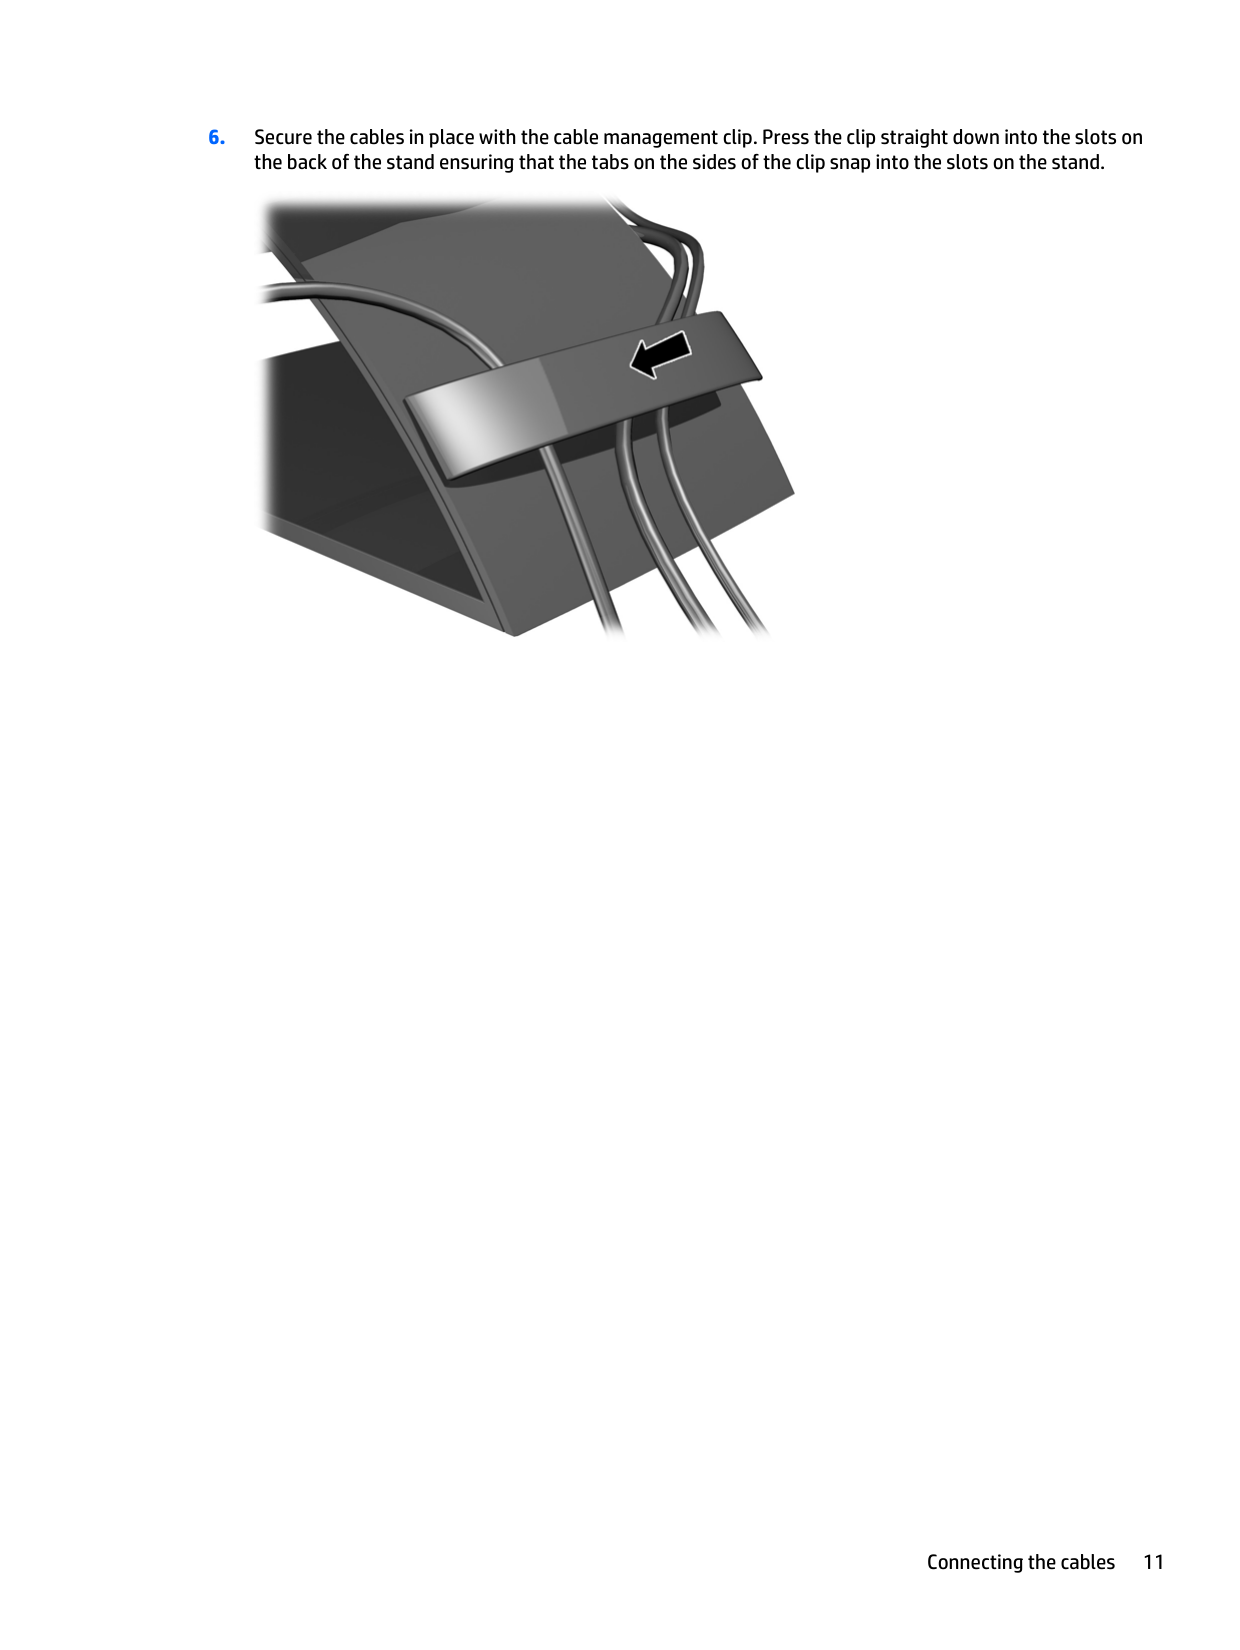
##### 6. Secure the cables in place with the cable management clip. Press the clip straight down into the slots onthe back of the stand ensuring that the tabs on the sides of the clip snap into the slots on the stand.

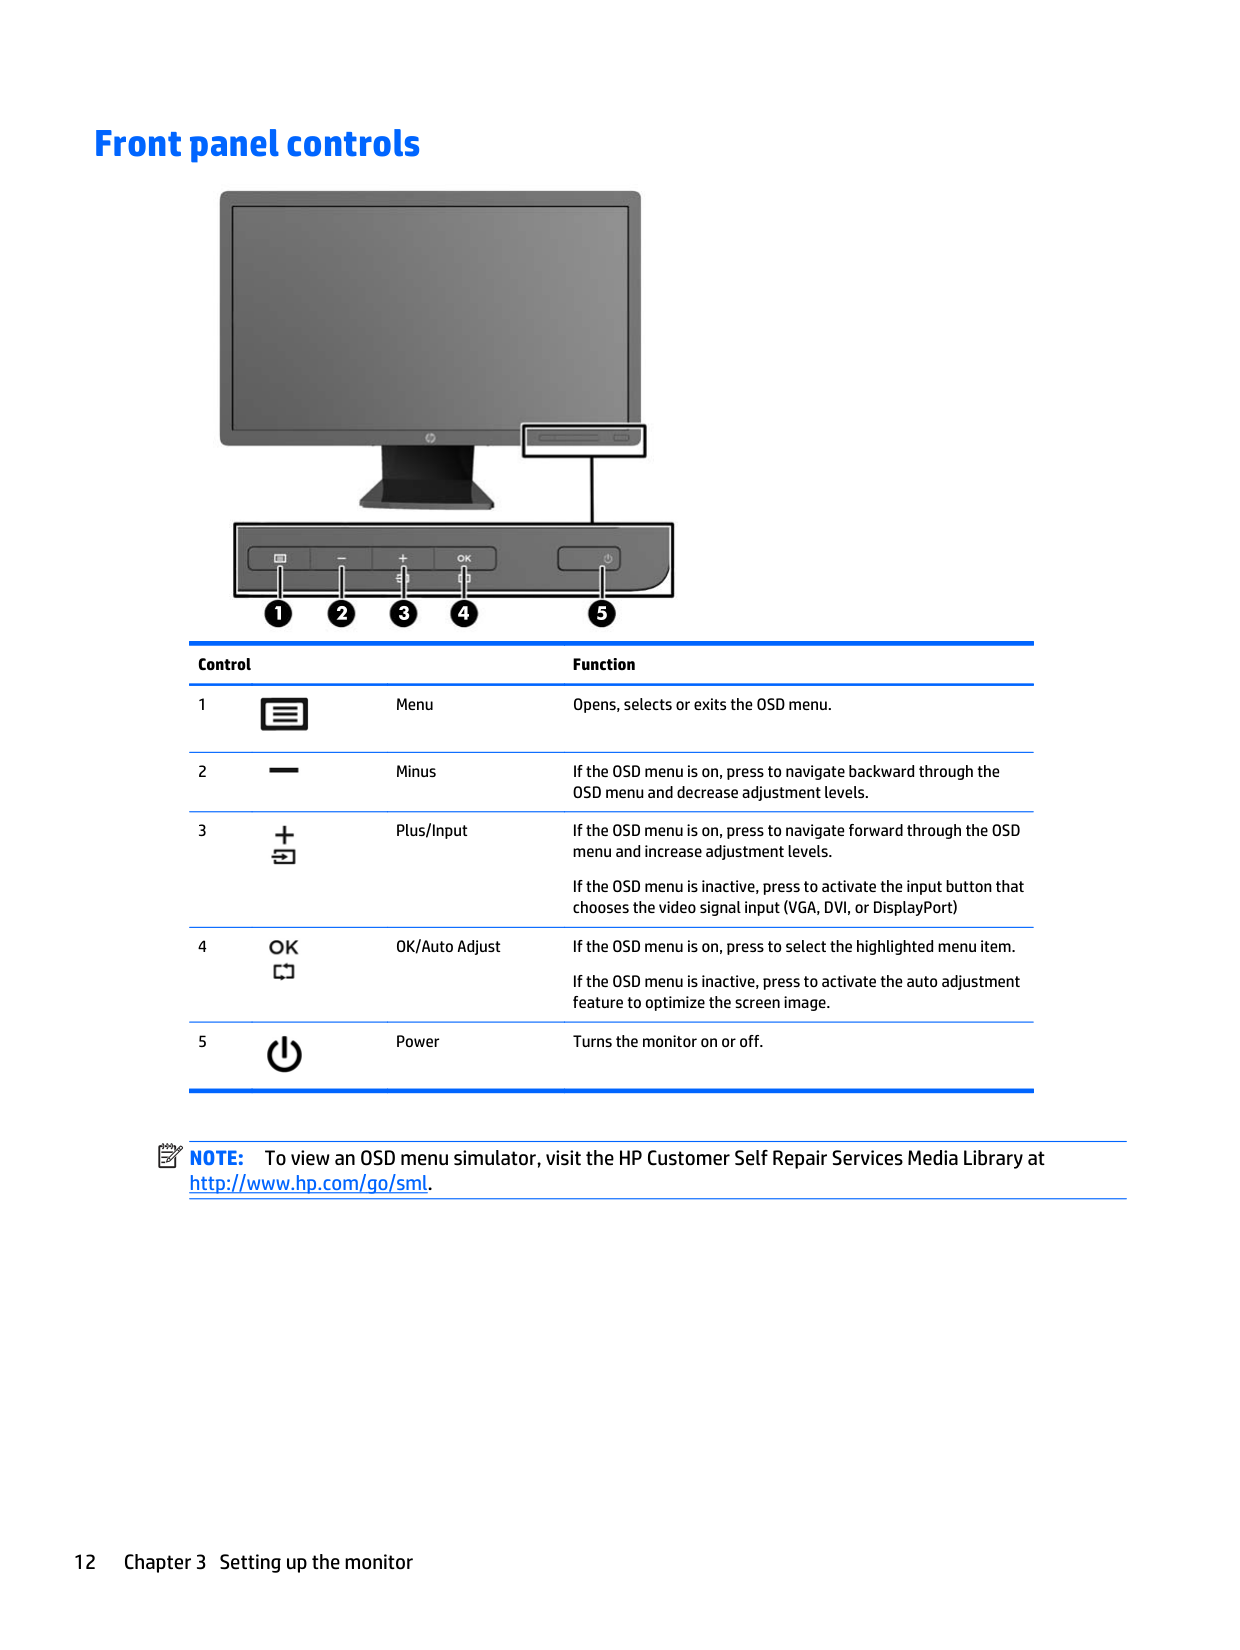
Front panel controls


###### Control Function


If the OSD menu is inactive, press to activate the input button that chooses the video signal input (VGA, DVI, or DisplayPort)

If the OSD menu is inactive, press to activate the auto adjustment feature to optimize the screen image.

| | |---|
NOTE: To view an OSD menu simulator, visit the HP Customer Self Repair Services Media Library at http://www.hp.com/go/sml.
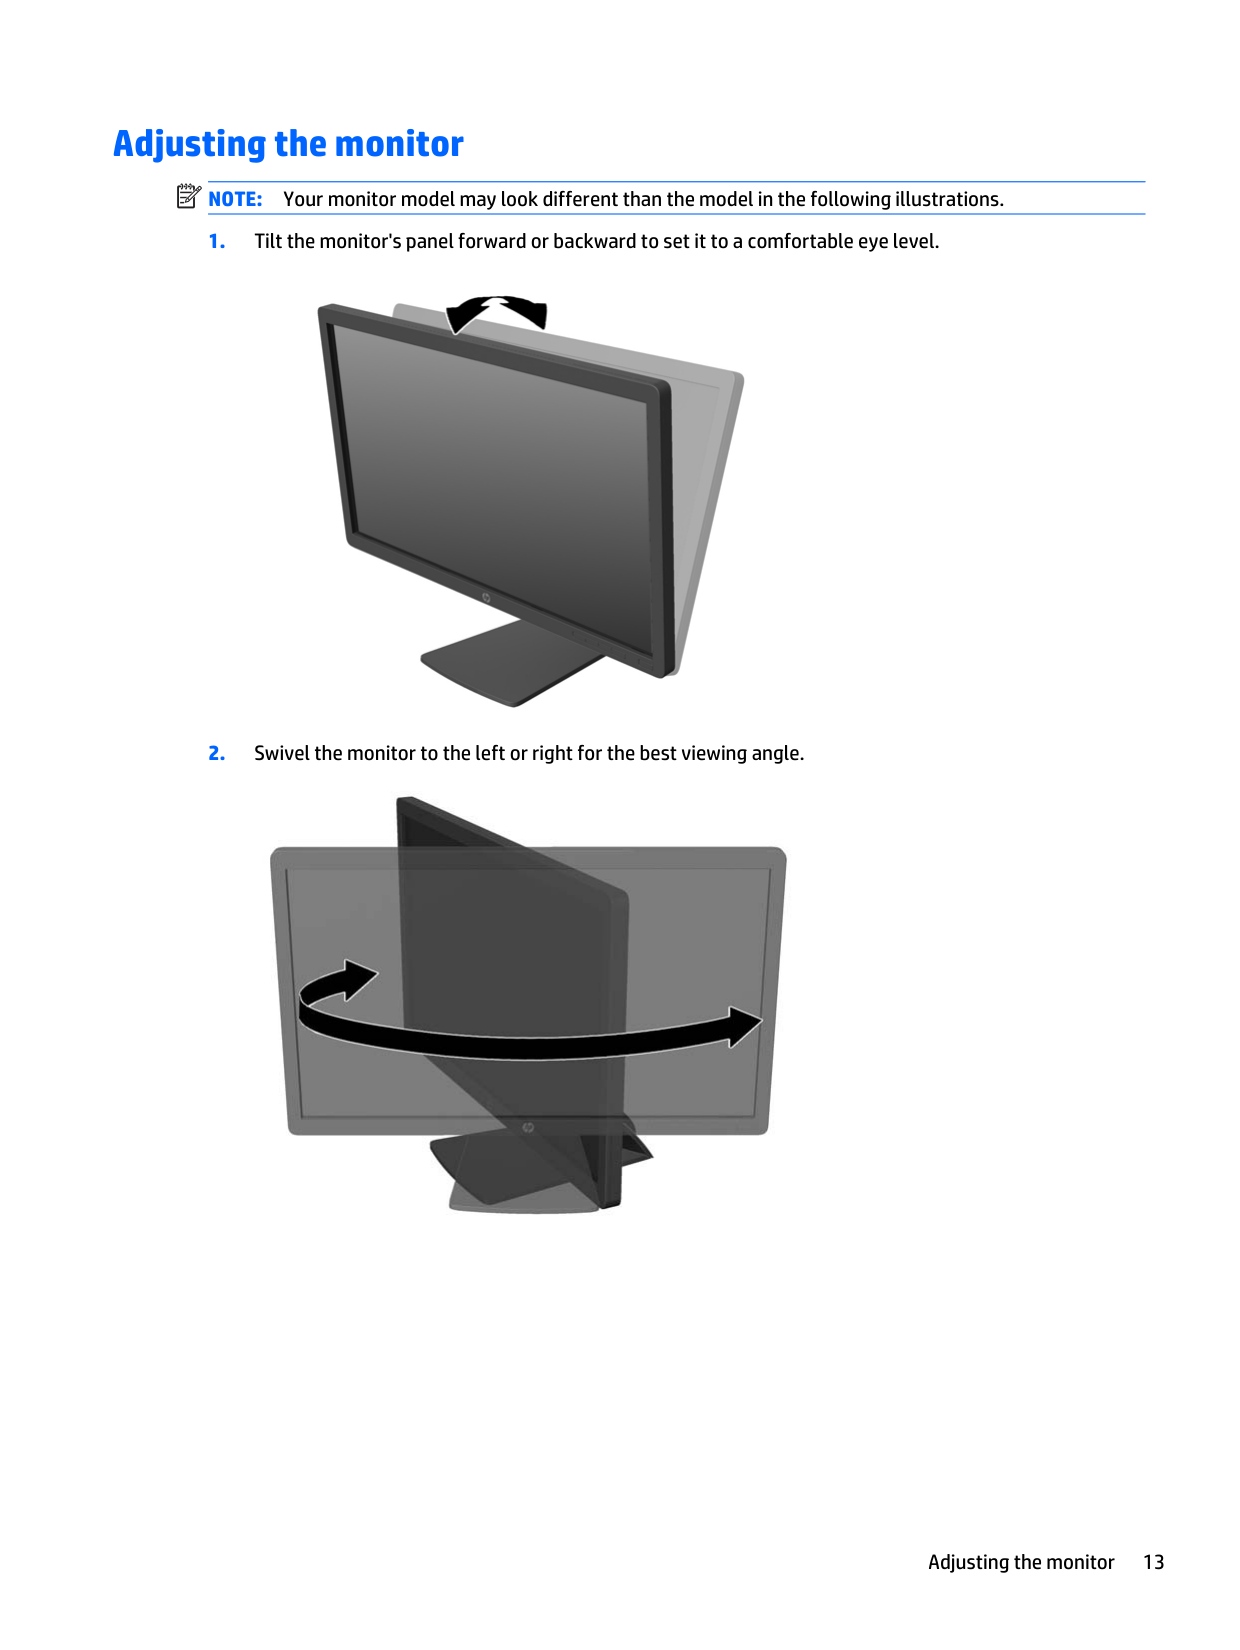
Adjusting the monitor
| | |---|
NOTE: Your monitor model may look different than the model in the following illustrations.


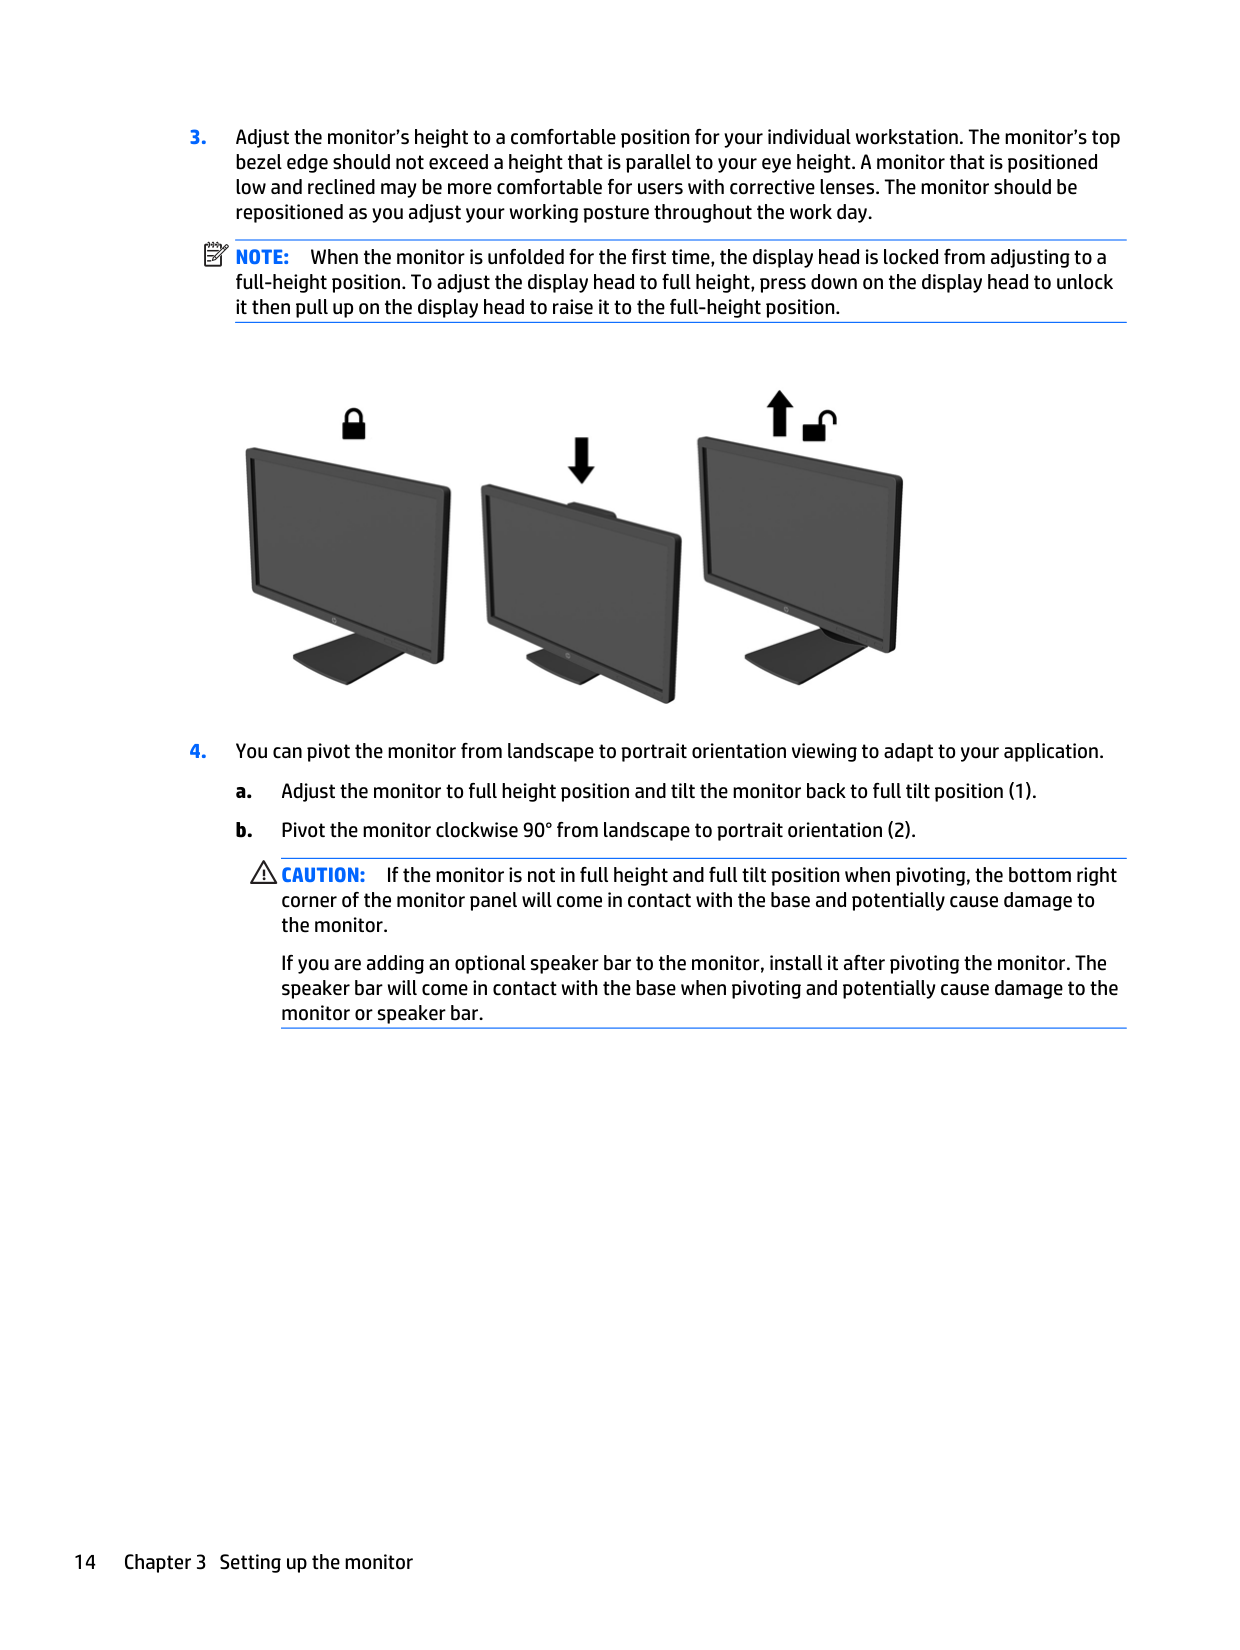
NOTE: When the monitor is unfolded for the first time, the display head is locked from adjusting to a full-height position. To adjust the display head to full height, press down on the display head to unlock it then pull up on the display head to raise it to the full-height position.

| | |---|
CAUTION: If the monitor is not in full height and full tilt position when pivoting, the bottom right corner of the monitor panel will come in contact with the base and potentially cause damage to the monitor.
If you are adding an optional speaker bar to the monitor, install it after pivoting the monitor. The speaker bar will come in contact with the base when pivoting and potentially cause damage to the monitor or speaker bar.
| | |---|


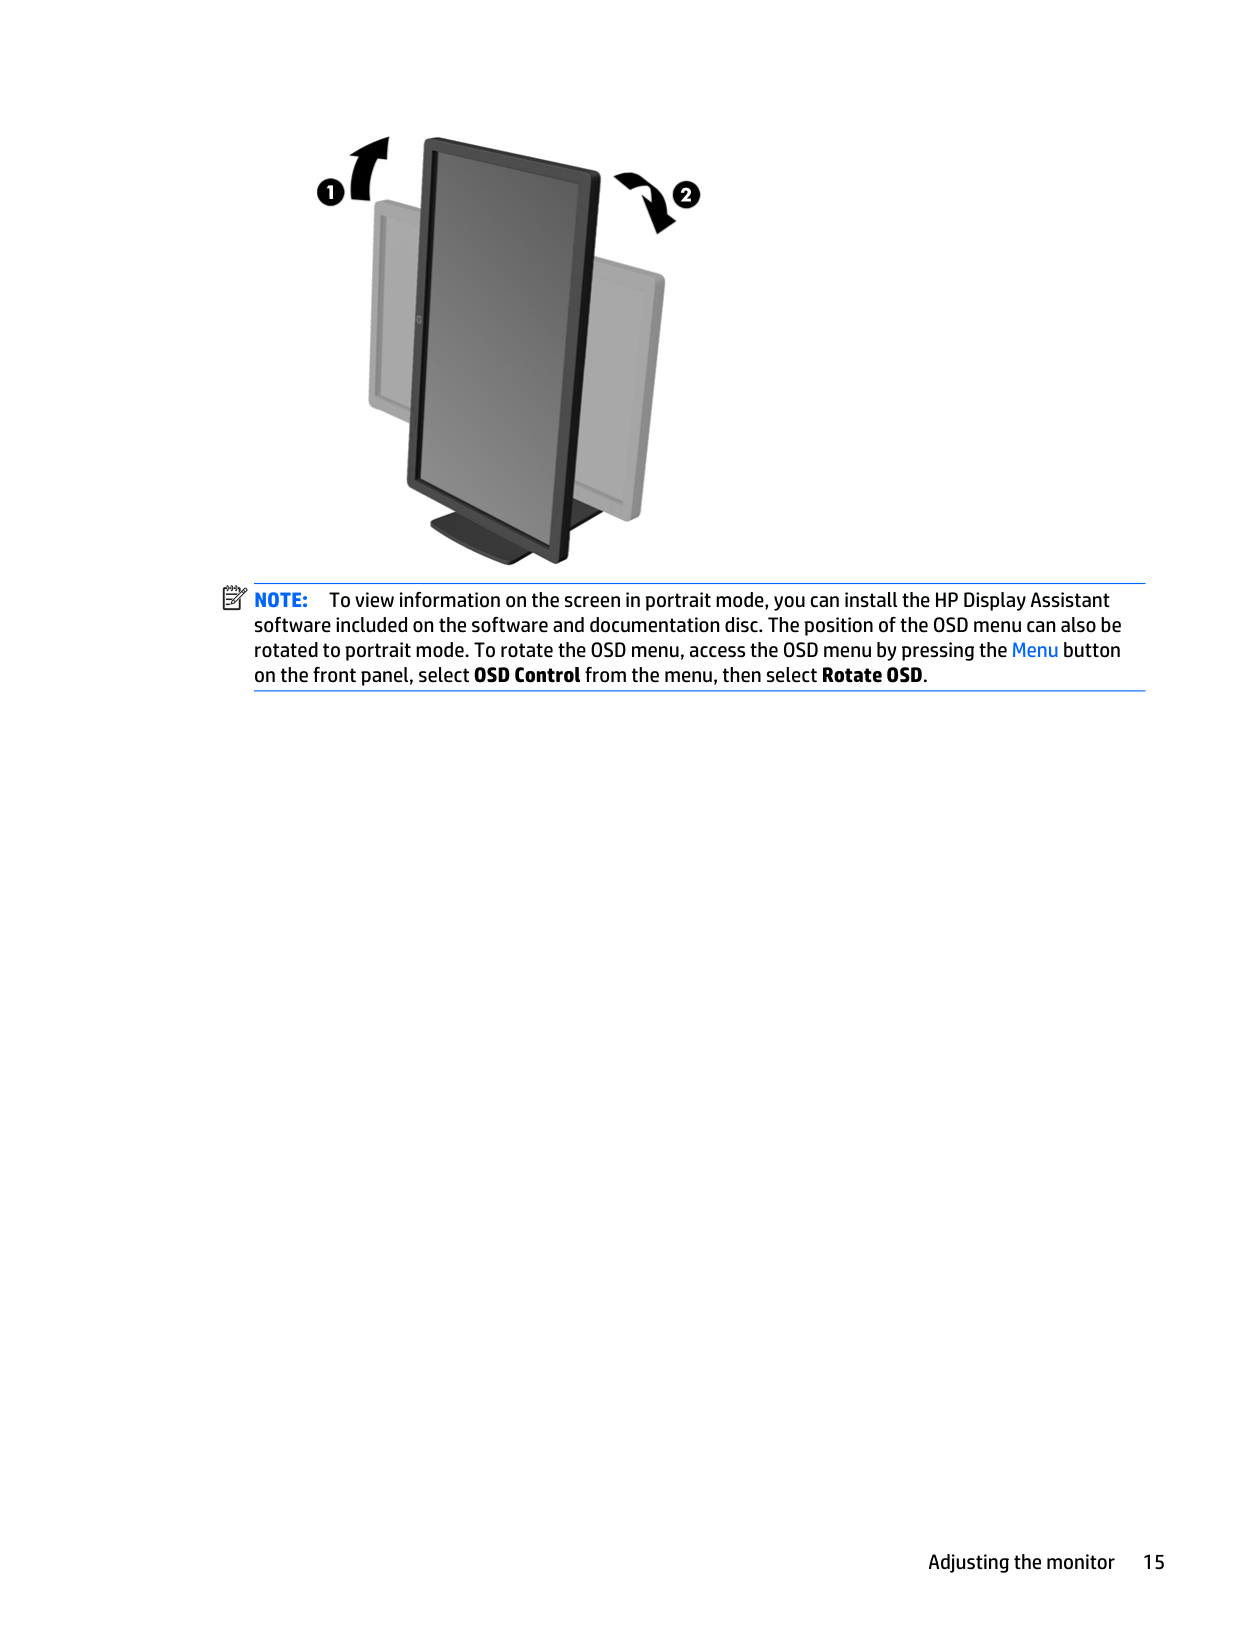
NOTE: To view information on the screen in portrait mode, you can install the HP Display Assistant
software included on the software and documentation disc. The position of the OSD menu can also be rotated to portrait mode. To rotate the OSD menu, access the OSD menu by pressing the Menu button on the front panel, select OSD Control from the menu, then select Rotate OSD.
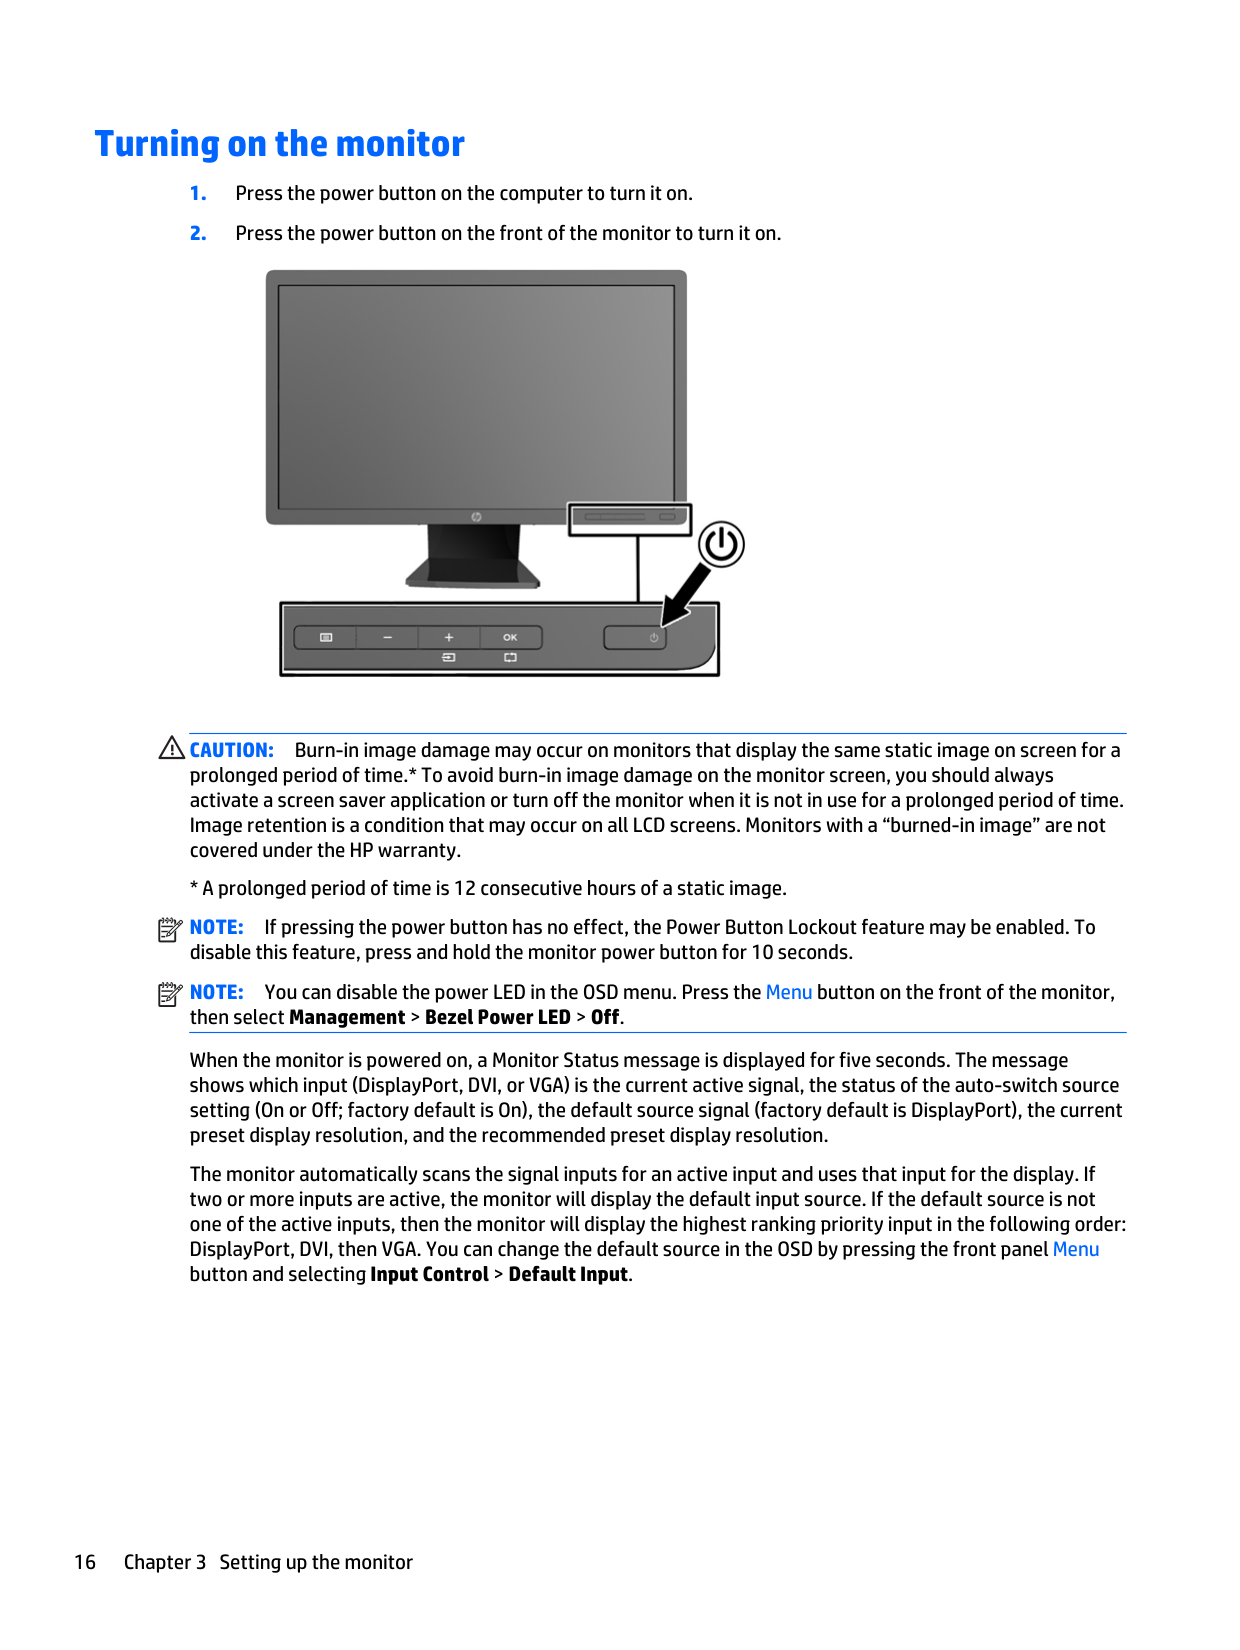
Turning on the monitor

CAUTION: Burn-in image damage may occur on monitors that display the same static image on screen for a prolonged period of time.* To avoid burn-in image damage on the monitor screen, you should always activate a screen saver application or turn off the monitor when it is not in use for a prolonged period of time. Image retention is a condition that may occur on all LCD screens. Monitors with a “burned-in image” are not covered under the HP warranty.
| | |---|
| |
|---|
The monitor automatically scans the signal inputs for an active input and uses that input for the display. If two or more inputs are active, the monitor will display the default input source. If the default source is not one of the active inputs, then the monitor will display the highest ranking priority input in the following order: DisplayPort, DVI, then VGA. You can change the default source in the OSD by pressing the front panel Menu button and selecting Input Control > Default Input.
HP watermark and image retention policy
The IPS monitor models are designed with IPS (In-Plane Switching) display technology which provides ultrawide viewing angles and advanced image quality. IPS monitors are suitable for a wide variety of advanced image quality applications. This panel technology, however, is not suitable for applications that exhibit static, stationary or fixed images for long periods of time without the use of screen savers. These types of applications may include camera surveillance, video games, marketing logos, and templates that are displayed on the screen for a prolonged period of time. Static images may cause image retention damage that could look like stains or watermarks on the monitor's screen.
Monitors in use for 24 hours per day that result in image retention damage are not covered under the HP warranty. To avoid image retention damage, always turn off the monitor when it is not in use or use the power management setting, if supported on your system, to turn off the display when the system is idle.
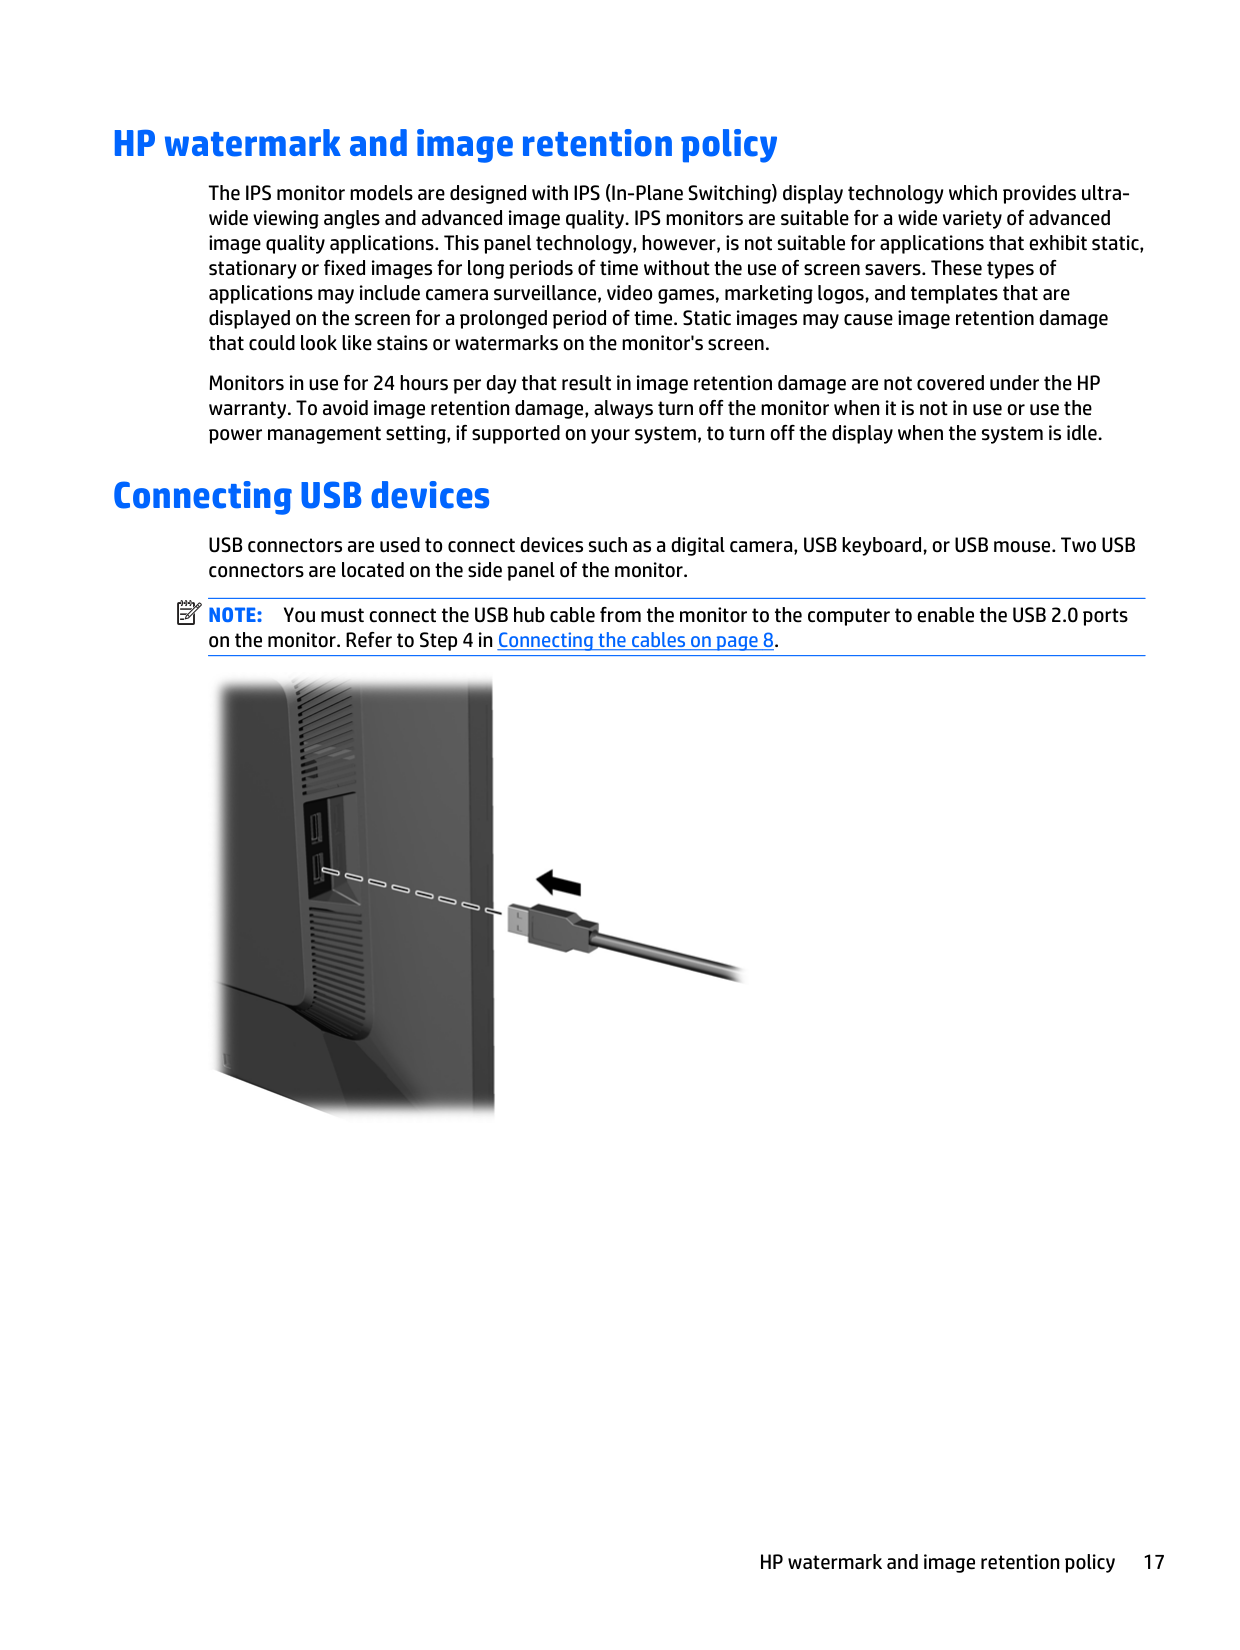
Connecting USB devices
USB connectors are used to connect devices such as a digital camera, USB keyboard, or USB mouse. Two USB connectors are located on the side panel of the monitor.
| | |---|
NOTE: You must connect the USB hub cable from the monitor to the computer to enable the USB 2.0 ports on the monitor. Refer to Step 4 in Connecting the cables on page 8.

HP watermark and image retention policy 17
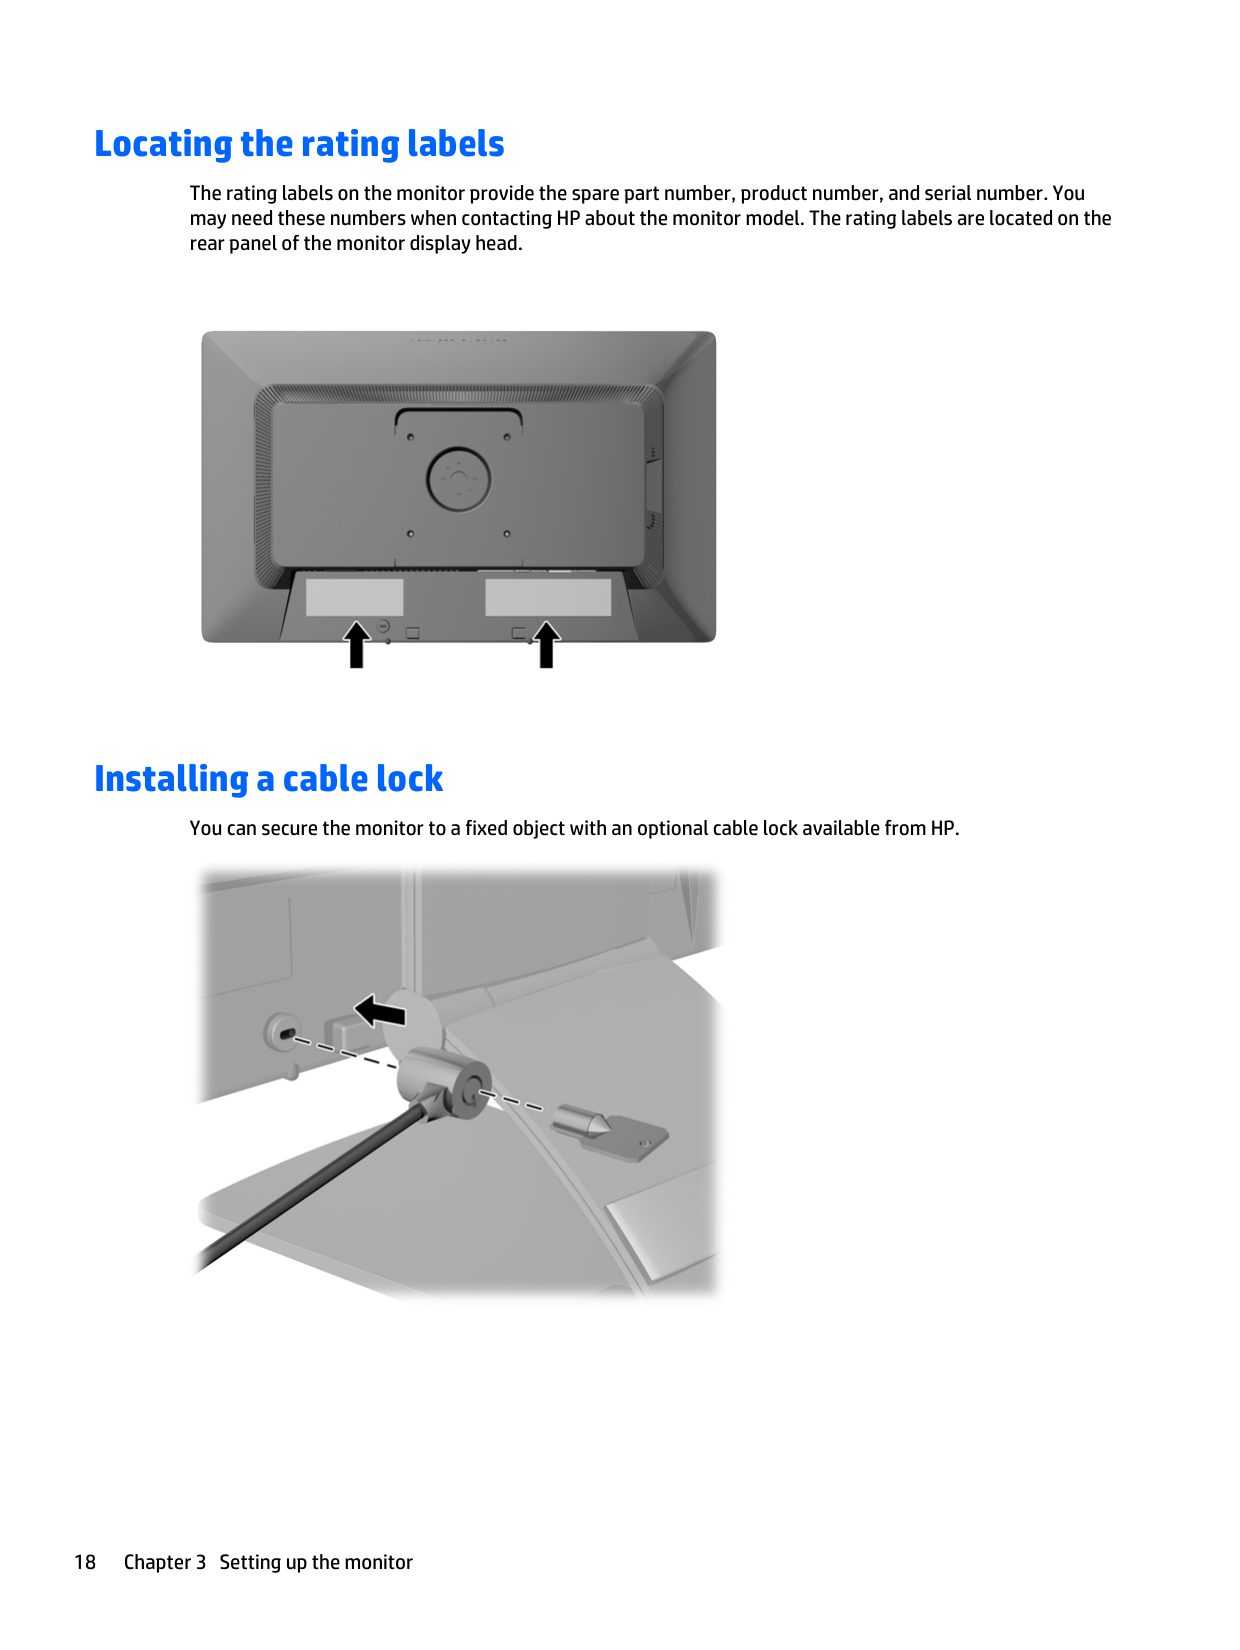
Locating the rating labels
The rating labels on the monitor provide the spare part number, product number, and serial number. You may need these numbers when contacting HP about the monitor model. The rating labels are located on the rear panel of the monitor display head.

Installing a cable lock
You can secure the monitor to a fixed object with an optional cable lock available from HP.

Downloading the monitor drivers
After you determine that you need to update, you can install the .INF and .ICM files from the disc or download them.
#### Installing from the disc
To install the .INF and .ICM files on the computer from the disc:
| | |---|
NOTE: You may need to install the digitally signed monitor .INF and .ICM files manually from the disc in the event of an installation error. Refer to the HP Monitor Software Information file on the disc.
#### Downloading from the Web
If you do not have a computer or source device with an optical drive, you can download the latest version of .INF and .ICM files from the HP monitors support Web site:
| | |---|
NOTE: You may need to install the digitally signed monitor .INF and .ICM files manually from the disc in the event of an installation error. Refer to the HP Monitor Software Information file on the disc.
Downloading the monitor drivers 19
A Support and troubleshooting
Solving common problems
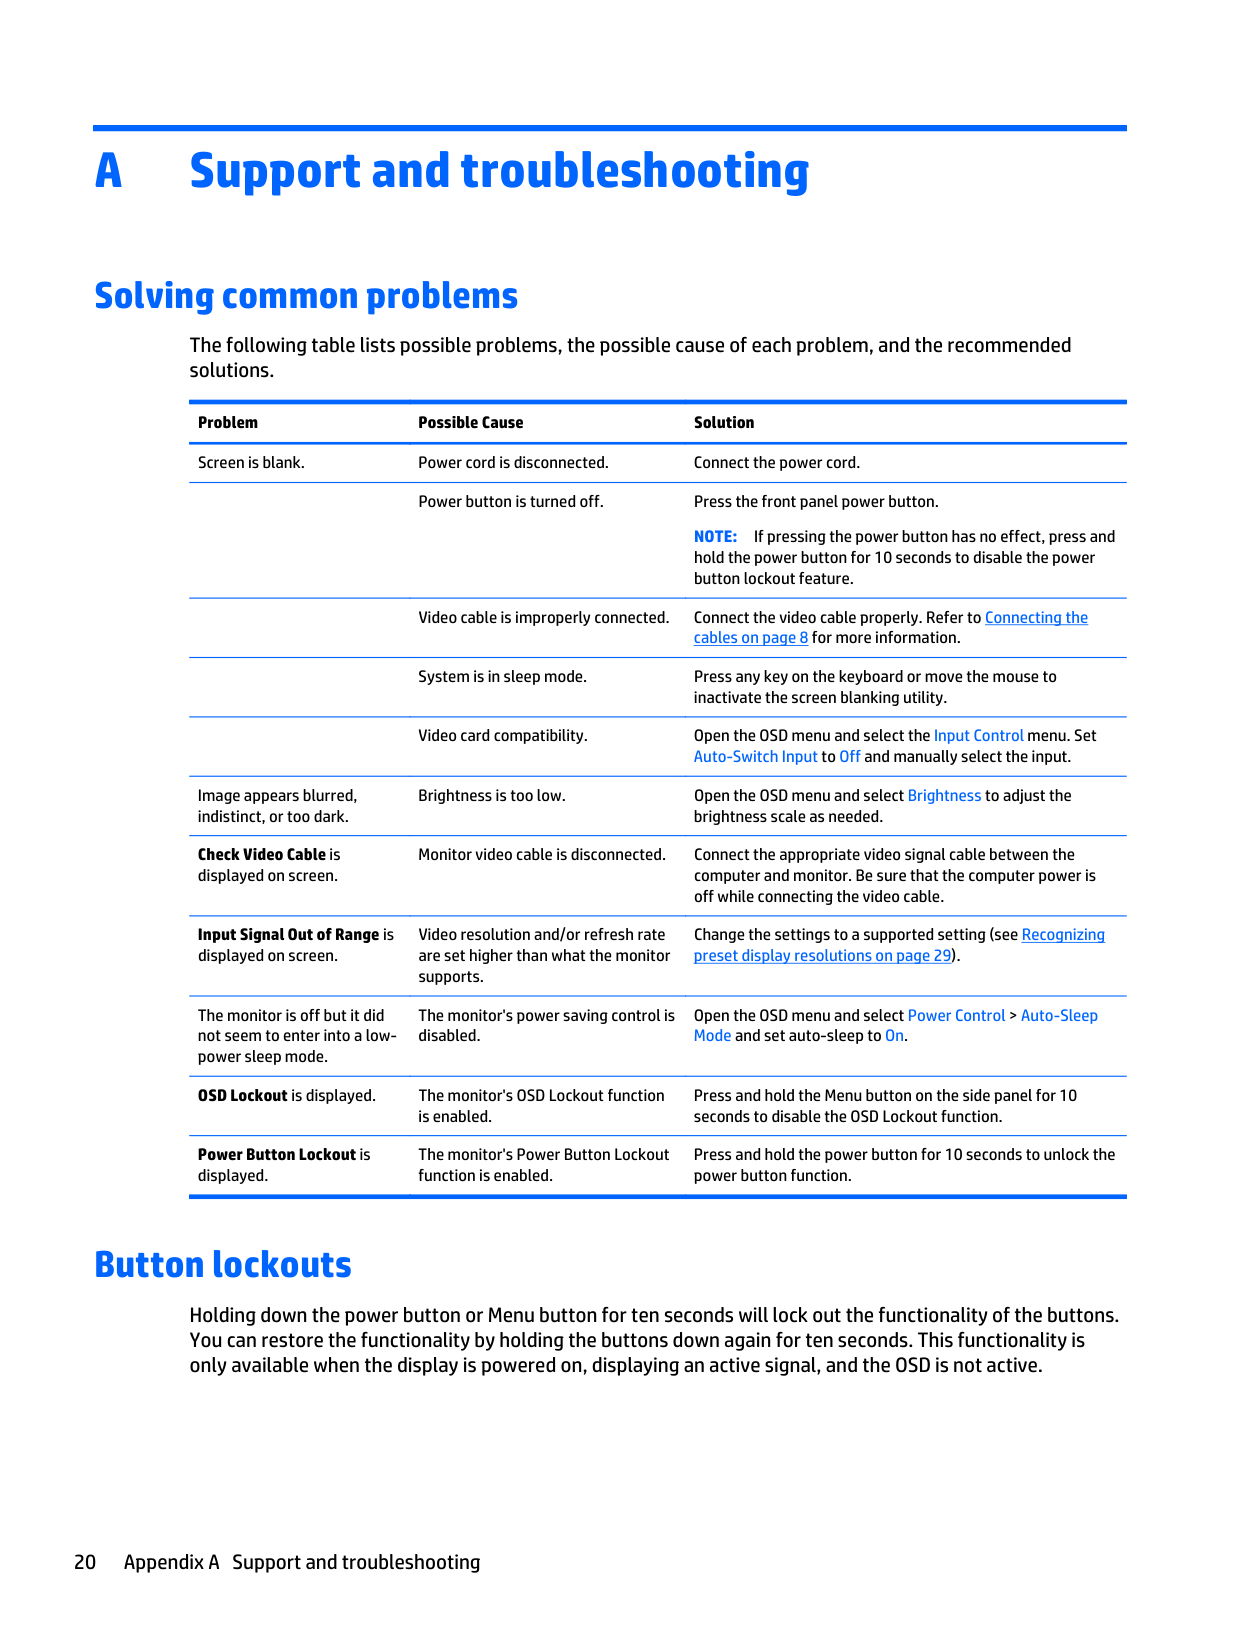
The following table lists possible problems, the possible cause of each problem, and the recommended solutions.
Problem Possible Cause Solution Screen is blank. Power cord is disconnected. Connect the power cord.
Image appears blurred, indistinct, or too dark.
Check Video Cable is displayed on screen.
Input Signal Out of Range is displayed on screen.
Power button is turned off. Press the front panel power button.
NOTE: If pressing the power button has no effect, press and hold the power button for 10 seconds to disable the power button lockout feature.
Video cable is improperly connected. Connect the video cable properly. Refer to Connecting the cables on page 8 for more information.
System is in sleep mode. Press any key on the keyboard or move the mouse to inactivate the screen blanking utility.
Video card compatibility. Open the OSD menu and select the Input Control menu. Set Auto-Switch Input to Off and manually select the input.
Brightness is too low. Open the OSD menu and select Brightness to adjust the brightness scale as needed.
Monitor video cable is disconnected. Connect the appropriate video signal cable between the computer and monitor. Be sure that the computer power is off while connecting the video cable.
Video resolution and/or refresh rate are set higher than what the monitor supports.
Change the settings to a supported setting (see Recognizing preset display resolutions on page 29).
The monitor is off but it did not seem to enter into a lowpower sleep mode.
The monitor's power saving control is disabled.
OSD Lockout is displayed. The monitor's OSD Lockout function
is enabled.
Power Button Lockout is displayed.
The monitor's Power Button Lockout function is enabled.
Open the OSD menu and select Power Control > Auto-Sleep Mode and set auto-sleep to On.
Press and hold the Menu button on the side panel for 10 seconds to disable the OSD Lockout function.
Press and hold the power button for 10 seconds to unlock the power button function.
Button lockouts
Holding down the power button or Menu button for ten seconds will lock out the functionality of the buttons. You can restore the functionality by holding the buttons down again for ten seconds. This functionality is only available when the display is powered on, displaying an active signal, and the OSD is not active.
20 Appendix A Support and troubleshooting
Product support
For additional information on using your monitor, go to http://www.hp.com/support. Select your country or region, select Troubleshooting, and then enter your model in the search window and click the Go button.
| | |---|
NOTE: The monitor user guide, reference material, and drivers are available at http://www.hp.com/ support.
If the information provided in the guide does not address your questions, you can contact support. For U.S. support, go to http://www.hp.com/go/contactHP. For worldwide support, go to http://welcome.hp.com/ country/us/en/wwcontact_us.html.
Here you can:
| | |---|
Preparing to call technical support
If you cannot solve a problem using the troubleshooting tips in this section, you may need to call technical support. Have the following information available when you call:
Product support 21
B Technical specifications
| | |---|
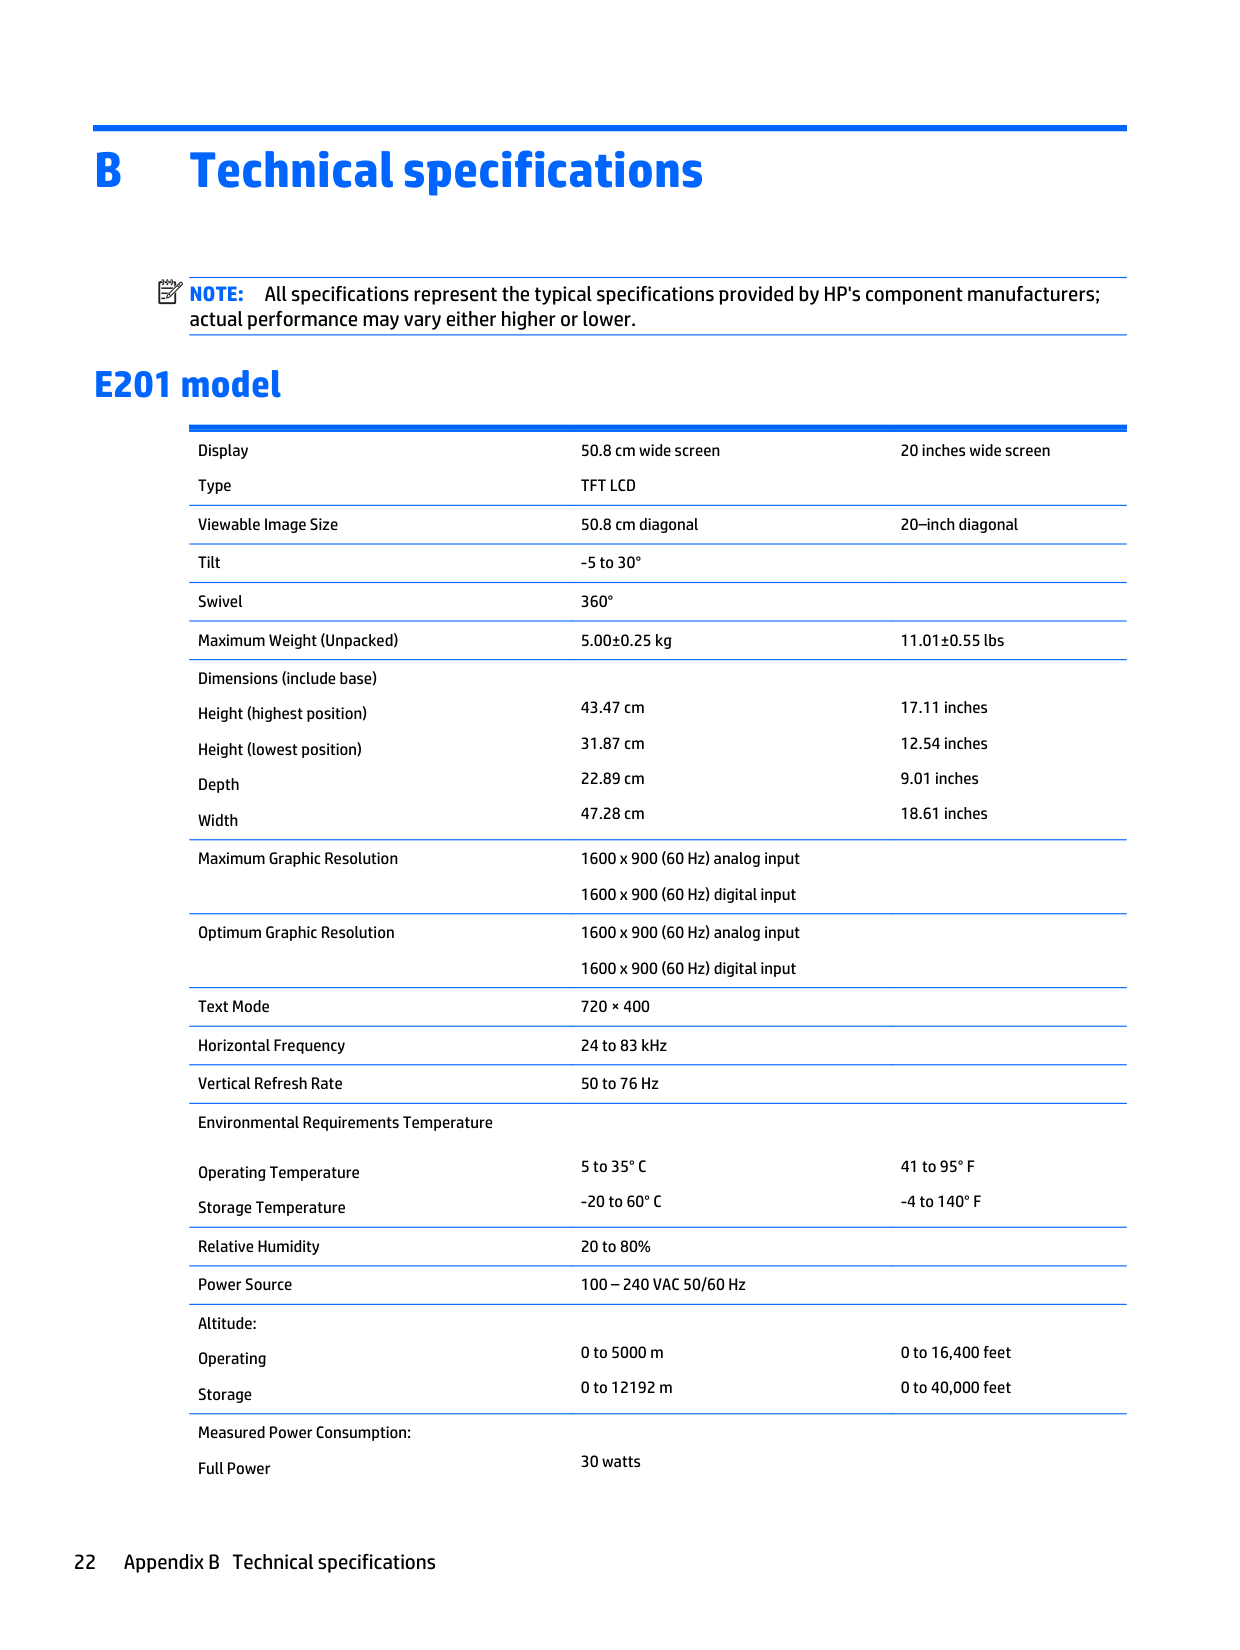
NOTE: All specifications represent the typical specifications provided by HP's component manufacturers; actual performance may vary either higher or lower.
E201 model
Display Type
50.8 cm wide screen TFT LCD
20 inches wide screen
Viewable Image Size 50.8 cm diagonal 20–inch diagonal Tilt -5 to 30° Swivel 360° Maximum Weight (Unpacked) 5.00±0.25 kg 11.01±0.55 lbs Dimensions (include base) Height (highest position) Height (lowest position) Depth Width
43.47 cm 31.87 cm 22.89 cm 47.28 cm
Maximum Graphic Resolution 1600 x 900 (60 Hz) analog input 1600 x 900 (60 Hz) digital input Optimum Graphic Resolution 1600 x 900 (60 Hz) analog input
1600 x 900 (60 Hz) digital input Text Mode 720 × 400 Horizontal Frequency 24 to 83 kHz Vertical Refresh Rate 50 to 76 Hz Environmental Requirements Temperature Operating Temperature Storage Temperature
5 to 35° C
-20 to 60° C
41 to 95° F
-4 to 140° F
Relative Humidity 20 to 80% Power Source 100 – 240 VAC 50/60 Hz Altitude: Operating Storage
0 to 5000 m 0 to 12192 m
Measured Power Consumption: Full Power 30 watts
0 to 16,400 feet 0 to 40,000 feet
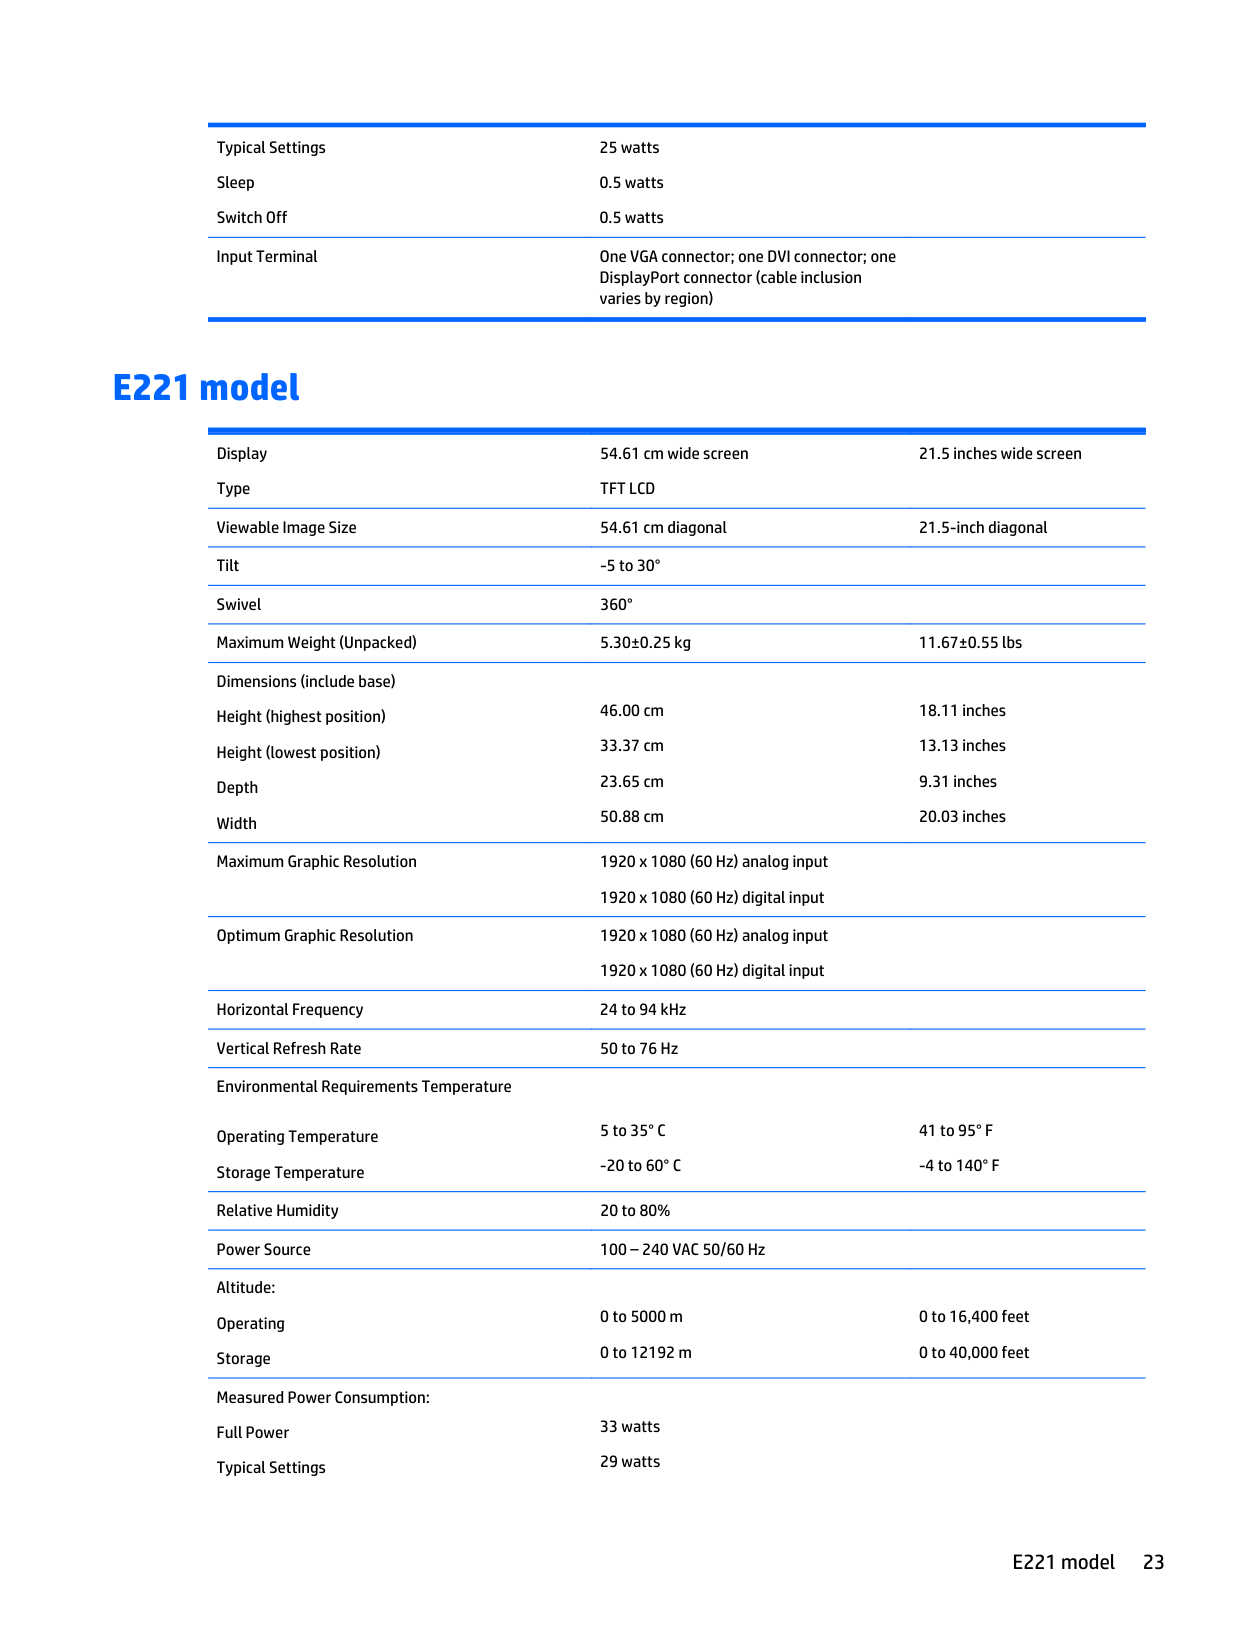
Typical Settings Sleep Switch Off
25 watts 0.5 watts 0.5 watts
Input Terminal One VGA connector; one DVI connector; one DisplayPort connector (cable inclusion varies by region)
E221 model
Display Type
54.61 cm wide screen TFT LCD
21.5 inches wide screen
Viewable Image Size 54.61 cm diagonal 21.5-inch diagonal Tilt -5 to 30° Swivel 360° Maximum Weight (Unpacked) 5.30±0.25 kg 11.67±0.55 lbs Dimensions (include base) Height (highest position) Height (lowest position) Depth Width
46.00 cm 33.37 cm 23.65 cm 50.88 cm
18.11 inches 13.13 inches 9.31 inches 20.03 inches
Maximum Graphic Resolution 1920 x 1080 (60 Hz) analog input 1920 x 1080 (60 Hz) digital input Optimum Graphic Resolution 1920 x 1080 (60 Hz) analog input
1920 x 1080 (60 Hz) digital input Horizontal Frequency 24 to 94 kHz Vertical Refresh Rate 50 to 76 Hz Environmental Requirements Temperature Operating Temperature Storage Temperature
5 to 35° C
-20 to 60° C
Relative Humidity 20 to 80% Power Source 100 – 240 VAC 50/60 Hz Altitude: Operating Storage
0 to 5000 m 0 to 12192 m
Measured Power Consumption: Full Power Typical Settings
33 watts 29 watts
41 to 95° F
-4 to 140° F
0 to 16,400 feet 0 to 40,000 feet
E221 model 23
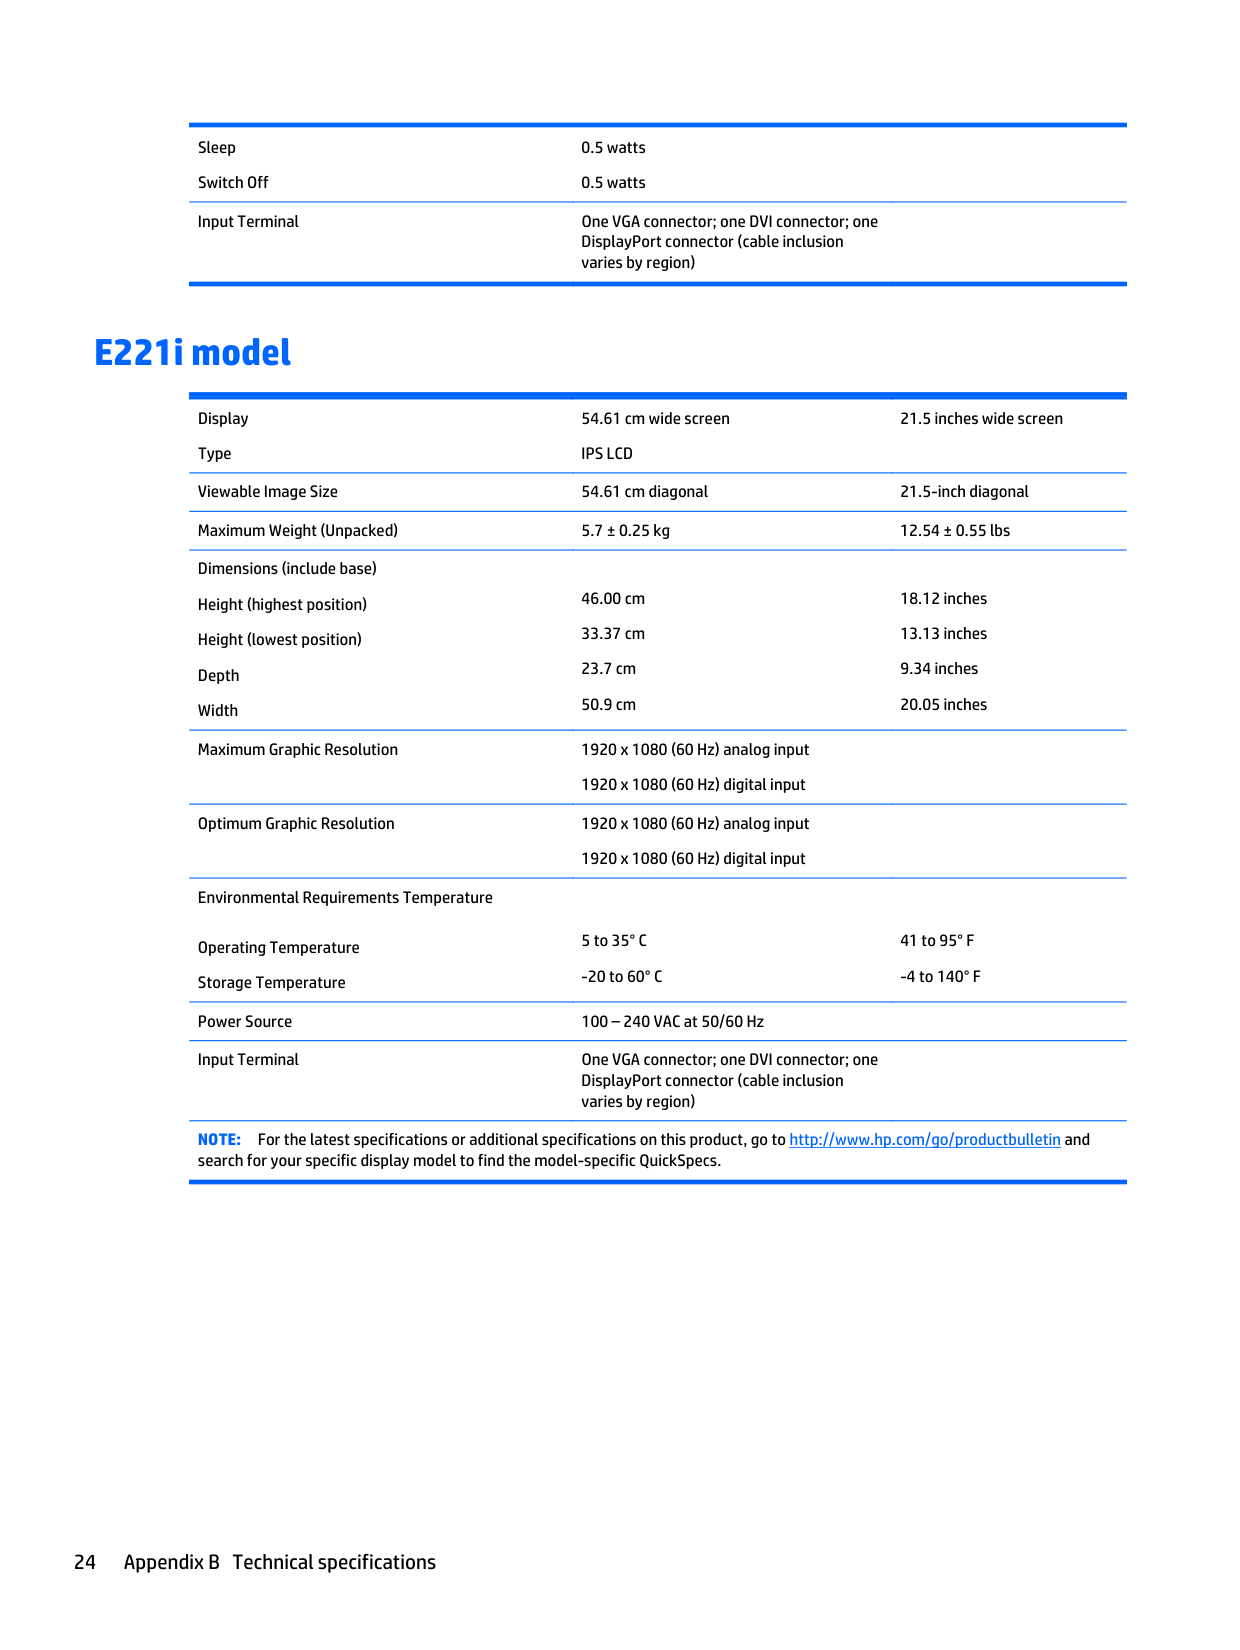
Sleep Switch Off
0.5 watts 0.5 watts
Input Terminal One VGA connector; one DVI connector; one DisplayPort connector (cable inclusion varies by region)
E221i model
Display Type
54.61 cm wide screen IPS LCD
21.5 inches wide screen
Viewable Image Size 54.61 cm diagonal 21.5-inch diagonal Maximum Weight (Unpacked) 5.7 ± 0.25 kg 12.54 ± 0.55 lbs Dimensions (include base) Height (highest position) Height (lowest position) Depth Width
18.12 inches 13.13 inches 9.34 inches 20.05 inches
46.00 cm 33.37 cm 23.7 cm 50.9 cm
Maximum Graphic Resolution 1920 x 1080 (60 Hz) analog input 1920 x 1080 (60 Hz) digital input Optimum Graphic Resolution 1920 x 1080 (60 Hz) analog input
1920 x 1080 (60 Hz) digital input Environmental Requirements Temperature
Operating Temperature Storage Temperature
5 to 35° C
-20 to 60° C
41 to 95° F
-4 to 140° F
Power Source 100 – 240 VAC at 50/60 Hz Input Terminal One VGA connector; one DVI connector; one
DisplayPort connector (cable inclusion varies by region)
NOTE: For the latest specifications or additional specifications on this product, go to http://www.hp.com/go/productbulletin and search for your specific display model to find the model-specific QuickSpecs.
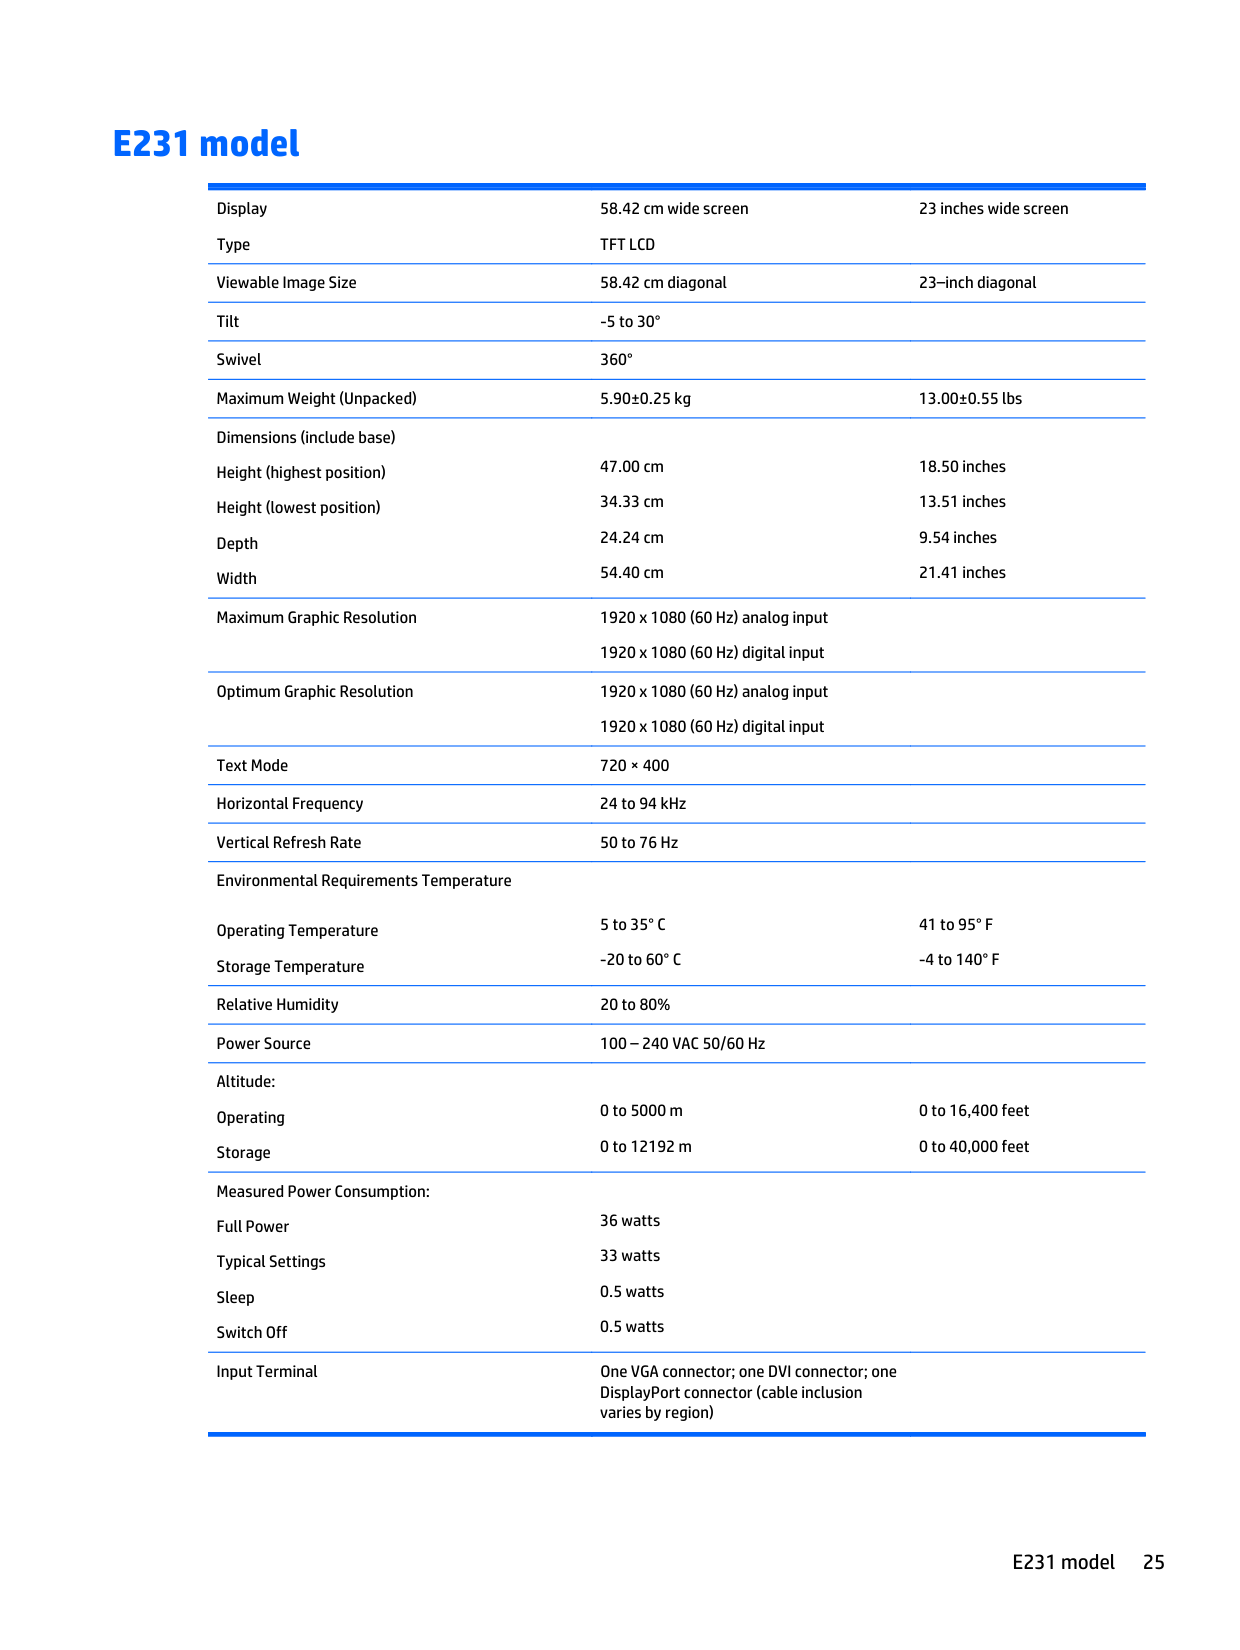
E231 model
Display Type
58.42 cm wide screen TFT LCD
23 inches wide screen
Viewable Image Size 58.42 cm diagonal 23–inch diagonal Tilt -5 to 30° Swivel 360° Maximum Weight (Unpacked) 5.90±0.25 kg 13.00±0.55 lbs Dimensions (include base) Height (highest position) Height (lowest position) Depth Width
47.00 cm 34.33 cm 24.24 cm 54.40 cm
18.50 inches 13.51 inches 9.54 inches 21.41 inches
Maximum Graphic Resolution 1920 x 1080 (60 Hz) analog input 1920 x 1080 (60 Hz) digital input Optimum Graphic Resolution 1920 x 1080 (60 Hz) analog input
1920 x 1080 (60 Hz) digital input Text Mode 720 × 400 Horizontal Frequency 24 to 94 kHz Vertical Refresh Rate 50 to 76 Hz Environmental Requirements Temperature Operating Temperature Storage Temperature
5 to 35° C
-20 to 60° C
Relative Humidity 20 to 80% Power Source 100 – 240 VAC 50/60 Hz Altitude: Operating Storage
0 to 5000 m 0 to 12192 m
Measured Power Consumption: Full Power Typical Settings Sleep Switch Off
36 watts 33 watts 0.5 watts 0.5 watts
Input Terminal One VGA connector; one DVI connector; one DisplayPort connector (cable inclusion varies by region)
41 to 95° F
-4 to 140° F
0 to 16,400 feet 0 to 40,000 feet
E231 model 25
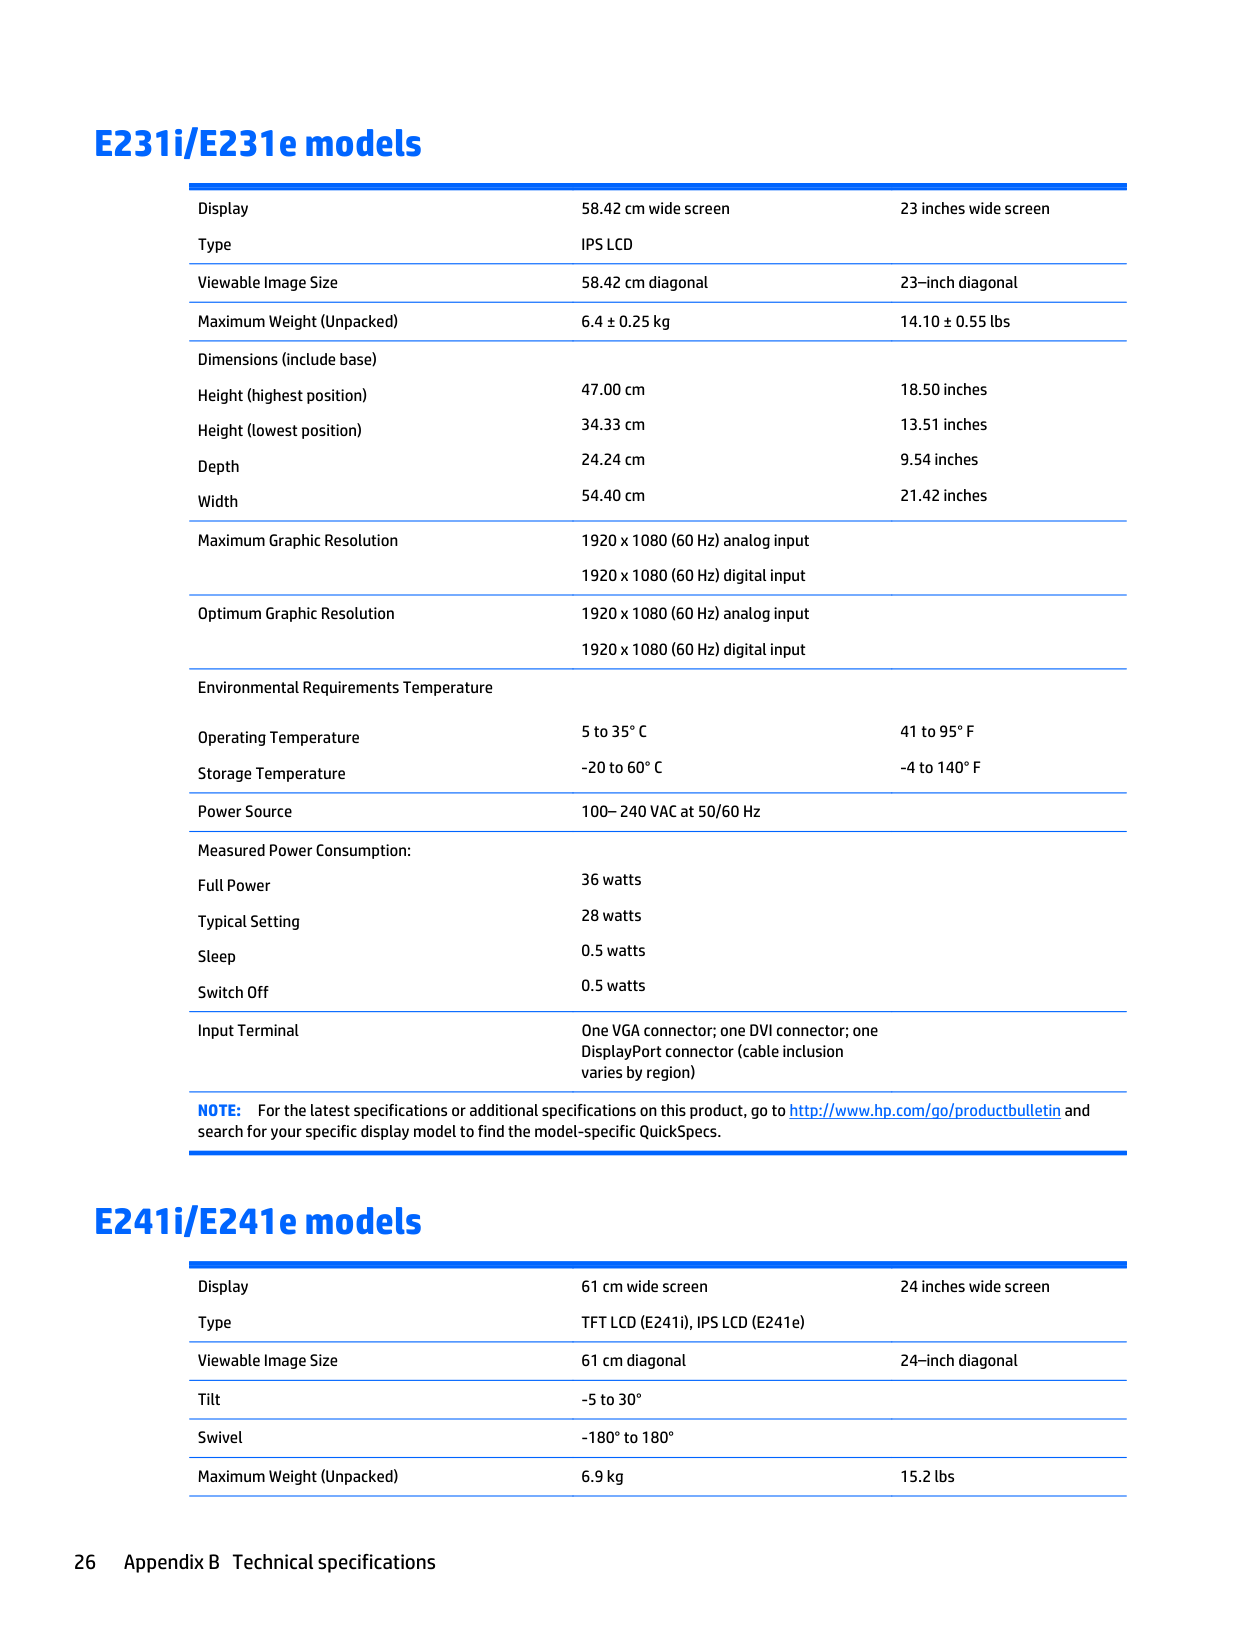
E231i/E231e models
Display Type
58.42 cm wide screen IPS LCD
23 inches wide screen
Viewable Image Size 58.42 cm diagonal 23–inch diagonal Maximum Weight (Unpacked) 6.4 ± 0.25 kg 14.10 ± 0.55 lbs Dimensions (include base) Height (highest position) Height (lowest position) Depth Width
47.00 cm 34.33 cm 24.24 cm 54.40 cm
18.50 inches 13.51 inches 9.54 inches 21.42 inches
Maximum Graphic Resolution 1920 x 1080 (60 Hz) analog input 1920 x 1080 (60 Hz) digital input Optimum Graphic Resolution 1920 x 1080 (60 Hz) analog input
1920 x 1080 (60 Hz) digital input Environmental Requirements Temperature
Operating Temperature Storage Temperature
5 to 35° C
-20 to 60° C
41 to 95° F
-4 to 140° F
Power Source 100– 240 VAC at 50/60 Hz Measured Power Consumption: Full Power Typical Setting Sleep Switch Off
36 watts 28 watts 0.5 watts 0.5 watts
Input Terminal One VGA connector; one DVI connector; one DisplayPort connector (cable inclusion varies by region)
NOTE: For the latest specifications or additional specifications on this product, go to http://www.hp.com/go/productbulletin and search for your specific display model to find the model-specific QuickSpecs.
E241i/E241e models
Display Type
61 cm wide screen TFT LCD (E241i), IPS LCD (E241e)
24 inches wide screen
Viewable Image Size 61 cm diagonal 24–inch diagonal Tilt -5 to 30° Swivel -180° to 180° Maximum Weight (Unpacked) 6.9 kg 15.2 lbs
Dimensions (include base) Height (highest position) Height (lowest position) Depth Width
51.7 cm 37.9 cm 27.6 cm 55.6 cm
Maximum Graphic Resolution 1920 x 1200 (60 Hz) analog input 1920 x 1200 (60 Hz) digital input Optimum Graphic Resolution 1920 x 1200 (60 Hz) analog input
1920 x 1200 (60 Hz) digital input Horizontal Frequency 31 to 80 kHz Vertical Refresh Rate 50 to 60 Hz Environmental Requirements Temperature Operating Temperature Storage Temperature
5 to 35° C
-20 to 60° C
Relative Humidity 20 to 80% Power Source 100 – 240 VAC 50/60 Hz Altitude: Operating Storage
0 to 5000 m 0 to 12192 m
Measured Power Consumption: Full Power Typical Settings Sleep Switch Off
40 watts 35 watts 0.5 watts 0.5 watts
Input Terminal One VGA connector; one DVI connector; one DisplayPort connector (cable inclusion varies by region)
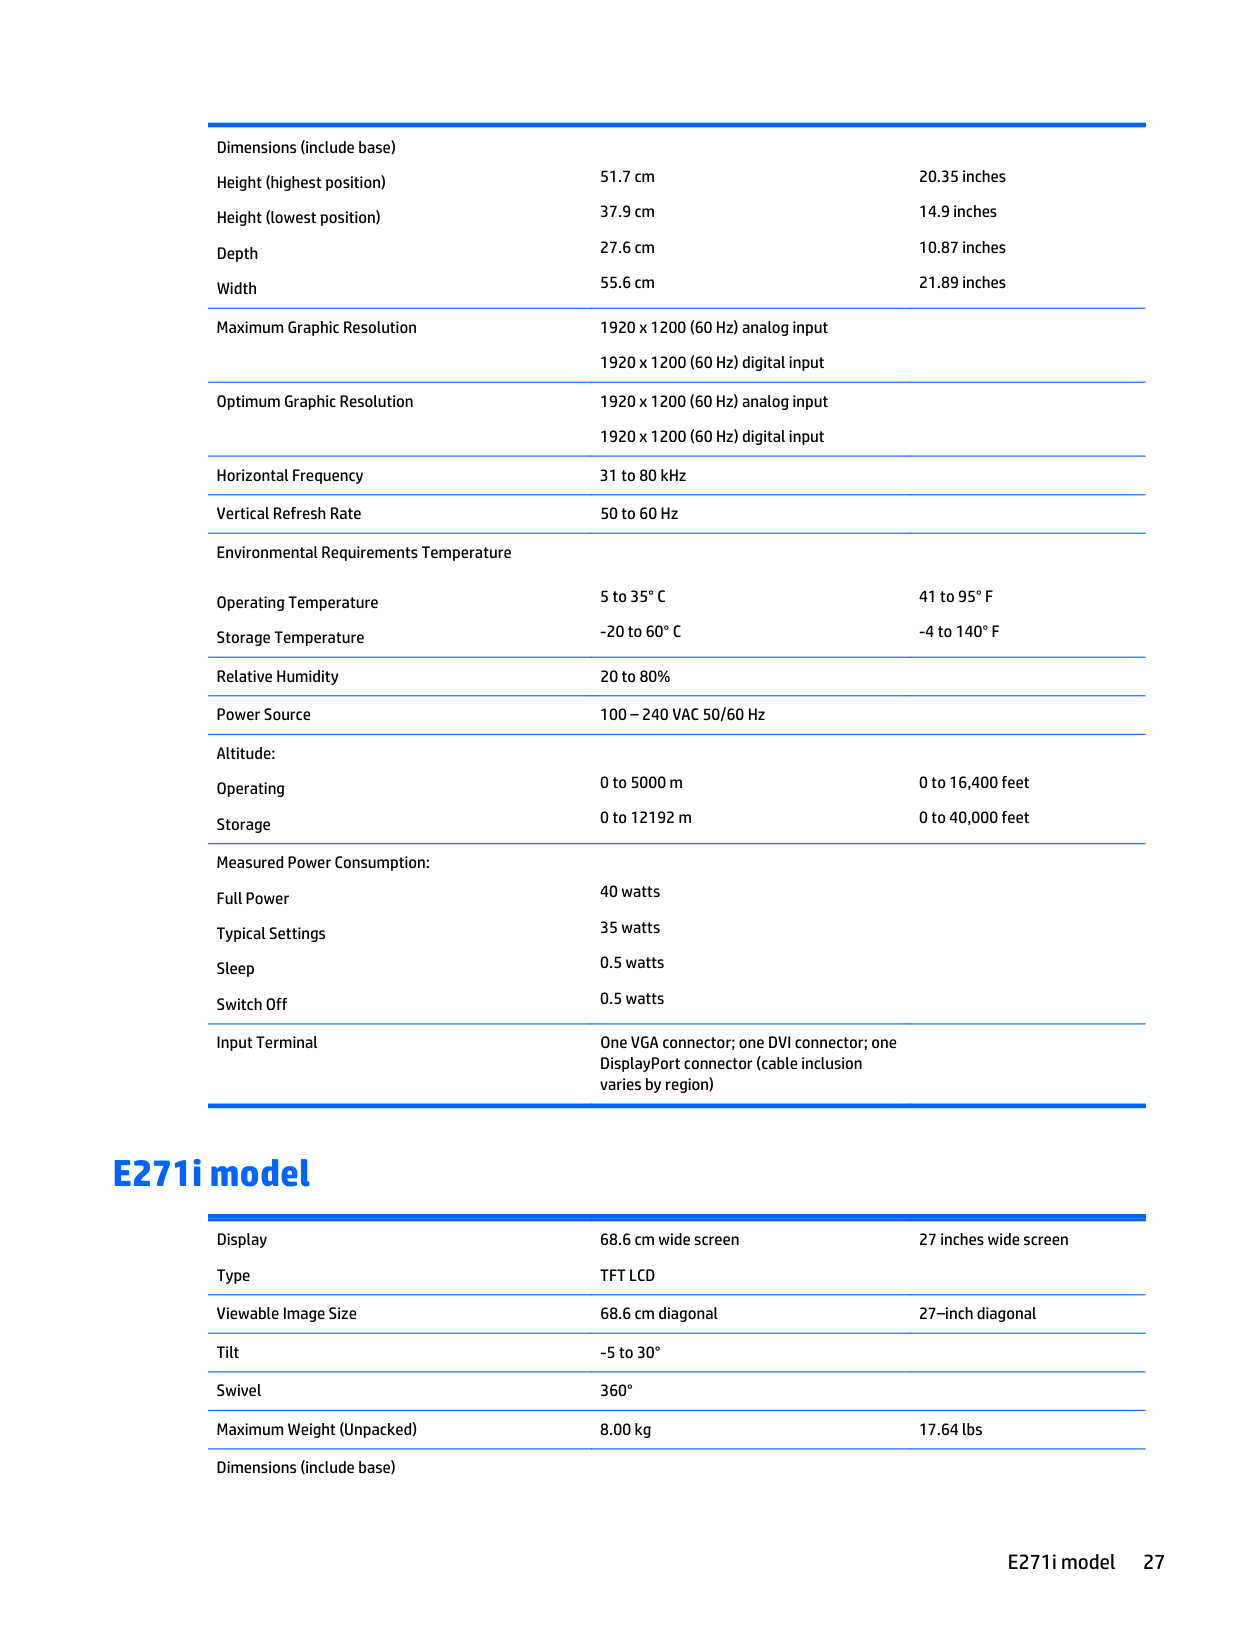
41 to 95° F
-4 to 140° F
0 to 16,400 feet 0 to 40,000 feet
E271i model
Display Type
68.6 cm wide screen TFT LCD
27 inches wide screen
Viewable Image Size 68.6 cm diagonal 27–inch diagonal Tilt -5 to 30° Swivel 360° Maximum Weight (Unpacked) 8.00 kg 17.64 lbs Dimensions (include base)
E271i model 27
Height (highest position) Height (lowest position) Depth Width
53.20 cm 40.20 cm 27.85 cm 64.20 cm
Maximum Graphic Resolution 1920 x 1080 (60 Hz) analog input 1920 x 1080 (60 Hz) digital input Optimum Graphic Resolution 1920 x 1080 (60 Hz) analog input
1920 x 1080 (60 Hz) digital input Horizontal Frequency 24 to 94 kHz Vertical Refresh Rate 50 to 76 Hz Environmental Requirements Temperature Operating Temperature Storage Temperature
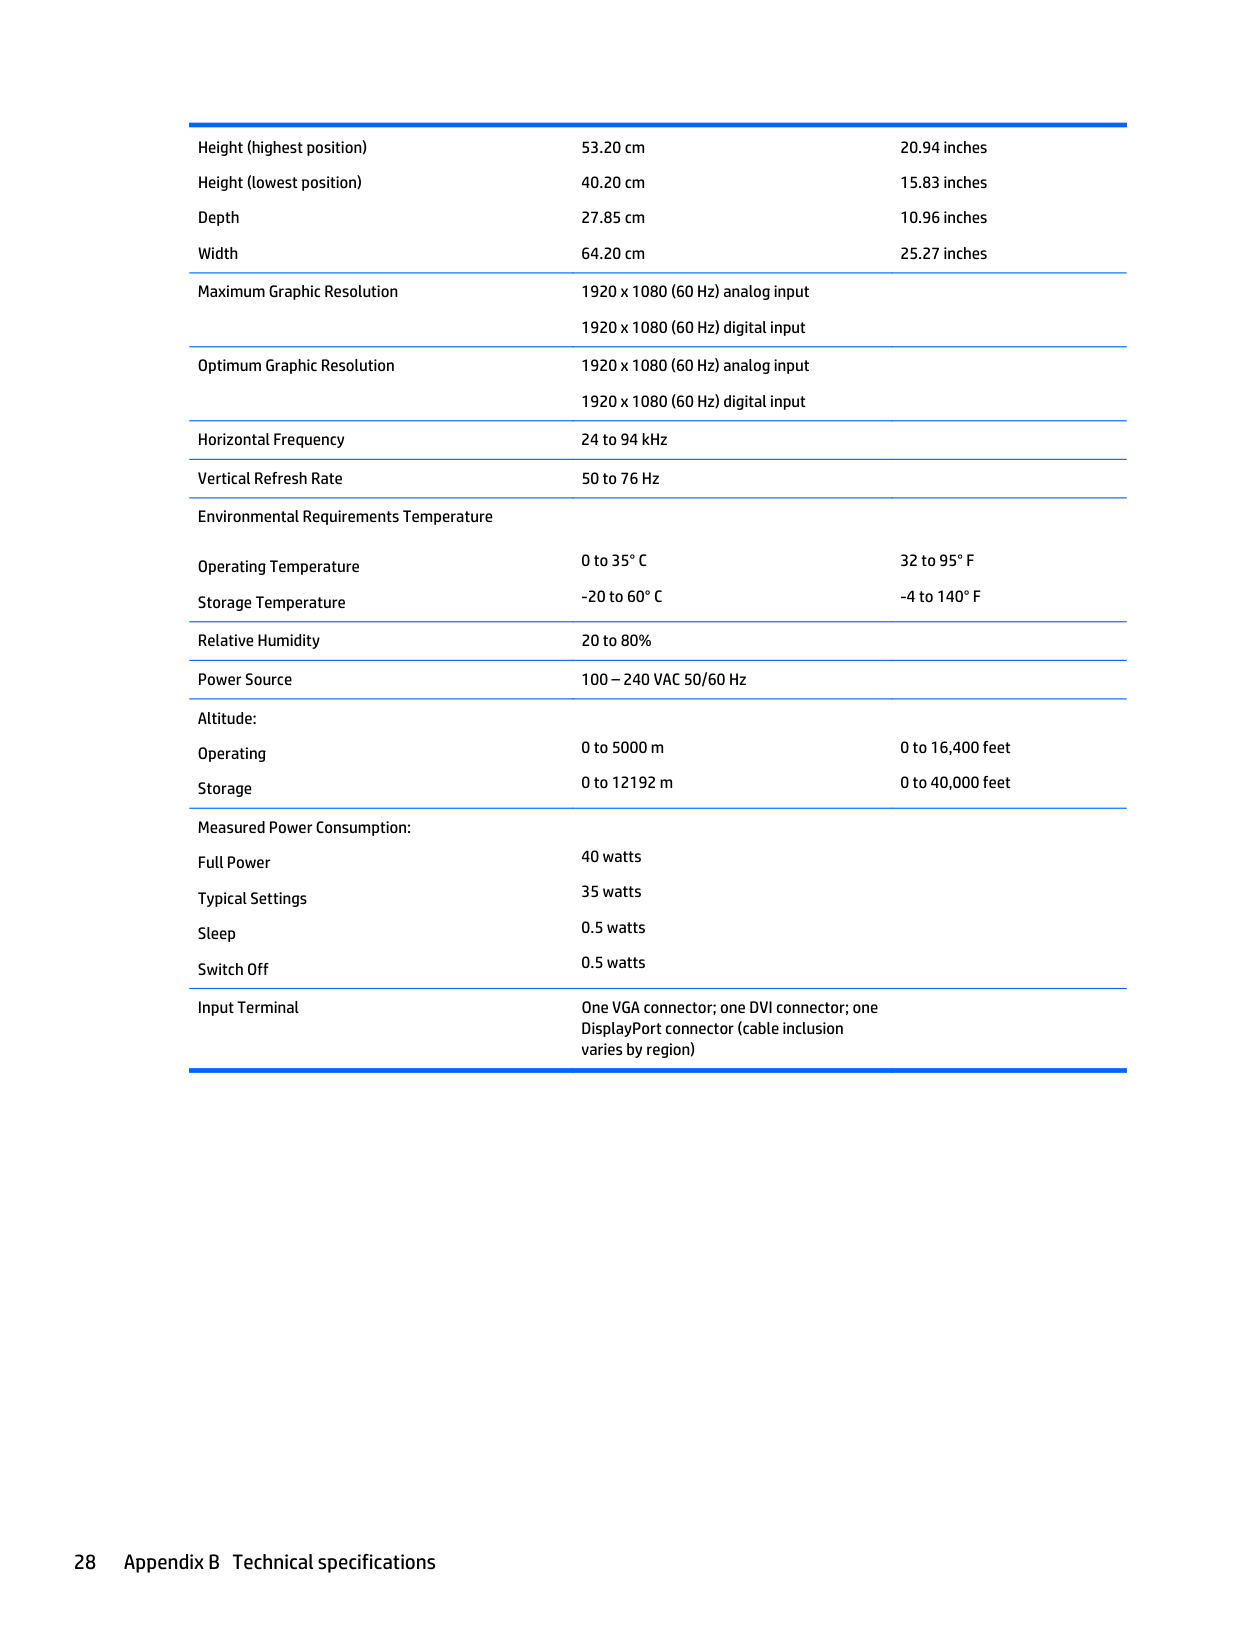
0 to 35° C
-20 to 60° C
Relative Humidity 20 to 80% Power Source 100 – 240 VAC 50/60 Hz Altitude: Operating Storage
0 to 5000 m 0 to 12192 m
Measured Power Consumption: Full Power Typical Settings Sleep Switch Off
40 watts 35 watts 0.5 watts 0.5 watts
Input Terminal One VGA connector; one DVI connector; one DisplayPort connector (cable inclusion varies by region)
20.94 inches 15.83 inches 10.96 inches 25.27 inches
32 to 95° F
-4 to 140° F
0 to 16,400 feet 0 to 40,000 feet
Recognizing preset display resolutions
The display resolutions listed below are the most commonly used modes and are set as factory defaults. This monitor automatically recognizes these preset modes and they will appear properly sized and centered on the screen.
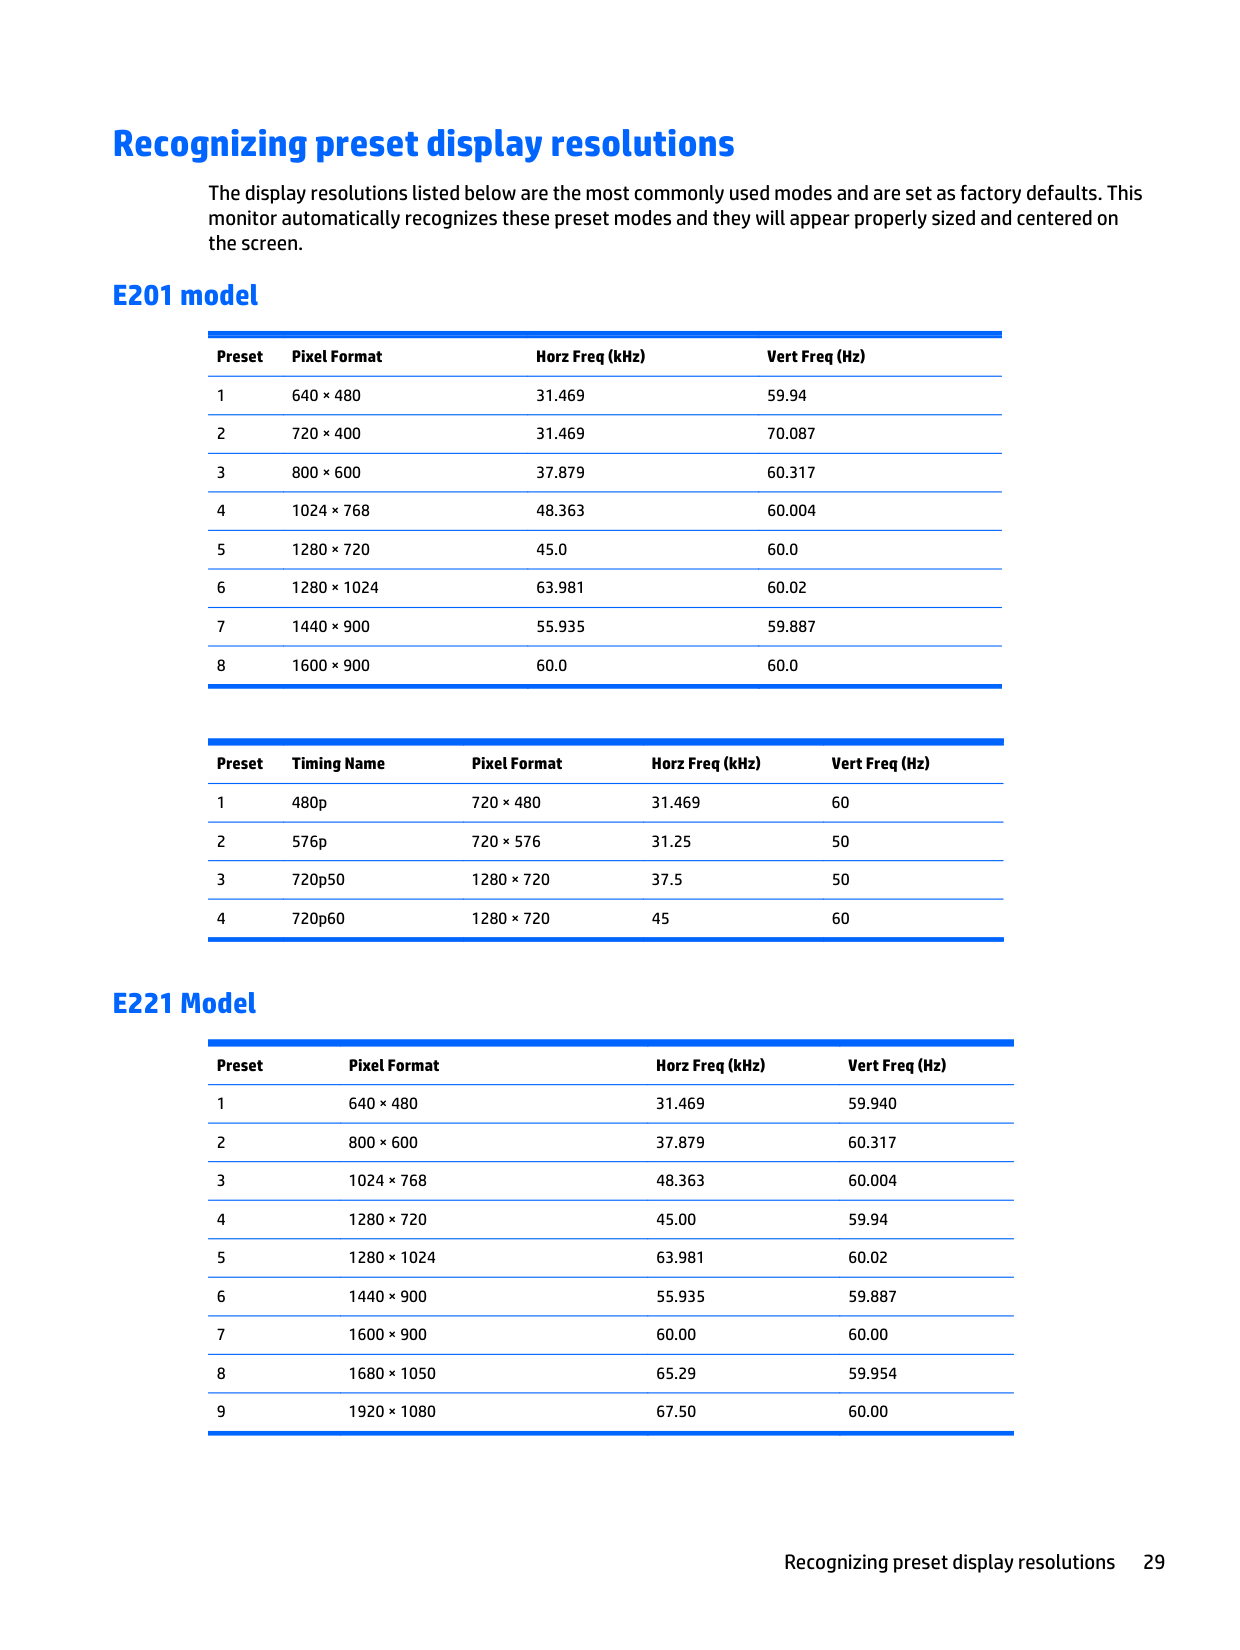
#### E201 model
###### Preset Pixel Format Horz Freq (kHz) Vert Freq (Hz)
###### Preset Timing Name Pixel Format Horz Freq (kHz) Vert Freq (Hz)
#### E221 Model
###### Preset Pixel Format Horz Freq (kHz) Vert Freq (Hz)
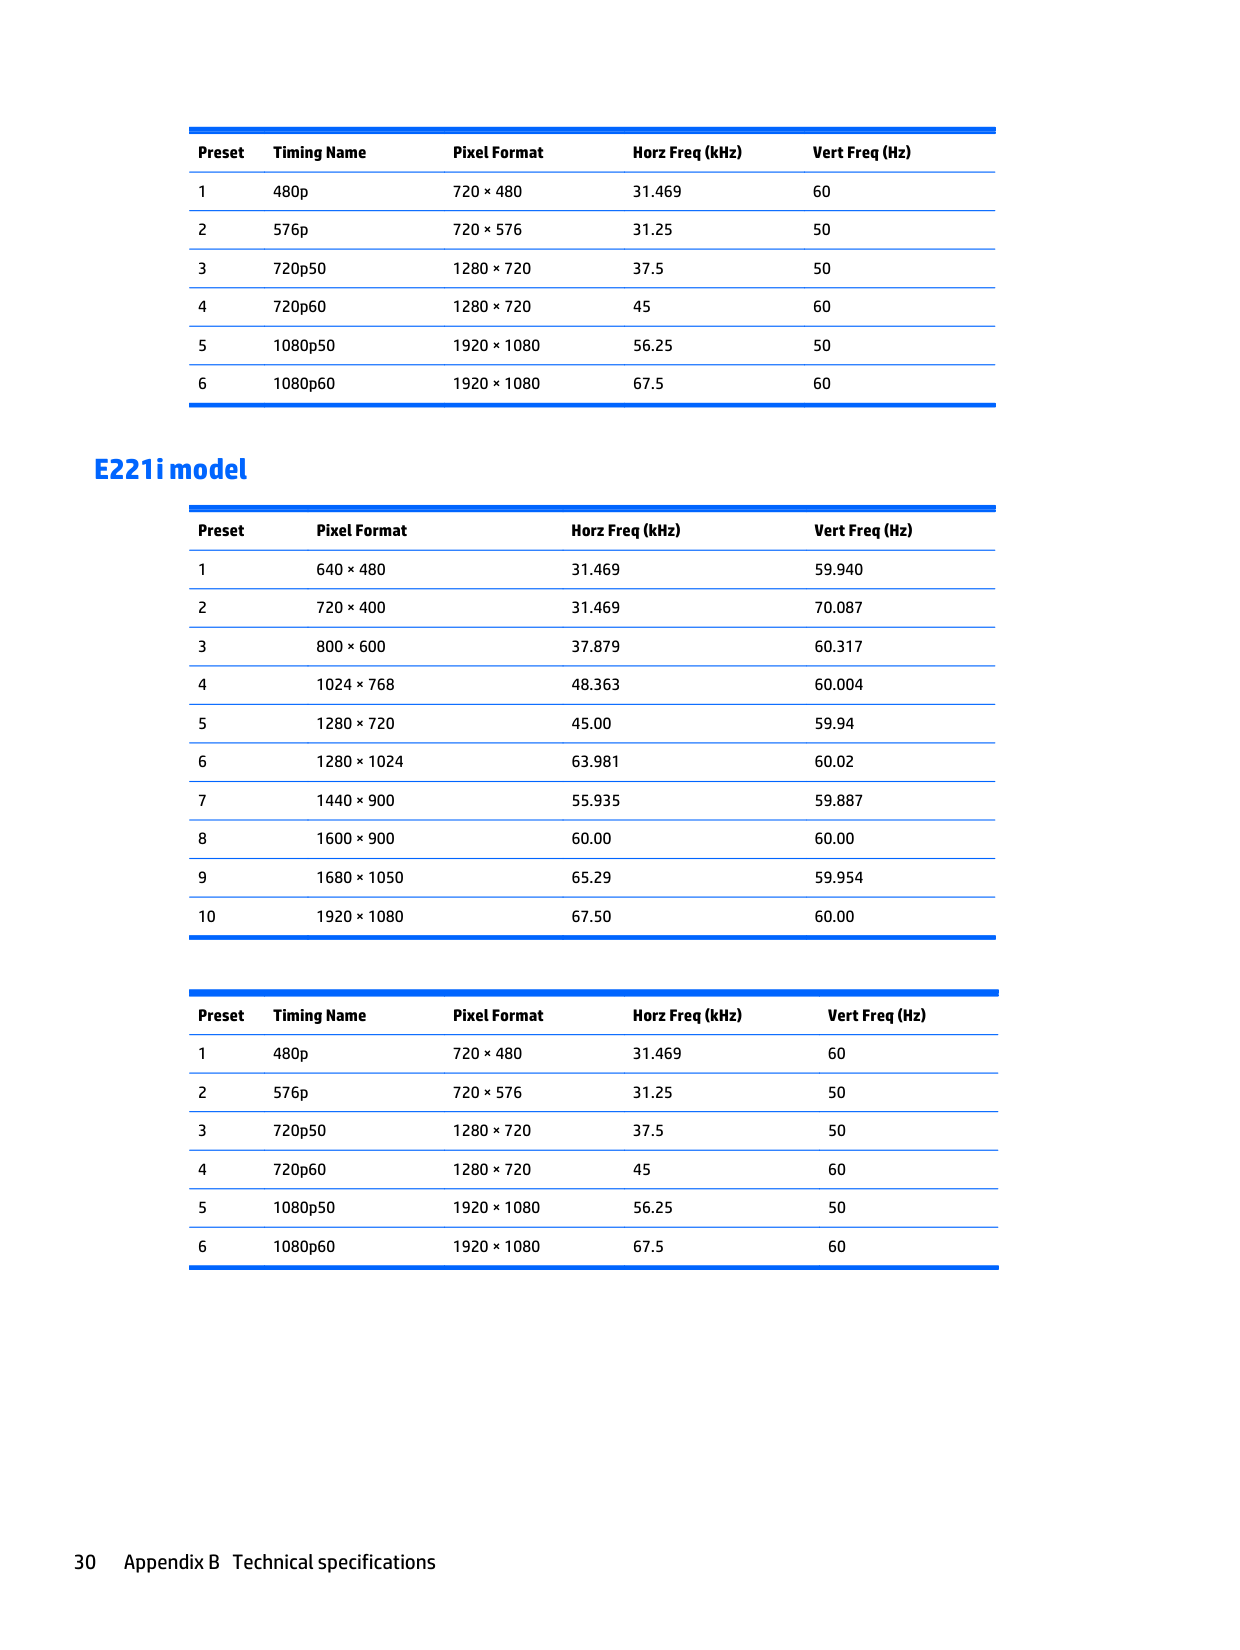
#### E221i model
###### Preset Pixel Format Horz Freq (kHz) Vert Freq (Hz)
###### Preset Timing Name Pixel Format Horz Freq (kHz) Vert Freq (Hz)
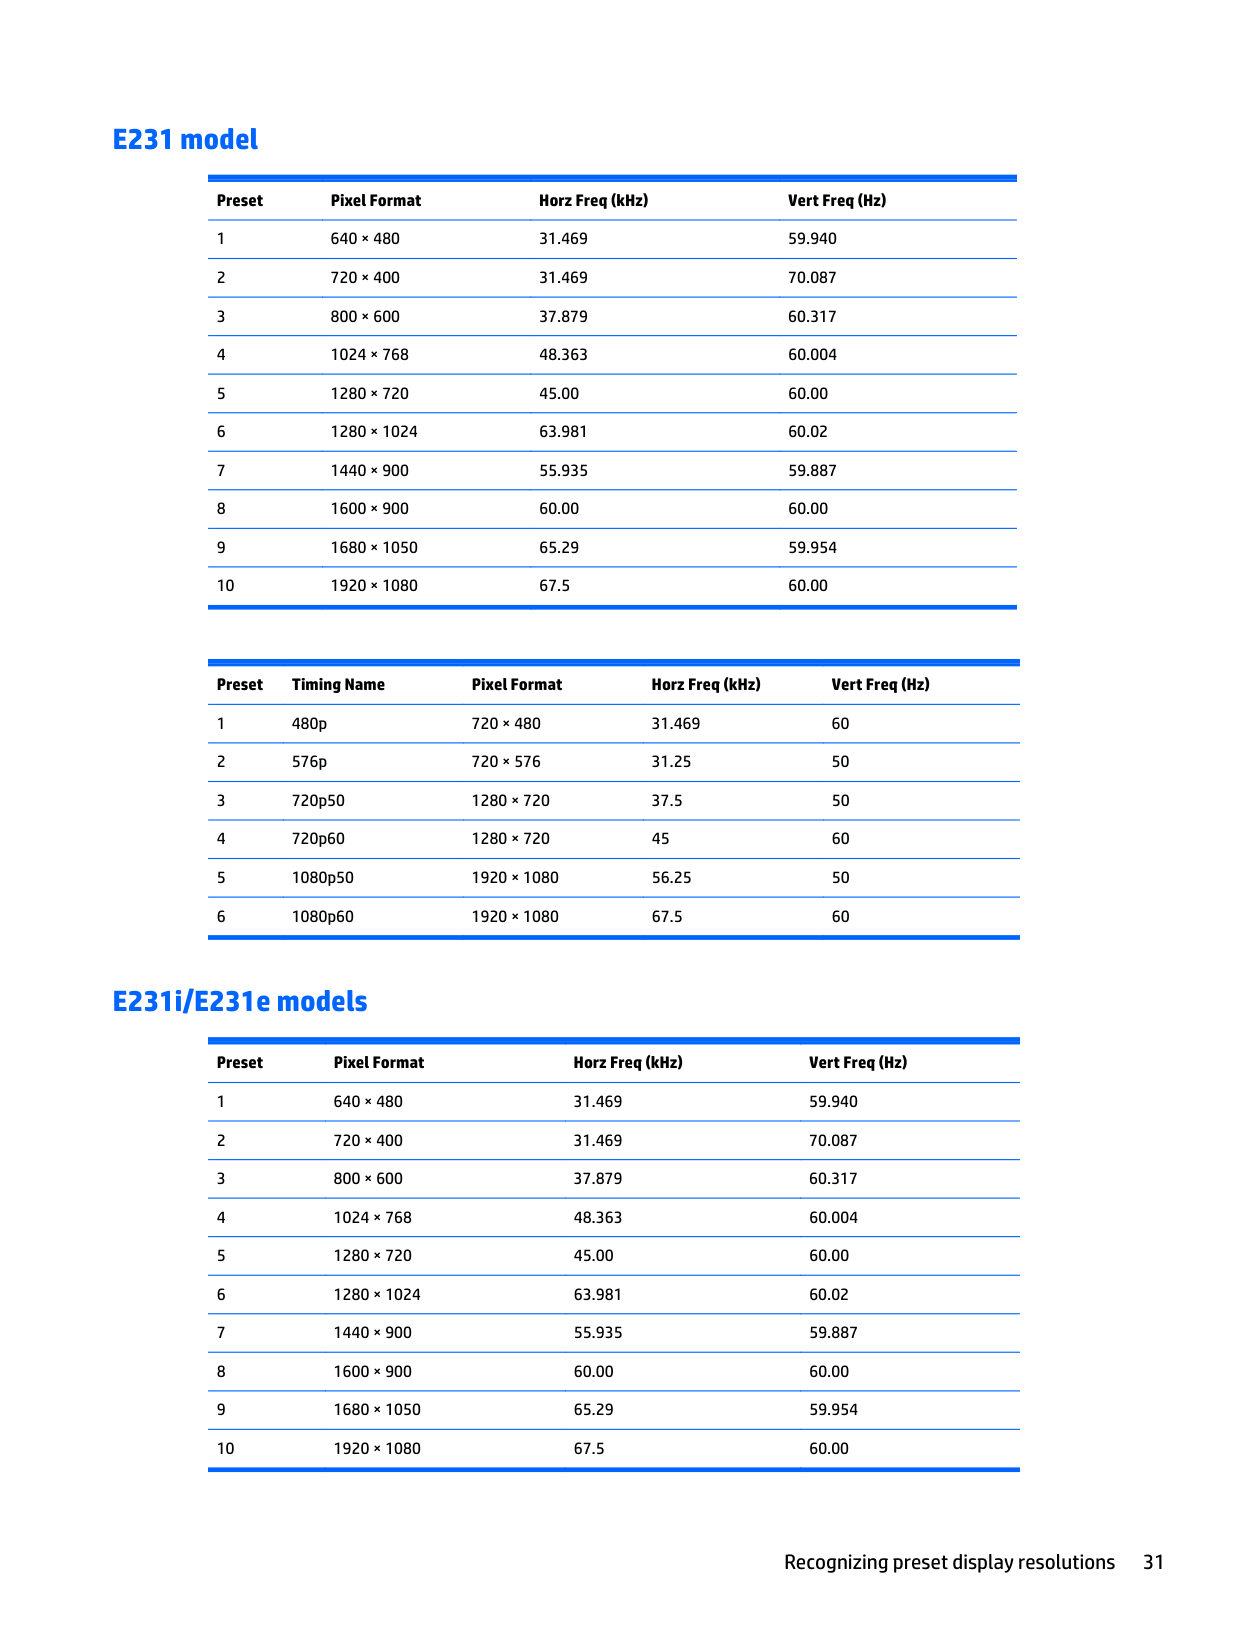
#### E231 model
###### Preset Pixel Format Horz Freq (kHz) Vert Freq (Hz)
###### Preset Timing Name Pixel Format Horz Freq (kHz) Vert Freq (Hz)
#### E231i/E231e models
###### Preset Pixel Format Horz Freq (kHz) Vert Freq (Hz)
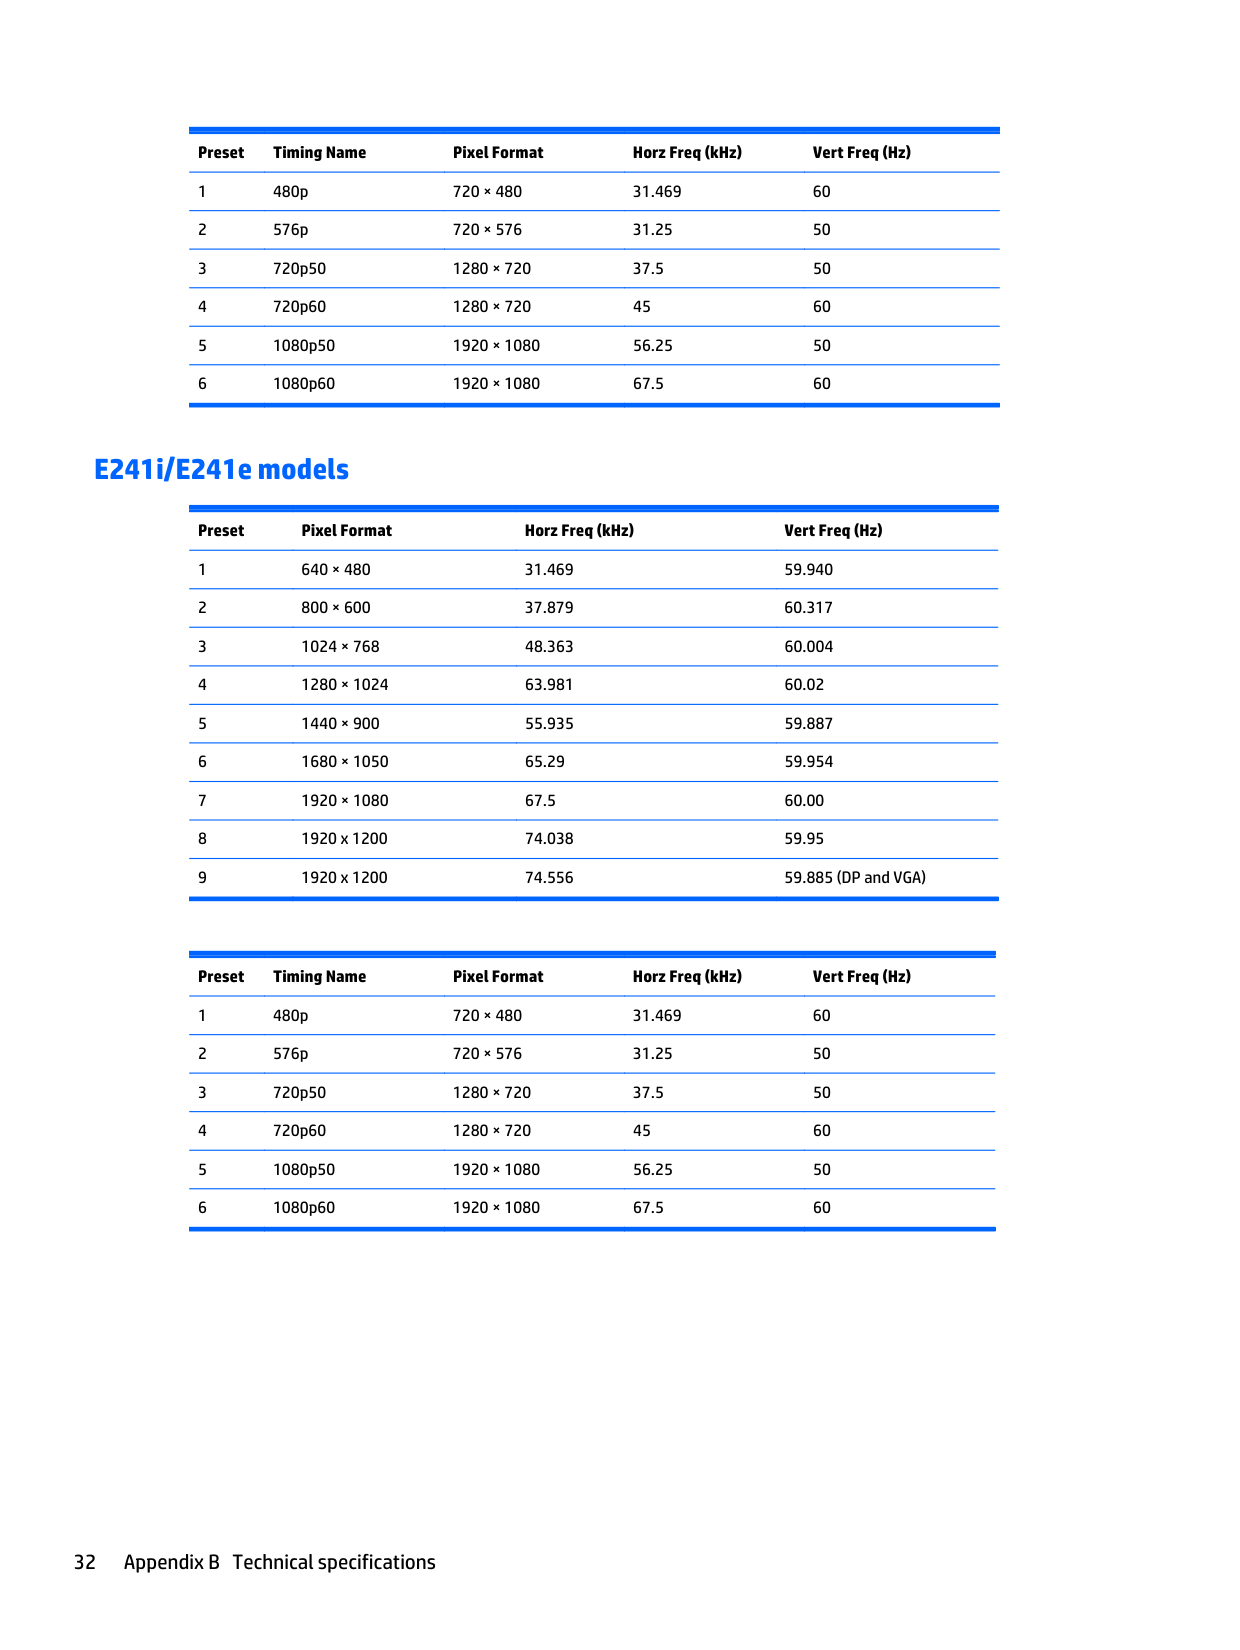
#### E241i/E241e models
###### Preset Pixel Format Horz Freq (kHz) Vert Freq (Hz)
###### Preset Timing Name Pixel Format Horz Freq (kHz) Vert Freq (Hz)
1 480p 720 × 480 31.469 60 2 576p 720 × 576 31.25 50 3 720p50 1280 × 720 37.5 50 4 720p60 1280 × 720 45 60 5 1080p50 1920 × 1080 56.25 50 6 1080p60 1920 × 1080 67.5 60
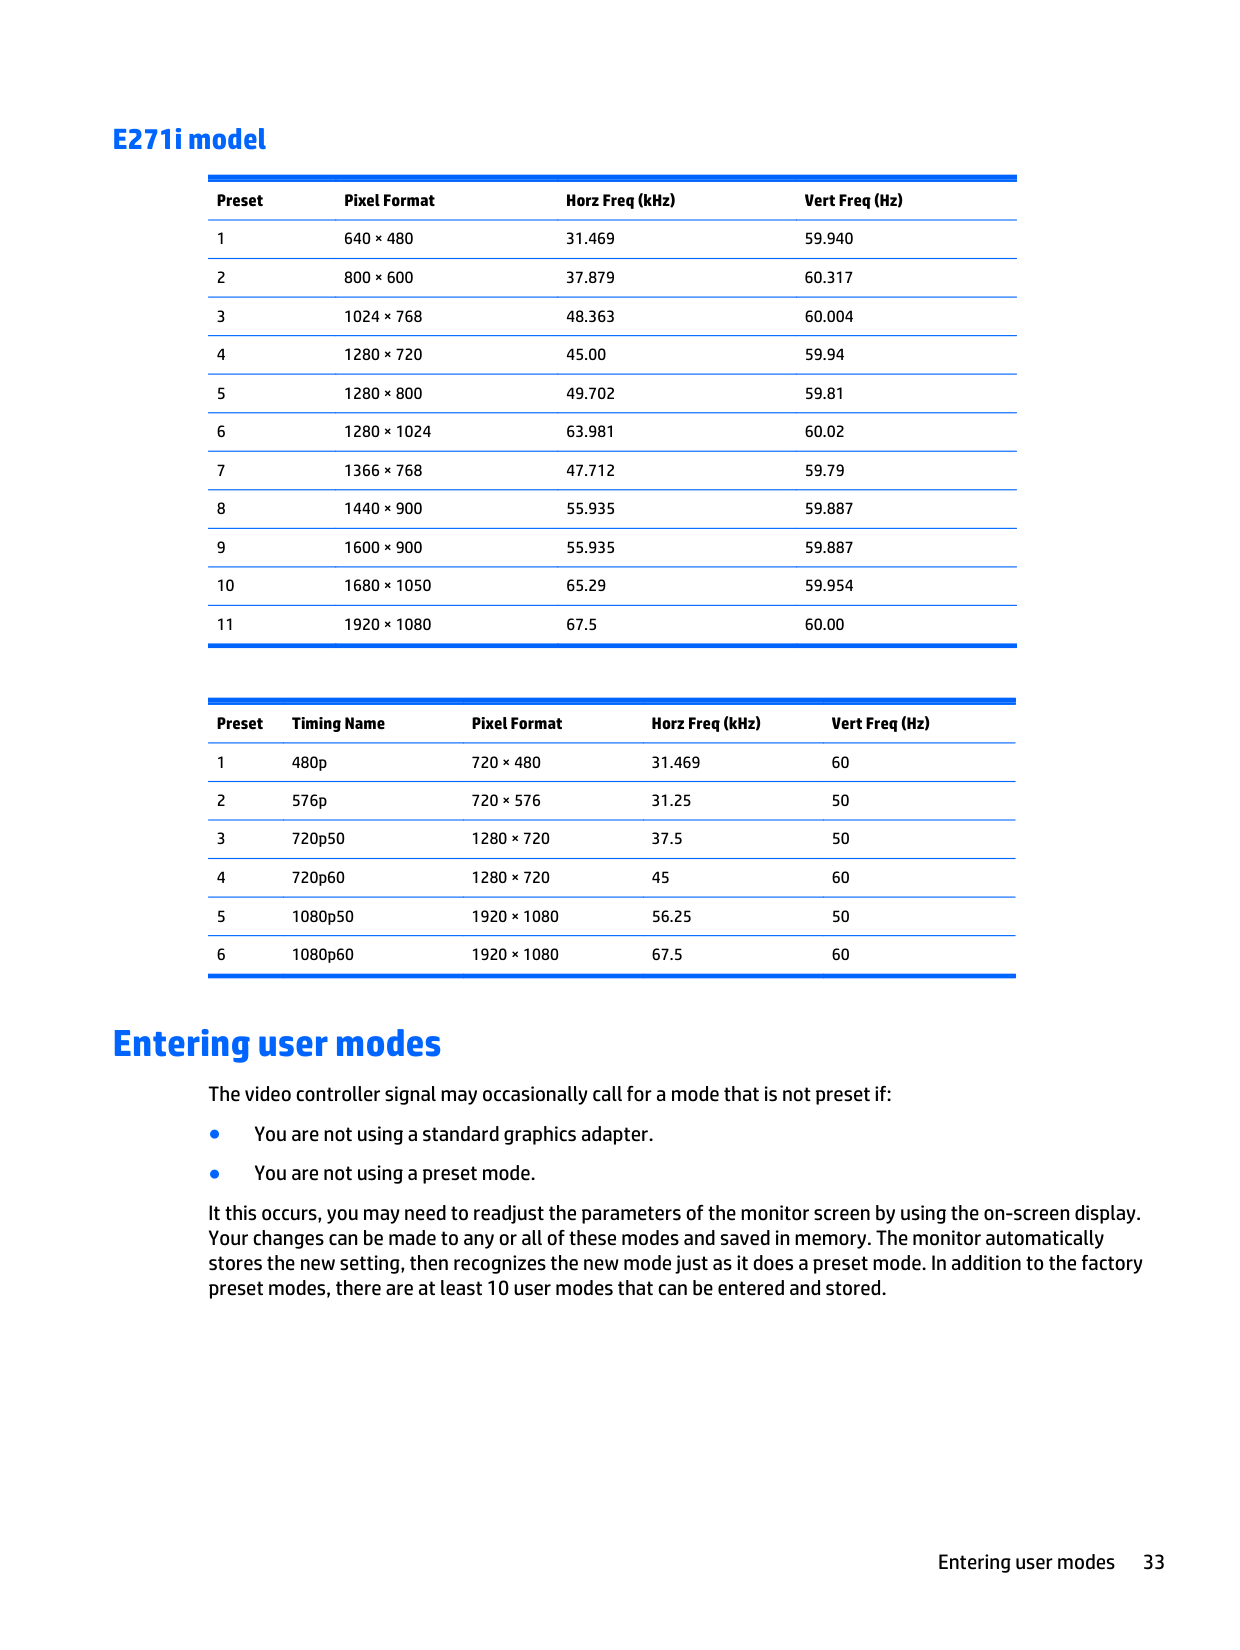
#### E271i model
###### Preset Pixel Format Horz Freq (kHz) Vert Freq (Hz)
###### Preset Timing Name Pixel Format Horz Freq (kHz) Vert Freq (Hz)
1 480p 720 × 480 31.469 60 2 576p 720 × 576 31.25 50 3 720p50 1280 × 720 37.5 50 4 720p60 1280 × 720 45 60 5 1080p50 1920 × 1080 56.25 50 6 1080p60 1920 × 1080 67.5 60
Entering user modes
The video controller signal may occasionally call for a mode that is not preset if:
It this occurs, you may need to readjust the parameters of the monitor screen by using the on-screen display. Your changes can be made to any or all of these modes and saved in memory. The monitor automatically stores the new setting, then recognizes the new mode just as it does a preset mode. In addition to the factory preset modes, there are at least 10 user modes that can be entered and stored.
Entering user modes 33
C Accessibility
HP designs, produces, and markets products and services that can be used by everyone, including people with disabilities, either on a stand-alone basis or with appropriate assistive devices.
Supported assistive technologies
HP products support a wide variety of operating system assistive technologies and can be configured to work with additional assistive technologies. Use the Search feature on your device to locate more information about assistive features.
| | |---|
NOTE: For additional information about a particular assistive technology product, contact customer support for that product.
Contacting support
We are constantly refining the accessibility of our products and services and welcome feedback from users. If you have an issue with a product or would like to tell us about accessibility features that have helped you, please contact us at (888) 259-5707, Monday through Friday, 6 a.m. to 9 p.m. Mountain Time. If you are deaf or hard-of-hearing and use TRS/VRS/WebCapTel, contact us if you require technical support or have accessibility questions by calling (877) 656-7058, Monday through Friday, 6 a.m. to 9 p.m. North American Mountain Time.
| | |---|
NOTE: Support is in English only.
34 Appendix C Accessibility