
Ask AI
— answers from the official manualAnswers from the official manual.
Common questions
Common Questions
5 totalWhat does the Action Keys mode setting do?
Action Key Mode allows you to choose whether action key (F1-F12) shortcuts require pressing Fn+F keys or directly pressing F1-F12 alone for functionality.
How can I enable USB boot in the BIOS?
Navigate to USB Boot within Setup Utilities and set it to Enabled for booting from USB drives. A power cycle is not required after this change.
Can I configure network boot settings using my BIOS?
Go to Settings such as Network Boot, select the protocol you prefer (IPv4, IPv6 or both), and determine when to enable/disable during start-up.
How do I configure Secure Boot in my BIOS?
Access Secure Boot within Setup Utilities; ensure Secure Boot is Enabled only if the system runs user mode. Disabling it bypasses secure boot control during startup.
What will happen when I load factory default keys in BIOS?
Loading HP Factory Default Keys resets certain BIOS settings to their original, out-of-the-box values provided by the manufacturer. This should be done with caution as it can undo recent configurations.
Full Manual
30 pages

Interactive BIOS simulator HP Pavilion Gaming Laptop 15-ec0xxx
Welcome to the interactive BIOS simulator for the HP Pavilion Gaming Laptop 15-ec0xxx
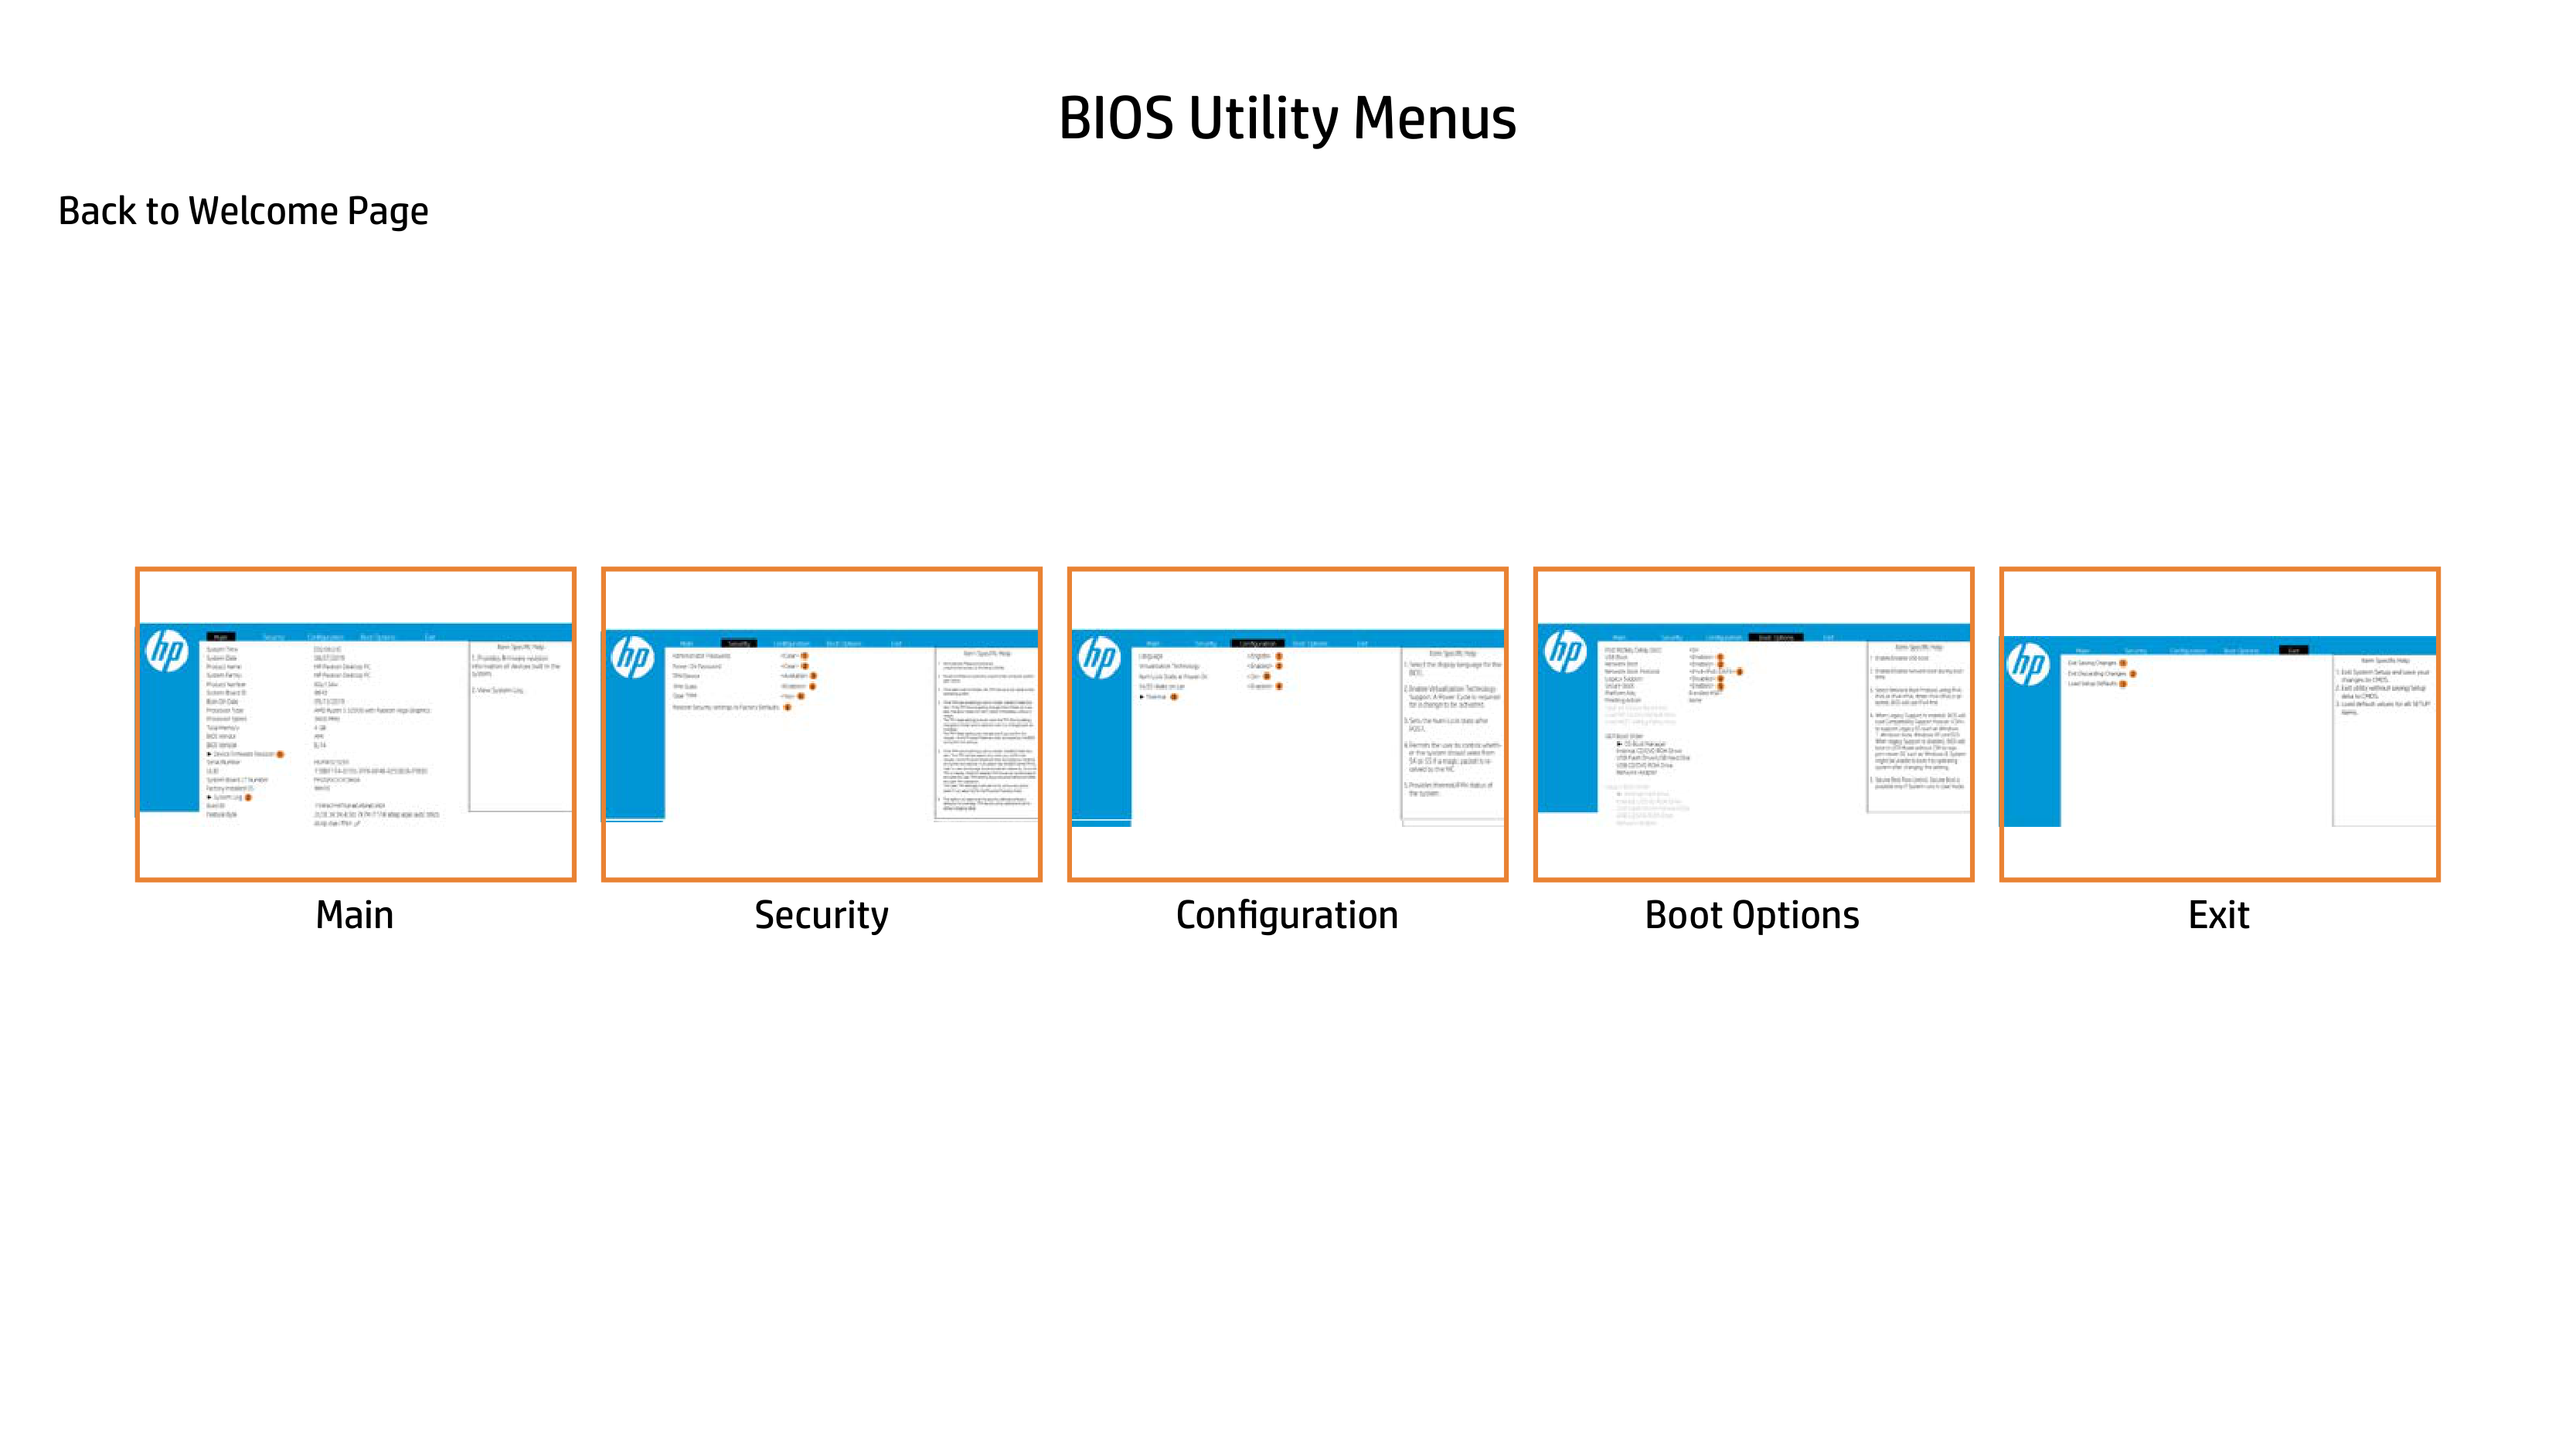
Here’s how to use it… BIOS Utility Menus: (Click the link to navigate to the individual menus) On this page you will find thumbnail images of each of the product’s BIOS utility menus. To view a specific menu in greater detail, simply click that thumbnail. Just as in the live BIOS, on each menu, you can select the tab of each of the other utility menus to navigate directly to that menu.
Menu options: While the menu options cannot be toggled, many of them offer item specific information about that option. To view this information, use the cursor to rollover the option and the information will present in a pane on the right of the BIOS screen.
That’s it! On every page there is a link that brings you back to either this Welcome page or the BIOS Utility Menus page enabling you to navigate to whatever BIOS option you wish to review.
BIOS Utility Menus
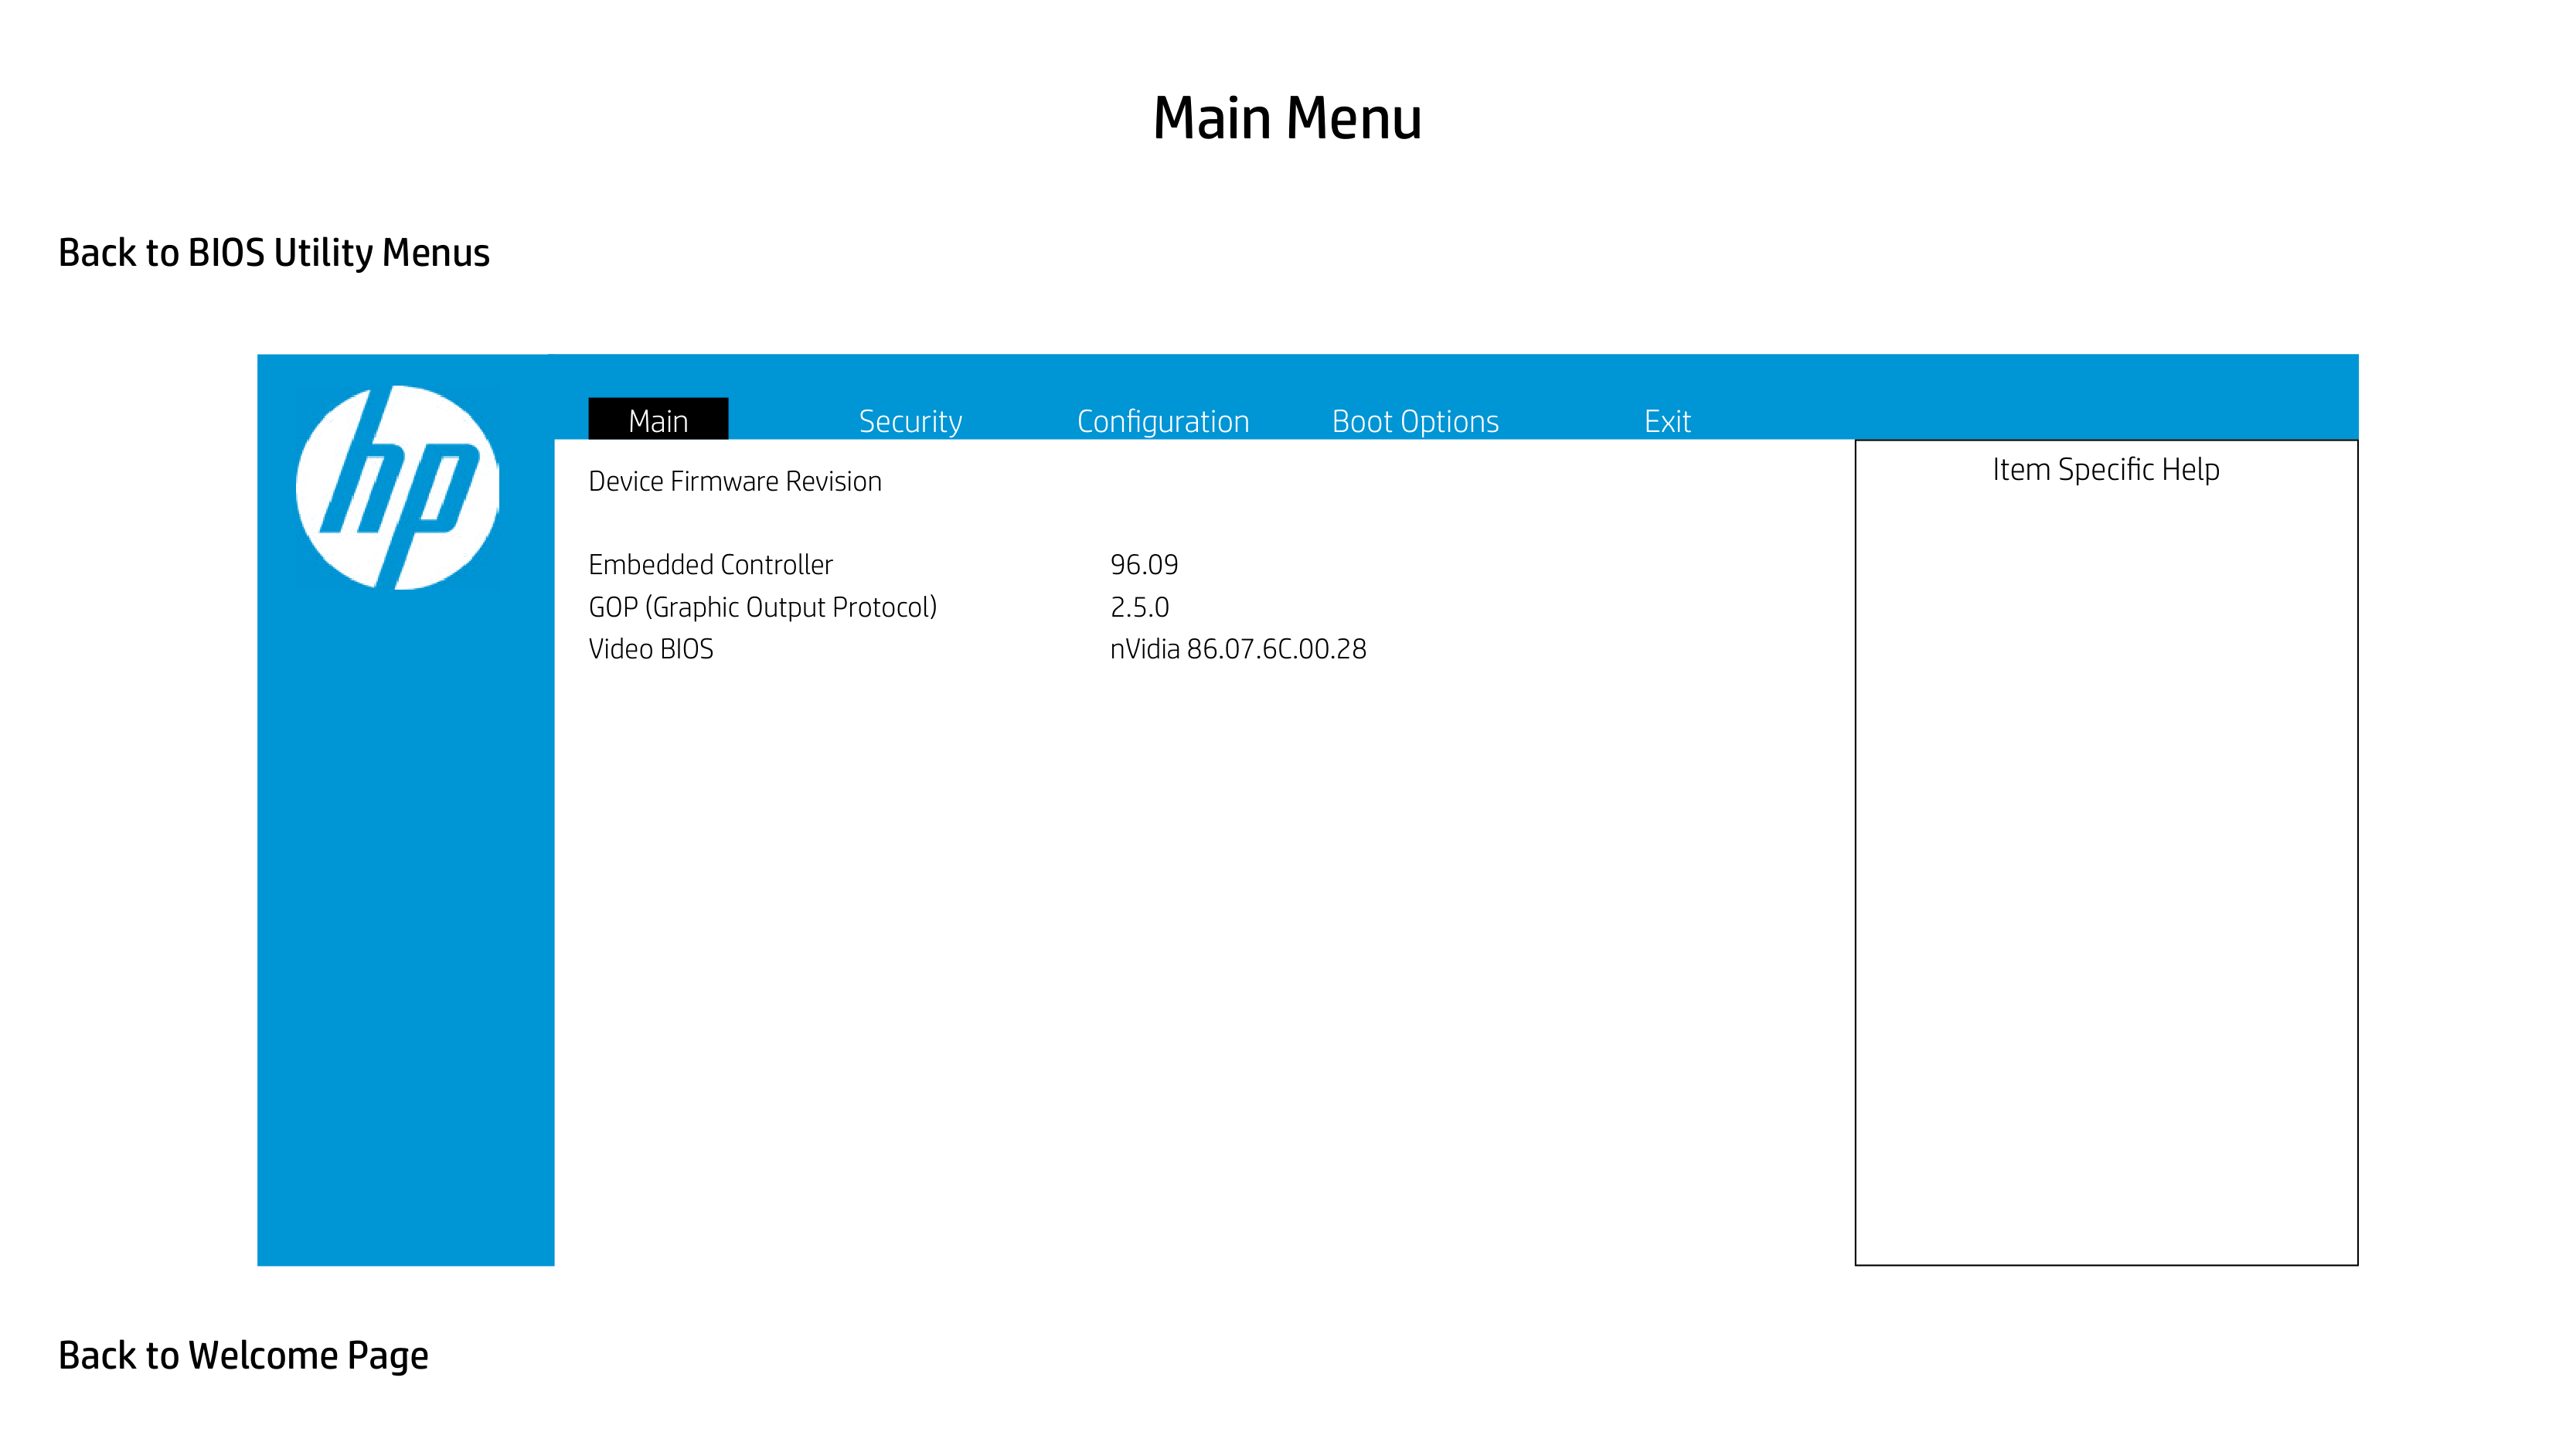
Main Security Configuration Boot Options Exit

System Time [16:45:28] System Date 08/13/2019 Product Name HP Pavilion Gaming Laptop 15-ec0xxx System Family HP Pavilion Product Number G3HSKU2#ABA System Board ID 86D4 Born On Date 00/00/0000 Processor Type AMD Ryzen 5 3550H with Radeon Vega Mobile Gfx Total Memory 8 GB BIOS Vendor AMI BIOS Version B.05
1
Serial Number 5CD9281LKX UUID 39444335-3832-4C31-4B58-80E82C2 System Board CT Number PG3H1DC8JCH010 Factory installed OS Win10 Primary Battery SN 41042 06/25/2019
2
Build ID 19WW2D1T6ae#SABA#DABA Feature Byte 3K6b 7B7K 7WaB apaq asaw bCbh cbdU dXdp dqfP
fdhZ .Na
|Item Specific Help
1. Provides firmware revision information of devices built in the system.
2. View System Log.
| |---|

Device Firmware Revision
Embedded Controller 96.09 GOP (Graphic Output Protocol) 2.5.0 Video BIOS nVidia 86.07.6C.00.28

|Item Specific Help| |---|

System Log
Result: Time:
|Item Specific Help| |---|


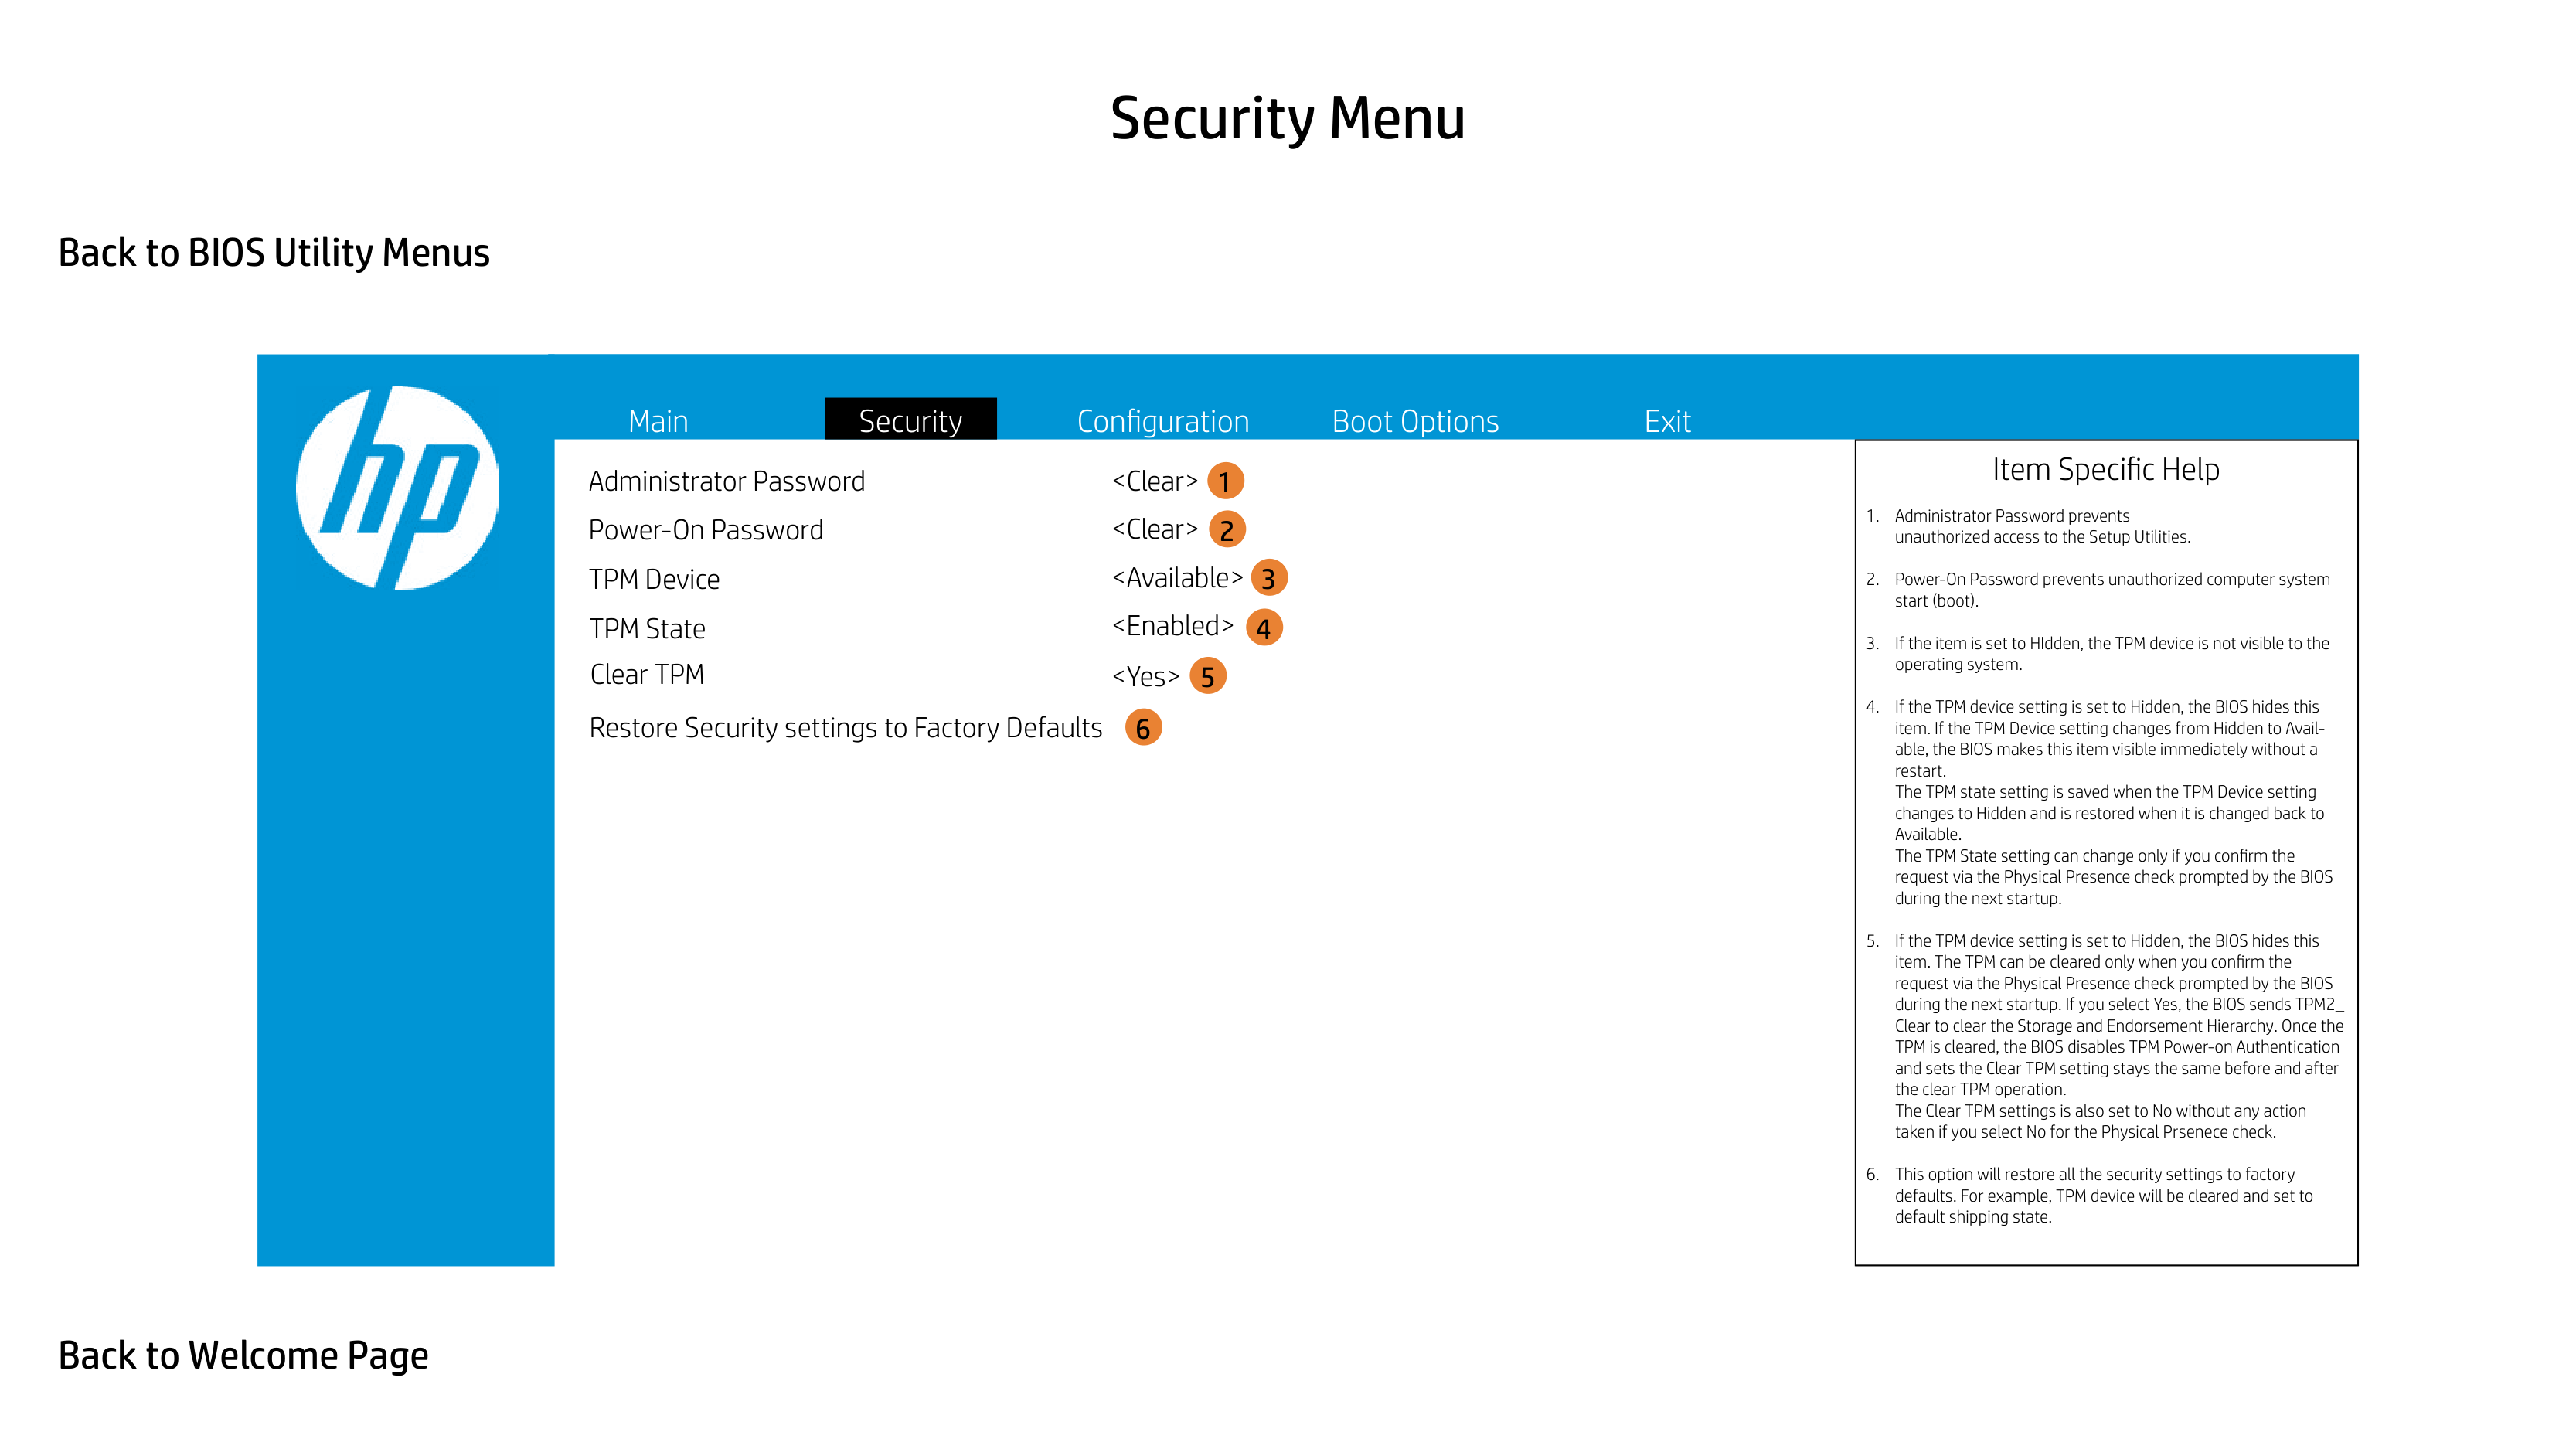
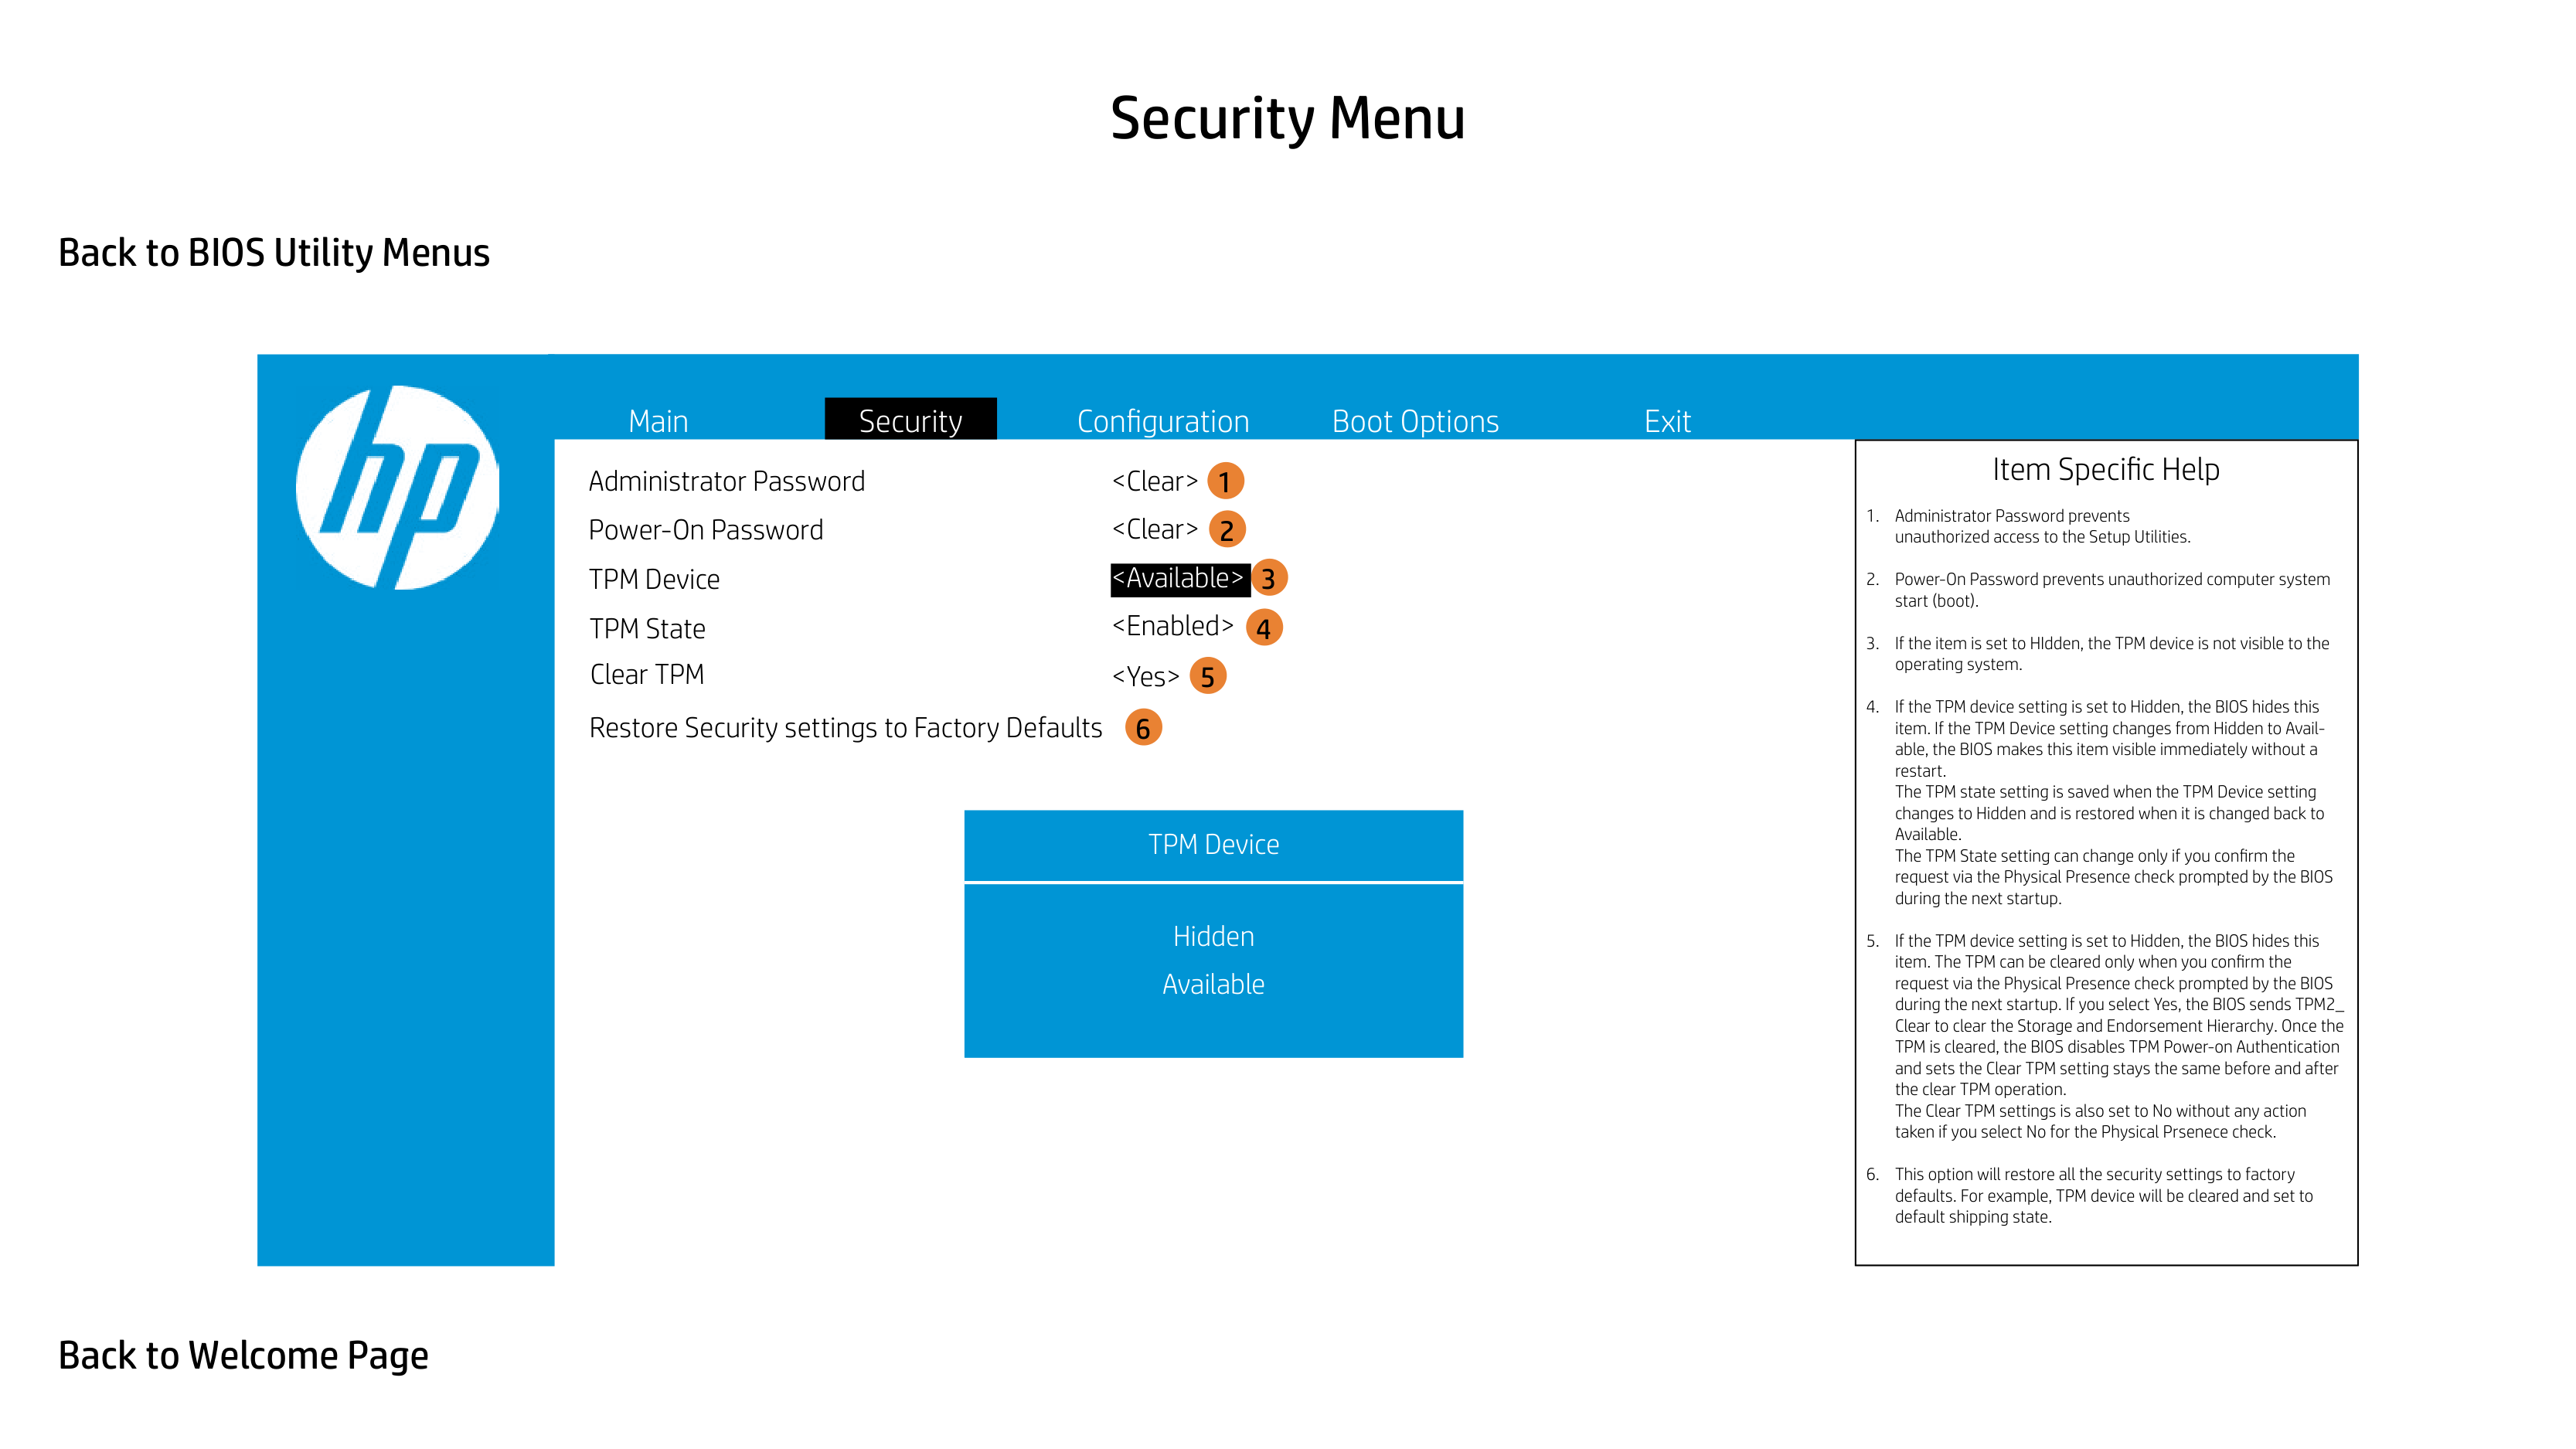
Administrator Password Power-On Password TPM Device
|Item Specific Help
1. Administrator Password prevents unauthorized access to the Setup Utilities.
2. Power-On Password prevents unauthorized computer system start (boot).
3. If the item is set to HIdden, the TPM device is not visible to the operating system.
4. If the TPM device setting is set to Hidden, the BIOS hides this item. If the TPM Device setting changes from Hidden to Available, the BIOS makes this item visible immediately without a restart. The TPM state setting is saved when the TPM Device setting changes to Hidden and is restored when it is changed back to Available. The TPM State setting can change only if you confirm the request via the Physical Presence check prompted by the BIOS during the next startup.
5. If the TPM device setting is set to Hidden, the BIOS hides this item. The TPM can be cleared only when you confirm the request via the Physical Presence check prompted by the BIOS during the next startup. If you select Yes, the BIOS sends TPM2_ Clear to clear the Storage and Endorsement Hierarchy. Once the TPM is cleared, the BIOS disables TPM Power-on Authentication and sets the Clear TPM setting stays the same before and after the clear TPM operation. The Clear TPM settings is also set to No without any action taken if you select No for the Physical Prsenece check.
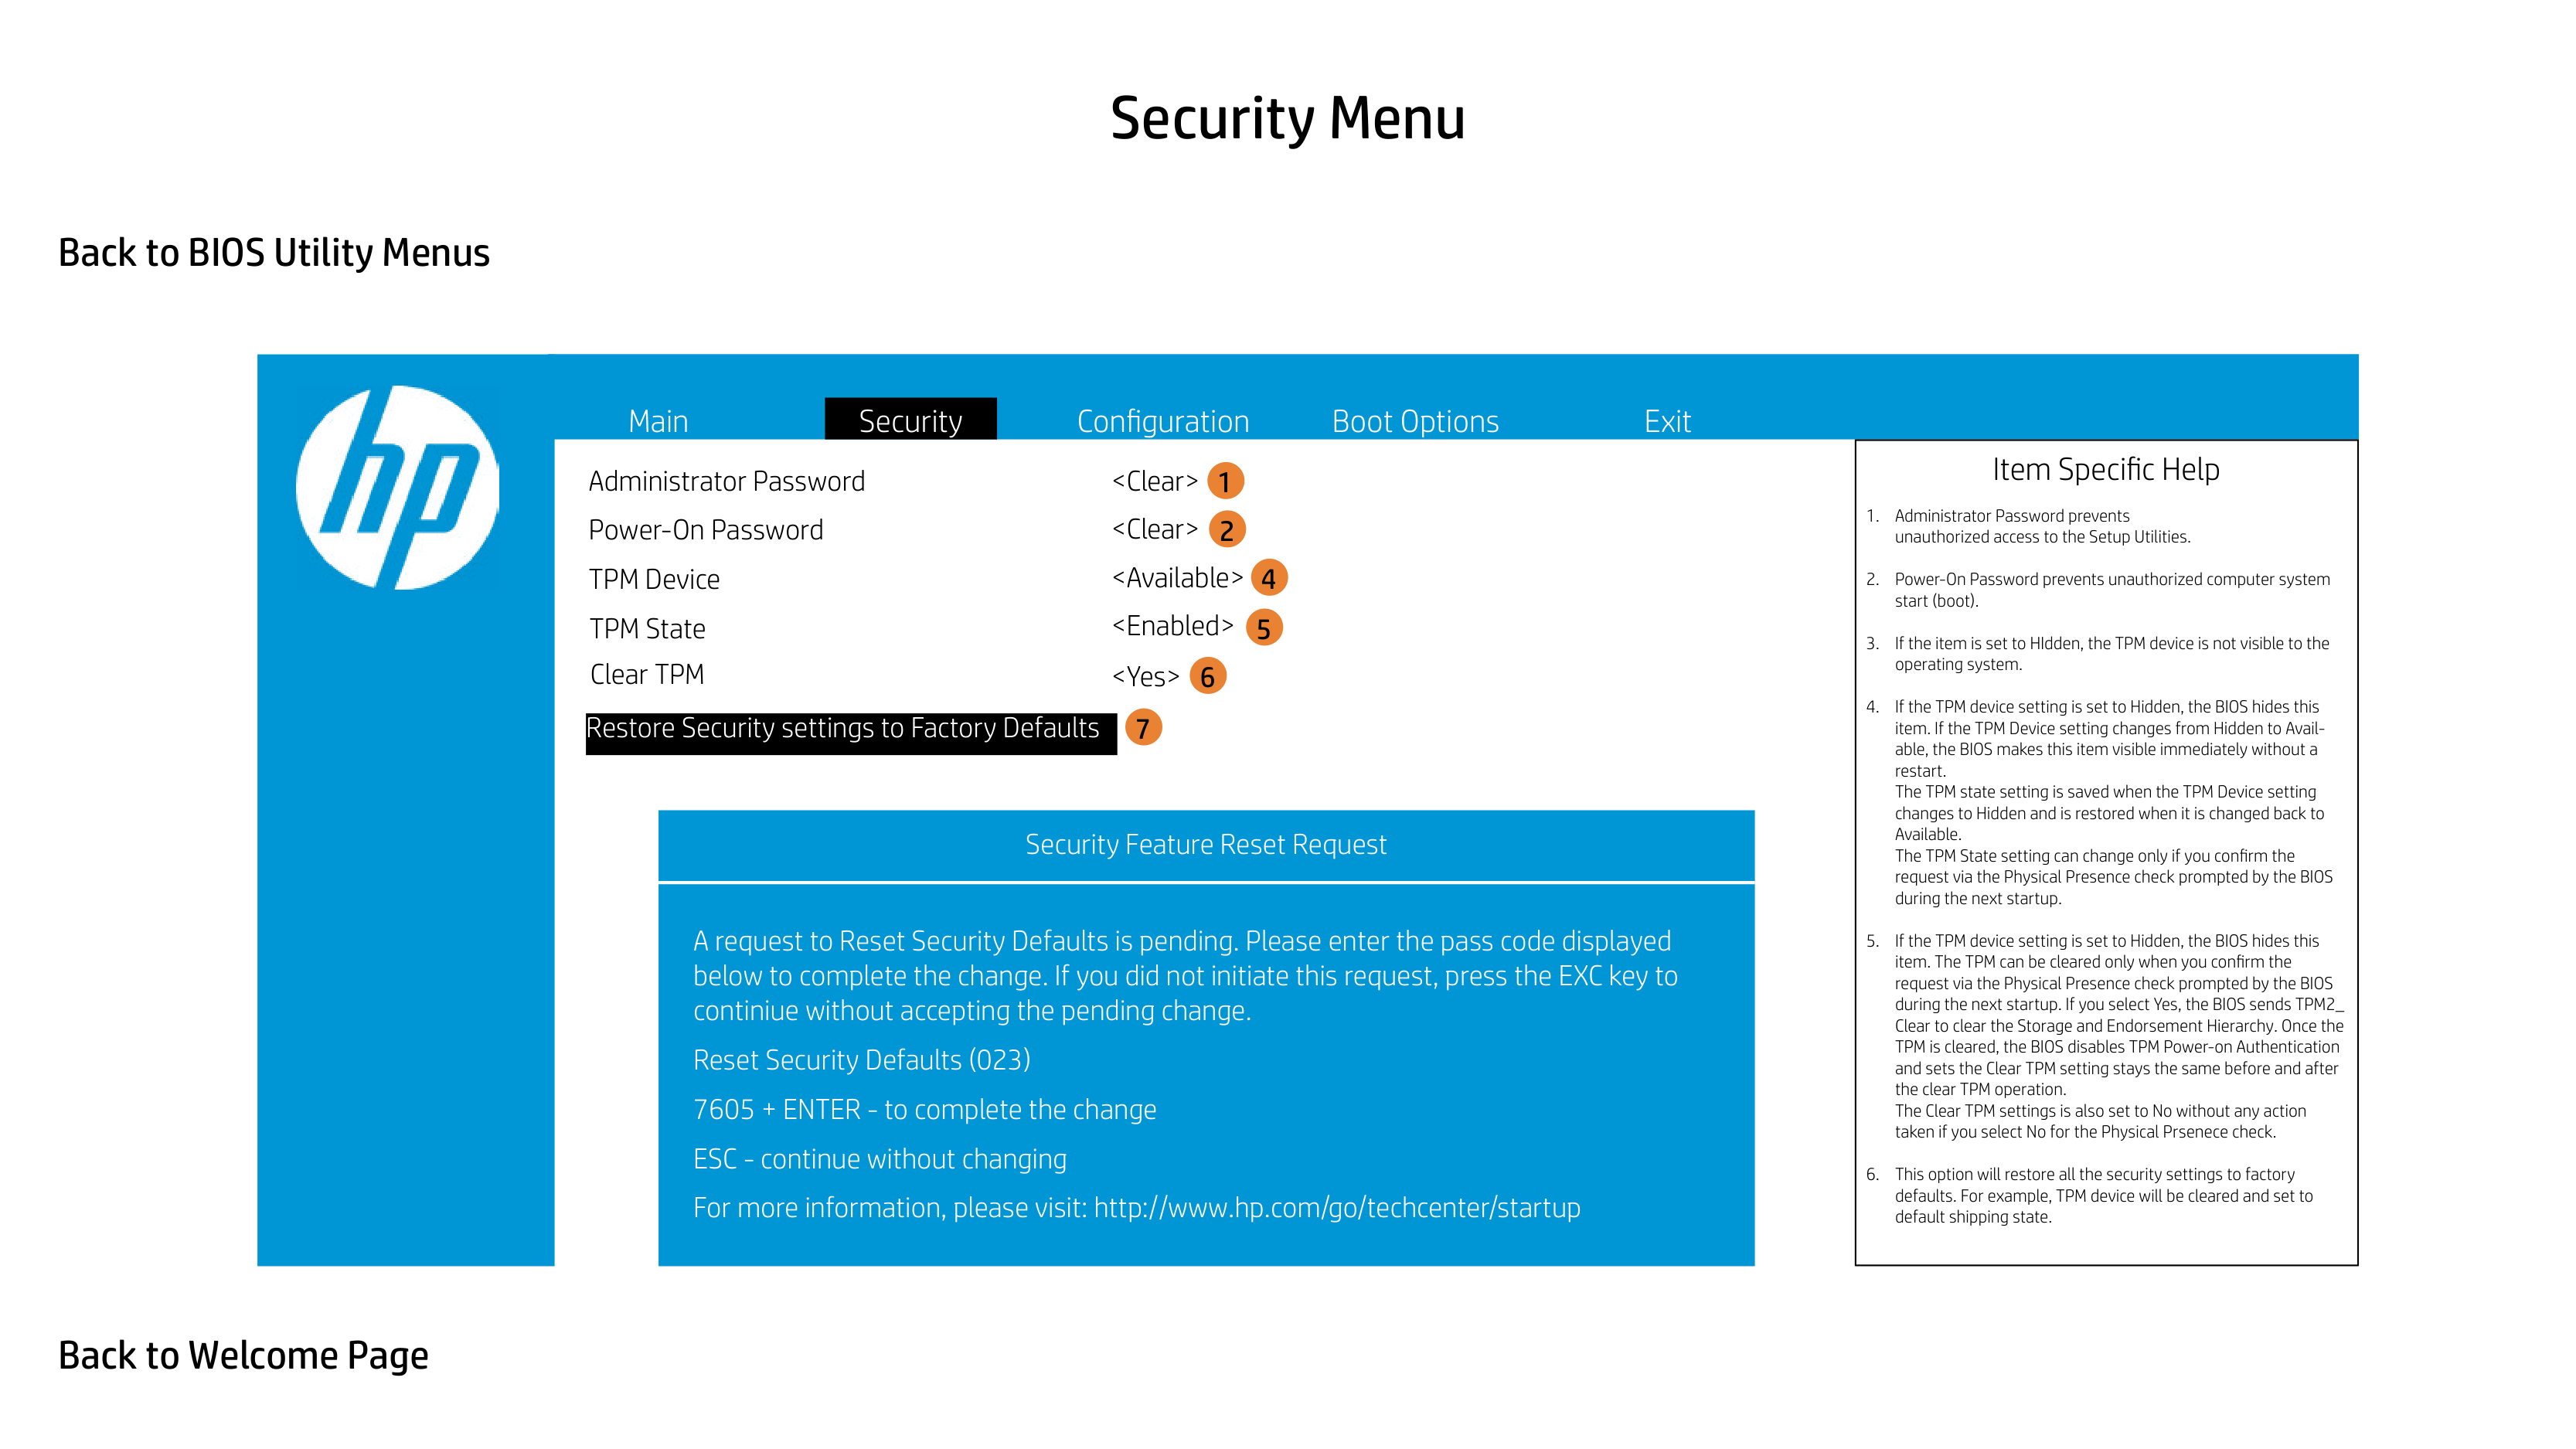
6. This option will restore all the security settings to factory defaults. For example, TPM device will be cleared and set to default shipping state.
| |---|

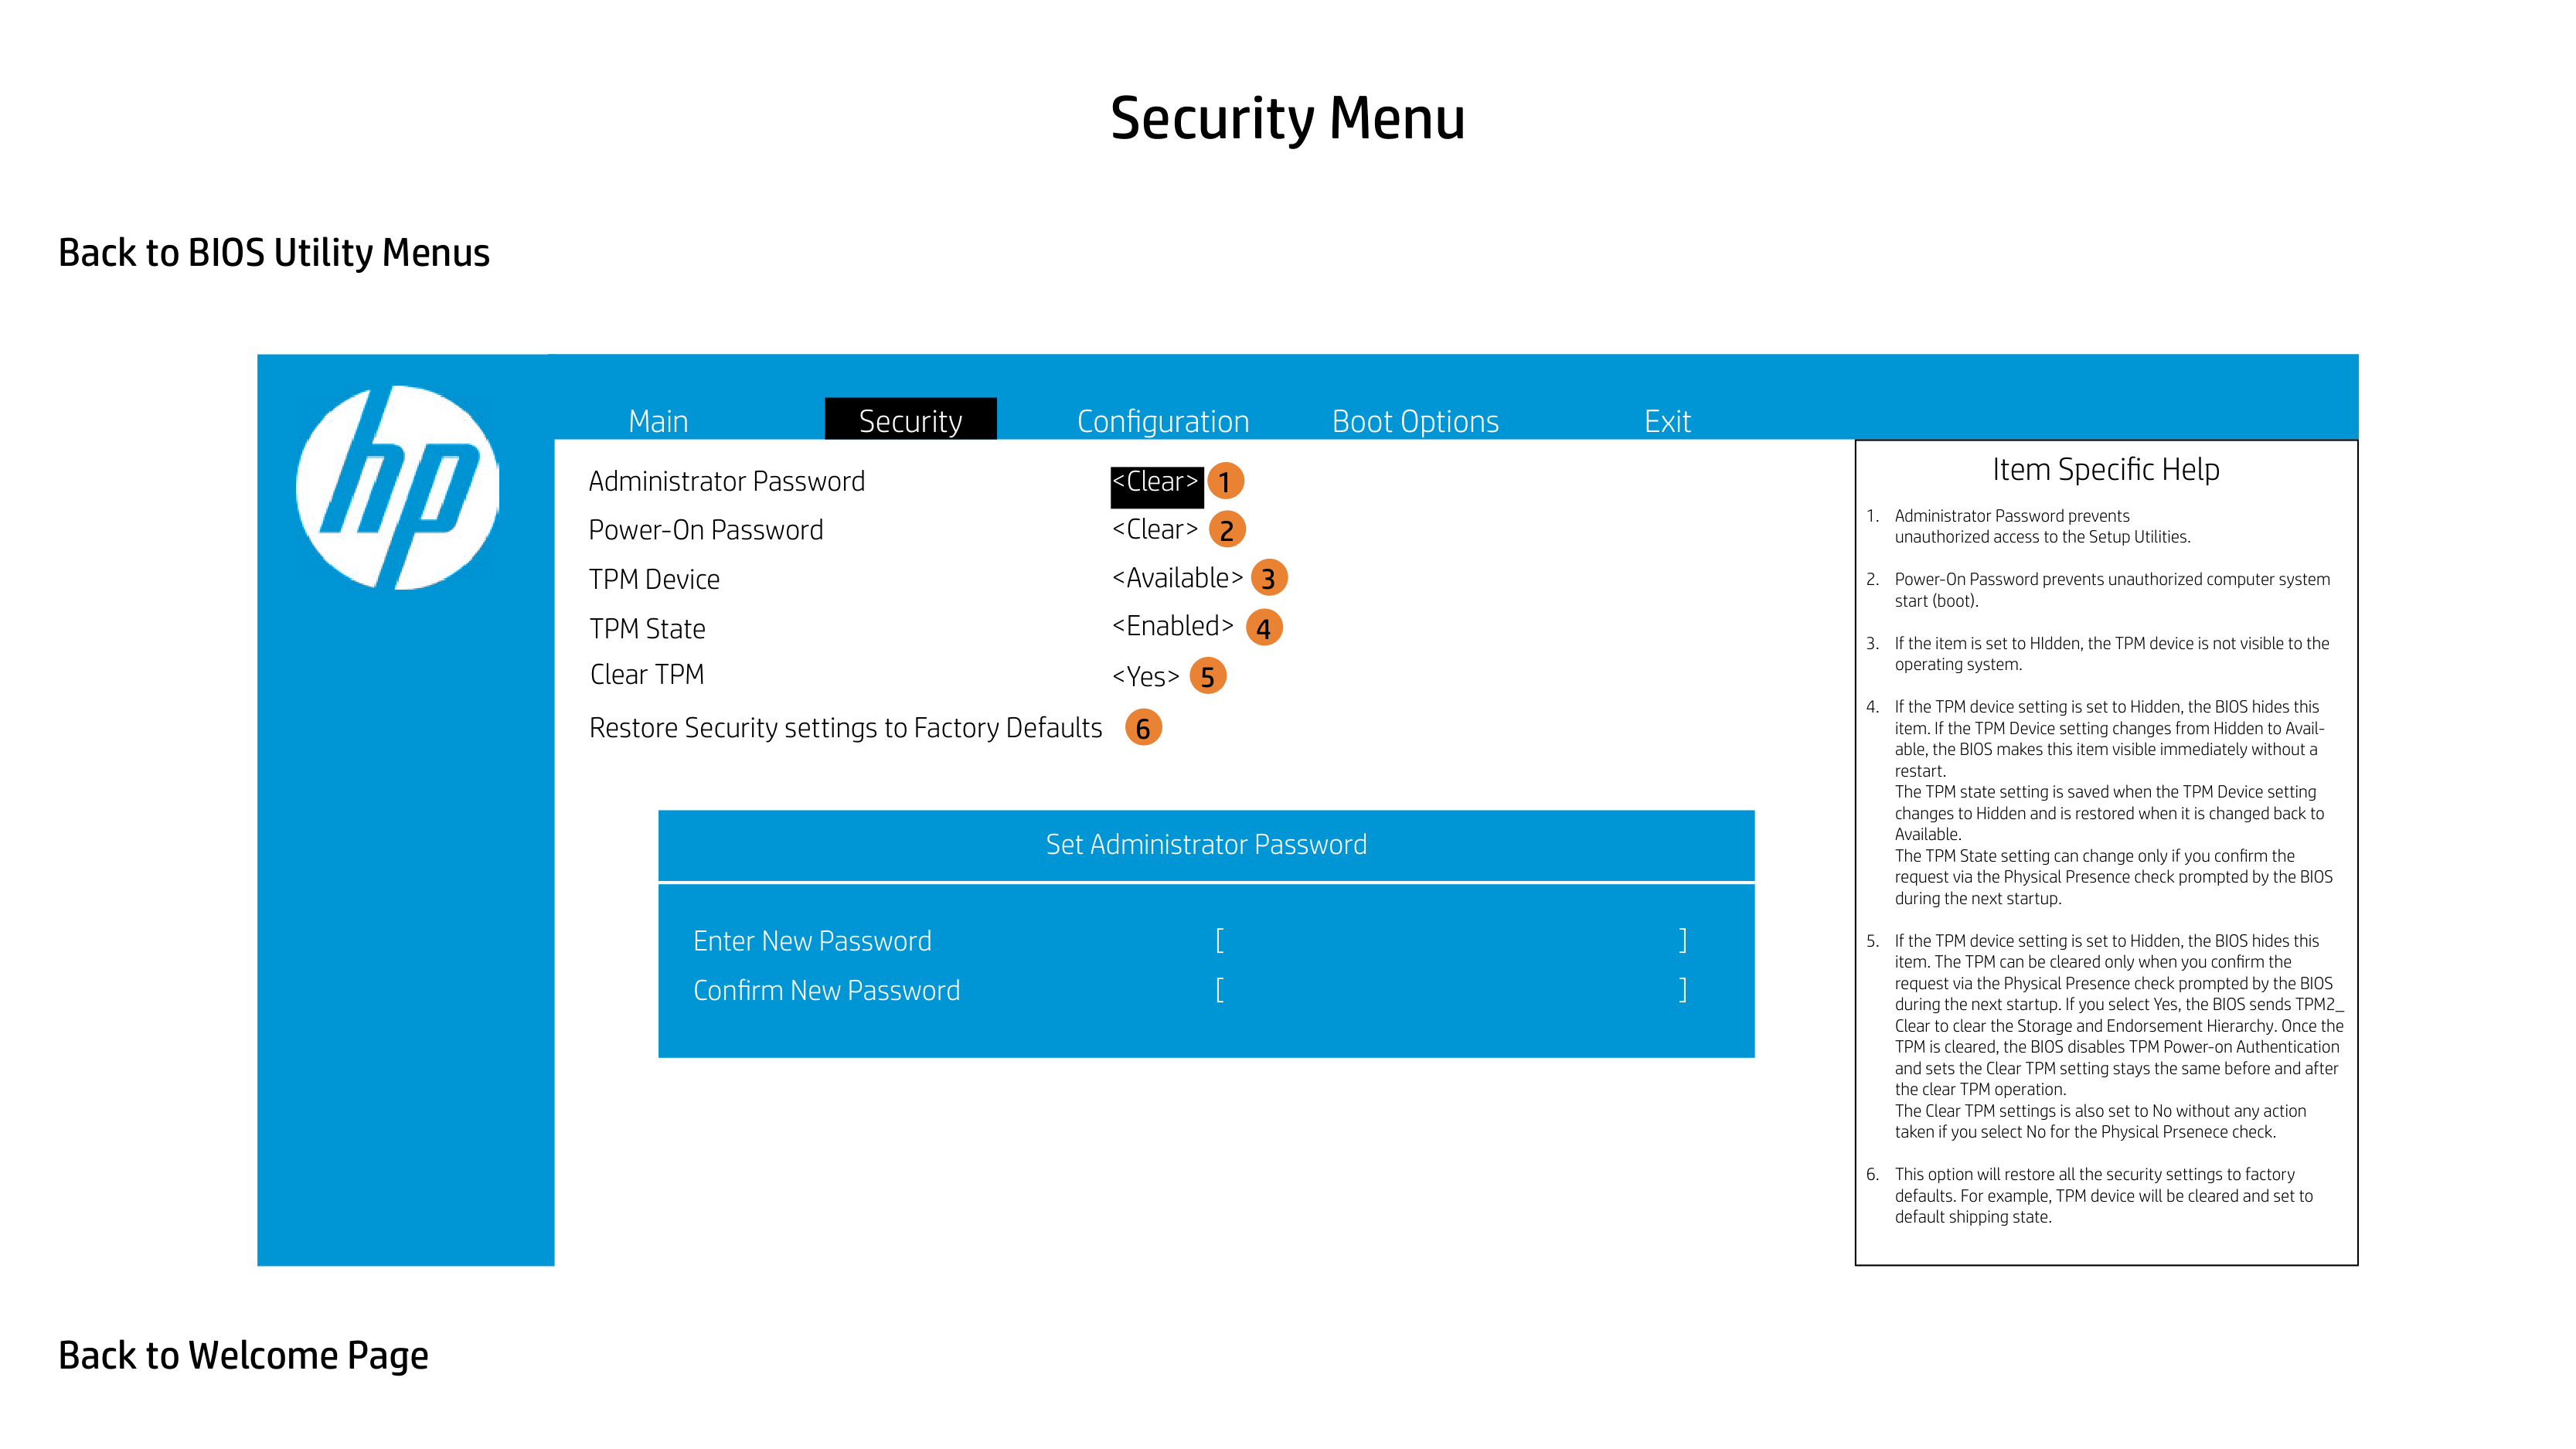
Administrator Password Power-On Password TPM Device
1 2
3
|Item Specific Help
1. Administrator Password prevents unauthorized access to the Setup Utilities.
2. Power-On Password prevents unauthorized computer system start (boot).
3. If the item is set to HIdden, the TPM device is not visible to the operating system.
4. If the TPM device setting is set to Hidden, the BIOS hides this item. If the TPM Device setting changes from Hidden to Available, the BIOS makes this item visible immediately without a restart. The TPM state setting is saved when the TPM Device setting changes to Hidden and is restored when it is changed back to Available. The TPM State setting can change only if you confirm the request via the Physical Presence check prompted by the BIOS during the next startup.
5. If the TPM device setting is set to Hidden, the BIOS hides this item. The TPM can be cleared only when you confirm the request via the Physical Presence check prompted by the BIOS during the next startup. If you select Yes, the BIOS sends TPM2_ Clear to clear the Storage and Endorsement Hierarchy. Once the TPM is cleared, the BIOS disables TPM Power-on Authentication and sets the Clear TPM setting stays the same before and after the clear TPM operation. The Clear TPM settings is also set to No without any action taken if you select No for the Physical Prsenece check.
6. This option will restore all the security settings to factory defaults. For example, TPM device will be cleared and set to default shipping state.
| |---|

Administrator Password Power-On Password TPM Device
1 2
3
TPM Device
|Item Specific Help
1. Administrator Password prevents unauthorized access to the Setup Utilities.
2. Power-On Password prevents unauthorized computer system start (boot).
3. If the item is set to HIdden, the TPM device is not visible to the operating system.
4. If the TPM device setting is set to Hidden, the BIOS hides this item. If the TPM Device setting changes from Hidden to Available, the BIOS makes this item visible immediately without a restart. The TPM state setting is saved when the TPM Device setting changes to Hidden and is restored when it is changed back to Available. The TPM State setting can change only if you confirm the request via the Physical Presence check prompted by the BIOS during the next startup.
5. If the TPM device setting is set to Hidden, the BIOS hides this item. The TPM can be cleared only when you confirm the request via the Physical Presence check prompted by the BIOS during the next startup. If you select Yes, the BIOS sends TPM2_ Clear to clear the Storage and Endorsement Hierarchy. Once the TPM is cleared, the BIOS disables TPM Power-on Authentication and sets the Clear TPM setting stays the same before and after the clear TPM operation. The Clear TPM settings is also set to No without any action taken if you select No for the Physical Prsenece check.
6. This option will restore all the security settings to factory defaults. For example, TPM device will be cleared and set to default shipping state.
| |---|

Administrator Password Power-On Password TPM Device

TPM State
|Item Specific Help
1. Administrator Password prevents unauthorized access to the Setup Utilities.
2. Power-On Password prevents unauthorized computer system start (boot).
3. If the item is set to HIdden, the TPM device is not visible to the operating system.
4. If the TPM device setting is set to Hidden, the BIOS hides this item. If the TPM Device setting changes from Hidden to Available, the BIOS makes this item visible immediately without a restart. The TPM state setting is saved when the TPM Device setting changes to Hidden and is restored when it is changed back to Available. The TPM State setting can change only if you confirm the request via the Physical Presence check prompted by the BIOS during the next startup.
5. If the TPM device setting is set to Hidden, the BIOS hides this item. The TPM can be cleared only when you confirm the request via the Physical Presence check prompted by the BIOS during the next startup. If you select Yes, the BIOS sends TPM2_ Clear to clear the Storage and Endorsement Hierarchy. Once the TPM is cleared, the BIOS disables TPM Power-on Authentication and sets the Clear TPM setting stays the same before and after the clear TPM operation. The Clear TPM settings is also set to No without any action taken if you select No for the Physical Prsenece check.
6. This option will restore all the security settings to factory defaults. For example, TPM device will be cleared and set to default shipping state.
| |---|

Administrator Password Power-On Password TPM Device
1 2
3
Clear TPM
|Item Specific Help
1. Administrator Password prevents unauthorized access to the Setup Utilities.
2. Power-On Password prevents unauthorized computer system start (boot).
3. If the item is set to HIdden, the TPM device is not visible to the operating system.
4. If the TPM device setting is set to Hidden, the BIOS hides this item. If the TPM Device setting changes from Hidden to Available, the BIOS makes this item visible immediately without a restart. The TPM state setting is saved when the TPM Device setting changes to Hidden and is restored when it is changed back to Available. The TPM State setting can change only if you confirm the request via the Physical Presence check prompted by the BIOS during the next startup.
5. If the TPM device setting is set to Hidden, the BIOS hides this item. The TPM can be cleared only when you confirm the request via the Physical Presence check prompted by the BIOS during the next startup. If you select Yes, the BIOS sends TPM2_ Clear to clear the Storage and Endorsement Hierarchy. Once the TPM is cleared, the BIOS disables TPM Power-on Authentication and sets the Clear TPM setting stays the same before and after the clear TPM operation. The Clear TPM settings is also set to No without any action taken if you select No for the Physical Prsenece check.
6. This option will restore all the security settings to factory defaults. For example, TPM device will be cleared and set to default shipping state.
| |---|

Administrator Password Power-On Password TPM Device
1 2
4
|Item Specific Help
1. Administrator Password prevents unauthorized access to the Setup Utilities.
2. Power-On Password prevents unauthorized computer system start (boot).
3. If the item is set to HIdden, the TPM device is not visible to the operating system.
4. If the TPM device setting is set to Hidden, the BIOS hides this item. If the TPM Device setting changes from Hidden to Available, the BIOS makes this item visible immediately without a restart. The TPM state setting is saved when the TPM Device setting changes to Hidden and is restored when it is changed back to Available. The TPM State setting can change only if you confirm the request via the Physical Presence check prompted by the BIOS during the next startup.
5. If the TPM device setting is set to Hidden, the BIOS hides this item. The TPM can be cleared only when you confirm the request via the Physical Presence check prompted by the BIOS during the next startup. If you select Yes, the BIOS sends TPM2_ Clear to clear the Storage and Endorsement Hierarchy. Once the TPM is cleared, the BIOS disables TPM Power-on Authentication and sets the Clear TPM setting stays the same before and after the clear TPM operation. The Clear TPM settings is also set to No without any action taken if you select No for the Physical Prsenece check.
6. This option will restore all the security settings to factory defaults. For example, TPM device will be cleared and set to default shipping state.
| |---|

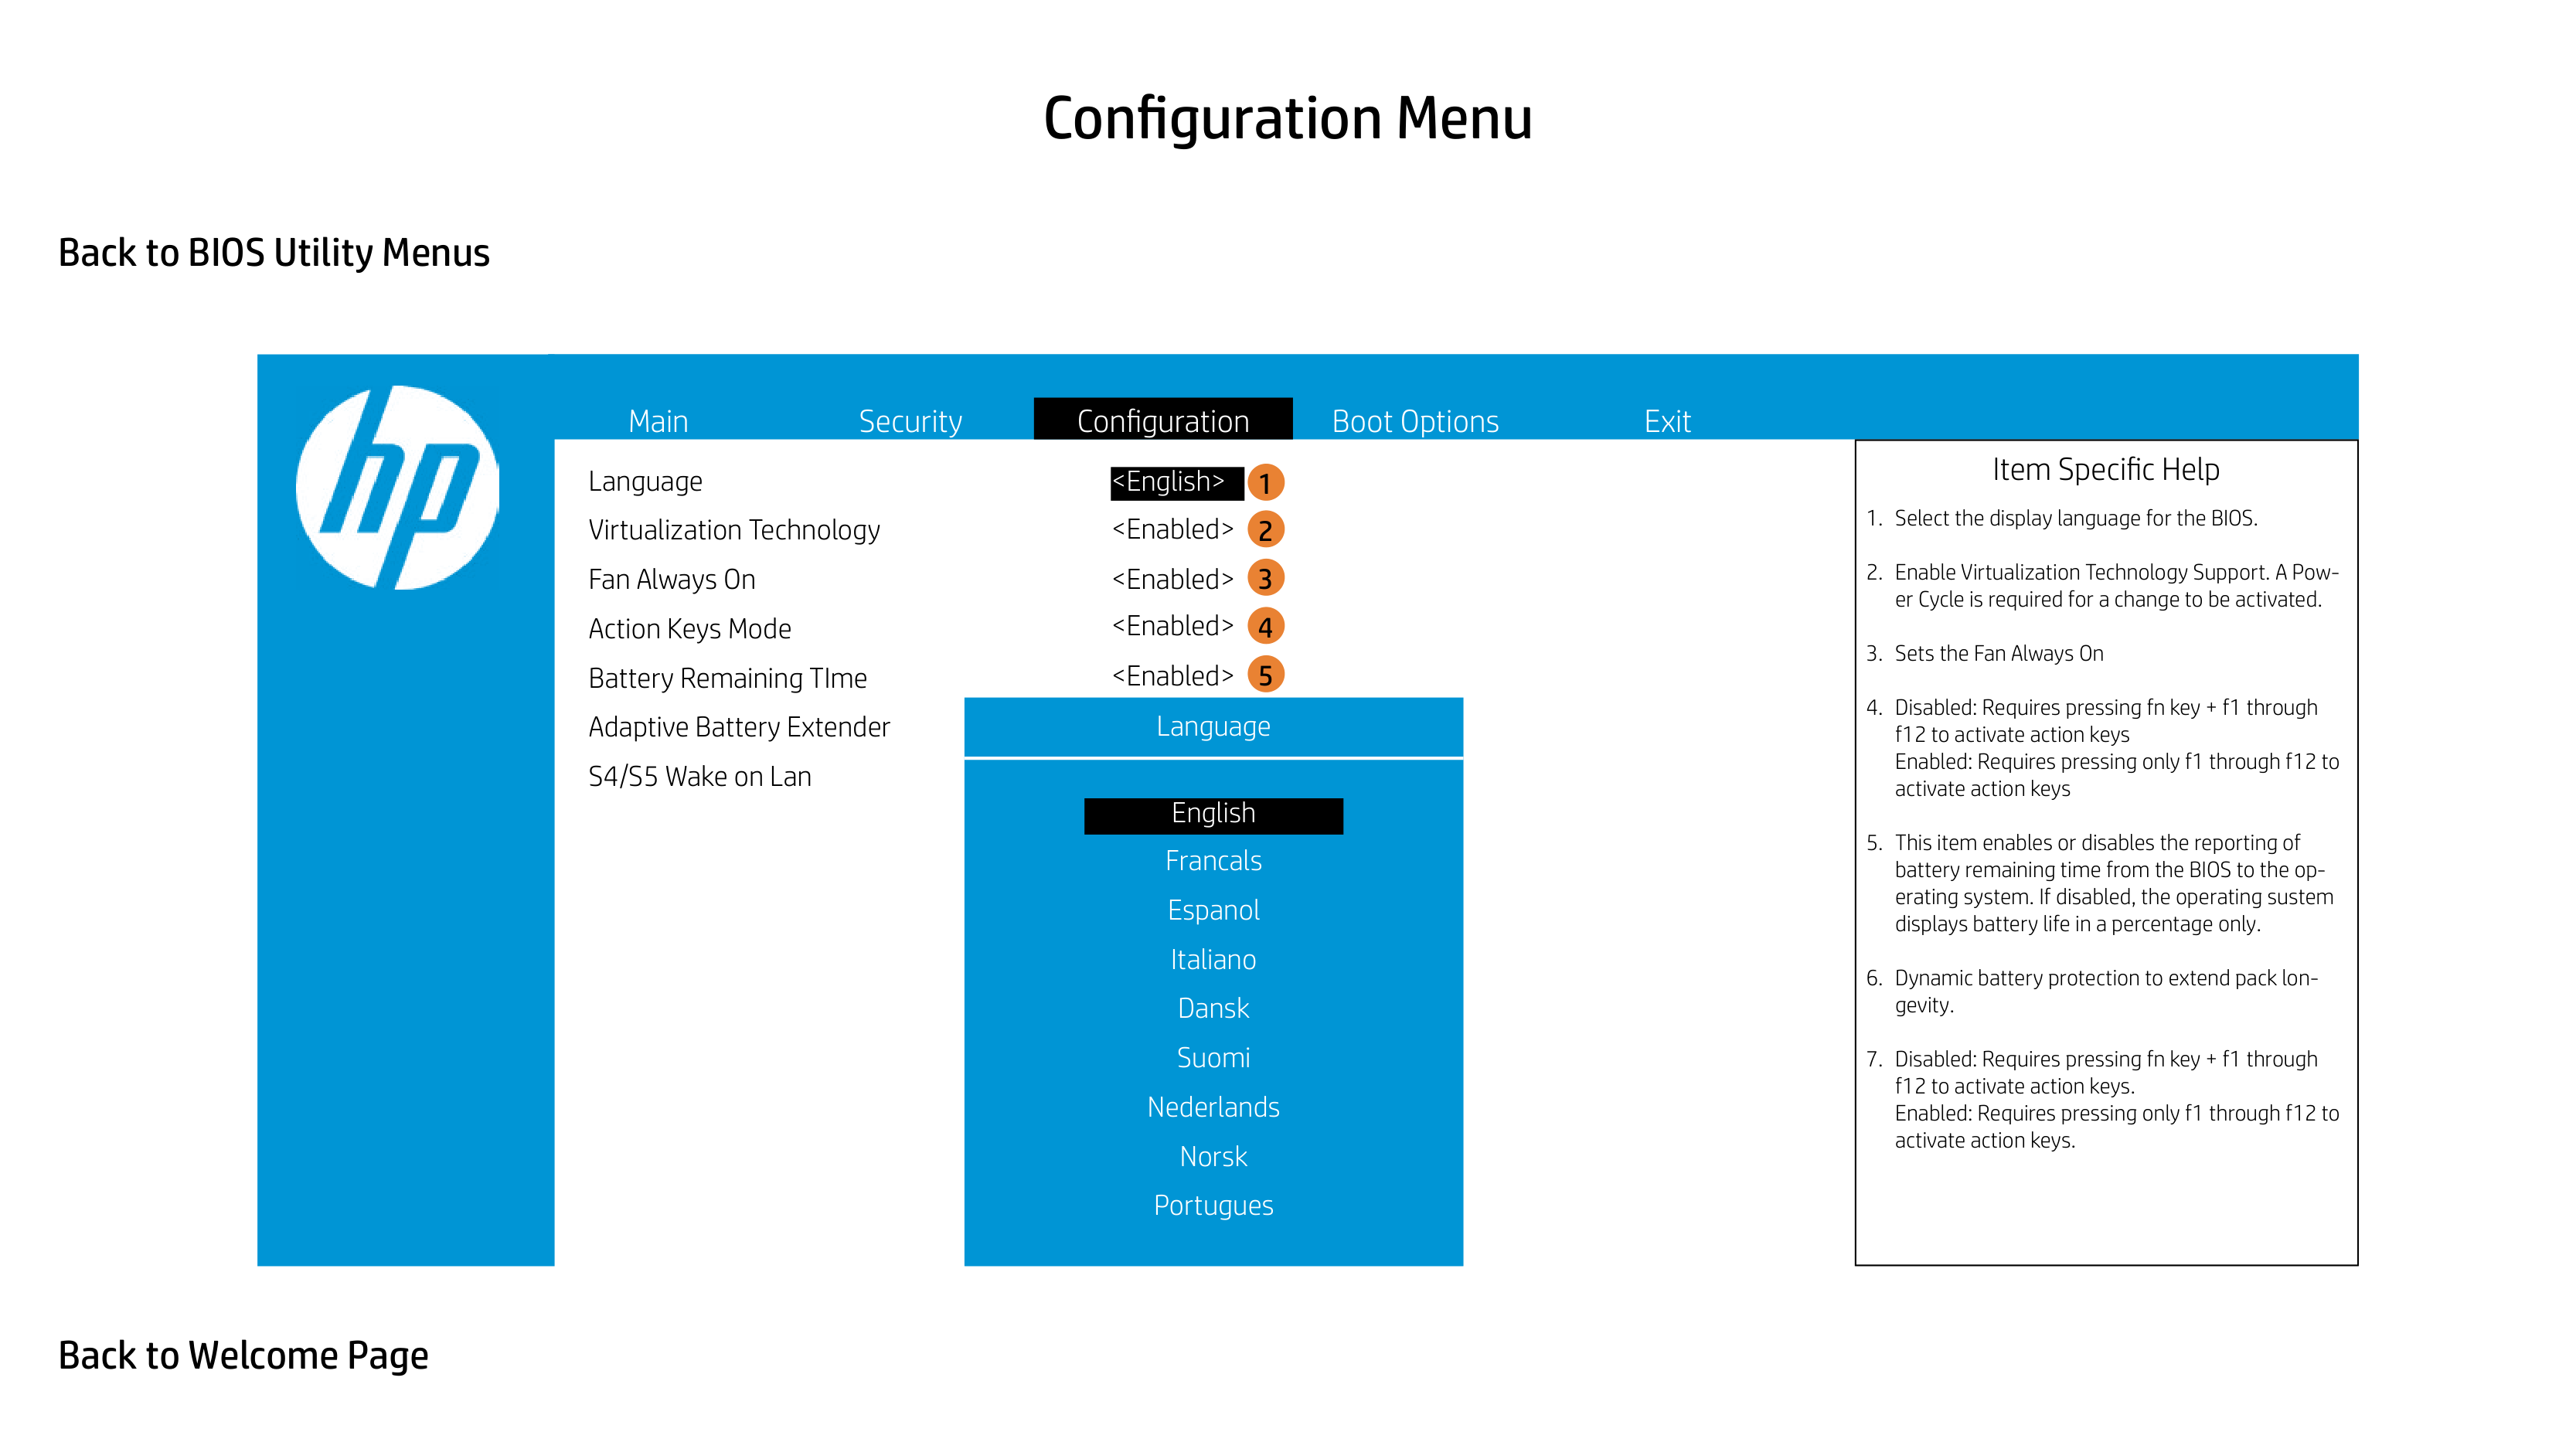
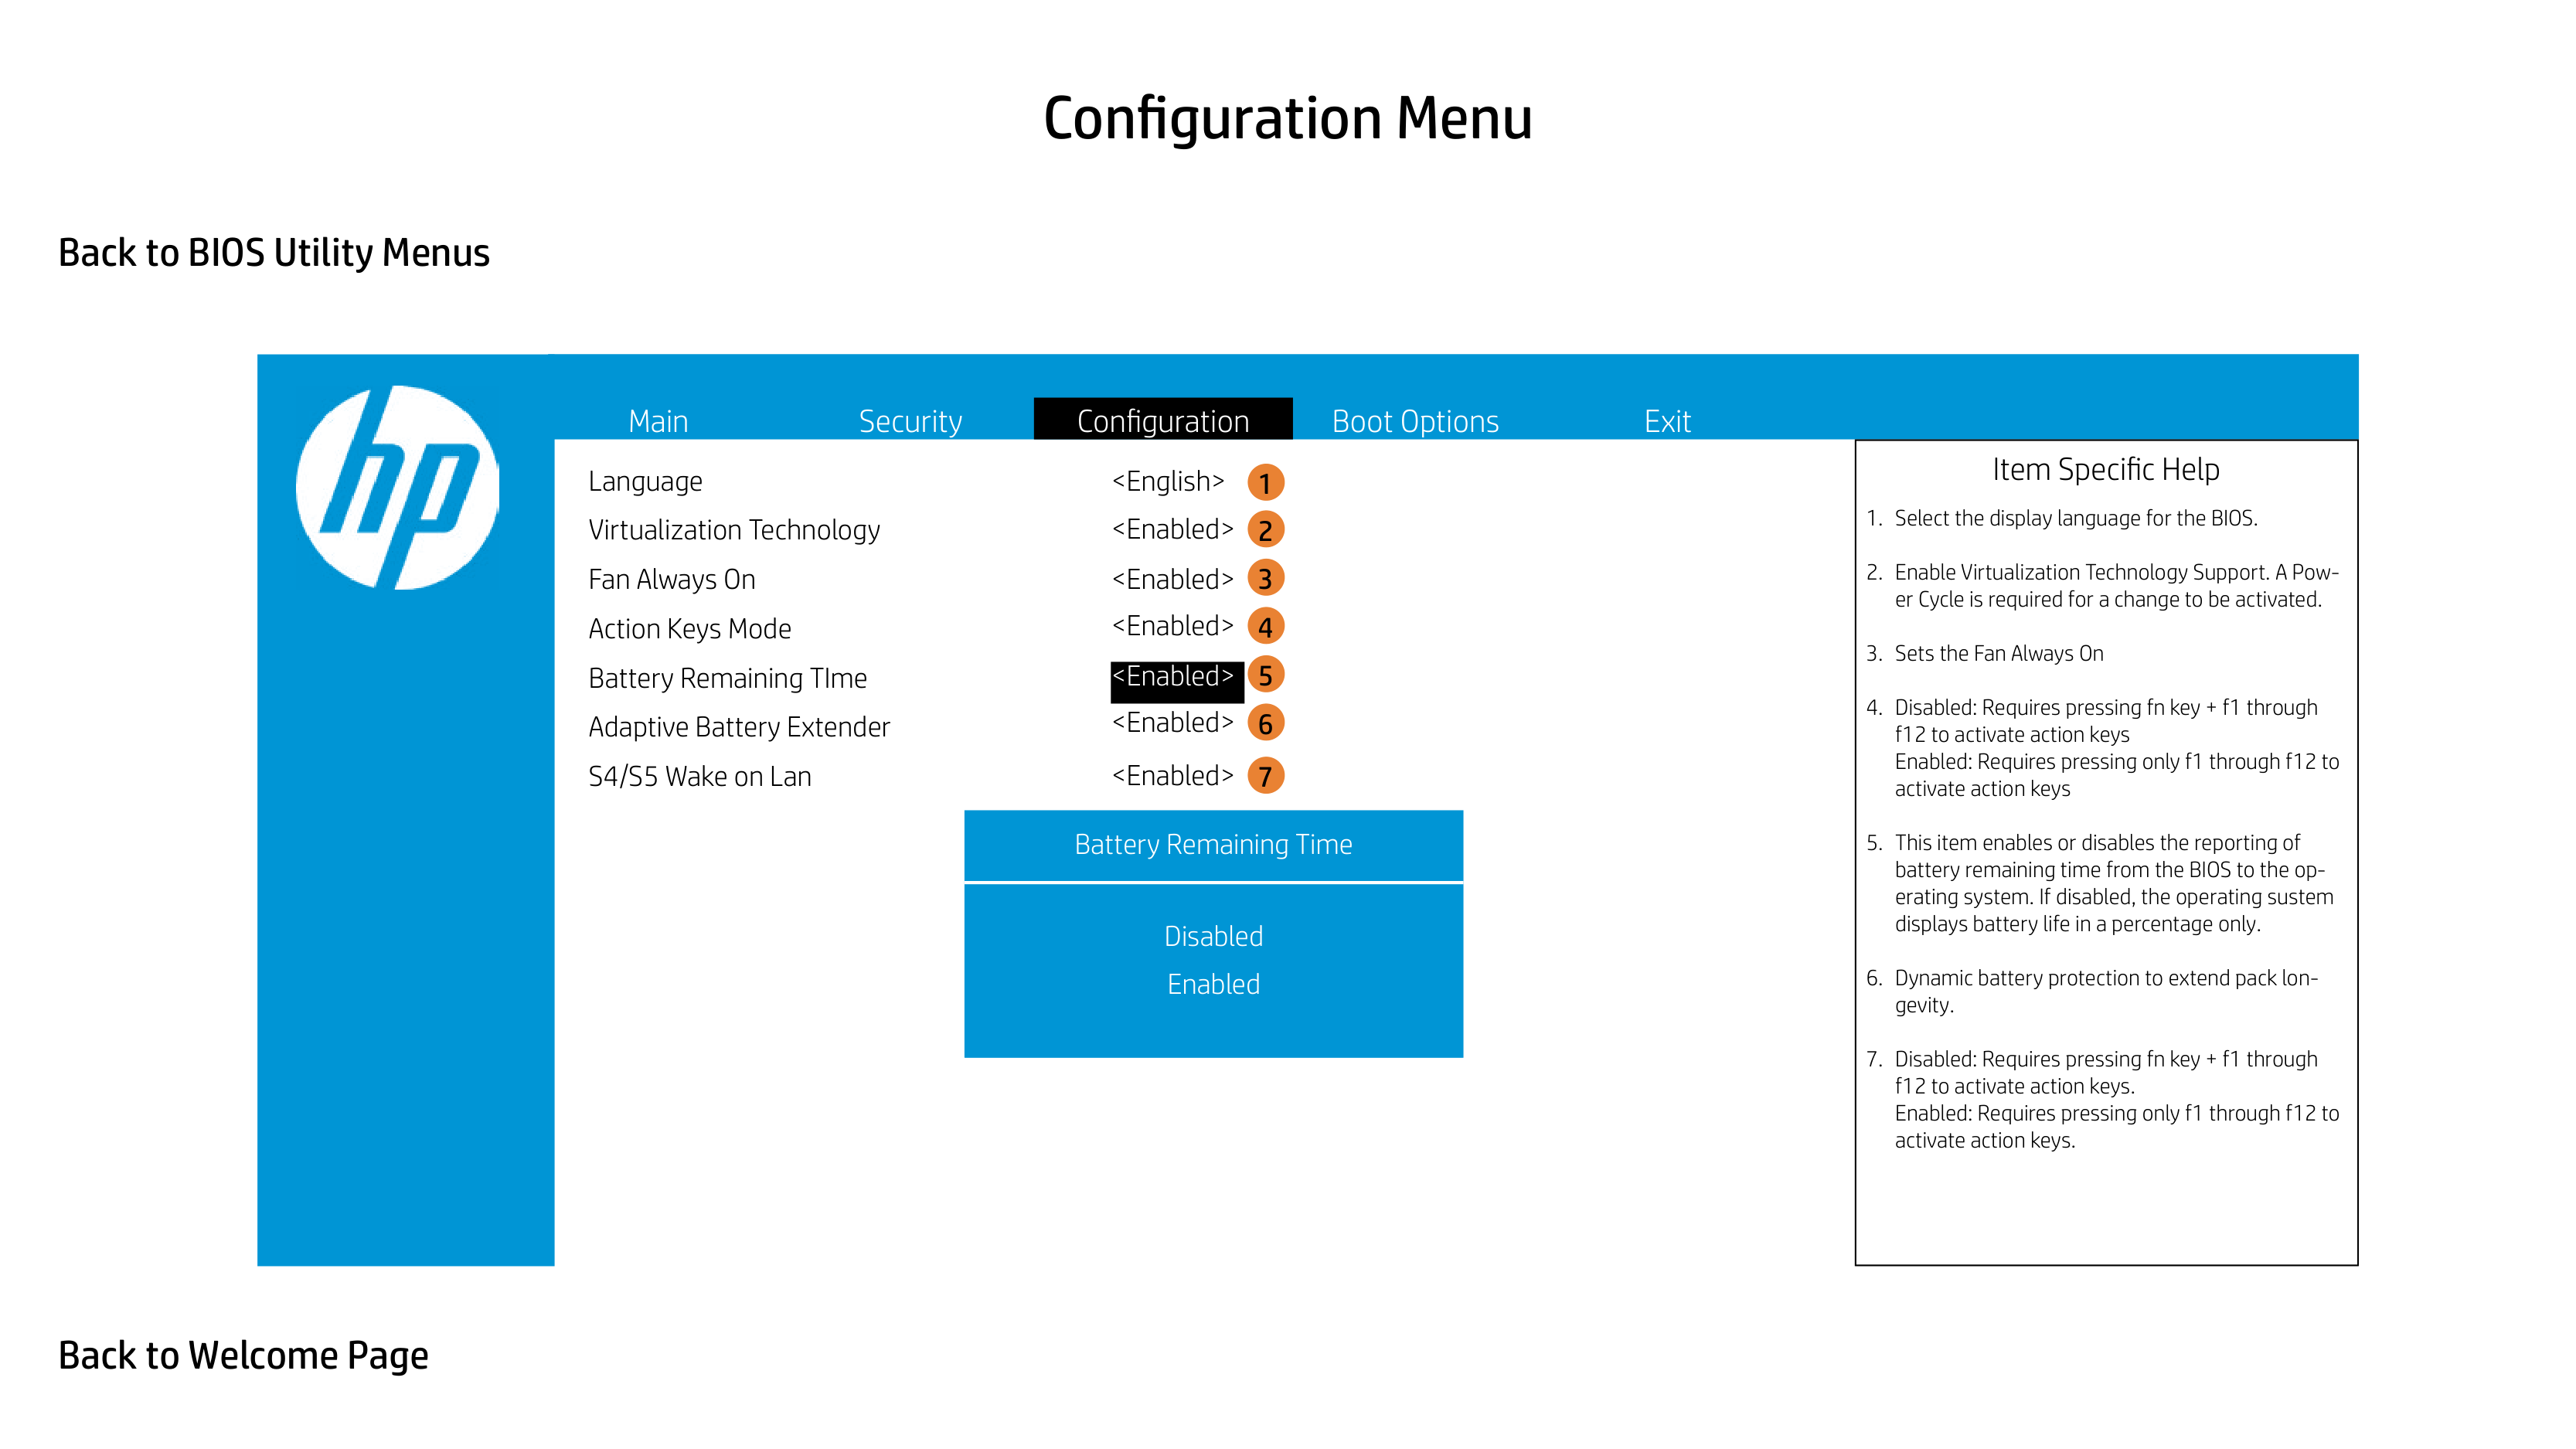
Language Virtualization Technology Fan Always On Action Keys Mode Battery Remaining TIme Adaptive Battery Extender S4/S5 Wake on Lan

3
|Item Specific Help
1. Select the display language for the BIOS.
2. Enable Virtualization Technology Support. A Power Cycle is required for a change to be activated.
3. Sets the Fan Always On
4. Disabled: Requires pressing fn key + f1 through f12 to activate action keys Enabled: Requires pressing only f1 through f12 to activate action keys
5. This item enables or disables the reporting of battery remaining time from the BIOS to the operating system. If disabled, the operating sustem displays battery life in a percentage only.
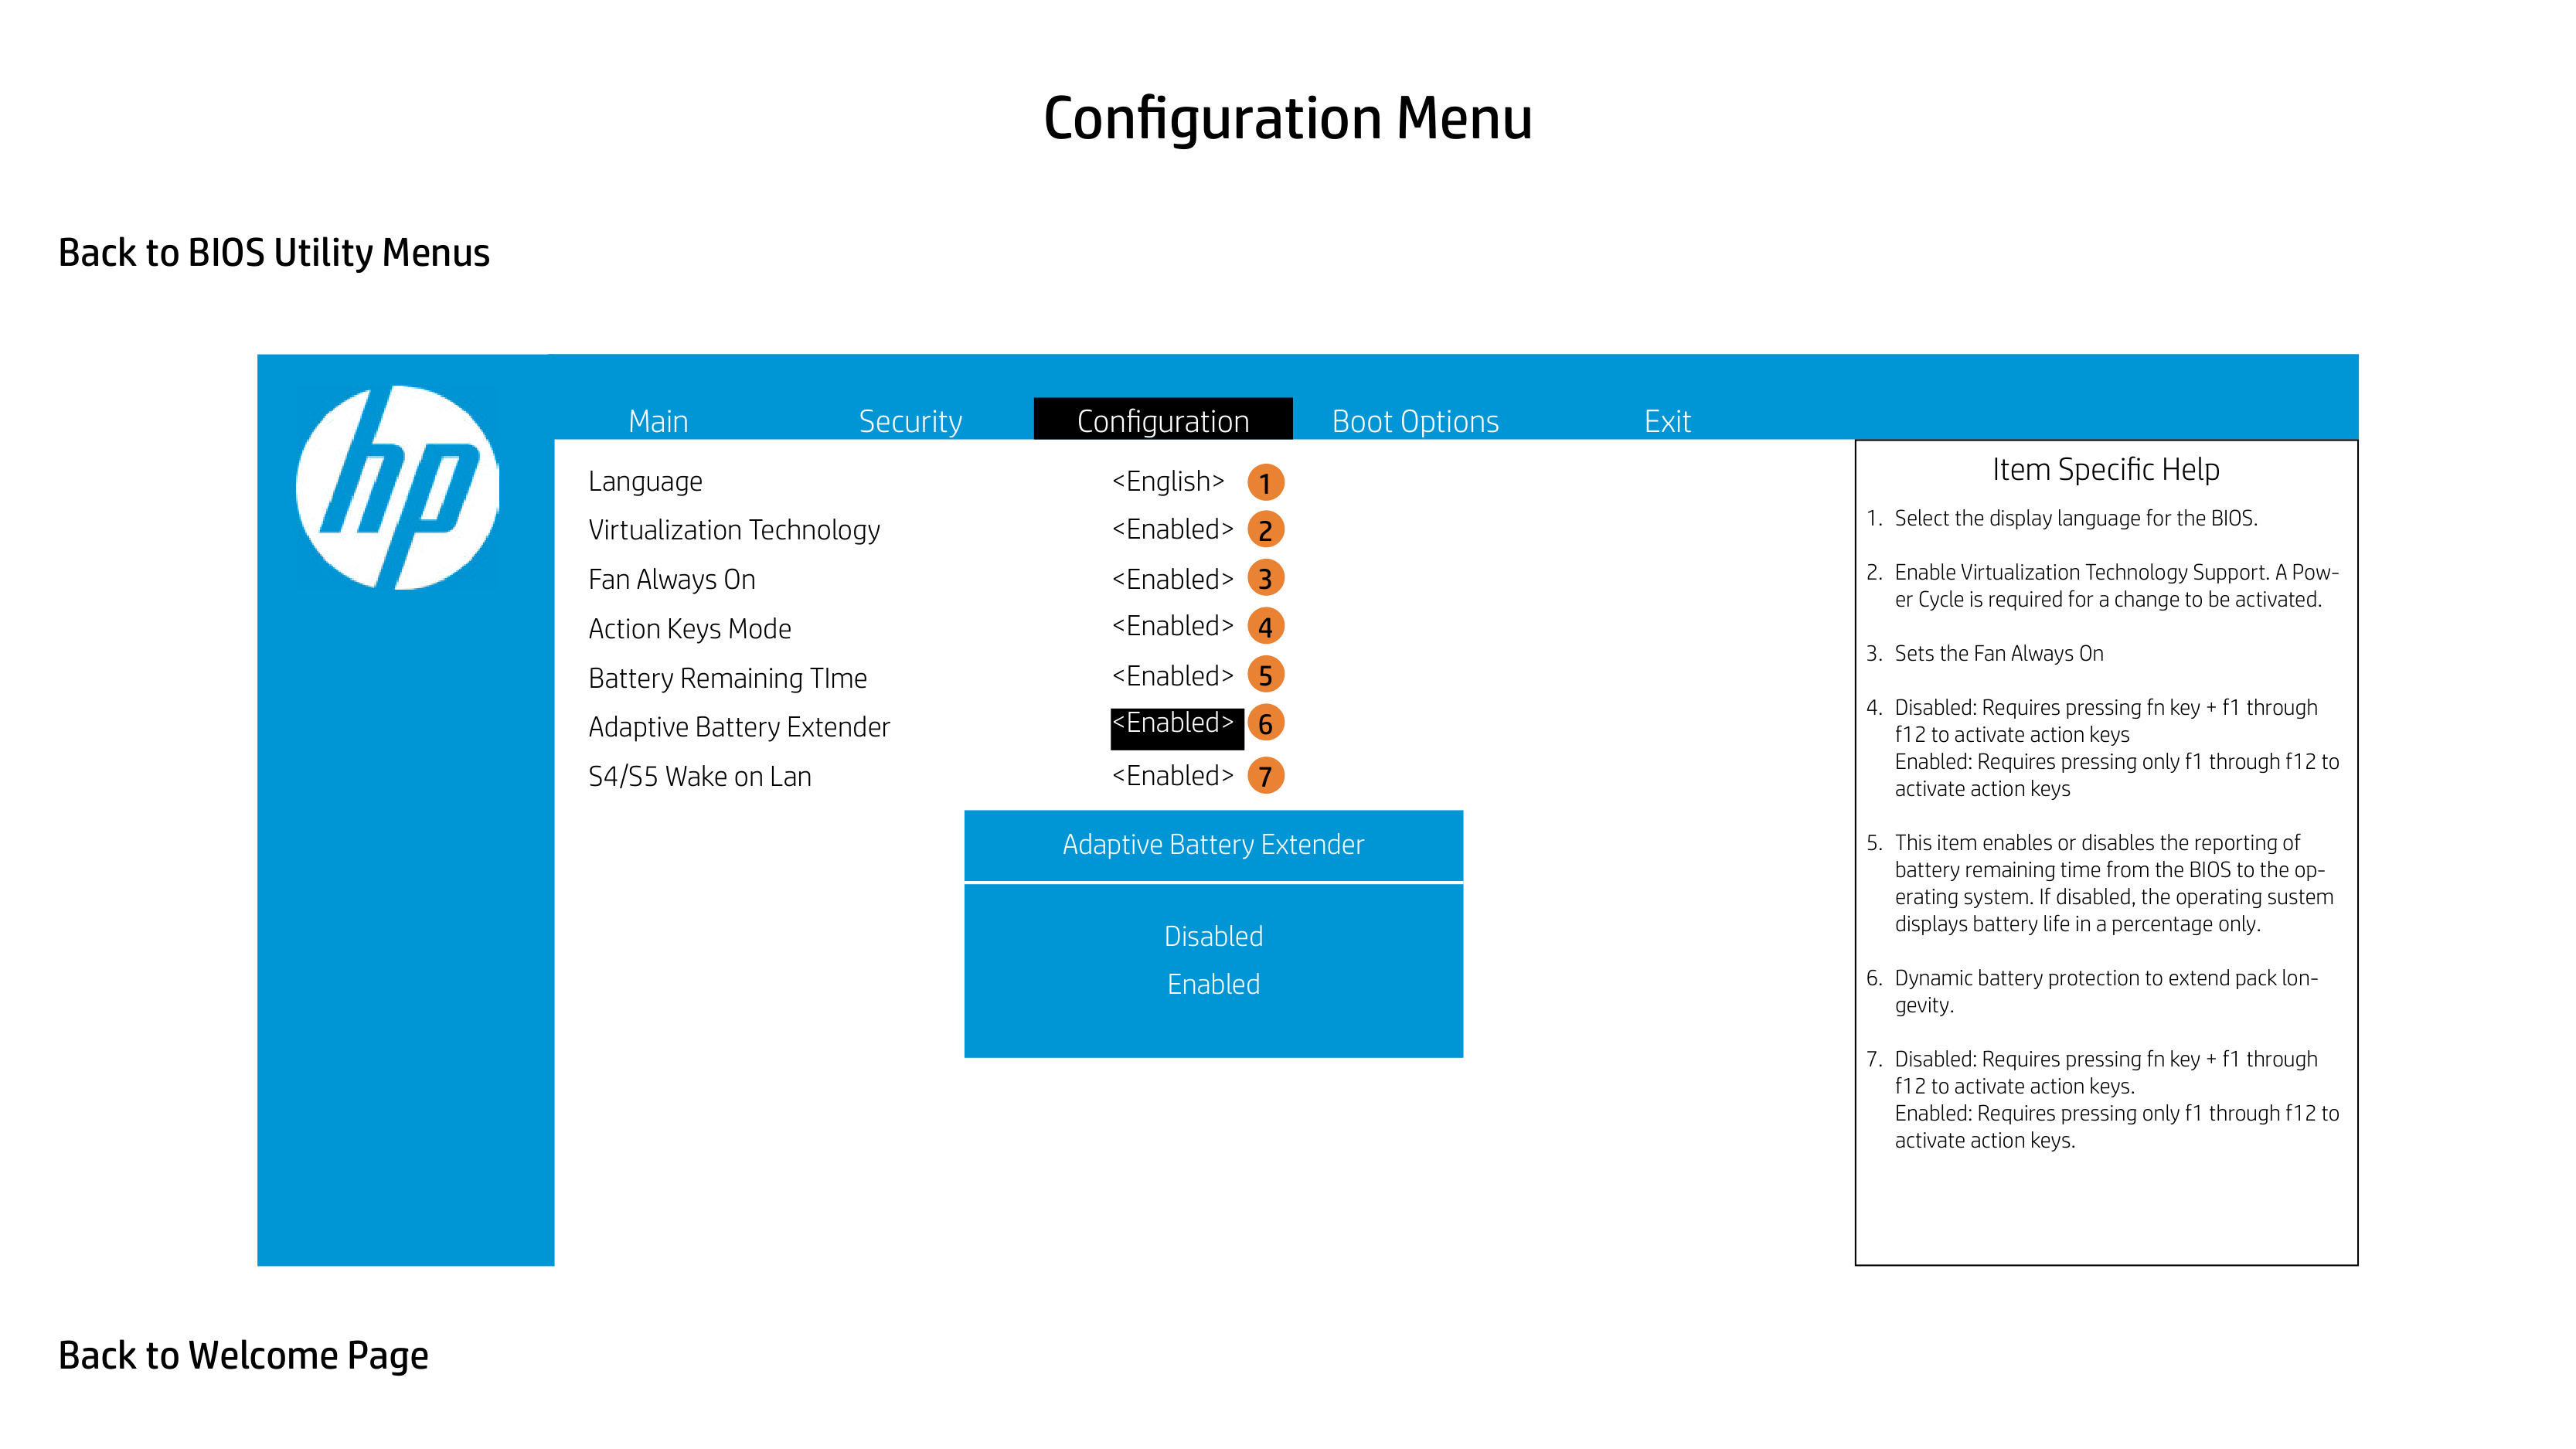
6. Dynamic battery protection to extend pack longevity.
7. Disabled: Requires pressing fn key + f1 through f12 to activate action keys. Enabled: Requires pressing only f1 through f12 to activate action keys.
| |---|


Language Virtualization Technology Fan Always On Action Keys Mode Battery Remaining TIme Adaptive Battery Extender S4/S5 Wake on Lan
4
6
Language
7
|Item Specific Help
1. Select the display language for the BIOS.
2. Enable Virtualization Technology Support. A Power Cycle is required for a change to be activated.
3. Sets the Fan Always On
4. Disabled: Requires pressing fn key + f1 through f12 to activate action keys Enabled: Requires pressing only f1 through f12 to activate action keys
5. This item enables or disables the reporting of battery remaining time from the BIOS to the operating system. If disabled, the operating sustem displays battery life in a percentage only.
6. Dynamic battery protection to extend pack longevity.
7. Disabled: Requires pressing fn key + f1 through f12 to activate action keys. Enabled: Requires pressing only f1 through f12 to activate action keys.
| |---|

Language Virtualization Technology Fan Always On Action Keys Mode Battery Remaining TIme Adaptive Battery Extender S4/S5 Wake on Lan
1 2
6

3
##### 7
Virtualizatiion Technology
|Item Specific Help
1. Select the display language for the BIOS.
2. Enable Virtualization Technology Support. A Power Cycle is required for a change to be activated.
3. Sets the Fan Always On
4. Disabled: Requires pressing fn key + f1 through f12 to activate action keys Enabled: Requires pressing only f1 through f12 to activate action keys
5. This item enables or disables the reporting of battery remaining time from the BIOS to the operating system. If disabled, the operating sustem displays battery life in a percentage only.
6. Dynamic battery protection to extend pack longevity.
7. Disabled: Requires pressing fn key + f1 through f12 to activate action keys. Enabled: Requires pressing only f1 through f12 to activate action keys.
| |---|

Language Virtualization Technology Fan Always On Action Keys Mode Battery Remaining TIme Adaptive Battery Extender S4/S5 Wake on Lan
1 2
3
4
5
6
##### 7
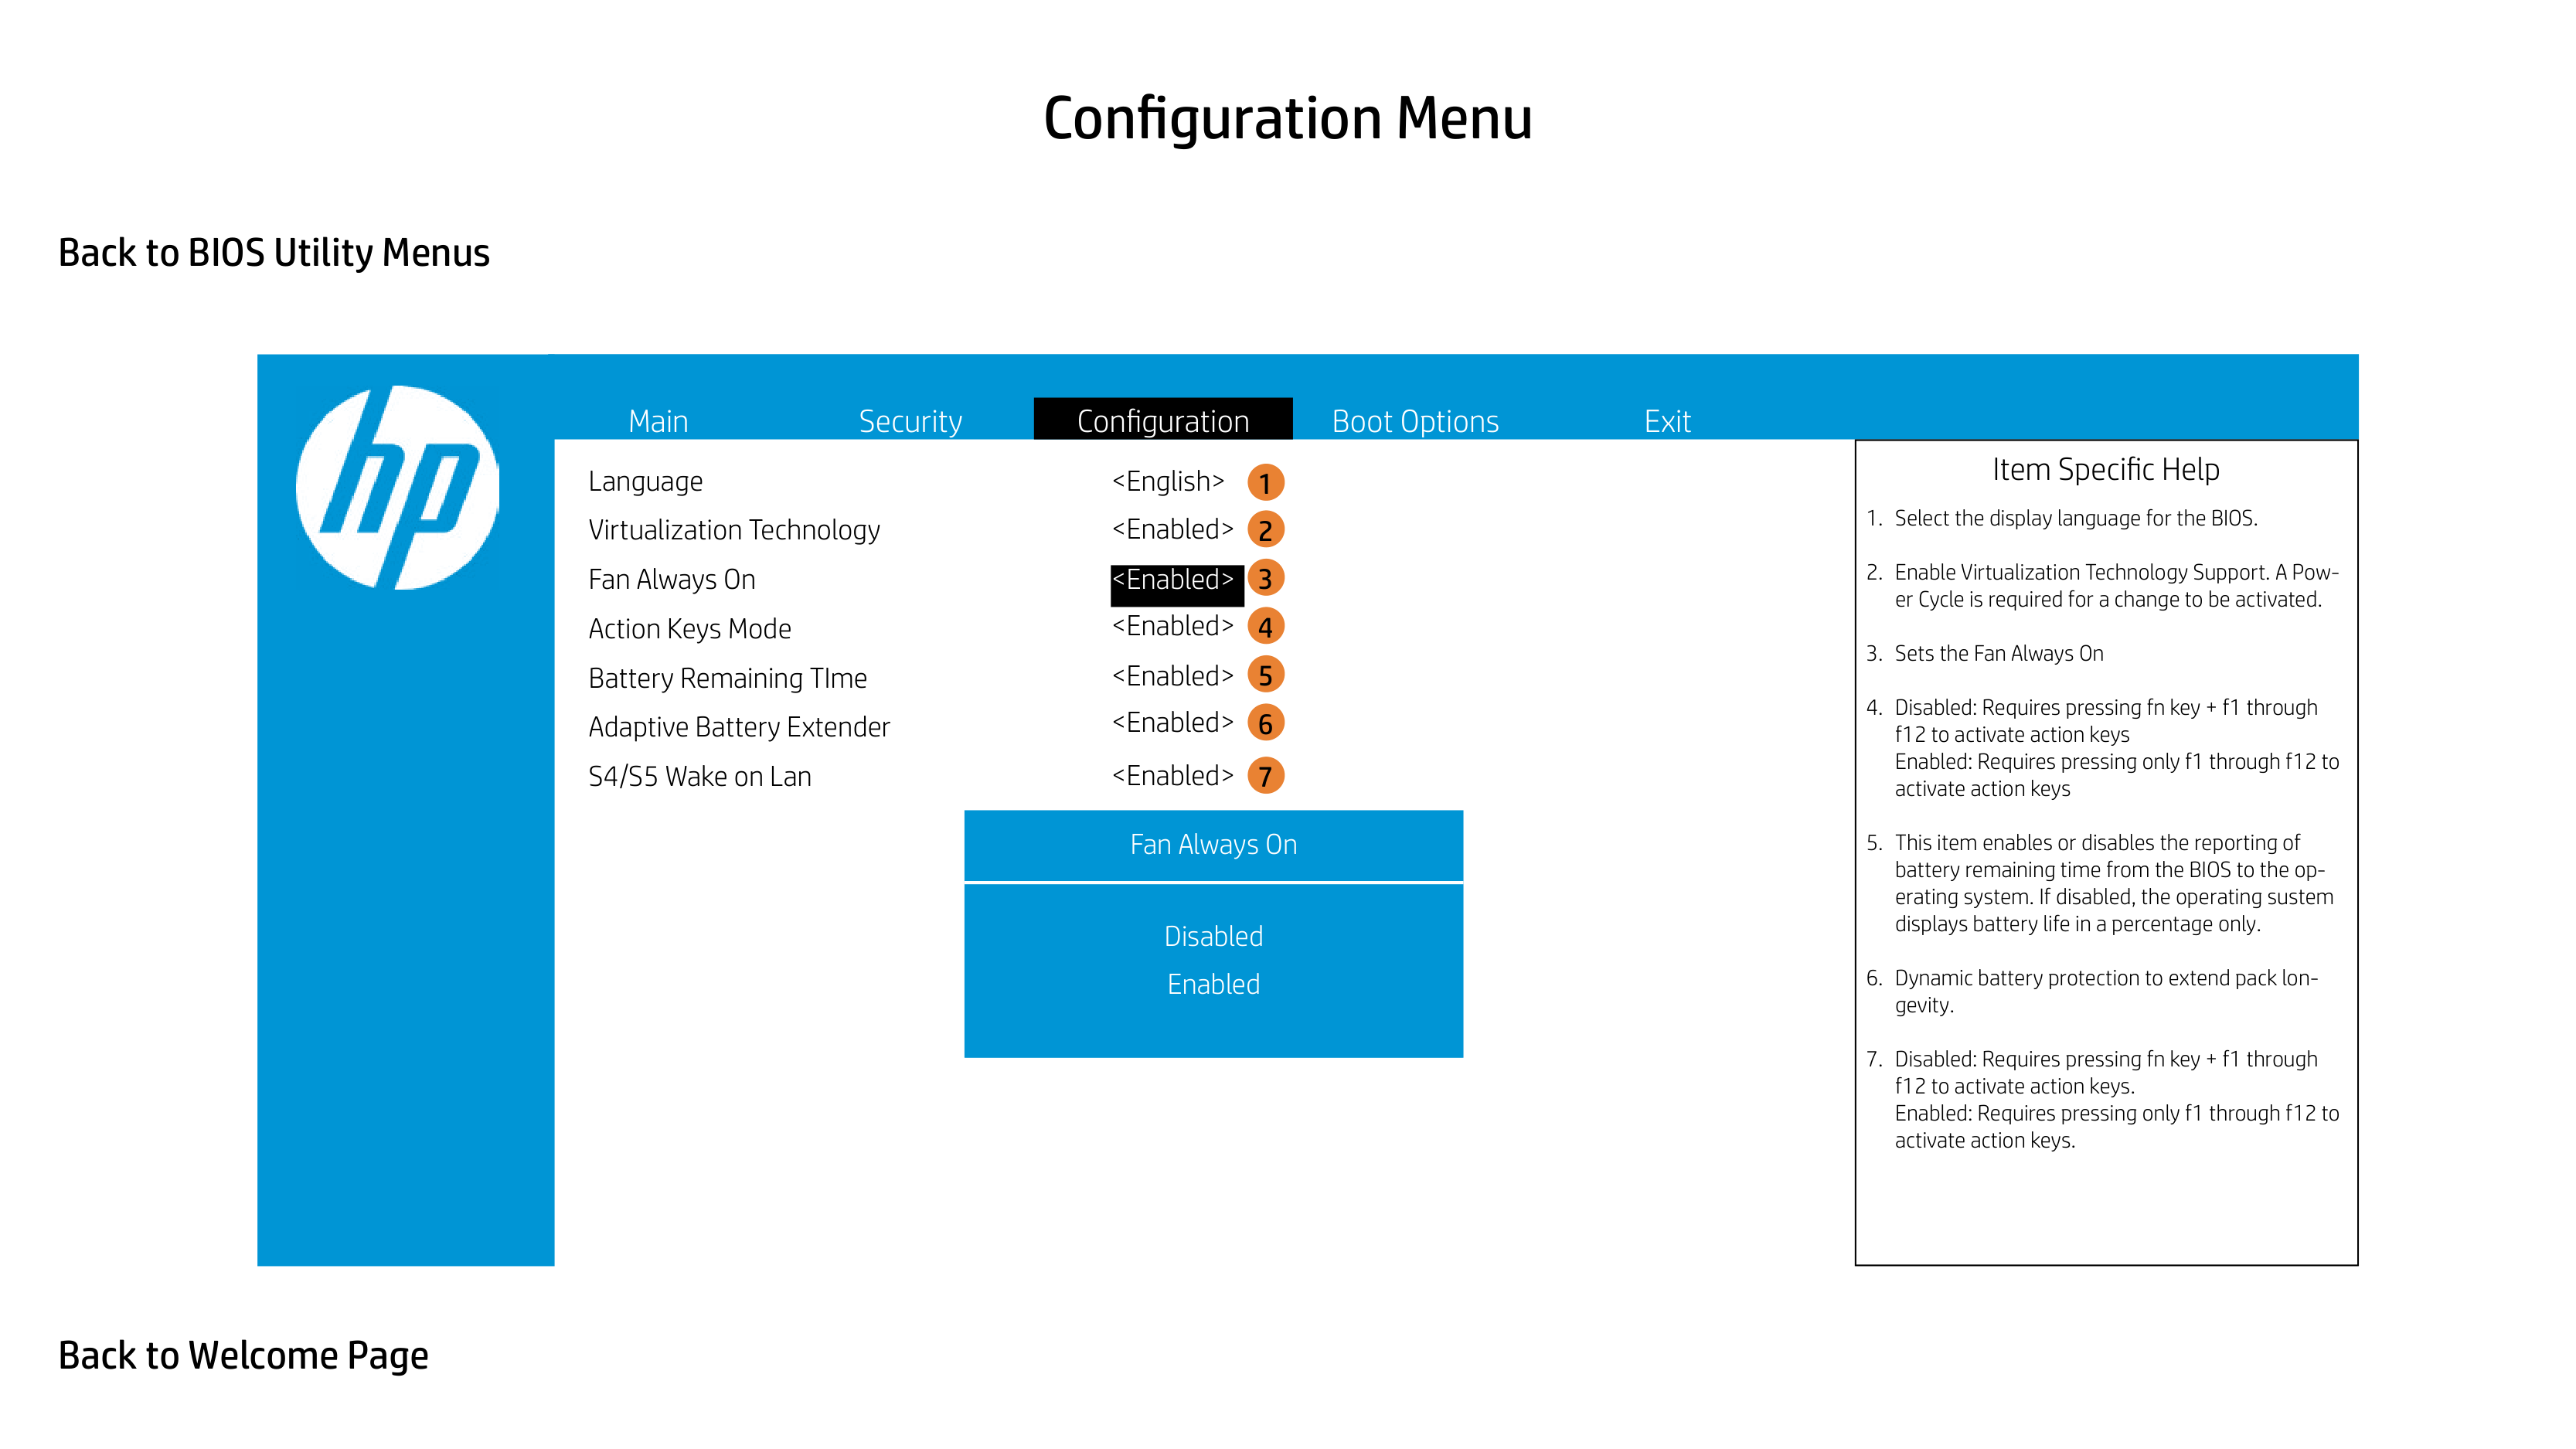
Fan Always On
|Item Specific Help
1. Select the display language for the BIOS.
2. Enable Virtualization Technology Support. A Power Cycle is required for a change to be activated.
3. Sets the Fan Always On
4. Disabled: Requires pressing fn key + f1 through f12 to activate action keys Enabled: Requires pressing only f1 through f12 to activate action keys
5. This item enables or disables the reporting of battery remaining time from the BIOS to the operating system. If disabled, the operating sustem displays battery life in a percentage only.
6. Dynamic battery protection to extend pack longevity.
7. Disabled: Requires pressing fn key + f1 through f12 to activate action keys. Enabled: Requires pressing only f1 through f12 to activate action keys.
| |---|

Language Virtualization Technology Fan Always On Action Keys Mode Battery Remaining TIme Adaptive Battery Extender S4/S5 Wake on Lan

1 2
3
4
5
6
##### 7
Action Keys Mode
|Item Specific Help
1. Select the display language for the BIOS.
2. Enable Virtualization Technology Support. A Power Cycle is required for a change to be activated.
3. Sets the Fan Always On
4. Disabled: Requires pressing fn key + f1 through f12 to activate action keys Enabled: Requires pressing only f1 through f12 to activate action keys
5. This item enables or disables the reporting of battery remaining time from the BIOS to the operating system. If disabled, the operating sustem displays battery life in a percentage only.
6. Dynamic battery protection to extend pack longevity.
7. Disabled: Requires pressing fn key + f1 through f12 to activate action keys. Enabled: Requires pressing only f1 through f12 to activate action keys.
| |---|

Language Virtualization Technology Fan Always On Action Keys Mode Battery Remaining TIme Adaptive Battery Extender S4/S5 Wake on Lan
3
5

Battery Remaining Time
|Item Specific Help
1. Select the display language for the BIOS.
2. Enable Virtualization Technology Support. A Power Cycle is required for a change to be activated.
3. Sets the Fan Always On
4. Disabled: Requires pressing fn key + f1 through f12 to activate action keys Enabled: Requires pressing only f1 through f12 to activate action keys
5. This item enables or disables the reporting of battery remaining time from the BIOS to the operating system. If disabled, the operating sustem displays battery life in a percentage only.
6. Dynamic battery protection to extend pack longevity.
7. Disabled: Requires pressing fn key + f1 through f12 to activate action keys. Enabled: Requires pressing only f1 through f12 to activate action keys.
| |---|

Language Virtualization Technology Fan Always On Action Keys Mode Battery Remaining TIme Adaptive Battery Extender S4/S5 Wake on Lan
1 2
3
4
5
6
7
Adaptive Battery Extender
|Item Specific Help
1. Select the display language for the BIOS.
2. Enable Virtualization Technology Support. A Power Cycle is required for a change to be activated.
3. Sets the Fan Always On
4. Disabled: Requires pressing fn key + f1 through f12 to activate action keys Enabled: Requires pressing only f1 through f12 to activate action keys
5. This item enables or disables the reporting of battery remaining time from the BIOS to the operating system. If disabled, the operating sustem displays battery life in a percentage only.
6. Dynamic battery protection to extend pack longevity.
7. Disabled: Requires pressing fn key + f1 through f12 to activate action keys. Enabled: Requires pressing only f1 through f12 to activate action keys.
| |---|

Language Virtualization Technology Fan Always On Action Keys Mode Battery Remaining TIme Adaptive Battery Extender S4/S5 Wake on Lan
6
3
##### 7
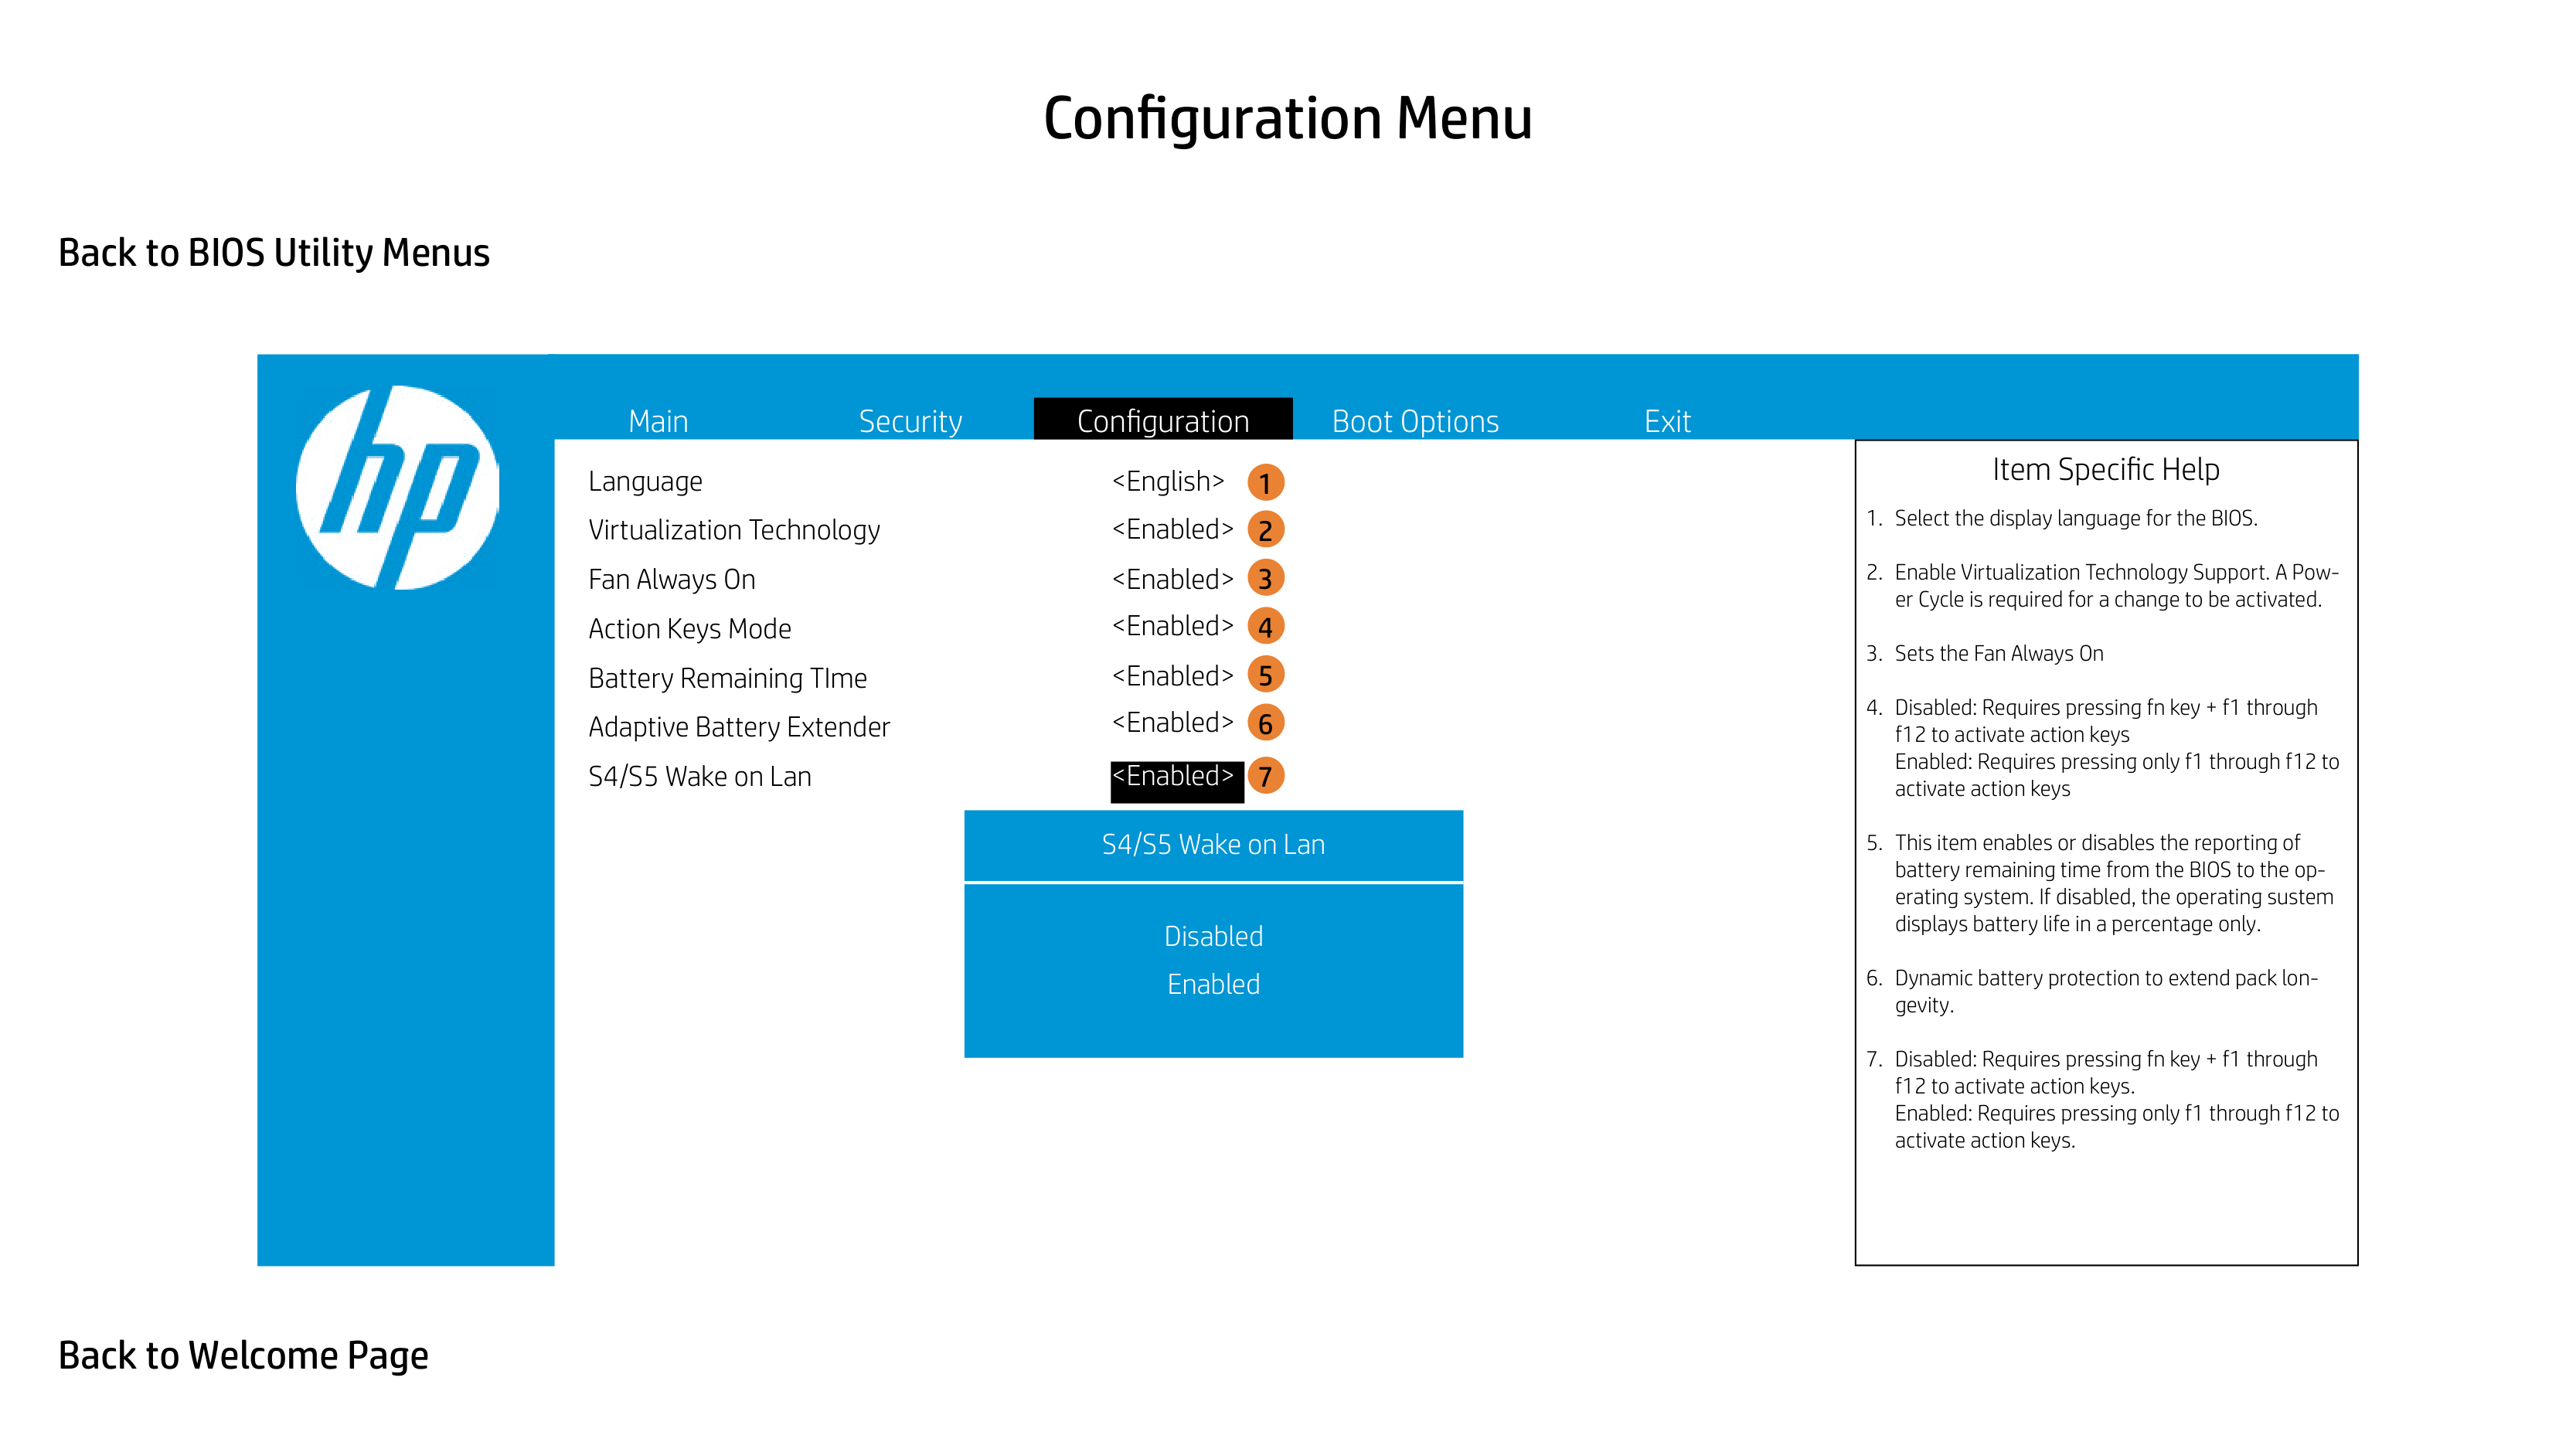
S4/S5 Wake on Lan
|Item Specific Help
1. Select the display language for the BIOS.
2. Enable Virtualization Technology Support. A Power Cycle is required for a change to be activated.
3. Sets the Fan Always On
4. Disabled: Requires pressing fn key + f1 through f12 to activate action keys Enabled: Requires pressing only f1 through f12 to activate action keys
5. This item enables or disables the reporting of battery remaining time from the BIOS to the operating system. If disabled, the operating sustem displays battery life in a percentage only.
6. Dynamic battery protection to extend pack longevity.
7. Disabled: Requires pressing fn key + f1 through f12 to activate action keys. Enabled: Requires pressing only f1 through f12 to activate action keys.
| |---|

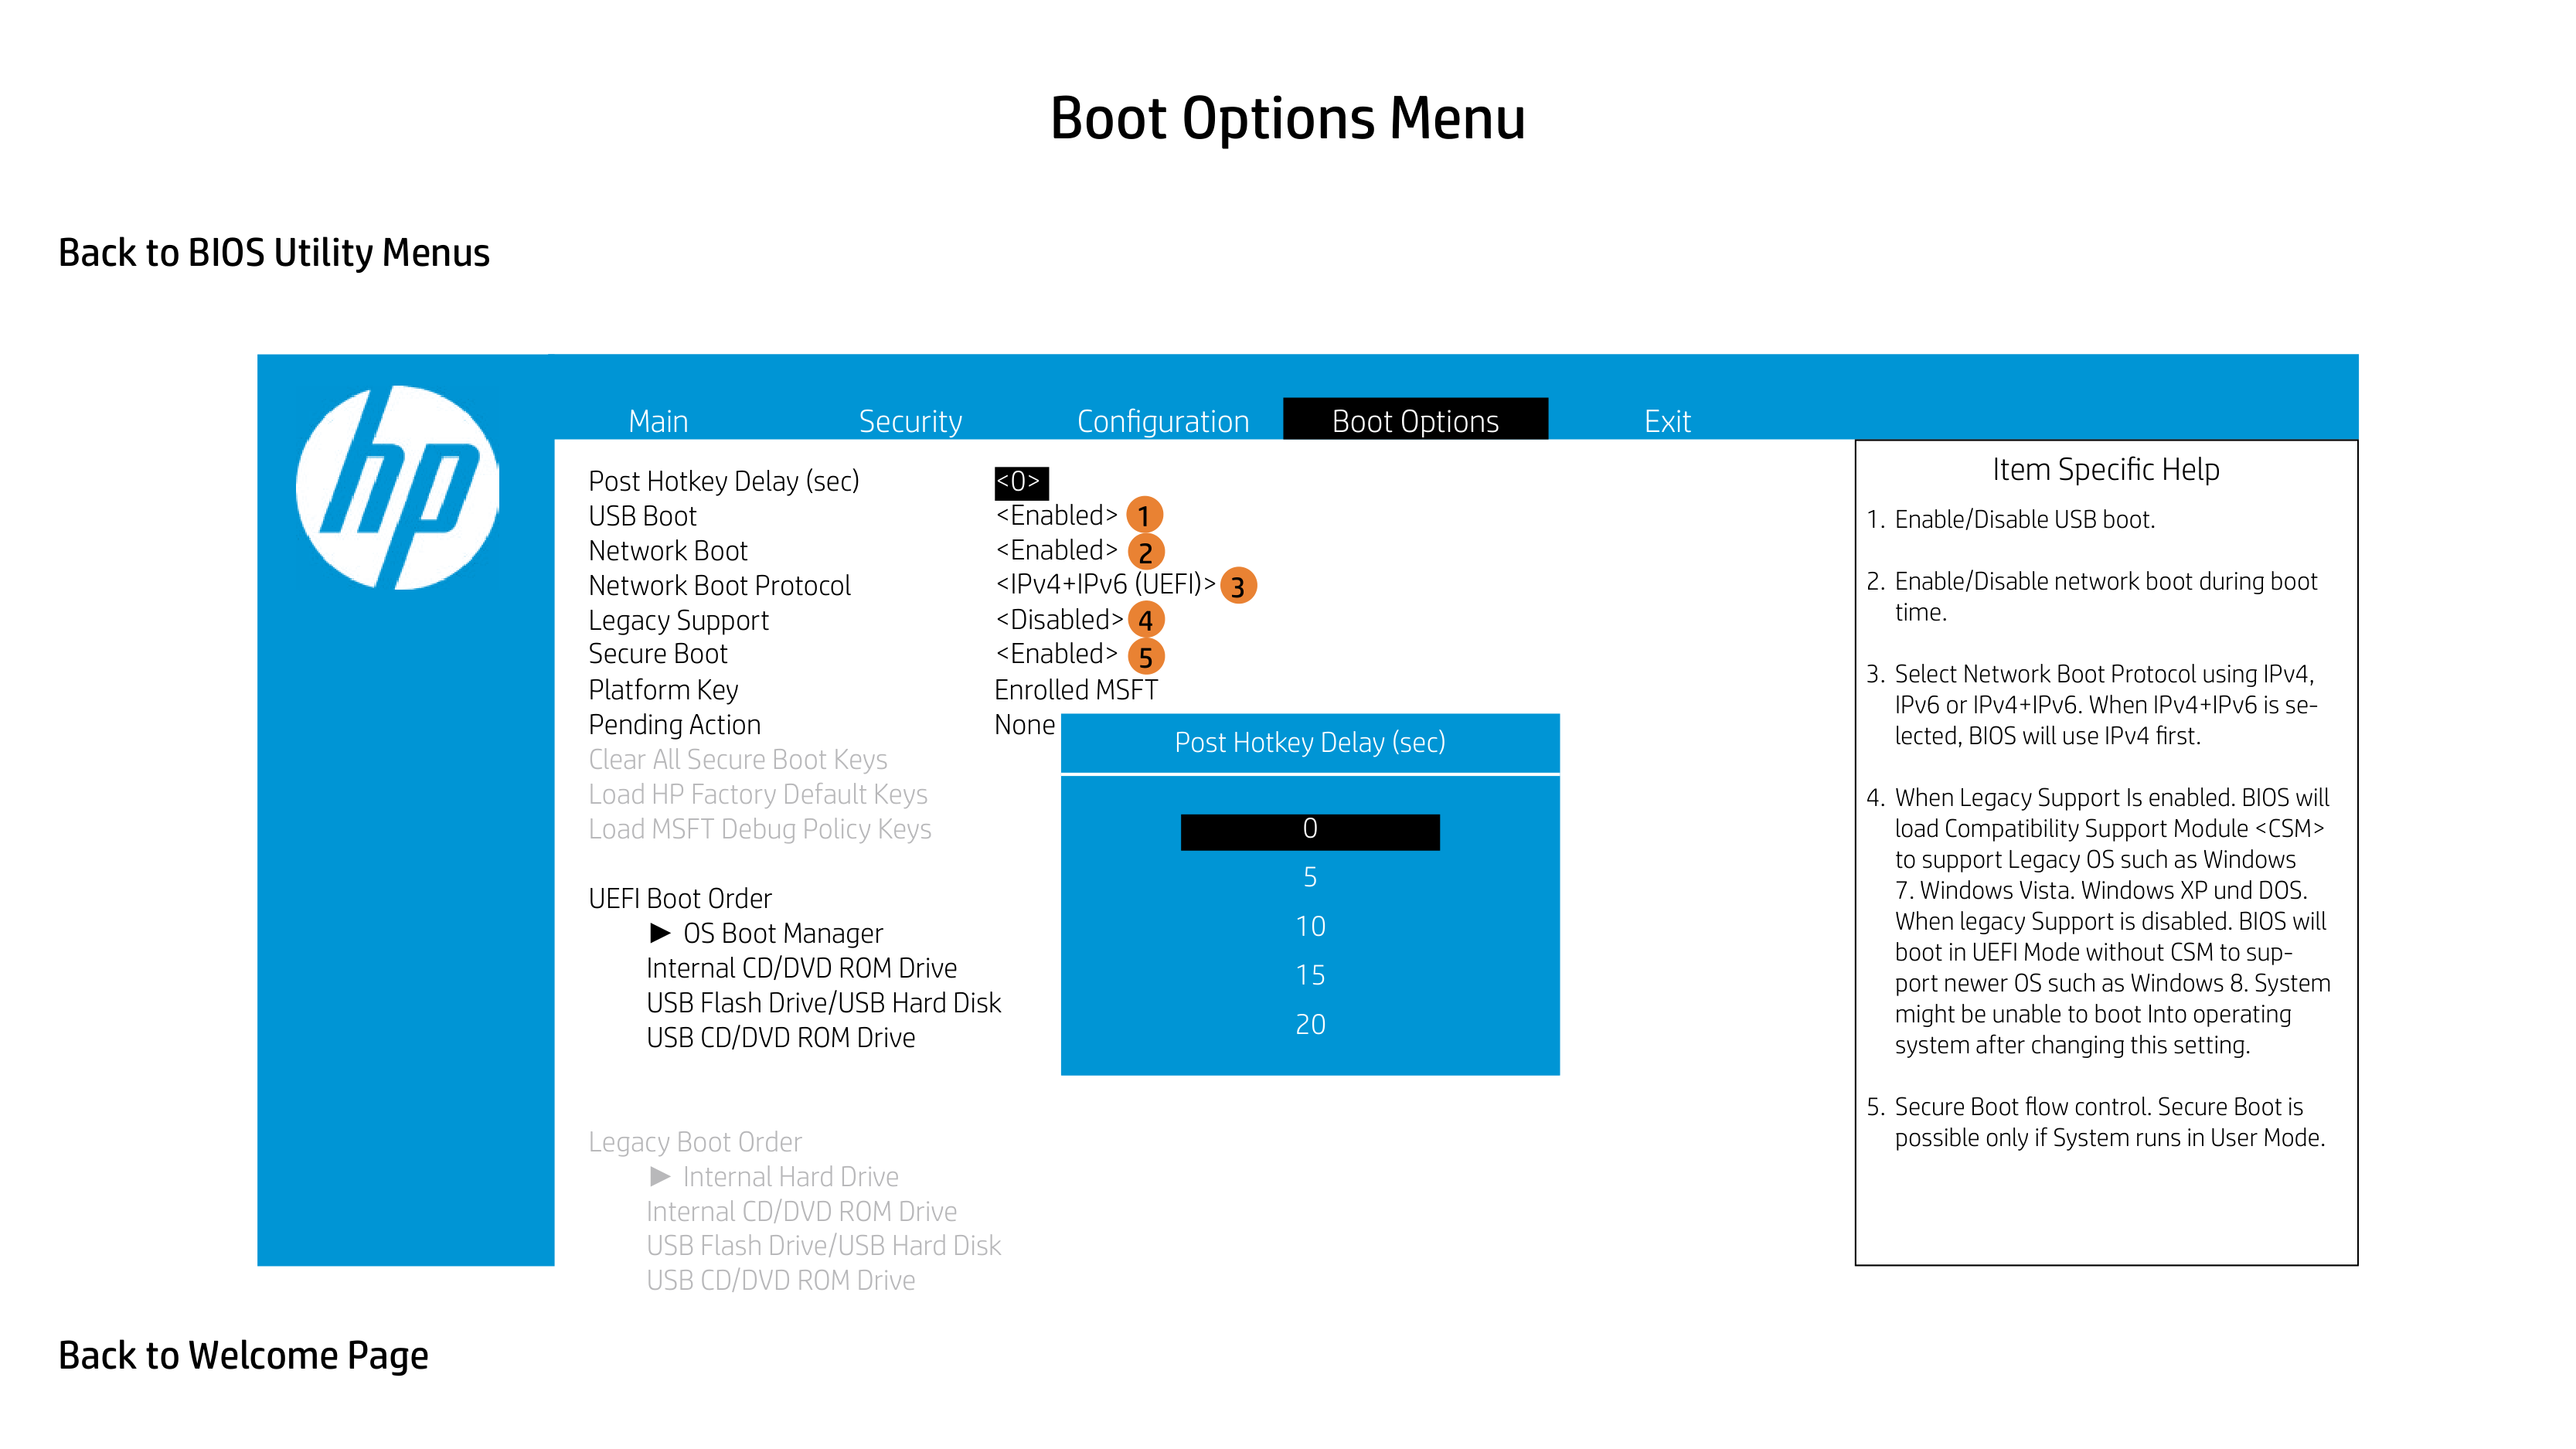
Post Hotkey Delay (sec) USB Boot Network Boot Network Boot Protocol Legacy Support
Platform Key Enrolled MSFT Pending Action None
Load HP Factory Default Keys Load MSFT Debug Policy Keys
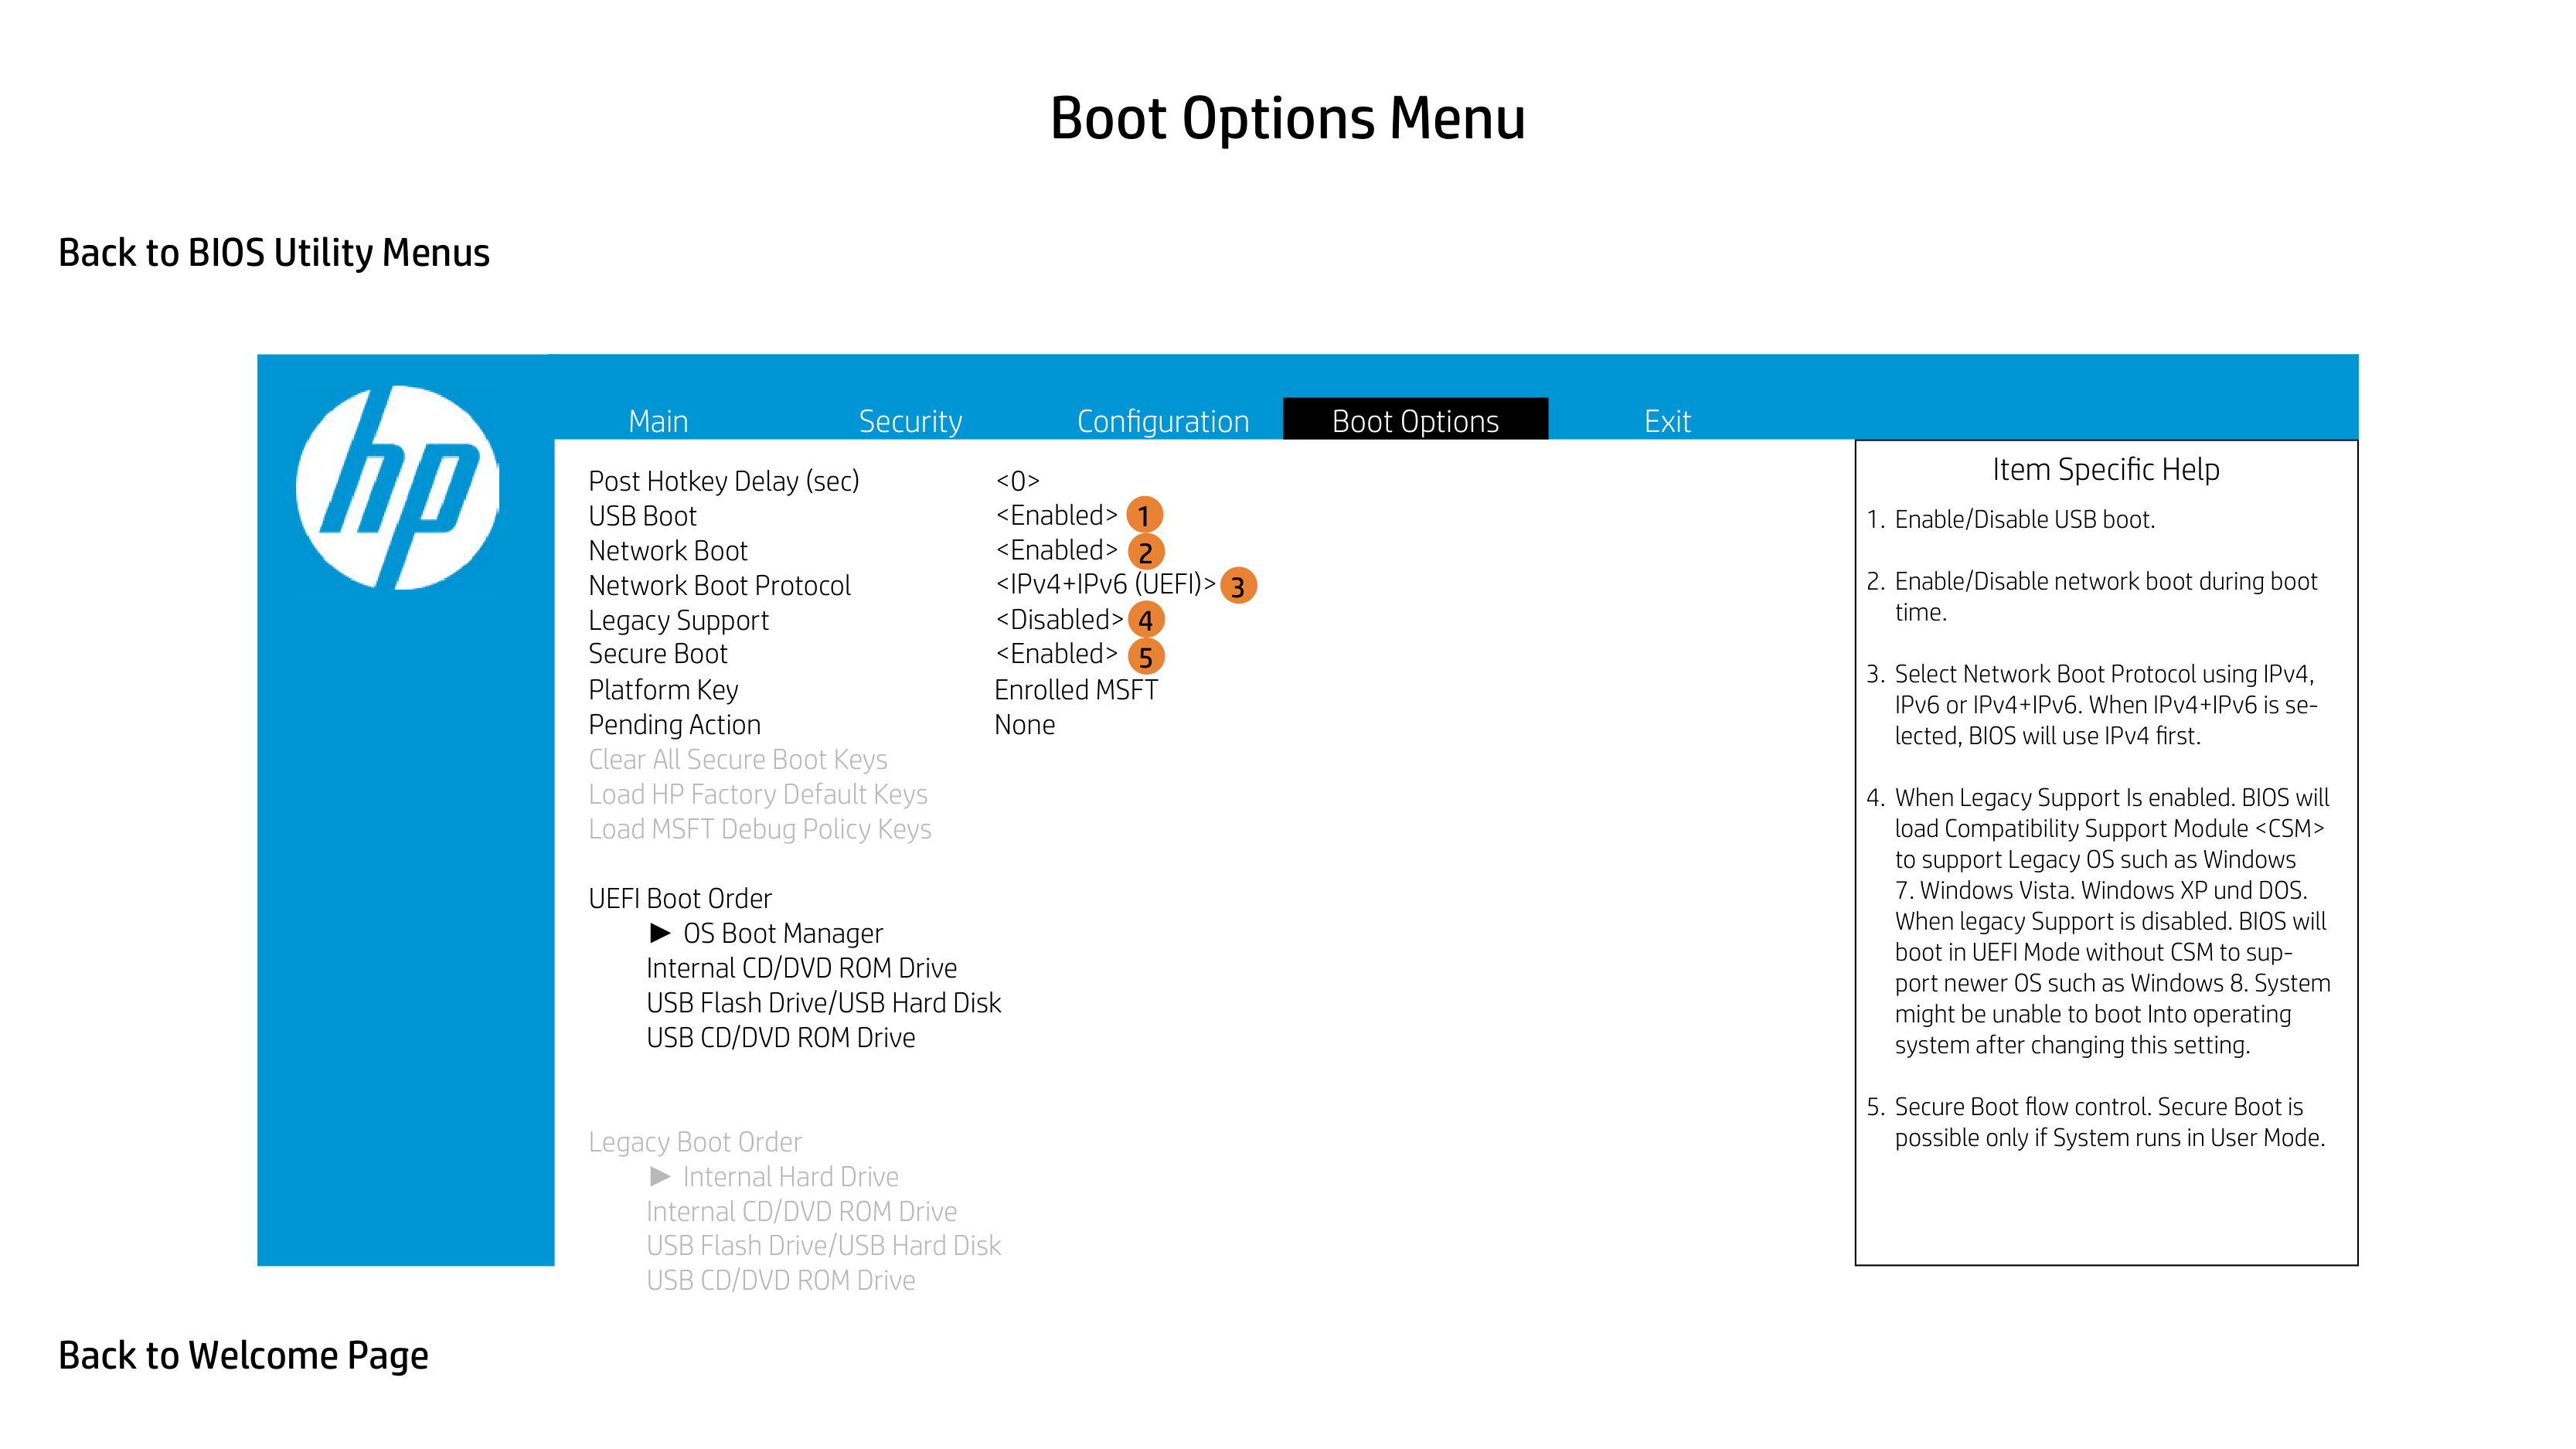
UEFI Boot Order
► OS Boot Manager Internal CD/DVD ROM Drive
|Item Specific Help
1. Enable/Disable USB boot.
2. Enable/Disable network boot during boot time.
3. Select Network Boot Protocol using IPv4, IPv6 or IPv4+IPv6. When IPv4+IPv6 is selected, BIOS will use IPv4 first.
4. When Legacy Support Is enabled. BIOS will load Compatibility Support Module
7. Windows Vista. Windows XP und DOS. When legacy Support is disabled. BIOS will boot in UEFI Mode without CSM to support newer OS such as Windows 8. System might be unable to boot Into operating system after changing this setting.
5. Secure Boot flow control. Secure Boot is possible only if System runs in User Mode.
| |---|

Post Hotkey Delay (sec) USB Boot Network Boot Network Boot Protocol Legacy Support
1 2
3
4 5
Platform Key Enrolled MSFT Pending Action None
Post Hotkey Delay (sec)
Load HP Factory Default Keys Load MSFT Debug Policy Keys
UEFI Boot Order
► OS Boot Manager Internal CD/DVD ROM Drive
|Item Specific Help
1. Enable/Disable USB boot.
2. Enable/Disable network boot during boot time.
3. Select Network Boot Protocol using IPv4, IPv6 or IPv4+IPv6. When IPv4+IPv6 is selected, BIOS will use IPv4 first.
4. When Legacy Support Is enabled. BIOS will load Compatibility Support Module
7. Windows Vista. Windows XP und DOS. When legacy Support is disabled. BIOS will boot in UEFI Mode without CSM to support newer OS such as Windows 8. System might be unable to boot Into operating system after changing this setting.
5. Secure Boot flow control. Secure Boot is possible only if System runs in User Mode.
| |---|

Post Hotkey Delay (sec) USB Boot Network Boot Network Boot Protocol Legacy Support
1 2

4 5
Platform Key Enrolled MSFT Pending Action None
3
Load HP Factory Default Keys Load MSFT Debug Policy Keys
UEFI Boot Order
► OS Boot Manager Internal CD/DVD ROM Drive
USB Boot
|Item Specific Help
1. Enable/Disable USB boot.
2. Enable/Disable network boot during boot time.
3. Select Network Boot Protocol using IPv4, IPv6 or IPv4+IPv6. When IPv4+IPv6 is selected, BIOS will use IPv4 first.
4. When Legacy Support Is enabled. BIOS will load Compatibility Support Module
7. Windows Vista. Windows XP und DOS. When legacy Support is disabled. BIOS will boot in UEFI Mode without CSM to support newer OS such as Windows 8. System might be unable to boot Into operating system after changing this setting.
5. Secure Boot flow control. Secure Boot is possible only if System runs in User Mode.
| |---|


Post Hotkey Delay (sec) USB Boot Network Boot Network Boot Protocol Legacy Support
1 2
4 5
Platform Key Enrolled MSFT Pending Action None
3
Load HP Factory Default Keys Load MSFT Debug Policy Keys
UEFI Boot Order
► OS Boot Manager Internal CD/DVD ROM Drive
Network Boot
|Item Specific Help
1. Enable/Disable USB boot.
2. Enable/Disable network boot during boot time.
3. Select Network Boot Protocol using IPv4, IPv6 or IPv4+IPv6. When IPv4+IPv6 is selected, BIOS will use IPv4 first.
4. When Legacy Support Is enabled. BIOS will load Compatibility Support Module
7. Windows Vista. Windows XP und DOS. When legacy Support is disabled. BIOS will boot in UEFI Mode without CSM to support newer OS such as Windows 8. System might be unable to boot Into operating system after changing this setting.
5. Secure Boot flow control. Secure Boot is possible only if System runs in User Mode.
| |---|

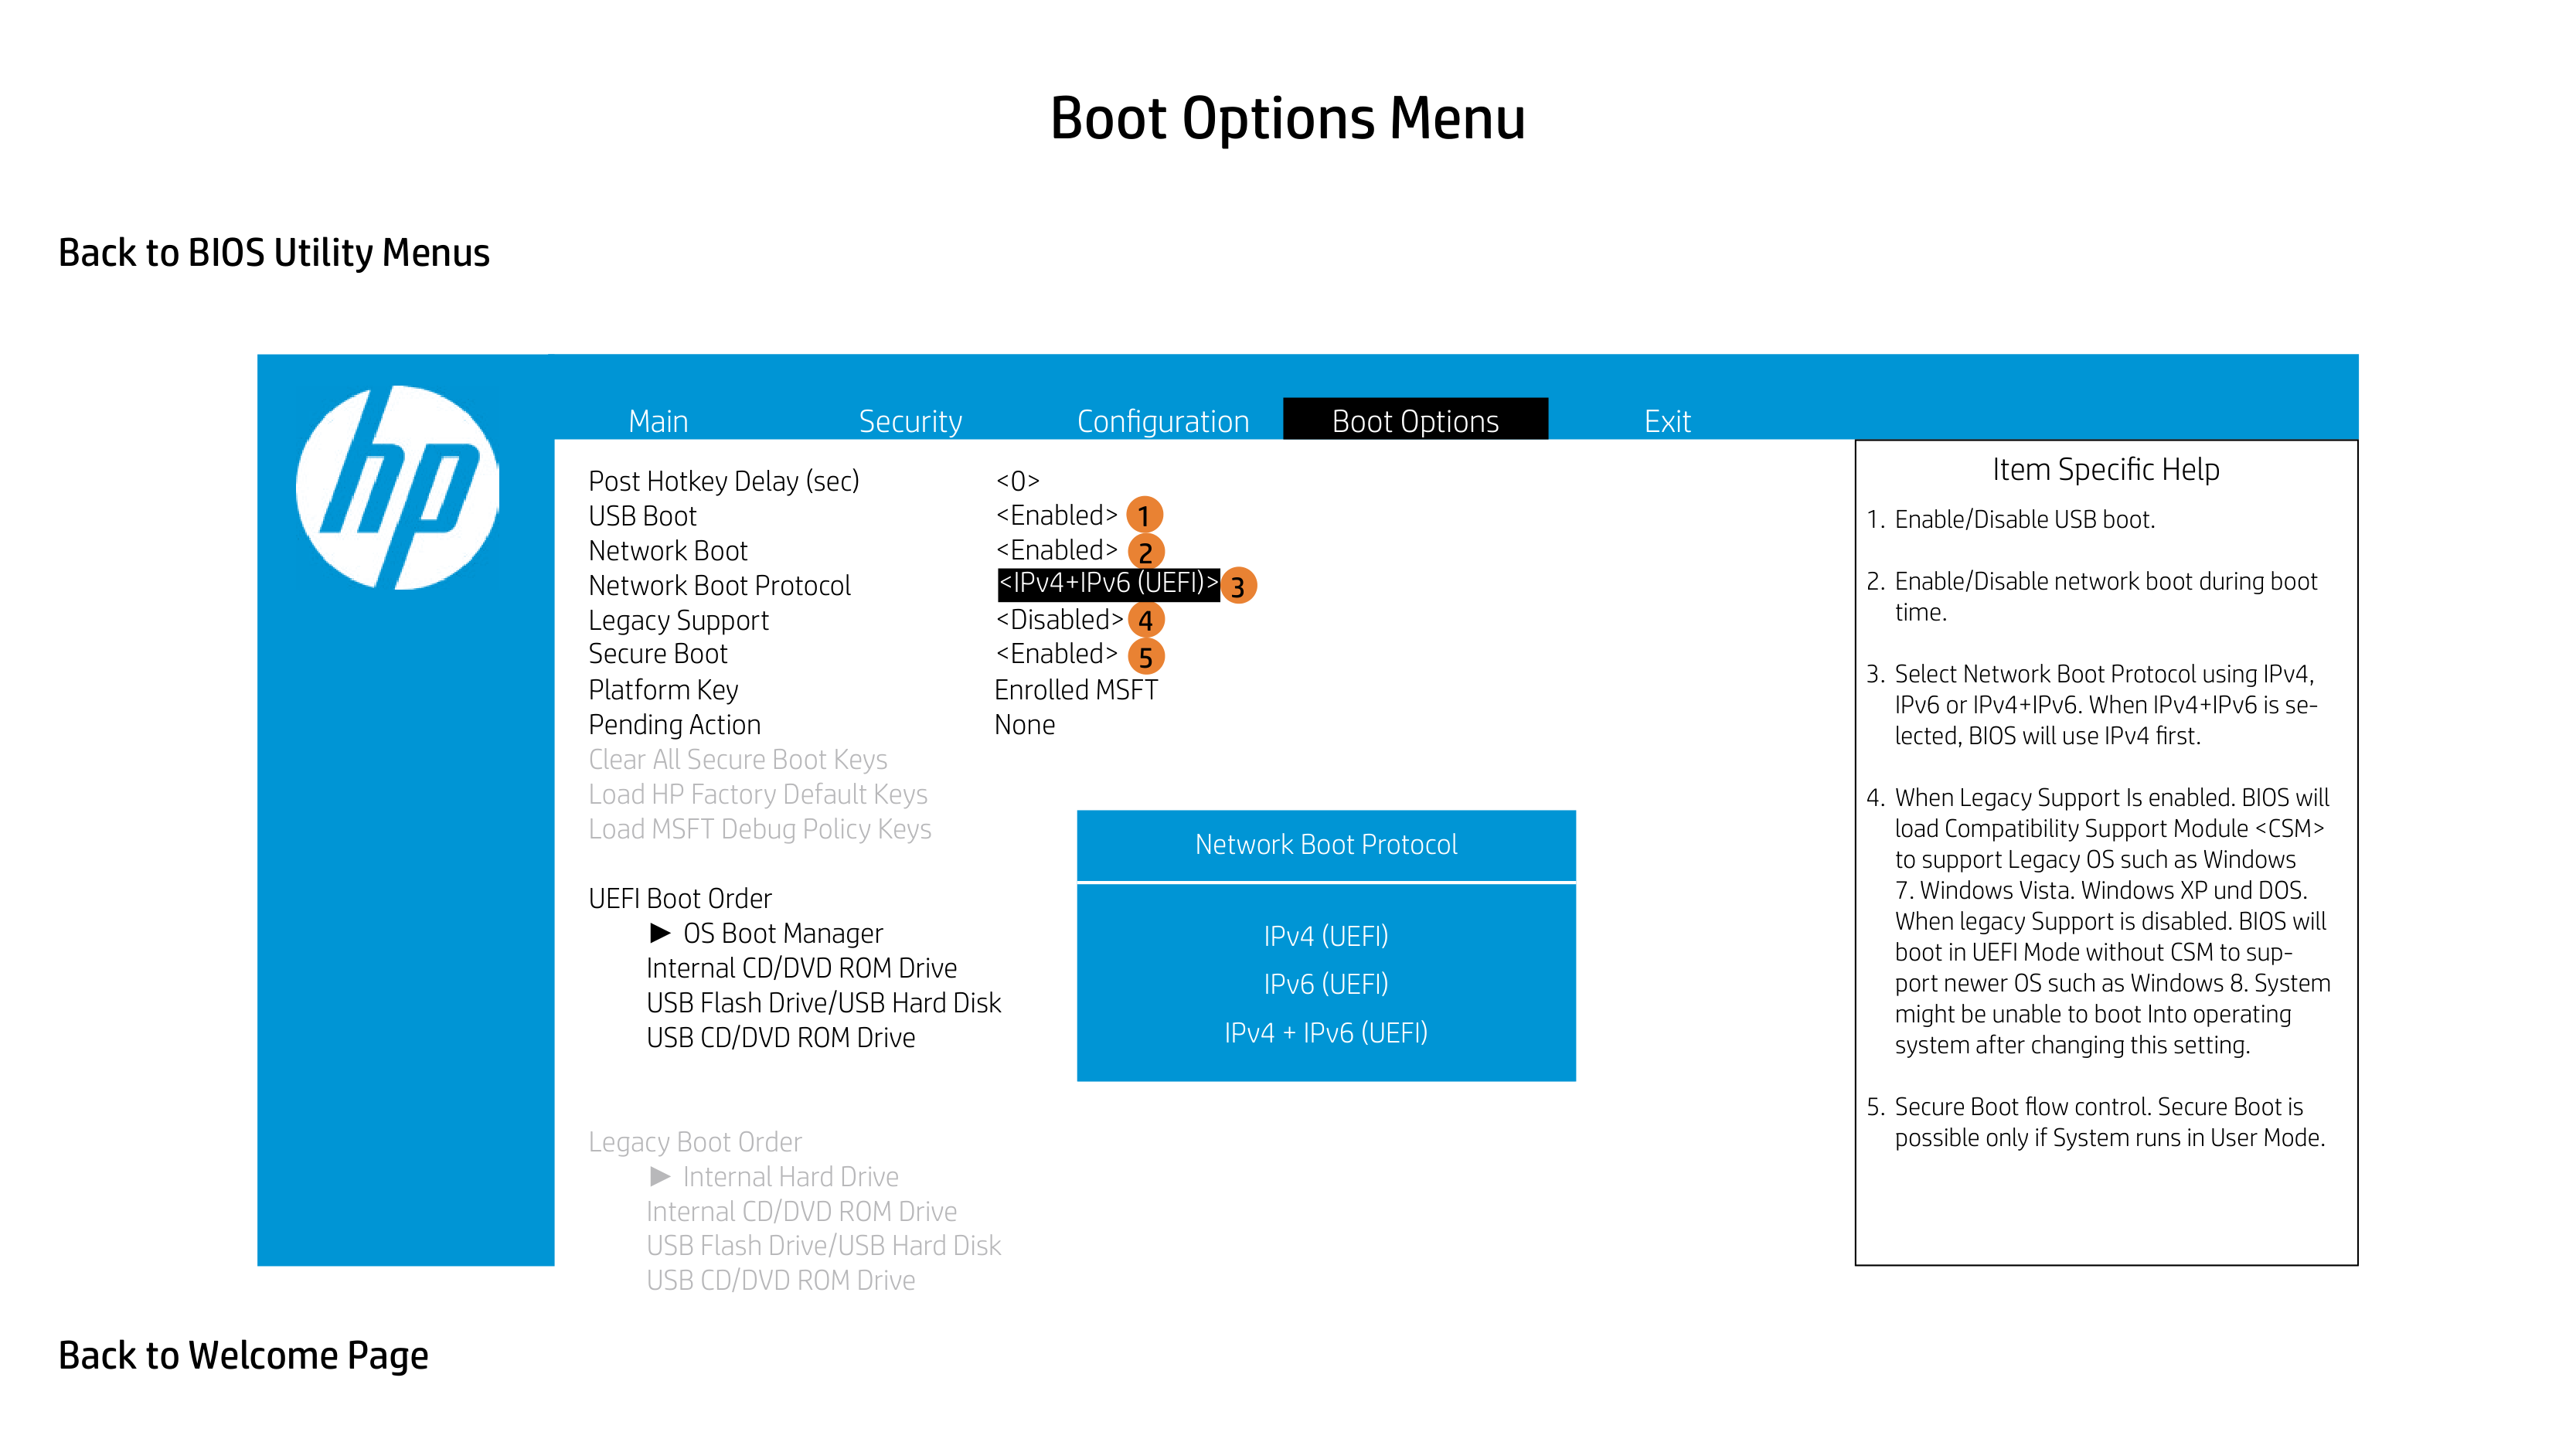
Post Hotkey Delay (sec) USB Boot Network Boot Network Boot Protocol Legacy Support
1 2
4 5
Platform Key Enrolled MSFT Pending Action None
3
Load HP Factory Default Keys Load MSFT Debug Policy Keys

UEFI Boot Order
► OS Boot Manager Internal CD/DVD ROM Drive
Network Boot Protocol
|Item Specific Help
1. Enable/Disable USB boot.
2. Enable/Disable network boot during boot time.
3. Select Network Boot Protocol using IPv4, IPv6 or IPv4+IPv6. When IPv4+IPv6 is selected, BIOS will use IPv4 first.
4. When Legacy Support Is enabled. BIOS will load Compatibility Support Module
7. Windows Vista. Windows XP und DOS. When legacy Support is disabled. BIOS will boot in UEFI Mode without CSM to support newer OS such as Windows 8. System might be unable to boot Into operating system after changing this setting.
5. Secure Boot flow control. Secure Boot is possible only if System runs in User Mode.
| |---|

Post Hotkey Delay (sec) USB Boot Network Boot Network Boot Protocol Legacy Support
1 2
4 5
Platform Key Enrolled MSFT Pending Action None

3
Load HP Factory Default Keys Load MSFT Debug Policy Keys
UEFI Boot Order
► OS Boot Manager Internal CD/DVD ROM Drive
Legacy Support
|Item Specific Help
1. Enable/Disable USB boot.
2. Enable/Disable network boot during boot time.
3. Select Network Boot Protocol using IPv4, IPv6 or IPv4+IPv6. When IPv4+IPv6 is selected, BIOS will use IPv4 first.
4. When Legacy Support Is enabled. BIOS will load Compatibility Support Module
7. Windows Vista. Windows XP und DOS. When legacy Support is disabled. BIOS will boot in UEFI Mode without CSM to support newer OS such as Windows 8. System might be unable to boot Into operating system after changing this setting.
5. Secure Boot flow control. Secure Boot is possible only if System runs in User Mode.
| |---|

Post Hotkey Delay (sec) USB Boot Network Boot Network Boot Protocol Legacy Support
1 2
4 5
Platform Key Enrolled MSFT Pending Action None
3
Load HP Factory Default Keys Load MSFT Debug Policy Keys
UEFI Boot Order
► OS Boot Manager Internal CD/DVD ROM Drive
Secure Boot
|Item Specific Help
1. Enable/Disable USB boot.
2. Enable/Disable network boot during boot time.
3. Select Network Boot Protocol using IPv4, IPv6 or IPv4+IPv6. When IPv4+IPv6 is selected, BIOS will use IPv4 first.
4. When Legacy Support Is enabled. BIOS will load Compatibility Support Module
7. Windows Vista. Windows XP und DOS. When legacy Support is disabled. BIOS will boot in UEFI Mode without CSM to support newer OS such as Windows 8. System might be unable to boot Into operating system after changing this setting.
5. Secure Boot flow control. Secure Boot is possible only if System runs in User Mode.
| |---|

3
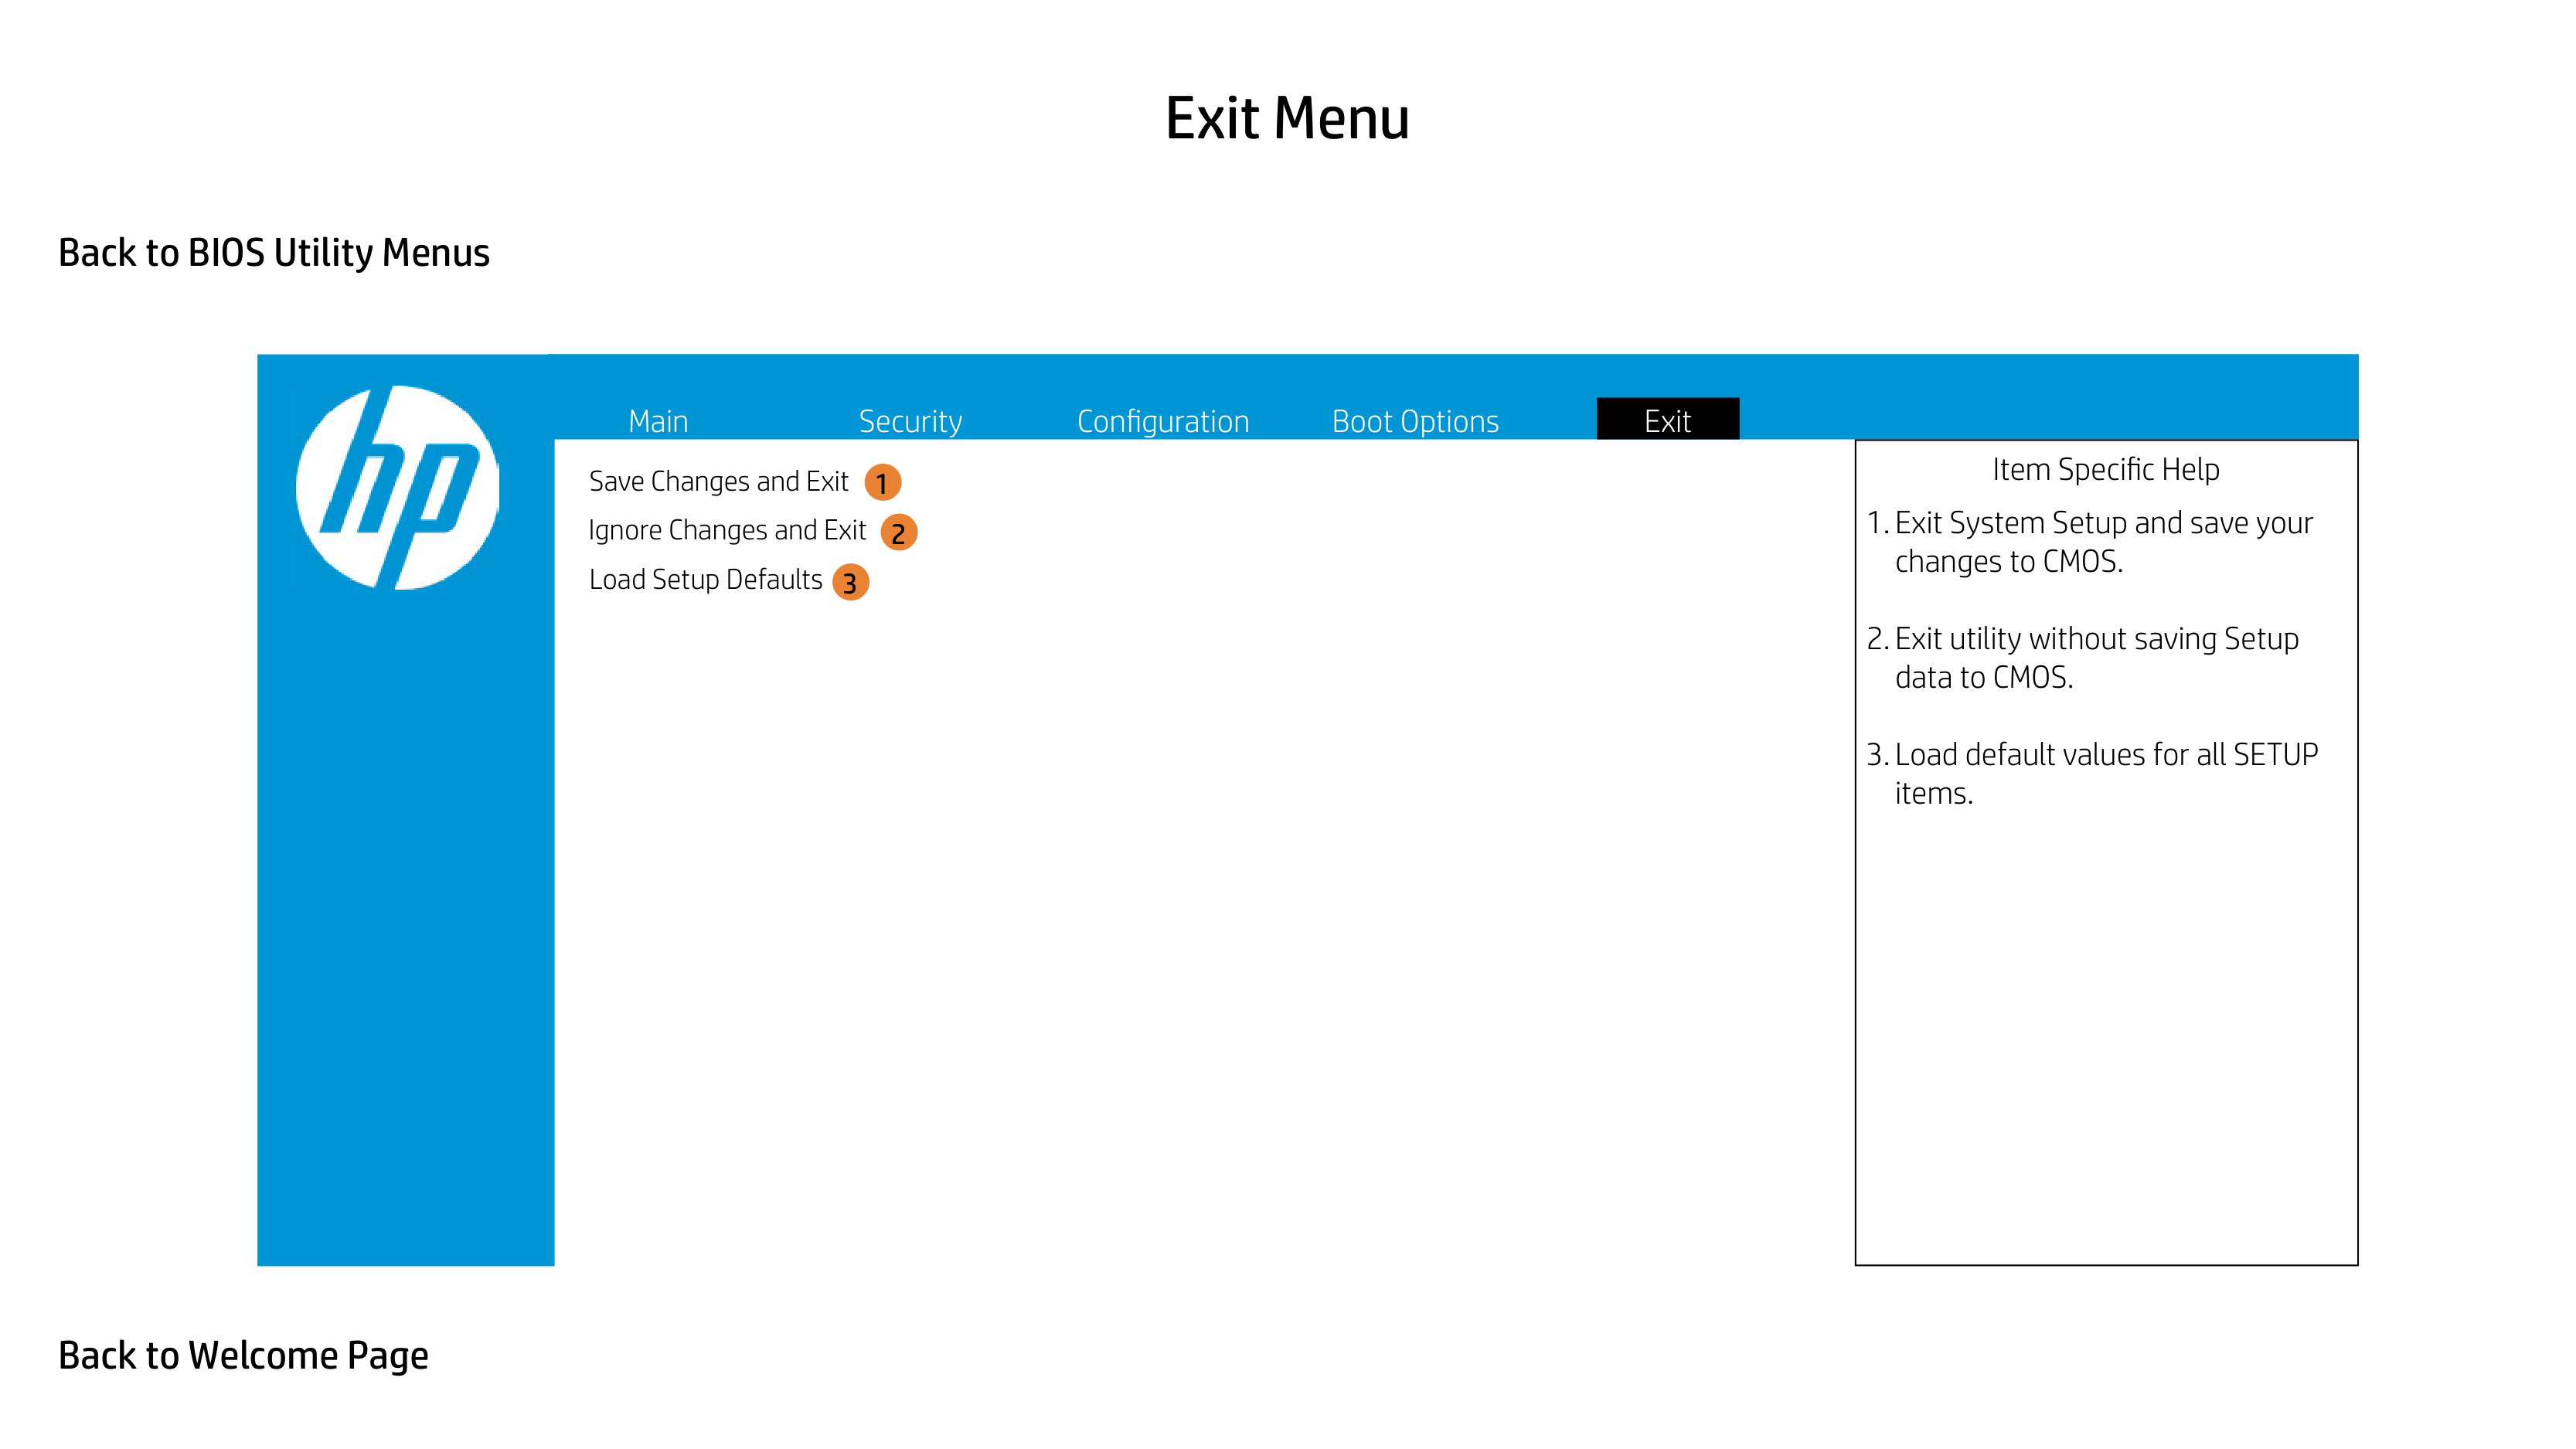
Ignore Changes and Exit
|Item Specific Help
1. Exit System Setup and save your changes to CMOS.
2. Exit utility without saving Setup data to CMOS.
3. Load default values for all SETUP items.
| |---|

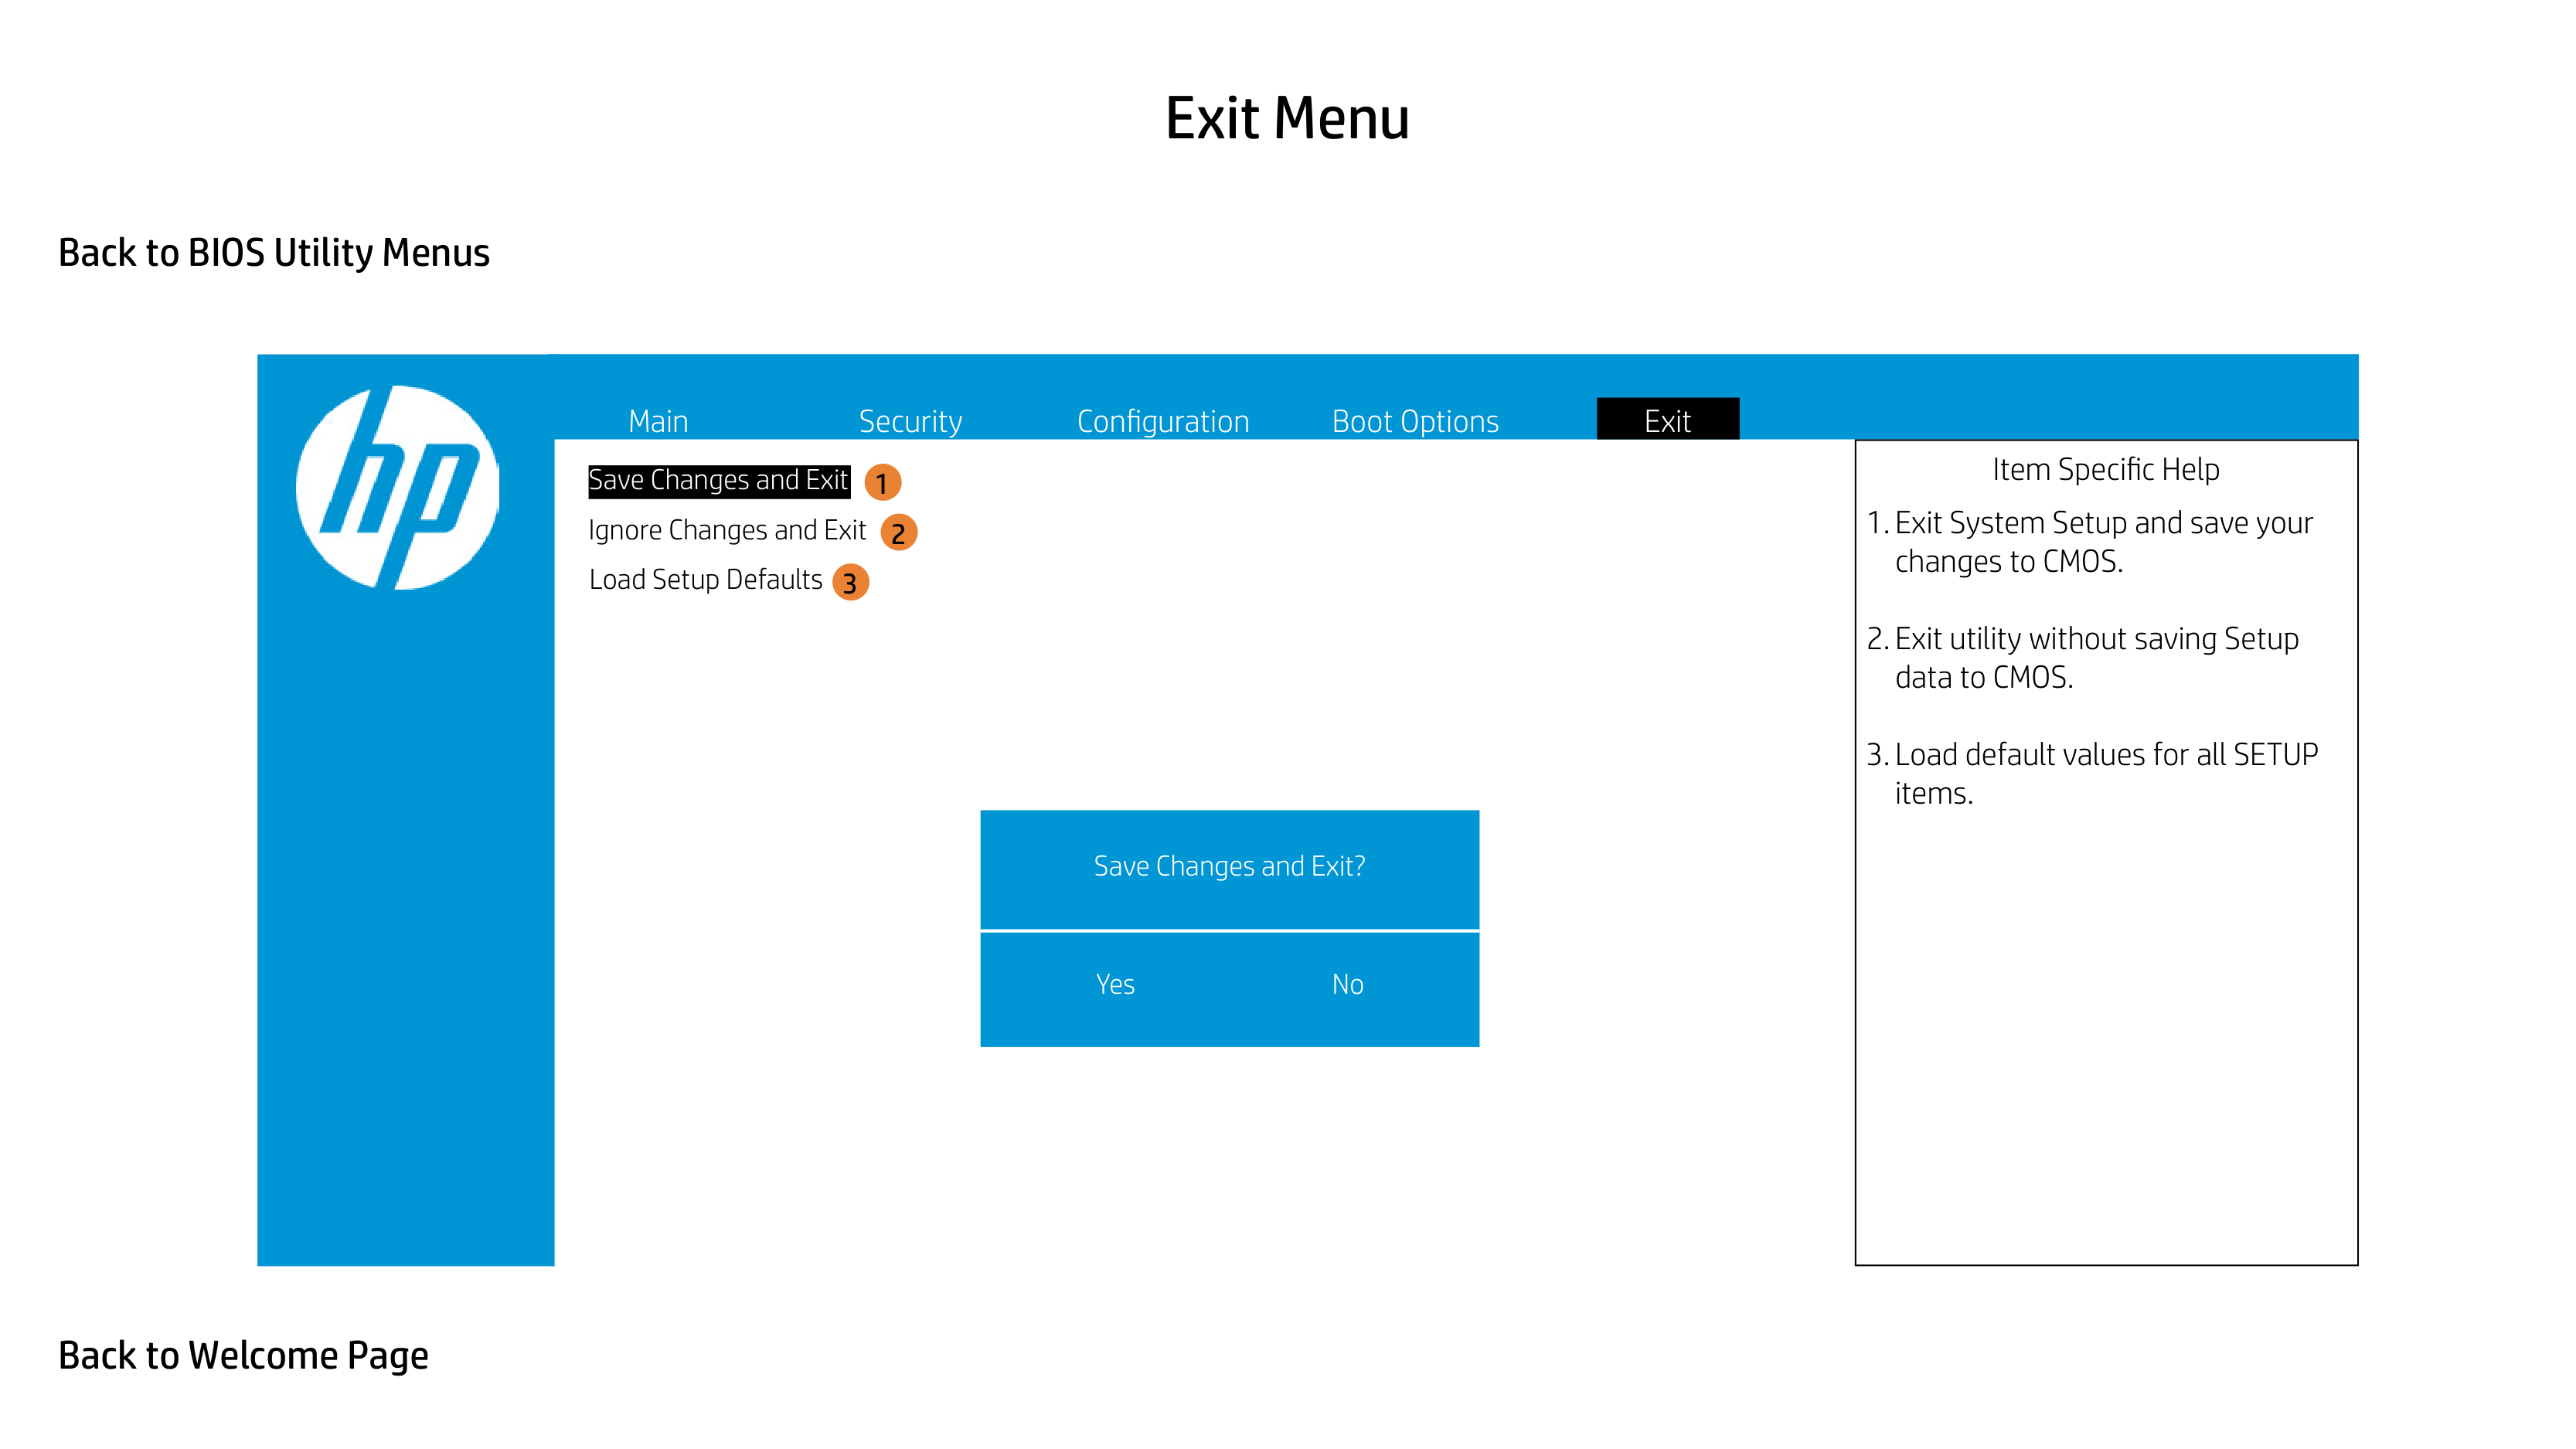
1

Ignore Changes and Exit
2
3
Save Changes and Exit?
|Item Specific Help
1. Exit System Setup and save your changes to CMOS.
2. Exit utility without saving Setup data to CMOS.
3. Load default values for all SETUP items.
| |---|

1
Ignore Changes and Exit
2
3
Load Setup Defaults?
|Item Specific Help
1. Exit System Setup and save your changes to CMOS.
2. Exit utility without saving Setup data to CMOS.
3. Load default values for all SETUP items.
| |---|