Ask AI
— answers from the official manualAnswers from the official manual.
Common questions
Common Questions
24 totalHow do I safely remove the battery from the HP ProBook 4540s?
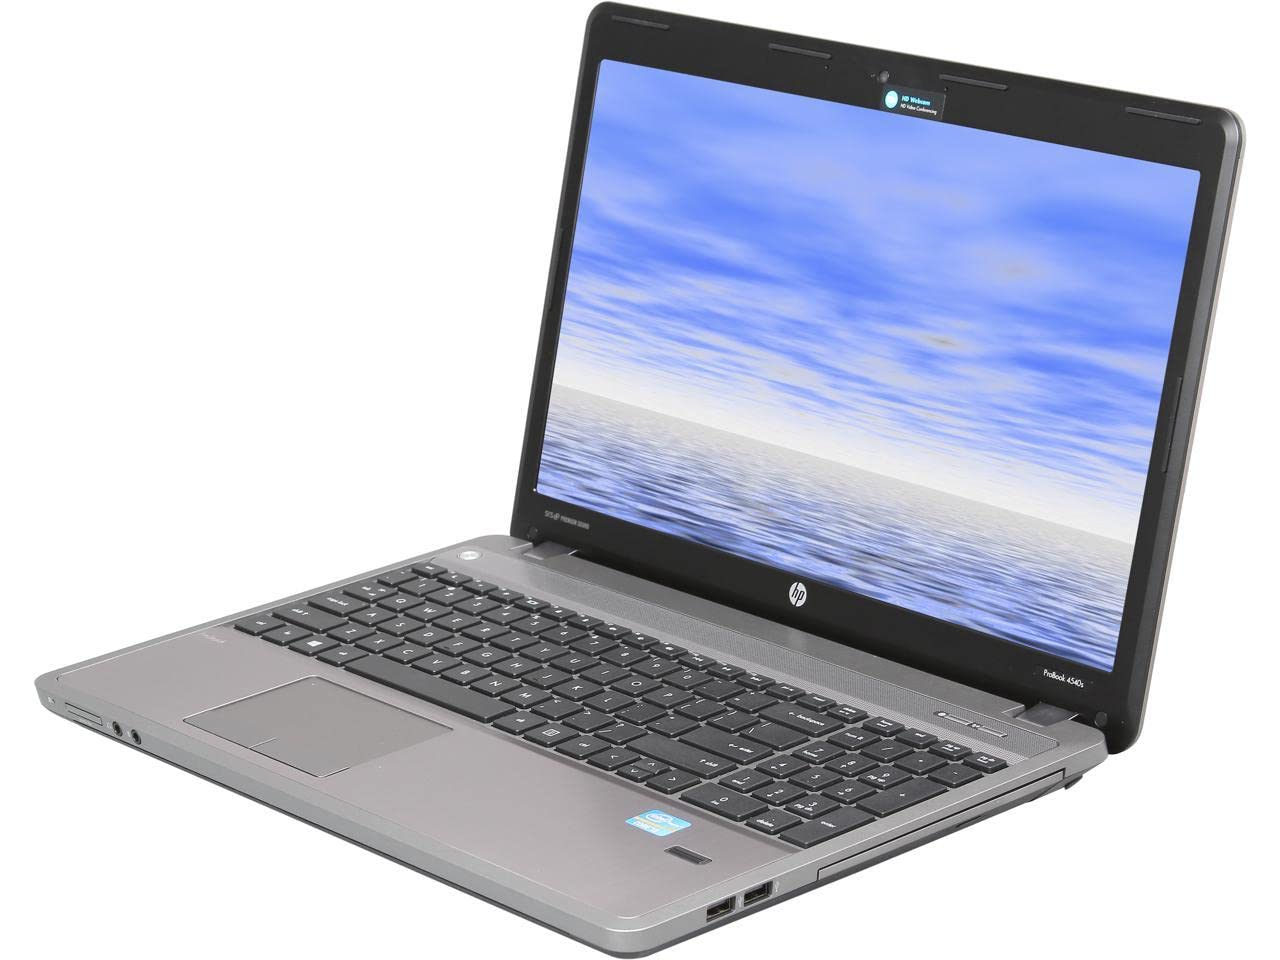
Position the computer upside-down on a flat surface, then slide the battery release latches to release the battery — you can slide them simultaneously or one at a time. Tilt the battery upward and remove it from the battery bay. Before doing so, shut down the computer, disconnect all external devices, and unplug the AC adapter. (Page 42)
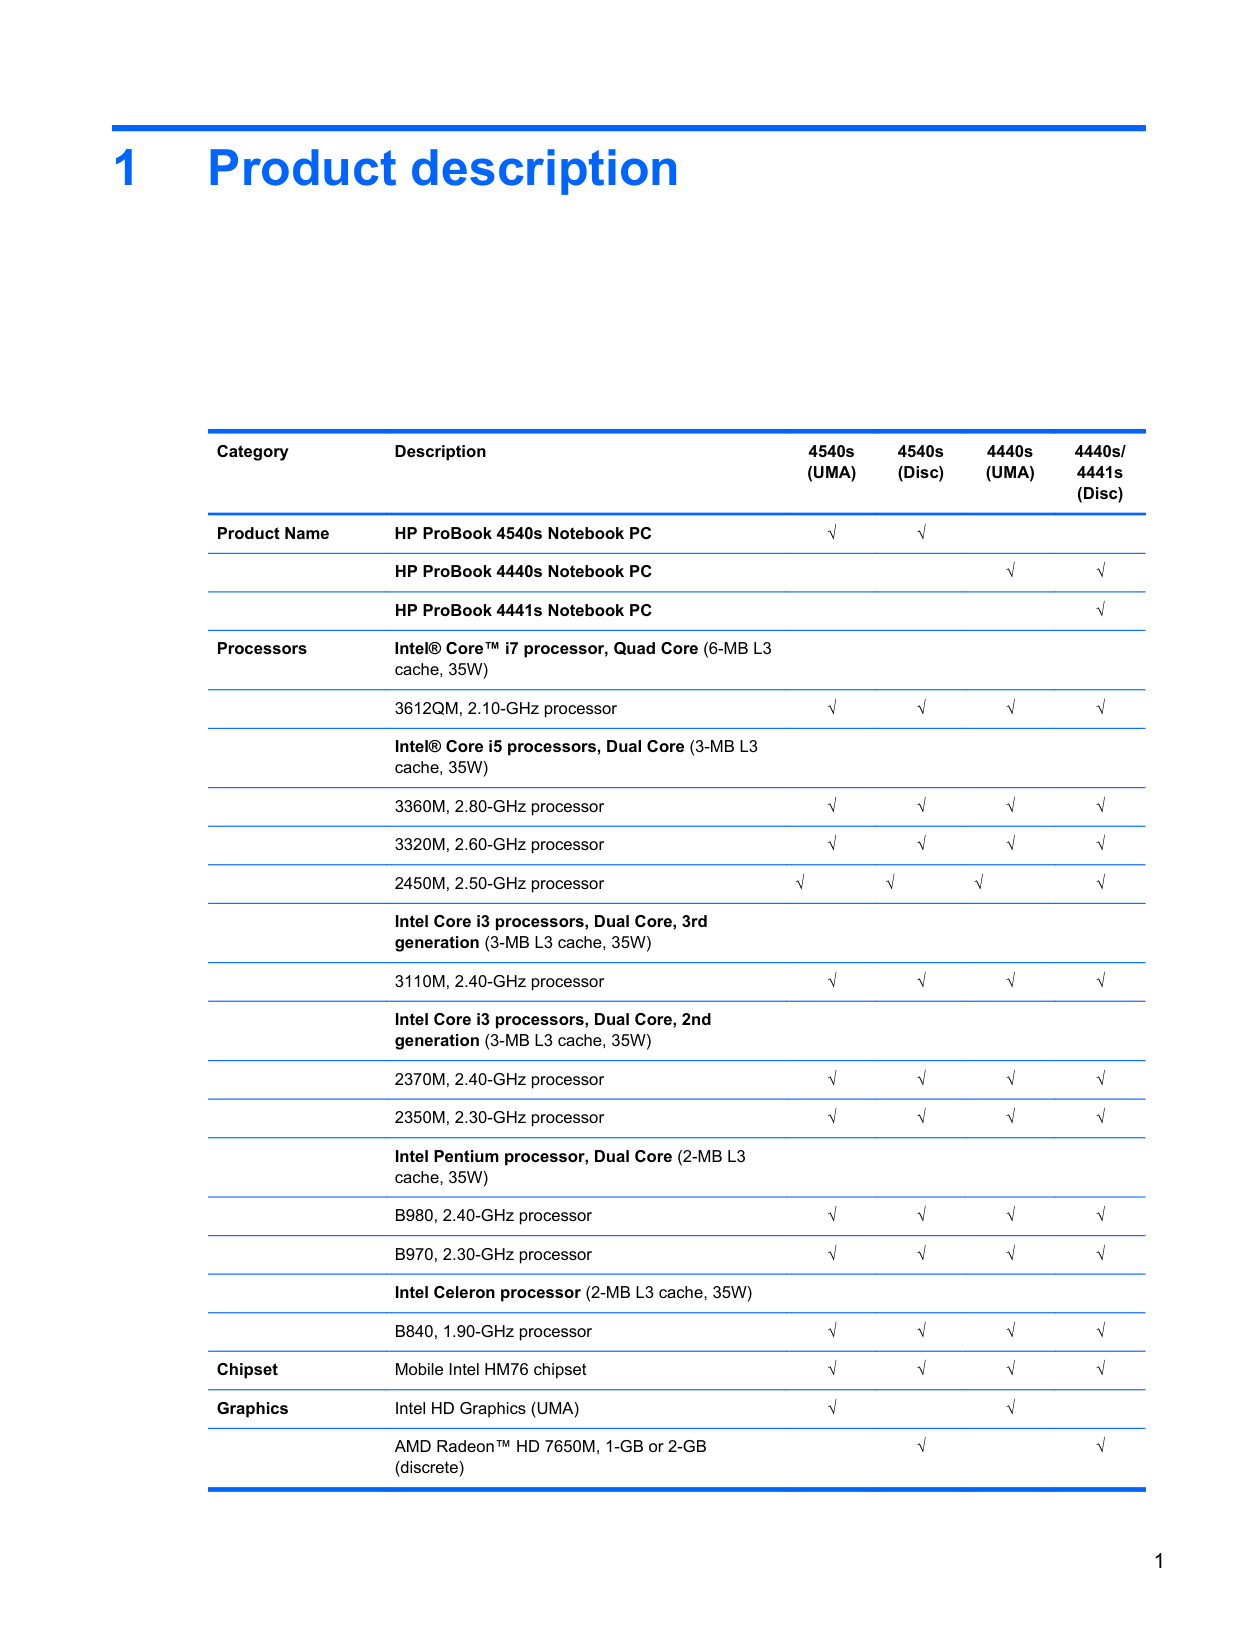
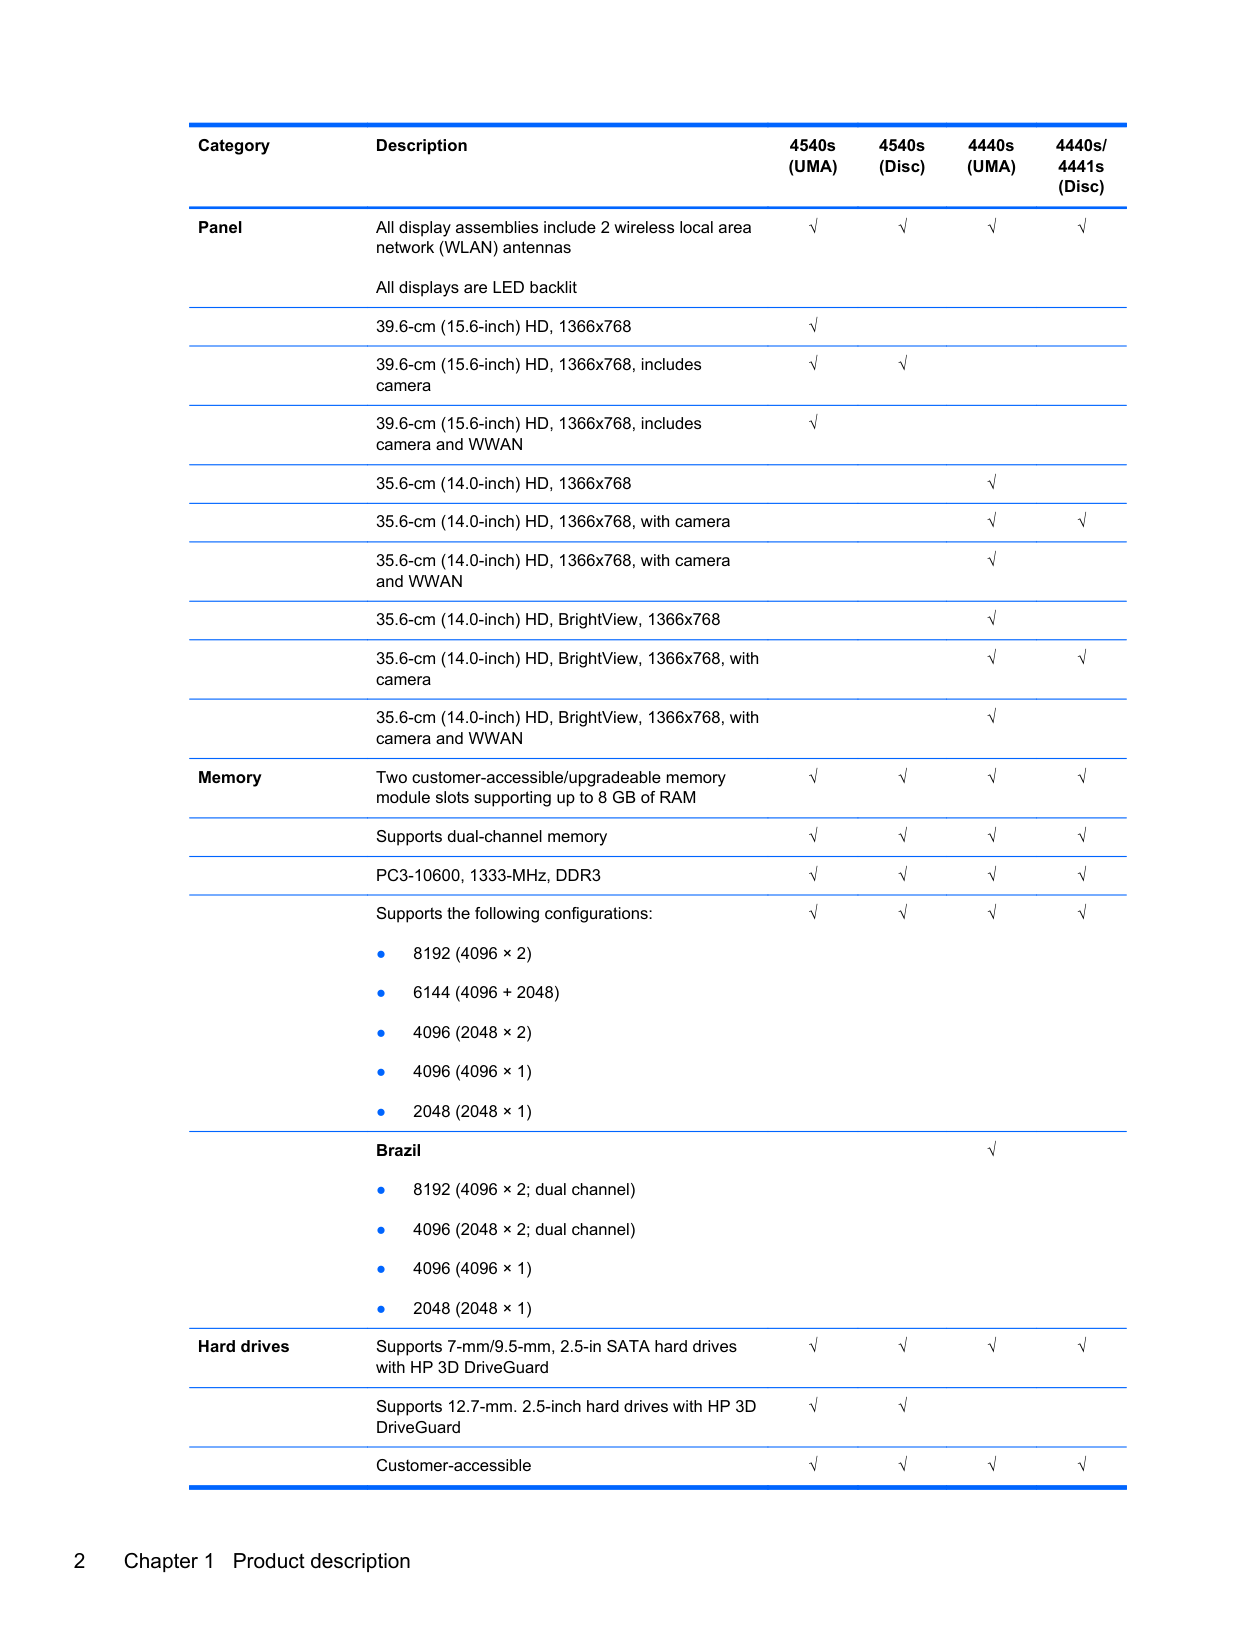
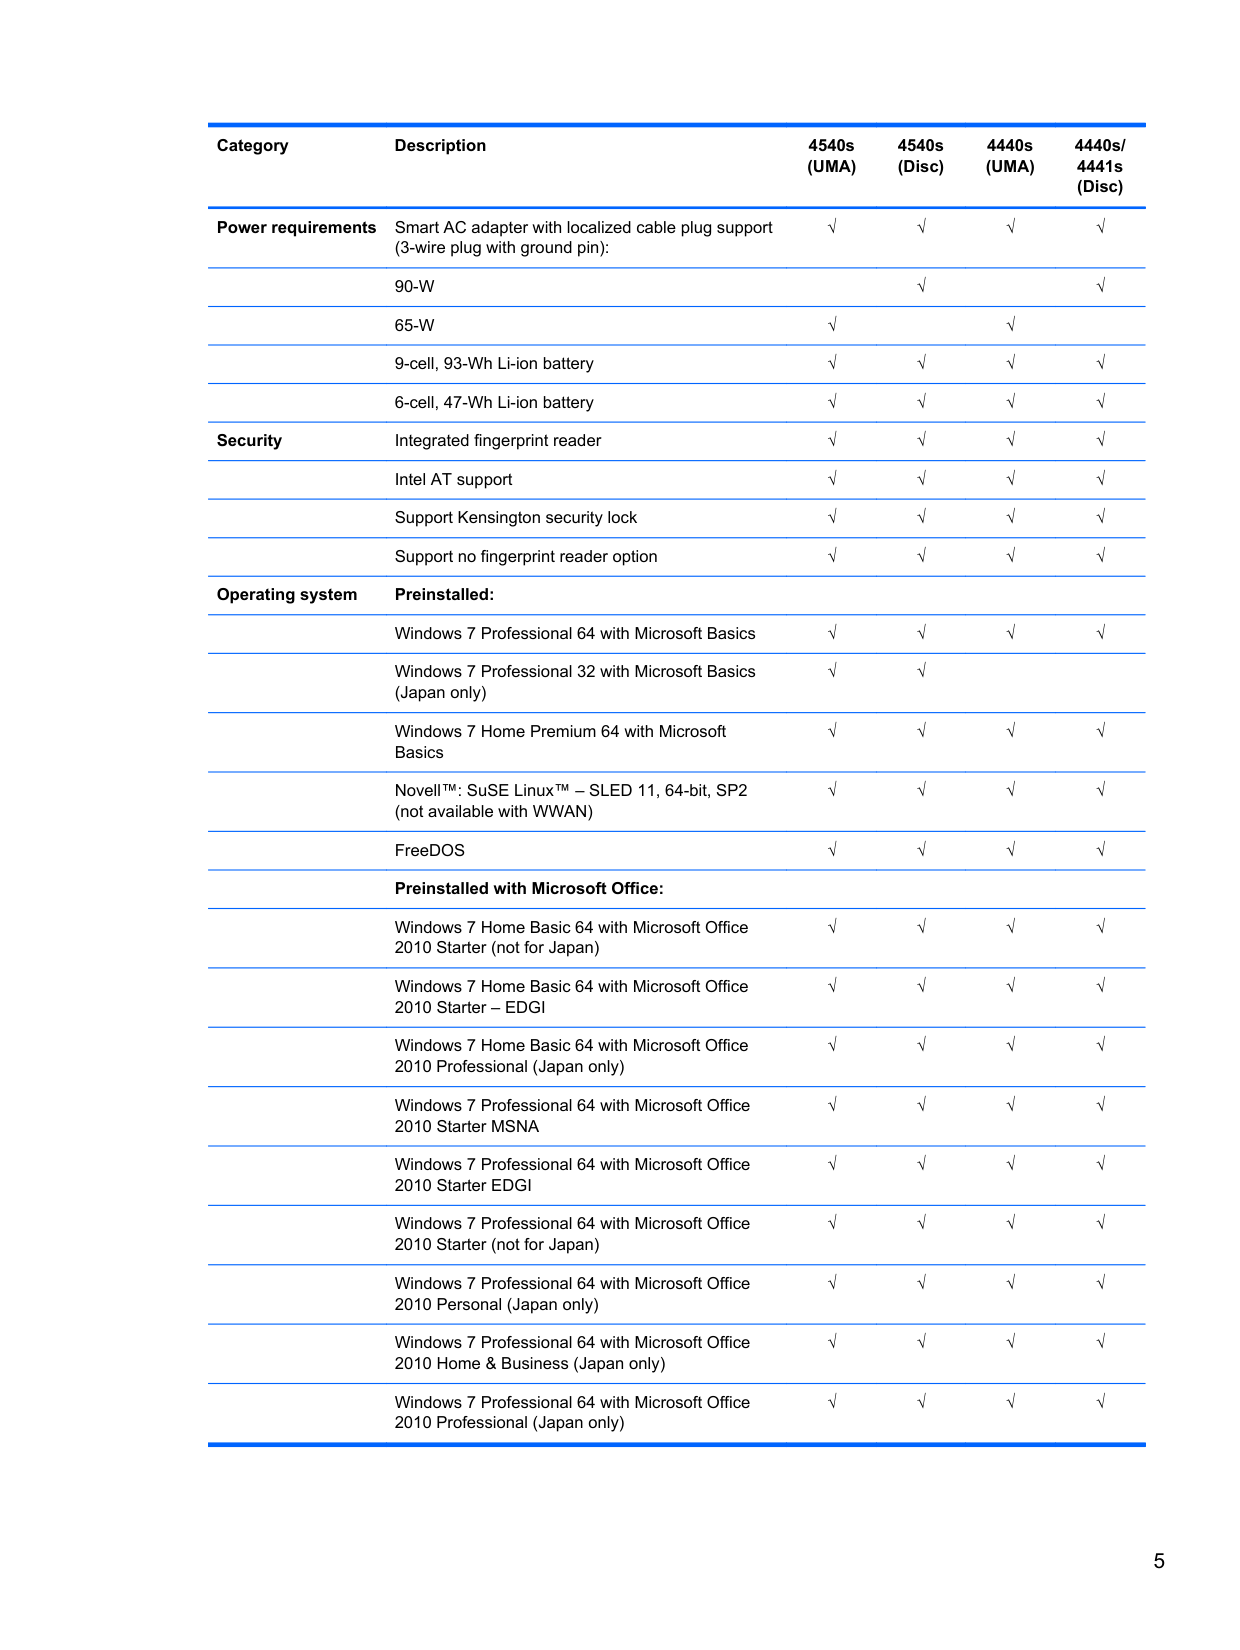
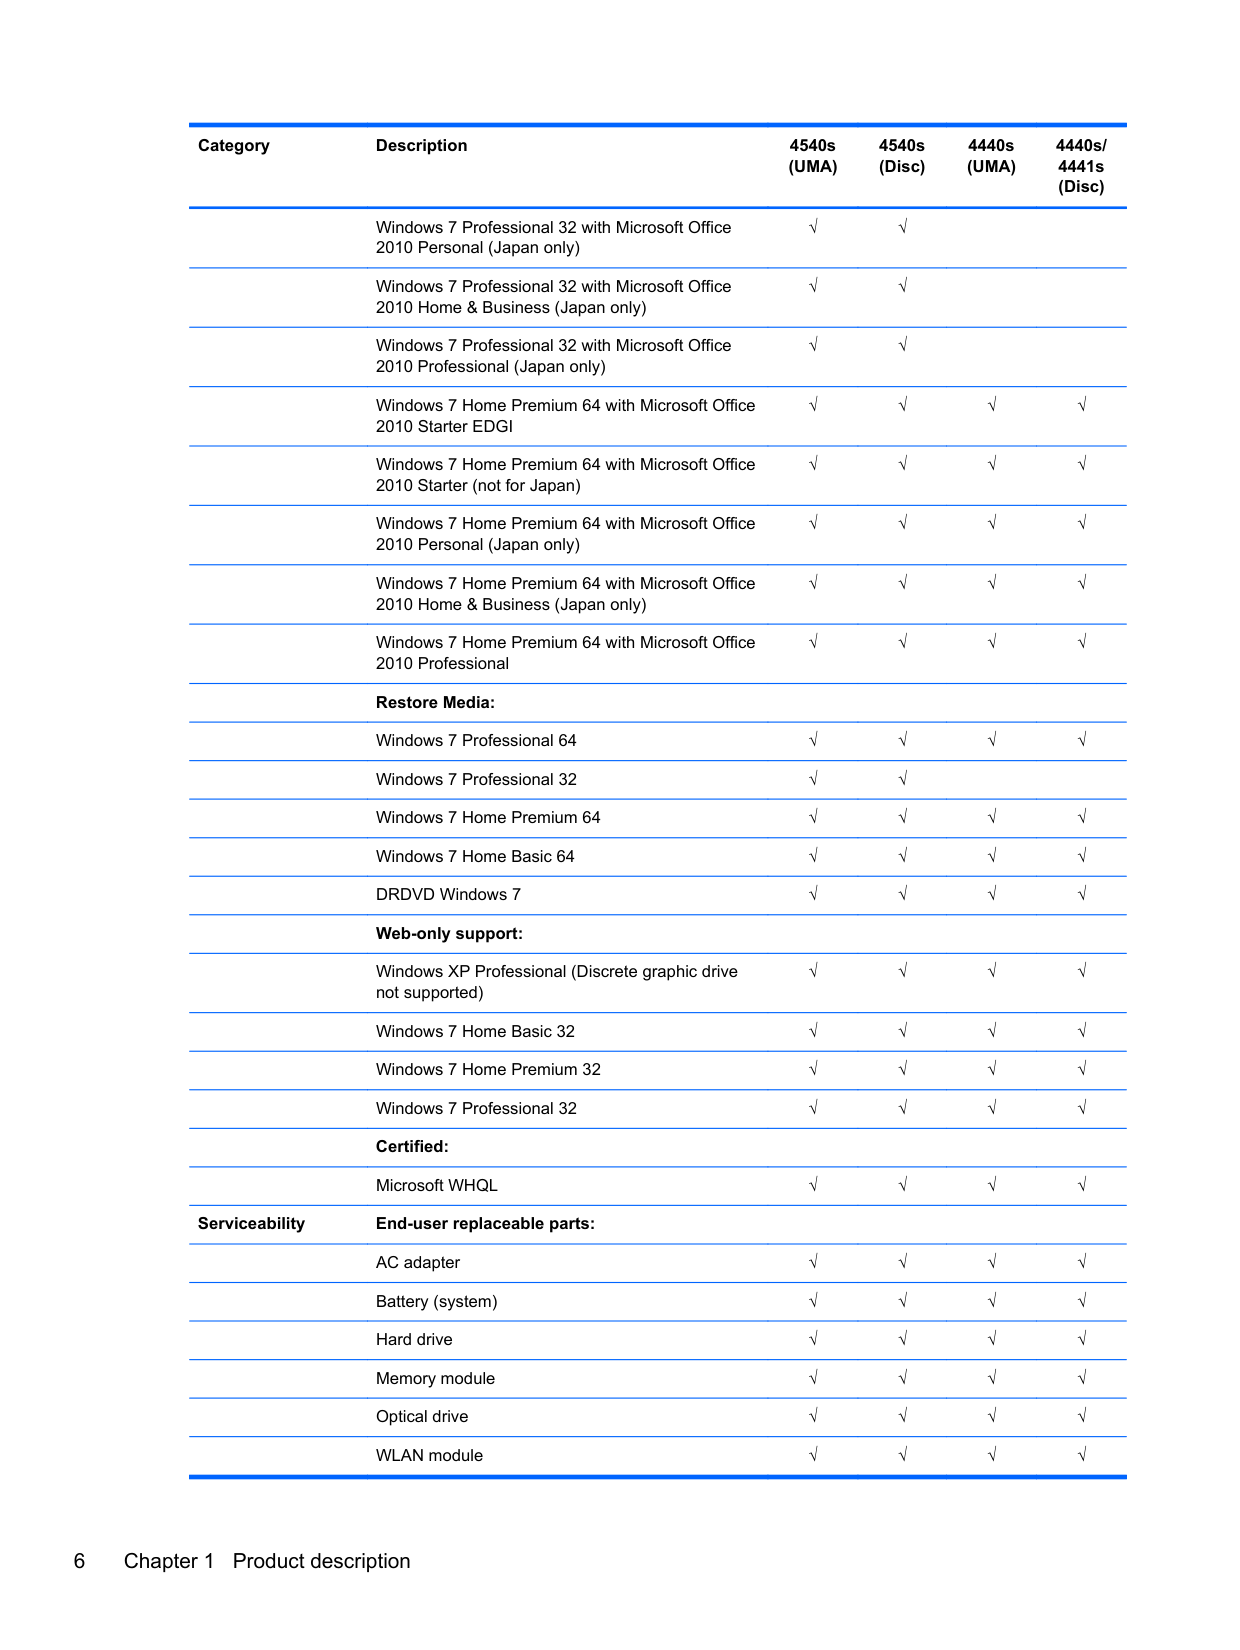
How much RAM can I install in the HP ProBook 4540s, and what type does it support?
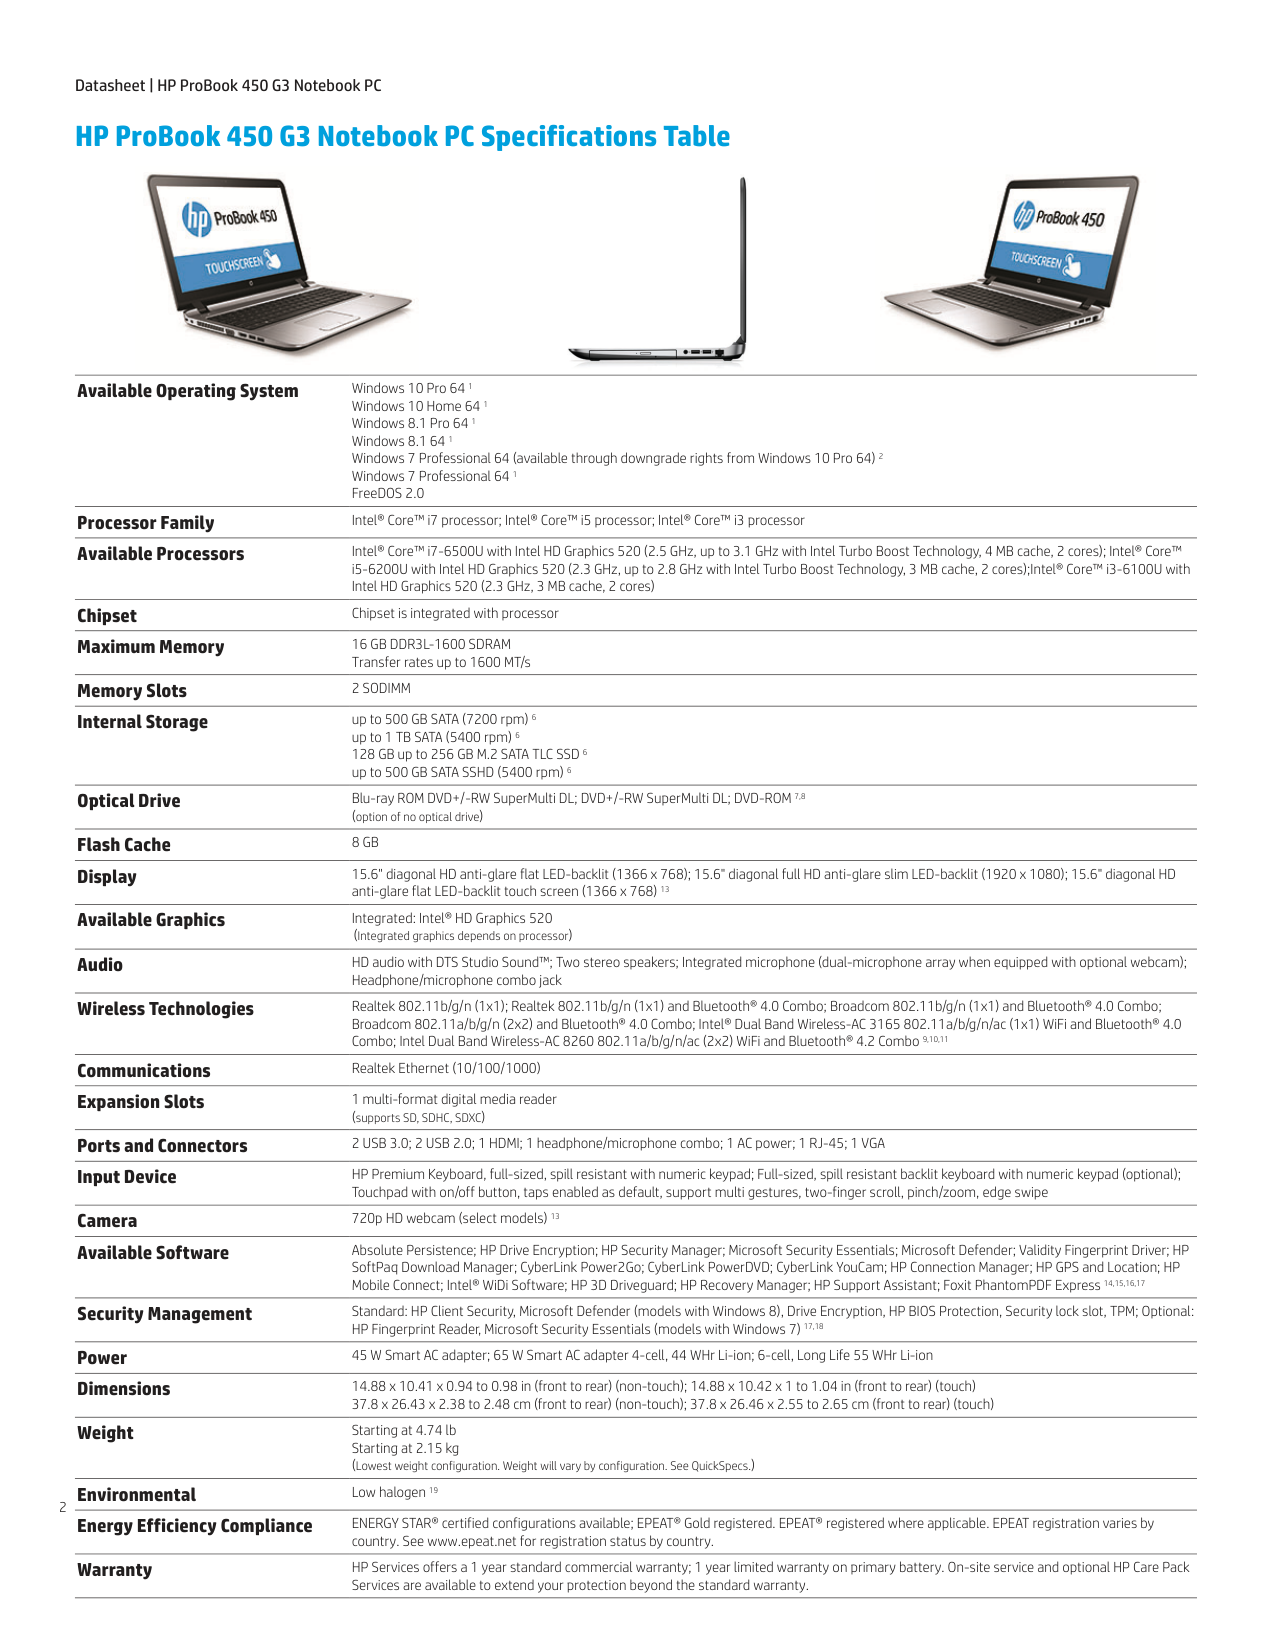
The HP ProBook 4540s supports up to 8 GB of RAM across two customer-accessible and upgradeable memory module slots. It uses PC3-10600, 1333-MHz, DDR3 memory and supports dual-channel memory configurations. Supported configurations include 8192 MB (4096 x 2), 6144 MB (4096 + 2048), 4096 MB, and 2048 MB. (Page 2)
Do I need to update the BIOS before installing new memory modules?
Yes, you must update the computer to the latest BIOS before adding new memory modules. Failure to update the BIOS prior to installing new memory may result in various system problems. To update, navigate to www.hp.com, go to Support & Drivers, search for your computer model, and download the latest BIOS. (Page 50)
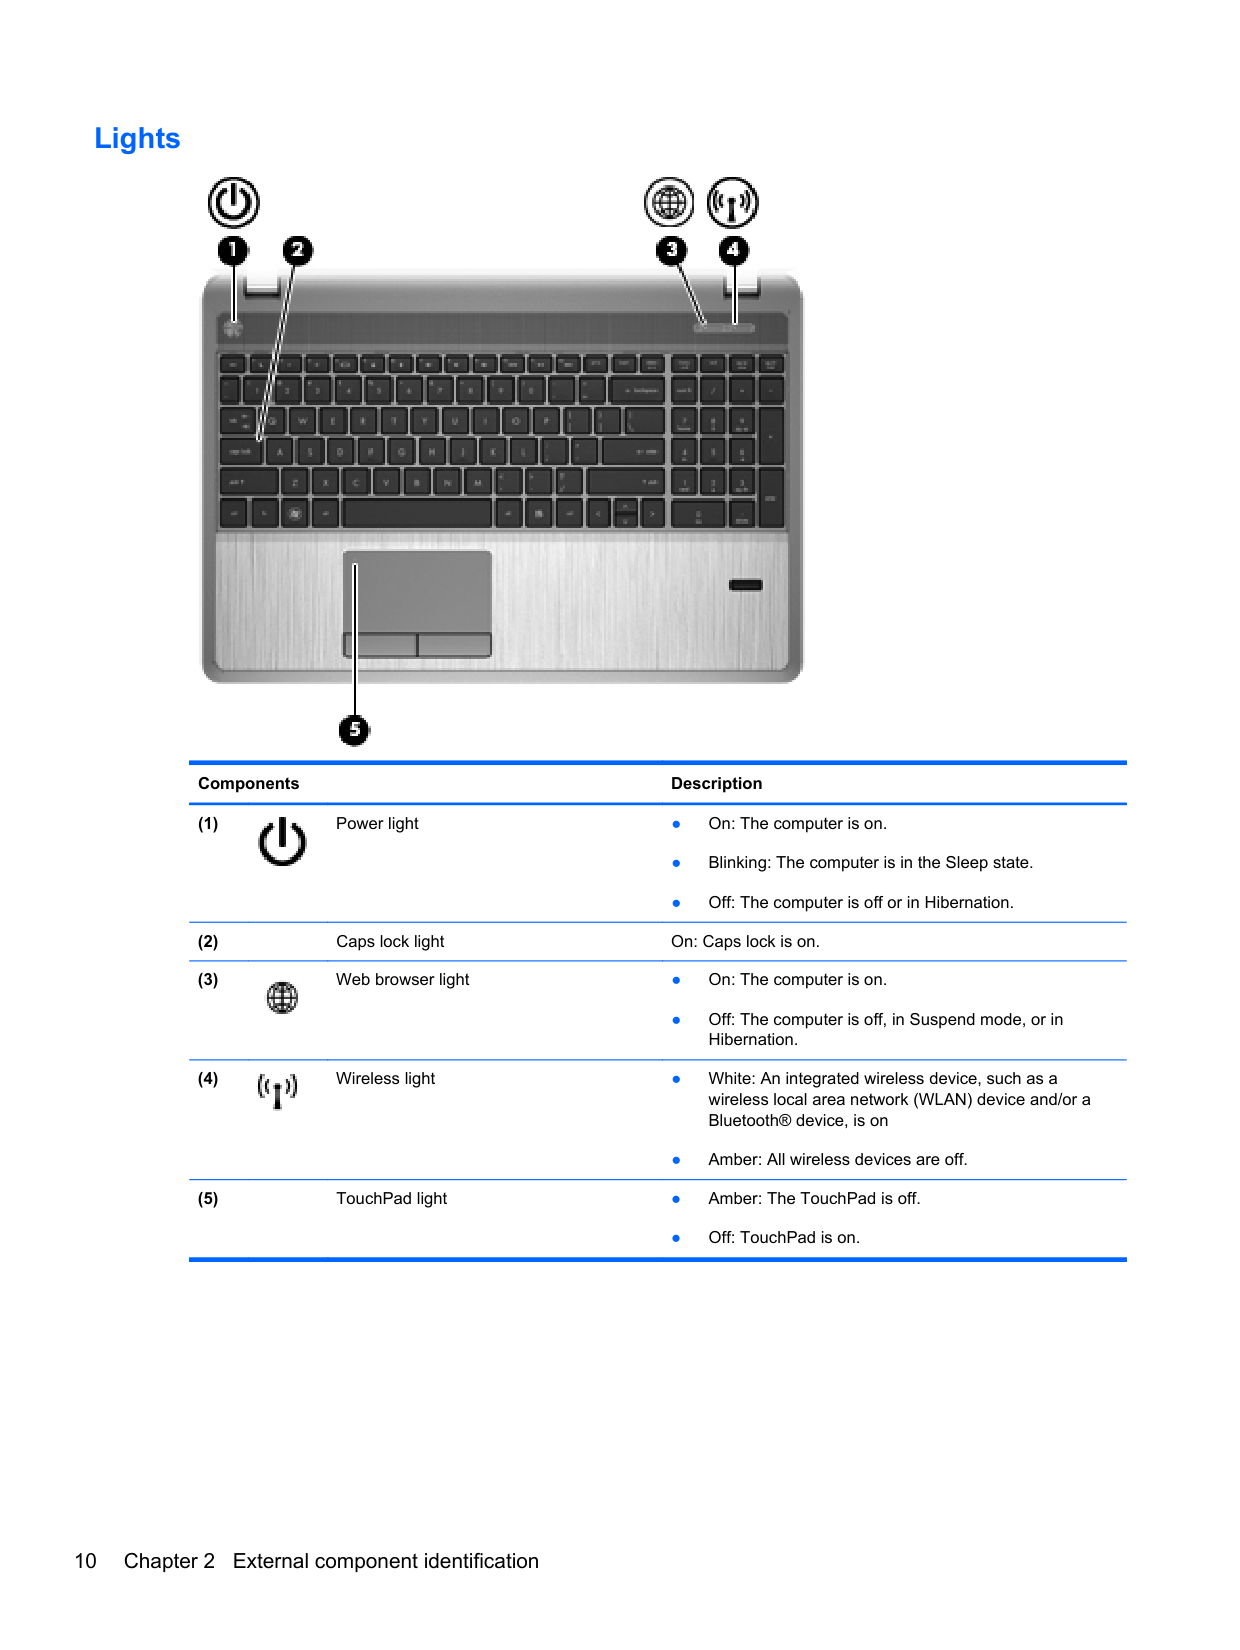
What does it mean when the AC adapter/battery light is blinking amber?
A blinking amber battery light means a battery that is the only available power source has reached a low battery level. When the battery reaches a critical battery level, the battery light begins blinking rapidly. You should connect the AC adapter immediately to avoid losing unsaved work. (Page 15)
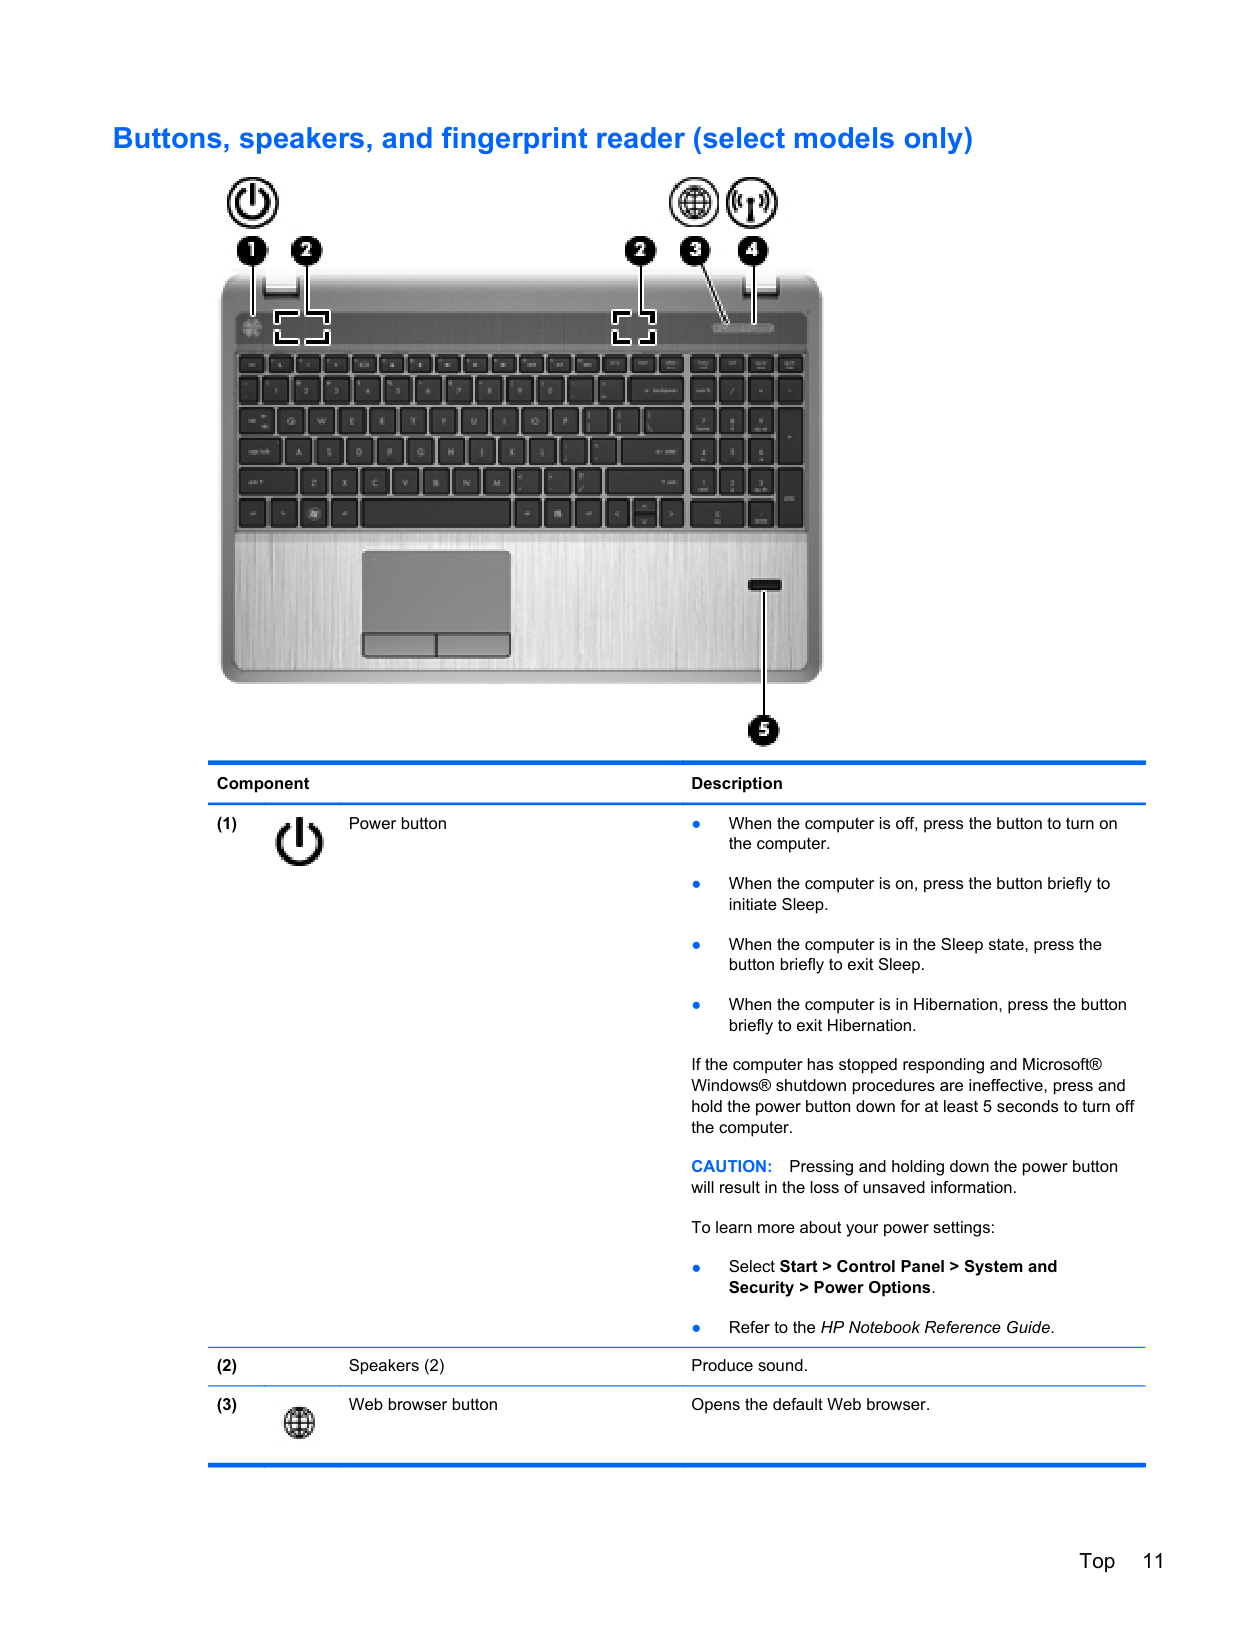
How do I safely place the computer to avoid overheating?
Do not place the computer directly on your lap or obstruct the computer air vents — use it only on a hard, flat surface. Do not allow hard or soft surfaces such as pillows, rugs, or clothing to block airflow, and do not allow the AC adapter to contact the skin or soft surfaces during operation. The computer and AC adapter comply with user-accessible surface temperature limits defined by IEC 60950. (Page 3)
How do I safely remove the battery from my HP ProBook 4540s?
First shut down the system and disconnect power. Then position your computer upside-down on a flat surface and slide both side latches to release the battery; lift it up to remove.
Show 18 more questions
How can I replace the keyboard in my HP ProBook 4540s?
What should I do if my HP ProBook 4540s has low battery warning?
How do I swap out the hard drive on my HP ProBook 4540s?
What tools do I need to perform hardware removal and replacement on the ProBook 4540s?
What precautions should I take when handling hard drives during replacement?
What do the different colors and states of the wireless light indicator mean?
What battery options are available for the HP ProBook 4540s and what are their part numbers?
How do I install the latest BIOS update on my HP ProBook 4540s?
How do I install a new optical drive on my HP ProBook 4540s?
How do I clean the LCD screen?
How can I ensure safety when setting up my LCD monitor?
Why won’t my HP notebook identify a USB graphics monitor?
What display mode is best for multi-tasking?
How do I change my monitor's display resolution?
What happens if I don’t properly route my USB cable?
How do I turn off my HP monitor for energy saving?
Why can’t I use multiple graphics cards from different providers?
How do I set up my monitor to be used full time?
Full Manual
20 pages
User Guide
© 2014 Hewlett-Packard Development Company, L.P.
Windows and Windows Vista are U.S. registered trademarks of Microsoft Corporation.
The only warranties for HP products and services are set forth in the express warranty statements accompanying such products and services . Nothing herein should be construed as constituting an additional warranty. HP shall not be liable for technical or editorial errors or omissions contained herein.
This document contains proprietary information that is protected by copyright. No part of this document may be photocopied, reproduced, or translated to another language without the prior written consent of Hewlett-Packard Company.
First Edition: September 2014 Document Part Number: 775557-001
#### About This Guide
This guide provides information on monitor features, setting up the monitor, and technical specifications.
WARNING! Text set off in this manner indicates that failure to follow directions could result in bodily harm or loss of life.
CAUTION: Text set off in this manner indicates that failure to follow directions could result in damage to equipment or loss of information.
| | |---|
NOTE: Text set off in this manner provides important supplemental information.
iii
###### iv About This Guide
Table of contents
Cleaning the Monitor ............................................................................................................ 3 Shipping the Monitor ............................................................................................................ 3
Attaching the Protective Cover ............................................................................................ 4 Setting Up the Monitor ......................................................................................................... 6
Installing Drivers and Connecting an HP Notebook Computer ............................................................ 8 Display Modes .................................................................................................................................... 10
Extend Mode (Default) ....................................................................................................... 10 Mirror Mode ....................................................................................................................... 11 Primary Display .................................................................................................................. 11
Rear Panel Controls ........................................................................................................................... 12
v
###### vi
1 Product Features

The LCD (liquid crystal display) monitor has an active matrix, thin-film transistor (TFT) panel with the following features:
1
2 Safety and Maintenance Guidelines
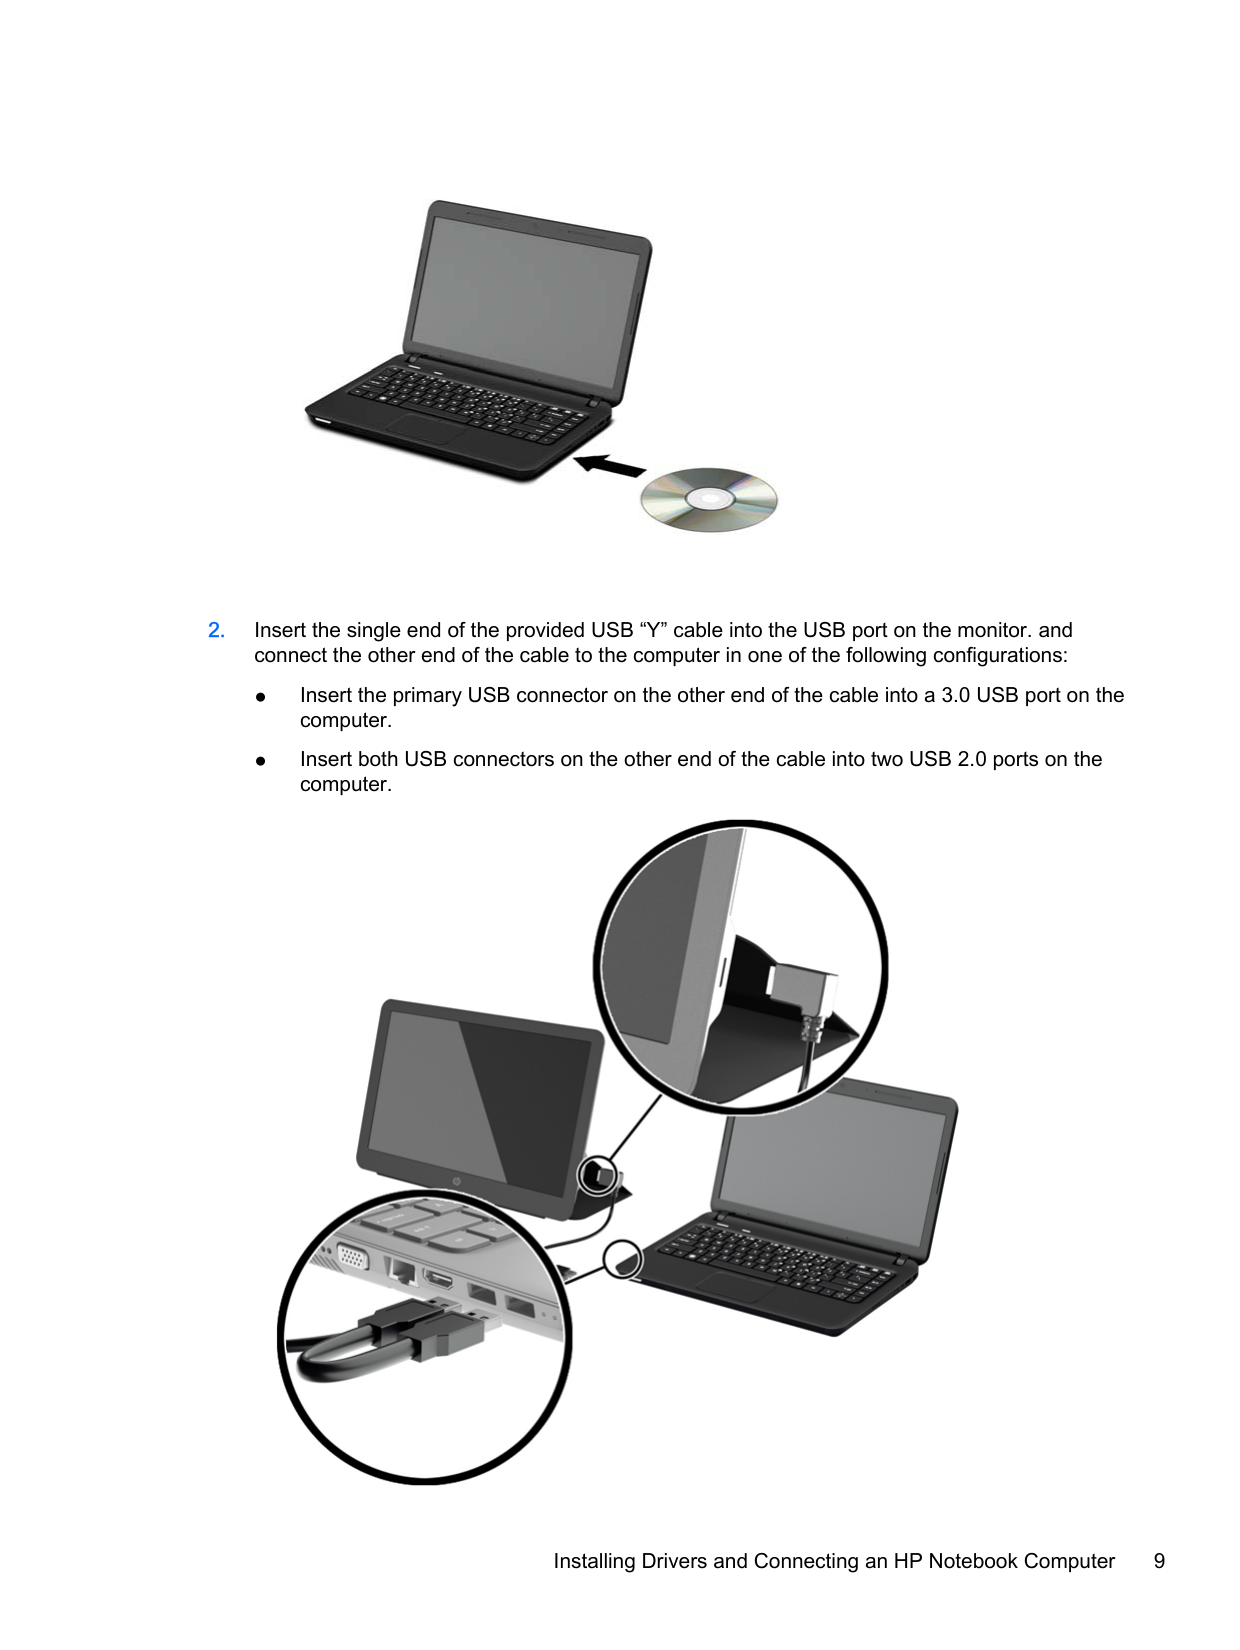
Important Safety Information For safety and regulatory information, refer to the Product Noticesprovided on your media disc, if one is included, or in your documentation kit. To locate updates to the user guide for your product, go to http://www.hp.com/support, and select your country. Select Drivers & Downloads, and then follow the on-screen instructions A USB cable for power and data is included with the monitor. Use only the supplied cable when connecting the monitor to a computer.
WARNING! To reduce the risk of serious injury, read the Safety and Comfort Guide. It describes proper workstation, setup, posture, and health and work habits for computer users, and provides important electrical and mechanical safety information. This guide is located on the Web at http://www.hp.com/ergo and/or on the documentation disc, if one is included with the monitor.
WARNING! LCD monitors that are inappropriately situated on dressers, bookcases, shelves, desks, speakers, chests, or carts may fall over and cause personal injury. Care should be taken to route the USB cable connected to the LCD monitor so that it can not be pulled, grabbed, or tripped over.
CAUTION: For the protection of the monitor, as well as the computer, connect the computer power cord to some form of surge protection device such as a power strip or Uninterruptible Power Supply (UPS). Not all power strips provide surge protection; the power strips must be specifically labeled as having this ability. Use a power strip whose manufacturer offers a Damage Replacement Policy so you can replace the equipment, if surge protection fails.
Use the appropriate and correctly sized furniture designed to properly support your HP LCD monitor. CAUTION: Do not pick up the monitor by its protective case. The case and monitor are attached together by magnets. If held improperly, the monitor could detach from the case and fall.
Maintenance Guidelines
To enhance the performance and extend the life of the monitor:
| |
|---|
#### Cleaning the Monitor
CAUTION: Spray the cleaner onto a cloth and use the damp cloth to gently wipe the screen surface. Never spray the cleaner directly on the screen surface. It may run behind the bezel and damage the electronics.
CAUTION: Do not use cleaners that contain any petroleum based materials such as benzene, thinner, or any volatile substance to clean the monitor screen or cabinet. These chemicals may damage the monitor.
#### Shipping the Monitor
Keep the original packing box in a storage area. You may need it later if you move or ship the monitor.
Maintenance Guidelines 3
3 Setting Up and Using the Monitor
Attaching the Protective Cover and Setting Up the Monitor
#### Attaching the Protective Cover

As the protective cover contacts the monitor, magnets in the bottom edge of the cover align and attach to the monitor.


| | |---|

NOTE: If the flap cannot be folded over the top of the monitor, then the cover has been attached with the wrong side up. Carefully detach the cover, turn it over, and repeat the procedure.
#### Setting Up the Monitor
CAUTION: Do not pick up the monitor by its protective case. The case and monitor are attached together by magnets. If held improperly, the monitor could detach from the case and fall.


| | |---|

NOTE: If you prefer the monitor to be in a more upright position, select the middle groove. For more incline, select the top groove.
Installing Drivers and Connecting an HP Notebook Computer
| | |---|
IMPORTANT: On Windows Vista and later versions, DisplayLink software interacts closely with the primary graphics card. DisplayLink supports and tests a single graphics card (GPU) installed in a PC from all major GPU vendors (Intel, ATI, NVIDIA, and Via). SIS graphics cards are not supported.
The following GPU configurations may exhibit compatibility issues on Windows Vista and later versions in certain circumstances:
Other GPU configurations, including the following, are currently unsupported and will not function on Windows Vista and later versions.
Do not turn on power to the monitor until you have installed the drivers on your computer and connected the monitor to the computer. To set up the monitor:
| | |---|


Installing Drivers and Connecting an HP Notebook Computer 9

Click the icon to open the menu to select your display mode and control the attached monitor. If the monitor does not turn on, perform the following steps:
| | |---|
Display Modes
When the monitor is attached to your notebook or desktop; computer, the monitor can be configured to use either extend mode or mirror mode, or it can be the primary display.
#### Extend Mode (Default)
In extend mode (the default mode), your Windows desktop display spreads over to the attached monitor. This mode allows you to perform multiple tasks more effectively without overlapping windows.
To set up the monitor in extend mode:
The Windows desktop display now extends in the same direction as the last time this mode was used.
You can also set up extend mode through the Windows display settings. To use this method:
To use your extended desktop, simply drag and drop your open windows over to the attached monitor.
| | |---|
NOTE: Some applications may not support display on an extended desktop.
#### Mirror Mode
In mirror or clone mode, your original screen (the primary notebook display) is mirrored to the attached monitor.
To set up the attached monitor in mirror mode:
You can also set up the attached monitor in mirror mode through the Windows display settings. To use this method:
In mirror mode, the settings on the primary monitor (screen resolution, color depth, and refresh rate) are replicated on the attached monitor.
#### Primary Display
To set up the attached monitor as the primary display:
You can also set up the attached monitor as the primary display through the Windows display settings. To use this method:
Display Modes 11
● On Windows Vista, Windows 7, and the Windows 8 series, click Personalize > Display
##### Settings.
● On Windows XP, click Properties > Settings.
The attached monitor stays primary if the PC enters hibernate or suspend mode or is rebooted. If the attached monitor is unplugged, the notebook or desktop display becomes primary again.
Rear Panel Controls


####### Icon Button Function


| | |---|
NOTE: To view an OSD menu simulator, visit the HP Customer Self Repair Services Media Library at http://www.hp.com/go/sml.
4 Finding More Information
Product Support
| | |---|
NOTE: The monitor user guide and latest drivers are available at http://www.hp.com/support.
If the information provided in the guide does not address your questions, you can contact support. For U.S. support, go to http://www.hp.com/go/contactHP.
For worldwide support, go to http://welcome.hp.com/country/us/en/wwcontact_us.html. Here you can:
| | |---|
Preparing to Call Technical Support
If you cannot solve a problem with the monitor, you may need to call technical support. Have the following information available when you call:
Locating the Rating Labels
The rating labels on the monitor provide the spare part number, product number, and serial number. You may need these numbers when contacting HP about the monitor model. The rating labels are located on the bottom of the monitor. To see them, you must remove the protective cover.
Product Support 13
5 Technical Specifications
| |

|---|
NOTE: All specifications represent the typical specifications provided by HP's component manufacturers; actual performance may vary either higher or lower.
Monitor Specifications
Input Terminal USB for power and video (cable
included) Maximum Weight (Unpacked) 1.25 kg 2.76 lbs Dimensions (includes cover) Height Depth Width
21.8 cm 1.6 cm 34.5 cm
8.6 in .63 in 13.6 in
Graphics Resolution 1600 X 900 @ 60 Hz Aspect Ratio 16:9 Power Source 1 USB 3.0 port or 2 USB 2.0 ports
(4.5 V , 0.9~1.8 A)
Energy Saver Feature
The monitors support a reduced power state. The reduced power state will be entered into if the monitor detects the absence of either the horizontal sync signal and/or the vertical sync signal. Upon detecting the absence of these signals, the monitor screen is blanked, the backlight is turned off, and the power light is turned amber. When the monitor is in the reduced power state, the monitor will utilize 0.5 watts of power. There is a brief warm up period before the monitor will return to its normal operating mode.
Refer to the computer manual for instructions on setting energy saver features (sometimes called power management features).
| | |---|
NOTE: The above power saver feature only works when connected to computers that have energy saver features.
14 Chapter 5 Technical Specifications