
Ikea Medelstor 45cm Integrated Dishwasher
Ask AI
— answers from the official manualAnswers from the official manual.
Common questions
Common Questions
27 totalWhat should I do if my water usage exceeds expectations?
Check for clogged filters, ensure proper installation of hoses (no kinks or bends), and confirm the water tap is open without any obstructions. Refer to pages that discuss issues with water supply for more troubleshooting details.
How do I set up salt and rinse aid?
Fill the salt container with 1 kg of rough dishwasher-specific salt (not fine salt). For rinse aid, fill to the marked line on the dispenser. Ensure proper water hardness level setting for optimal performance.
What is the significance of the Machine Care indicator?
When this indicator lights up, it means your appliance requires internal cleaning to remove grease and limescale buildup. Start the Machine Care programme as described in the manual chapter on maintenance.
Why does the door automatically open during a wash cycle?
The AutoOpen function is active for drying purposes by default; it opens the door automatically at the end of programs to improve drying performance and allows items to cool down.
How do you check water inlet hose filters?
Disconnect the hose, turn the fastener clockwise, clean any blockages or debris from the filter opening. Connect back before use. Refer maintenance section for detailed instructions.
What is a correct loading arrangement inside the dishwasher baskets?
Arrange items so they do not touch each other, with heavier or larger objects at the bottom and lighter items in the upper basket. Ensure spray arms move freely after loading.
Show 21 more questions
How can I prevent dulling or discoloration of dishes?
What causes poor drying results in a Medelstor Dishwasher?
What should I do before using the dishwasher for the very first time?
How do I fill the salt container correctly?
What does it mean when the display shows an alarm code and the appliance won't fill with water?
What alarm code appears when the appliance cannot drain water, and how do I fix it?
What should I do if the anti-flood device is activated?
How do I cancel a running programme or a delay start countdown?
How do I clean the filters, and how often should I do it?
Why are my dishes coming out wet, and how can I improve drying results?
What is the AutoOpen feature and are there any cautions when using it?
How do I reset the dishwasher when it stops unexpectedly?
How do I check if the water inlet hose filter of the dishwasher is clogged?
What should I do if there's a small leak from the dishwasher door?
How can I maintain good washing results when using multi-tablets?
How do I clean the spray arms to ensure optimal washing performance?
How often should I clean my dishwasher to maintain its performance?
How can I improve drying results in my dishwasher?
What should I do if the 'rinse aid empty notification' no longer works?
What should I check to fix a problem when water doesn't drain from appliance?
How long is the IKEA guarantee on this dishwasher and what does it cover?
Full Manual
36 pages

MEDELSTOR
GB
ENGLISH Please refer to the last page of this manual for the full list of IKEA appointed After Sales Service Provider and relative national phone numbers.
#### ENGLISH 4
#### Contents
Safety information 4 Safety instructions 6 Product description 8 Control panel 9 Programme selection 10 Basic settings 12 Before first use 16 Daily use 17
Hints and tips 20 Care and cleaning 21 Troubleshooting 25 Technical information 29 Environmental concerns 30 IKEA guarantee 30
Subject to change without notice.
#### Safety information
Before the installation and use of the appliance, carefully read the supplied instructions. The manufacturer is not responsible for any injuries or damage that are the result of incorrect installation or usage. Always keep the instructions in a safe and accessible location for future reference.
Children and vulnerable people safety

General Safety
Safety instructions Installation
Warning! Only a qualified person must install this appliance.

1362) fuse (UK and Ireland only). Water connection
Warning! Dangerous voltage.
###### Electrical connection
Warning! Risk of fire and electric shock.
###### Use
###### Service
###### Disposal
Warning! Risk of injury or suffocation.
#### Product description
| | |
|---|---| | | |
8
567
4
3
The graphics is a general overview. For more details, refer to other chapters or documents provided with the appliance.
###### Beam-on-Floor
Beam-on-Floor is a light displayed on the floor below the appliance door.
• When a programme starts, a white light is on and stays on for the duration of the programme.
Beam-on-Floor is off when the appliance is deactivated.
#### Control panel
1 3 4 5 62

Display
A AB
|Indicator|Description| |---|---| | |Rinse aid indicator. It is on when the rinse aid dispenser needs re‐ filling. Refer to "Before first use".|
|Indicator|Description| |---|---| | |Salt indicator. It is on when the salt container needs refilling. Re‐ fer to "Before first use".| | |Machine Care indicator. It is on when the appliance needs inter‐ nal cleaning with the Machine Care programme. Refer to "Care and cleaning".| | |Drying phase indicator. It is on when a programme with the dry‐ ing phase is selected. It flashes when the drying phase operates. Refer to "Programme selec‐ tion".|
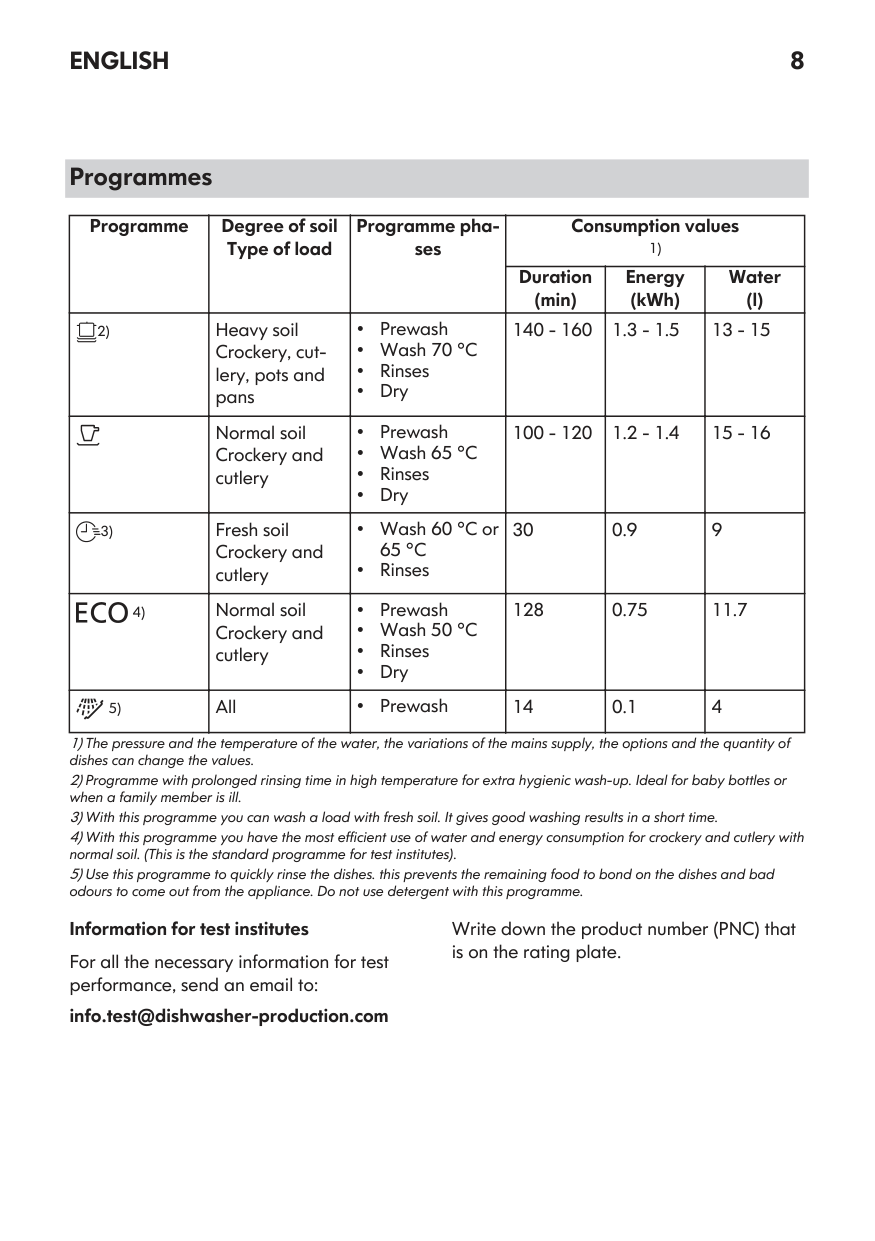
Programme selection Programmes
cutlery with normal soil. This is the standard programme for test institutes. 1)
########## A B C D E
###### AUTO
| | | | | | | |---|---|---|---|---|---| | | | | | | |
The AUTO programme automatically adjusts the dishwashing cycle to the type of load.
The appliance senses the degree of soil and the amount of dishes in the baskets. It adjusts the temperature and quantity of water as well as the wash duration.
• Rinse & Hold is a programme for rinsing off food remains from the dishes. It prevents odours forming in the appliance. Do not use detergent with this programme.
###### Options
You can adjust the programme selection to your needs by activating options.
Power Clean
Power Clean improves the dishwashing results of the selected programme. The option increases the wash temperature and duration.
Gentle / Glass
Gentle / Glass prevents delicate load, glassware in particular, from damaging. The option prevents rapid changes in the dishwashing temperature of the selected programme and reduces it to 45 °C.
###### Programmes overview

|Programme|Dishwasher load|Degree of soil|Programme phases|Options| |---|---|---|---|---| | |Crockery, cut‐ lery|Fresh|• Dishwashing 50 °C
• Intermediate rinse
• Final rinse 45 °C
• AutoOpen
|• •
|
1) This programme is used to assess compliance with the Ecodesign Comission Regulation (EU) 2019/2022. This programme is used to assess compliance with the UK Ecodesign for Energy-Related Products and Energy Information Regulations.
|Programme|Dishwasher load|Degree of soil|Programme phases|Options| |---|---|---|---|---| | |All|All degrees of soil|• Prewash|Not applicable| | |Crockery, cut‐ lery|Fresh, lightly dried-on|• Dishwashing 60 °C
• Intermediate rinse
• Final rinse 50 °C
• AutoOpen
|• •
| | |Crockery, cut‐ lery, pots, pans|Normal, lightly dried-on|• Dishwashing 60 °C
• Intermediate rinse
• Final rinse 55 °C
• Drying
• AutoOpen
|• •
| | |Crockery, cut‐ lery, pots, pans|Normal to heavy, dried-on|• Prewash
• Dishwashing 60 °C
• Intermediate rinse
• Final rinse 60 °C
• Drying
• AutoOpen
|• •
| | |Crockery, cut‐ lery, pots, pans|Normal, lightly dried-on|• Prewash
• Dishwashing 50 °C
• Intermediate rinse
• Final rinse 55 °C
• Drying
• AutoOpen
|• •
| | |Crockery, cut‐ lery, pots, pans|All degrees of soil|• Prewash
• Dishwashing 50 60 °C
• Intermediate rinse
• Final rinse 60 °C
• Drying
• AutoOpen
|Not applicable| |Machine Care|For cleaning the appliance in‐ terior. Refer to "Care and Cleaning".|For cleaning the appliance in‐ terior. Refer to "Care and Cleaning".|• Cleaning 70 °C
• Intermediate rinse
• Final rinse
• AutoOpen
|Not applicable|
####### Consumption values
|Programme 1)2)|Water (l)|Energy (kWh)|Duration (min)| |---|---|---|---| | |9.3 -11.3|0.56 - 0.685|30|
|Programme 1)2)|Water (l)|Energy (kWh)|Duration (min)| |---|---|---|---| | |3.1 - 3.8|0.012 - 0.014|15| | |9 - 11|0.693 - 0.847|60| | |9.3 - 11.4|0.772 - 0.944|90| | |9.4 - 11.5|0.876 - 1.071|160| | |9.9|0.673|240| | |8.3 - 11.5|0.677 - 1.036|120 - 170|
|Machine Care|8.3 - 10.1|0.593 - 0.725|60|
Information for test institutes
To receive the necessary information for conducting performance tests (e.g. according to: EN60436 /BS EN60436 ), send an email to:
info.test@dishwasher-production.com
In your request, include the product number code (PNC) from the rating plate.
For any other questions regarding your dishwasher, refer to the service book provided with your appliance.
#### Basic settings
You can configure the appliance by changing basic settings according to your needs.
|Number|Setting|Values|Factory setting|Description1)| |---|---|---|---|---| |1|Water hardness|1L - 10L|5L|Adjust the level of the water softener according to the water hardness in your area.| |2|Rinse aid level|0A - 8A|5A|Adjust the level of the rinse aid accord‐ ing to the necessary dosage.| |3|End sound|1b (on) / 0b (off)|0b|Activate or deactivate the acoustic sig‐ nal for the end of a programme.| |4|Auto door open|1o (on) / 0o (off)|1o|Activate or deactivate the AutoOpen.|
|Number|Setting|Values|Factory setting|Description1)| |---|---|---|---|---| |5|Key tones|1F (on) / 0F (off)|1F|Activate or deactivate the sound of the buttons when pressed.| |6|Latest pro‐ gramme selec‐ tion|1H (on) / 0H (off)|0H|Enable or disable the automatic selec‐ tion of the most recently used pro‐ gramme and options.|
1) For more details, refer to the information provided in this chapter.
You can change the basic settings in setting mode. Instructions on how to configure the appliance are provided further in this chapter.
When the appliance is in setting mode, the display shows a digit and a letter. For each setting, a dedicated letter is displayed. The dedicated letters are indicated in the table.
The order of the basic settings presented in the table is also the order of the settings in setting mode.
negative effect on the washing results and on the appliance.
The higher the content of these minerals, the harder your water is. Water hardness is measured in equivalent scales.
The water softener should be adjusted according to the hardness of the water in your area. Your local water authority can advise you on the hardness of the water in your area. Set the right level of the water softener to assure good washing results.
###### The water softener
The water softener removes minerals from the water supply, which would have a
########### Water hardness
|German de‐ grees (°dH)|French de‐ grees (°fH)|mmol/l|mg/l (ppm)|Clarke de‐ grees|Water softener level| |---|---|---|---|---|---| |47 - 50|84 - 90|8.4 - 9.0|835 - 904|58 - 63|10| |43 - 46|76 - 83|7.6 - 8.3|755 - 834|53 - 57|9| |37 - 42|65 - 75|6.5 - 7.5|645 - 754|46 - 52|8| |29 - 36|51 - 64|5.1 - 6.4|505 - 644|36 - 45|7| |23 - 28|40 - 50|4.0 - 5.0|395 - 504|28 - 35|6| |19 - 22|33 - 39|3.3 - 3.9|325 - 394|23 - 27|5 1)| |15 - 18|26 - 32|2.6 - 3.2|255 - 324|18 - 22|4| |11 - 14|19 - 25|1.9 - 2.5|185 - 254|13 - 17|3| |4 - 10|7 - 18|0.7 - 1.8|70 - 184|5 - 12|2|
|German de‐ grees (°dH)|French de‐ grees (°fH)|mmol/l|mg/l (ppm)|Clarke de‐ grees|Water softener level| |---|---|---|---|---|---| |<4|<7|<0.7|<70|< 5|1 2)|
Regardless of the type of detergent used, set the proper water hardness level to keep the salt refill indicator active.
Multi-tabs containing salt are not effective enough to soften hard water.
Regeneration process For the correct water softener operation, the resin of the softener device needs to be regenerated regularly. This process is automatic and is the part of the normal dishwasher operation.
When the prescribed quantity of water (see values in the table) has been used since the previous regeneration process, a new regeneration process will be initiated between the final rinse and the programme end.
|Water softener level|Amount of water (l)| |---|---| |1|250| |2|100| |3|62| |4|47| |5|25| |6|17| |7|10| |8|5| |9|3| |10|3|
In case of the high water softener setting, it may occur also in the middle of the programme, before the rinse (twice during a
programme). Regeneration initiation has no impact on the cycle duration, unless it occurs in the middle of a programme or at the end of a programme with a short drying phase. In such cases, the regeneration prolongs the total duration of a programme by additional 5 minutes.
Subsequently, the rinsing of the water softener that lasts 5 minutes may begin in the same cycle or at the beginning of the next programme. This activity increases the total water consumption of a programme by additional 4 litres and the total energy consumption of a programme by additional 2 Wh. The rinsing of the softener ends with a complete drain.
Each performed softener rinse (possible more than one in the same cycle) may prolong the programme duration by another 5 minutes when it occurs at any point at the beginning or in the middle of a programme.
All the consumption values mentioned in this section are determined in line with the currently applicable standard in laboratory conditions with water hardness 2.5mmol/L (water softener: level 3) according to the regulation: 2019/2022 / UK Ecodesign 2021/745. The pressure and the temperature of water as well as the variations of the mains supply can change the values.
###### The rinse aid level
The rinse aid helps to dry the dishes without streaks and stains. It is automatically released during the hot rinse phase. It is
possible to set the released quantity of rinse aid.
When rinse aid chamber is empty, the rinse aid indicator is on notifying to refill rinse aid. If the drying results are satisfactory while using multi-tablets only, it is possible to deactivate the dispenser and the indicator. However, for best drying performance, always use rinse aid and keep the rinse aid indicator active.
To deactivate the rinse aid dispenser and indicator, set the level of rinse aid to 0A.
###### End sound
You can activate an acoustic signal that sounds when the programme is completed.
Acoustic signals sound also when a malfunction of the appliance occurs. It is not possible to deactivate these signals.
###### AutoOpen
AutoOpen improves the drying results with less energy consumption. The appliance door opens automatically during the drying phase and remains ajar.
AutoOpen is automatically activated with all programmes other than Rinse & Hold.
Caution! Do not try to close the appliance door within 2 minutes after automatic opening. This can cause damage to the appliance.
Caution! If children, pets or people with disabilities have access to the appliance, deactivate AutoOpen. The automatic opening of the door may pose a danger and expose possible hazards inside the appliance (such as knives, sharp objects, chemicals).
When AutoOpen opens the door, Beam-on-Floor might not be completely visible. To see if the programme is complete, look at the control panel.
###### Key tones
The buttons on the control panel make a click sound when you press them. You can deactivate this sound.
###### Latest programme selection
You can set the automatic selection of the most recently used programme and options.
The latest programme that was completed before the appliance deactivation is saved. It is then selected automatically after you activate the appliance.
When the latest programme selection is disabled, the default programme is ECO.
Setting mode How to enter setting mode
You can enter setting mode before starting a programme. You cannot enter setting mode while the programme is running.
To enter setting mode, press and hold simultaneously and for about 3 seconds.
How to navigate in setting mode
You can navigate in setting mode using programme buttons.
########## A B C
| | | | | |---|---|---|---| | | | | |
Use OK to enter the selected setting and to confirm changing its value. How to change a setting Make sure the appliance is in setting mode.
The display shows the current setting value (a digit and the dedicated letter).
for about 3 seconds to exit
setting mode. The appliance returns to the programme selection. The saved settings remain valid until you change them again.
#### Before first use
After starting the programme, the appliance recharges the resin in the water softener for up to 5 minutes. The washing phase starts only after this procedure is complete. The procedure is repeated periodically.
###### The salt container
Caution! Use rough salt designed for dishwashers only. Fine salt increases the risk of corrosion.
The salt is used to recharge the resin in the water softener and to assure good washing results in daily use.
Filling the salt container 1 2
########### 4
Put 1 litre of water in the salt container (only for the first time).
Put 1 kg of salt in the salt container.
########### 5
Turn the cap of the salt container clockwise to close the salt container.
Caution! Water and salt may come out of the salt container when you fill it. After you fill the salt container, immediately start a programme to prevent corrosion.
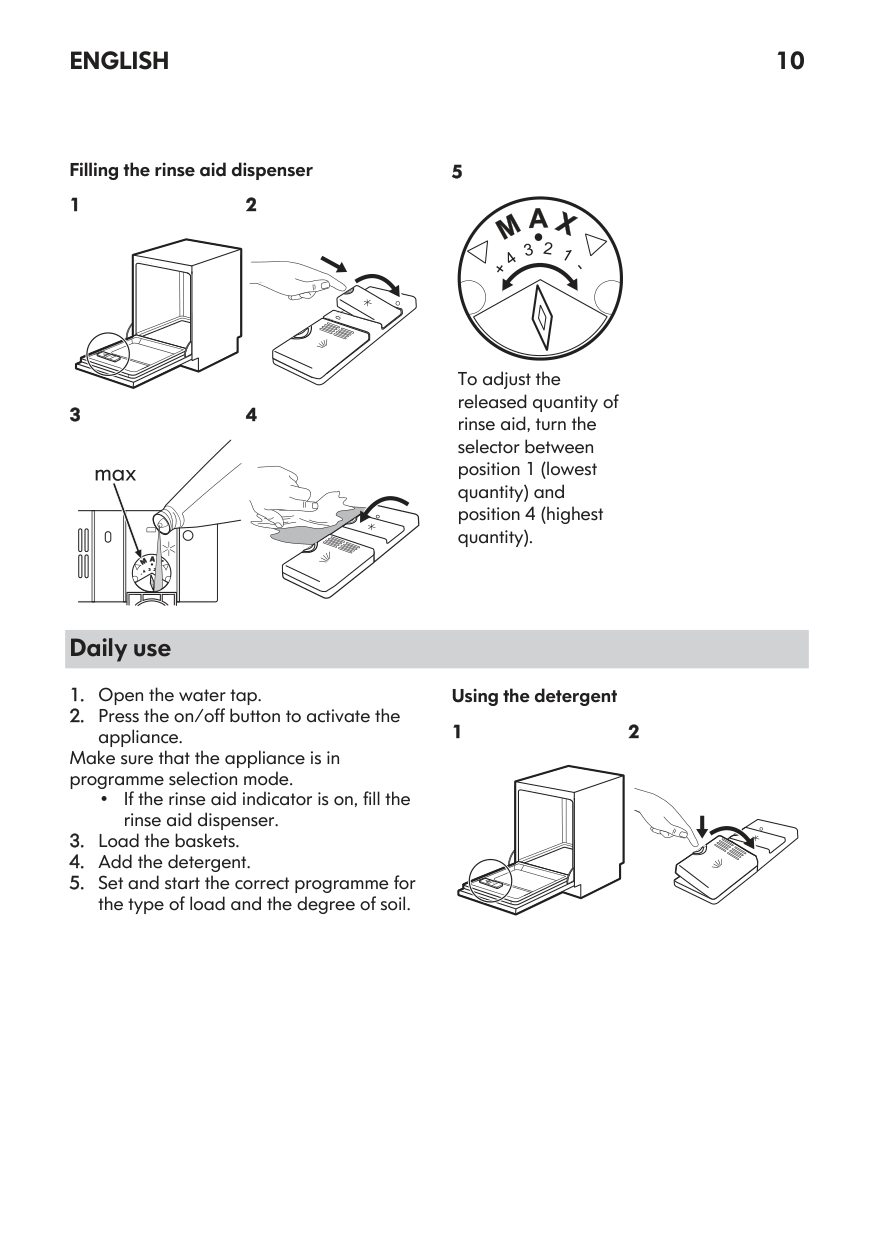
###### Filling the rinse aid dispenser 1 2
########### 3
########### 4
Pour the rinse aid in the dispenser until the liquid reaches the marking "FILL".
Remove the spilled rinse aid with an absorbent cloth to prevent excessive foam formation.
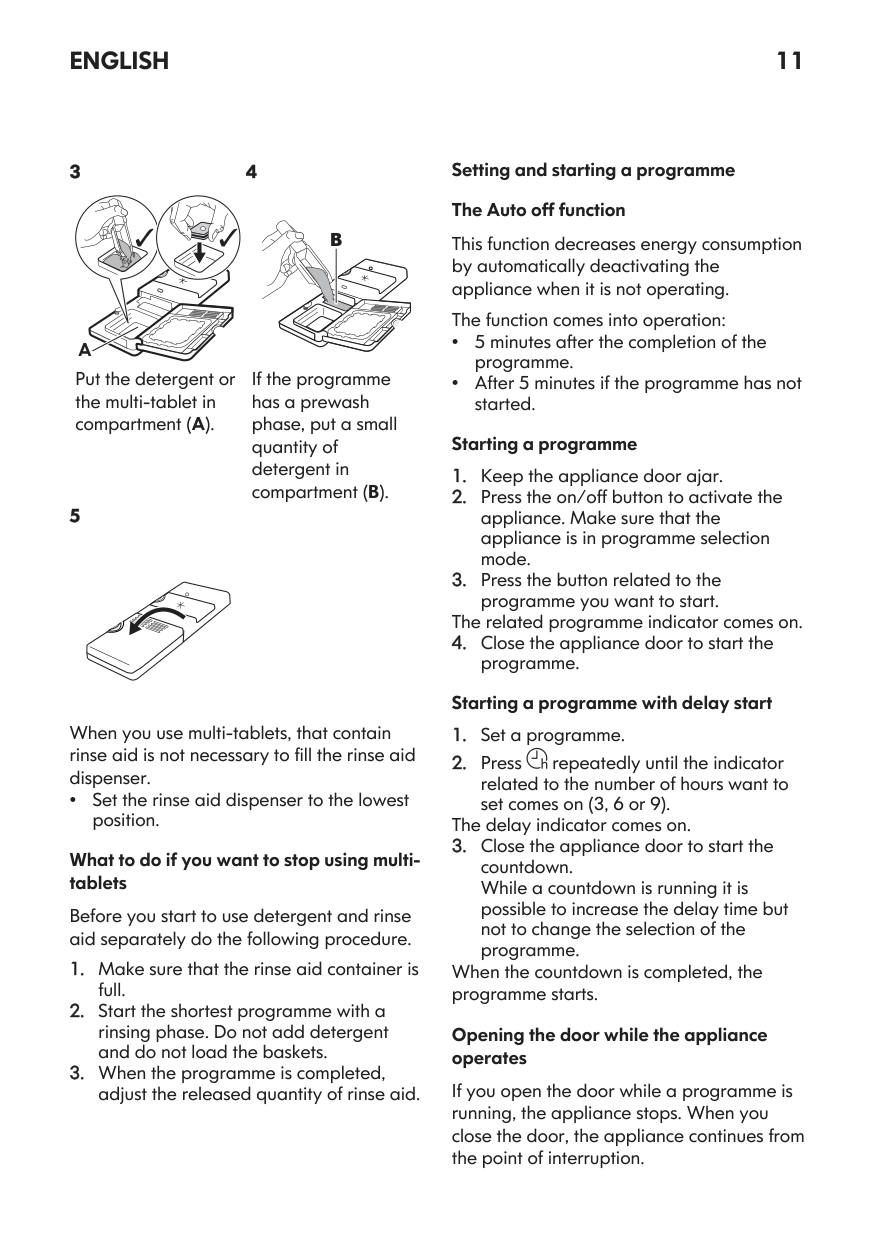
#### Daily use
###### Using the detergent 1 2
########### 4
######## A
Put the detergent or the multi-tablet in compartment (A).
If the programme has a prewash phase, put a small quantity of detergent on the inner part of the appliance door.
When you use multi-tablets that contain salt and rinse aid, it is not necessary to fill the salt container and the rinse aid dispenser.
Multi-tabs containing salt are not effective enough to soften hard water.
###### How to select and start a programme
###### How to select and start the programme
Options are not applicable to this programme.
###### How to activate options
By default, options must be activated every time before you start a programme. If the latest programme selection is enabled, the saved options are activated automatically along with the programme.
It is not possible to activate or deactivate options while a programme is running.
Not all options are compatible with each other.
Activating options often increases the water and energy consumption as well as the programme duration.
###### How to select and start the programme AUTO
The appliance senses the type of load and adjusts a suitable wash cycle. During the cycle, the sensors operate several times and the initial programme duration can decrease.
###### How to delay the start of a programme
The light related to the button is on.
During the countdown, it is not possible to change the delay time and the programme selection.
When the countdown is complete, the programme starts.
###### How to cancel the delay start while the countdown operates
Press and hold for about 3 seconds. The appliance returns to the programme selection.
If you cancel the delay start, you have to select the programme again.
How to cancel a running programme Press and hold for about 3 seconds. The appliance returns to the programme selection.
Make sure that there is detergent in the detergent dispenser before you start a new programme.
###### Opening the door while the appliance operates
Opening the door while a programme is running stops the appliance. It may affect the energy consumption and the programme duration. After closing the door, the appliance continues from the point of interruption.
If the door is opened for more than 30 seconds during the drying phase, the running programme ends. It does not happen if the door is opened by AutoOpen function.
###### The Auto Off function
This function saves energy by switching the appliance off when it is not operating.
The function activates automatically:
###### End of the programme
When the programme is complete, the display shows 0:00.
The Auto Off function switches the appliance off automatically.
All buttons are inactive except for the on/off button.
#### Hints and tips General
###### Using salt, rinse aid and detergent
Follow the hints below to ensure optimal cleaning and drying results in daily use and to protect the environment.
###### What to do if you want to stop using multi-tablets
Before you start using separately detergent, salt and rinse aid, complete the following steps:
###### Before starting a programme
Before you start the selected programme, make sure that:
Refer to the supplied leaflet with examples of the load of the baskets.
###### Unloading the baskets
After the programme is completed, water can still remain on the inside surfaces of the appliance.
#### Care and cleaning
Warning! Before any maintenance other than running the programme Machine Care, deactivate the appliance and disconnect the mains plug from the main socket.
Dirty filters and clogged spray arms negatively affect the washing results. Check these elements regularly and, if necessary, clean them.
###### Machine Care
Machine Care is a programme designed to clean the appliance interior with optimal
results. It removes limescale and grease buildup.
When the appliance senses the need for cleaning, the indicator is on. Start the Machine Care programme to clean the appliance interior.
How to start the Machine Care programme
Before starting the Machine Care programme, clean the filters and spray arms.
for about 3 seconds.
The indicators and flash. The display shows the programme duration.
When the programme is complete, the indicator is off.
###### Internal cleaning
###### Removal of foreign objects
Check the filters and the sump after each use of the dishwasher. Foreign objects (e.g.
pieces of glass, plastic, bones or toothpicks, etc) decrease the cleaning performance and can cause damage to the drain pump.
Caution! If unable to remove the
foreign objects, contact an Authorised Service Centre.
###### External cleaning
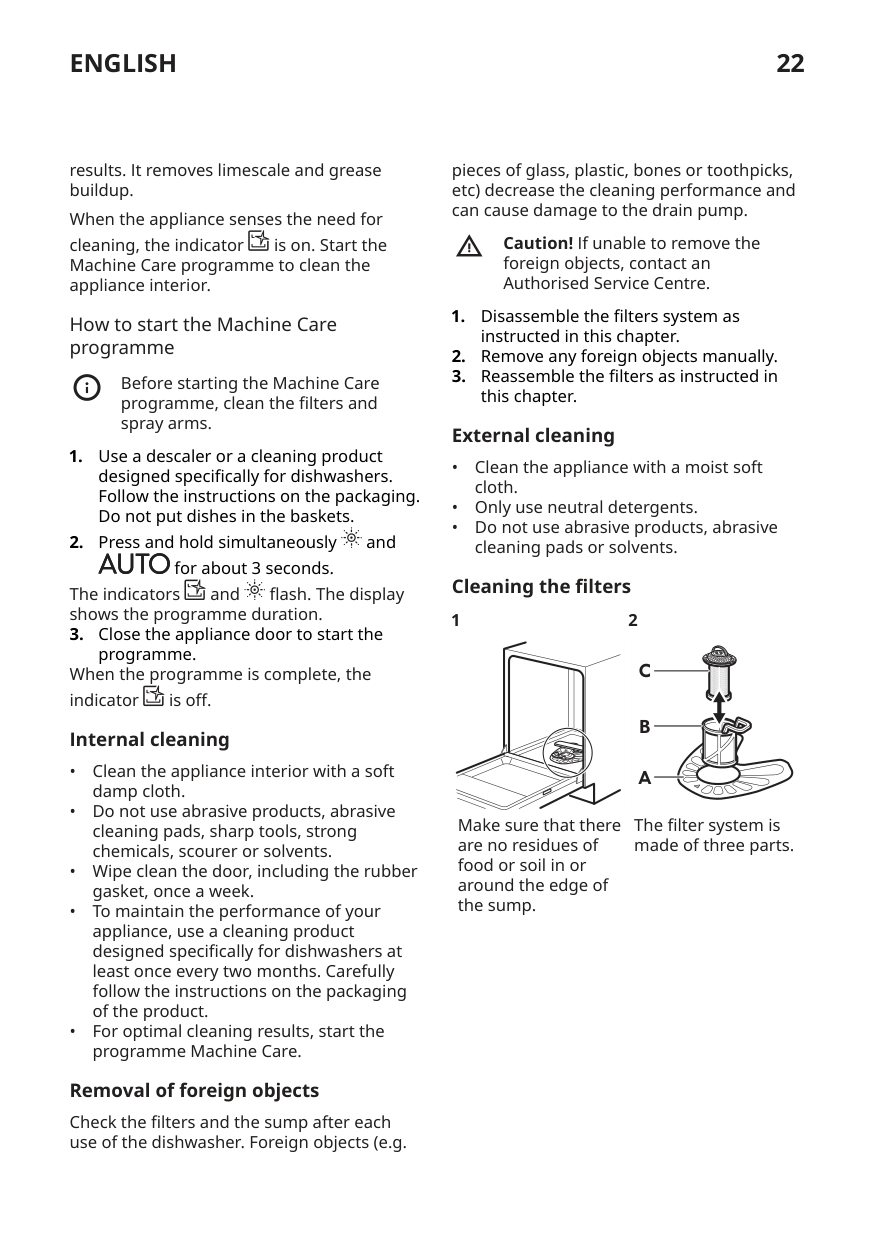
cleaning pads or solvents. Cleaning the filters 1
2
C
B
A
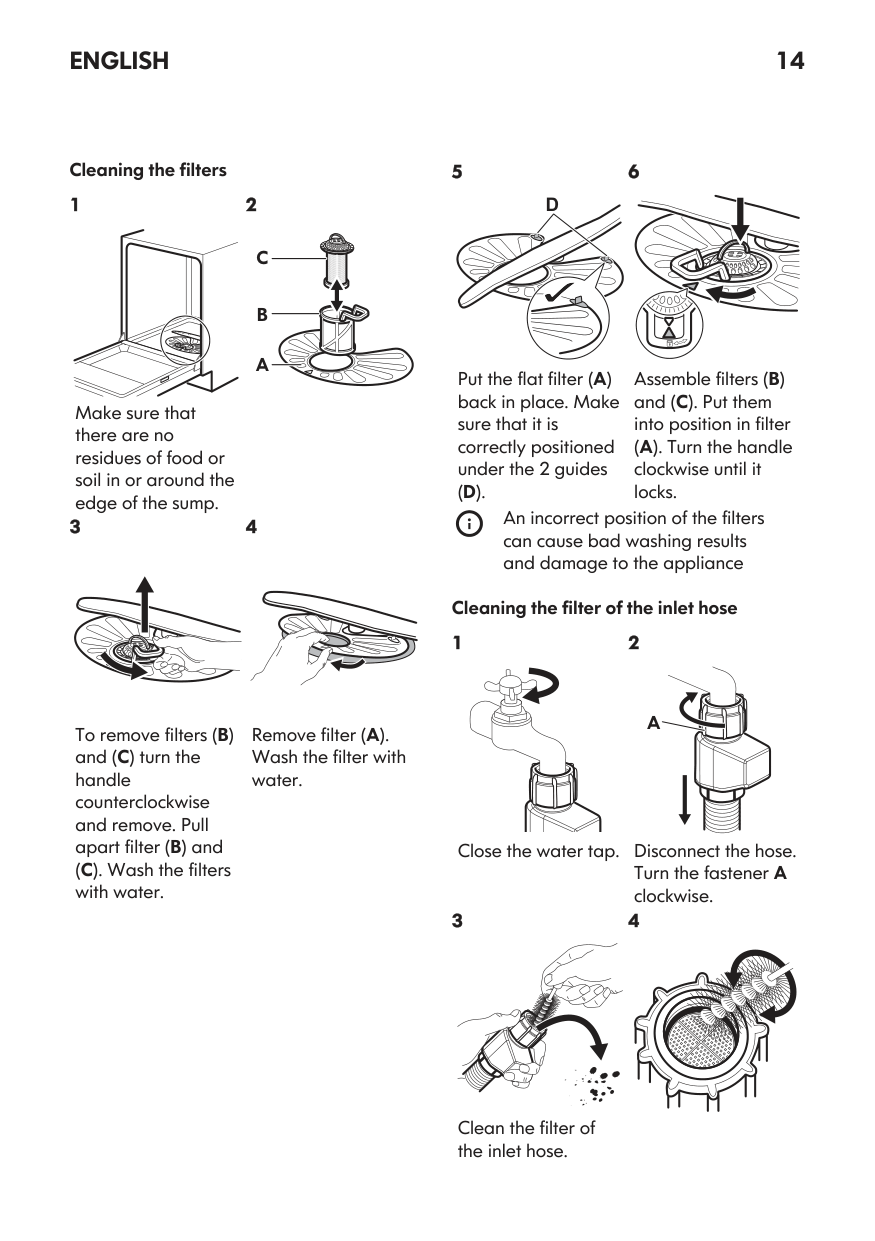
Make sure that there are no residues of food or soil in or around the edge of the sump.
The filter system is made of three parts.
########### 3
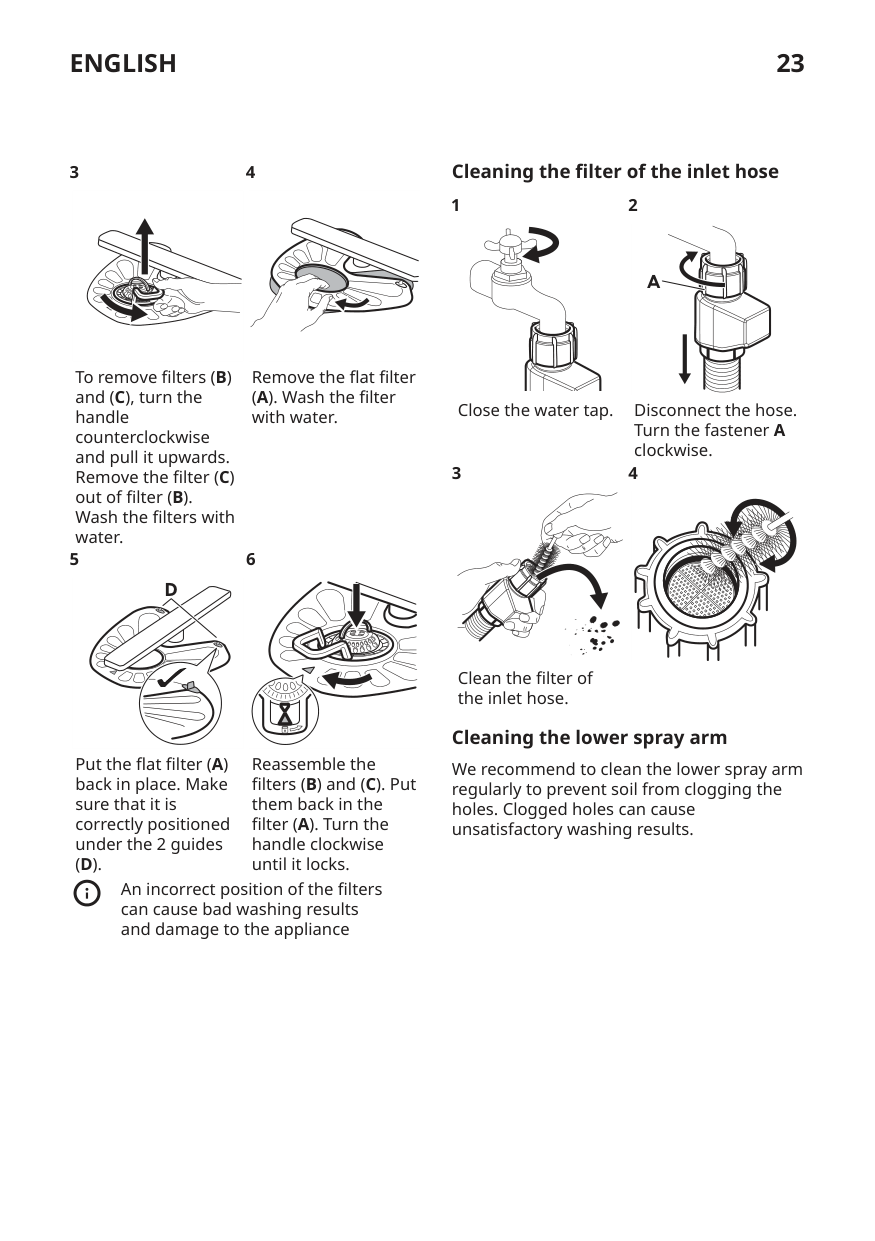
########### 4
To remove filters (B) and (C), turn the handle counterclockwise and pull it upwards. Remove the filter (C) out of filter (B). Wash the filters with water.
Remove the flat filter (A). Wash the filter with water.
5
########### 6
##### D
Put the flat filter (A) back in place. Make sure that it is correctly positioned under the 2 guides (D).
Reassemble the filters (B) and (C). Put them back in the filter (A). Turn the handle clockwise until it locks.
An incorrect position of the filters can cause bad washing results and damage to the appliance
###### Cleaning the filter of the inlet hose 1
2
######### A
Close the water tap.
Disconnect the hose. Turn the fastener A clockwise.
3
4
Clean the filter of the inlet hose.
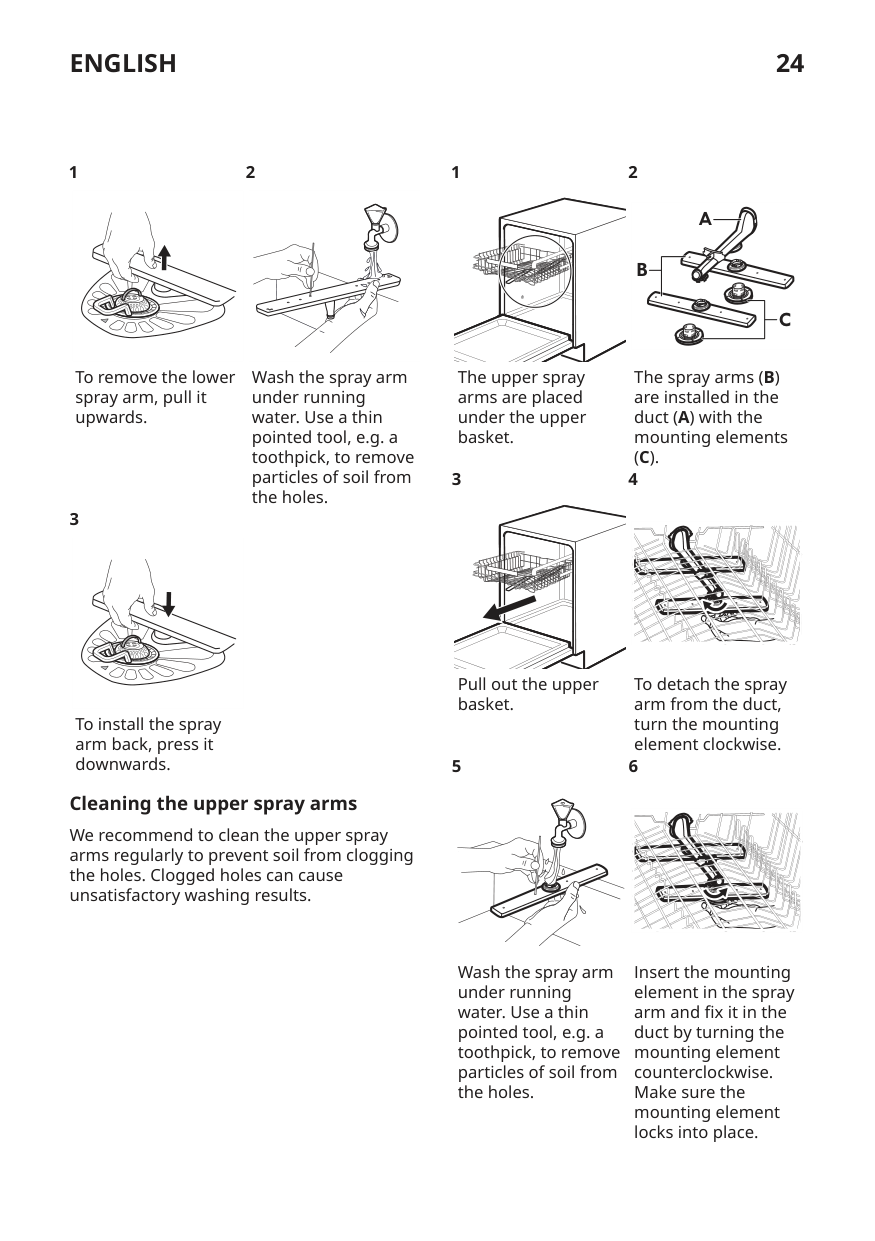
###### Cleaning the lower spray arm
We recommend to clean the lower spray arm regularly to prevent soil from clogging the holes. Clogged holes can cause unsatisfactory washing results.
########### 1
########### 1
########### 2
2
A
B
| | | |---|---| | | |
C
To remove the lower spray arm, pull it upwards.
Wash the spray arm under running water. Use a thin pointed tool, e.g. a toothpick, to remove particles of soil from the holes.
The upper spray arms are placed under the upper basket.
The spray arms (B) are installed in the duct (A) with the mounting elements (C).
########### 4
3
3
Pull out the upper basket.
To detach the spray arm from the duct, turn the mounting element clockwise.
To install the spray arm back, press it downwards.
5
########### 6
###### Cleaning the upper spray arms
We recommend to clean the upper spray arms regularly to prevent soil from clogging the holes. Clogged holes can cause unsatisfactory washing results.
Wash the spray arm under running water. Use a thin pointed tool, e.g. a toothpick, to remove particles of soil from the holes.
Insert the mounting element in the spray arm and fix it in the duct by turning the mounting element counterclockwise. Make sure the mounting element locks into place.
#### Troubleshooting
Warning! Improper repair of the appliance may pose a danger to the safety of the user. Any repairs must be performed by qualified personnel.
The majority of problems that may occur can be solved without the need to contact an Authorised Service Centre.
Refer to the below table for information on possible problems.
With some problems, the display shows an alarm code.
|Problem and alarm code|Possible cause and solution| |---|---| |You cannot activate the appli‐ ance.|• Make sure that the mains plug is connected to the mains socket.
• Make sure that there is no damaged fuse in the fuse box.
| |The programme does not start.|• Make sure that the appliance door is closed.
• If the delay start is set, cancel the setting or wait for the end of the countdown.
• The appliance recharges the resin inside the water soften‐ er. The duration of the procedure is approximately 5 mi‐ nutes.
| |The appliance does not fill with water. The display shows i10 or i11.|• Make sure that the water tap is open.
• Make sure that the pressure of the water supply is not too low. For this information, contact your local water authori‐ ty.
• Make sure that the water tap is not clogged.
• Make sure that the filter in the inlet hose is not clogged.
• Make sure that the inlet hose has no kinks or bends.
| |The appliance does not drain the water. The display shows i20.|• Make sure that the sink spigot is not clogged.
• Make sure that the interior filter system is not clogged.
• Make sure that the drain hose has no kinks or bends.
| |The anti-flood device is on. The display shows i30.|• Close the water tap.
• Make sure that the appliance is correctly installed.
• Make sure the baskets are loaded as instructed in the user manual.
| |Malfunction of the water lev‐ el detection sensor. The display shows i41 - i44.|• Make sure that the filters are clean.
• Switch the appliance off and on.
|
|Problem and alarm code|Possible cause and solution| |---|---| |Malfunction of the wash pump or the drain pump. The display shows i51 - i59 or i5A - i5F.|• Switch the appliance off and on.| |The temperature of the wa‐ ter inside the appliance is too high or malfunction of the temperature sensor occur‐ red. The display shows i61 or i69.|• Make sure that the temperature of the inlet water does not exceed 60°C.
• Switch the appliance off and on.
| |Technical malfunction of the appliance. The display shows iC0 or iC3.|• Switch the appliance off and on.| |The level of water inside the appliance is too high. The display shows iF1.|• Switch the appliance off and on.
• Make sure that the filters are clean.
• Make sure that the outlet hose is installed at the right height above the floor. Refer to the installation instruc‐ tions.
| |The appliance stops and starts more times during op‐ eration.|• It is normal. It provides optimal cleaning results and ener‐ gy savings.| |The programme lasts too long.|• If the delay start option is set, cancel the delay setting or wait for the end of the countdown.
• Activating options can increase the programme duration.
| |The remaining time in the display increases and skips nearly to the end of the pro‐ gramme duration.|• This is not a defect. The appliance is working correctly.| |Small leak from the appli‐ ance door.|• The appliance is not levelled. Loosen or tighten the ad‐ justable feet (if applicable).
• The appliance door is not centred on the tub. Adjust the rear foot (if applicable).
|
|The appliance door is difficult to close.|• The appliance is not levelled. Loosen or tighten the ad‐ justable feet (if applicable).
• Parts of the tableware are protruding from the baskets.
|
|Problem and alarm code|Possible cause and solution| |---|---| |The appliance door opens during the wash cycle.|• The AutoOpen is activated. This function opens the appli‐ ance door during the drying phase to improve the drying performance and let the dishes cool down. The door re‐ mains ajar.
– The duration of the drying phase and the door open‐ ing time vary depending on the selected programme and options.
– When the AutoOpen opens the door, the display shows the remaining time of the running programme.
If you don't want the door to automatically open, deacti‐ vate AutoOpen. Refer to "Settings".| |Rattling or knocking sounds from the inside of the appli‐ ance.|• The tableware is not properly arranged in the baskets. Re‐ fer to basket loading leaflet.
• Make sure that the spray arms can rotate freely.
| |The appliance trips the cir‐ cuit-beaker.|• The amperage is insufficient to supply simultaneously all the appliances in use. Check the socket amperage and the capacity of the meter or turn off one of the appliances in use.
• Internal electrical fault of the appliance. Contact an Au‐ thorised Service Centre.
|
Once you have checked the appliance, deactivate and activate the appliance. If the problem occurs again, contact an Authorised Service Centre.
For alarm codes not described in the table, contact an Authorised Service Centre.
Warning! We do not recommend using the appliance until the problem has been completely fixed. Unplug the appliance and do not plug it in again until you are certain that it operates correctly.
###### The product number code (PNC)
If you contact an Authorised Service Centre, you need to provide the product number code of your appliance.
The PNC can be found on the rating plate on the appliance door. You can also check the PNC on the control panel.
Before checking the PNC, make sure the appliance is in the programme selection.
for about 3 seconds. The display shows the PNC of your appliance.
hold simultaneously and for about 3 seconds.
The appliance returns to the programme selection.
###### The dishwashing and drying results are not satisfactory
|Problem|Possible cause and solution| |---|---| |Poor washing results.|• Refer to "Daily use", "Hints and tips" and the basket loading leaflet.
• Use more intensive washing programme.
• Activate the Power Clean option to improve the washing results of a selected programme.
• Clean spray arm jets and filter. Refer to "Care and Cleaning".
| |Poor drying results.|• Tableware was left for too long inside the closed appli‐ ance. Activate AutoOpen to set the automatic opening of the door and to improve the drying performance.
• There is no rinse aid or the dosage of rinse aid is not sufficient. Fill the rinse aid dispenser or set the level of rinse aid to a higher level.
• The quality of the rinse aid can be the cause.
• We recommend to use rinse aid always, even in combi‐ nation with multi-tablets.
• Plastic items may need to be towel dried.
• The programme does not have the drying phase. Refer to "Programmes overview".
| |There are whitish streaks or bluish layers on glasses and dishes.|• The released quantity of rinse aid is too high. Adjust the rinse aid level to a lower level.
• The quantity of detergent is too high.
| |There are stains and dry water drops on glasses and dishes.|• The released quantity of rinse aid is not sufficient. Ad‐ just the rinse aid level to a higher level.
• The quality of the rinse aid can be the cause.
| |The interior of the appliance is wet.|• This is not a defect of the appliance. Humid air conden‐ sates on the appliance walls.| |Unusual foam during washing.|• Use the detergent designed specifically for dishwash‐ ers.
• There is a leak in the rinse aid dispenser. Contact an Au‐ thorised Service Centre.
| |Traces of rust on cutlery.|• There is too much salt in the water used for washing. Refer to "The water softener".
• Silver and stainless steel cutlery were placed together. Do not put silver and stainless steel items close togeth‐ er.
|
|Problem|Possible cause and solution| |---|---| |There are residues of deter‐ gent in the dispenser at the end of the programme.|• The detergent tablet was stuck in the dispenser and therefore was not completely washed away by water.
• Water cannot wash away the detergent from the dis‐ penser. Make sure that the spray arms are not blocked or clogged.
• Make sure that items in the baskets do not impede the lid of the detergent dispenser from opening.
| |Odours inside the appliance.|• Refer to "Internal cleaning".
• Start the Machine Care programme with a descaler or a cleaning product designed for dishwashers.
| |Limescale deposits on the ta‐ bleware, on the tub and on the inside of the door.|• The level of salt is low, check the refill indicator.
• The cap of the salt container is loose.
• Your tap water is hard. Refer to "The water softener".
• Use salt and set regeneration of the water softener even when multi-functional tablets are used. Refer to "The water softener".
• Start the Machine Care programme with a descaler de‐ signed for dishwashers.
• If limescale deposits still remain, clean the appliance with appliance cleaners which are particularly suitable for this purpose.
• Try a different detergent.
• Contact the detergent manufacturer.
| |Dull, discoloured or chipped ta‐ bleware.|• Make sure that only dishwasher-safe items are washed in the appliance.
• Load and unload the basket carefully. Refer to the bas‐ ket loading leaflet.
• Place delicate items in the upper basket.
• Activate the Gentle / Glass option to ensure special care for glassware and delicate items.
|
Refer to "Before first use", "Daily use", or "Hints and tips" for other possible causes.
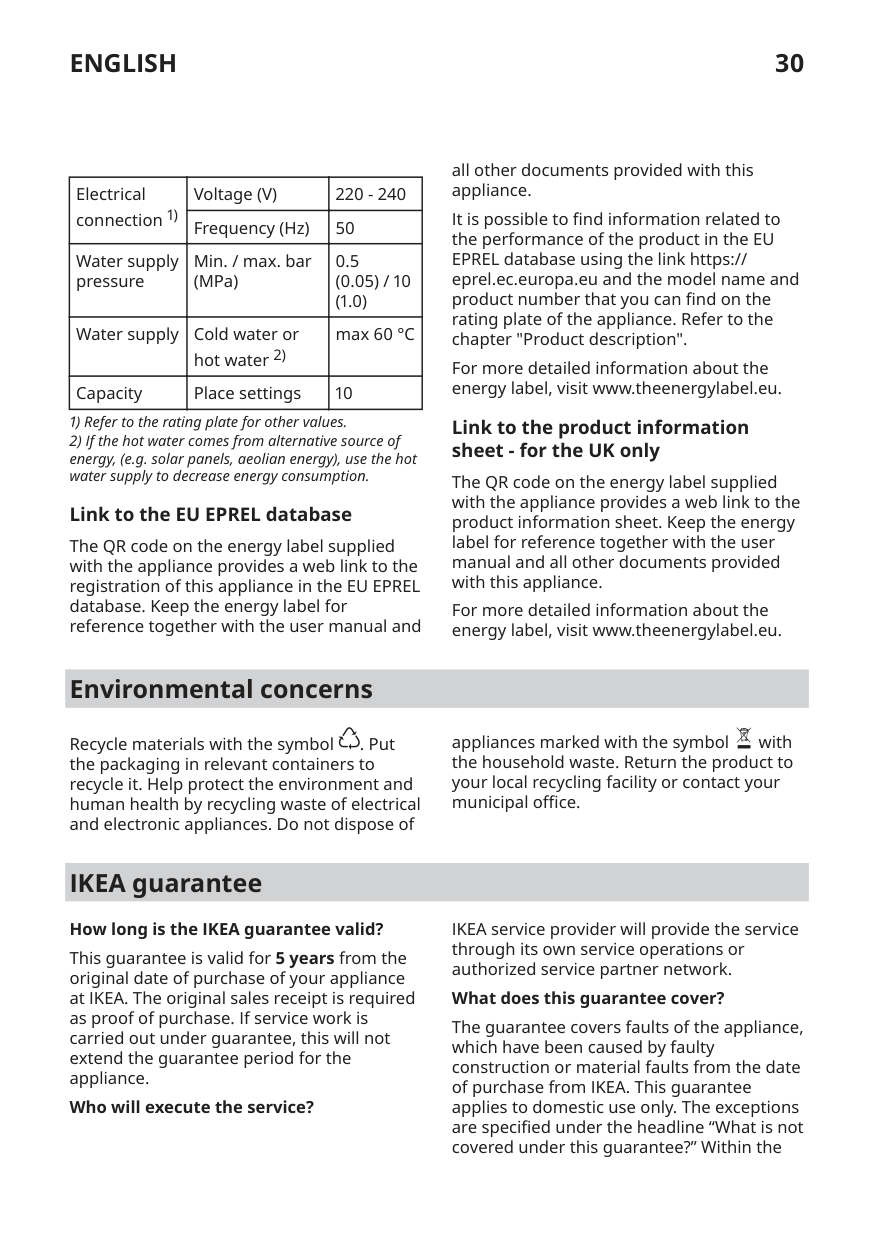
#### Technical information
|Product type|Fully integrated dishwasher| |---|---|
|Dimensions|Width / height / depth (mm)|446 / 818
- 898 / 550| |---|---|---|
|Electrical connection 1)|Voltage (V)|220 - 240| |---|---|---| |Electrical connection 1)|Frequency (Hz)|50| |Water supply pressure|Min. / max. bar (MPa)|0.5
(0.05) / 10
(1.0)
| |Water supply|Cold water or hot water 2)|max 60 °C| |Capacity|Place settings|10|
###### Link to the EU EPREL database
The QR code on the energy label supplied with the appliance provides a web link to the registration of this appliance in the EU EPREL database. Keep the energy label for reference together with the user manual and
all other documents provided with this appliance.
It is possible to find information related to the performance of the product in the EU EPREL database using the link https:// eprel.ec.europa.eu and the model name and product number that you can find on the rating plate of the appliance. Refer to the chapter "Product description".
For more detailed information about the energy label, visit www.theenergylabel.eu.
###### Link to the product information sheet - for the UK only
The QR code on the energy label supplied with the appliance provides a web link to the product information sheet. Keep the energy label for reference together with the user manual and all other documents provided with this appliance.
For more detailed information about the energy label, visit www.theenergylabel.eu.
#### Environmental concerns
Recycle materials with the symbol . Put the packaging in relevant containers to recycle it. Help protect the environment and human health by recycling waste of electrical and electronic appliances. Do not dispose of
appliances marked with the symbol with the household waste. Return the product to your local recycling facility or contact your municipal office.
#### IKEA guarantee
########### How long is the IKEA guarantee valid?
This guarantee is valid for 5 years from the original date of purchase of your appliance at IKEA. The original sales receipt is required as proof of purchase. If service work is carried out under guarantee, this will not extend the guarantee period for the appliance.
Who will execute the service?
IKEA service provider will provide the service through its own service operations or authorized service partner network.
########### What does this guarantee cover?
The guarantee covers faults of the appliance, which have been caused by faulty construction or material faults from the date of purchase from IKEA. This guarantee applies to domestic use only. The exceptions are specified under the headline “What is not covered under this guarantee?” Within the
guarantee period, the costs to remedy the fault e.g. repairs, parts, labour and travel will be covered, provided that the appliance is accessible for repair without special expenditure. On these conditions the EU guidelines (Nr. 99/44/EG) and the respective local regulations are applicable. Replaced parts become the property of IKEA.
########### What will IKEA do to correct the problem?
IKEA appointed service provider will examine the product and decide, at its sole discretion, if it is covered under this guarantee. If considered covered, IKEA service provider or its authorized service partner through its own service operations, will then, at its sole discretion, either repair the defective product or replace it with the same or a comparable product.
What is not covered under this guarantee?

This restriction do not apply to fault-free work carried out by a qualified specialist using our original parts in order to adapt the appliance to the technical safety specifications of another EU country.
########### How country law applies
The IKEA guarantee gives you specific legal rights, which covers or exceed local demands. However these conditions do not limit in any way consumer rights described in the local legislation.
########### Area of validity
For appliances which are purchased in one EU country and taken to another EU country, the services will be provided in the framework of the guarantee conditions normal in the new country. An obligation to carry out services in the framework of the
guarantee exists only if the appliance complies and is installed in accordance with:
The dedicated After Sales Service for IKEA appliances:
Please do not hesitate to contact IKEA After Sales Service to:

To ensure that we provide you with the best assistance, please read carefully the Assembly Instructions and/or the User Manual section of this booklet before contacting us.
########### How to reach us if you need our service
| | | | | |---|---|---|---| | | | | |
Please refer to the last page of this manual for the full list of IKEA appointed contacts and relative national phone numbers.
In order to provide you with a quicker service, we recommend that you use the specific phone numbers listed at the end of this manual. Always refer to the numbers listed in the booklet of the specific appliance you need an assistance for. Before calling us, assure that you have to hand the IKEA article number (8 digit code) and the Serial Number (8 digit code that can be found on the rating plate) for the appliance of which you need our assistance.
SAVE THE SALES RECEIPT! It is your proof of purchase and required for the guarantee to apply. Note that the receipt reports also the IKEA article name and number (8 digit code) for each of the appliances you have purchased.
########### Do you need extra help?
For any additional questions not related to After Sales of your appliances, please contact our nearest IKEA store call centre. We recommend you read the appliance documentation carefully before contacting us.
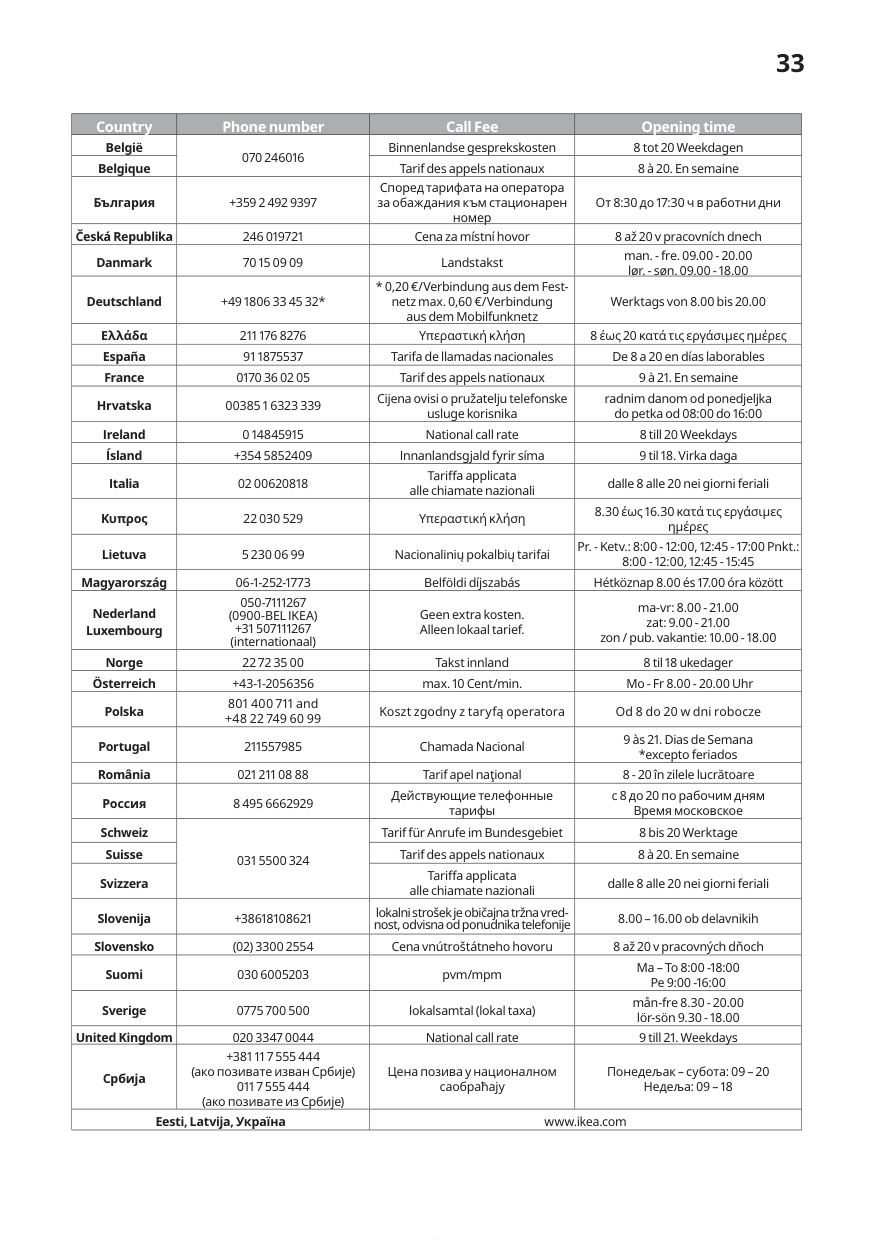
#### 33
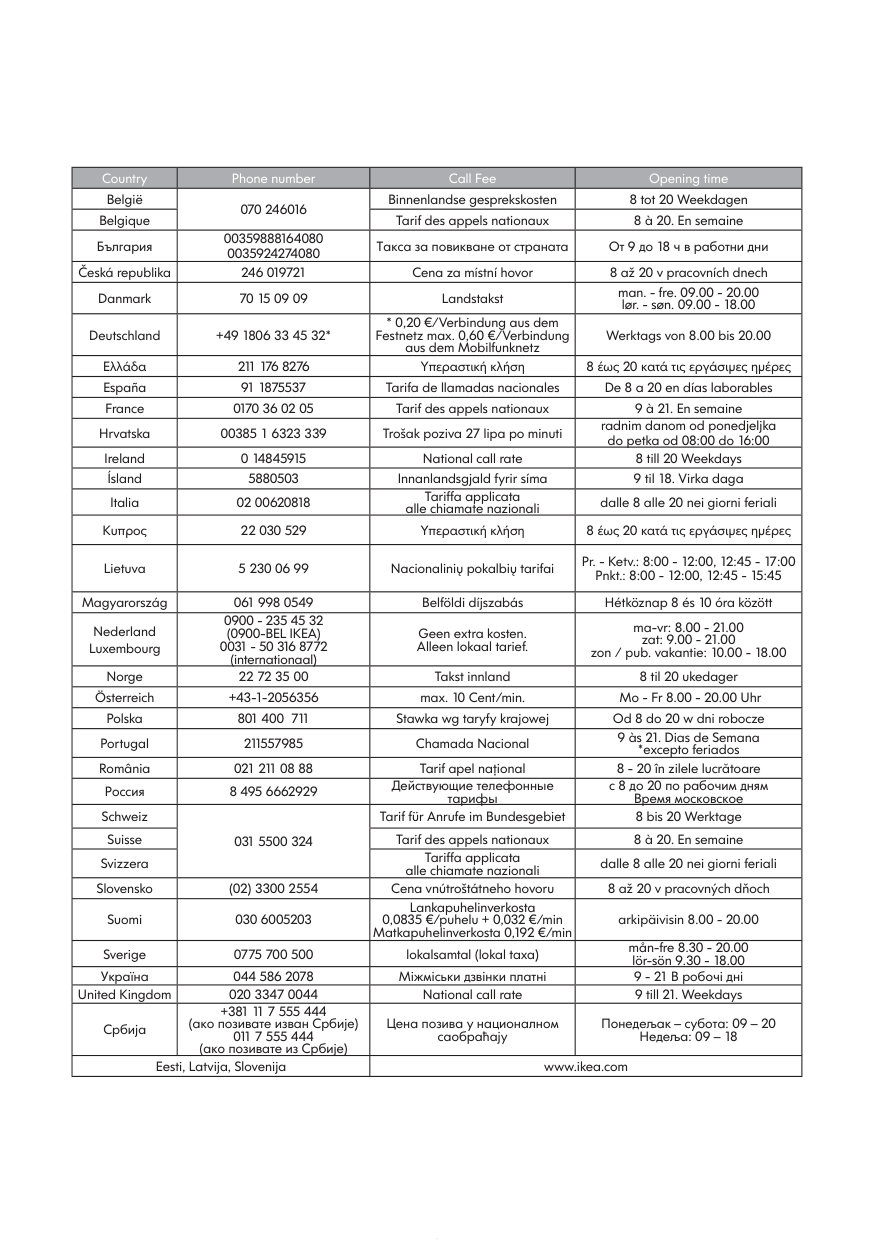
|Country|Phone number|Call Fee|Opening time| |---|---|---|---| |België|070 246016|Binnenlandse gesprekskosten|8 tot 20 Weekdagen| |Belgique|070 246016|Tarif des appels nationaux|8 à 20. En semaine| |България|+359 2 492 9397|Според тарифата на оператора за обаждания към стационарен номер|От 8:30 до 17:30 ч в работни дни| |Česká Republika|246 019721|Cena za místní hovor|8 až 20 v pracovních dnech| |Danmark| | |man. - fre. 09.00 - 20.00 lør. - søn. 09.00 - 18.00|

|Deutschland|+49 1806 33 45 32*|* 0,20 €/Verbindung aus d em Festnetz max. 0,60 €/Verbindung aus dem Mobilfunknetz|Werktags von 8.00 bis 20.00| |Ελλάδα|211 176 8276|Υπεραστική κλήση|8 έως 20 κατά τις εργάσιμες ημέρες| |España|91 1875537|Tarifa de llamadas nacionales|De 8 a 20 en días laborables| |France|0170 36 02 05|Tarif des appels nationaux|9 à 21. En semaine| |Hrvatska|00385 1 6323 339|Cijena ovisi o pružatelju telefonske usluge korisnika|radnim danom od ponedjeljka do petka od 08:00 do 16:00| |Ireland|0 14845915|National call rate|8 till 20 Weekdays| |Ísland|+354 5852409|Innanlandsgjald fyrir síma|9 til 18. Virka daga| |Italia|02 00620818|a applicata alle chiamate nazionali|dalle 8 alle 20 nei giorni feriali| |Κυπρος|22 030 529|Υπεραστική κλήση|8.30 έως 16.30 κατά τις εργάσιμες ημέρες| |Lietuva|5 230 06 99|Nacionalinių pokalbių tarifai|Pr. - Ketv.: 8:00 - 12:00, 12:45 - 17:00 Pnkt.: 8:00 - 12:00, 12:45 - 15:45| |Magyarország|06-1-252-1773|Belföldi díjszabás|Hétköznap 8.00 és 17.00 óra között| |Nederland Luxembourg|050-7111267 (0900-BEL IKEA) +31 507111267 (internationaal)|Geen extra kosten. Alleen lokaal tarief.|ma-vr: 8.00 - 21.00 zat: 9.00 - 21.00 zon / pub. vakantie: 10.00 - 18.00| |Norge| | | | |Österreich|+43-1-2056356|max. 10 Cent/min.|Mo - Fr 8.00 - 20.00 Uhr| |Polska|801 400 711 and +48 22 749 60 99|Koszt zgodny z taryfą operatora|Od 8 do 20 w dni robocze| |Portugal|211557985|Chamada Nacional|9 às 21. Dias de Semana *excepto feriados| |România|021 211 08 88|Tarif apel naţional|8 - 20 în zilele lucrătoare| |Россия|8 495 6662929|Действующие телефонные тарифы|с 8 до 20 по рабочим дням Время московское| |Schweiz|031 5500 324|Tarif für Anrufe im Bundesgebiet|8 bis 20 Werktage| |Suisse|031 5500 324|Tarif des appels nationaux|8 à 20. En semaine| |Svizzera|031 5500 324|a applicata alle chiamate nazionali|dalle 8 alle 20 nei giorni feriali| |Slovenija|+38618108621|lokalni strošek je običajna tržna vrednost, odvisna od ponudnika telefonije|8.00 – 16.00 ob delavnikih| |Slovensko|(02) 3300 2554|Cena vnútroštátneho hovoru|8 až 20 v pracovných dňoch| |Suomi|030 6005203| |Ma – To 8:00 -18:00 Pe 9:00 -16:00| |Sverige|0775 700 500|lokalsamtal (lokal taxa)|mån-fre 8.30 - 20.00 lör-sön 9.30 - 18.00| |United Kingdom|020 3347 0044|National call rate|9 till 21. Weekdays| |Србија|+381 11 7 555 444 (ако позивате изван Србије) 011 7 555 444 (ако позивате из Србије)|Цена позива у националном саобраћају|Понедељак – субота: 09 – 20 Недеља: 09 – 18| |Eesti, Latvija, Україна|Eesti, Latvija, Україна|www.ikea.com|www.ikea.com|
© Inter IKEA Systems B.V. 2022
|21552| |---|
AA-2189662-3