
Ask AI
— answers from the official manualAnswers from the official manual.
Common questions
Common Questions
30 totalWhat are the two ways to connect the Signature M650 For Business wireless mouse?
The mouse can connect via a Logi Bolt USB receiver or Bluetooth Low Energy Wireless Technology. The Logi Bolt USB receiver comes pre-paired out of the box, so no additional setup is required for that connection method. (Page 1)
What operating systems are compatible with the Signature M650 For Business mouse?
Via Logi Bolt USB receiver, the mouse supports Windows 10/11 or later, macOS 10.10 or later, Linux, and Chrome OS. Via Bluetooth Low Energy, it additionally supports iPadOS 13.4 or later and Android 5 or later, though macOS requires version 10.15 or later for Bluetooth connectivity. (Page 2)
What is the wireless range of the Signature M650 For Business mouse?
The mouse has a wireless range of 10 meters. This applies to the Logi Bolt USB receiver connection. (Page 1)
Can I customize the side buttons on the Signature M650 For Business mouse?
Yes, the side buttons are customizable using Logi Options+ software. Logi Options+ is available on Windows 10 and macOS 10.15 or later, and common customizations include back/forward or copy/paste functions. (Page 1)
How many Logi Bolt products can I pair to a single Logi Bolt USB receiver?
You can pair up to 6 Logi Bolt products with a single Logi Bolt USB receiver. Note that Logi Bolt wireless products will not pair with other Logitech USB receivers. (Page 1)
What is the tracking DPI range of the Signature M650 For Business mouse?
The mouse supports a tracking DPI range of 400 to 4000. It uses Precision tracking technology along with SmartWheel scrolling. (Page 1)
Show 24 more questions
What are the operating and storage temperature requirements for the Signature M650 mouse?
What are the dimensions and weight of the Signature M650 and M650L For Business mice?
What is the wireless range of the M650 mouse?
How do I reset my M650 mouse when it isn’t working?
What are the dimensions of the M650 mouse?
How do I pair a Logi Bolt mouse with multiple devices?
What operating systems and platforms are supported?
How can I maintain the performance of the M650 mouse?
How long does the battery last in the Signature M650 For Business mouse?
Does the Signature M650 For Business mouse work on Linux or Chrome OS without installing software?
How do I connect the M650 mouse with a Logi Bolt receiver?
What functions can I customize for the side buttons?
Can I adjust the SmartWheel scroll function?
How can I check the battery status of the M650 mouse?
What applications can be configured with special mouse settings?
How do I replace the AA alkaline battery?
How do I customize the functionality of side buttons for different applications?
What does a red blinking LED indicate on the M650 mouse?
How can I switch between desktops using gesture buttons?
How do I pair the M650 mouse with a computer?
What are the specifications for the battery life of the M650 mouse?
How do I customize the side buttons on my M650 mouse?
How can I replace the battery in the M650 mouse?
How do I pair the M650 mouse to a device using Bluetooth?
Full Manual
8 pages

#### User Manual of Product 1:
Logitech Signature M650 Wireless Mouse - For Small to Medium Sized Hands, 2-Year Battery, Silent Clicks, Customizable Side Buttons, Bluetooth, for PC/Mac/Multi-Device/Chromebook - Off White

Support
Welcome to Logitech Support
How can we help you ?
Due to the impact of precautionary health and safety measures, wait times for live support may temporarily be longer than usual and response times may be a ected. We appreciate your patience and understanding of any temporary delays in service as we work to ensure the safety and wellbeing of our team.
Register
Getting Started
FAQ
Community
Downloads
Warranty
Speci cations
Spare Parts
| | |---|
Gallery
Contact Us
Getting Started - Signature M650
####### x
LEARN MORE ABOUT YOUR PRODUCT
H he e Ho he o H he e Ho he o H he e Ho he o H he e Ho he o H he e Ho he o
Hi there! How can I help you?
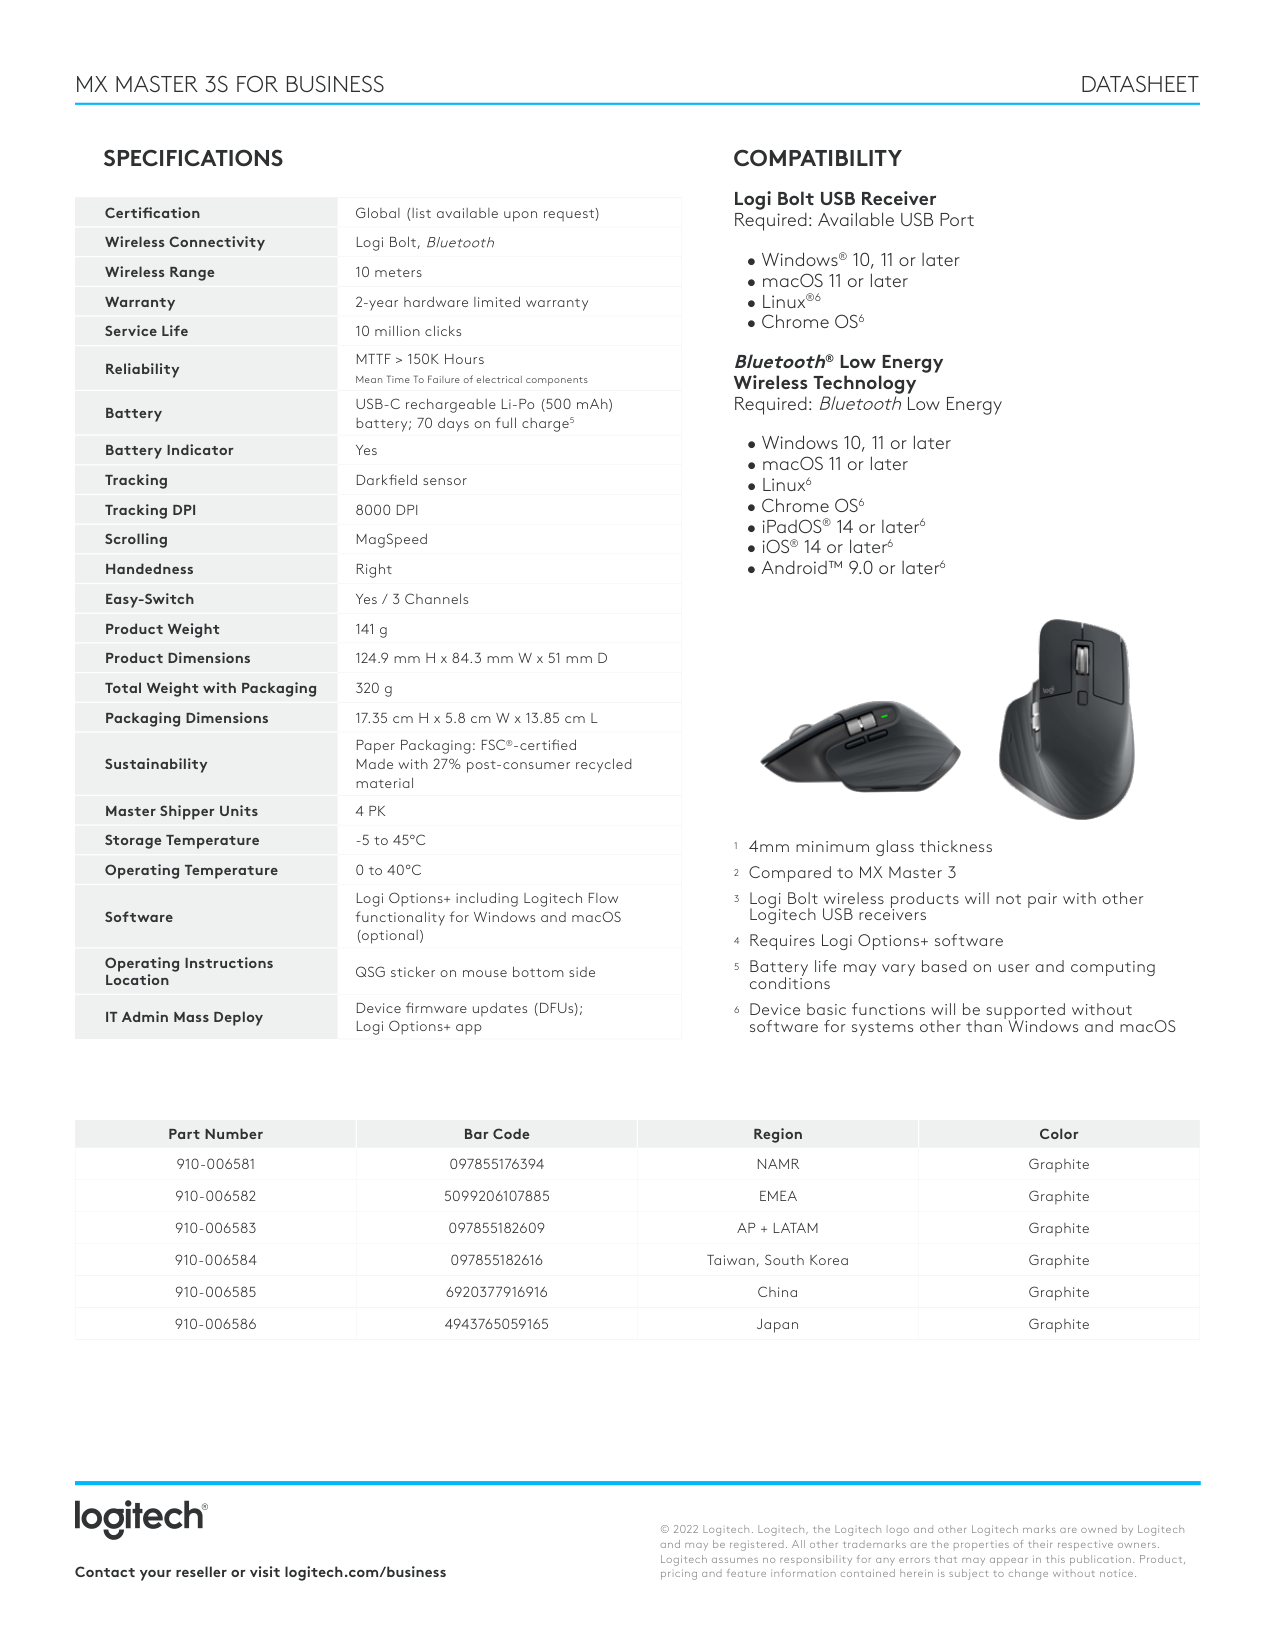
Connect your mouse to your device You can pair your mouse to your device using the Bluetooth® Low Energy connection or our new Logi Bolt receiver.

Support
To pair through Bluetooth®:
||STEP 1 Remove the pull tab from the mouse. It will automatically turn on. Channel 1 will be ready to pair.| |---|---|
To pair through Logi Bolt receiver:
||STEP 1 Take the Logi Bolt receiver from the compartment inside the battery door but don’t remove the pull tab yet.| |---|---| ||STEP 2 Insert the receiver into any available USB port on your desktop or laptop.|
||STEP 3 Now you can remove the pull tab from the mouse. It will automatically turn on. The receiver will be connected to Channel 1 and your mouse will be ready to use.|
|---|---|
Install Logitech Software Download Logitech Software to customize your mouse and bene t from advanced shortcuts and all the possibilities this mouse has to o er. Click here to download and learn more about the full range of features.
Product Overview

Our new Logitech SmartWheel on your mouse

The Signature M650 and M650L feature SmartWheel scrolling that delivers precision or speed the moment you need it. Seamlessly switch between these two scrolling styles with the ick of your nger.
####### x
H he e Ho he o H he e Ho he o H he e Ho he o H he e Ho he o H he e Ho he o
Hi there! How can I help you?
Line-by-line (ratchet) scroll — get line-by-line precision when you need to focus on the details. Scroll slowly, you will feel each step on the wheel. Ideal for reading or precise navigation of items and lists.


Support
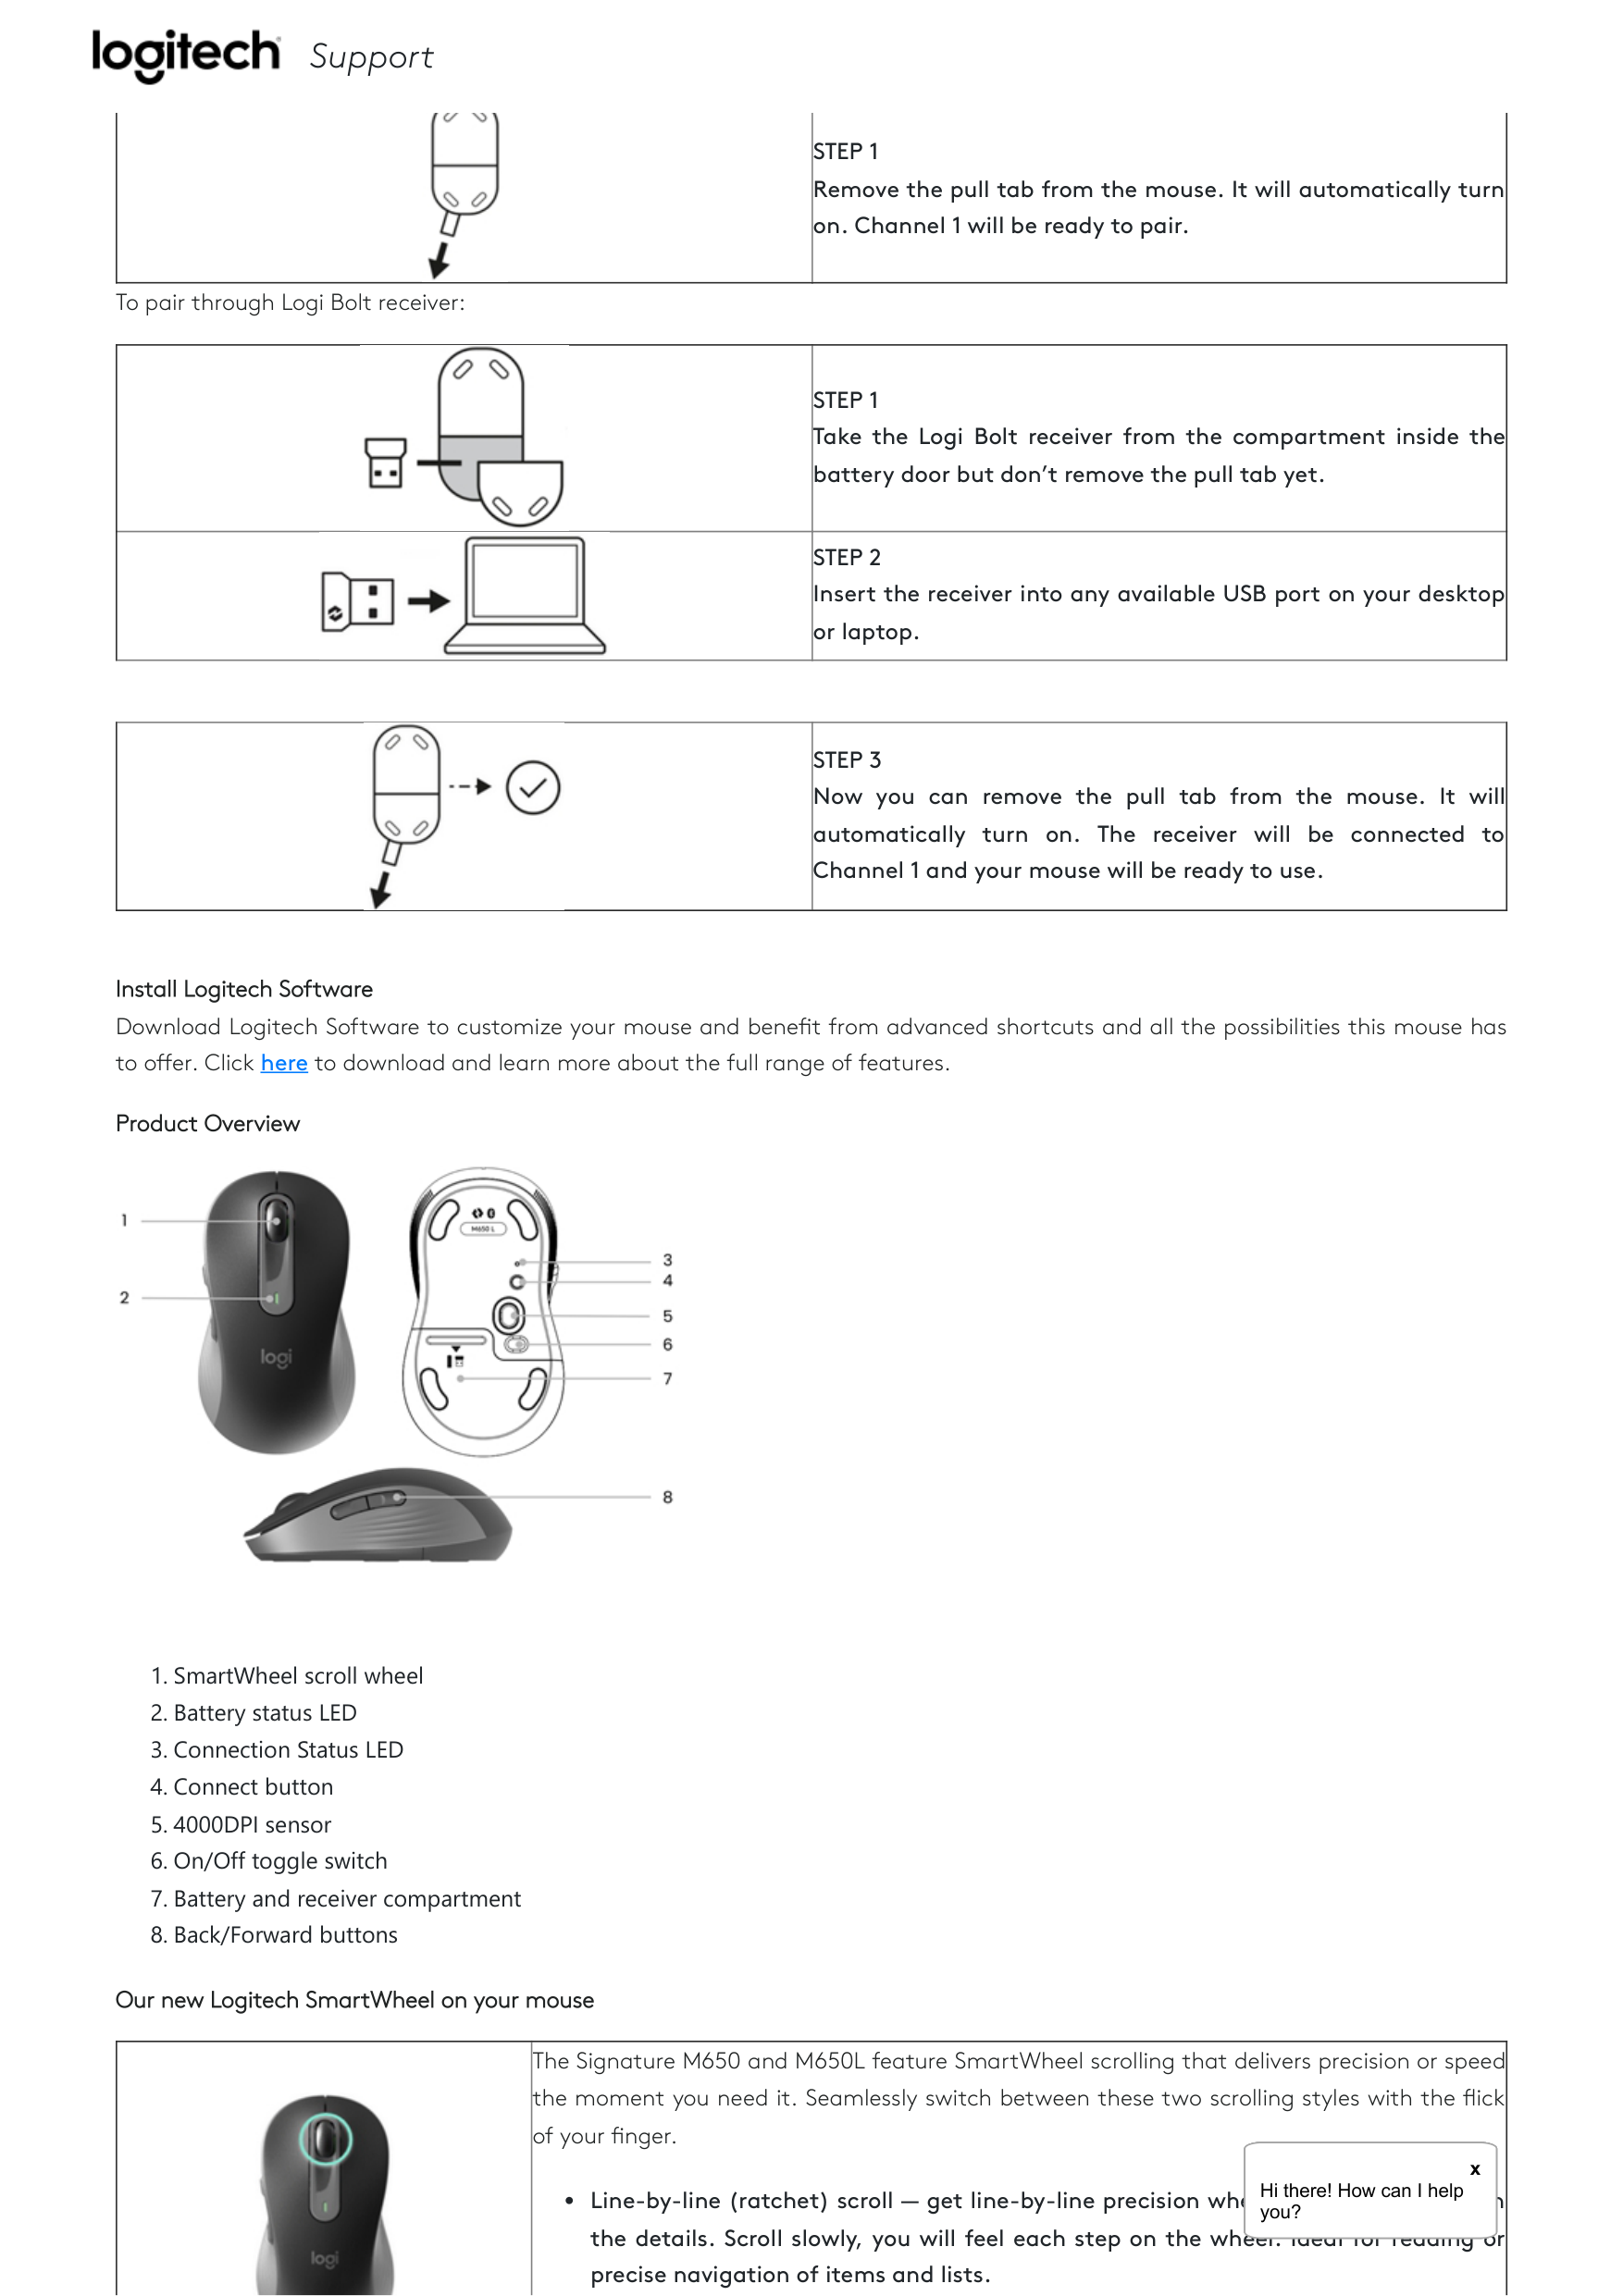
Horizontal Scroll
||You can scroll horizontally with your mouse.
This is done with a two-button combination: press and hold one of the side buttons and scroll with the wheel simultaneously.
NOTE: The horizontal scroll is ON by default. You can customize this feature on the Point & Scroll tab in Logitech software.
For more detailed information on Horizontal Scroll, click here.
| |---|---|
Back/Forward buttons
||The back and forward buttons enhance navigation and simplify tasks.
To move back and forward, press the back or forward button to navigate web or document pages, depending on the location of the mouse pointer.| |---|---|
Logitech software lets you assign other useful functions to the buttons, including undo/redo, OS navigation, volume up/down, and more.
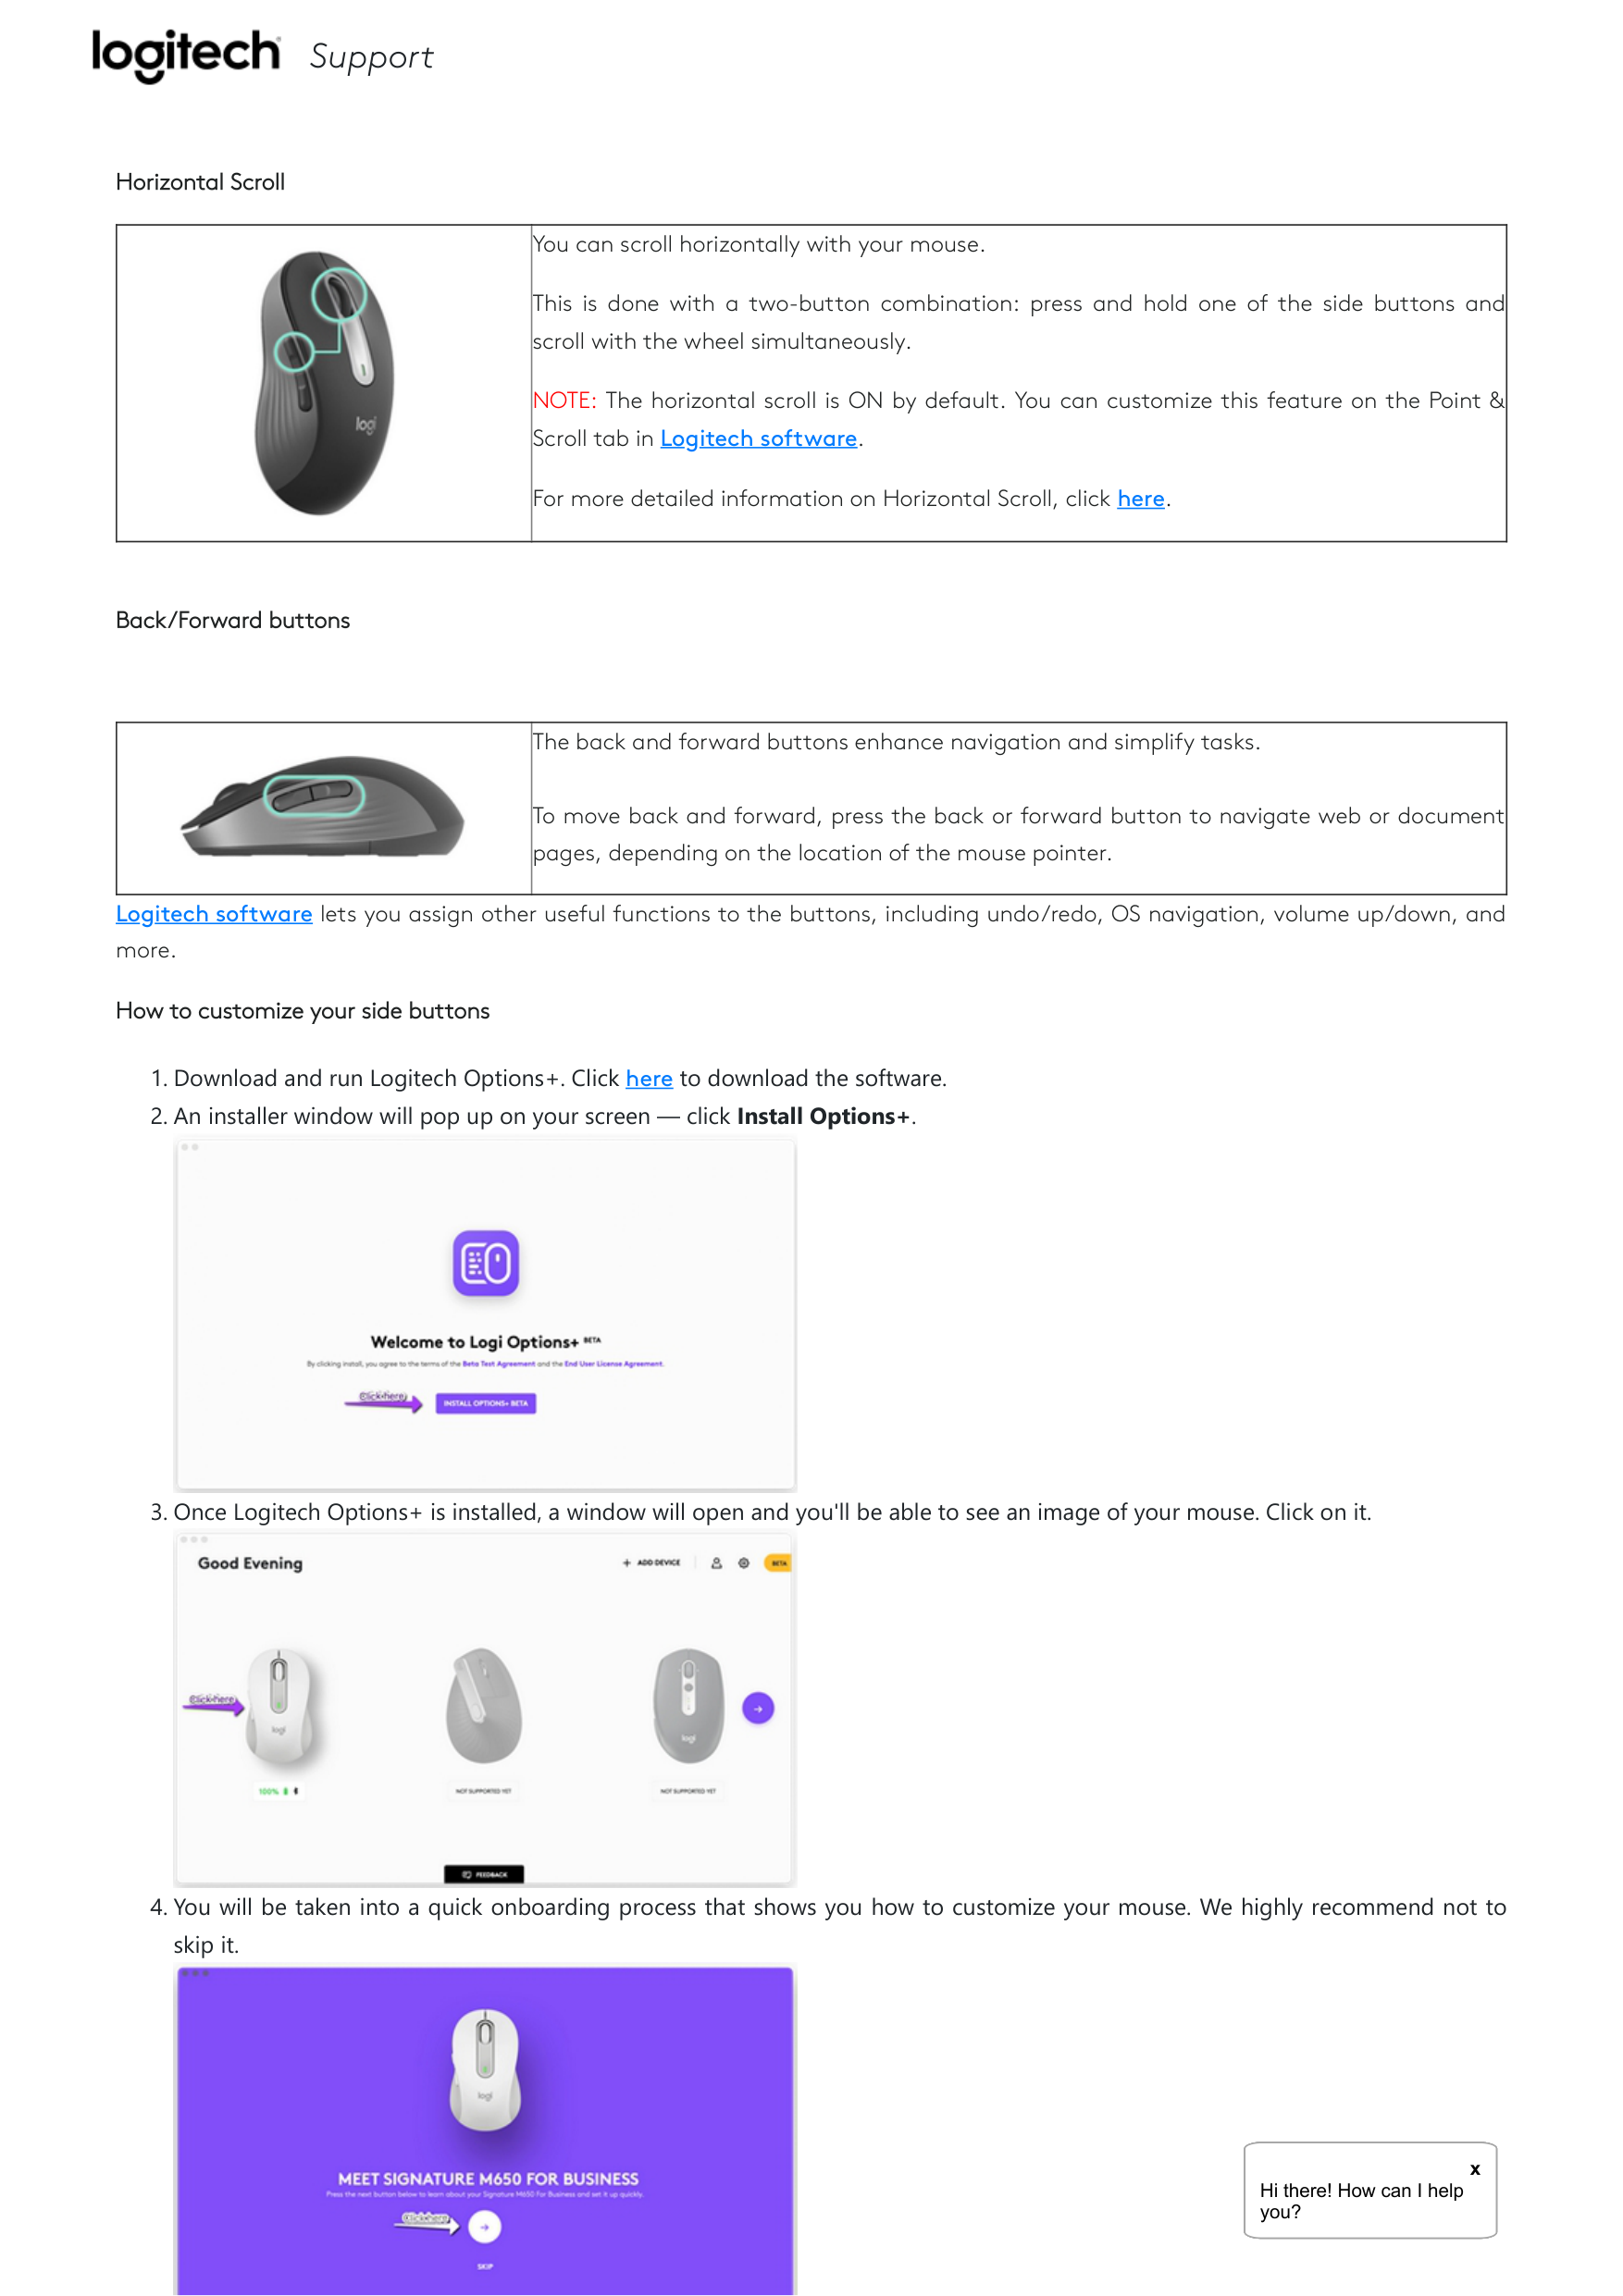
How to customize your side buttons


####### x
H he e Ho he o H he e Ho he o H he e Ho he o H he e Ho he o H he e Ho he o
Hi there! How can I help you?


###### 5. Once you're finished, on the left side of the window, click
Support

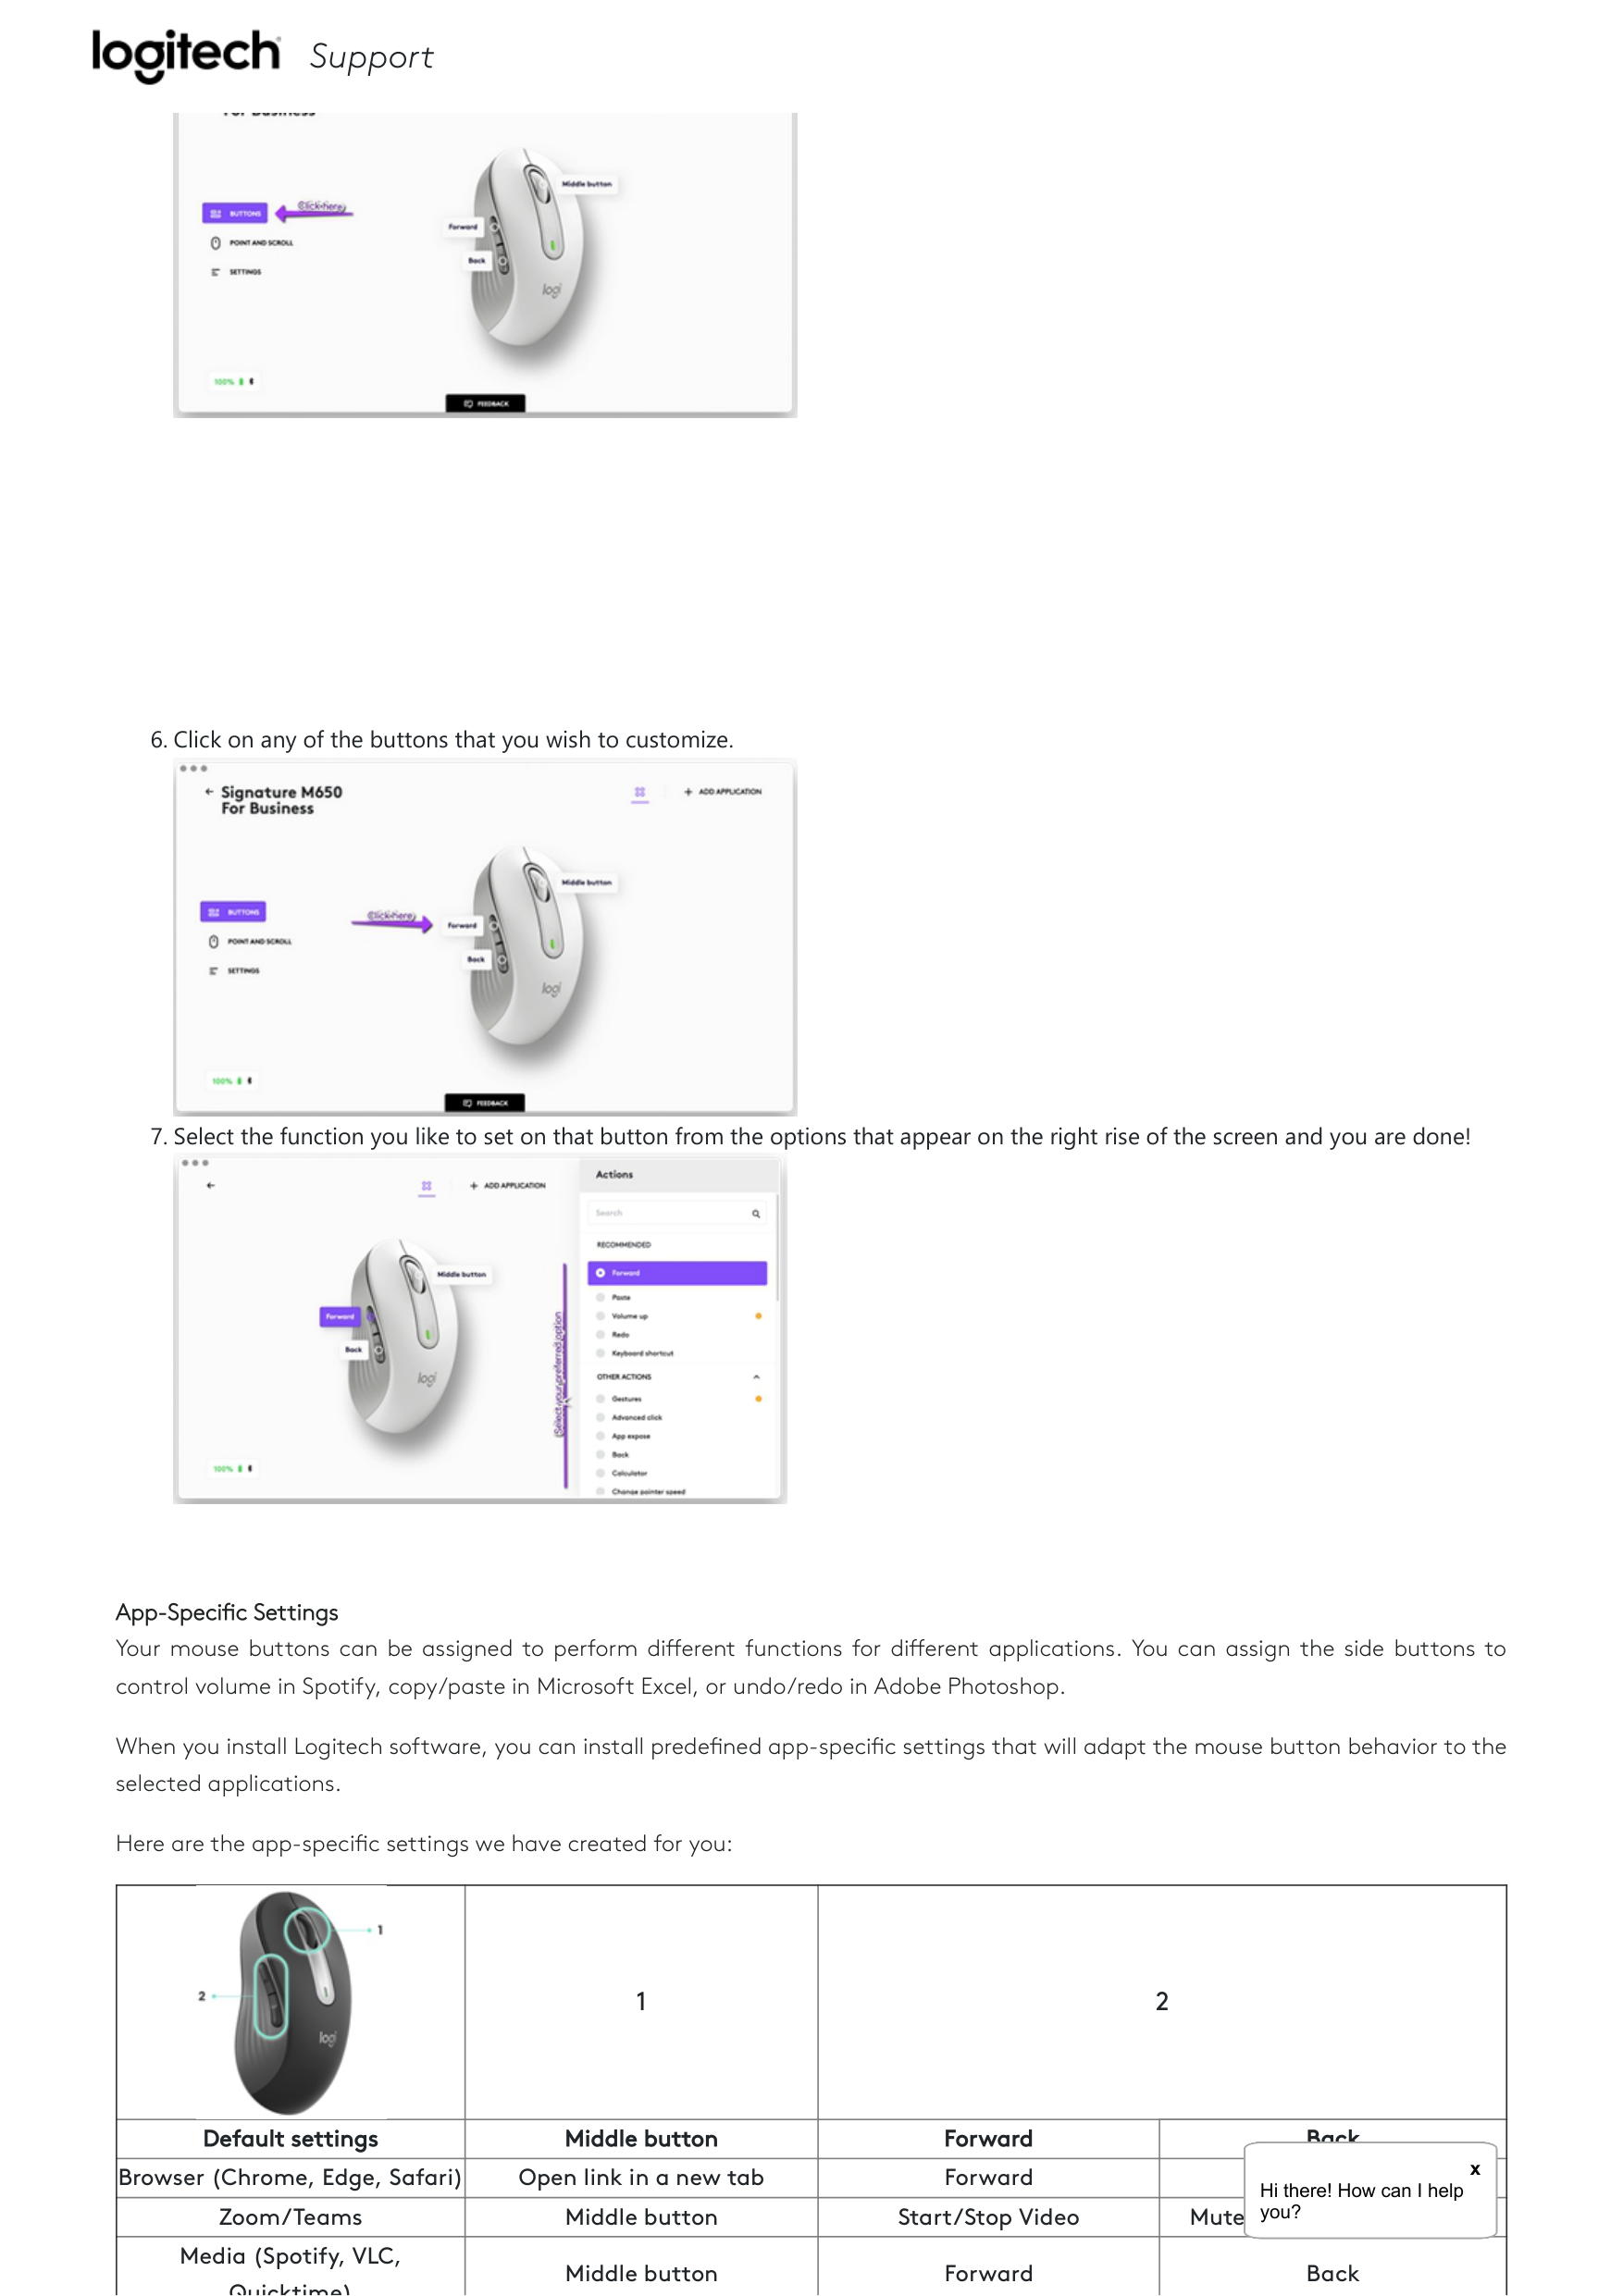
###### 6. Click on any of the buttons that you wish to customize.

###### 7. Select the function you like to set on that button from the options that appear on the right rise of the screen and you are done!

App-Speci c Settings Your mouse buttons can be assigned to perform di erent functions for di erent applications. You can assign the side buttons to control volume in Spotify, copy/paste in Microsoft Excel, or undo/redo in Adobe Photoshop.
When you install Logitech software, you can install prede ned app-speci c settings that will adapt the mouse button behavior to the selected applications.
Here are the app-speci c settings we have created for you:
||1|2|2| |---|---|---|---|
|Default settings|Middle button|Forward|Back| |Browser (Chrome, Edge, Safari)|Open link in a new tab|Forward|BackHheeHo heHheeHoheHheeHoheHheeHoheHheeHohe
x Hi there! How can I help| |Zoom/Teams|Middle button|Start/Stop Video|Mute/unmute Microphoneoooooyou?| |Media (Spotify, VLC, Quicktime)|Middle button|Forward|Back|
| | | | | |---|---|---|---| |Microsoft ExcelSupport| | | | |Microsoft Word
| | | | |Microsoft PowerPoint|Pan (hold and move the mouse)|Redo|Undo| |Adobe Photoshop|Pan (hold and move the mouse)|Redo|Undo|
Each of these settings can be customized manually, for any application.
Assign gestures to the side buttons
If you want more advanced functionality, you can assign any of the side buttons of the mouse to be the Gesture Button. This will transform your forward or back button into a powerful multi-function button allowing you to use gestures for desktop navigation, app management, pan, zoom, and more.
On the Mouse tab, select any side button (forward or back) button and click on Gesture Button.

By default, the gesture buttons will allow you to navigate between windows and desktops. In order to perform the gestures, you will need to hold the button while you move the mouse.
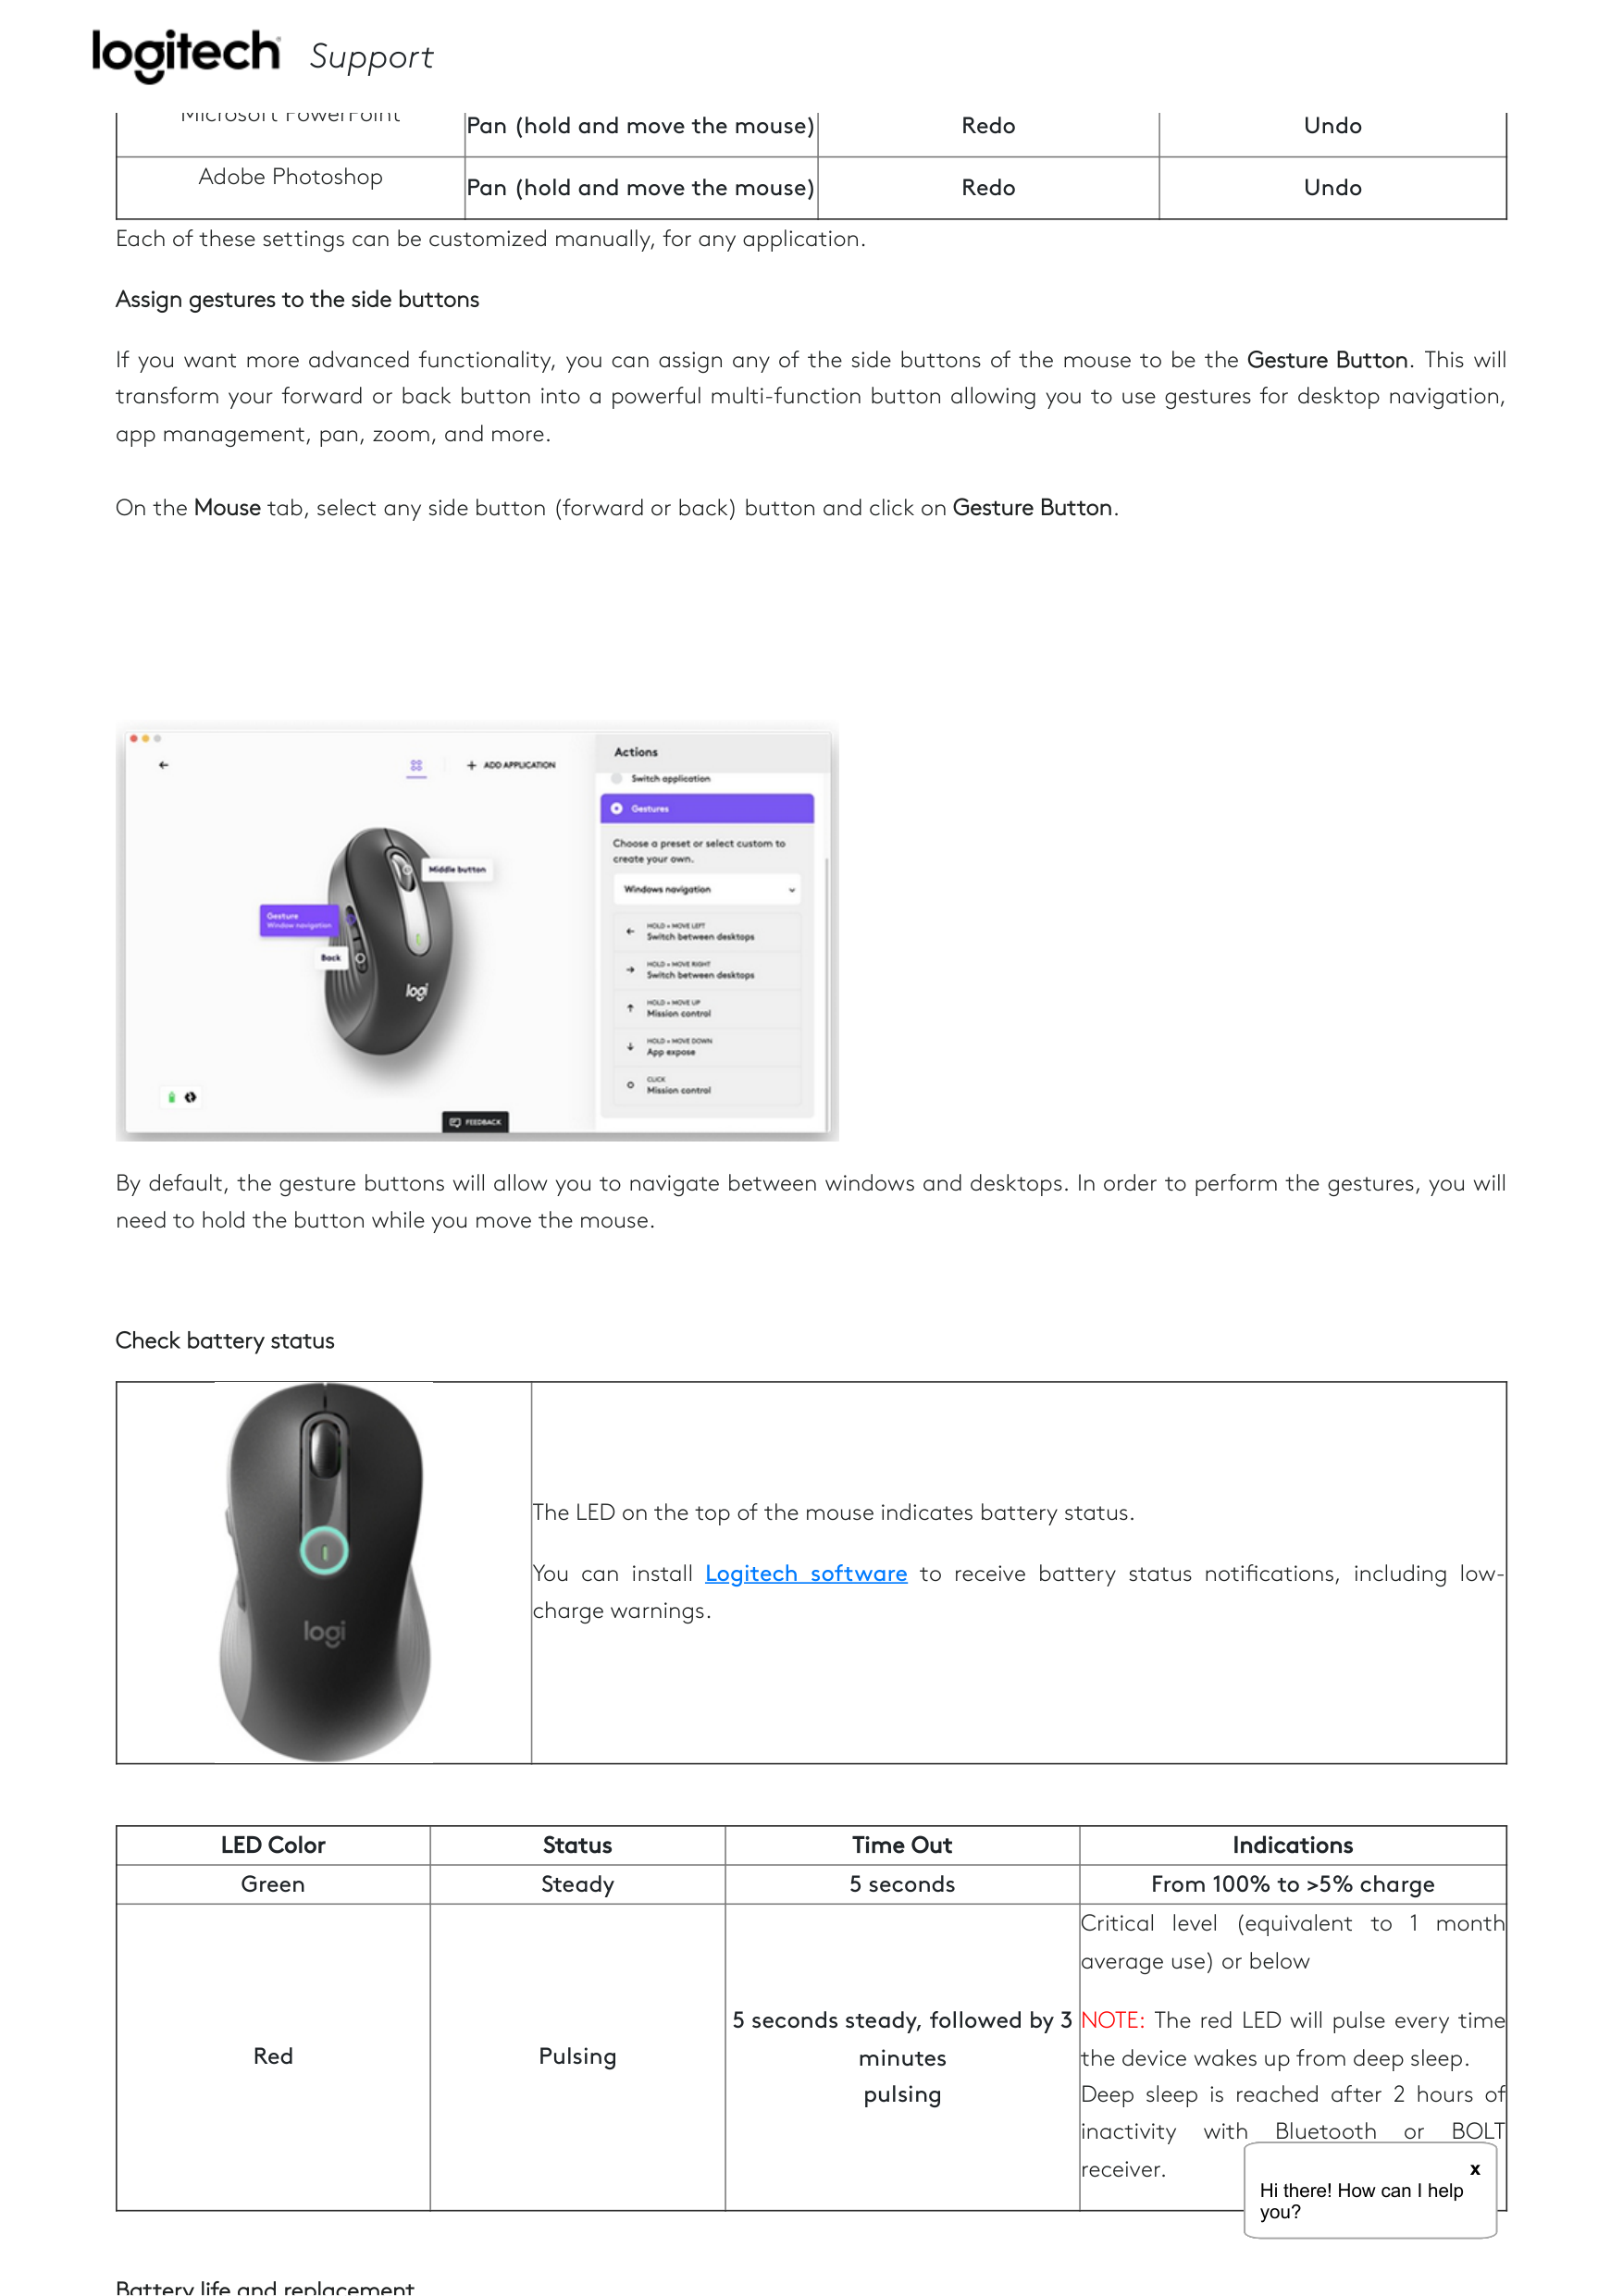
Check battery status
||The LED on the top of the mouse indicates battery status.
You can install Logitech software to receive battery status noti cations, including lowcharge warnings.
| |---|---|
|LED Color|Status|Time Out|Indications| |---|---|---|---|
|Green|Steady|5 seconds|From 100% to >5% charge| |Red|Pulsing|5 seconds steady, followed by 3 minutes pulsing|Critical level (equivalent to 1 month average use) or below
NOTE: The red LED will pulse every time the device wakes up from deep sleep. Deep sleep is reached after 2 hours of inactivity with Bluetooth or BOLT receiver.
H he e Ho heHheeHoheHheeHoheHheeHoheHheeHohe
x Hi there! How can I help|
oooooyou?
Battery life and replacement

Support
Battery information:
Requires 1 AA alkaline battery
Expected battery life is up to 24 months
Installing a new battery
||Slide the battery compartment cover down and then lift it o . Insert the battery, making sure that it faces the correct direction and then replace the battery cover.| |---|---|
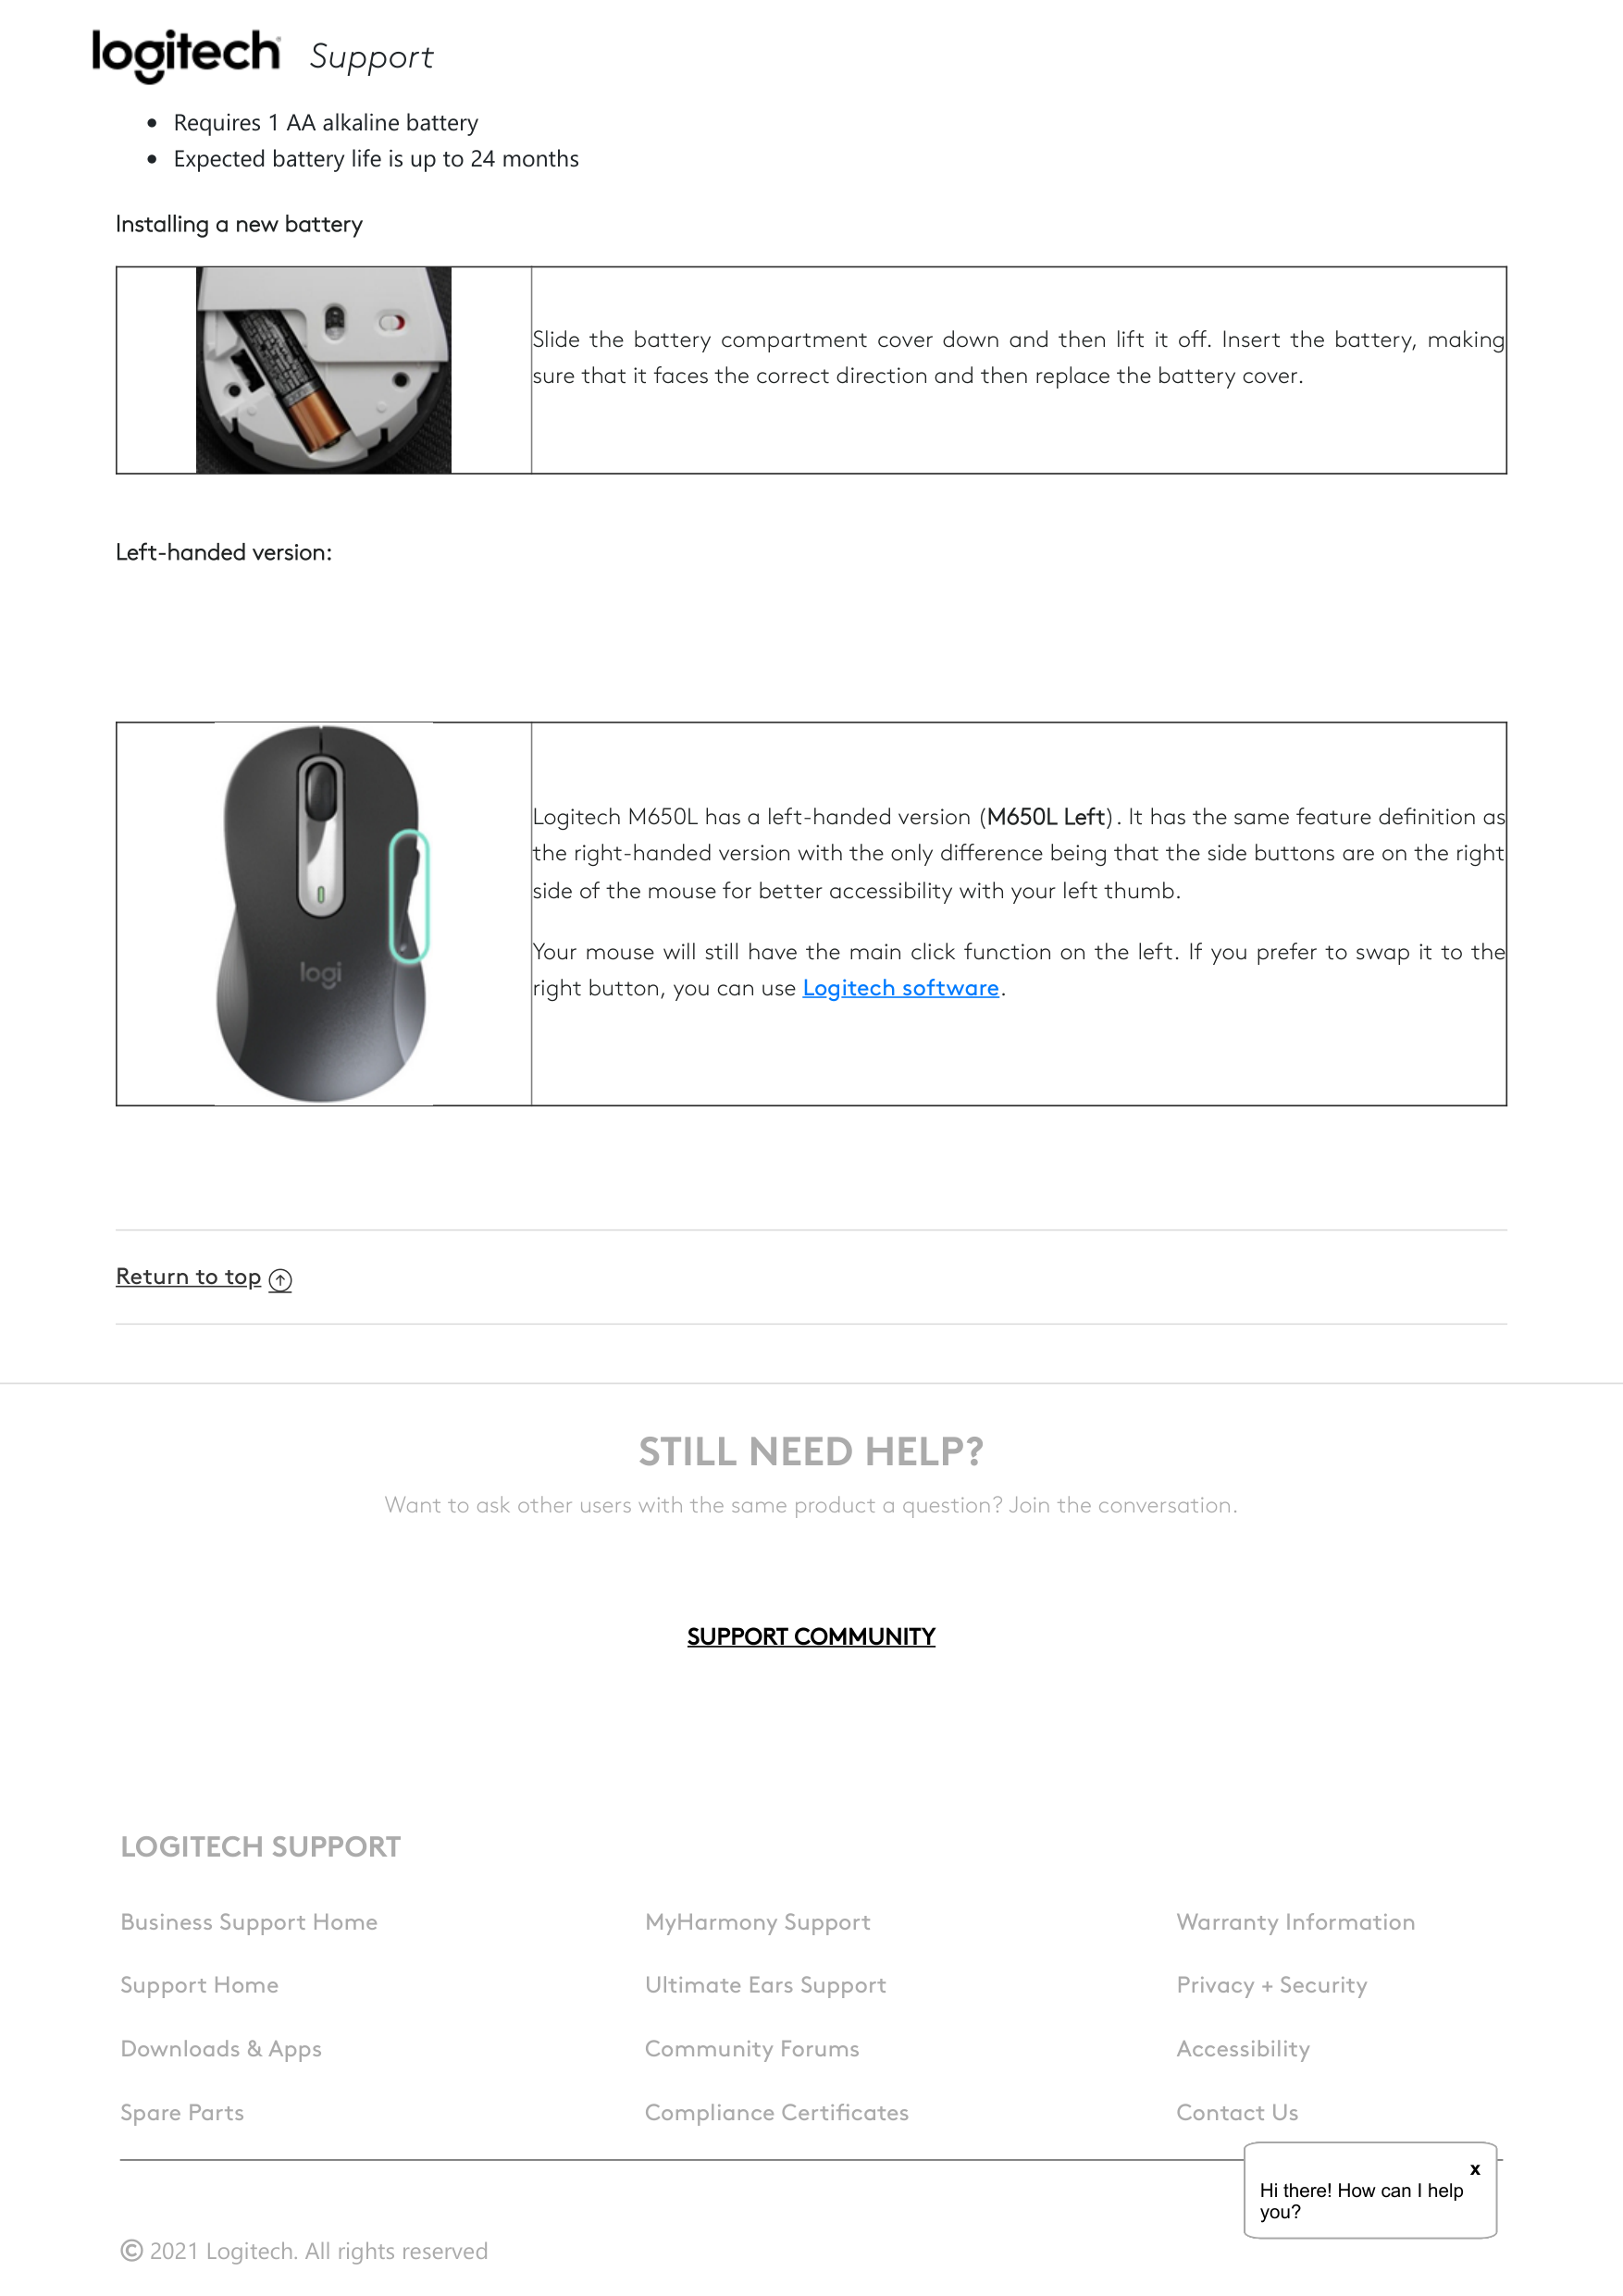
Left-handed version:
||Logitech M650L has a left-handed version (M650L Left). It has the same feature de nition as the right-handed version with the only di erence being that the side buttons are on the right side of the mouse for better accessibility with your left thumb.
Your mouse will still have the main click function on the left. If you prefer to swap it to the right button, you can use Logitech software.
| |---|---|
Return to top ⬆
STILL NEED HELP?

Want to ask other users with the same product a question? Join the conversation.
|SUPPORT COMMUNITY| |---|
##### LOGITECH SUPPORT
Business Support Home
Support Home
Downloads & Apps
Spare Parts
2021 Logitech. All rights reserved
MyHarmony Support
Ultimate Ears Support
Community Forums
Compliance Certi cates
Warranty Information
Privacy + Security
Accessibility
Contact Us
####### x
H he e Ho he o H he e Ho he o H he e Ho he o H he e Ho he o H he e Ho he o
Hi there! How can I help you?