
Ask AI
— answers from the official manualAnswers from the official manual.
Common questions
Common Questions
30 totalHow do I reset the RE220 extender to its factory default settings?
Use a pin to press the RESET button for 1 second while the extender is powered on, and the extender will reboot. Alternatively, log in to the web management page at http://tplinkrepeater.net, go to Settings > System Tools > Backup & Restore, and click FACTORY RESTORE. It is strongly recommended to backup your current configuration settings before resetting. (Page 52)
What do the different Signal LED colors mean on the RE220?
A solid green Signal LED means the extender is connected to your router's wireless network and is in a suitable location. A solid red Signal LED means the extender is experiencing poor signal strength and you should try relocating it closer to your host router. If the Signal LED is off, no wireless connection has been established. (Page 4)
What are the three ways to set up the RE220 extender?
The extender can be set up via the TP-Link Tether app, via a web browser, or via the WPS button. For the web browser method, connect to the extender's network (TP-Link_Extender) and navigate to http://tplinkrepeater.net or http://192.168.0.254. The WPS method requires pressing the WPS button on your host router first, then pressing the extender's WPS button within 2 minutes. (Page 6)
Where is the best location to place the RE220 extender for optimal performance?
Plug the extender approximately halfway between your router and the Wi-Fi dead zone, ensuring the location is within the range of your router. Wait about 2 minutes until the Signal LED turns solid green; if it doesn't, relocate the extender closer to the router. To minimize signal interference, choose a location far away from Bluetooth devices and other household electronics such as cordless phones, microwave ovens, and baby monitors. (Page 13)
What are the safe operating temperature and installation requirements for the RE220?
The operating temperature should be between 0°C and 40°C (32°F – 104°F). For safety, the extender should only be plugged in upright directions as shown in the manual. Additionally, keep the device away from water, fire, humidity, or hot environments. (Page 6)
What should I do if I can't access the RE220 web management page?
First, ensure your computer is connected to the extender's SSID if using Wi-Fi, or verify the Ethernet cable connection is stable if using a wired connection. Make sure your computer is configured to obtain an IP address and DNS server address automatically, and verify that http://tplinkrepeater.net is correctly entered in the browser. You can also try accessing the extender using its default IP address of 192.168.0.254, or reset the extender and try again. (Page 52)
Show 24 more questions
How do I upgrade the firmware on the RE220 extender?
How can I turn off the LEDs on the RE220 so they don't disturb me at night?
What happens to my RE220's wireless settings when it joins a OneMesh network?
How do I factory reset the range extender?
What should I do if my range extender stops working after forgetting my login password?
How do I connect my devices to an extender that is in Access Point mode?
What should I do if my range extender's IP address conflict with another device on my local network?
How do I upgrade my range extender's firmware?
How can I control LEDs on my range extender?
How do I check my range extender's internet connectivity status?
How do I add a device's MAC address to my router’s filter when using an extender?
What if my smartphone or tablet can't find an extended Wi-Fi signal?
How can I extend an additional wireless network using the range extender?
What should I do if my router uses MAC filtering and my devices can't connect through the RE220?
How do I reset the extender?
How do I access the configuration settings of the extender?
What should I do if I can't access the web management page of the extender?
How do I perform Quick Setup using my web browser for the TP-Link RE200?
What is the process for setting up TP-Link RE200 using WPS?
How do I relocate my TP-Link range extender for optimal performance?
What steps should I follow for troubleshooting if WPS connection fails?
How do I configure my TP-Link RE200’s wireless security and network name?
What are common issues with extending networks, and how can they be resolved?
How can I use my TP-Link RE200 as an Ethernet adapter?
Full Manual
2 pages
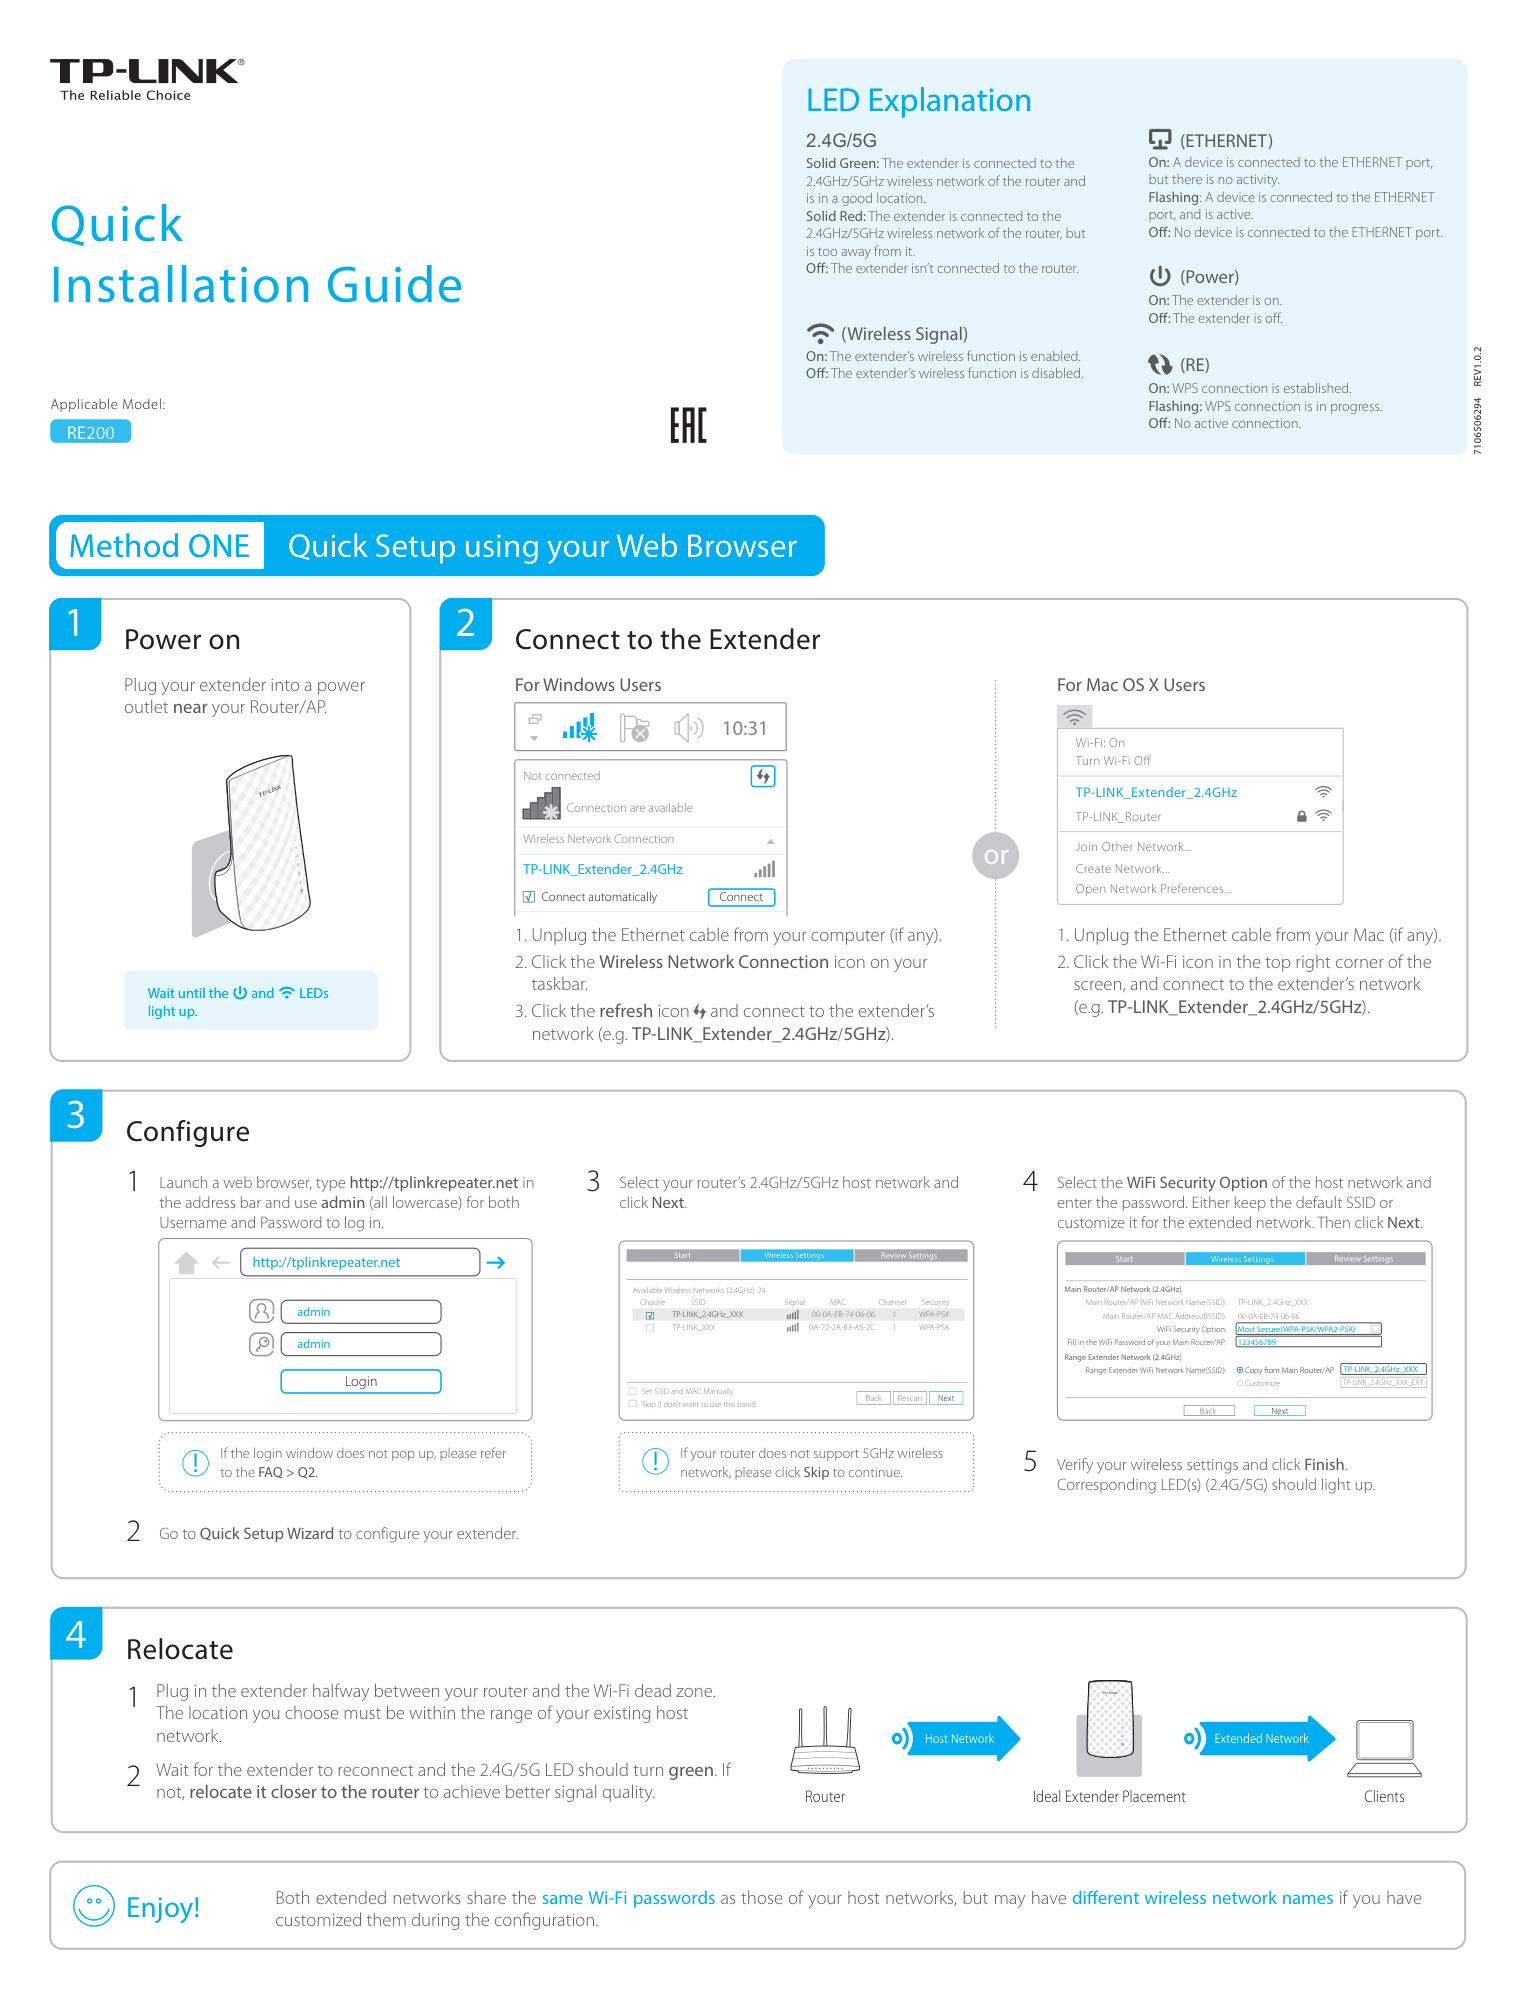
Quick Installation Guide
Applicable Model:
RE200
LED Explanation
2.4G/5G Solid Green: The extender is connected to the 2.4GHz/5GHz wireless network of the router and is in a good location. Solid Red: The extender is connected to the 2.4GHz/5GHz wireless network of the router, but is too away from it. O : The extender isn’t connected to the router.
###### (Wireless Signal)
On: The extender’s wireless function is enabled. O : The extender’s wireless function is disabled.
(ETHERNET) On: A device is connected to the ETHERNET port, but there is no activity. Flashing: A device is connected to the ETHERNET port, and is active. O : No device is connected to the ETHERNET port.
###### (Power)
On: The extender is on. O : The extender is off.
(RE)
On: WPS connection is established. Flashing: WPS connection is in progress. O : No active connection.
7106506294 REV1.0.2
Method ONE Quick Setup using your Web Browser
#### Quick Setup using your Web BrowserMethod ONE
Power on1 2
Plug your extender into a power outlet near your Router/AP.
Wait until the and LEDs light up.
Connect to the Extender
For Windows Users
##### 10:31
Not connected
Connection are available
Wireless Network Connection
TP-LINK_Extender_2.4GHz
Connect automatically Connect
|√
| |---|
or
For Mac OS X Users
Wi-Fi: On Turn Wi-Fi Off
TP-LINK_Extender_2.4GHz
TP-LINK_Router Join Other Network... Create Network... Open Network Preferences...
Relocate
Ideal Extender PlacementRouter Clients
Extended NetworkHost Network
Wait for the extender to reconnect and the 2.4G/5G LED should turn green. If not, relocate it closer to the router to achieve better signal quality.
Plug in the extender halfway between your router and the Wi-Fi dead zone. The location you choose must be within the range of your existing host network.
Configure 1 4 Select theWiFi Security Optionof the host network and
3 Select your router’s 2.4GHz/5GHz host network and
Launch a web browser, type http://tplinkrepeater.net in the address bar and use admin (all lowercase) for both Username and Password to log in.
click Next.
enter the password. Either keep the default SSID or customize it for the extended network. Then click Next.
Review Settings
Start
Wireless Settings
Review Settings
Start
Wireless Settings
http://tplinkrepeater.net
Main Router/AP Network (2.4GHz)
Available Wireless Networks (2.4GHz): 24
Choose SSID TP-LINK_2.4GHz_XXX TP-LINK_XXX
Signal MAC Channel Security
TP-LINK_2.4GHz_XXX 00-0A-EB-74-06-06 Most Secure(WPA-PSK/WPA2-PSK) 123456789
Main Router/AP WiFi Network Name(SSID): Main Router/AP MAC Address(BSSID): WiFi Security Option:
admin
00-0A-EB-74-06-06 1 WPA-PSK 0A-72-2A-B3-A5-2C 1 WPA-PSK
√
| | |---|
admin
Fill in the WiFi Password of your Main Router/AP: Range Extender Network (2.4GHz)
TP-LINK_2.4GHz_XXX
Copy from Main Router/AP Customize
Range Extender WiFi Network Name(SSID):
Login
TP-LINK_2.4GHz_XXX_EXT
Set SSID and MAC Manually Skip (I don’t want to use this band)
| | |---|
|Back| |---|
|Rescan| |---|
|Next| |---|
| | |---|
|Back| |---|
|Next| |---|
If the login window does not pop up, please refer to the FAQ > Q2.
If your router does not support 5GHz wireless network, please click Skip to continue.
5 Verify your wireless settings and clickFinish.
Corresponding LED(s) (2.4G/5G) should light up.
Go to Quick Setup Wizard to configure your extender.2
Enjoy! Both extended networks share the same Wi-Fi passwordsas those of your host networks, but may have di erent wireless network namesif you havecustomized them during the configuration.
Method TWO Quick Setup using the WPS (RE) Button
WPS is an easier way to extend your host network. You are recommended to use this method if your host router has a WPS button. The button might look like one of these: . Otherwise, please refer to Method ONE.
1 2
#### Connect
Power on
1 Press the WPS button on your router, and then press the button on your extender.
Plug the extender into a power outlet near your router.
The LED should go from ashing to solid, indicating that WPS connection was successful, and then it will go o in 2 minutes.
2
If you are connecting the extender to a dual-band router but only 2.4G or 5G LED is on, repeat Step 1 to connect the other band.
For more information about using WPS on your router, please refer to the router manufacturer's user guide. Some ISP gateways disable the WPS function by default. If the WPS connection fails, please refer to Method ONE.
Wait until the and LEDs light up.
3
#### Relocate
Plug in the extender halfway between your router and the Wi-Fi dead zone. The location you choose must be within the range of your existing host network.
Extended NetworkHost Network
Wait for the extender to reconnect and the 2.4G/5G LED should turn green. If not, relocate it closer to the router to achieve better signal quality.
Ideal Extender PlacementRouter Clients
Both extended networks share the same network names (SSIDs) and passwords as those of your host networks.Enjoy!
Entertainment Adapter
Ethernet connection
The extender can be used as a wireless adapter to connect any Ethernet-only device such as a Blu-ray player, game console, DVR or smart TV to your Wi-Fi network. First, connect the extender to your router referring to Method ONE or Method TWO. Then connect your Ethernet-only device to the extender via an Ethernet cable.
Smart TV Game Console Desktop
Router
Frequently Asked Questions (FAQ)
Q1. How to reset the extender?
Q2. What should I do if I can not access the web management page of the extender?
©2016 TP-LINK