
Ask AI
— answers from the official manualAnswers from the official manual.
Common questions
Common Questions
20 totalHow do I reset the Canon PowerShot ZOOM to its factory default settings?
To reset the camera, select [Set-up: Clear all camera settings] from the menu, then select [OK] on the confirmation screen. This restores shooting functions and menu functions to their defaults. (Page 102)
How do I charge the Canon PowerShot ZOOM and how long does it take?
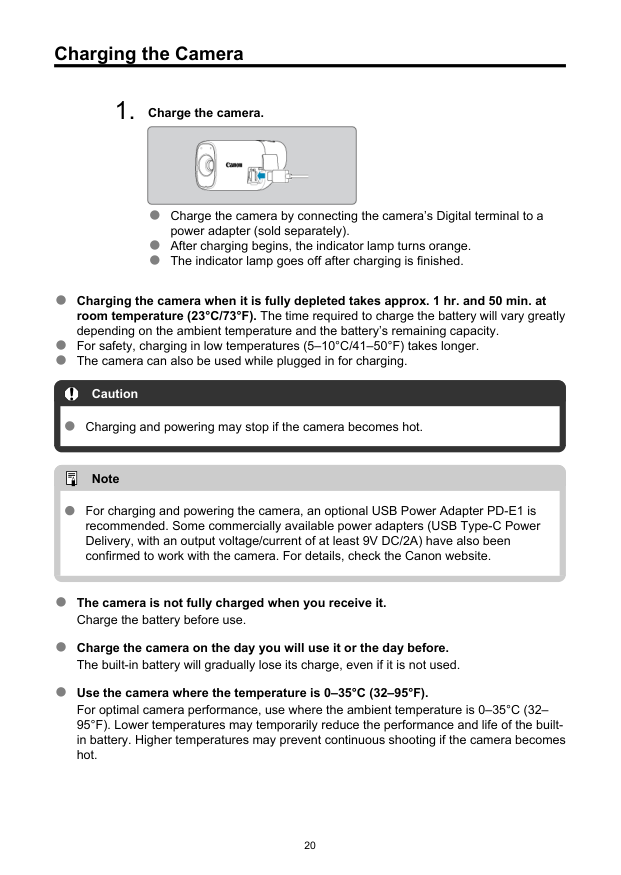
Charge the camera by connecting its Digital terminal (USB Type-C) to a compatible power adapter (sold separately). The indicator lamp turns orange when charging begins and goes off when charging is complete. Charging a fully depleted battery takes approximately 1 hour and 50 minutes at room temperature (23°C/73°F). An optional USB Power Adapter PD-E1 is recommended, or a USB Type-C Power Delivery adapter with at least 9V DC/2A output. (Page 20)
What type of memory cards are compatible with the PowerShot ZOOM?
The camera supports microSD, microSDHC, and microSDXC memory cards, regardless of capacity. The cards must be SD speed class, UHS speed class, and UHS-I compatible. For movie recording, SD Speed Class 6 or higher is required. (Page 12)
What is the maximum movie recording time per clip on the PowerShot ZOOM?
The maximum recording time per movie is 9 minutes and 59 seconds, after which recording automatically stops. You can immediately start recording a new clip by pressing the movie button again, which saves it as a new file. (Page 53)
How do I connect the PowerShot ZOOM to my smartphone?
Install the free Canon Camera Connect app on your Android or iOS smartphone, then on the camera select [Wi-Fi/Bluetooth connection] and choose [Connect to smartphone]. You can pair via Bluetooth (requires Bluetooth Specification Version 4.2 or later on the smartphone) or connect directly via Wi-Fi without Bluetooth. Once connected, you can browse images, save them to the smartphone, or shoot remotely. (Page 67)
What should I do if a card-related error message appears on the camera?
If a card-related error message appears, remove and reinsert the card. If the error persists, try a different card. If you can transfer images to a computer, do so and then format the card using the camera, which may return the card to normal. (Page 24)
Show 14 more questions
How do I adjust the viewfinder diopter on the PowerShot ZOOM?
What zoom levels are available on the PowerShot ZOOM and what magnifications do they correspond to?
What safety precautions should I follow when charging the PowerShot ZOOM?
How do I force restart the camera if the buttons become unresponsive?
How long does it take to fully charge the camera?
What types of memory cards are compatible with this camera?
What should I do if the card shows an error message?
How do I adjust the viewfinder focus?
What is the maximum movie recording duration per file?
How do I prevent camera shake when shooting?
What should I do if the camera becomes too hot during use?
How many zoom levels does this camera have?
What are the available autofocus methods?
How do I reset the camera to factory settings?
Full Manual
125 pages
Advanced User Guide This manual is for PowerShot ZOOM with firmware version 1.1.0 or later installed.
E
Ct2-D116-D
© Canon Inc. 2021
Contents Introduction. . . . . . . . . . . . . . . . . . . . . . . . . . . . . . . . . . . . . . . . . . . . . . . . 4 Package Contents. . . . . . . . . . . . . . . . . . . . . . . . . . . . . . . . . . . . . . . . . . . . . . . 5 Instruction Manuals. . . . . . . . . . . . . . . . . . . . . . . . . . . . . . . . . . . . . . . . . . . . . . 6 Steps to Use the Camera Immediately. . . . . . . . . . . . . . . . . . . . . . . . . . . . . . . 7 About This Guide. . . . . . . . . . . . . . . . . . . . . . . . . . . . . . . . . . . . . . . . . . . . . . . 10 Compatible Cards. . . . . . . . . . . . . . . . . . . . . . . . . . . . . . . . . . . . . . . . . . . . . . 12 Safety Instructions. . . . . . . . . . . . . . . . . . . . . . . . . . . . . . . . . . . . . . . . . . . . . . 13 Handling Precautions. . . . . . . . . . . . . . . . . . . . . . . . . . . . . . . . . . . . . . . . . . . . 15 Part Names. . . . . . . . . . . . . . . . . . . . . . . . . . . . . . . . . . . . . . . . . . . . . . . . . . . 17 Preparation and Basic Operations. . . . . . . . . . . . . . . . . . . . . . . . . . . . . 19 Charging the Camera. . . . . . . . . . . . . . . . . . . . . . . . . . . . . . . . . . . . . . . . . . . . 20 Inserting/Removing Cards. . . . . . . . . . . . . . . . . . . . . . . . . . . . . . . . . . . . . . . . 21 Turning on the Power. . . . . . . . . . . . . . . . . . . . . . . . . . . . . . . . . . . . . . . . . . . . 25 Basic Operations. . . . . . . . . . . . . . . . . . . . . . . . . . . . . . . . . . . . . . . . . . . . . . . 27 Menu Operations and Settings. . . . . . . . . . . . . . . . . . . . . . . . . . . . . . . . . . . . . 33 Shooting and Recording. . . . . . . . . . . . . . . . . . . . . . . . . . . . . . . . . . . . . 37 Using the Camera as a Monocular. . . . . . . . . . . . . . . . . . . . . . . . . . . . . . . . . . 38 Still Photo Shooting. . . . . . . . . . . . . . . . . . . . . . . . . . . . . . . . . . . . . . . . . . . . . 39 Movie Recording. . . . . . . . . . . . . . . . . . . . . . . . . . . . . . . . . . . . . . . . . . . . . . . 40 Exposure Compensation. . . . . . . . . . . . . . . . . . . . . . . . . . . . . . . . . . . . . . . . . 42 Selecting the AF Method. . . . . . . . . . . . . . . . . . . . . . . . . . . . . . . . . . . . . . . . . 44 Continuous AF. . . . . . . . . . . . . . . . . . . . . . . . . . . . . . . . . . . . . . . . . . . . . . . . . 49 Drive Mode. . . . . . . . . . . . . . . . . . . . . . . . . . . . . . . . . . . . . . . . . . . . . . . . . . . . 50 Movie Recording Size. . . . . . . . . . . . . . . . . . . . . . . . . . . . . . . . . . . . . . . . . . . 51 Playback. . . . . . . . . . . . . . . . . . . . . . . . . . . . . . . . . . . . . . . . . . . . . . . . . 54 Image Playback. . . . . . . . . . . . . . . . . . . . . . . . . . . . . . . . . . . . . . . . . . . . . . . . 55 Movie Playback. . . . . . . . . . . . . . . . . . . . . . . . . . . . . . . . . . . . . . . . . . . . . . . . 56 Erasing Images. . . . . . . . . . . . . . . . . . . . . . . . . . . . . . . . . . . . . . . . . . . . . . . . 59 Formatting. . . . . . . . . . . . . . . . . . . . . . . . . . . . . . . . . . . . . . . . . . . . . . . . . . . . 62 Wireless Features. . . . . . . . . . . . . . . . . . . . . . . . . . . . . . . . . . . . . . . . . 64
What You Can Do Wirelessly. . . . . . . . . . . . . . . . . . . . . . . . . . . . . . . . . . . . . . 65 Camera Connect Communication from Smartphones. . . . . . . . . . . . . . . . . . . 66 Ending Connections or Reconnecting. . . . . . . . . . . . . . . . . . . . . . . . . . . . . . . 81 Wi-Fi Settings. . . . . . . . . . . . . . . . . . . . . . . . . . . . . . . . . . . . . . . . . . . . . . . . . . 83 Bluetooth Settings. . . . . . . . . . . . . . . . . . . . . . . . . . . . . . . . . . . . . . . . . . . . . . 84 GPS Features. . . . . . . . . . . . . . . . . . . . . . . . . . . . . . . . . . . . . . . . . . . . . . . . . 85 Troubleshooting. . . . . . . . . . . . . . . . . . . . . . . . . . . . . . . . . . . . . . . . . . . . . . . . 87 Clearing Wireless Settings. . . . . . . . . . . . . . . . . . . . . . . . . . . . . . . . . . . . . . . . 91 Set-up. . . . . . . . . . . . . . . . . . . . . . . . . . . . . . . . . . . . . . . . . . . . . . . . . . . 92 Date/Time/Zone. . . . . . . . . . . . . . . . . . . . . . . . . . . . . . . . . . . . . . . . . . . . . . . . 93 Power Saving. . . . . . . . . . . . . . . . . . . . . . . . . . . . . . . . . . . . . . . . . . . . . . . . . . 98 Video System. . . . . . . . . . . . . . . . . . . . . . . . . . . . . . . . . . . . . . . . . . . . . . . . . 100 Language. . . . . . . . . . . . . . . . . . . . . . . . . . . . . . . . . . . . . . . . . . . . . . . . . . . . 101 Resetting the Camera. . . . . . . . . . . . . . . . . . . . . . . . . . . . . . . . . . . . . . . . . . 102 Other Information. . . . . . . . . . . . . . . . . . . . . . . . . . . . . . . . . . . . . . . . . . . . . . 103 Reference. . . . . . . . . . . . . . . . . . . . . . . . . . . . . . . . . . . . . . . . . . . . . . . 104 Troubleshooting Guide. . . . . . . . . . . . . . . . . . . . . . . . . . . . . . . . . . . . . . . . . . 105 Error Codes. . . . . . . . . . . . . . . . . . . . . . . . . . . . . . . . . . . . . . . . . . . . . . . . . . 110 Information Display. . . . . . . . . . . . . . . . . . . . . . . . . . . . . . . . . . . . . . . . . . . . 111 Specifications. . . . . . . . . . . . . . . . . . . . . . . . . . . . . . . . . . . . . . . . . . . . . . . . . 113 Before Disposal. . . . . . . . . . . . . . . . . . . . . . . . . . . . . . . . . . . . . . . . . . . . . . . 120 Trademarks and Licensing. . . . . . . . . . . . . . . . . . . . . . . . . . . . . . . . . . 123
Introduction Read before you start shooting To avoid shooting problems and accidents, first read the Safety Instructions and Handling Precautions. Also read this Advanced User Guide carefully to ensure that you use the camera correctly. Take some test shots, and understand about product liability After shooting, play images back and check whether they have been properly recorded. If the camera or memory card is faulty and the images cannot be recorded or downloaded to a computer, Canon cannot be held liable for any loss or inconvenience caused. Copyrights Unauthorized public use of images captured with the camera that include copyrighted subjects may be prohibited by law. Also be aware that certain public performances, exhibitions, etc. may prohibit photography even for private enjoyment. Firmware version Update the firmware by downloading the latest version from the Canon website. Updating the firmware will automatically turn the camera off. Connecting other devices Use the included interface cable or a Canon cable when connecting the camera to a computer or other device. Use of cables that are no longer than 2.5m is recommended.
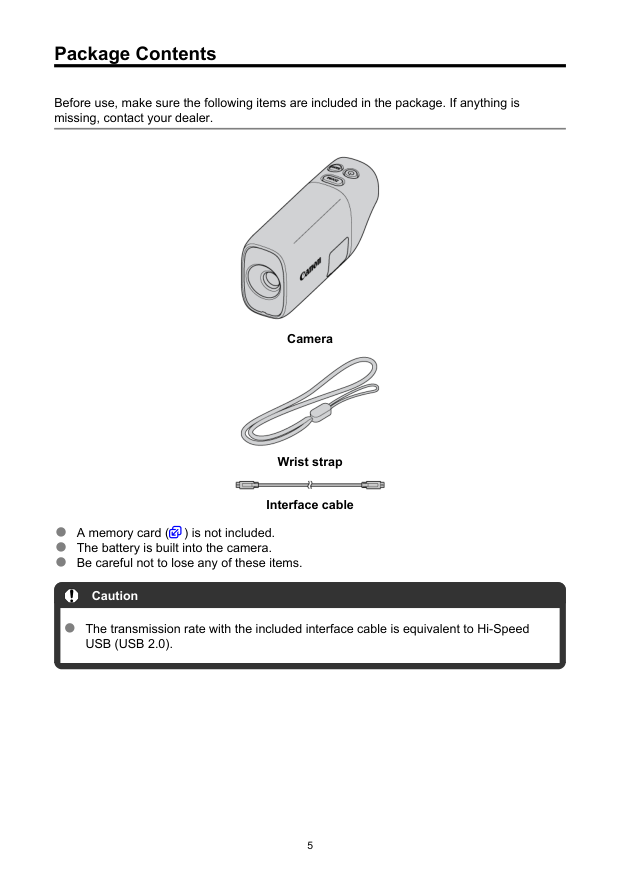
Package Contents Before use, make sure the following items are included in the package. If anything is missing, contact your dealer. Camera Wrist strap Interface cable A memory card ( ) is not included. The battery is built into the camera. Be careful not to lose any of these items. Caution The transmission rate with the included interface cable is equivalent to Hi-Speed
Usb (Usb 2.0).
5
Instruction Manuals The Instruction Manual, which describes camera features and provides instructions up to turning the camera on, is included with the camera. Advanced User Guide Complete instructions are provided in this Advanced User Guide. For the latest Advanced User Guide, refer to the following website. https://cam.start.canon/C008/ 6
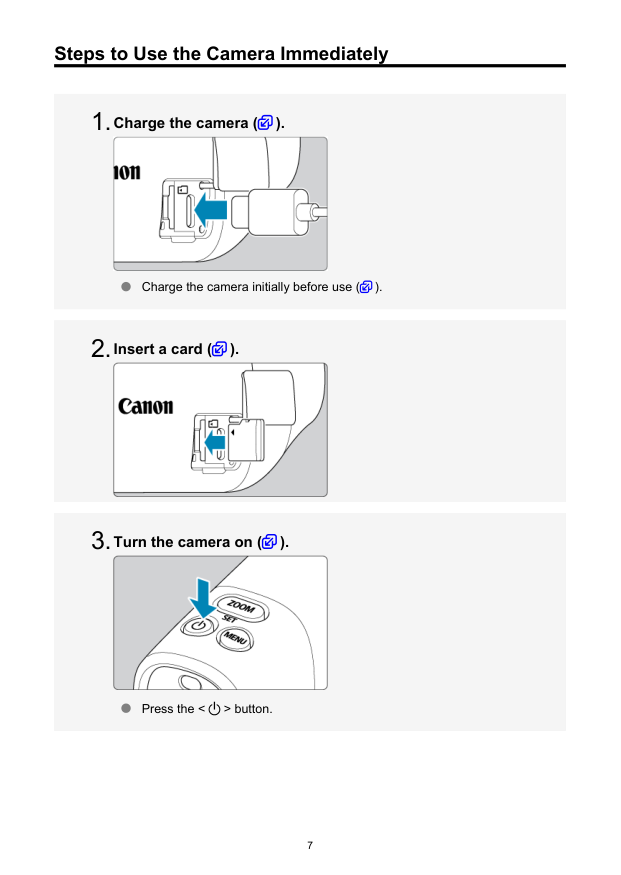
Steps to Use the Camera Immediately Charge the camera ( ). Charge the camera initially before use ( ). Insert a card ( ). Turn the camera on ( ). Press the < > button. 7

Adjust the viewfinder ( ). Turn the dioptric adjustment dial until the image in the viewfinder looks the sharpest. Zoom in. Each press of the < > button switches between three zoom levels. Focus on the subject ( ). Look through the viewfinder and center the subject on the screen. Press the shutter button halfway, and the camera will focus on the subject. To shoot, press the shutter button completely. 8
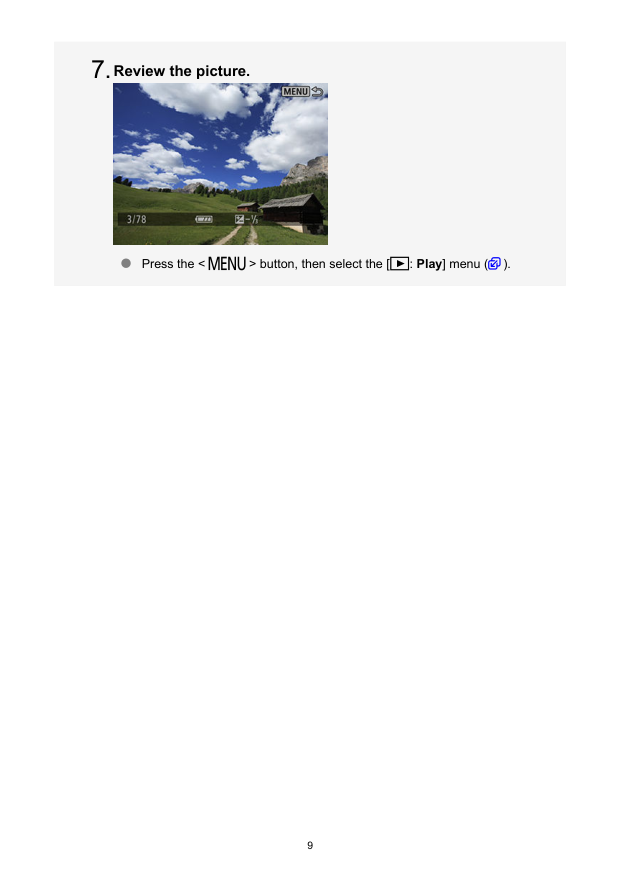
Review the picture. Press the < > button, then select the [ : Play] menu ( ). 9 7.

About This Guide Icons in This Guide Basic Assumptions for Operational Instructions and Sample Photos Icons in This Guide < > Indicates the Set button. In reference to buttons or setting positions, the guide also uses the same icons or display items found on camera buttons and in the viewfinder. Links to pages with related topics. Warning to prevent shooting problems. Supplemental information. 10

Basic Assumptions for Operational Instructions and Sample Photos Instructions apply to the camera with the power on ( ). It is assumed that all menu settings are set to defaults. Sample photos in this guide are only for illustration. 11
Compatible Cards In this guide, all supported memory cards are simply referred to as “the card.” The following cards can be used with the camera regardless of capacity. If the card is new or was previously formatted (initialized) by another camera or computer, format the card with this camera ( ). microSD / microSDHC / microSDXC memory cards
Warning:
Safety Instructions Be sure to read these instructions in order to operate the product safely. Follow these instructions to prevent injury or harm to the operator of the product or others. Denotes the risk of serious injury or death. Keep the product out of the reach of young children. A strap wrapped around a person’s neck may result in strangulation. The parts or provided items of cameras or accessories are dangerous if swallowed. If swallowed, seek immediate medical assistance. Use only power sources specified in this Advanced User Guide for use with the product. Do not disassemble or modify the product. Do not expose the product to strong shocks or vibration. Do not touch any exposed internal parts. Stop using the product in any case of unusual circumstances such as the presence of smoke or a strange smell. Do not use organic solvents such as alcohol, benzine or paint thinner to clean the product. Do not get the product wet. Do not insert foreign objects or liquids into the product. Do not use the product where flammable gases may be present. This may cause electric shock, explosion or fire. Do not touch the product connected to a power outlet during lightning storms. This may cause electric shock. Observe the following instructions when using a battery charger or AC adapter.- 104 °F).
This may cause electric shock, explosion or fire. Do not allow the product to maintain contact with the same area of skin for extended periods of time during use. This may result in low-temperature contact burns, including skin redness and blistering, even if the product does not feel hot. Follow any indications to turn off the product in places where its use is forbidden. Not doing so may cause other equipment to malfunction due to the effect of electromagnetic waves and even result in accidents. 13
Caution:
Follow the cautions below. Otherwise physical injury or property damage may result. Do not look through the viewfinder for extended periods of time. This may induce symptoms similar to motion sickness. In such a case, stop using the product immediately and rest for a while before resuming use. Do not leave the product in places exposed to extremely high or low temperatures. The product may become extremely hot/cold and cause burns or injury when touched. Strap is intended for use on the body only. Hanging the strap with any product attached on a hook or other object may damage the product. Also, do not shake the product or expose the product to strong impacts. Do not apply strong pressure on the lens or allow an object to hit it. This may cause injury or damage to the product. If any abnormal skin reaction or irritation occurs during or following the use of this product, refrain from further use and get medical advice/attention. Do not touch the card immediately after extended use. The card may be hot, which may cause burns. During use, do not touch the terminal or surrounding area for an extended period if the terminal cover is open. This may cause low-temperature burns. 14
Handling Precautions Camera care This camera is a precision instrument. Do not drop it or subject it to physical shock. The camera is not waterproof and cannot be used underwater. If the camera gets wet, contact a Canon Service Center immediately. Wipe off any water droplets with a clean, dry cloth, and if the camera is exposed to salty air, wipe it off with a clean, well-wrung wet cloth. If water gets on the camera, wipe it off with a dry and clean cloth. If dirt, dust, or salt gets on the camera, wipe it off with a clean, well-wrung wet cloth. Using the camera in dusty or dirty locations may lead to damage. Cleaning the camera after use is recommended. Allowing dirt, dust, water, or salt to remain on the camera may cause a malfunction. Never leave the camera near anything having a strong magnetic field such as a magnet or electric motor. Also, avoid using or leaving the camera near anything emitting strong radio waves, such as a large antenna. Strong magnetic fields can cause camera malfunction or destroy image data. Do not leave the camera in excessive heat, such as in a car in direct sunlight. High temperatures can cause the camera to malfunction. The camera contains precision electronic circuitry. Never attempt to disassemble the camera yourself. If the camera is suddenly brought in from the cold into a warm room, condensation may form on the camera and internal parts. To prevent condensation, first put the camera in a sealed plastic bag and let it adjust to the warmer temperature before taking it out of the bag. If condensation forms on the camera, to avoid damage, do not use the camera or remove the card. Turn the camera off and wait until the moisture has fully evaporated before resuming use. Even after the camera is completely dry, if it is still internally cold, do not remove the card until the camera has adjusted to the ambient temperature. If the camera will not be used for an extended period, store it in a cool, dry, well- ventilated location. Even while the camera is in storage, press the shutter button a few times once in a while to check that the camera is still working. Avoid storing the camera where there are chemicals that result in rust and corrosion such as in a chemical lab. If the camera has not been used for an extended period, test all its functions before using it. If you have not used the camera for some time or if there is an important shoot such as a foreign trip coming up, have the camera checked by your nearest Canon Service Center or check the camera yourself and make sure it is working properly. The camera may become hot after repeated continuous shooting or still photo/movie shooting over an extended period. This is not a malfunction. If there is a bright light source inside or outside the image area, ghosting may occur. 15
Viewfinder Although the viewfinder is produced under extremely high-precision manufacturing conditions and more than 99.99% of the pixels meet design specifications, 0.01% or fewer pixels may be defective or appear as red or black dots. This does not indicate damage. They do not affect the images recorded. Cards To protect the card and its recorded data, note the following: Do not drop, bend, or wet the card. Do not subject it to excessive force, physical shock, or vibration. Do not touch the card’s electronic contacts with your fingers or anything metallic. Do not affix any stickers, etc. on the card. Do not store or use the card near anything that has a strong magnetic field, such as a television, speakers, or magnets. Also avoid places prone to having static electricity. Do not leave the card in direct sunlight or near a heat source. Store the card in a case. Do not store the card in hot, dusty, or humid locations. 16
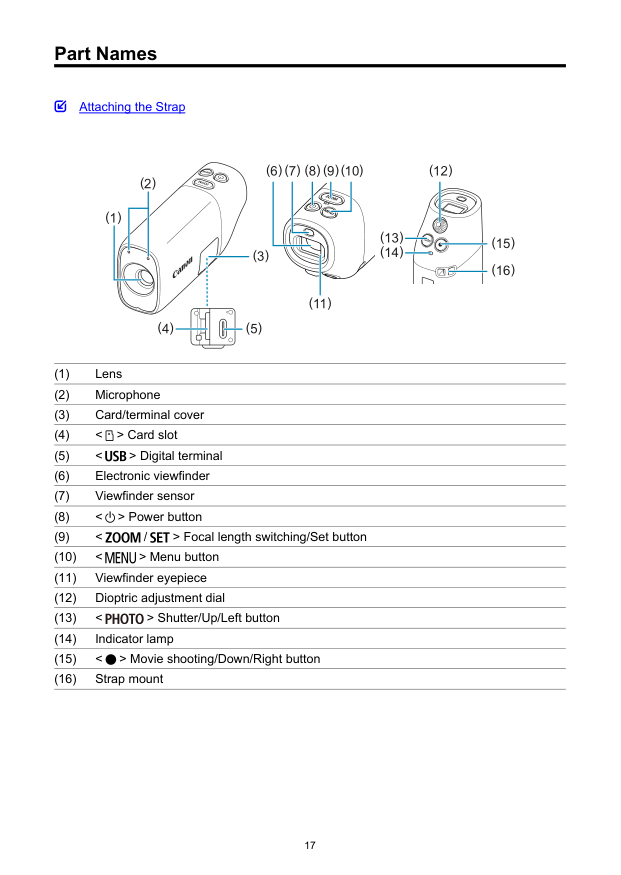
Part Names Attaching the Strap (4) (5) (8) (9) (6) (7) (1) (10) (3) (2) (15) (12) (11) (16) (13) (14) (1) Lens (2) Microphone (3) Card/terminal cover (4) < > Card slot (5) < > Digital terminal (6) Electronic viewfinder (7) Viewfinder sensor (8) < > Power button (9) < / > Focal length switching/Set button (10) < > Menu button (11) Viewfinder eyepiece (12) Dioptric adjustment dial (13) < > Shutter/Up/Left button (14) Indicator lamp (15) < > Movie shooting/Down/Right button (16) Strap mount 17

Attaching the Strap Attach the included wrist strap to the camera strap mount. 18

Preparation and Basic Operations This chapter describes preparatory steps before you start shooting and the basic camera operations.
Charging the Camera
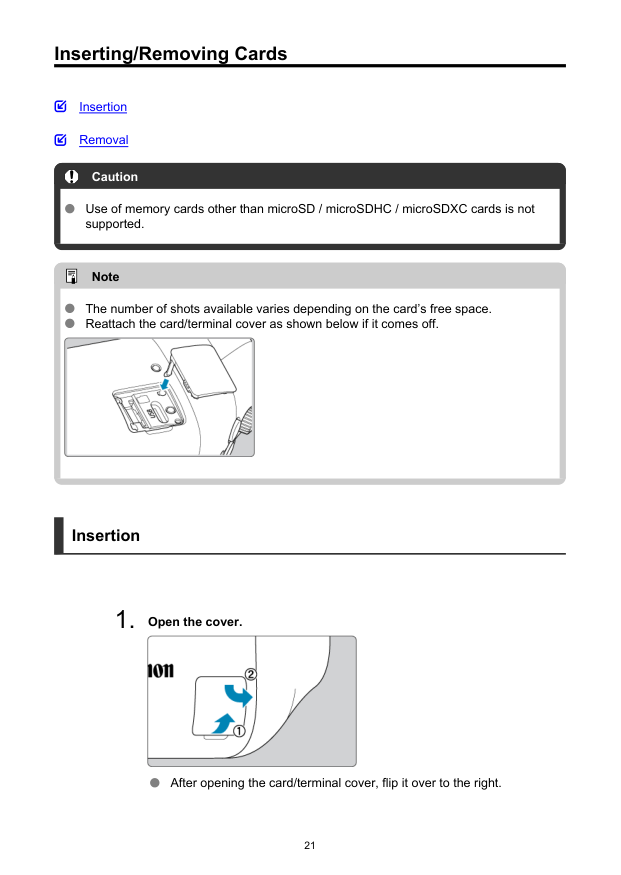
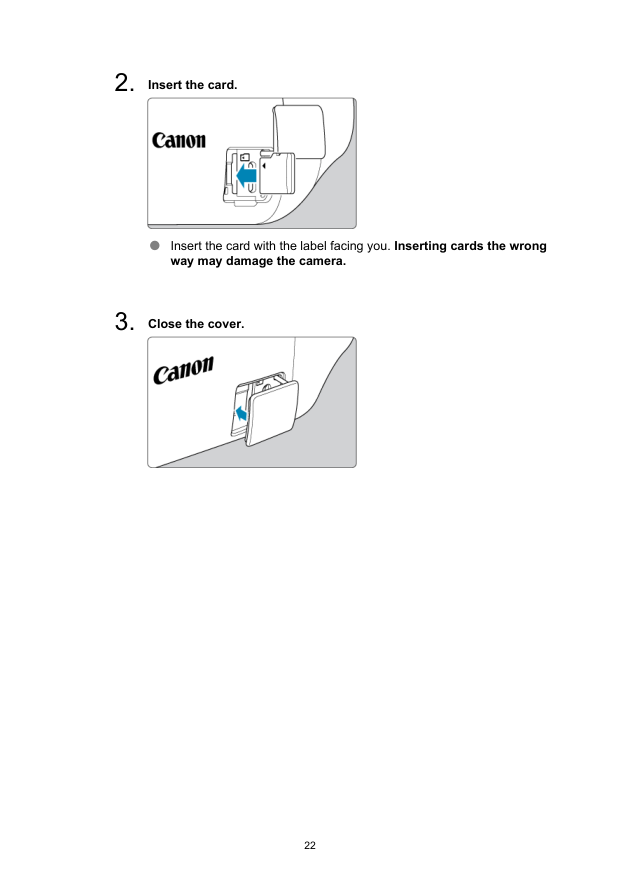
Inserting/Removing Cards Insertion Removal Caution Use of memory cards other than microSD / microSDHC / microSDXC cards is not supported. Note The number of shots available varies depending on the card’s free space. Reattach the card/terminal cover as shown below if it comes off. Insertion
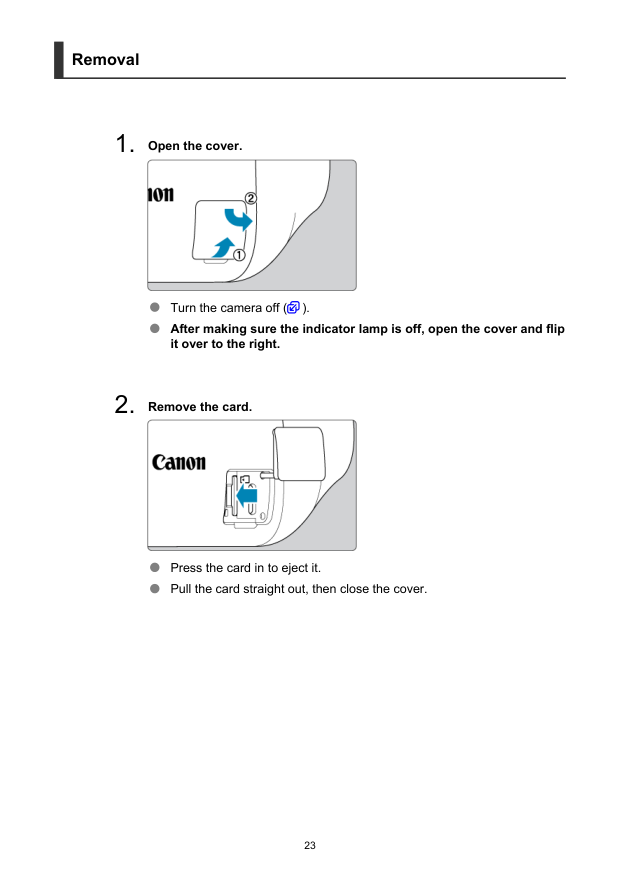
Removal

Caution A lit indicator lamp indicates that the camera is writing to, reading from, erasing from, or transferring data to the card. Do not open the card/terminal cover at this time. To avoid image data corruption and damage to cards or the camera, never do any of the following while the indicator lamp is lit.
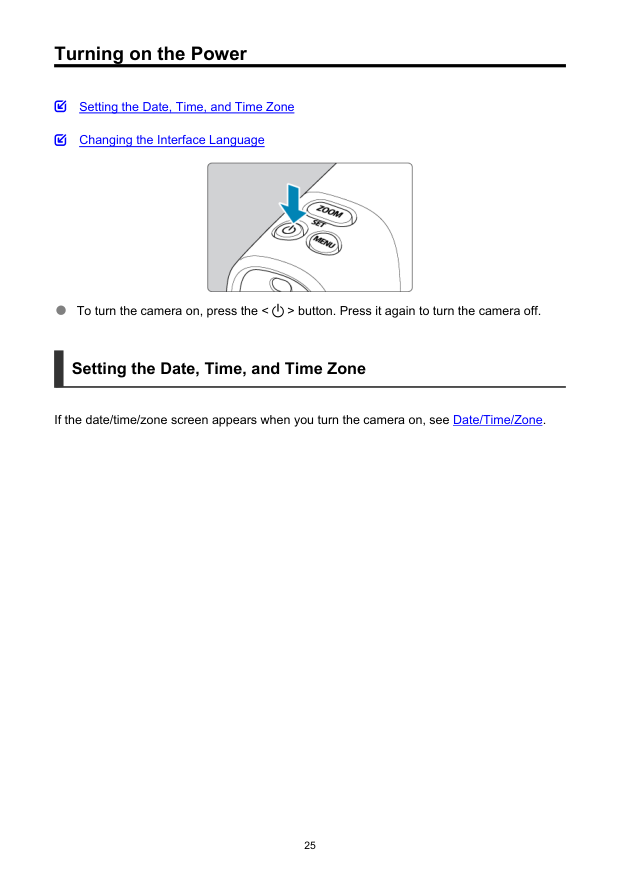
Turning on the Power Setting the Date, Time, and Time Zone Changing the Interface Language To turn the camera on, press the < > button. Press it again to turn the camera off. Setting the Date, Time, and Time Zone If the date/time/zone screen appears when you turn the camera on, see Date/Time/Zone. 25

Changing the Interface Language To change the interface language, see Language. 26

Basic Operations Adjusting the Viewfinder Holding the Camera Zoom Button Shutter Button 27

Adjusting the Viewfinder

Holding the Camera The camera can be held in a variety of ways to suit how you will use it. Wearing the Strap Place the strap around your wrist before you hold the camera. After the strap is around your wrist, keep it between your thumb and index finger in use. Holding the camera for viewing Gently hold the front of the camera. Holding the camera securely for viewing Securely hold the camera with your fingers around it. Rest your index finger lightly on the < > button. 29
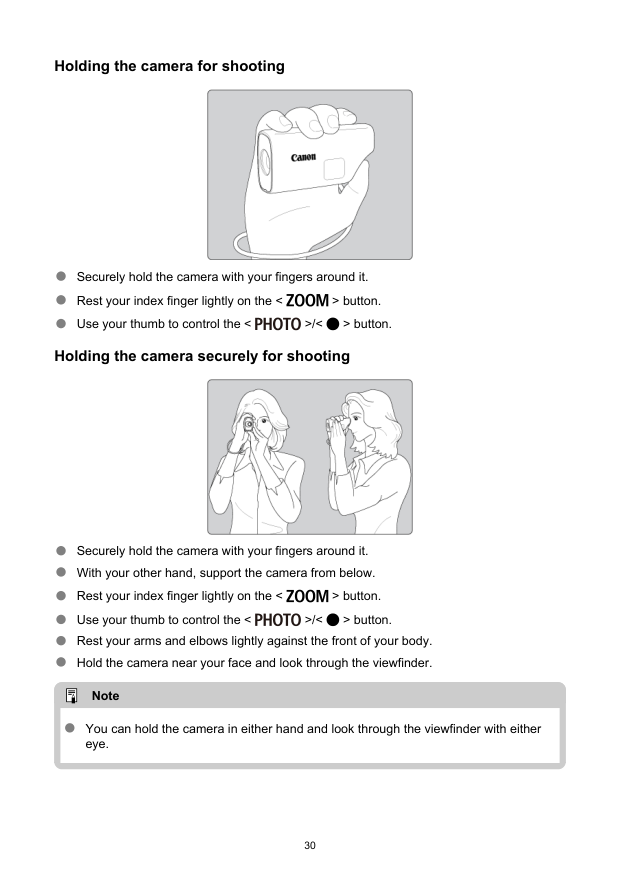
Holding the camera for shooting Securely hold the camera with your fingers around it. Rest your index finger lightly on the < > button. Use your thumb to control the < >/< > button. Holding the camera securely for shooting Securely hold the camera with your fingers around it. With your other hand, support the camera from below. Rest your index finger lightly on the < > button. Use your thumb to control the < >/< > button. Rest your arms and elbows lightly against the front of your body. Hold the camera near your face and look through the viewfinder. Note You can hold the camera in either hand and look through the viewfinder with either eye. 30

Zoom Button Each press of the < > button switches between three zoom levels. 31
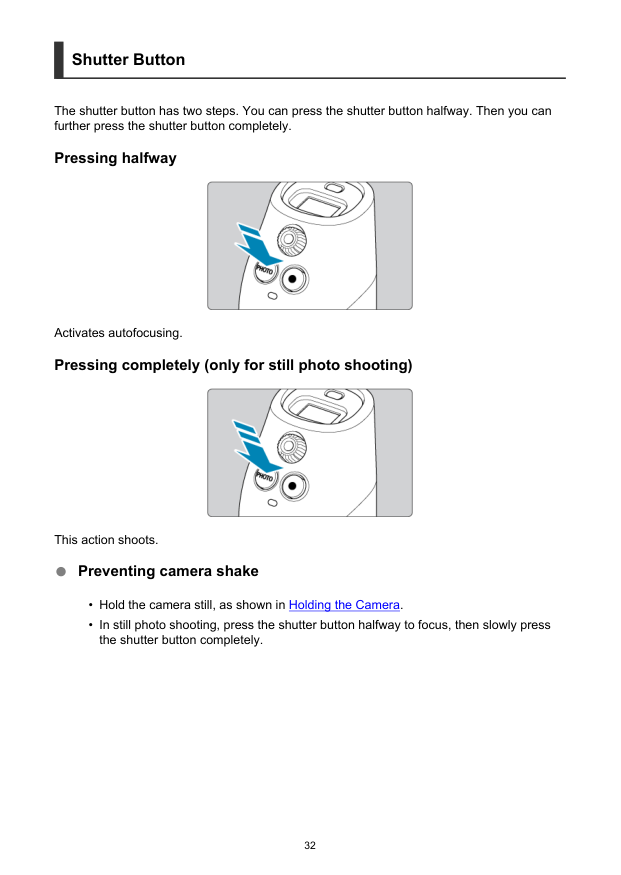
Shutter Button The shutter button has two steps. You can press the shutter button halfway. Then you can further press the shutter button completely. Pressing halfway Activates autofocusing. Pressing completely (only for still photo shooting) This action shoots. Preventing camera shake

Menu Operations and Settings Menu Screen Menu Setting Procedure 33
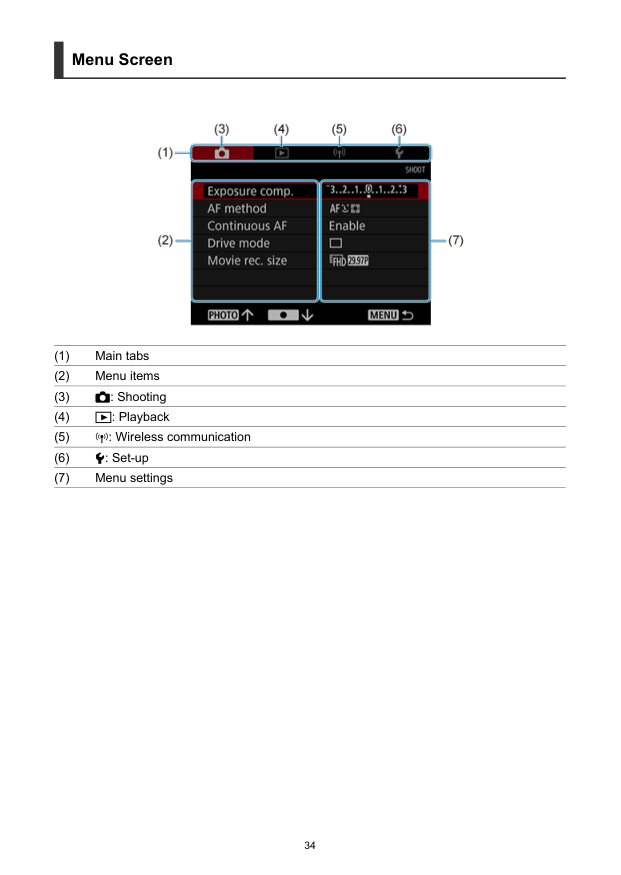
Menu Screen (1) Main tabs (2) Menu items (3)
: Shooting (4)
: Playback (5)
: Wireless communication (6) : Set-up (7) Menu settings 34
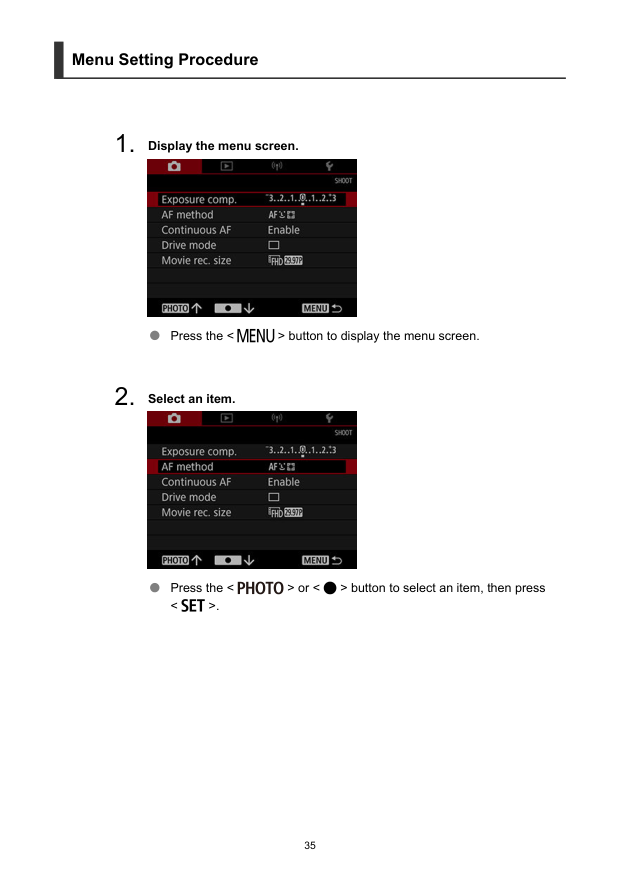
Menu Setting Procedure

Shooting and Recording This chapter describes shooting and introduces menu settings on the shooting ([ ]) tab.
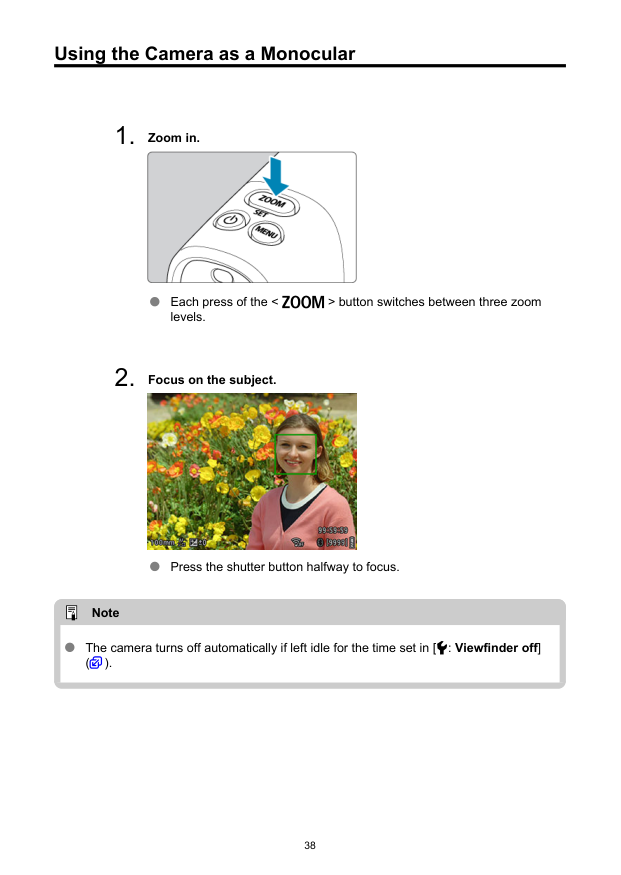
Using the Camera as a Monocular
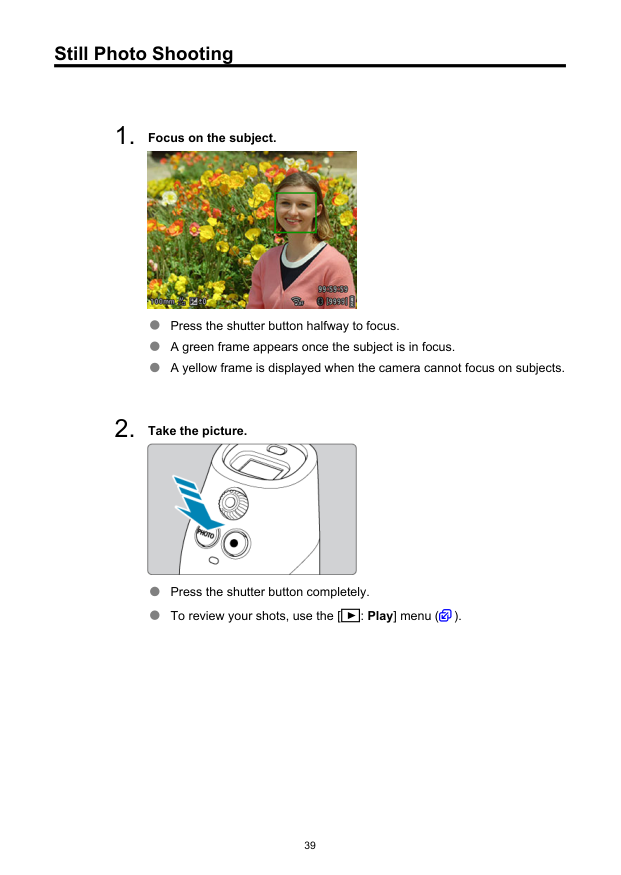
Still Photo Shooting
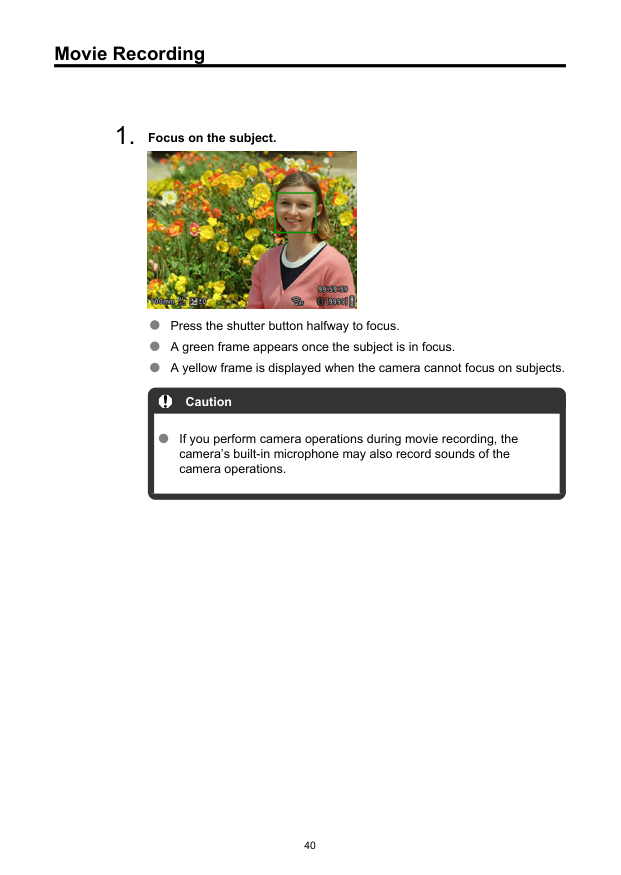
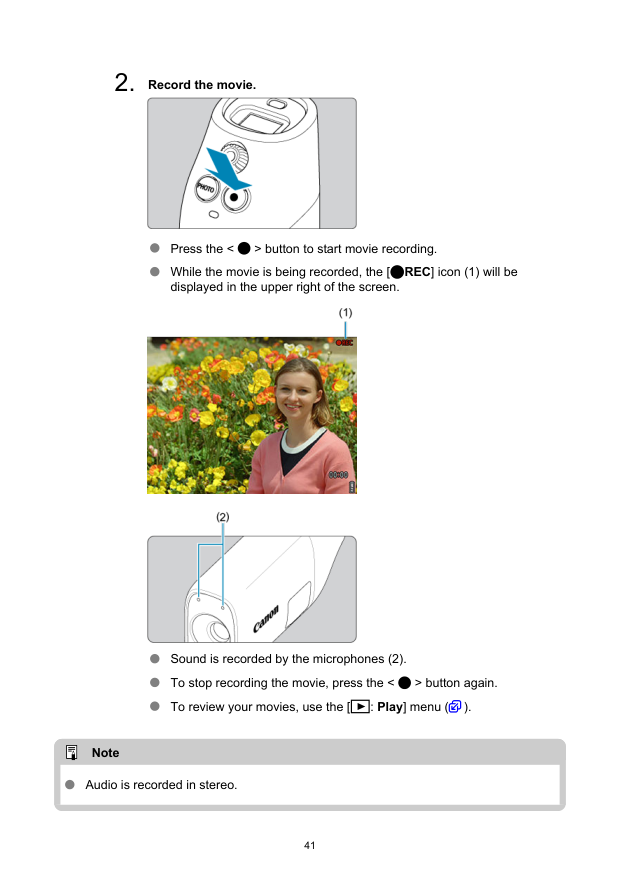
Movie Recording
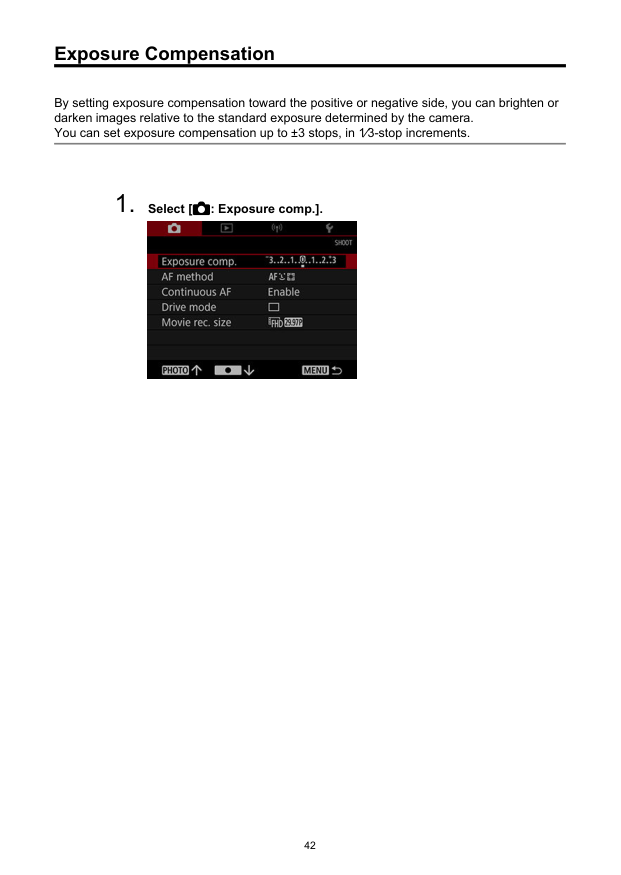
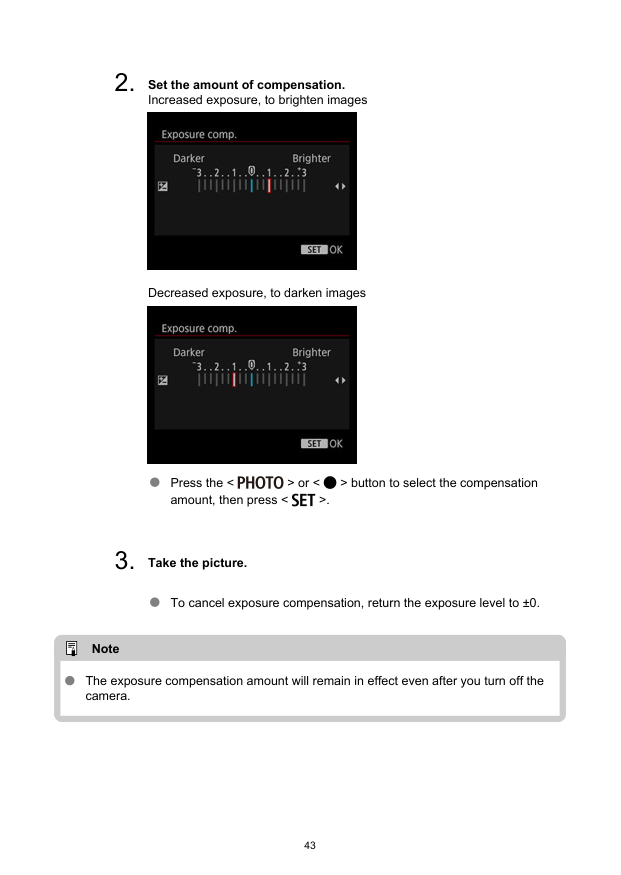
Exposure Compensation By setting exposure compensation toward the positive or negative side, you can brighten or darken images relative to the standard exposure determined by the camera. You can set exposure compensation up to ±3 stops, in 1⁄3-stop increments.
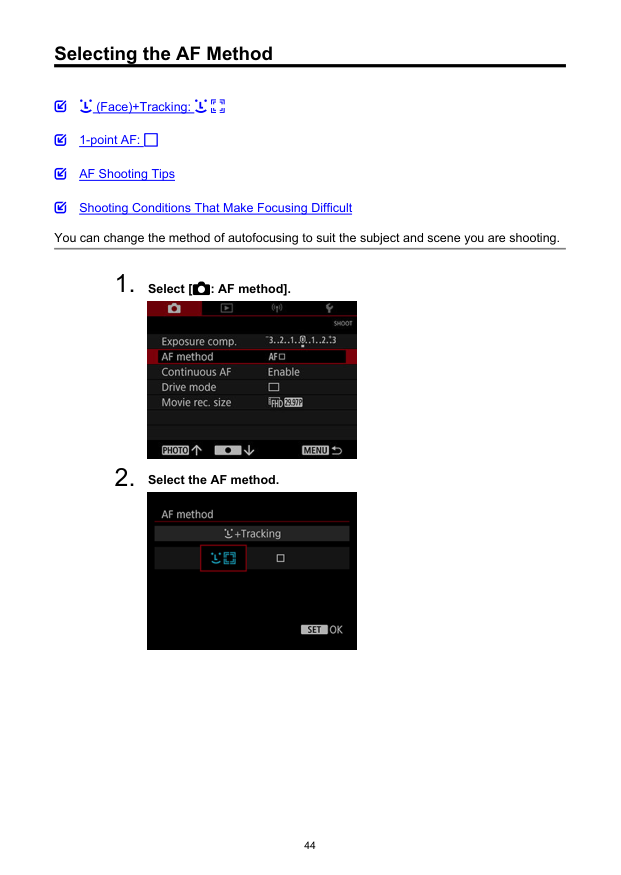
Selecting the AF Method (Face)+Tracking: 1-point AF: AF Shooting Tips Shooting Conditions That Make Focusing Difficult You can change the method of autofocusing to suit the subject and scene you are shooting.
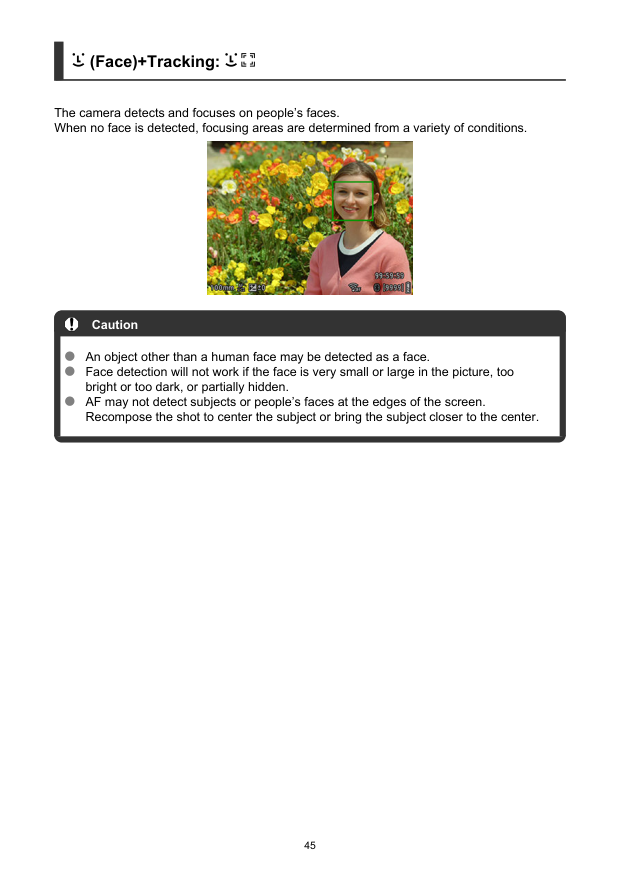
(Face)+Tracking: The camera detects and focuses on people’s faces. When no face is detected, focusing areas are determined from a variety of conditions. Caution An object other than a human face may be detected as a face. Face detection will not work if the face is very small or large in the picture, too bright or too dark, or partially hidden. AF may not detect subjects or people’s faces at the edges of the screen. Recompose the shot to center the subject or bring the subject closer to the center. 45
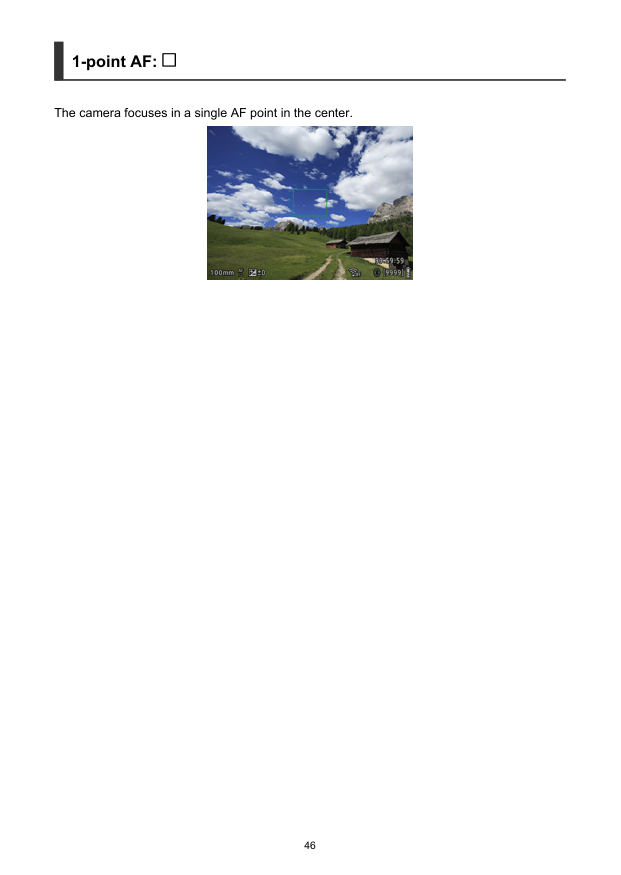
1-point AF: The camera focuses in a single AF point in the center. 46

AF Shooting Tips Even when focus is achieved, pressing the shutter button halfway will focus again. Image brightness may change during autofocusing. It may take some time to focus, depending on the subject and shooting conditions. If the light source changes as you shoot, the screen may flicker, and focusing may be difficult. In this case, restart the camera and resume shooting with AF under the light source you will use. For peripheral subjects that are slightly out of focus, try to focus again with the subject centered, then recompose the shot and shoot. 47
Shooting Conditions That Make Focusing Difficult Subjects with low contrast, such as a blue sky or flat surfaces in solid colors, or other cases when highlight or shadow details are clipped. Subjects in low light. Stripes and other patterns where there is contrast only in the horizontal direction. Subjects with repetitive patterns (Example: Skyscraper windows, computer keyboards, etc.). Fine lines and subject outlines. Under light sources with constantly changing brightness, colors, or patterns. Night scenes or points of light. The image flickers under fluorescent or LED lighting. Extremely small subjects. Subjects at the edge of the screen. Strongly backlit or reflective subjects (Example: Car with a highly reflective surfaces, etc.). Near and distant subjects covered by an AF point (Example: Animal in a cage, etc.). Subjects that keep moving within the AF point and will not stay still due to camera shake or subject blur. Performing AF when the subject is very far out of focus. Noise (dots of light, banding, etc.) appears on the screen during AF. 48
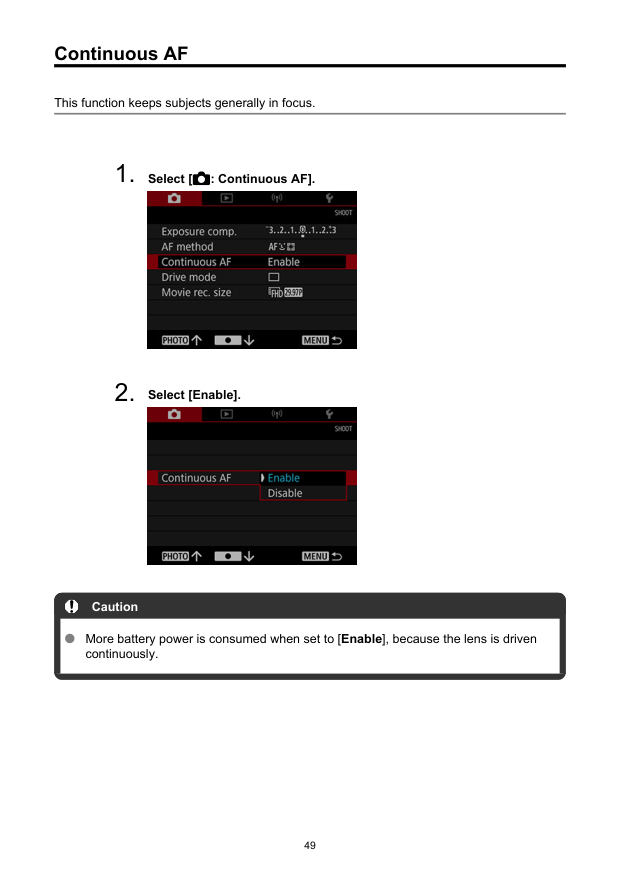
Continuous AF This function keeps subjects generally in focus.
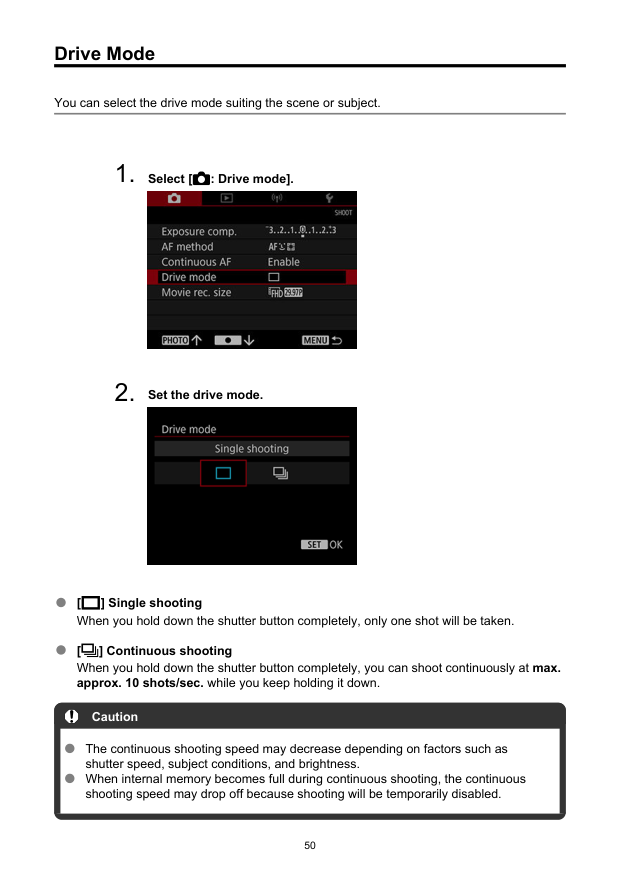
Drive Mode You can select the drive mode suiting the scene or subject.
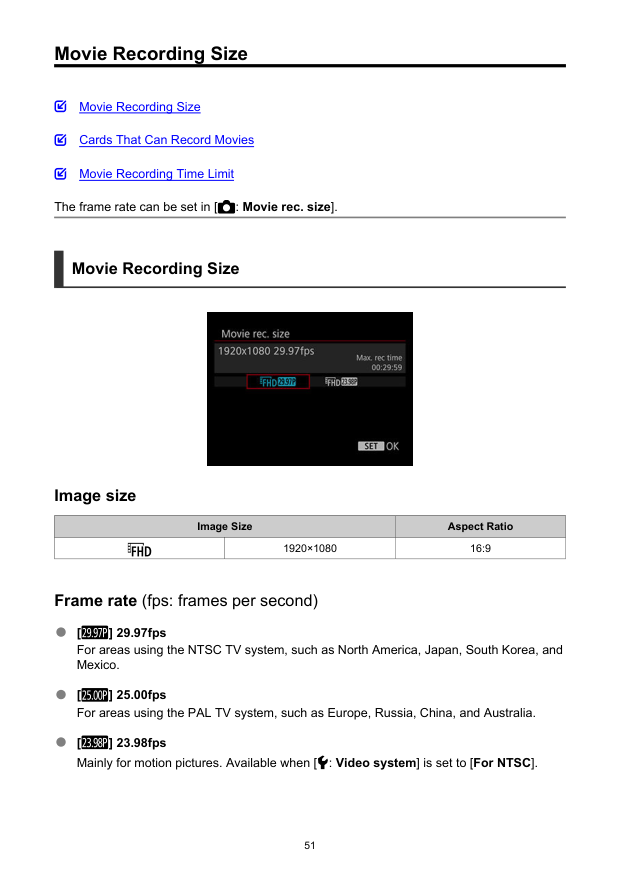
Movie Recording Size Movie Recording Size Cards That Can Record Movies Movie Recording Time Limit The frame rate can be set in [ : Movie rec. size]. Movie Recording Size Image size Image Size Aspect Ratio 1920×1080 16:9 Frame rate (fps: frames per second) [ ] 29.97fps For areas using the NTSC TV system, such as North America, Japan, South Korea, and Mexico. [ ] 25.00fps For areas using the PAL TV system, such as Europe, Russia, China, and Australia. [ ] 23.98fps Mainly for motion pictures. Available when [ : Video system] is set to [For NTSC]. 51
Cards That Can Record Movies See Card performance requirements (movie recording) for details on cards that can record at each level of movie recording quality. Test cards by recording a few movies to make sure they can record correctly. Caution If you use a slow-writing card when recording movies, the movie may not be recorded properly. Also, if you play back a movie on a card with a slow reading speed, the movie may not be played back properly. When recording movies, use high-performance cards with a writing speed sufficiently higher than the bit rate. When movies cannot be recorded correctly, format the card and try again. If formatting the card does not resolve the problem, refer to the card manufacturer’s website, etc. 52

Movie Recording Time Limit The maximum recording time per movie is 9 min. 59 sec. Once 9 min. 59 sec. is reached, recording automatically stops. You can start recording a movie again by pressing the < > button (which records the movie as a new file). 53

Playback This chapter covers topics related to playback—playing back captured still photos and movies—and introduces menu settings on the Playback ([ ]) tab. Caution Normal display or selection on this camera may not be possible for images captured on other cameras, or images from this camera that have been edited or renamed on a computer.
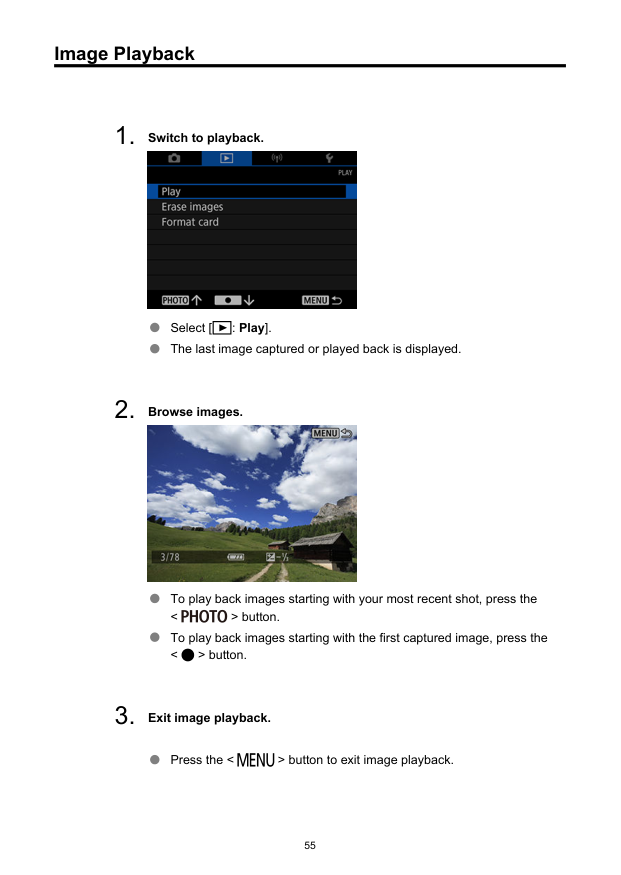
Image Playback
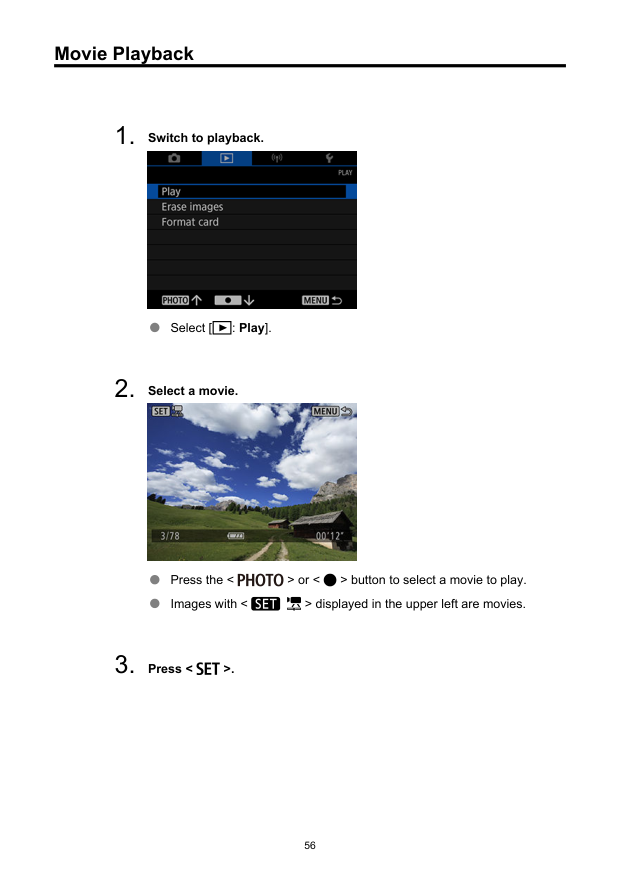
Movie Playback
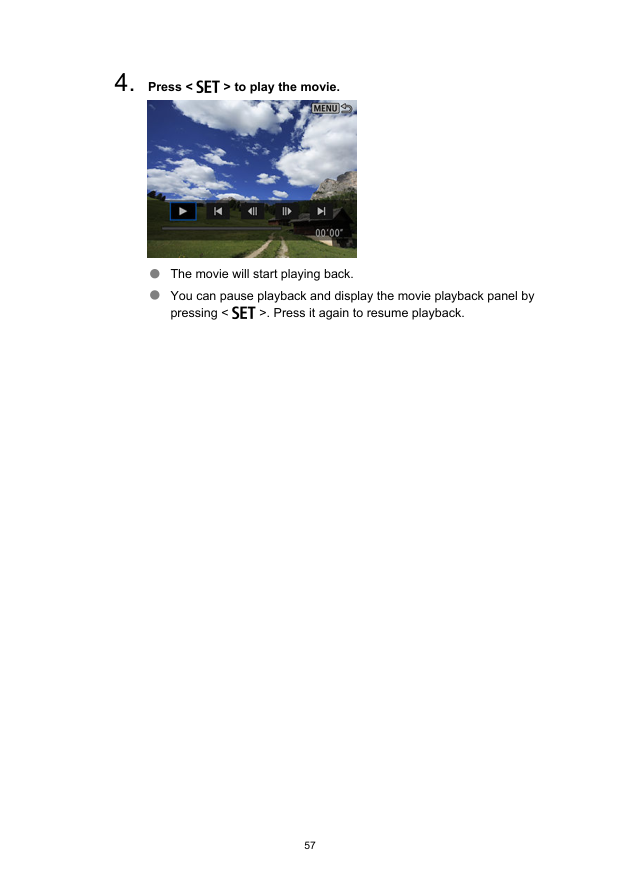
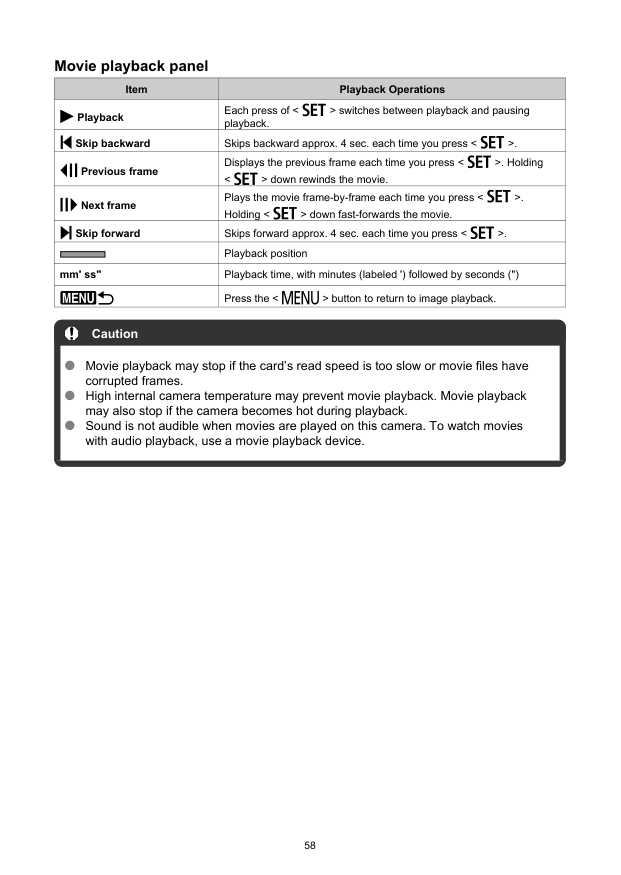
Movie playback panel Item Playback Operations Playback Each press of < > switches between playback and pausing playback. Skip backward Skips backward approx. 4 sec. each time you press < >. Previous frame Displays the previous frame each time you press < >. Holding < > down rewinds the movie. Next frame Plays the movie frame-by-frame each time you press < >. Holding < > down fast-forwards the movie. Skip forward Skips forward approx. 4 sec. each time you press < >. Playback position mm' ss" Playback time, with minutes (labeled ') followed by seconds (") Press the < > button to return to image playback. Caution Movie playback may stop if the card’s read speed is too slow or movie files have corrupted frames. High internal camera temperature may prevent movie playback. Movie playback may also stop if the camera becomes hot during playback. Sound is not audible when movies are played on this camera. To watch movies with audio playback, use a movie playback device. 58
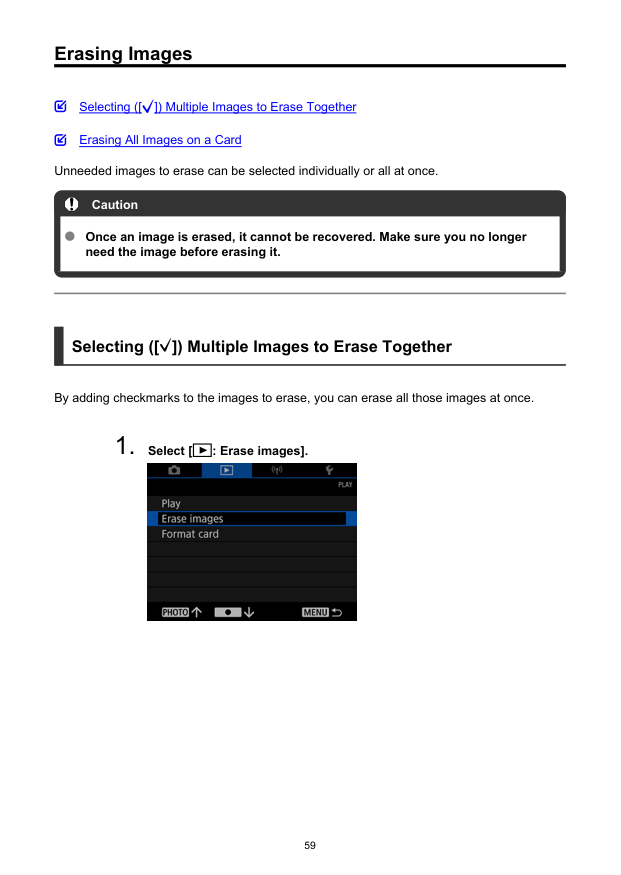
Erasing Images Selecting ([ ]) Multiple Images to Erase Together Erasing All Images on a Card Unneeded images to erase can be selected individually or all at once. Caution Once an image is erased, it cannot be recovered. Make sure you no longer need the image before erasing it. Selecting ([ ]) Multiple Images to Erase Together By adding checkmarks to the images to erase, you can erase all those images at once.
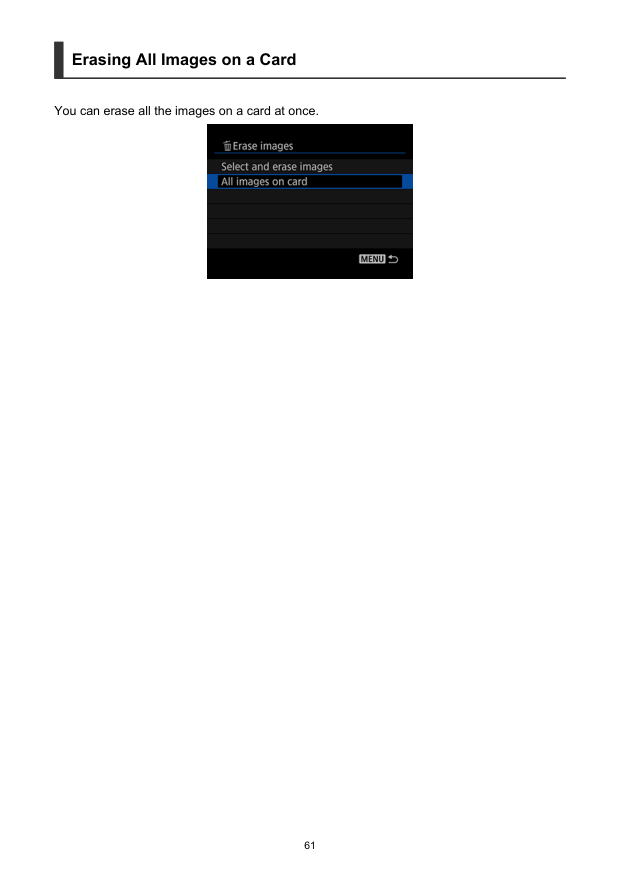
Erasing All Images on a Card You can erase all the images on a card at once. 61
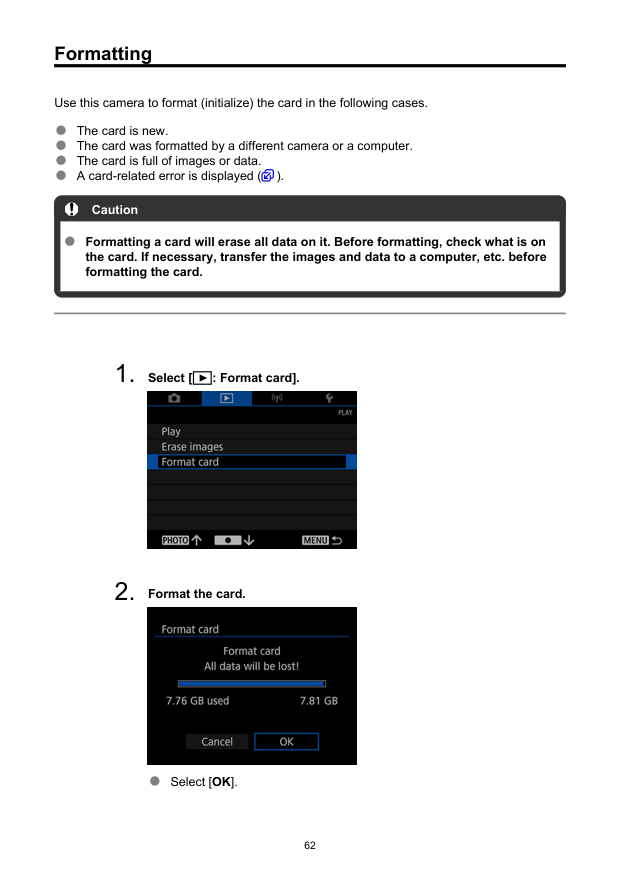
Formatting Use this camera to format (initialize) the card in the following cases. The card is new. The card was formatted by a different camera or a computer. The card is full of images or data. A card-related error is displayed ( ). Caution Formatting a card will erase all data on it. Before formatting, check what is on the card. If necessary, transfer the images and data to a computer, etc. before formatting the card.
Card file formats microSD cards will be formatted in FAT12/16, microSDHC cards in FAT32, and microSDXC in exFAT. Caution It may not be possible to use microSDXC cards formatted with this camera in other cameras. Also note that exFAT-formatted cards may not be recognized by some computer operating systems or card readers. Formatting or erasing data on a card does not completely erase the data. Be aware of this when selling or discarding the card. When disposing of cards, take steps to protect personal information if necessary, as by physically destroying cards. Note The card capacity displayed on the card format screen may be smaller than the capacity indicated on the card. This device incorporates exFAT technology licensed from Microsoft. 63
Wireless Features This chapter describes how communication functions are used to connect the camera to a smartphone or tablet (hereafter, collectively referred to as “smartphones”) over Wi-Fi and send images, control the camera remotely, or perform other operations. Caution Over Wi-Fi, this camera can only connect to smartphones. Caution Important Note that Canon cannot be held liable for any loss or damage caused by erroneous network settings when using the camera. In addition, Canon cannot be held liable for any other loss or damage caused by use of the camera. Take security measures that you deem necessary when using a network, at your discretion. Canon cannot be held liable for any loss or damage caused by unauthorized access or other security breaches.

What You Can Do Wirelessly You can use a smartphone to browse images on the camera and save them to the smartphone. You can control the camera remotely from a smartphone. You can use smartphone GPS features to geotag images. 65
Camera Connect Communication from Smartphones Installing Camera Connect on Smartphones Connecting to a Bluetooth-compatible Smartphone via Wi-Fi Camera Connect Functions Canceling the Pairing Wi-Fi Connection Without Using Bluetooth General Precautions on Camera Connect Communication from Smartphones Installing Camera Connect on Smartphones The dedicated app Camera Connect (free of charge) must be installed on the smartphone on which Android or iOS is installed. Camera Connect can be installed from Google Play or App Store. You can also access Google Play or the App Store from a QR code in the Instruction Manual included with the camera. Note For the operating system versions supported by Camera Connect, refer to the download site of Camera Connect. Sample screens and other details in this guide may not match the actual user interface elements after camera firmware updates or updates to Camera Connect, Android, or iOS. 66
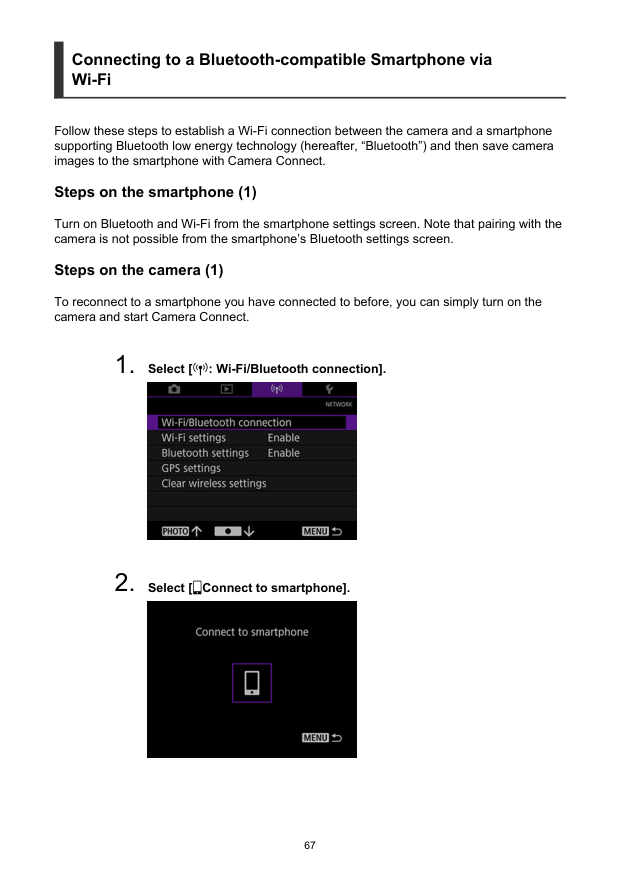
Connecting to a Bluetooth-compatible Smartphone via Wi-Fi Follow these steps to establish a Wi-Fi connection between the camera and a smartphone supporting Bluetooth low energy technology (hereafter, “Bluetooth”) and then save camera images to the smartphone with Camera Connect. Steps on the smartphone (1) Turn on Bluetooth and Wi-Fi from the smartphone settings screen. Note that pairing with the camera is not possible from the smartphone’s Bluetooth settings screen. Steps on the camera (1) To reconnect to a smartphone you have connected to before, you can simply turn on the camera and start Camera Connect.

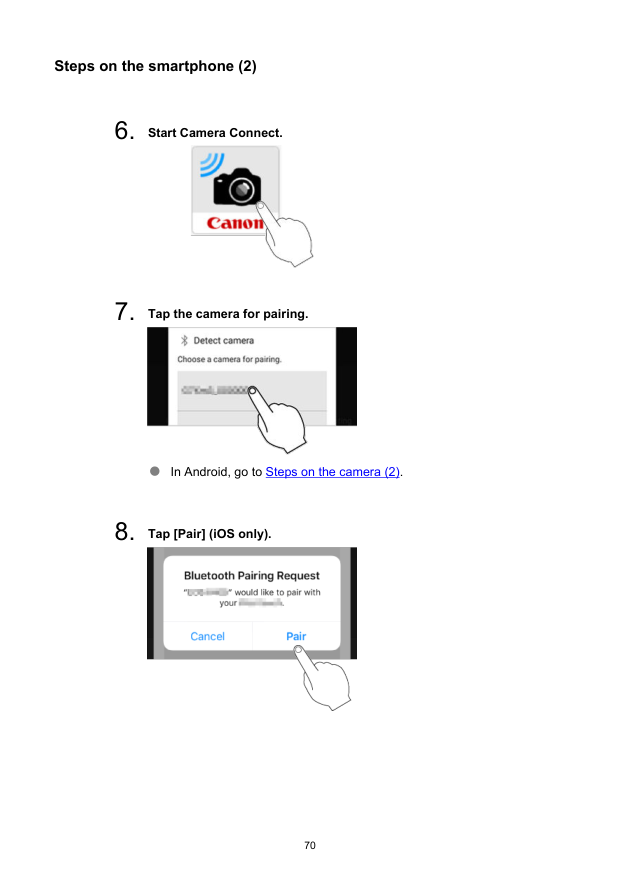
Steps on the smartphone (2)
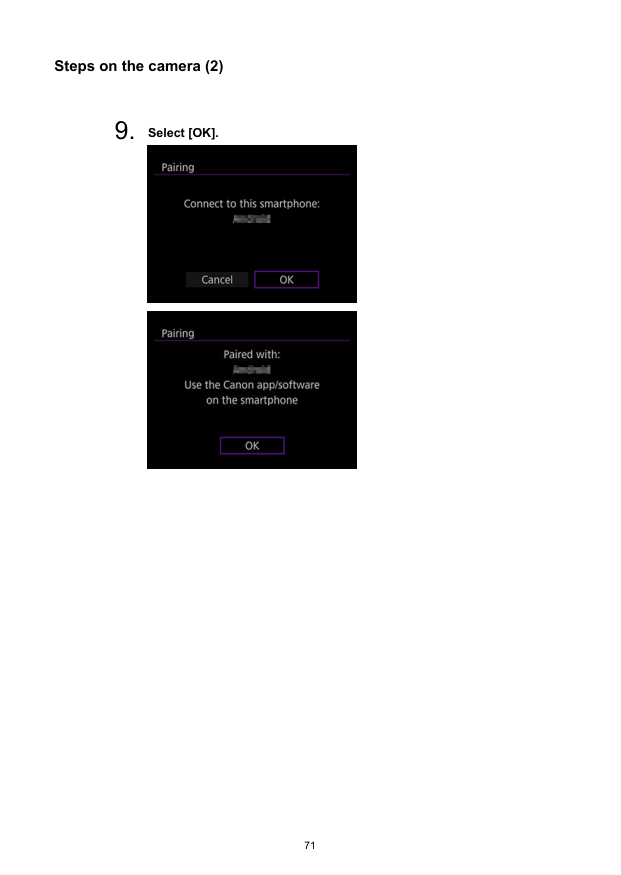
Steps on the camera (2)

Steps on the smartphone (3)
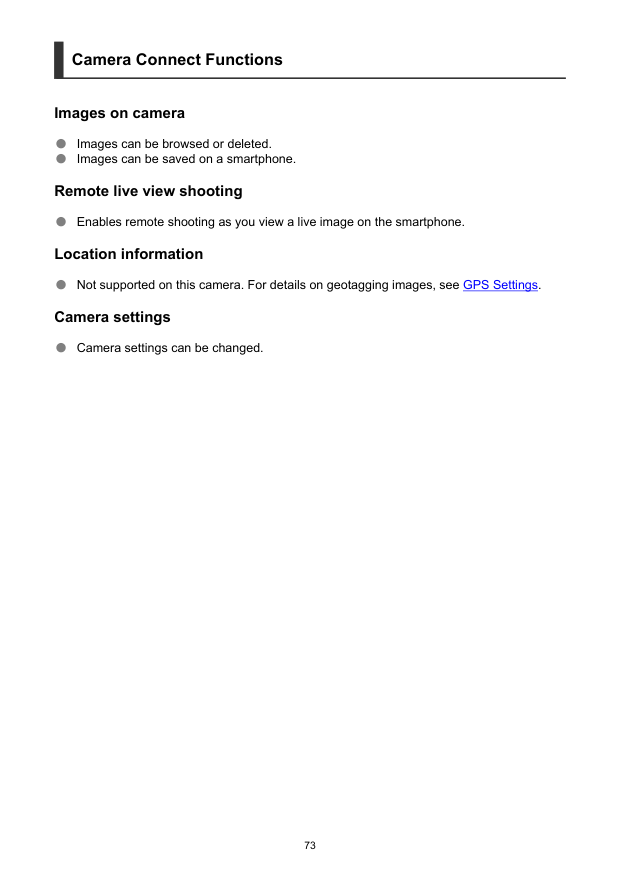
Camera Connect Functions Images on camera Images can be browsed or deleted. Images can be saved on a smartphone. Remote live view shooting Enables remote shooting as you view a live image on the smartphone. Location information Not supported on this camera. For details on geotagging images, see GPS Settings. Camera settings Camera settings can be changed. 73
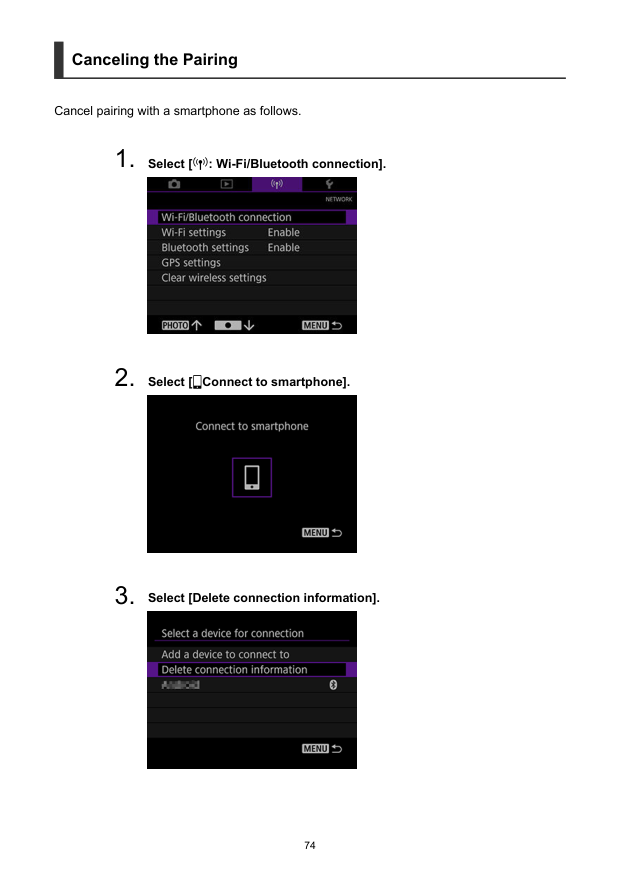
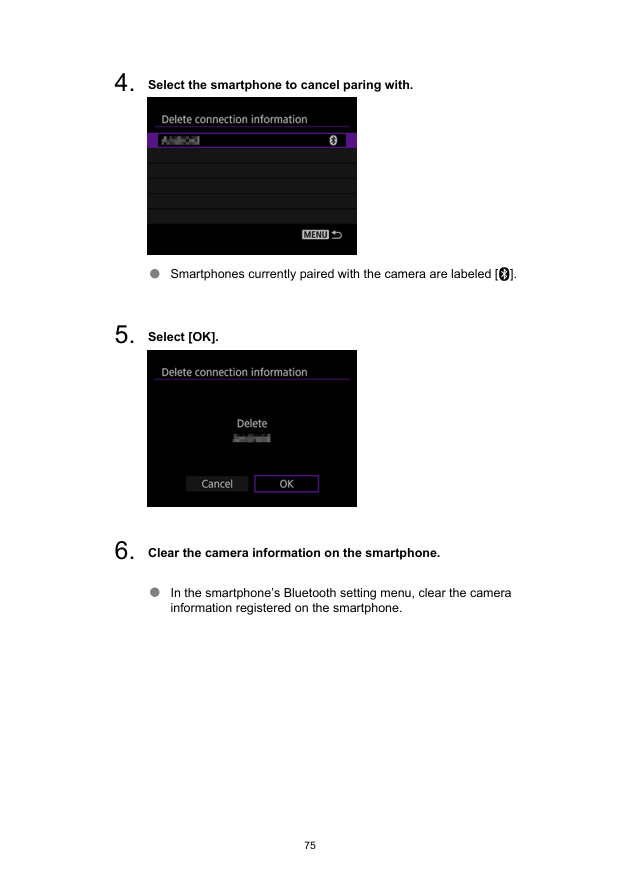
Canceling the Pairing Cancel pairing with a smartphone as follows.
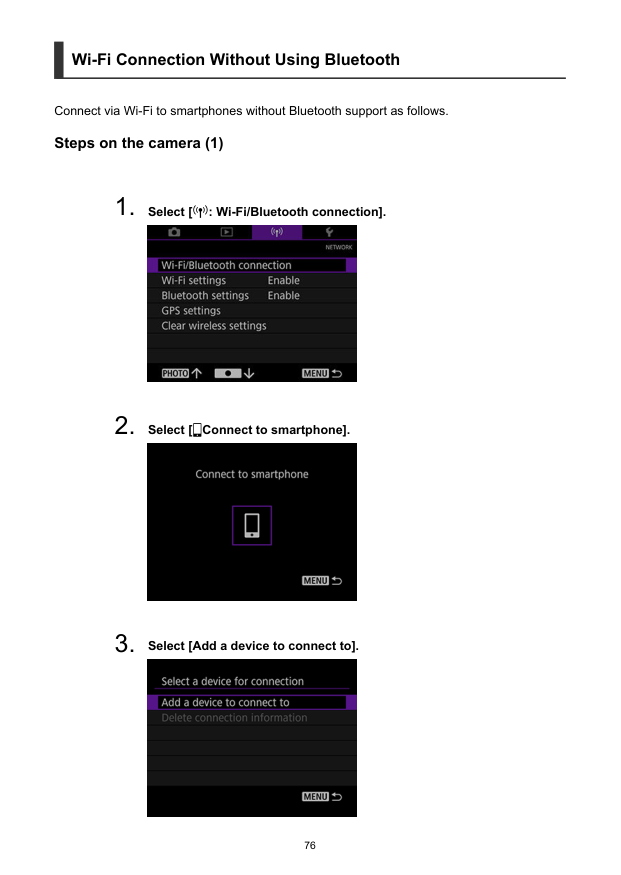
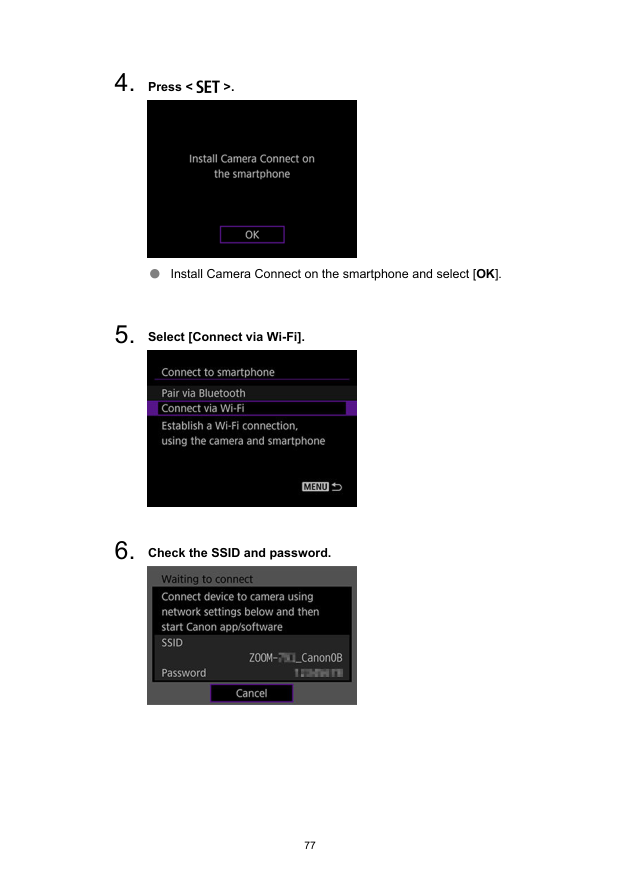
Wi-Fi Connection Without Using Bluetooth Connect via Wi-Fi to smartphones without Bluetooth support as follows. Steps on the camera (1)
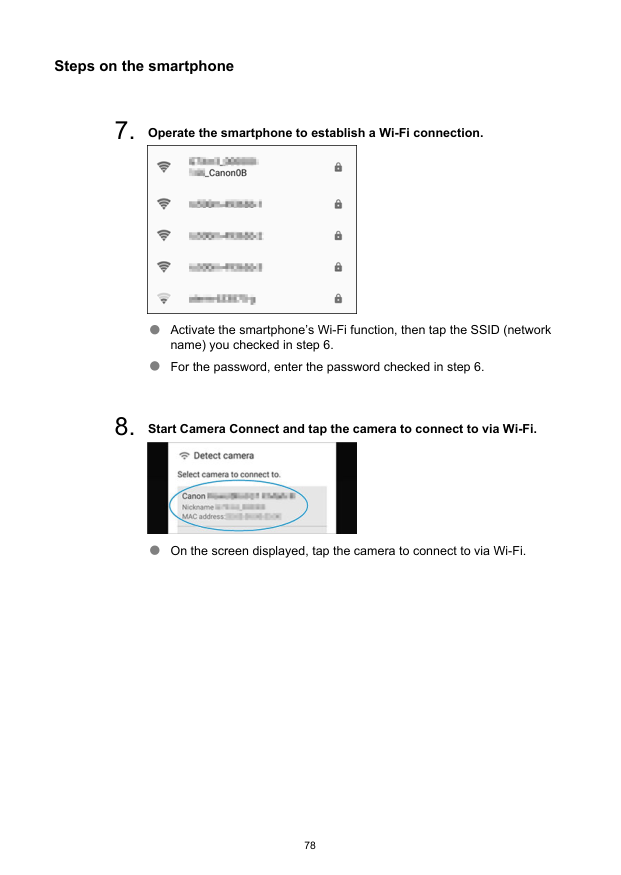
Steps on the smartphone

Steps on the camera (2)

General Precautions on Camera Connect Communication from Smartphones Caution Some functions are not available while connected via Wi-Fi. In remote shooting, the AF speed may become slower. Depending on the communication status, image display or shutter release timing may be delayed. Note With a Wi-Fi connection established, disabling the smartphone’s power saving function is recommended. 80
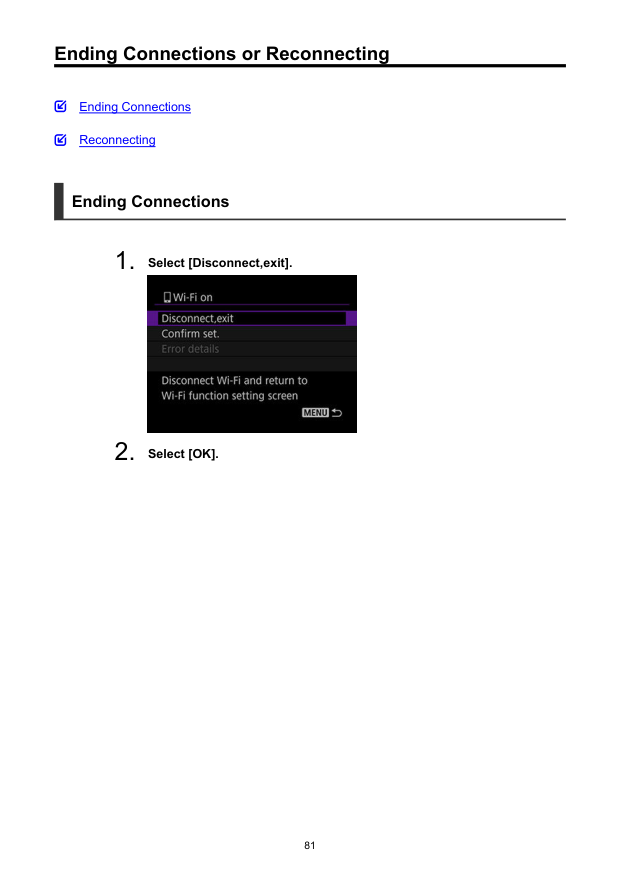
Ending Connections or Reconnecting Ending Connections Reconnecting Ending Connections
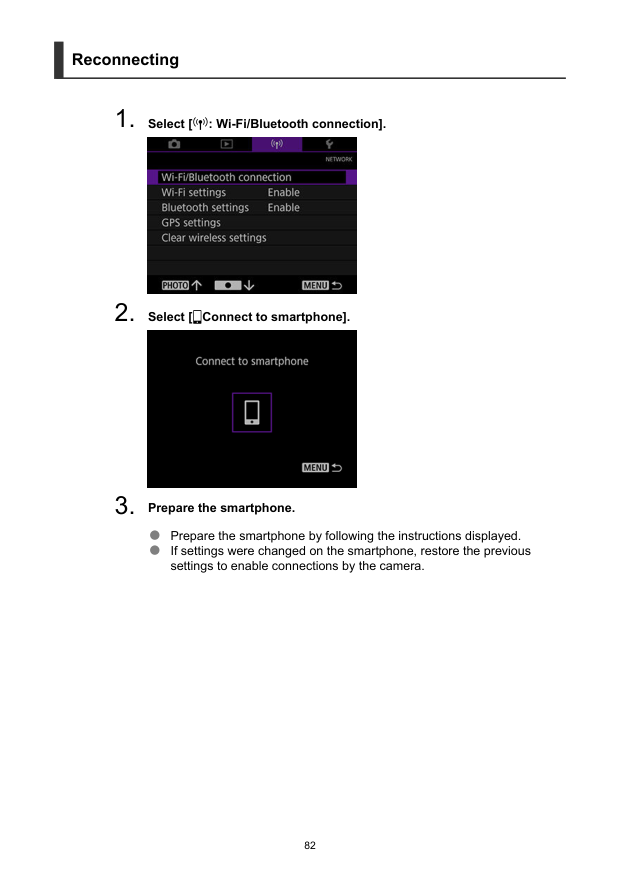
Reconnecting
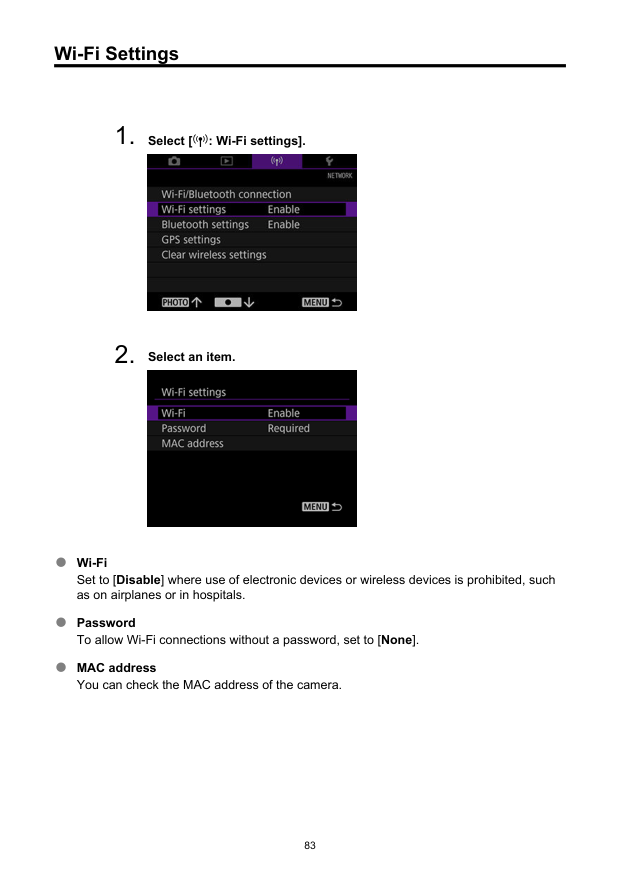
Wi-Fi Settings
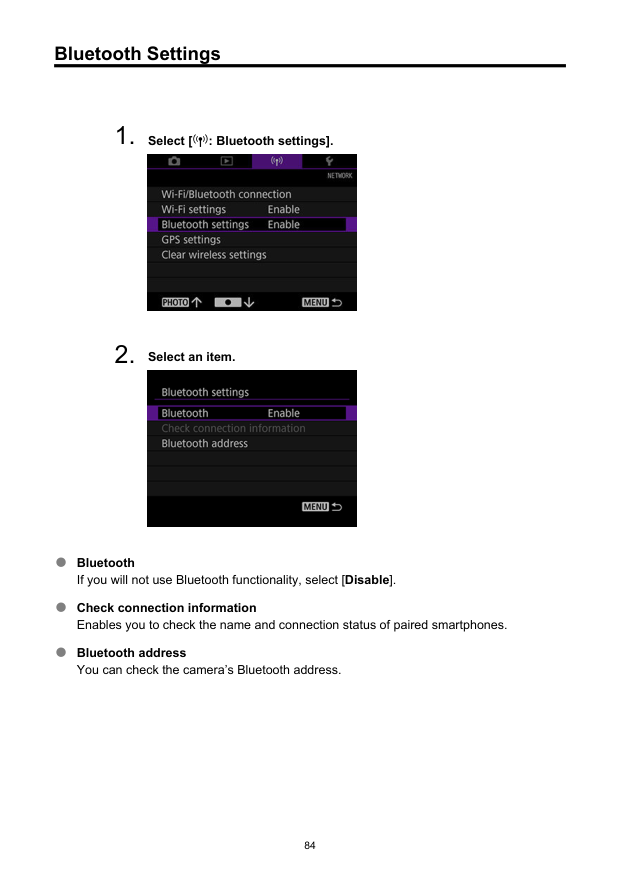
Bluetooth Settings
GPS Features GPS Settings Your shots can be geotagged using GPS information (such as latitude, longitude, and elevation) from a smartphone paired via Bluetooth. On the smartphone, activate location services. Caution Elevation is not as accurate as latitude or longitude, due to the nature of GPS. Shots may not be geotagged immediately after the camera is turned on. Countries/regions permitting use of GPS functions Use of GPS features is restricted in some countries and regions, and illegal use may be punishable under national or local regulations. To avoid violating GPS regulations, visit the Canon website to check where use is allowed. Note that Canon cannot be held liable for any problems arising from use of GPS functions in other countries and regions.
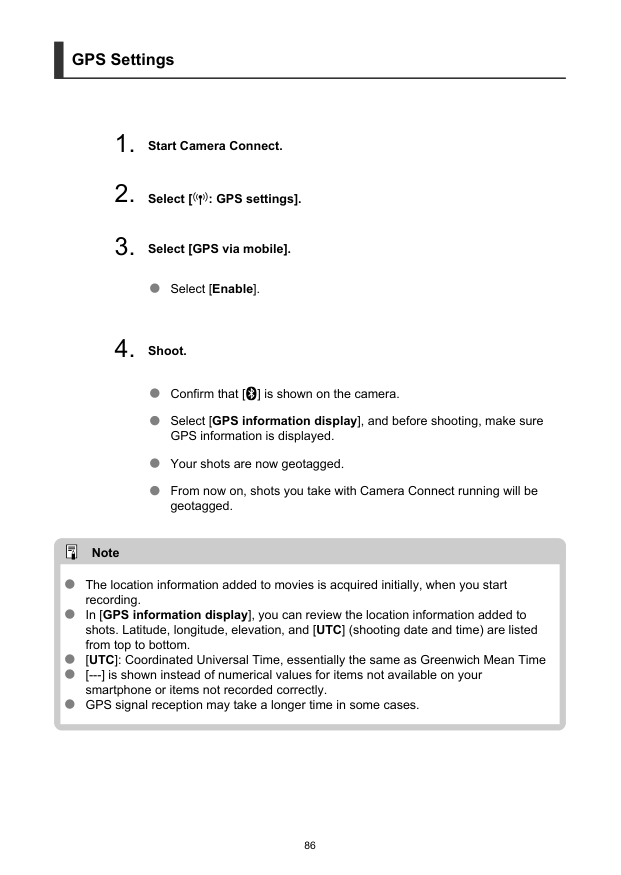
GPS Settings

Troubleshooting Responding to Error Messages Communication Function Precautions Security Responding to Error Messages Resolve any errors displayed in the viewfinder by referring to these examples of corrective actions. 11 12 87

11: Connection target not found Is Camera Connect running?
Communication Function Precautions In case of slower transmission, lost connections, choppy image display, or other problems when using communication functions, try the following corrective actions. If the wireless LAN transmission rate drops due to interference from the following electronic devices, stop using them or establish a connection away from them. In IEEE 802.11b/g/n wireless networks, the camera communicates on the 2.4 GHz band. For this reason, the wireless LAN transmission rate may drop if there are nearby Bluetooth devices, microwave ovens, cordless telephones, microphones, smartphones, or similar devices operating on the same frequency band. 89
Security If security settings have not been properly set, the following problems may occur. Transmission monitoring Third parties with malicious intent may monitor wireless LAN transmissions and attempt to acquire the data you are sending. Unauthorized network access Third parties with malicious intent may gain unauthorized access to the network you are using to steal, modify, or destroy information. Additionally, you could fall victim to other types of unauthorized access such as impersonation (where someone assumes an identity to gain access to unauthorized information) or springboard attacks (where someone gains unauthorized access to your network as a springboard to cover their tracks when infiltrating other systems). It is recommended to make use of the systems and functions to thoroughly secure your network, preventing these types of problems from occurring. 90
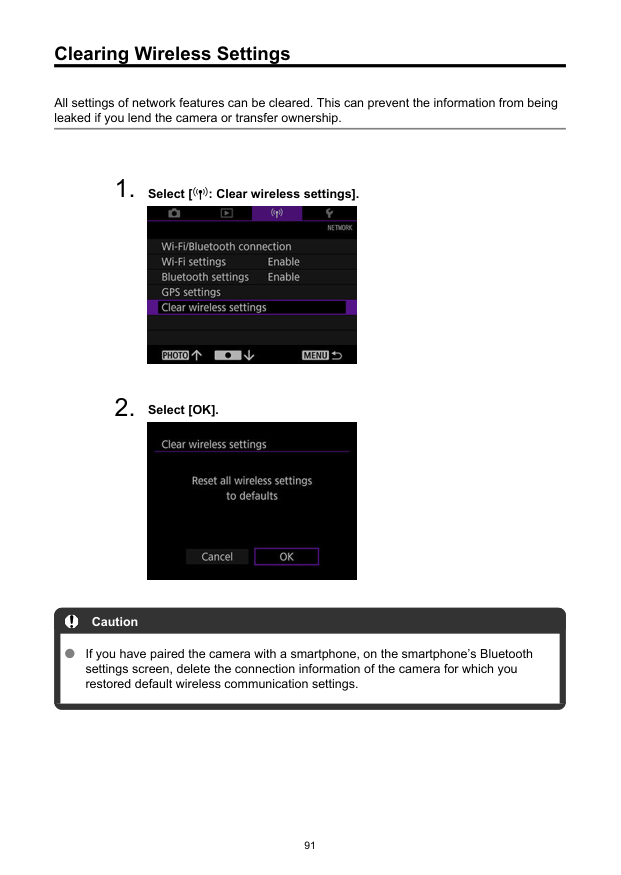
Clearing Wireless Settings All settings of network features can be cleared. This can prevent the information from being leaked if you lend the camera or transfer ownership.

Set-up This chapter describes menu settings on the set-up ([ : Set-up]) tab.
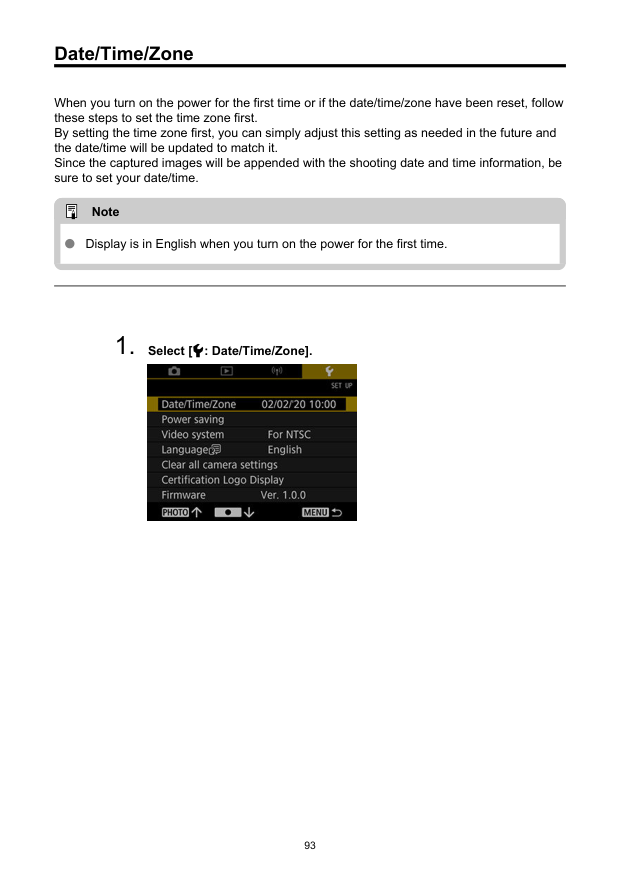
Date/Time/Zone When you turn on the power for the first time or if the date/time/zone have been reset, follow these steps to set the time zone first. By setting the time zone first, you can simply adjust this setting as needed in the future and the date/time will be updated to match it. Since the captured images will be appended with the shooting date and time information, be sure to set your date/time. Note Display is in English when you turn on the power for the first time.
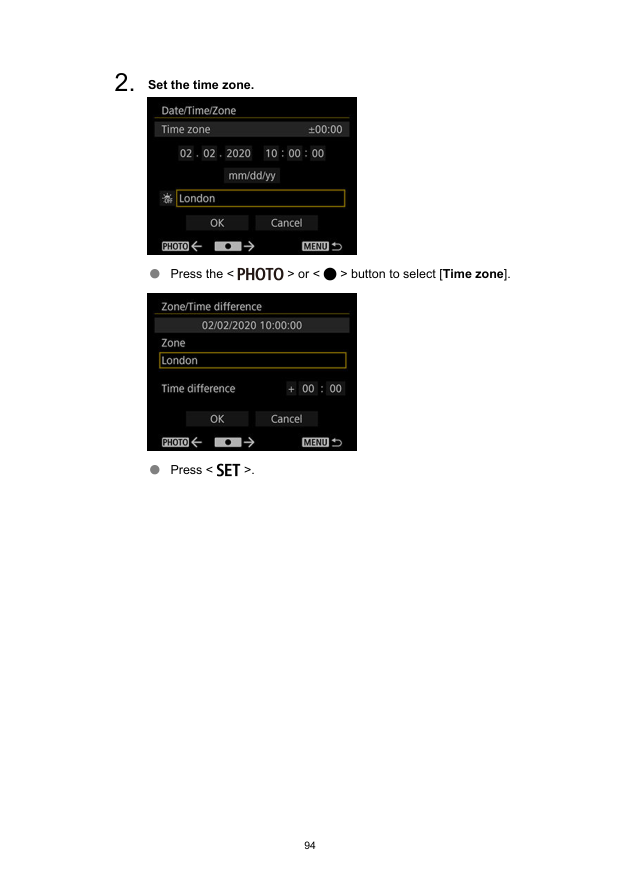

Press the < > or < > button to select the time zone, then press < >. If your time zone is not listed, press the < > button, then set the difference from UTC in [Time difference]. Press the < > or < > button to select a [Time difference] item (+ or –, hours, or minutes), then press < >. Press the < > or < > button to set it, then press < >. After entering the time zone or time difference, press the < > or < > button to select [OK], then press < >. 95
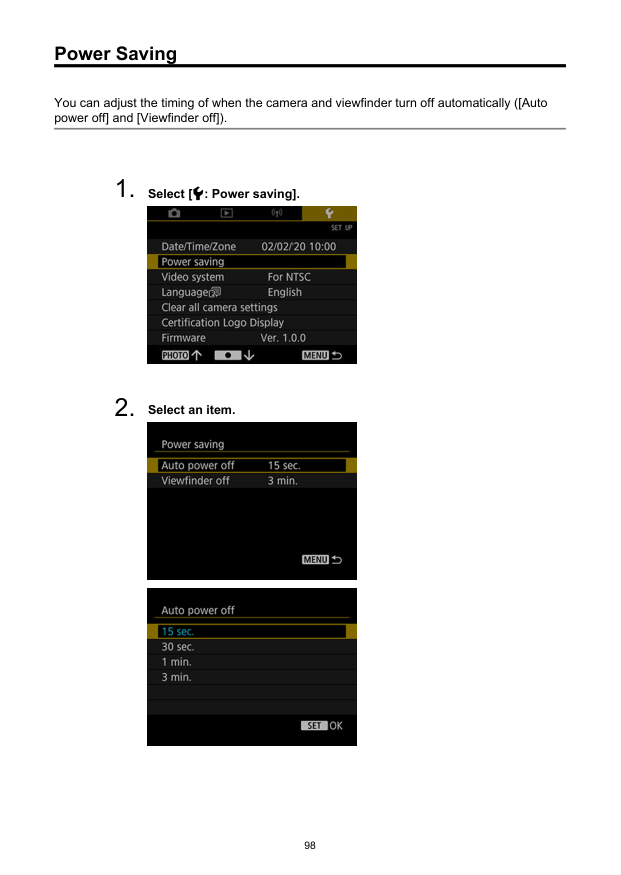
Power Saving You can adjust the timing of when the camera and viewfinder turn off automatically ([Auto power off] and [Viewfinder off]).

Note To conserve battery power, you should normally set [Auto power off] to 15 sec. Pressing any button before the [Viewfinder off] timer expires will reset the timer. Power saving settings do not apply during shooting, movie playback, or wireless connections. 99
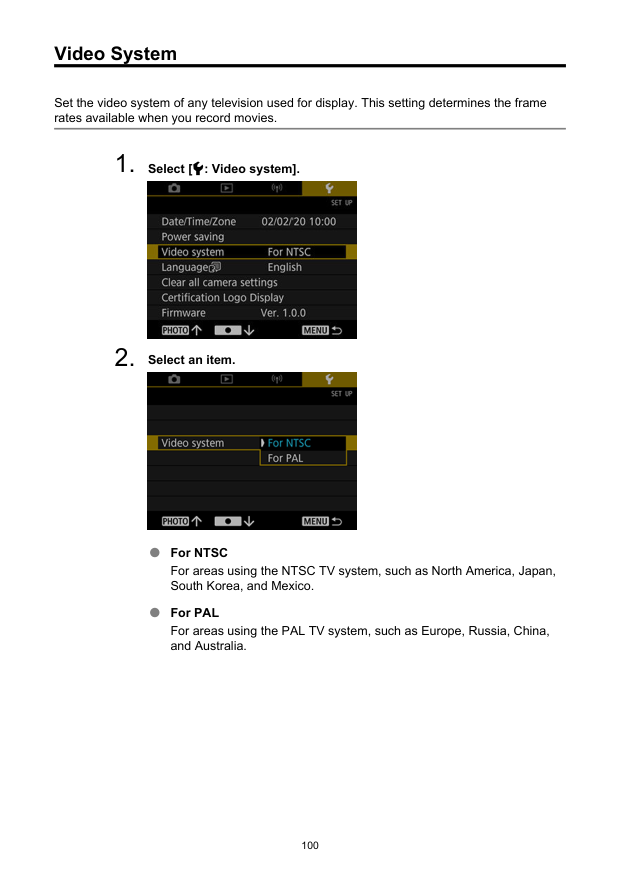
Video System Set the video system of any television used for display. This setting determines the frame rates available when you record movies.
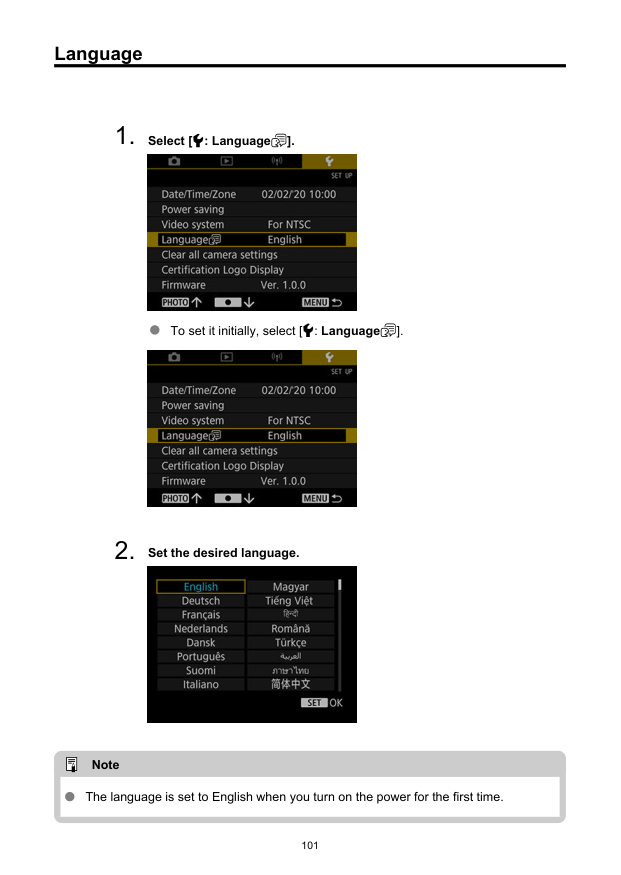
Language
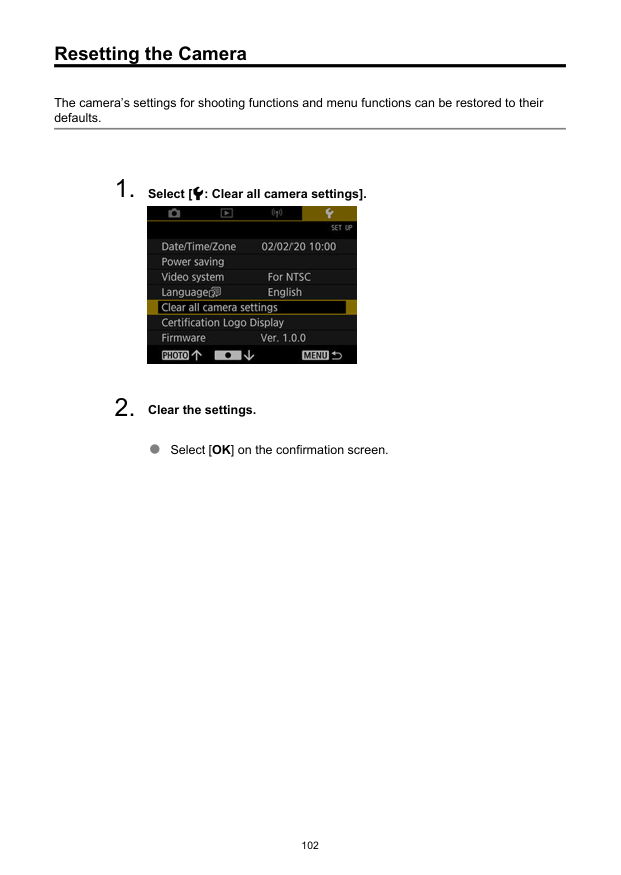
Resetting the Camera The camera’s settings for shooting functions and menu functions can be restored to their defaults.
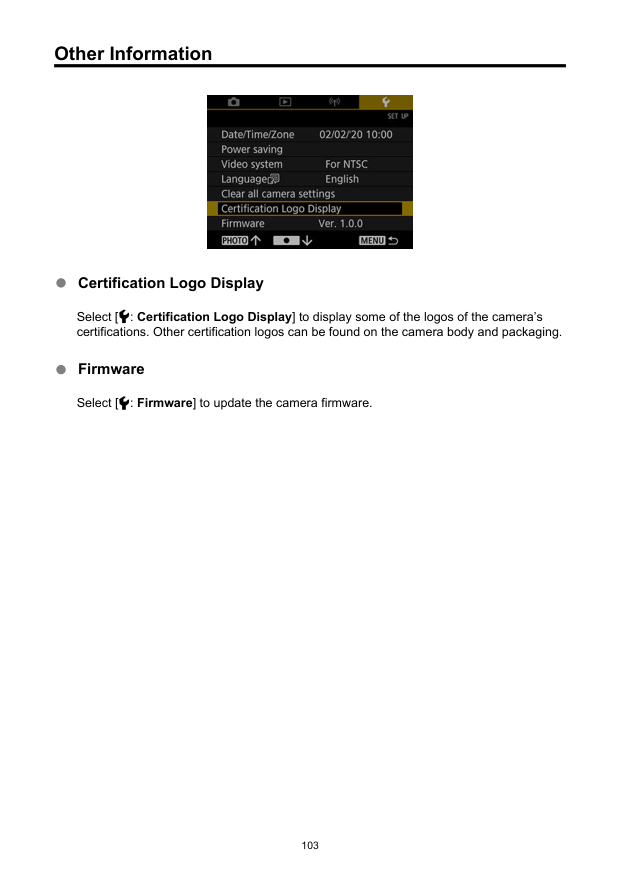
Other Information Certification Logo Display Select [ : Certification Logo Display] to display some of the logos of the camera’s certifications. Other certification logos can be found on the camera body and packaging. Firmware Select [ : Firmware] to update the camera firmware. 103

Reference This chapter provides reference information on camera features.
Troubleshooting Guide Power-related problems Shooting-related problems Problems with wireless features Operation problems Display problems Playback problems If a problem occurs with the camera, first refer to this Troubleshooting Guide. If this Troubleshooting Guide does not resolve the problem, contact your dealer or nearest Canon Service Center. Power-related problems Cannot charge the camera. In case of charging issues, see Charging the Camera. The camera is not activated even when turned on. Charge the camera ( ). The indicator lamp is still lit or blinking when the camera is off. The indicator lamp will remain on or continue to blink for a few seconds if the camera is turned off while an image is being recorded to the card. When the image recording is complete, the power will turn off automatically. Battery life does not last long. Using the camera when it is fully charged is recommended ( ). The following operations reduce battery life and the number of shots available.

Shooting-related problems No images can be shot or recorded. Make sure the card is properly inserted ( ). If the card is full, replace the card or delete unnecessary images to make space ( , ). The card cannot be used. If a card error message is displayed, see Inserting/Removing Cards and Error Codes. The image is out of focus or blurred. Press the shutter button gently to prevent camera shake ( , ). [ ] is displayed. [ ] may be displayed after repeated movie recording, or if you keep the camera standing by for movie recording over extended periods. The camera turns off automatically in approx. 3 min. if you continue to record movies while [ ] is displayed. Turn off the camera when [ ] is displayed and wait until it cools down. During movie recording, the red icon is displayed. It indicates that the camera’s internal temperature is high. Display of the red [ ] icon indicates that movie recording will soon stop automatically. Movie recording stops by itself. If the card’s writing speed is slow, movie recording may stop automatically. For details on cards that can record movies, see Cards That Can Record Movies. To find out the card’s writing speed, refer to the card manufacturer’s website, etc. Format the card if the writing or reading speed seems slow ( ). Movie recording stops automatically at 9 min. and 59 sec. The image flickers or horizontal stripes appear during movie recording. Flickering, horizontal stripes (noise), or irregular exposures can be caused by fluorescent lighting, LED lighting, or other light sources during movie recording. Also, changes in the exposure (brightness) or color tone may be recorded. 106

The subject looks distorted during movie recording. If you move the camera to the left or right (panning) or shoot a moving subject, the image may look distorted. I cannot take still photos during movie recording. Still photos cannot be taken during movie recording. Stop movie recording before shooting still photos. 107
Problems with wireless features Cannot pair with a smartphone. Use a smartphone compliant with Bluetooth Specification Version 4.2 or later. Turn on Bluetooth from the smartphone settings screen. Pairing with the camera is not possible from the smartphone’s Bluetooth settings screen. Install the dedicated app Camera Connect (free of charge) on the smartphone ( ). Pairing with a previously paired smartphone is not possible if pairing information registered for another camera remains on the smartphone. If so, remove that camera’s registered pairing information from the Bluetooth settings on the smartphone and try pairing again ( ). Operations such as shooting and playback are not possible. With a Wi-Fi connection established, operations such as shooting and playback may not be possible. Terminate the Wi-Fi connection, then perform the operation. Cannot reconnect to a smartphone. Reconnecting may not be possible, even with the same camera and smartphone, if you have changed the settings or selected other settings. In this case, delete the camera connection settings from the Wi-Fi settings on the smartphone and set up a connection again. A connection may not be established if Camera Connect is running when you reconfigure connection settings. In this case, quit Camera Connect for a moment and then restart it. 108
Operation problems Camera operation is erratic. The buttons are unresponsive. An internal error may have occurred. Force the camera off by holding down the < > and < > buttons together for 8 sec. Wait a while before restarting the camera by pressing the power button. Display problems The shooting date and time displayed are incorrect. Make sure the correct date and time are set ( ). Check the time zone and daylight saving time ( ). Playback problems Still photos and movies cannot be played back. The camera may not be able to play back images taken with another camera. Movies edited with a computer cannot be played back with the camera. Mechanical sounds or sounds of camera operations can be heard during movie playback. If you perform camera operations during movie recording, the camera’s built-in microphone may also record sounds of the camera operations. The movie appears to freeze momentarily. Significant changes in exposure during movie recording may cause recording to stop momentarily until the brightness stabilizes. 109
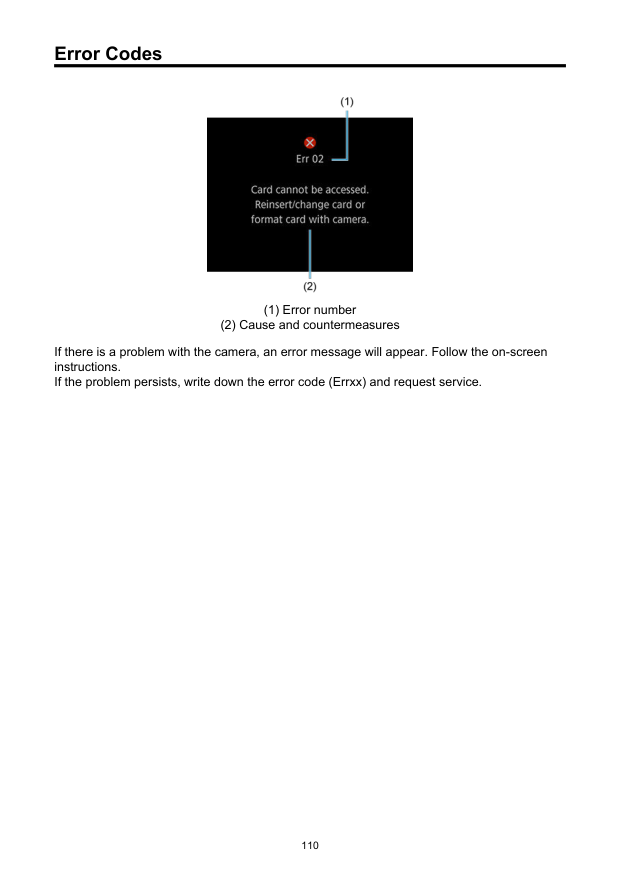
Error Codes (1) Error number (2) Cause and countermeasures If there is a problem with the camera, an error message will appear. Follow the on-screen instructions. If the problem persists, write down the error code (Errxx) and request service. 110
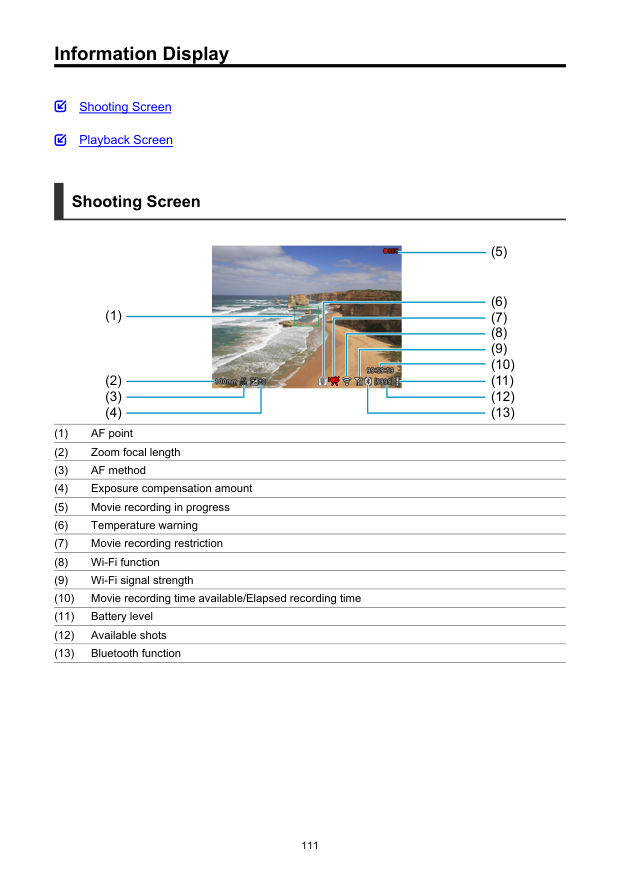
Information Display Shooting Screen Playback Screen Shooting Screen (1) (5) (7) (6) (8) (9) (2) (3) (4) (10) (11) (12) (13) (1) AF point (2) Zoom focal length (3) AF method (4) Exposure compensation amount (5) Movie recording in progress (6) Temperature warning (7) Movie recording restriction (8) Wi-Fi function (9) Wi-Fi signal strength (10) Movie recording time available/Elapsed recording time (11) Battery level (12) Available shots (13) Bluetooth function 111
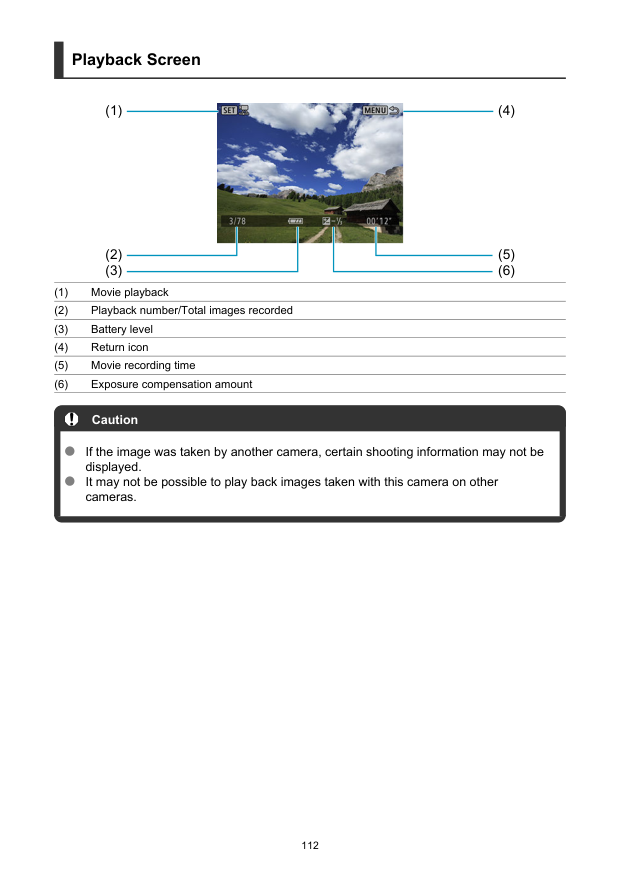
Playback Screen (1) (4) (2) (3) (5) (6) (1) Movie playback (2) Playback number/Total images recorded (3) Battery level (4) Return icon (5) Movie recording time (6) Exposure compensation amount Caution If the image was taken by another camera, certain shooting information may not be displayed. It may not be possible to play back images taken with this camera on other cameras. 112
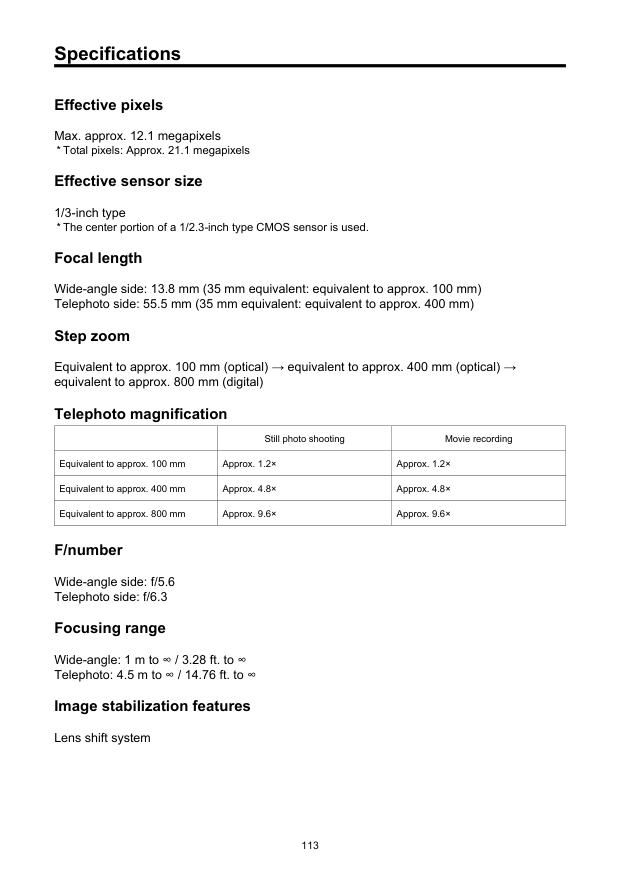
Specifications Effective pixels Max. approx. 12.1 megapixels
Still photo shooting Movie recording Equivalent to approx. 100 mm Approx. 1.2× Approx. 1.2× Equivalent to approx. 400 mm Approx. 4.8× Approx. 4.8× Equivalent to approx. 800 mm Approx. 9.6× Approx. 9.6× F/number Wide-angle side: f/5.6 Telephoto side: f/6.3 Focusing range Wide-angle: 1 m to ∞ / 3.28 ft. to ∞ Telephoto: 4.5 m to ∞ / 14.76 ft. to ∞ Image stabilization features Lens shift system 113
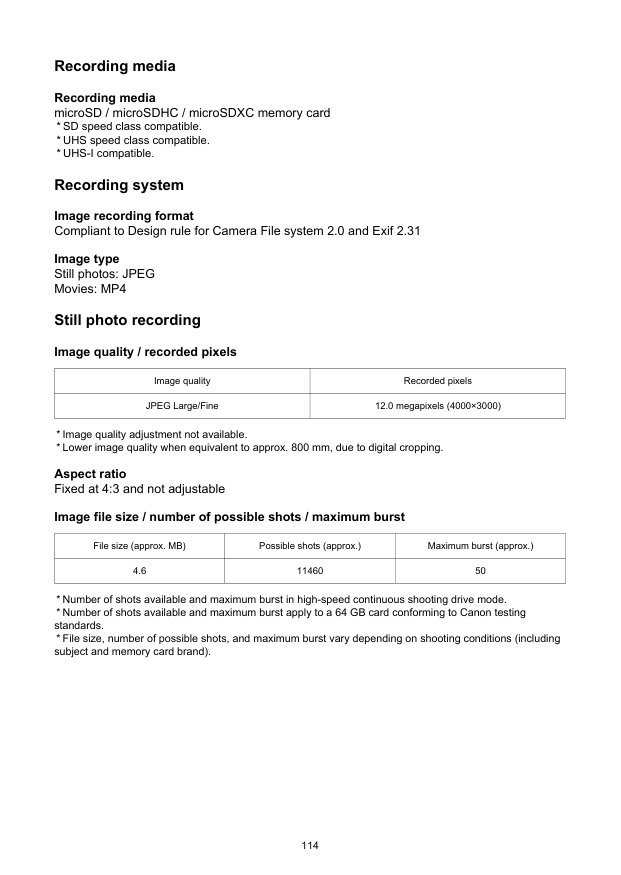
Recording media Recording media microSD / microSDHC / microSDXC memory card
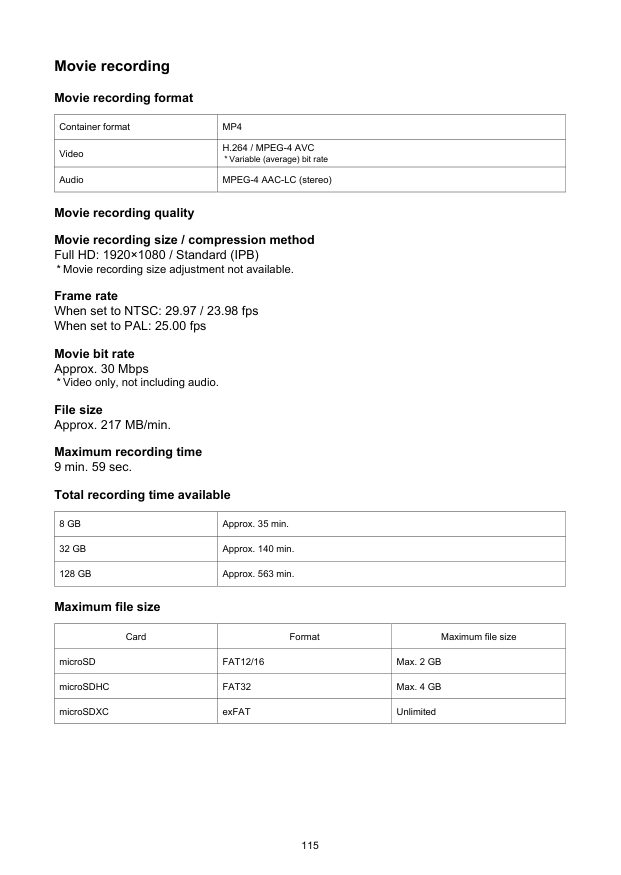
Movie recording Movie recording format Container format
Mp4
VideoH.264 / Mpeg-4 Avc
8 Gb
Approx. 35 min.32 Gb
Approx. 140 min.128 Gb
Approx. 563 min. Maximum file size Card Format Maximum file size microSDFat12/16
Max. 2 GB microSDHCFat32
Max. 4 GB microSDXC exFAT Unlimited 115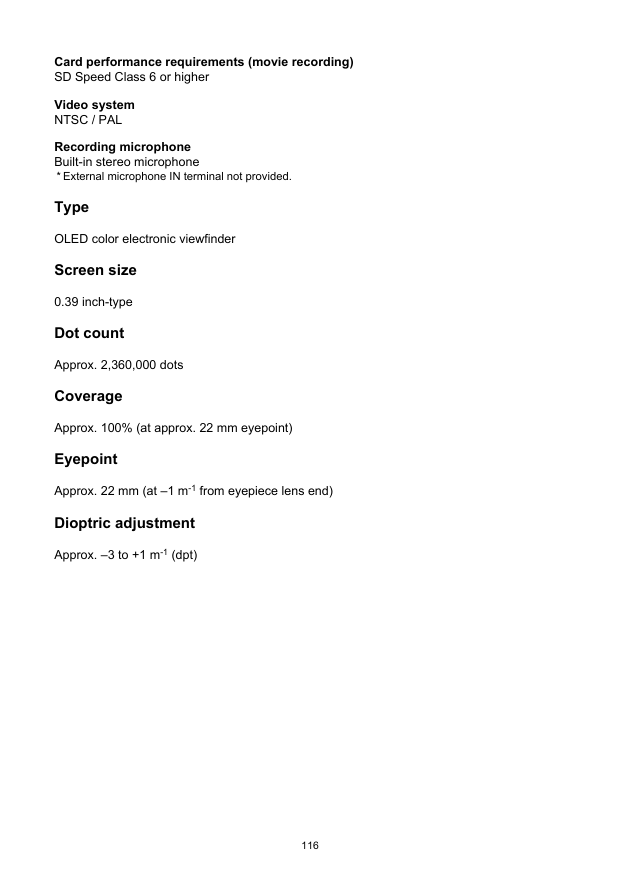
Card performance requirements (movie recording) SD Speed Class 6 or higher Video system
Ntsc / Pal
Recording microphone Built-in stereo microphone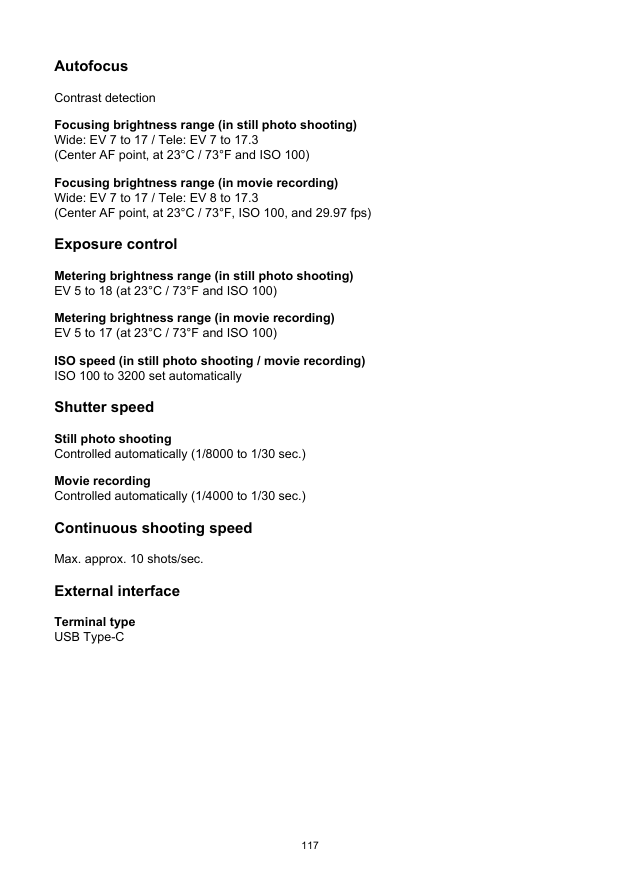
Autofocus Contrast detection Focusing brightness range (in still photo shooting) Wide: EV 7 to 17 / Tele: EV 7 to 17.3 (Center AF point, at 23°C / 73°F and ISO 100) Focusing brightness range (in movie recording) Wide: EV 7 to 17 / Tele: EV 8 to 17.3 (Center AF point, at 23°C / 73°F, ISO 100, and 29.97 fps) Exposure control Metering brightness range (in still photo shooting) EV 5 to 18 (at 23°C / 73°F and ISO 100) Metering brightness range (in movie recording) EV 5 to 17 (at 23°C / 73°F and ISO 100) ISO speed (in still photo shooting / movie recording) ISO 100 to 3200 set automatically Shutter speed Still photo shooting Controlled automatically (1/8000 to 1/30 sec.) Movie recording Controlled automatically (1/4000 to 1/30 sec.) Continuous shooting speed Max. approx. 10 shots/sec. External interface Terminal type USB Type-C 117
Battery used A rechargeable lithium-ion battery is built into the body. Charging temperature Approx. 5–40°C / Approx. 41–104°F Number of shots available Approx. 150 shots
0–40°C (32–104°F)
Operating humidity 10–90% 118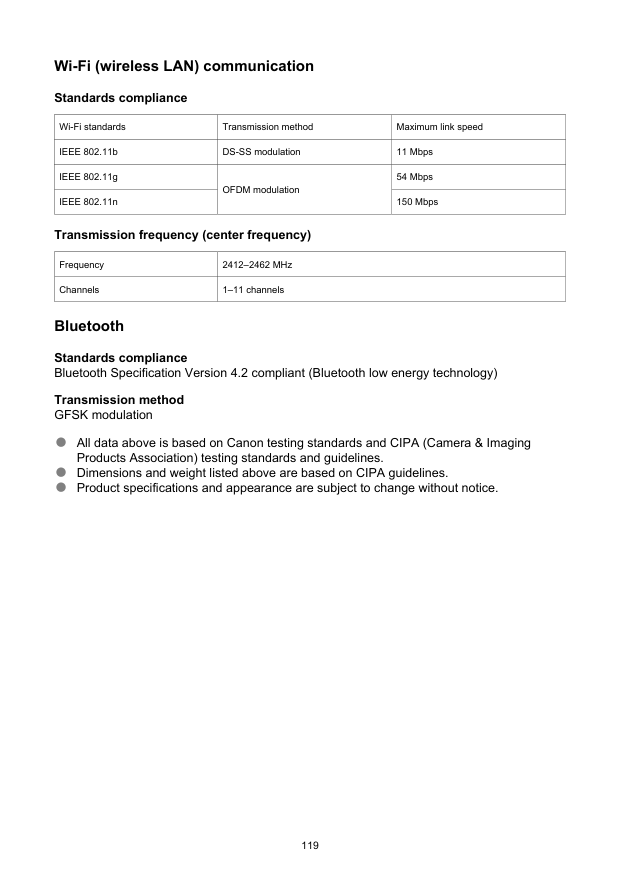
Wi-Fi (wireless LAN) communication Standards compliance Wi-Fi standards Transmission method Maximum link speed IEEE 802.11b DS-SS modulation 11 Mbps IEEE 802.11g OFDM modulation 54 Mbps IEEE 802.11n 150 Mbps Transmission frequency (center frequency) Frequency 2412–2462 MHz Channels 1–11 channels Bluetooth Standards compliance Bluetooth Specification Version 4.2 compliant (Bluetooth low energy technology) Transmission method GFSK modulation All data above is based on Canon testing standards and CIPA (Camera & Imaging Products Association) testing standards and guidelines. Dimensions and weight listed above are based on CIPA guidelines. Product specifications and appearance are subject to change without notice. 119
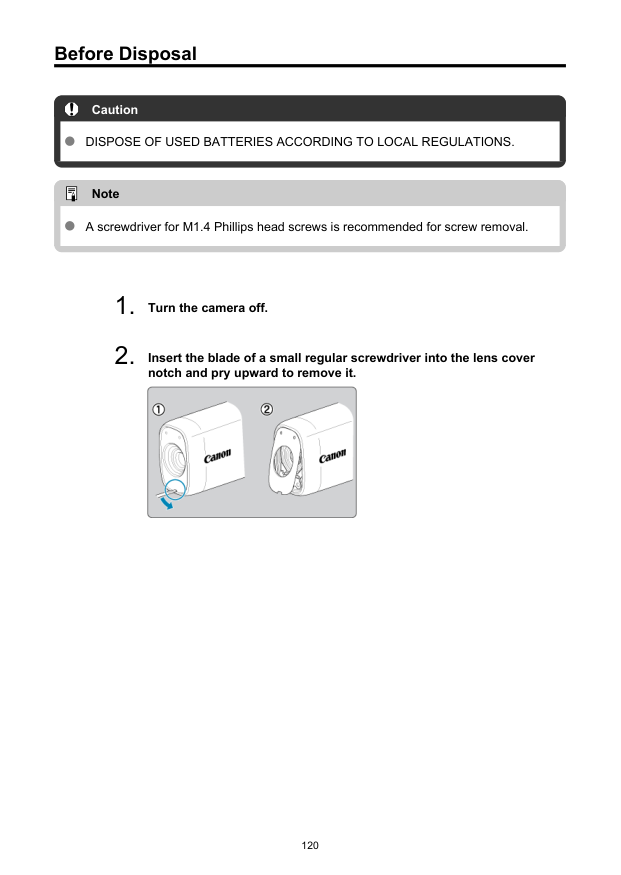
Before Disposal Caution
Dispose Of Used Batteries According To Local Regulations.
Note A screwdriver for M1.4 Phillips head screws is recommended for screw removal.

Trademarks and Licensing Trademarks About MPEG-4 Licensing Accessories Trademarks Microsoft and Windows are trademarks or registered trademarks of Microsoft Corporation in the United States and/or other countries. App Store and macOS are trademarks of Apple Inc., registered in the U.S. and other countries. Google Play and Android are trademarks of Google LLC. IOS is a trademark or registered trademark of Cisco in the U.S. and other countries and is used under license. QR Code is a trademark of Denso Wave Inc. The Bluetooth® word mark and logos are registered trademarks owned by Bluetooth SIG, Inc. and any use of such marks by Canon Inc. is under license. Other trademarks and trade names are those of their respective owners. All other trademarks are the property of their respective owners. 123

About MPEG-4 Licensing “This product is licensed under AT&T patents for the MPEG-4 standard and may be used for encoding MPEG-4 compliant video and/or decoding MPEG-4 compliant video that was encoded only (1) for a personal and non-commercial purpose or (2) by a video provider licensed under the AT&T patents to provide MPEG-4 compliant video. No license is granted or implied for any other use for MPEG-4 standard.”
This Product Is Licensed Under The Avc Patent Portfolio License For
The Personal Use Of A Consumer Or Other Uses In Which It Does Not
RECEIVE REMUNERATION TO (i) ENCODE VIDEO IN COMPLIANCE WITH THE AVC STANDARD (''AVC VIDEO'') AND/OR (ii) DECODE AVC VIDEO THAT WAS ENCODED BYA Consumer Engaged In A Personal Activity And/Or Was Obtained From
A Video Provider Licensed To Provide Avc Video. No License Is Granted
Or Shall Be Implied For Any Other Use. Additional Information May Be
Obtained From Mpeg La, L.L.C. See Http://Www.Mpegla.Com

Accessories Use of genuine Canon accessories is recommended This product is designed to achieve optimum performance when used with genuine Canon accessories. Therefore, using this product with genuine accessories is highly recommended. Canon shall not be liable for any damage to this product and/or accidents such as malfunction, fire, etc. caused by the failure of non-genuine Canon accessories. Please note that repairs arising out of the malfunction of non-genuine accessories will not be covered by the warranty for repairs, although you may request such repairs on a chargeable basis. 125