
Bestway Flowclear 58515 Sand Filtration Pump Flow
Ask AI
— answers from the official manualAnswers from the official manual.
Common questions
Common Questions
30 totalWhat type and size of sand should I use in the Bestway Flowclear 58515?
You must use #20 silica sand sized 0.45–0.85mm, free of all limestone or clay, and approximately one 8.5kg bag should suffice. Using the wrong size sand will reduce filtering performance and may damage the sand filter, voiding the warranty. As an alternative, you can use Flowclear™ Polysphere, using 28g to replace every 1kg of sand. (Page 5)
How do I prepare the sand filter for first-time use?
Before first use, you must perform a Backwash followed by a Rinse cycle to wash the sand. Set the Control Valve to Backwash, run the filter for 3–5 minutes until the water runs clear, then switch to Rinse and run for 1 minute. Switch off, set the valve to Closed, and top up pool water as needed. (Page 8)
How do I know when it is time to clean the sand filter?
When the Pressure Gauge reads 0.25 Bar (3.5 PSI) or higher, or water flow returning to the pool is too low, it is time to clean the sand. As dirt builds up in the sand filter, the pressure reading on the Pressure Gauge will increase. To clean the sand bed, perform the Backwash and Rinse procedures. (Page 8)
What are the six Control Valve functions and what does each one do?
The six functions are: Filter (filters pool water, used 99% of the time), Backwash (cleans the sand bed by pumping water upward through the sand), Rinse (levels the sand bed after backwashing), Closed (stops water flow between filter and pool), Drain (drains water from the pool out of Port D), and Circulate (circulates pool water bypassing the sand filter, used if the filter is broken). Always switch off the sand filter before changing the Control Valve function. (Page 7)
Why is there no water flow from my sand filter?
Common causes include stopper plugs not being removed, air not being released, the Control Valve being set to Closed, a blocked strainer, or a broken sand filter. Solutions include removing stopper plugs and inserting debris screens, releasing trapped air, setting the valve to the Filter function, and cleaning the strainer. If the sand filter is broken, call for service. (Page 9)
Why is sand flowing into my pool, and how do I fix it?
Sand flowing into the pool is typically caused by sand that is too small, an overfilled sand level, or a broken skimmer. Use the recommended #20 silica sand (0.45–0.85mm), always stop the filter before changing the Control Valve position, check that the sand level is between the MAX and MIN marks on the collector hub, and replace the skimmer if broken. (Page 9)
Show 24 more questions
How do I winterize the Bestway Flowclear 58515 sand filter?
How do I clean the strainer on the sand filter?
Is it safe to use the pump while people are in the pool?
How often should I run the sand filter, and how often should I backwash it?
How do I set up the sand filter the first time?
How can I ensure safety when using the sand filter?
What size sand should be used in the filter?
How do I winterize the sand filter?
How often should I clean the filter?
Why shouldn't the control valve be set between functions?
What should I do if there's no water flow?
How do I stop the sand filter from leaking?
What should I do if sand is flowing to the pool?
How can I release air from the system?
How do I ensure the pool is installed safely and correctly?
What are some safety guidelines before swimming?
How do I assemble the pool safely?
How should I handle chemicals for my pool?
What is the correct procedure for emptying my pool?
What should I do to prevent algae growth in my pool?
How often should I clean my pool liner?
How do I prepare for winter storage?
How can I ensure my pool location is safe?
What is the correct water level for my pool?
Full Manual
16 pages
|OWNER’S MANUAL bestwaycorp.com/support Visit Bestway YouTube channel

WE SUGGEST NOT TO RETURN THE PRODUCT TO THE STORE QUESTIONS? PROBLEMS? MISSING PARTS? For FAQ, Manuals, Videos Or Spare Parts, Please Visit bestwaycorp.com/support
V
i
s
i
t
w
w
w
.
b
e
s
t
w
a
y
c
o
r
p
.
c
o
m
/
s
u
p
p
o
r
t f o
r
h e l p| |---|
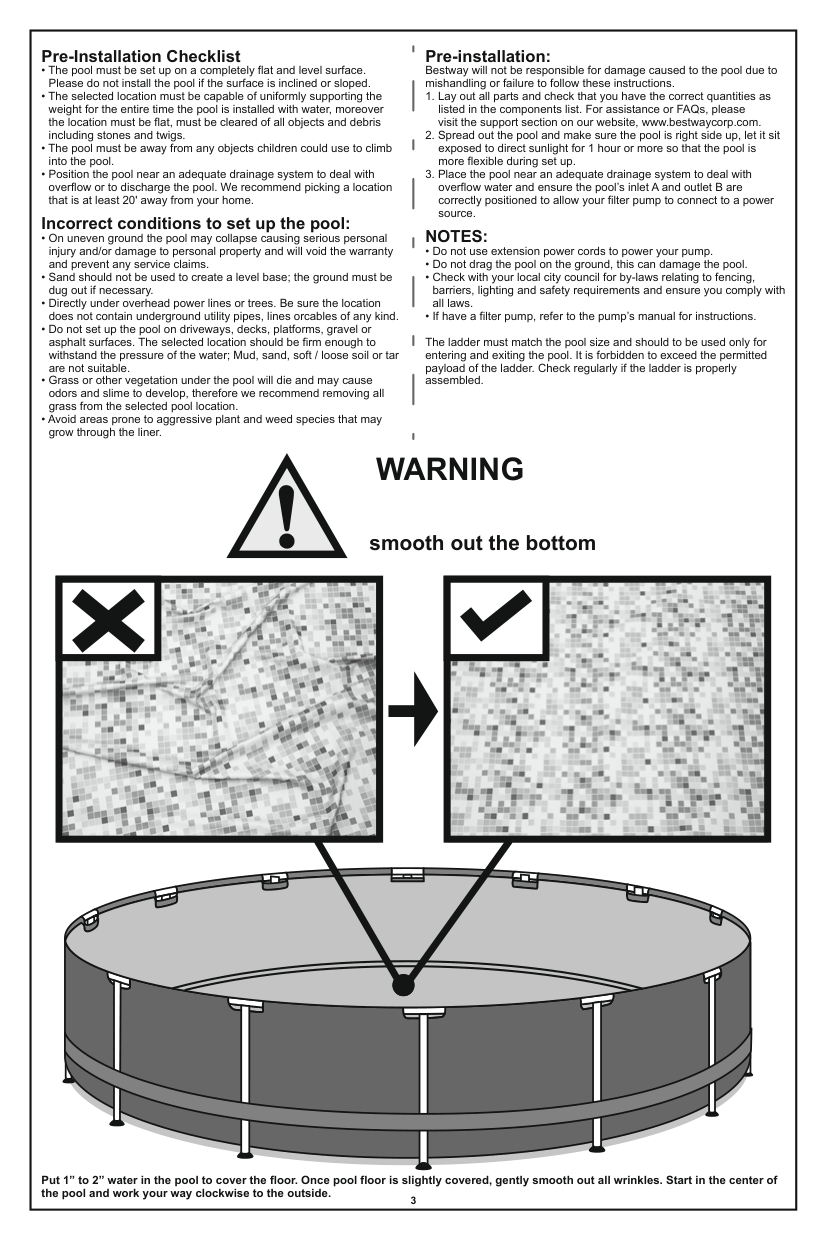
Pre-Installation Checklist
####### Incorrect conditions to set up the pool:
Pre-installation: Bestway will not be responsible for damage caused to the pool due to mishandling or failure to follow these instructions.
####### NOTES:
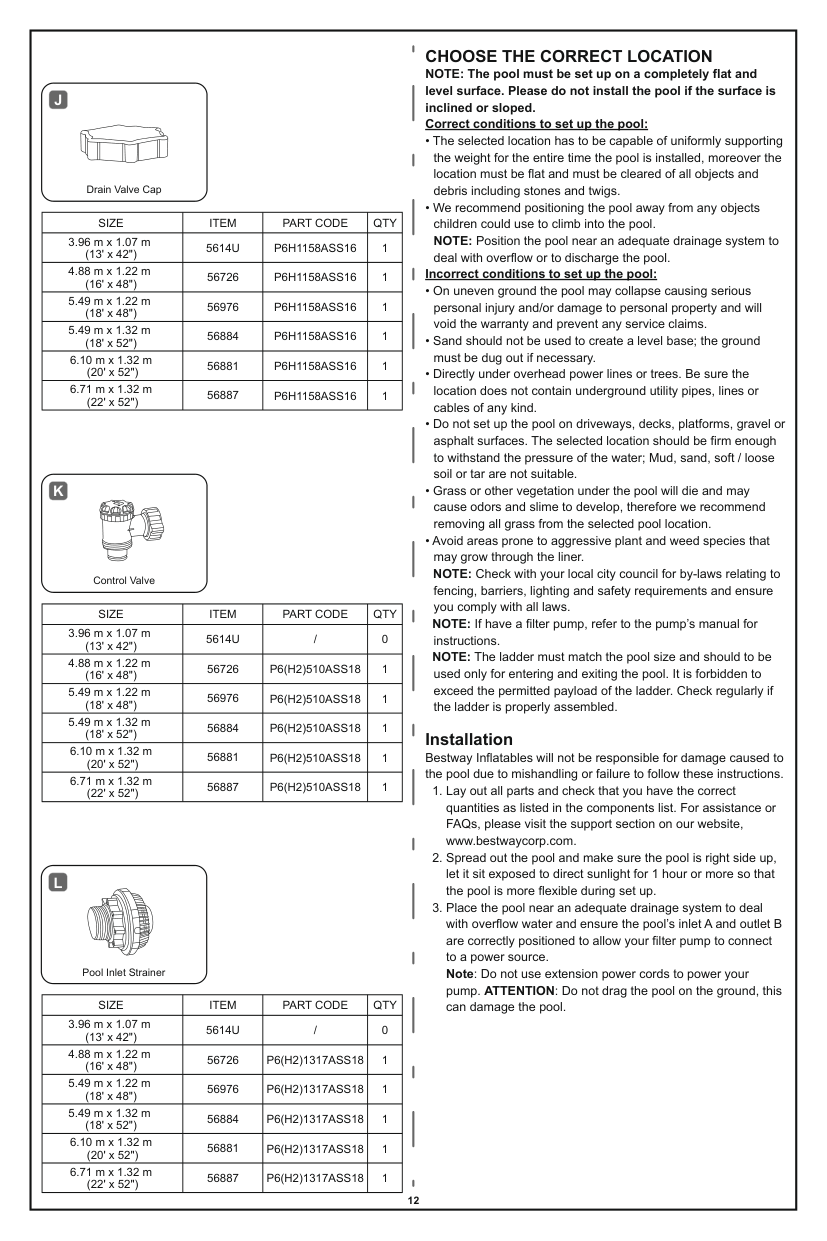
The ladder must match the pool size and should to be used only for entering and exiting the pool. It is forbidden to exceed the permitted payload of the ladder. Check regularly if the ladder is properly assembled.
WARNING
smooth out the bottom
|| |---|
|| |---|
Put 1” to 2” water in the pool to cover the floor. Once pool floor is slightly covered, gently smooth out all wrinkles. Start in the center of the pool and work your way clockwise to the outside.
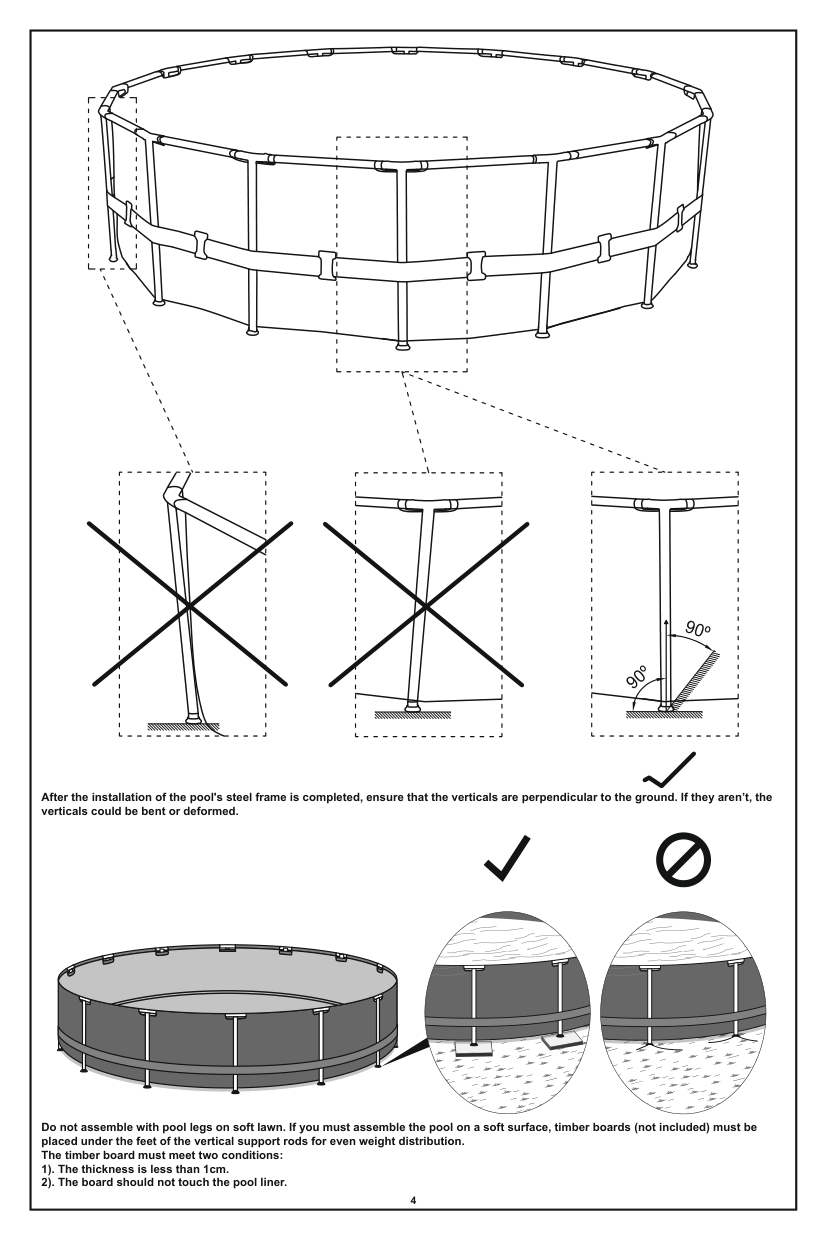
90º 90º
After the installation of the pool's steel frame is completed, ensure that the verticals are perpendicular to the ground. If they aren’t, the verticals could be bent or deformed.

Do not assemble with pool legs on soft lawn. If you must assemble the pool on a soft surface, timber boards (not included) must be placed under the feet of the vertical support rods for even weight distribution. The timber board must meet two conditions:
WARNING
Carefully read, understand, and follow all information in this user manual before installing and using the swimming pool. These warnings, instructions, and safety guidelines address some common risks of water recreation, but they cannot cover all risks and dangers in all cases. Always use caution, common sense, and good judgment when enjoying any water activity. Retain this information for future use. Non Swimmers safety
Please read carefully and keep for future reference Installation usually takes approximately 20-30 minutes with 2-3 people excluding earthworks and filling. Part descriptions. NOTE: Some parts already have been installed on the pool.
######### Safety devices
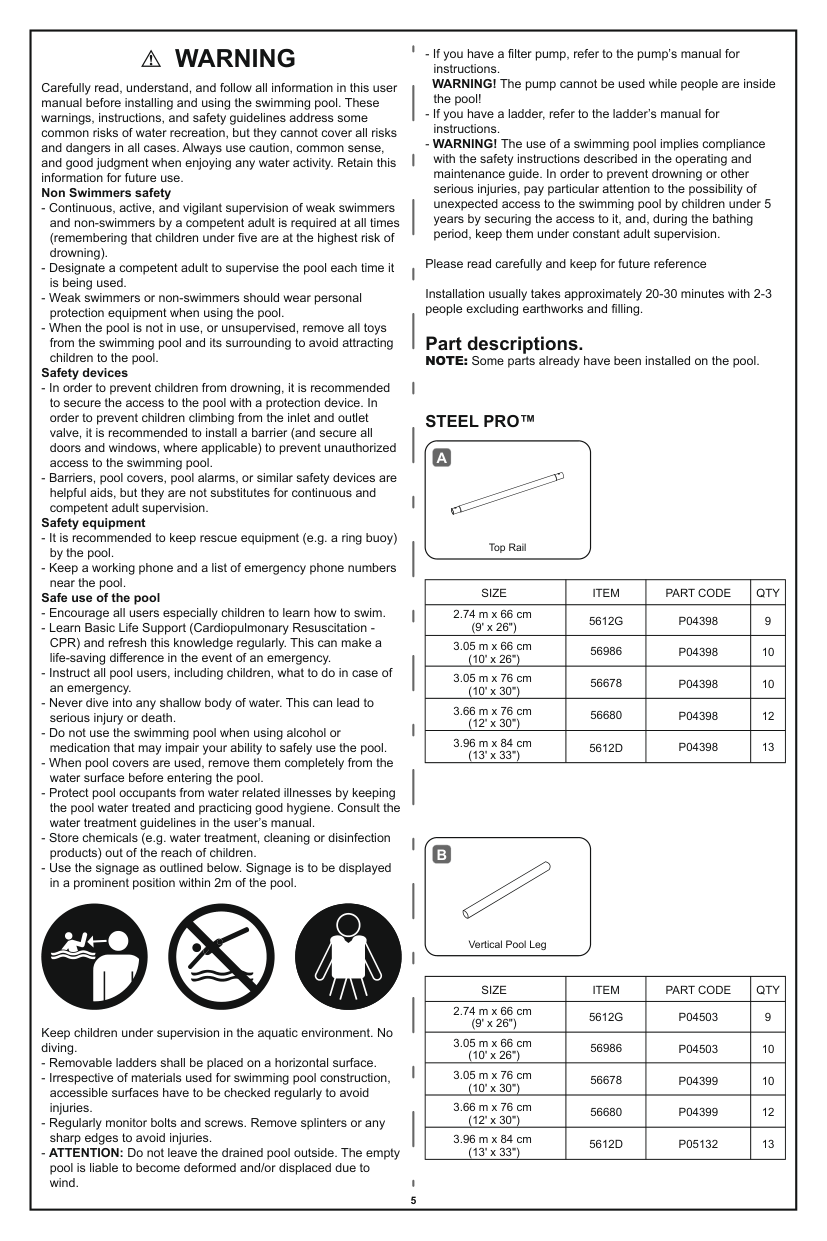
####### STEEL PRO™
######## A
######### Safety equipment
Top Rail
|SIZE|ITEM|PART CODE|QTY| |---|---|---|---| |2.74 m x 66 cm (9' x 26")|5612G|P04398|9| |3.05 m x 66 cm (10' x 26")|56986|P04398|10| |3.05 m x 76 cm (10' x 30")|56678|P04398|10| |3.66 m x 76 cm (12' x 30")|56680|P04398|12| |3.96 m x 84 cm (13' x 33")|5612D|P04398|13|
######### Safe use of the pool
######## B
Vertical Pool Leg
|SIZE|ITEM|PART CODE|QTY| |---|---|---|---| |2.74 m x 66 cm (9' x 26")|5612G|P04503|9| |3.05 m x 66 cm (10' x 26")|56986|P04503|10| |3.05 m x 76 cm (10' x 30")|56678|P04399|10| |3.66 m x 76 cm (12' x 30")|56680|P04399|12| |3.96 m x 84 cm (13' x 33")|5612D|P05132|13|
Keep children under supervision in the aquatic environment. No diving.
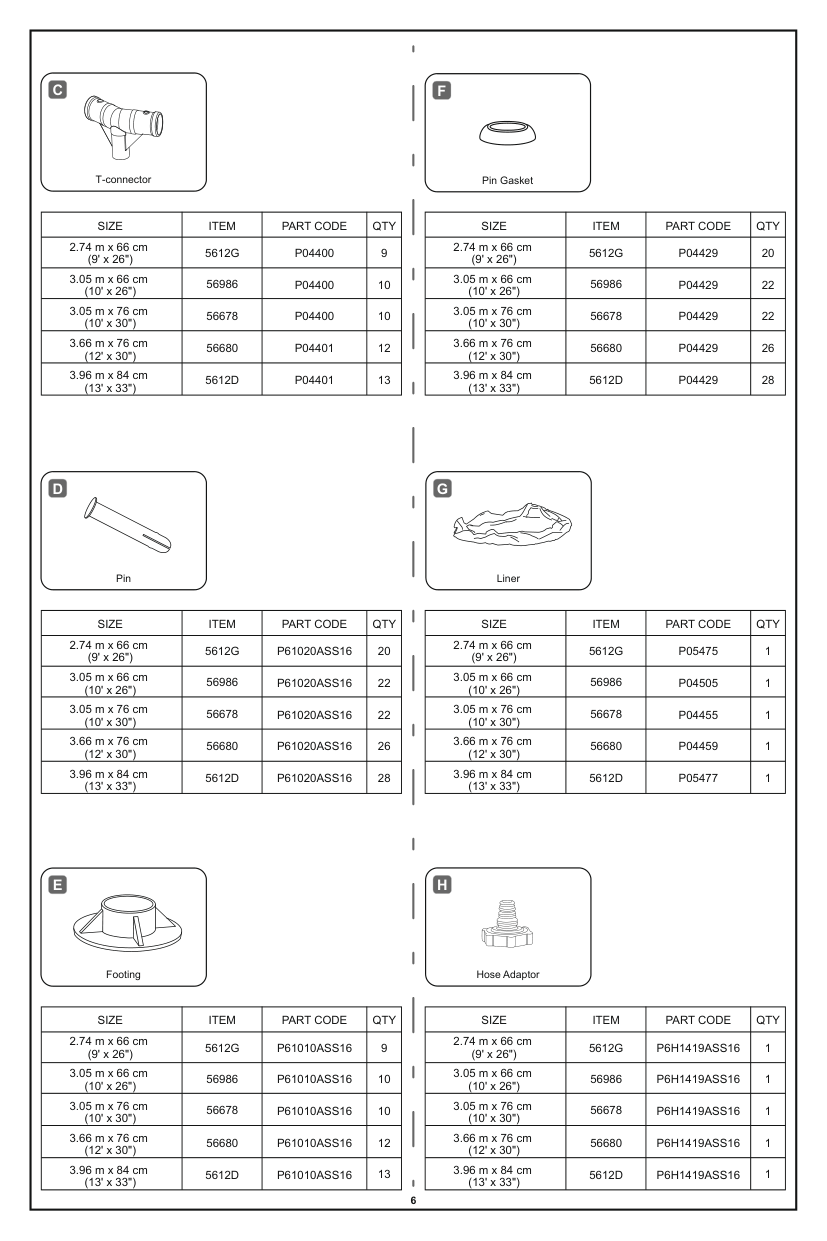
######## C
######## F
T-connector
Pin Gasket
|SIZE|ITEM|PART CODE|QTY| |---|---|---|---| |2.74 m x 66 cm (9' x 26")|5612G|P04400|9| |3.05 m x 66 cm (10' x 26")|56986|P04400|10| |3.05 m x 76 cm (10' x 30")|56678|P04400|10| |3.66 m x 76 cm (12' x 30")|56680|P04401|12| |3.96 m x 84 cm (13' x 33")|5612D|P04401|13|
|SIZE|ITEM|PART CODE|QTY| |---|---|---|---| |2.74 m x 66 cm (9' x 26")|5612G|P04429|20| |3.05 m x 66 cm (10' x 26")|56986|P04429|22| |3.05 m x 76 cm (10' x 30")|56678|P04429|22| |3.66 m x 76 cm (12' x 30")|56680|P04429|26| |3.96 m x 84 cm (13' x 33")|5612D|P04429|28|
######## D
Pin
|SIZE|ITEM|PART CODE|QTY| |---|---|---|---| |2.74 m x 66 cm (9' x 26")|5612G|P61020ASS16|20| |3.05 m x 66 cm (10' x 26")|56986|P61020ASS16|22| |3.05 m x 76 cm (10' x 30")|56678|P61020ASS16|22| |3.66 m x 76 cm (12' x 30")|56680|P61020ASS16|26| |3.96 m x 84 cm (13' x 33")|5612D|P61020ASS16|28|
######## E
Footing
######## G
Liner
|SIZE|ITEM|PART CODE|QTY| |---|---|---|---| |2.74 m x 66 cm (9' x 26")|5612G|P05475|1| |3.05 m x 66 cm (10' x 26")|56986|P04505|1| |3.05 m x 76 cm (10' x 30")|56678|P04455|1| |3.66 m x 76 cm (12' x 30")|56680|P04459|1| |3.96 m x 84 cm (13' x 33")|5612D|P05477|1|
######## H
Hose Adaptor
|SIZE|ITEM|PART CODE|QTY| |---|---|---|---| |2.74 m x 66 cm (9' x 26")|5612G|P61010ASS16|9| |3.05 m x 66 cm (10' x 26")|56986|P61010ASS16|10| |3.05 m x 76 cm (10' x 30")|56678|P61010ASS16|10| |3.66 m x 76 cm (12' x 30")|56680|P61010ASS16|12| |3.96 m x 84 cm (13' x 33")|5612D|P61010ASS16|13|
|SIZE|ITEM|PART CODE|QTY| |---|---|---|---| |2.74 m x 66 cm (9' x 26")|5612G|P6H1419ASS16|1| |3.05 m x 66 cm (10' x 26")|56986|P6H1419ASS16|1| |3.05 m x 76 cm (10' x 30")|56678|P6H1419ASS16|1| |3.66 m x 76 cm (12' x 30")|56680|P6H1419ASS16|1| |3.96 m x 84 cm (13' x 33")|5612D|P6H1419ASS16|1|
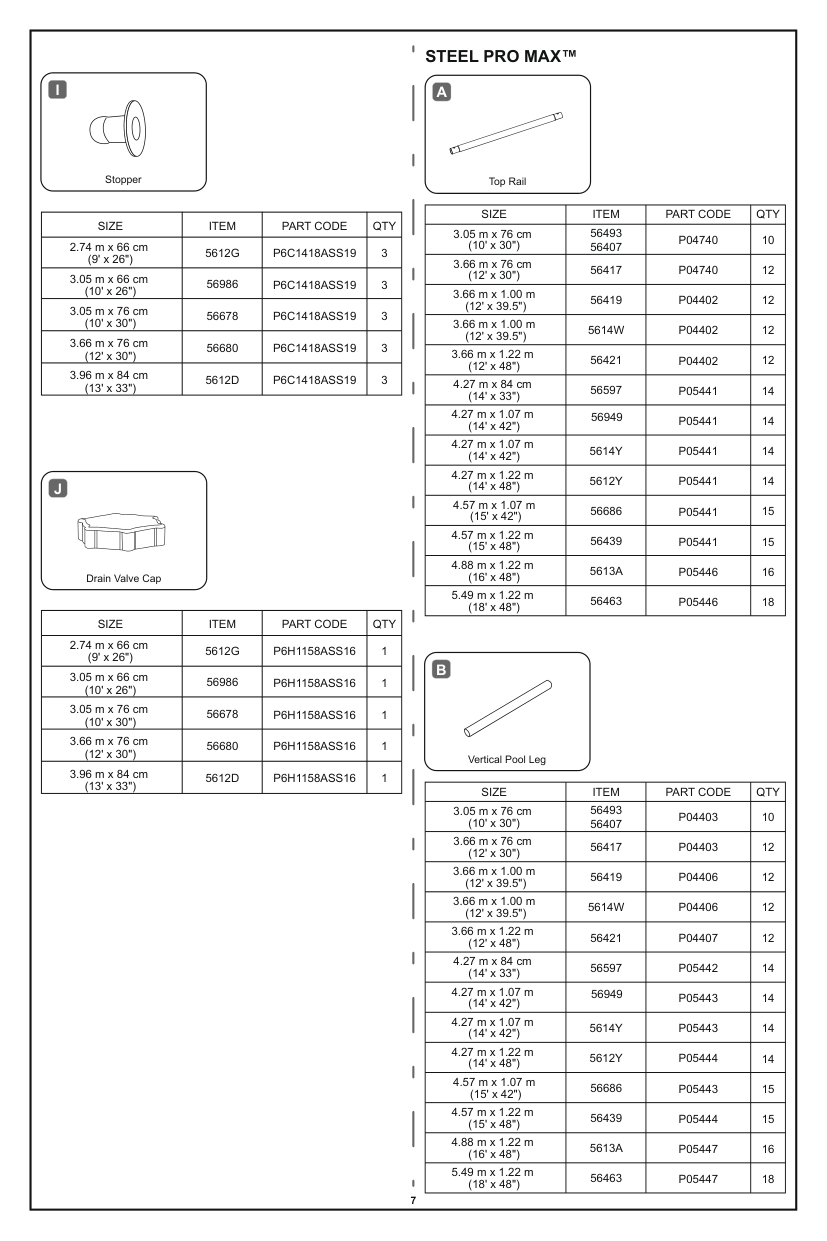
######## I
Stopper
####### STEEL PRO MAX™
######## A
Top Rail
|SIZE|ITEM|PART CODE|QTY| |---|---|---|---| |3.05 m x 76 cm (10' x 30")|56493 56407|P04740|10| |3.66 m x 76 cm (12' x 30")|56417|P04740|12| |3.66 m x 1.00 m (12' x 39.5")|56419|P04402|12| |3.66 m x 1.00 m (12' x 39.5")|5614W|P04402|12| |3.66 m x 1.22 m (12' x 48")|56421|P04402|12| |4.27 m x 84 cm (14' x 33")|56597|P05441|14| |4.27 m x 1.07 m (14' x 42")|56949|P05441|14| |4.27 m x 1.07 m (14' x 42")|5614Y|P05441|14| |4.27 m x 1.22 m (14' x 48")|5612Y|P05441|14| |4.57 m x 1.07 m (15' x 42")|56686|P05441|15| |4.57 m x 1.22 m (15' x 48")|56439|P05441|15| |4.88 m x 1.22 m (16' x 48")|5613A|P05446|16| |5.49 m x 1.22 m (18' x 48")|56463|P05446|18|
|SIZE|ITEM|PART CODE|QTY| |---|---|---|---| |2.74 m x 66 cm (9' x 26")|5612G|P6C1418ASS19|3| |3.05 m x 66 cm (10' x 26")|56986|P6C1418ASS19|3| |3.05 m x 76 cm (10' x 30")|56678|P6C1418ASS19|3| |3.66 m x 76 cm (12' x 30")|56680|P6C1418ASS19|3| |3.96 m x 84 cm (13' x 33")|5612D|P6C1418ASS19|3|
######## J
Drain Valve Cap
|SIZE|ITEM|PART CODE|QTY| |---|---|---|---| |2.74 m x 66 cm (9' x 26")|5612G|P6H1158ASS16|1| |3.05 m x 66 cm (10' x 26")|56986|P6H1158ASS16|1| |3.05 m x 76 cm (10' x 30")|56678|P6H1158ASS16|1| |3.66 m x 76 cm (12' x 30")|56680|P6H1158ASS16|1| |3.96 m x 84 cm (13' x 33")|5612D|P6H1158ASS16|1|
######## B
Vertical Pool Leg
|SIZE|ITEM|PART CODE|QTY| |---|---|---|---| |3.05 m x 76 cm (10' x 30")|56493 56407|P04403|10| |3.66 m x 76 cm (12' x 30")|56417|P04403|12| |3.66 m x 1.00 m (12' x 39.5")|56419|P04406|12| |3.66 m x 1.00 m (12' x 39.5")|5614W|P04406|12| |3.66 m x 1.22 m (12' x 48")|56421|P04407|12| |4.27 m x 84 cm (14' x 33")|56597|P05442|14|
|4.27 m x 1.07 m (14' x 42")|56949|P05443|14| |4.27 m x 1.07 m (14' x 42")|5614Y|P05443|14| |4.27 m x 1.22 m (14' x 48")|5612Y|P05444|14| |4.57 m x 1.07 m (15' x 42")|56686|P05443|15| |4.57 m x 1.22 m (15' x 48")|56439|P05444|15| |4.88 m x 1.22 m (16' x 48")|5613A|P05447|16| |5.49 m x 1.22 m (18' x 48")|56463|P05447|18|
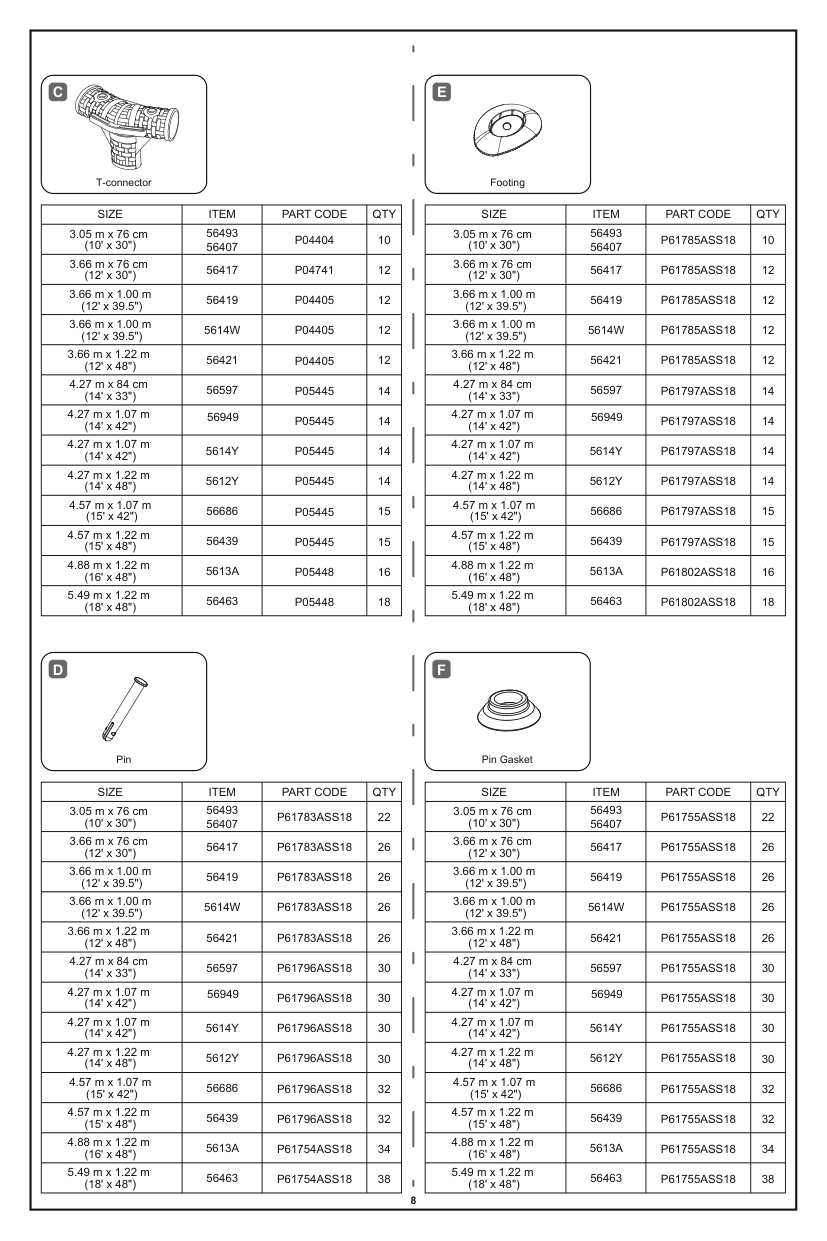
######## C
T-connector
|SIZE|ITEM|PART CODE|QTY| |---|---|---|---| |3.05 m x 76 cm (10' x 30")|56493 56407|P04404|10| |3.66 m x 76 cm (12' x 30")|56417|P04741|12| |3.66 m x 1.00 m (12' x 39.5")|56419|P04405|12| |3.66 m x 1.00 m (12' x 39.5")|5614W|P04405|12| |3.66 m x 1.22 m (12' x 48")|56421|P04405|12| |4.27 m x 84 cm (14' x 33")|56597|P05445|14| |4.27 m x 1.07 m (14' x 42")|56949|P05445|14| |4.27 m x 1.07 m (14' x 42")|5614Y|P05445|14| |4.27 m x 1.22 m (14' x 48")|5612Y|P05445|14| |4.57 m x 1.07 m (15' x 42")|56686|P05445|15| |4.57 m x 1.22 m (15' x 48")|56439|P05445|15| |4.88 m x 1.22 m (16' x 48")|5613A|P05448|16| |5.49 m x 1.22 m (18' x 48")|56463|P05448|18|
######## E
Footing
|SIZE|ITEM|PART CODE|QTY| |---|---|---|---| |3.05 m x 76 cm (10' x 30")|56493 56407|P61785ASS18|10| |3.66 m x 76 cm (12' x 30")|56417|P61785ASS18|12| |3.66 m x 1.00 m (12' x 39.5")|56419|P61785ASS18|12| |3.66 m x 1.00 m (12' x 39.5")|5614W|P61785ASS18|12| |3.66 m x 1.22 m (12' x 48")|56421|P61785ASS18|12| |4.27 m x 84 cm (14' x 33")|56597|P61797ASS18|14| |4.27 m x 1.07 m (14' x 42")|56949|P61797ASS18|14| |4.27 m x 1.07 m (14' x 42")|5614Y|P61797ASS18|14| |4.27 m x 1.22 m (14' x 48")|5612Y|P61797ASS18|14| |4.57 m x 1.07 m (15' x 42")|56686|P61797ASS18|15| |4.57 m x 1.22 m (15' x 48")|56439|P61797ASS18|15| |4.88 m x 1.22 m (16' x 48")|5613A|P61802ASS18|16| |5.49 m x 1.22 m (18' x 48")|56463|P61802ASS18|18|
######## D
Pin
######## F
Pin Gasket
|SIZE|ITEM|PART CODE|QTY| |---|---|---|---| |3.05 m x 76 cm (10' x 30")|56493 56407|P61783ASS18|22| |3.66 m x 76 cm (12' x 30")|56417|P61783ASS18|26| |3.66 m x 1.00 m (12' x 39.5")|56419|P61783ASS18|26| |3.66 m x 1.00 m (12' x 39.5")|5614W|P61783ASS18|26| |3.66 m x 1.22 m (12' x 48")|56421|P61783ASS18|26| |4.27 m x 84 cm (14' x 33")|56597|P61796ASS18|30| |4.27 m x 1.07 m (14' x 42")|56949|P61796ASS18|30| |4.27 m x 1.07 m (14' x 42")|5614Y|P61796ASS18|30| |4.27 m x 1.22 m (14' x 48")|5612Y|P61796ASS18|30| |4.57 m x 1.07 m (15' x 42")|56686|P61796ASS18|32| |4.57 m x 1.22 m (15' x 48")|56439|P61796ASS18|32| |4.88 m x 1.22 m (16' x 48")|5613A|P61754ASS18|34| |5.49 m x 1.22 m (18' x 48")|56463|P61754ASS18|38|
|SIZE|ITEM|PART CODE|QTY| |---|---|---|---| |3.05 m x 76 cm (10' x 30")|56493 56407|P61755ASS18|22| |3.66 m x 76 cm (12' x 30")|56417|P61755ASS18|26| |3.66 m x 1.00 m (12' x 39.5")|56419|P61755ASS18|26| |3.66 m x 1.00 m (12' x 39.5")|5614W|P61755ASS18|26| |3.66 m x 1.22 m (12' x 48")|56421|P61755ASS18|26| |4.27 m x 84 cm (14' x 33")|56597|P61755ASS18|30| |4.27 m x 1.07 m (14' x 42")|56949|P61755ASS18|30| |4.27 m x 1.07 m (14' x 42")|5614Y|P61755ASS18|30| |4.27 m x 1.22 m (14' x 48")|5612Y|P61755ASS18|30| |4.57 m x 1.07 m (15' x 42")|56686|P61755ASS18|32| |4.57 m x 1.22 m (15' x 48")|56439|P61755ASS18|32| |4.88 m x 1.22 m (16' x 48")|5613A|P61755ASS18|34| |5.49 m x 1.22 m (18' x 48")|56463|P61755ASS18|38|
######## G
Liner
|SIZE|ITEM|PART CODE|QTY| |---|---|---|---| |3.05 m x 76 cm (10' x 30")|56493 56407|P05299|1| |3.66 m x 76 cm (12' x 30")|56417|P05301|1| |3.66 m x 1.00 m (12' x 39.5")|56419|P05303|1| |3.66 m x 1.00 m (12' x 39.5")|5614W|P05455|1| |3.66 m x 1.22 m (12' x 48")|56421|P05305|1| |4.27 m x 84 cm (14' x 33")|56597|P05459|1| |4.27 m x 1.07 m (14' x 42")|56949|P05461|1| |4.27 m x 1.07 m (14' x 42")|5614Y|P05457|1| |4.27 m x 1.22 m (14' x 48")|5612Y|P05463|1| |4.57 m x 1.07 m (15' x 42")|56686|P05465|1| |4.57 m x 1.22 m (15' x 48")|56439|P05467|1| |4.88 m x 1.22 m (16' x 48")|5613A|P05469|1| |5.49 m x 1.22 m (18' x 48")|56463|P05471|1|
I
Stopper
|SIZE|ITEM|PART CODE|QTY| |---|---|---|---| |3.05 m x 76 cm (10' x 30")|56493 56407|P6C1418ASS19|3| |3.66 m x 76 cm (12' x 30")|56417|P6C1418ASS19|3| |3.66 m x 1.00 m (12' x 39.5")|56419|P6C1418ASS19|3| |3.66 m x 1.00 m (12' x 39.5")|5614W|P6C1418ASS19|3| |3.66 m x 1.22 m (12' x 48")|56421|P6C1418ASS19|3| |4.27 m x 84 cm (14' x 33")|56597|P6C1418ASS19|3| |4.27 m x 1.07 m (14' x 42")|56949|P6C1418ASS19|3| |4.27 m x 1.07 m (14' x 42")|5614Y|P6C1418ASS19|3| |4.27 m x 1.22 m (14' x 48")|5612Y|P6C1418ASS19|3| |4.57 m x 1.07 m (15' x 42")|56686|P6C1418ASS19|3| |4.57 m x 1.22 m (15' x 48")|56439|P6C1418ASS19|3| |4.88 m x 1.22 m (16' x 48")|5613A|P6C1418ASS19|2| |5.49 m x 1.22 m (18' x 48")|56463|P6C1418ASS19|2|
######## H
J
Hose Adaptor
Drain Valve Cap
|SIZE|ITEM|PART CODE|QTY| |---|---|---|---| |3.05 m x 76 cm (10' x 30")|56493 56407|P6H1419ASS16|1| |3.66 m x 76 cm (12' x 30")|56417|P6H1419ASS16|1| |3.66 m x 1.00 m (12' x 39.5")|56419|P6H1419ASS16|1| |3.66 m x 1.00 m (12' x 39.5")|5614W|P6H1419ASS16|1| |3.66 m x 1.22 m (12' x 48")|56421|P6H1419ASS16|1| |4.27 m x 84 cm (14' x 33")|56597|P6H1419ASS16|1| |4.27 m x 1.07 m (14' x 42")|56949|P6H1419ASS16|1| |4.27 m x 1.07 m (14' x 42")|5614Y|P6H1419ASS16|1| |4.27 m x 1.22 m (14' x 48")|5612Y|P6H1419ASS16|1| |4.57 m x 1.07 m (15' x 42")|56686|P6H1419ASS16|1| |4.57 m x 1.22 m (15' x 48")|56439|P6H1419ASS16|1| |4.88 m x 1.22 m (16' x 48")|5613A|P6H1419ASS16|1| |5.49 m x 1.22 m (18' x 48")|56463|P6H1419ASS16|1|
|SIZE|ITEM|PART CODE|QTY| |---|---|---|---| |3.05 m x 76 cm (10' x 30")|56493 56407|P6H1158ASS16|1| |3.66 m x 76 cm (12' x 30")|56417|P6H1158ASS16|1| |3.66 m x 1.00 m (12' x 39.5")|56419|P6H1158ASS16|1| |3.66 m x 1.00 m (12' x 39.5")|5614W|P6H1158ASS16|1| |3.66 m x 1.22 m (12' x 48")|56421|P6H1158ASS16|1| |4.27 m x 84 cm (14' x 33")|56597|P6H1158ASS16|1|
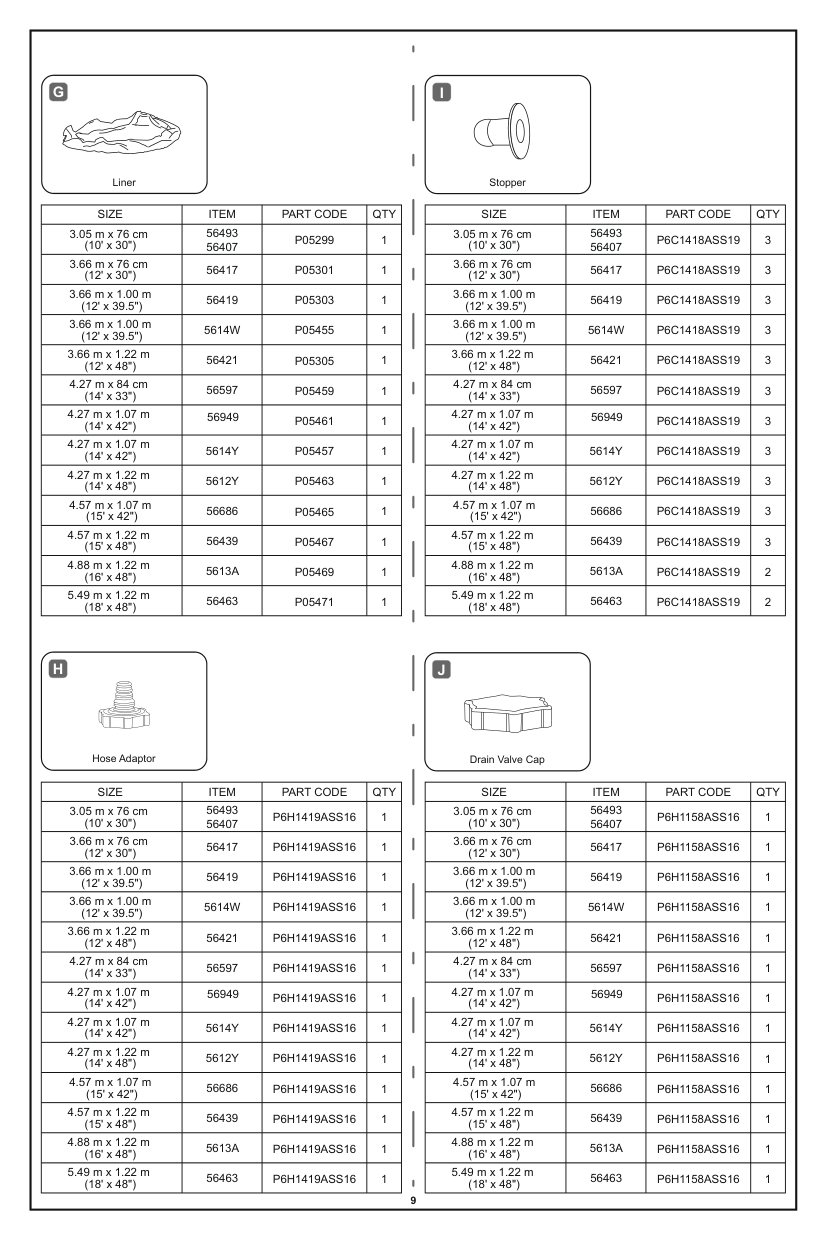
|4.27 m x 1.07 m (14' x 42")|56949|P6H1158ASS16|1| |4.27 m x 1.07 m (14' x 42")|5614Y|P6H1158ASS16|1| |4.27 m x 1.22 m (14' x 48")|5612Y|P6H1158ASS16|1| |4.57 m x 1.07 m (15' x 42")|56686|P6H1158ASS16|1| |4.57 m x 1.22 m (15' x 48")|56439|P6H1158ASS16|1| |4.88 m x 1.22 m (16' x 48")|5613A|P6H1158ASS16|1| |5.49 m x 1.22 m (18' x 48")|56463|P6H1158ASS16|1|
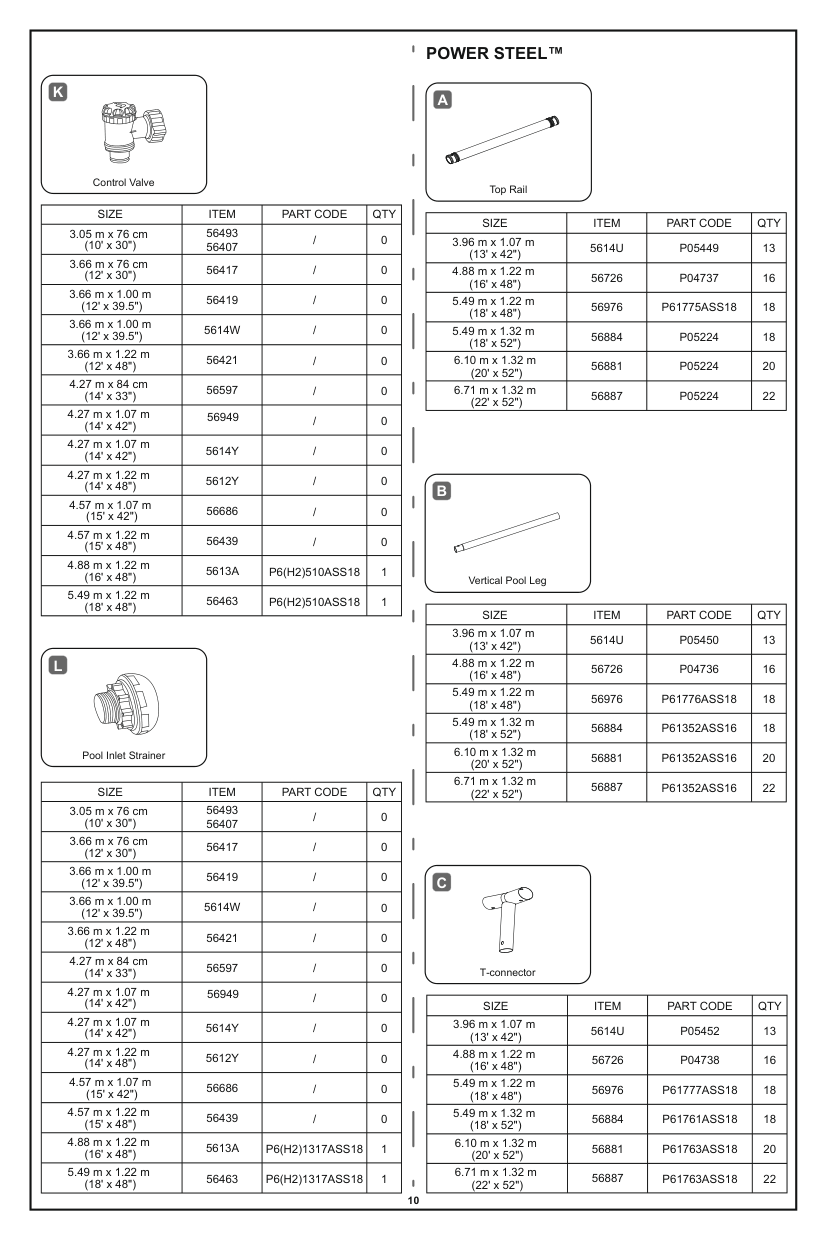
####### POWER STEEL™
######## K
######## A
Control Valve
Top Rail
|SIZE|ITEM|PART CODE|QTY| |---|---|---|---| |3.05 m x 76 cm (10' x 30")|56493 56407|/|0| |3.66 m x 76 cm (12' x 30")|56417|/|0| |3.66 m x 1.00 m (12' x 39.5")|56419|/|0| |3.66 m x 1.00 m (12' x 39.5")|5614W|/|0| |3.66 m x 1.22 m (12' x 48")|56421|/|0| |4.27 m x 84 cm (14' x 33")|56597|/|0| |4.27 m x 1.07 m (14' x 42")|56949|/|0| |4.27 m x 1.07 m (14' x 42")
|5614Y|/|0| |4.27 m x 1.22 m (14' x 48")|5612Y|/|0| |4.57 m x 1.07 m (15' x 42")|56686|/|0| |4.57 m x 1.22 m (15' x 48")|56439|/|0| |4.88 m x 1.22 m (16' x 48")|5613A|P6(H2)510ASS18|1| |5.49 m x 1.22 m (18' x 48")|56463|P6(H2)510ASS18|1|
|SIZE|ITEM|PART CODE|QTY| |---|---|---|---| |3.96 m x 1.07 m (13' x 42")|5614U|P05449|13| |4.88 m x 1.22 m (16' x 48")|56726|P04737|16| |5.49 m x 1.22 m (18' x 48")|56976|P61775ASS18|18| |5.49 m x 1.32 m (18' x 52")|56884|P05224|18| |6.10 m x 1.32 m (20' x 52")|56881|P05224|20| |6.71 m x 1.32 m (22' x 52")|56887|P05224|22|
######## B
Vertical Pool Leg
|SIZE|ITEM|PART CODE|QTY| |---|---|---|---| |3.96 m x 1.07 m (13' x 42")|5614U|P05450|13| |4.88 m x 1.22 m (16' x 48")|56726|P04736|16| |5.49 m x 1.22 m (18' x 48")|56976|P61776ASS18|18| |5.49 m x 1.32 m (18' x 52")|56884|P61352ASS16|18|
|6.10 m x 1.32 m (20' x 52")|56881|P61352ASS16|20| |6.71 m x 1.32 m (22' x 52")|56887|P61352ASS16|22|
######## L
Pool Inlet Strainer
|SIZE|ITEM|PART CODE|QTY| |---|---|---|---| |3.05 m x 76 cm (10' x 30")|56493 56407|/|0| |3.66 m x 76 cm (12' x 30")|56417|/|0| |3.66 m x 1.00 m (12' x 39.5")|56419|/|0| |3.66 m x 1.00 m (12' x 39.5")|5614W|/|0| |3.66 m x 1.22 m (12' x 48")|56421|/|0| |4.27 m x 84 cm (14' x 33")|56597|/|0| |4.27 m x 1.07 m (14' x 42")|56949|/|0| |4.27 m x 1.07 m (14' x 42")|5614Y|/|0| |4.27 m x 1.22 m (14' x 48")|5612Y|/|0| |4.57 m x 1.07 m (15' x 42")|56686|/|0| |4.57 m x 1.22 m (15' x 48")|56439|/|0| |4.88 m x 1.22 m (16' x 48")|5613A|P6(H2)1317ASS18|1| |5.49 m x 1.22 m (18' x 48")|56463|P6(H2)1317ASS18|1|
######## C
T-connector
|SIZE|ITEM|PART CODE|QTY| |---|---|---|---| |3.96 m x 1.07 m (13' x 42")|5614U|P05452|13| |4.88 m x 1.22 m (16' x 48")|56726|P04738|16| |5.49 m x 1.22 m (18' x 48")|56976|P61777ASS18|18| |5.49 m x 1.32 m (18' x 52")|56884|P61761ASS18|18| |6.10 m x 1.32 m (20' x 52")|56881|P61763ASS18|20| |6.71 m x 1.32 m (22' x 52")|56887|P61763ASS18|22|
######## D
G
Pin
Liner
|SIZE|ITEM|PART CODE|QTY| |---|---|---|---| |3.96 m x 1.07 m (13' x 42")|5614U|P05493|28| |4.88 m x 1.22 m (16' x 48")|56726|P61754ASS18|34| |5.49 m x 1.22 m (18' x 48")|56976|P61759ASS18|38| |5.49 m x 1.32 m (18' x 52")|56884|P61759ASS18|38| |6.10 m x 1.32 m (20' x 52")|56881|P61759ASS18|42| |6.71 m x 1.32 m (22' x 52")|56887|P61759ASS18|46|

|SIZE|ITEM|PART CODE|QTY| |---|---|---|---| |3.96 m x 1.07 m (13' x 42")|5614U|P05479|1| |4.88 m x 1.22 m (16' x 48")|56726|P04745|1| |5.49 m x 1.22 m (18' x 48")|56976|P04425|1| |5.49 m x 1.32 m (18' x 52")|56884|P04419|1| |6.10 m x 1.32 m (20' x 52")|56881|P04421|1| |6.71 m x 1.32 m (22' x 52")|56887|P04423|1|
######## E
######## H
Footing
Hose Adaptor
|SIZE|ITEM|PART CODE|QTY| |---|---|---|---| |3.96 m x 1.07 m (13' x 42")|5614U|P6H1419ASS16|1| |4.88 m x 1.22 m (16' x 48")|56726|P6H1419ASS16|1| |5.49 m x 1.22 m (18' x 48")|56976|P6H1419ASS16|1| |5.49 m x 1.32 m (18' x 52")|56884|P6H1419ASS16|1| |6.10 m x 1.32 m (20' x 52")|56881|P6H1419ASS16|1| |6.71 m x 1.32 m (22' x 52")|56887|P6H1419ASS16|1|
|SIZE|ITEM|PART CODE|QTY| |---|---|---|---| |3.96 m x 1.07 m (13' x 42")|5614U|P05453|13| |4.88 m x 1.22 m (16' x 48")|56726|P61756ASS18|16| |5.49 m x 1.22 m (18' x 48")|56976|P61760ASS18|18| |5.49 m x 1.32 m (18' x 52")|56884|P61760ASS18|18| |6.10 m x 1.32 m (20' x 52")|56881|P61760ASS18|20| |6.71 m x 1.32 m (22' x 52")|56887|P61760ASS18|22|
######## F
######## I
Pin Gasket
Stopper
|SIZE|ITEM|PART CODE|QTY| |---|---|---|---| |3.96 m x 1.07 m (13' x 42")|5614U|P61755ASS18|28| |4.88 m x 1.22 m (16' x 48")|56726|P61755ASS18|34| |5.49 m x 1.22 m (18' x 48")|56976|P61755ASS18|38| |5.49 m x 1.32 m (18' x 52")|56884|P61755ASS18|38| |6.10 m x 1.32 m (20' x 52")|56881|P61755ASS18|42| |6.71 m x 1.32 m (22' x 52")|56887|P61755ASS18|46|
|SIZE|ITEM|PART CODE|QTY| |---|---|---|---| |3.96 m x 1.07 m (13' x 42")|5614U|P6C1418ASS19|3| |4.88 m x 1.22 m (16' x 48")|56726|P6C1418ASS19|2| |5.49 m x 1.22 m (18' x 48")|56976|P6C1418ASS19|2| |5.49 m x 1.32 m (18' x 52")|56884|P6C1418ASS19|2| |6.10 m x 1.32 m (20' x 52")|56881|P6C1418ASS19|2| |6.71 m x 1.32 m (22' x 52")|56887|P6C1418ASS19|2|
CHOOSE THE CORRECT LOCATION NOTE: The pool must be set up on a completely flat and level surface. Please do not install the pool if the surface is inclined or sloped. Correct conditions to set up the pool:
######## J
Drain Valve Cap
|SIZE|ITEM|PART CODE|QTY| |---|---|---|---| |3.96 m x 1.07 m (13' x 42")|5614U|P6H1158ASS16|1| |4.88 m x 1.22 m (16' x 48")|56726|P6H1158ASS16|1| |5.49 m x 1.22 m (18' x 48")|56976|P6H1158ASS16|1| |5.49 m x 1.32 m (18' x 52")|56884|P6H1158ASS16|1| |6.10 m x 1.32 m (20' x 52")|56881|P6H1158ASS16|1| |6.71 m x 1.32 m (22' x 52")|56887|P6H1158ASS16|1|
######### Incorrect conditions to set up the pool:
######## K
Control Valve
|SIZE|ITEM|PART CODE|QTY| |---|---|---|---| |3.96 m x 1.07 m (13' x 42")|5614U|/|0| |4.88 m x 1.22 m (16' x 48")|56726|P6(H2)510ASS18|1| |5.49 m x 1.22 m (18' x 48")|56976|P6(H2)510ASS18|1| |5.49 m x 1.32 m (18' x 52")|56884|P6(H2)510ASS18|1| |6.10 m x 1.32 m (20' x 52")|56881|P6(H2)510ASS18|1| |6.71 m x 1.32 m (22' x 52")|56887|P6(H2)510ASS18|1|
####### Installation
Bestway Inflatables will not be responsible for damage caused to the pool due to mishandling or failure to follow these instructions.
######## L
Pool Inlet Strainer
|SIZE|ITEM|PART CODE|QTY| |---|---|---|---| |3.96 m x 1.07 m (13' x 42")|5614U|/|0| |4.88 m x 1.22 m (16' x 48")|56726|P6(H2)1317ASS18|1| |5.49 m x 1.22 m (18' x 48")|56976|P6(H2)1317ASS18|1| |5.49 m x 1.32 m (18' x 52")|56884|P6(H2)1317ASS18|1| |6.10 m x 1.32 m (20' x 52")|56881|P6(H2)1317ASS18|1| |6.71 m x 1.32 m (22' x 52")|56887|P6(H2)1317ASS18|1|
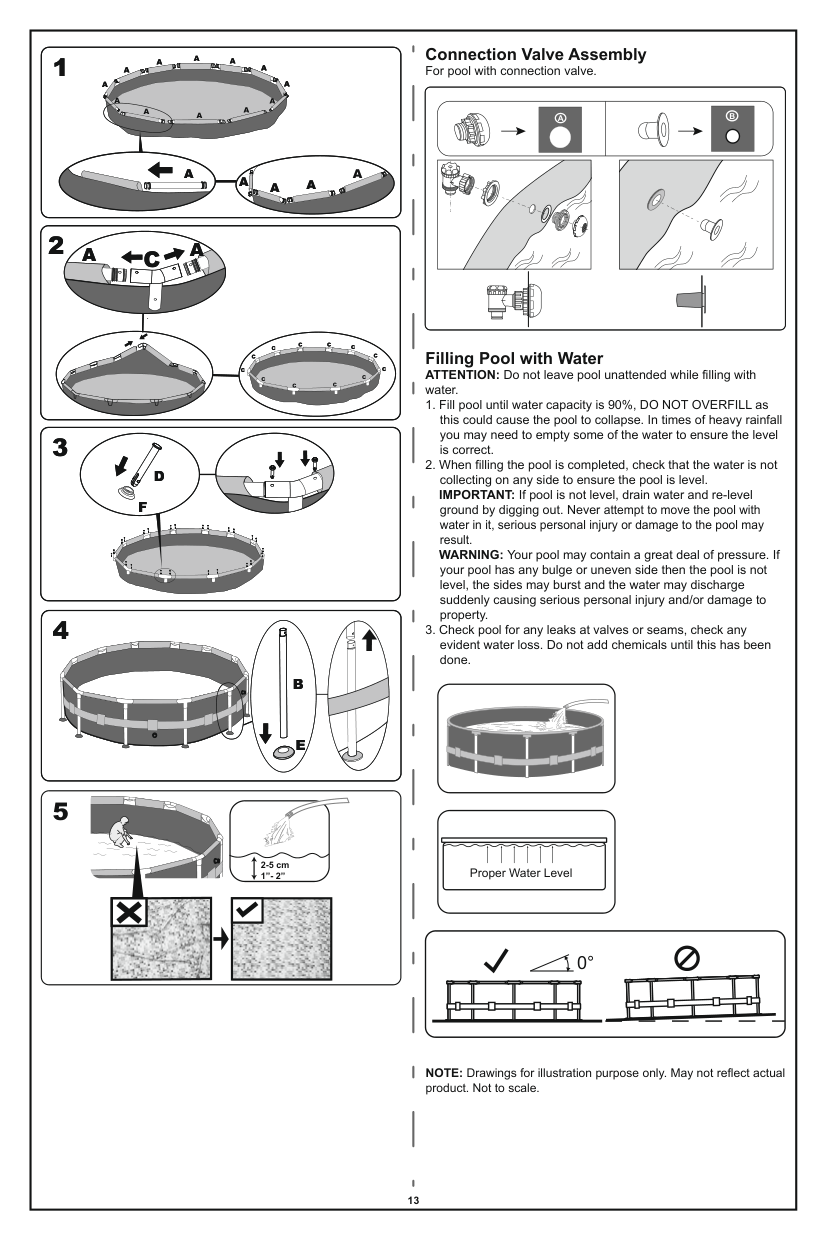
####### Connection Valve Assembly For pool with connection valve.
#### 1
A A A
A A A
A
A
A
A
A A
A A
A
A
A
A
A
A
AA
AA
A B
A
A
A
A
A
A
A A
A A
#### 2
##### CA A
CA A
| | | | | | |---|---|---|---|---| | | | | | |
C C
C C
C
C
C
C
Filling Pool with Water ATTENTION: Do not leave pool unattended while filling with water.
C
C
C
C
C
C

C
C
C
C
C
C
C
C
C
C
#### 3
D F
#### 4
B
E
#### 5
2-5 cm 1”- 2”
Proper Water Level
|| |---|

0°
NOTE: Drawings for illustration purpose only. May not reflect actual product. Not to scale.
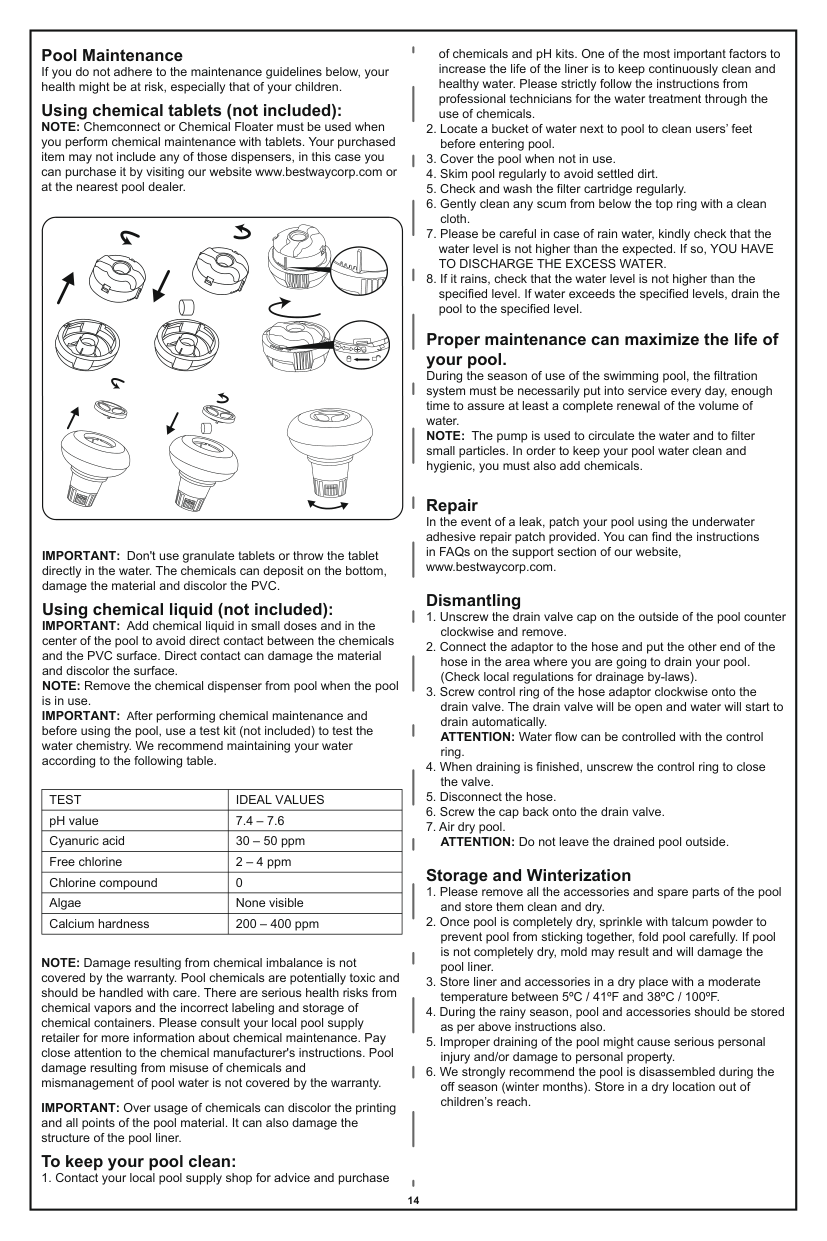
Pool Maintenance If you do not adhere to the maintenance guidelines below, your health might be at risk, especially that of your children. Using chemical tablets (not included): NOTE: Chemconnect or Chemical Floater must be used when you perform chemical maintenance with tablets. Your purchased item may not include any of those dispensers, in this case you can purchase it by visiting our website www.bestwaycorp.com or at the nearest pool dealer.
of chemicals and pH kits. One of the most important factors to increase the life of the liner is to keep continuously clean and healthy water. Please strictly follow the instructions from professional technicians for the water treatment through the use of chemicals.

Proper maintenance can maximize the life of your pool. During the season of use of the swimming pool, the filtration system must be necessarily put into service every day, enough time to assure at least a complete renewal of the volume of water. NOTE: The pump is used to circulate the water and to filter small particles. In order to keep your pool water clean and hygienic, you must also add chemicals.
Repair In the event of a leak, patch your pool using the underwater adhesive repair patch provided. You can find the instructions in FAQs on the support section of our website, www.bestwaycorp.com.
IMPORTANT: Don't use granulate tablets or throw the tablet directly in the water. The chemicals can deposit on the bottom, damage the material and discolor the PVC.
####### Dismantling
Using chemical liquid (not included): IMPORTANT: Add chemical liquid in small doses and in the center of the pool to avoid direct contact between the chemicals and the PVC surface. Direct contact can damage the material and discolor the surface. NOTE: Remove the chemical dispenser from pool when the pool is in use. IMPORTANT: After performing chemical maintenance and before using the pool, use a test kit (not included) to test the water chemistry. We recommend maintaining your water according to the following table.
|TEST|IDEAL VALUES| |---|---| |pH value|7.4 – 7.6| |Cyanuric acid|30 – 50 ppm| |Free chlorine|2 – 4 ppm| |Chlorine compound|0| |Algae|None visible| |Calcium hardness|200 – 400 ppm|
####### Storage and Winterization
NOTE: Damage resulting from chemical imbalance is not covered by the warranty. Pool chemicals are potentially toxic and should be handled with care. There are serious health risks from chemical vapors and the incorrect labeling and storage of chemical containers. Please consult your local pool supply retailer for more information about chemical maintenance. Pay close attention to the chemical manufacturer's instructions. Pool damage resulting from misuse of chemicals and mismanagement of pool water is not covered by the warranty.
IMPORTANT: Over usage of chemicals can discolor the printing and all points of the pool material. It can also damage the structure of the pool liner.
####### To keep your pool clean:
For support please visit us at:
bestwaycorp.com/support
©2020 Bestway Inflatables & Material Corp. All rights reserved/Tous droits réservés/Todos los derechos reservados/Alle Rechte vorbehalten/Tutti i diritti riservati ®™ Trademarks used in some countries under license to/ Marques ®™ utilisées dans certains pays sous la licence de/ Marcas comerciales ®™ utilizadas en algunos países bajo la licencia de/ ®™ Die Warenzeichen werden in einigen Ländern verwendet unter Lizenz der/ ®™ Marchi utilizzati in alcuni paesi concessi in licenza a Bestway Inflatables & Material Corp., No.3065 Cao An Road, Shanghai, 201812, China. Manufactured,distributed and represented in the European Union by/ Fabriqués, distribués et représentés dans l’Union Européenne par/Fabricado, distribuido y representado en la Unión Europea por/ Hergestellt, vertrieben und in der Europäischen Union vertreten von/Prodotto, distribuito e rappresentato nell'Unione Europea da Bestway (Europe) S.r.l., Via Resistenza, 5, 20098 San Giuliano Milanese (Milano), Italy Distributed in North America by/Distribués en Amérique du Nord par/Distribuido en Norteamérica por Bestway (USA) Inc., 3411 E. Harbour Drive, Phoenix, Arizona 85034, United States of America Tel: +86 21 69135588 (For U.S. and Canada) Distributed in Latin America by/Distribué en Amérique latine par/Distribuido en Latinoamérica por/Distribuído na América Latina por Bestway Central & South America Ltda, Salar Ascotan 1282, Parque Enea, Pudahuel, Santiago, Chile Distributed in Australia & New Zealand by Bestway Australia Pty Ltd, Unit 2/98-104 Carnarvon St Silverwater, NSW 2128, Australia Tel: Australia: (+61) 29 0371 388; New Zealand: 0800 142 101 Exported by/Exporté par/Exportado por/Exportiert von/Esportato da Bestway (Hong Kong) International Ltd./Bestway Enterprise Company Limited Suite 713, 7/Floor, East Wing, Tsim Sha Tsui Centre, 66 Mody Road, Kowloon, Hong Kong
###### www.bestwaycorp.com
303021238481