
Ask AI
— answers from the official manualAnswers from the official manual.
Common questions
Common Questions
27 totalHow do I change the water filter on my Samsung refrigerator?
Shut off the water supply, then turn the water filter about 1/4 turn counter-clockwise and pull it out of the filter case. Insert the new Samsung brand filter, push it in, and turn it clockwise until it locks. After installing the new filter, press and hold the Crushed Ice button for 3 seconds to reset the filter indicator from red to off. (Page 22)
What are the recommended temperatures for the freezer and fridge compartments?
The recommended temperatures for the Freezer and Fridge Compartments are 0 °F (-18 °C) and 37 °F (3 °C) respectively. The freezer can be set between -8 °F and 5 °F (-23 °C and -15 °C), and the fridge can be set between 34 °F and 44 °F (1 °C and 7 °C). Press the respective Freezer or Fridge button repeatedly to adjust the temperature by 1 °F (or 1 °C) with each press. (Page 24–25)
How do I know when it's time to replace the water filter?
The Filter light on the control panel turns red to indicate it is time to change the water filter cartridge, usually after the refrigerator has dispensed about 300 gallons of water (approximately every 6 months). If water is not dispensing or is dispensing slowly, the water filter may be clogged and needs replacement. Areas with high lime content in the water may cause the filter to clog more quickly. (Page 21)
What does the 'PC-Er' blinking display mean on my refrigerator?
The 'PC-Er' blinking display indicates a communication error between the Display and Main Controller, and the refrigerator will also beep. If the blinking continues for a long period of time, you should contact a Samsung Electronics Service Center. (Page 25)
Why is my refrigerator not making ice?
The refrigerator may take longer to make ice if it is not sufficiently cool, such as when first installed. You should also check that the water line is connected and the shut-off valve is open, ensure the ice making function has not been manually stopped, and verify that the water filter is properly installed. For proper ice maker operation, water pressure of 20 to 125 psi is required. (Page 32)
What should I do if I'm going on vacation for more than three weeks?
Remove all food and the ice in the ice bucket, unplug the refrigerator, and close the water valve to prevent water leakage. Wipe excess moisture from inside the walls and leave the doors open to prevent odors and mold from developing. If you will be away for less than three weeks, there is no need to disconnect the refrigerator from the power supply. (Page 6)
Show 21 more questions
What should I do if the temperature display is blinking on my Samsung refrigerator?
How do I activate and cancel Power Freeze on the freezer?
How do I prepare my refrigerator if I'm going on a long vacation?
Why is my ice maker not producing ice?
What are the correct temperature and pressure requirements for the water supply line?
How do I properly clean the refrigerator?
What is Exhibition Mode and how do I activate or cancel it?
What should I do before installing my DA68 refrigerator?
How do I level my refrigerator?
What is the recommended temperature for the freezer and fridge?
How do I change the water filter?
What water pressure is required for the ice maker to operate properly?
Why is the temperature indicator blinking?
What should I do if I'm leaving for more than three weeks?
How long does it take to make a full bucket of ice after installation?
What should I do if the ice maker is not producing ice?
How do I activate Power Freeze and how long does it run?
How do I flush the water line after installing a new water filter?
How do I level the refrigerator and adjust the door height?
How do I clean the refrigerator safely?
How do I know when it's time to change the water filter, and how do I reset it?
Full Manual
108 pages
Refrigerator user manual imagine the possibilities Thank you for purchasing this Samsung product. Free Standing Appliance This manual is made with 100 % recycled paper. DA68-03194D-00.indb 1
English - 2
Safety Information
Warning
Hazards or unsafe practices that may result in severe personal injury or death.Caution
Hazards or unsafe practices that may result in minor personal injury or property damage. Do NOT attempt. Do NOT disassemble. Do NOT touch. Follow directions carefully. Unplug the power plug from the wall socket. Make sure the machine is grounded to prevent electric shock. Call the contact center for help. Note. Safety information ContentsSafety Information………………………………………………………… 2
Setting Up Your Refrigerator… ……………………………………… 9
Operating Your Samsung Refrigerator…………………………
19Troubleshooting…………………………………………………………
32 DA68-03194D-00.indb 2
English - 3 safety information These warning signs are here to prevent injury to you and others. Please follow them carefully. After reading this section, keep it in a safe place for future reference.
Warning
Critical Transportation And
Site Warnings
Warning
Critical Installation Warnings

English - 4
Caution
Installation Cautions
Warning
Critical Usage Warnings

English - 5 safety information products in the refrigerator. -- Products that require strict temperature controls must not be stored in the refrigerator.

English - 6 changing the interior lamps in the refrigerator -- Otherwise, there is a risk of electric shock.
Caution
Usage Cautions

English - 7 safety information
Caution
Cleaning And Maintenance
Cautions
Warning
Warning
Critical Disposal Warnings

English - 8
Additional Tips For
Proper Usage

English - 9 setting up
Getting Ready To Install The
Refrigerator
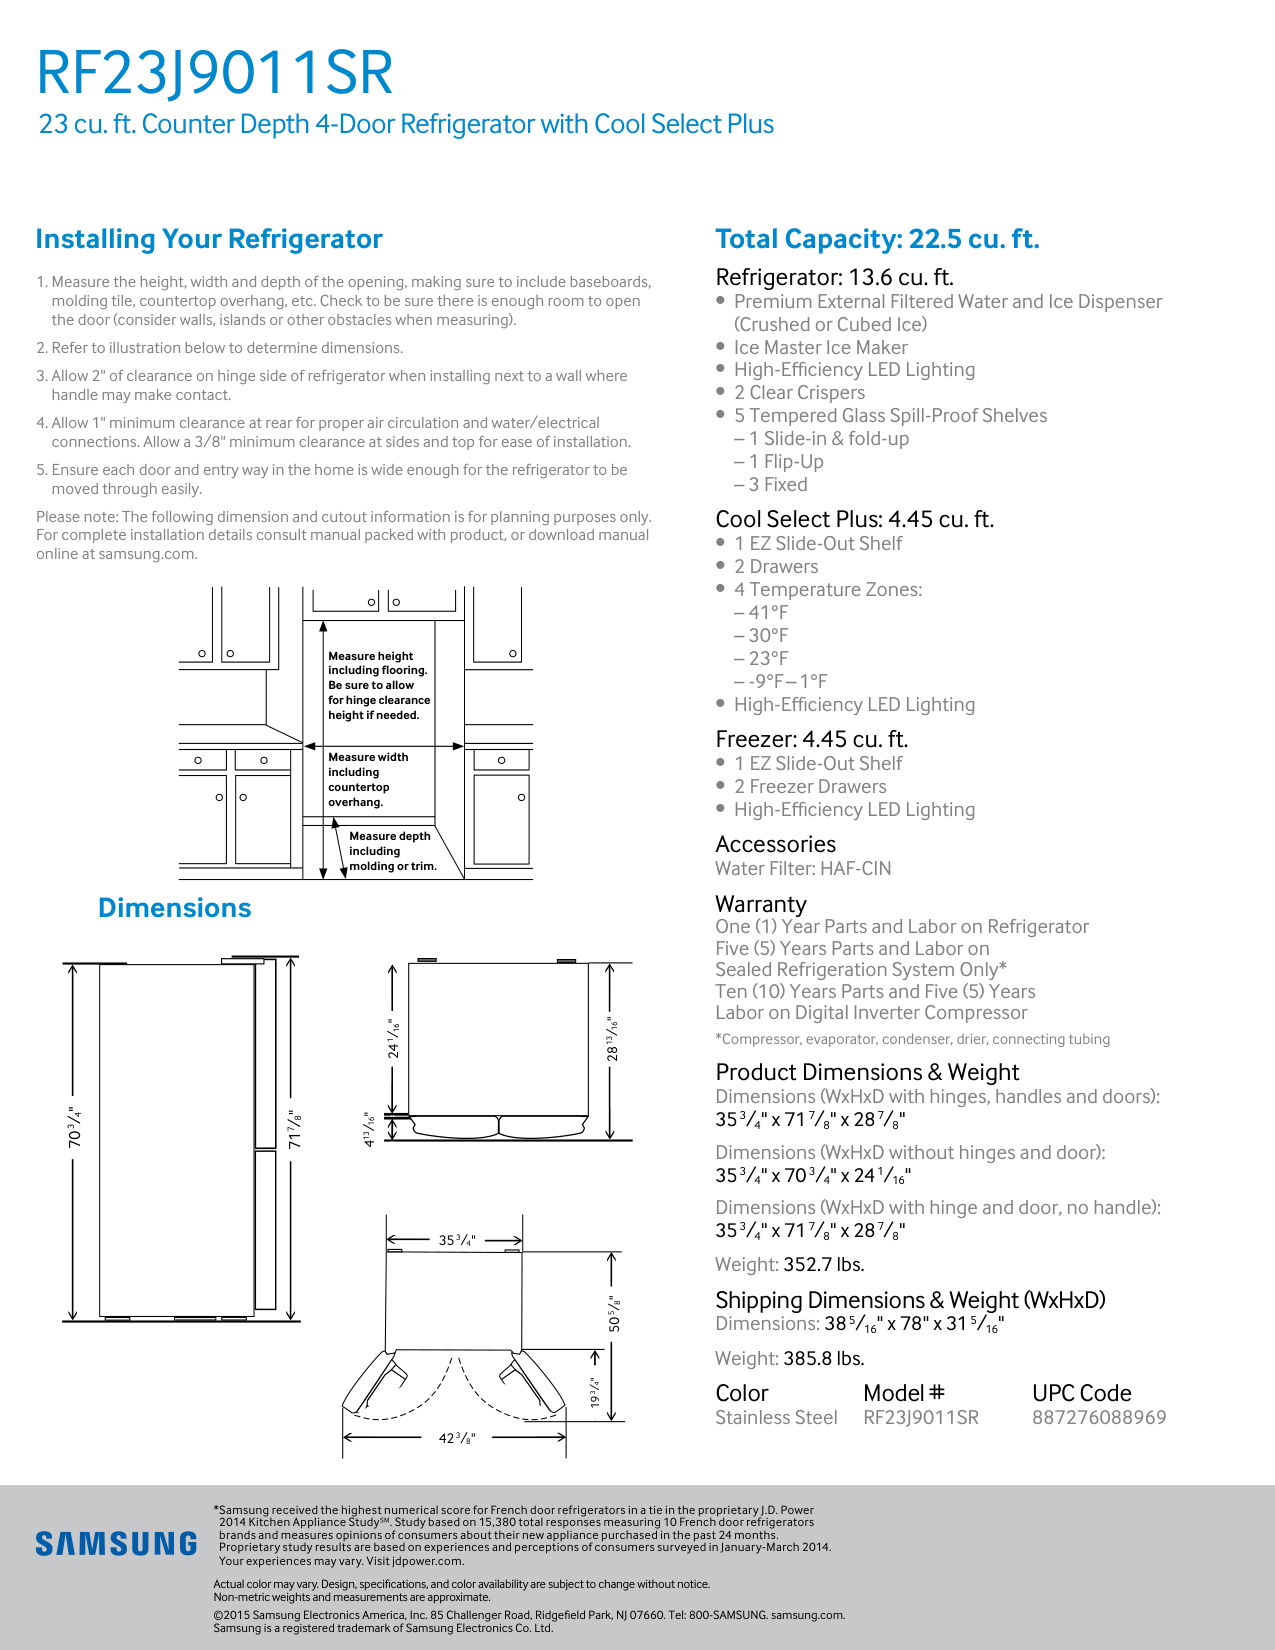
Congratulations on the purchase of your Samsung refrigerator. We hope you enjoy the state-of-art features and efficiencies that this new appliance offers. Selecting the best location for the Refrigerator Choose :(10 °C).
A
Bb
Cc
Dd
Depth “A” 28 7/8” (733 mm) Width “B” 35 3/4” (908 mm) Height “C” 70 3/4” (1797 mm) Overall Height “D” 71 7/8” (1825 mm) 59 6/8” (1519 mm) 12” (305.5 mm) 125° 125° 2” (50 mm) 35 3/4” (908 mm) 24” (610 mm) 2 6/8” (72.3 mm) 1 3/4” (43 mm) 42 1/4” (1075 mm) 11 6/8” (300 mm) 11 6/8” (300 mm)
English - 10 When moving your refrigerator To prevent floor damage, be sure the front leveling legs are in the up position (above the floor). Refer to “HOW TO LEVEL THE REFRIGERATOR” on page 15. Flooring For proper installation, you must place this refrigerator on a level, hard surface that is the same height as the rest of the floor. This surface should be strong enough to support a fully loaded refrigerator. To protect the finish of the flooring, cut out a large section of the cardboard carton and place it under the refrigerator where you are working. When moving the refrigerator, you need to pull and push it straight forwards or back. Do not wiggle it from side to side.
Removing The Refrigerator
Doors
If the refrigerator is too large to pass through your doorway easily, you can remove the refrigerator doors. Tools you will need (Not provided) Philips screwdriver (+) Flat-blade screwdriver (-) Socket wrench (10 mm) Pliers Allen wrench (4 mm) Allen wrench (5 mm)Caution

English - 11 setting up
Disassembling The Fridge
Doors
A
B
D
C
B
E
E
F
Caution

English - 12
Disassembling The Freezer
Doors
Caution
A
B
C
D
E
Assembling The
Refrigerator Doors
Caution
A
B
DA68-03194D-00.indb 12
English - 13 setting up
Caution
C
D
E
A
B
B

English - 14
E
C
E
D
Caution
Keep the clips out of the reach of children and make sure that children do not play with them or put them into their mouths.Caution
E
DA68-03194D-00.indb 14
English - 15 setting up
Leveling The Refrigerator
And Adjusting The Height
And Gap Of The Doors
How to level the refrigerator To ensure your refrigerator is stable, install it on a flat, level surface and level it according to the instructions in this section.Caution
Failure to level the refrigerator may result in the refrigerator tipping over and causing personal injury. -- If the front of the refrigerator is slightly higher than the rear, the doors can be opened and closed more easily. -- When you install the refrigerator, make sure the adjustable legs touch the floor. The adjustable legs are located just behind the doors on the bottom front right and left corners of the refrigerator. If the Refrigerator is on a floor that is not level, it can cause a height difference between the doors.
English - 16
How To Adjust The Door
Height
If any one of the doors is lower than the other:Caution
How To Adjust The Door Gap
If the gap between the left and right fridge compartment doors is not even.
English - 17 setting up
Installing The Water
Dispenser Line
A water dispenser with a filter is one of the helpful features on your new refrigerator. To help promote better health, the water filter removes unwanted particles from your water. However, it does not sterilize or destroy microorganisms. You may need to purchase a water purifying system to do that. The water line also connects to the ice maker. For the ice maker to operate properly, water pressure of 20 ~ 125 psi is required. If the refrigerator is installed in an area with low water pressure (below 20 psi), you can install a booster pump to compensate for the low pressure. After you have connected the water line, make sure the water storage tank inside the refrigerator is properly filled. To do this, press the water dispenser lever until the water runs from the water outlet.
English - 18
Caution
Product Features
• Triple Cooling
-- Separate condensers in the freezer, fresh food, and convertible compartments maintain optimum temperature and humidity in each compartment and prevent smells from one compartment leaking into another.• Flex Zone
-- Lets you store food at various, user-selectable temperatures (Freezer, Soft Freezing, Chill, and Cool).
English - 19 Operating ( 1 ) Freezer (Hold 3 sec for Power Freeze) Touch this button to set the freezer to your desired temperature. You can set the temperature between -8 °F and 5 °F (between -23 °C and -15 °C). Touch and hold this button for 3 seconds to turn on Power Freeze and decrease the time needed to freeze products in the Freezer. This can be helpful if you need to quickly freeze easily spoiled items or if the temperature in the freezer has warmed dramatically. (For example, if the door was left open.) To cancel the Power Freeze function, press and hold the Freezer/Power Freeze (3 sec) button again for 3 seconds. ( 2 ) Door Alarm (Hold 3 sec for °C↔°F) This button serves two purposes:
Using The Control Panel
(1) (2) (3) (4) (5) (7) (8) (6) DA68-03194D-00.indb 19
English - 20 ( 3 ) Energy Saver (Hold 3 sec for Control Lock) Touching this button turns Energy Saver mode on and off. When you turn Energy Saver on, the Energy Saver icon lights. Turn Energy Saver off and the icon goes off. The Energy Saver function is set to “ON” in the factory. If condensation or water drops appear on the doors, turn the Energy Saver mode off. Also, touching and holding this button for 3 seconds turns on Control Lock which locks the display panel and dispenser buttons so the buttons can not be used. The Control Lock icon lights up to indicate you’ve activated the Control Lock function. Touch and hold this button again for 3 seconds to turn Control Lock off. ( 4 ) Fridge (Hold 3 sec for Power Cool) Touch this button to set the fridge to your desired temperature. You can set the temperature between 34 °F and 44 °F (between 1 °C and 7 °C). Touch and hold this button for 3 seconds turn Power Cool on and decrease the time needed to cool products in the Fridge. This can be helpful if you need to quickly cool easily spoiled items or if the temperature in the fridge has warmed dramatically. (For example, if the door was left open.) To cancel the Power Cool function, press and hold the Fridge/Power Cool (3 sec) button again for 3 seconds. ( 5 ) Cool Select+ (Cool Select Room) The CoolSelect+ button lets you set the Cool Select Room on the bottom right of your refrigerator to one of four settings: Freezer, Soft Freezing, Chill, or Cool. Touch and hold the CoolSelect+ button for three seconds to activate the Cool Select Room function, and then touch the CoolSelect+ button repeatedly until the desired mode is selected. Freezer Select Freezer to set the same temperature as the freezer.
(-1 °C).
Cool Select Cool to set the temperature to41 °F (5 °C).

English - 21 Operating ( 6 ) Ice Type Touch the Ice Type button to change the ice type. Each time you touch the Ice Type button, the cubed and crushed ice modes alternate and the Cubed or Crushed ice icon lights up, indicating your selection. If you don’t need ice, turn the function off to save on water and energy consumption. (See Ice Maker Off below.) Lighting Touch and hold the Cubed button for three seconds to set the Dispenser LED lamp (under the display) to continuous mode so that it stays on continuously. If you want the Dispenser lamp to come on only when some one uses the dispenser, touch and hold this button for 3 seconds again to turn the continuous mode off. ( 7 ) Ice Maker Off (Hold 3 sec) Touch the Ice Maker Off button for 3 seconds until the Ice Maker Off Indicator ( ) illuminates. ( 8 ) Filter Water filter usage This icon lights when you need to change the filter, usually after the refrigerator has dispensed about 300 gallons of water (after about 6 months). After you install the new water filter, touch and hold the Crushed Ice button for 3 Seconds to reset the filter. -- If water is not dispensing or dispensing slowly, you need to replace the water filter because the water filter is clogged. -- Some areas have large amounts of lime in their water, which causes the water filter to clog more quickly. Exhibition Mode
Caution

English - 22
Changing The Water Filter
Warning
To reduce risk of water damage to your property DO NOT use generic brands of water filters in your SAMSUNG Refrigerator.Use Only Samsung Brand
Water Filters.
SAMSUNG is not legally responsible for any damage, including, but not limited to, property damage caused by water leakage from the use of a generic water filter. (Red) SAMSUNG Refrigerators are designed to work ONLY WITH SAMSUNG Water Filters. The Filter light turns red to let you know when it is time to change your water filter cartridge. To give you time to get a new filter, the red light comes on just before the capacity of the current filter runs out. Changing the filter on time provides you with the freshest, cleanest water from your refrigerator.
English - 23 Operating Removing any residual matter inside the water supply line after installing the water filter.
Important:
The pressure of the water supply coming out of a reverse osmosis system going to the water inlet valve of the refrigerator needs to be between 241 and 827 kPa. If a reverse osmosis water filtration system is connected to your cold water supply, the water pressure to the reverse osmosis system needs to be a minimum of 276 to 414 kPa. If the water pressure to the reverse osmosis system is less than 276 to 414 kPa:
English - 24
Controlling The
Temperature
Recommended freezer and fridge compartment temperatures The recommended temperatures for the Freezer and Fridge Compartments are 0 °F and 37 °F (-18 °C and 3 °C) respectively. If the temperature of the Freezer and Fridge Compartments are too high or low, adjust the temperature manually.Controlling The Freezer
Temperature
Recommend Temp (Freezer) : 0 °F (-18 °C) Freezer The Freezer temperature can be set between -8 °F and 5 °F (or between -23 °C and -15 °C) to suit your particular needs. The default temperature is0 °F (-18 °C).
Press the Freezer button repeatedly until the desired temperature is shown in the temperature display. The temperature will change by 1 °F (or 1 °C) with each press in the order shown below. Fahrenheit : 0 °F ➞ -1 °F ➞ -2 °F ➞ -3 °F ➞ -4 °F➞ -5 °F ➞ -6 °F ➞ -7 °F ➞ -8 °F ➞ 5 °F ➞ 4 °F ➞
3 °F ➞ 2 °F ➞ 1 °F ➞ 0 °F.
Centigrade : -18 °C ➞ -19 °C ➞ -20 °C ➞ -21 °C➞ -22 °C ➞ -23 °C ➞ -15 °C ➞ -16 °C ➞ -17 °C
➞ -18 °C.

English - 25 Operating
Controlling The Fridge
Temperature
Recommend Temp (Fridge) : 37 °F (3 °C ) The Fridge temperature can be set between 34 °F and 44 °F (or between 1 °C and 7 °C) to suit your particular needs. The default temperature is 37 °F(8 °C).
Press the Fridge button repeatedly until the desired temperature is shown in the temperature display. The temperature will change by 1 °F (or 1 °C) with each press in the order shown below. Fahrenheit : 37 °F ➞ 36 °F ➞ 35 °F ➞ 34 °F ➞44 °F ➞ 43 °F ➞ 42 °F ➞ 41 °F ➞ 40 °F ➞ 39 °F
➞ 38 °F ➞37 °F.
Centigrade : 3 °C ➞ 2 °C ➞ 1 °C ➞ 7 °C ➞ 6 °C➞ 5 °C ➞ 4 °C ➞ 3 °C.
Using The Ice And Cold
Water Dispensers
Push the Cubed or Crushed Ice button to select the ice you want dispensed Using the ice lever ( 1 ) Push the Ice lever dispenser ( 1 ) gently with your glass. Ice will be released from the dispenser. You can choose the type of ice by pushing the cubed or crushed button first.No Ice
Select this if you want to turn ice maker off Using the Water lever ( 2 ) Push the Water lever dispenser ( 2 ) gently with your glass. Water will be released from the dispenser. ( 1 ) ( 2 )
English - 26 Using the Ice & Water Dispenser together To get Ice and water, push the Ice lever ( 1 ) first for ice, then move your glass down and press the water dispenser lever ( 2 ) for water.
Maintaining The Ice Bucket
Making Ice
Caution
Caution
Caution

English - 27 Operating
Caution
Using The Ice Off Function
When you select the Ice Off mode, remove all ice cubes from the bucket. If you leave the ice cubes in the bucket, the ice cubes may clump together, making it difficult to remove them. To remove the ice bucket safely and avoid injury, hold the bottom of the bucket with one hand and the side of the bucket with the other. Then, lift up on the ice bucket, and pull it straight out. To put the ice bucket back in, push it firmly straight back.Caution
Going On Vacation...
If you are going on a long vacation or business trip and won’t use the water or ice dispensers for a long time: -- Close the water valve. Otherwise, water leakage may occur. -- Remove all food and the ice in the ice bucket. -- Unplug the refrigerator. -- Wipe excess moisture from inside and leave the doors open. Otherwise, odor and mold may develop. DA68-03194D-00.indb 27
English - 28
Ice Maker Do’S And Don’Ts
Do not put your fingers, hands or any other unsuitable objects in the chute or ice-maker bucket. -- You can hurt yourself or damage the refrigerator. Never put your finger or any other objects in the dispenser opening. -- You can injure yourself. Do not try to disassemble the ice maker. Do not wash or spray the ice bucket with water while it is in the refrigerator. Remove it to clean it.Caution

English - 29 Operating
Parts And Features
Use this page to become more familiar with the parts and features of the Refrigerator. Fridge Fixed-Shelf Quick Space -Shelf Egg tray Water filter Foldable-Shelf Ice-Maker Fridge Multi-Purpose Guard Easy Fresh Vegetable & Fruit Drawers Easy Slide-Shelf Dry Food and Meat Storage Bin Freezer Door Bins Freezer Cool select room When closing the door, make sure the Vertical Hinged Section is in the correct position to avoid scratching the other door. If the Vertical Hinged Section is reversed, put it back into the correct position, and then close the door. Moisture may appear at times on the Vertical Hinged Section. The door handle may become loose over time. If this happens, tighten the bolts found on the inside of the door. If you close one door with too much force, the other door may open. When the door opens, the interlock switch automatically turns off the auger motor in the ice maker for safety reasons. If the interior or exterior LED lamp has gone out, please contact Samsung service. DA68-03194D-00.indb 29
English - 30
Removing The Refrigerator
Accessories
Caution
Caution

English - 31 Operating
Cleaning The Refrigerator
Warning
Changing The Interior
Lights
Freezer / Fridge LED LampCaution

English - 32 Troubleshooting
Problem
Solution
The refrigerator does not work at all or it does not chill sufficiently.
English - 33 troubleshooting
Problem
Solution
You can hear water bubbling in the refrigerator.
Warranty (USA)
Warranty On Samsung Refrigerator
Limited Warranty To Original Purchaser
This Samsung brand product, as supplied and distributed by Samsung Electronics America, Inc. (Samsung) and delivered new, in the original carton to the original consumer purchaser, is warranted by Samsung against manufacturing defects in materials and workmanship for a limited warranty period of: One (1) year Parts and Labor on Refrigerator Five (5) years Parts and Labor on sealed Refrigeration system only* Ten (10) years Parts and Five (5) years Labor on Digital Inverter Compressor (*Compressor, evaporator, condenser, drier, connecting tubing) This limited warranty begins on the original date of purchase, and is valid only on products purchased and used in the United States. To receive warranty service, the purchaser must contact Samsung for problem determination and service procedures. Warranty service can only be performed by a Samsung authorized service center. The original dated bill of sale must be presented upon request as proof of purchase to Samsung or Samsung authorized service center. Samsung will repair or replace any part found to be defective, at our option and at no charge as stipulated herein, with new or reconditioned parts during the limited warranty period specified above. All replaced parts and products become the property of Samsung and must be returned to Samsung. Replacement parts and products assume the remaining original warranty, or ninety (90) days, whichever is longer. In-home service will be provided during the warranty labor period subject to availability within the contiguous United States. In-home service is not available in all areas. To receive in-home service, the product must be unobstructed and accessible from floor level to service personnel. If during in-home service repair cannot be completed, it may be necessary to remove, repair and return the product. If in-home service is unavailable, Samsung may elect, at our option, to provide for transportation of our choice to and from a Samsung authorized service center. Otherwise, transportation to and from the Samsung authorized service center is the responsibility of the purchaser. This limited warranty covers manufacturing defects in materials and workmanship encountered in normal, noncommercial use of this product, and shall not apply to the following, including, but not limited to: damage which occurs in shipment; delivery and installation; applications and uses for which this product was not intended; altered product or serial numbers; cosmetic damage or exterior finish; accidents, abuse, neglect, fire, water, lightning or other acts of nature; use of products, equipment, systems, utilities, services, parts, supplies, accessories, applications, installations, repairs, external plumbing and leaks, external wiring, circuit breakers, fuses or connectors not supplied and authorized by Samsung, or which damage this product or result in service problems; incorrect electrical line voltage, fluctuations and surges; customer adjustments and failure to follow operating instructions, cleaning, maintenance and environmental instructions that are covered and prescribed in the instruction book; loss of food due to spoilage; consumable items including filters and light. THERE ARE NO EXPRESS WARRANTIES OTHER THAN THOSE LISTED AND DESCRIBED ABOVE, AND NO WARRANTIES WHETHER EXPRESS OR IMPLIED, INCLUDING, BUT NOT LIMITED TO, ANY IMPLIED WARRANTIES OF MERCHANTABILITY OR FITNESS FOR A PARTICULAR PURPOSE, SHALL APPLY AFTER THE EXPRESS WARRANTY PERIODS STATED ABOVE, AND NO OTHER EXPRESS WARRANTY OR GUARANTY GIVEN BY ANY PERSON, FIRM OR CORPORATION WITH RESPECT TO THIS PRODUCT SHALL BE BINDING ON SAMSUNG. SAMSUNG SHALL NOT BE LIABLE FOR LOSS OF REVENUE OR PROFITS, FAILURE TO REALIZE SAVINGS OR OTHER BENEFITS, OR ANY OTHER SPECIAL, INCIDENTAL OR CONSEQUENTIAL DAMAGES CAUSED BY THE USE, MISUSE OR INABILITY TO USE THIS PRODUCT, REGARDLESS OF THE LEGAL THEORY ON WHICH THE CLAIM IS BASED, AND EVEN IF SAMSUNG HAS BEEN ADVISED OF THE POSSIBILITY OF SUCH DAMAGES. NOR SHALL RECOVERY OF ANY KIND AGAINST SAMSUNG BE GREATER IN AMOUNT THAN THE PURCHASE PRICE OF THE PRODUCT SOLD BY SAMSUNG AND CAUSING THE ALLEGED DAMAGE. WITHOUT LIMITING THE FOREGOING, PURCHASER ASSUMES ALL RISK AND LIABILITY FOR LOSS, DAMAGE OR INJURY TO PURCHASER AND PURCHASER’S PROPERTY AND TO OTHERS AND THEIR PROPERTY ARISING OUT OF THE USE, MISUSE OR INABILITY TO USE THIS PRODUCT SOLD BY SAMSUNG NOT CAUSED DIRECTLY BY THE NEGLIGENCE OF SAMSUNG. THIS LIMITED WARRANTY SHALL NOT EXTEND TO ANYONE OTHER THAN THE ORIGINAL PURCHASER OF THIS PRODUCT, ISNontransferable And States Your Exclusive Remedy.
Some states do not allow limitations on how long an implied warranty lasts, or the exclusion or limitation of incidental or consequential damages, so the above limitations or exclusions may not apply to you. This warranty gives you specific legal rights, and you may also have other rights, which vary from state to state. To obtain warranty service, please contact Samsung at:Samsung Customer Care Center
Samsung Electronics America, Inc. 85 Challenger Road Ridgefield Park, NJ 076601-800-Samsung(726-7864)
www.samsung.com/us/support DA68-03194D-00.indb 34
If your refrigerator needs service Do not hesitate to call any Samsung Authorized Service Center nearby giving them your name, address and telephone number when your product is not functioning properly. Warranty Information (CANADA) Limited Warranty for Original Purchaser This Samsung product is warranted by Samsung Electronics Canada Inc. (hereafter referred to as SECA) against manufacturing defects in material or workmanship for the following periods: Labor : 1 years (in-home) Parts : 1 years Inverter Compressor : 10 years SECA further warrants that if this product fails to operate properly within the specified warranty period and the failure is due to improper workmanship or defective material, SECA will repair or replace the product at its option. In-home service is not available in all areas. Contact us to find out if in-home service is currently available in your area by using the contact information at the back of this warranty. All warranty repairs or part replacements must be performed by a SECA Authorized Service Center. (To find the nearest SECA Service Center, call 1-800-SAMSUNG (7267864) or visit our web site at www.samsung.com/ca) Obligation to the Original Owner The original dated sales receipt must be retained by the customer and is the only acceptable proof of purchase. It must be presented to a SECA Authorized Service Center at the time service is requested before warranty services are rendered. On all carry-in models, transportation to and from the Authorized Service Center is the responsibility of the customer. Exclusions of the Warranty This warranty does not cover damage due to accident, fire, flood, and/or other Acts of God, misuse, incorrect line voltage, improper installation, improper or unauthorized repairs, commercial use, or damage that occurs during shipping. Customer adjustments which are explained in this owners manual are not covered under the terms of this warranty. This warranty will automatically be voided for any unit found with a missing or altered serial number. This warranty is valid only on products purchased and used in the Canada.
Samsung Customer Care Center
Samsung Electronics Canada Inc. 2050 Derry Road West, Mississauga, Ontario L5N 0B9 Canada1-800-Samsung (726-7864)
www.samsung.com/ca/support (English) www.samsung.com/ca_fr/support (French) DA68-03194D-00.indb 35
Scan the QR code* or visit www.samsung.com/spsn to view our helpful How-to Videos and Live Shows
U.S.A
1-800-Samsung
(726-7864) www.samsung.com/us/support Samsung Electronics America, Inc. 85 Challenger Road Ridgefield Park, NJ 07660Canada
1-800-Samsung
(726-7864) www.samsung.com/ca/support (English) www.samsung.com/ca_fr/support (French) Samsung Electronics Canada Inc. 2050 Derry Road West Mississauga, Ontario L5N 0B9 Canada DA68-03194D-00.indb 36
Refrigerador manual del usuario imagine las posibilidades Gracias por adquirir este producto Samsung. Electrodoméstico independiente Este manual está impreso en papel 100 % reciclado. DA68-03194D-00.indb 1

Español - 2
Información Sobre Seguridad
Advertencia
Riesgos o prácticas inseguras que pueden causar graves lesiones personales o incluso la muerte.Precaución
Riesgos o prácticas inseguras que pueden causar lesiones personales leves o daños materiales menores. NO lo intente. NO lo desarme. Información sobre seguridad ContenidoInformación Sobre Seguridad………………………………………… 2
Puesta A Punto Del Refrigerador… ………………………………… 9
Funcionamiento Del Refrigerador Samsung… ………………
19Solución De Problemas… ……………………………………………
32 DA68-03194D-00.indb 2
Español - 3 información sobre seguridad NO lo toque. Siga atentamente las instrucciones. Desconecte el enchufe del tomacorriente. Asegúrese de que la unidad esté conectada a tierra para evitar una descarga eléctrica. Comuníquese con el centro de contacto para obtener ayuda. Nota. Estas señales de advertencia se incluyen aquí para evitar que usted o terceros sufran lesiones. Sígalas atentamente. Después de leer esta sección, consérvela en un lugar seguro para referencia futura.
Advertencia
Advertencias Muy Importantes
Para El Transporte Y El
Emplazamiento
Advertencia
Advertencias Muy Importantes
Para La Instalación

Español - 4
Precaución
Precauciones Para La
Instalación

Español - 5 información sobre seguridad
Advertencia
Advertencias Muy Importantes
Para El Uso

Español - 6 agente de servicios del fabricante.
Precaución
Precauciones De Uso

Español - 7 información sobre seguridad en el compartimiento del congelador. No coloque botellas ni recipientes de vidrio en el congelador. -- Cuando el contenido se congela, el vidrio puede romperse y provocar lesiones personales o daños materiales.
Precaución
Precauciones Para La Limpieza
Y El Mantenimiento
Advertencia

Español - 8
Advertencia
Advertencias Muy Importantes
Para La Eliminación De Residuos
Recomendaciones Adicionales
Para El Uso Correcto
Iso.
Pero si desea evitar un aumento excesivo en la temperatura de los alimentos congelados mientras descongela el electrodoméstico, envuelva los alimentos congelados con varias capas de papel de periódico.
Español - 9 puesta a punto
Preparación Para La
Instalación Del Refrigerador
Felicitaciones por haber adquirido el refrigerador Samsung. Esperamos que disfrute las funciones y ventajas de vanguardia que ofrece este nuevo electrodoméstico. Selección de la mejor ubicación para el refrigerador Elija:A
Bb
Cc
Dd
Profundidad “A” 28 7/8” (733 mm) Ancho “B” 35 3/4” (908 mm) Altura “C” 70 3/4” (1797 mm) Altura total “D” 71 7/8” (1825 mm) 59 6/8” (1519 mm) 12” (305.5 mm) 125° 125° 2” (50 mm) 35 3/4” (908 mm) 24” (610 mm) 2 6/8” (72.3 mm) 1 3/4” (43 mm) 42 1/4” (1075 mm) 11 6/8” (300 mm) 11 6/8” (300 mm)
Español - 10 Cuando mueva el refrigerador Para evitar que se dañe el piso, asegúrese de que las patas de ajuste delanteras estén en posición vertical (sobre el piso). Consulte “CÓMO NIVELAR EL REFRIGERADOR” en la página 15 del manual. Piso Para realizar una instalación correcta, se debe colocar el refrigerador sobre una superficie nivelada de material rígido que tenga la misma altura que el resto del piso. Esta superficie debe ser lo suficientemente resistente como para soportar el peso de un refrigerador completamente cargado. Para proteger el acabado del piso, corte una hoja grande de cartón y colóquela debajo del refrigerador mientras trabaja. Cuando mueva el refrigerador, tire y empuje en forma recta hacia adelante o hacia atrás. No lo mueva de lado a lado.
Cómo Retirar Las Puertas
Del Refrigerador
Si el refrigerador es demasiado grande para pasar a través de la entrada, se pueden retirar las puertas. Herramientas necesarias (no suministradas) Destornillador Philips (+) Destornillador de punta chata (-) Llave de tubo (10 mm) Pinzas Llave Allen (4 mm) Llave Allen (5 mm)Precaución

Español - 11 puesta a punto
Cómo Desarmar Las Puertas
Del Refrigerador
A
B
D
C
B
E
E
F
Precaución

Español - 12
Cómo Desarmar Las Puertas
Del Congelador
Precaución
A
B
C
D
E
Cómo Armar Las Puertas
Del Refrigerador
Precaución
A
B
DA68-03194D-00.indb 12
Español - 13 puesta a punto
Precaución
C
D
E
A
B
B

Español - 14
E
C
E
D
Precaución
Mantenga las grapas fuera del alcance de los niños y evite que estos jueguen con ellas o se las pongan en la boca.Precaución
E
DA68-03194D-00.indb 14
Español - 15 puesta a punto
Nivelación Del Refrigerador
Y Ajuste De La Altura Y Del
Espacio De Las Puertas
Cómo nivelar el refrigerador Para evitar riesgos debidos a la inestabilidad del refrigerador, coloque este en una superficie horizontal y nivelada de acuerdo con las siguientes instrucciones de instalación.Precaución
De no seguir esta recomendación, el refrigerador se podría volcar y causar lesiones personales. Si la parte frontal del electrodoméstico está un poco más elevada que la posterior, la puerta puede abrirse y cerrarse con mayor facilidad. Si instala el refrigerador sobre un superficie que no esté nivelada, el refrigerador quedará desequilibrado. -- Para una instalación segura del refrigerador, verifique que las patas toquen el piso. -- Las patas se encuentran en la parte posterior debajo de cada puerta. Inserte un destornillador de punta chata y ajústelo en la dirección de la flecha. Si el refrigerador se coloca sobre un suelo desnivelado, puede causar una diferencia de altura entre las puertas.
Español - 16
Cómo Ajustar La Altura De
La Puerta
Si una de las puertas está más baja que la otra:Precaución
Cómo Ajustar La Holgura
De Las Puertas
Si la holgura entre las puertas del compartimiento izquierdo y derecho del refrigerador no es uniforme.
Español - 17 puesta a punto
Instalación De La Tubería
Del Dispensador De Agua
El dispensador de agua con filtro es una de las funciones útiles de su nuevo refrigerador. Con el fin de promover la buena salud, el filtro de agua elimina las partículas no deseadas del agua. No obstante, no la esteriliza ni destruye los microorganismos. Para eso, necesita adquirir un sistema de purificación de agua. La tubería del agua también se conecta a la fábrica de hielo. Para que la fábrica de hielo funcione correctamente, se necesita una presión de agua de 20-125 psi. Si el refrigerador se instala en una zona con baja presión de agua (inferior a los 20 psi), puede instalar una bomba cebadora para compensar la baja presión. Una vez conectada la tubería de agua, asegúrese de que el tanque de almacenamiento de agua dentro del refrigerador esté lleno. Para hacerlo, presione la palanca del dispensador hasta que salga el agua.
Español - 18
Precaución
(B).
Características Del
Producto
• Triple Enfriamiento
-- Los condensadores independientes del congelador y de los compartimientos de alimentos frescos y convertibles mantienen una temperatura y una humedad óptimas en cada compartimiento y evitan que se mezclen los olores.• Flex Zone
-- Permite almacenar a distintas temperaturas seleccionables por el usuario (Congelador, Congelación suave, Frío y Fresco).
Español - 19 Funcionamiento (1) Freezer (Hold 3 sec for Power Freeze) (Congelador [Presionar 3 seg. para Congelación rápida]) Presione este botón para ajustar el congelador a la temperatura deseada. Puede establecer la temperatura entre -8 °F y 5 °F (entre -23 °C y -15 °C). Toque este botón durante 3 segundos para activar la congelación rápida y reducir el tiempo necesario para congelar los productos que se encuentran en el congelador. Esto puede ser útil si necesita congelar rápidamente alimentos que se degradan fácilmente o si la temperatura del congelador subió drásticamente (Por ejemplo, si la puerta quedó abierta). Para cancelar la función Congelación rápida, mantenga presionado el botón Freezer/Power Freeze (3 sec) (Congelador/ Congelación rápida [3 segundos]) nuevamente durante 3 segundos. (2) Door Alarm (Alarma) (Hold 3 sec for °C↔°F) (Presionar 3 seg. para °C↔°F) Este botón cumple dos propósitos:
Uso Del Panel De Control
(1) (2) (3) (4) (5) (7) (8) (6) DA68-03194D-00.indb 19
Español - 20 (3) Energy Saver (Ahorro de energía) (Hold 3 sec for Control Lock) (Presionar 3 seg. para Bloqueo control) Al tocar este botón se activa y desactiva el modo de ahorro de energía. Cuando se activa el modo de ahorro de energía, se ilumina el ícono Energy Saver (Ahorro de energía). Cuando se desactiva el modo de ahorro de energía, el ícono se apaga. La función de ahorro de energía ya viene activada de fábrica. Si hay condensación o gotas de agua en las puertas, apague el modo de ahorro de energía. Asimismo, al tocar este botón durante 3 segundos se activa el Control Lock (Bloqueo de control) que bloquea el panel del visor y los botones del dispensador de manera tal que los botones no pueden utilizarse. (4) Fridge (Hold 3 sec for Power Cool) (Refrigerador [Presionar 3 seg. para Refrigeración rápida]) Toque este botón para ajustar el refrigerador a la temperatura deseada. Puede ajustar la temperatura entre 34 °F y 44 °F (entre 1 °C y 7 °C). Toque este botón durante 3 segundos para activar Power Cool (Refrigeración rápida) y reducir el tiempo necesario para enfriar los productos que se encuentran en el refrigerador. Esto puede ser útil si necesita enfriar rápidamente alimentos que se degradan fácilmente o si la temperatura del refrigerador subió drásticamente (por ejemplo, si la puerta quedó abierta). ( 5 ) Cool Select+ (Selección de frío+) (Zona de selección de frío) El botón CoolSelect+ (Selección de frío+) permite establecer la zona de selección de frío situada en la la parte inferior derecha del frigorífico en uno de los 4 ajustes: Freezer (Congelador), Soft Freezing (Congelación suave), Chill (Frío) y Cool (Fresco). Pulse el botón CoolSelect+ (Selección de frío+) durante tres segundos para activar la función de Zona de selección de frío y seleccione uno de los cuatro ajustes. Freezer (Congelador) Seleccione Freezer (Congelador) para ajustar la misma temperatura que el congelador.
(-5 °C).
30 °F (-1 °C).
Cool (Fresco) Seleccione Fresco para ajustar la temperatura a 41 °F (5 °C).
Español - 21 Funcionamiento ( 6 ) Ice Type (Tipo de hielo) Toque el botón Ice Type (Tipo de hielo) para cambiarlo. Cada vez que toca el botón Ice Type (Tipo de hielo), los modos de cubitos y de hielo picado se alternan y se ilumina el icono correspondiente para indicar la selección. Si no necesita hielo, apague la función para ahorrar consumo de agua y de energía. (Consulte Apagar máquina de hielo.) Luz Toque el botón Cubed (Cubitos) durante tres segundos para establecer la lámpara LED del dispensador (debajo de la pantalla) en modo continuo para que permanezca encendida. Si desea que la lámpara del dispensador se encienda solo cuando alguien utiliza el dispensador, vuelva a tocar este botón durante tres segundos para desactivar el modo de encendido continuo. (7) Ice Maker Off (Hold 3 sec) (Fábrica de hielo desactivada [Presionar 3 seg.]) Toque el botón Ice Maker Off (Fábrica de hielo desactivada) durante 3 segundos hasta que se ilumine el indicador correspondiente ( ). (8) Filter (Filtro) Uso del filtro de agua Este ícono se enciende cuando es necesario reemplazar el filtro, normalmente después de que el refrigerador haya despachado 300 galones de agua (después de aproximadamente 6 meses). Después de haber instalado el nuevo filtro de agua, mantenga presionado el botón Crushed Ice (Hielo triturado) durante 3 segundos para restablecer el filtro. -- Si el agua no sale del dispensador o lo hace lentamente, es necesario remplazar el filtro porque está obturado. -- Algunas zonas poseen grandes cantidades de cal en el agua, lo que provoca que el filtro de agua se obstruya con más rapidez. Cancelación del modo de exhibición
Precaución

Español - 22
Cambio Del Filtro De Agua
Advertencia
Para reducir el riesgo de daños materiales ocasionados por el agua, NO use marcas genéricas de filtros de agua en su refrigerador SAMSUNG.Solo Use Filtros De Agua
Marca Samsung.
SAMSUNG no será legalmente responsable por cualquier daño incluidos, entre otros, daños causados por pérdidas de agua por el uso de un filtro de agua genérico. (Rojo) Los refrigeradores SAMSUNG están diseñados para funcionar SOLO CON filtros de agua SAMSUNG. La luz del filtro se pone roja para indicar el momento en que hay que cambiar el cartucho del filtro de agua. Para darle tiempo hasta que consiga un nuevo filtro, la luz roja se enciende justo antes de que la capacidad del filtro actual se acabe. Cambiar el filtro a tiempo hará que su refrigerador provea agua más fresca y más limpia.
Español - 23 Funcionamiento Eliminación de los materiales residuales que se encuentran dentro de la tubería del suministro de agua después de instalar el filtro de agua.
Importante:
La presión del suministro de agua que sale del sistema por ósmosis inversa que va a la válvula de entrada de agua del refrigerador debe ser entre 241 y 827 kPa. Si se conecta un sistema de filtración de agua por ósmosis inversa al suministro de agua fría, la presión de agua al sistema de ósmosis inversa debe tener un mínimo de 276 a 414 kPa. Si la presión de agua al sistema de ósmosis inversa es menor de 276 a 414 kPa:
Español - 24
Control De La Temperatura
Temperaturas recomendadas de los compartimientos del congelador y del refrigerador La temperatura recomendada de los compartimientos del congelador y del refrigerador es de 0 °F y 37 °F (-18 °C y 3 °C) respectivamente. Si la temperatura de los compartimientos del congelador y del refrigerador es demasiado alta o baja, ajuste la temperatura manualmente.Control De La Temperatura
Del Congelador
Temperatura recomendada (congelador): 0 °F (-18 °C) Freezer (Congelador) La temperatura del congelador puede establecerse entre -8 °F y 5 °F (o entre -23 °C y -15 °C) para satisfacer sus necesidades particulares. La temperatura predeterminada es de 0 °F (-18 °C). Presione el botón Freezer (Congelador) varias veces hasta que aparezca la temperatura deseada en el visor. Cada vez que presione el botón, la temperatura cambiará en 1 °F (o 1 °C) en el siguiente orden. Fahrenheit: 0 °F ➞ -1 °F ➞ -2 °F ➞ -3 °F ➞ -4 °F➞ -5 °F ➞ -6 °F ➞ -7 °F ➞ -8 °F ➞ 5 °F ➞ 4 °F ➞
3 °F ➞ 2 °F ➞ 1 °F ➞ 0 °F.
Centígrados: -18 °C ➞ -19 °C ➞ -20 °C ➞ -21 °C➞ -22 °C ➞ -23 °C ➞ -15 °C ➞ -16 °C ➞ -17 °C
➞ -18 °C.

Español - 25 Funcionamiento
Control De La Temperatura
Del Refrigerador
Temperatura recomendada (refrigerador): 37 °F (3 °C ) La temperatura del refrigerador puede establecerse entre 34 °F y 44 °F (o entre 1 °C y 7 °C) para satisfacer sus necesidades particulares. La temperatura predeterminada es de 37 °F (8 °C). Presione el botón Fridge (Refrigerador) varias veces hasta que aparezca la temperatura deseada en el visor. Cada vez que presione el botón, la temperatura cambiará en 1 °F (o 1 °C) en el siguiente orden. Fahrenheit: 37 °F ➞ 36 °F ➞ 35 °F ➞ 34 °F ➞44 °F ➞ 43 °F ➞ 42 °F ➞ 41 °F ➞ 40 °F ➞ 39 °F
➞ 38 °F ➞37 °F.
Centígrados: 3 °C ➞ 2 °C ➞ 1 °C ➞ 7 °C ➞ 6 °C➞ 5 °C ➞ 4 °C ➞ 3 °C.
Uso De Los Despachadores
De Hielo Y Agua Fría
Pulse el botón Cubed Ice (Hielo en cubos) o Crushed Ice (Hielo triturado) para seleccionar el tipo de hielo que desea obtener. Uso de la palanca de hielo ( 1 ) Empuje la palanca del dispensador de hielo ( 1 ) levemente con el vaso. El hielo saldrá del dispensador. Puede elegir el tipo de hielo presionando primero el botón para hielo en cubos o para hielo triturado.Sin Hielo
Seleccione esta opción si desea apagar la fábrica de hielo. Uso de la palanca de agua ( 2 ) Empuje levemente la palanca del dispensador de agua ( 2 ) con el vaso. Saldrá agua del dispensador. ( 1 ) ( 2 )
Español - 26 Uso simultáneo del dispensador de hielo y de agua Para obtener hielo y agua, empuje primero la palanca de hielo ( 1 ) para obtener hielo y a continuación mueva el vaso hacia abajo y empuje la palanca del dispensador de agua ( 2 ) para obtener agua.
Mantenimiento De La Cubeta
De Hielo
Fábrica De Hielo
Precaución
Precaución
Precaución

Español - 27 Funcionamiento
Precaución
Uso De La Función De Hielo
Desactivado
Cuando selecciona el modo Hielo desactivado, retire todos los cubos de hielo de la cubeta. Si deja los cubos de hielo en la cubeta, es posible que se amontonen y sea difícil retirarlos. Para retirar la cubeta de hielo con seguridad y evitar lesionarse, sujete la parte inferior de la cubeta con una mano y un lado de la cubeta con la otra mano. Luego levante la cubeta y jale hacia afuera. Para volver a colocar la cubeta empújela en línea recta firmemente hacia atrás.Precaución
Durante Las Vacaciones...
Si viaja por vacaciones o negocios y no utilizará los dispensadores de agua o de hielo por un período prolongado: -- Cierre la válvula de agua. De lo contrario, pueden producirse fugas de agua. -- Retire todos los alimentos y el hielo de la cubeta de hielo. -- Desenchufe el refrigerador. -- Retire el exceso de humedad del interior del refrigerador y deje las puertas abiertas. De lo contrario, pueden aparecer olores y moho. DA68-03194D-00.indb 27
Español - 28
Recomendaciones Acerca
De La Fábrica De Hielo
No coloque los dedos, las manos, ni cualquier otro objeto inapropiado en el recipiente o en la cubeta de la fábrica de hielo. -- Puede lesionarse o dañar el refrigerador. Nunca coloque los dedos ni objetos en la abertura del dispensador. -- Puede lesionarse. No intente desarmar la fábrica de hielo. No limpie ni pulverice la cubeta de hielo con agua mientras está dentro del refrigerador. Retírela para limpiarla.Precaución

Español - 29 Funcionamiento
Piezas Y Funciones
Utilice esta página para familiarizarse con las piezas y las funciones del refrigerador. Refrigerador Estante fijo Estante espacio rápido Huevera Filtro de agua Estante plegable Fábrica de hielo Guarda multiusos del refrigerador Cajones accesibles de verduras y frutas frescas Estante corredizo accesible Compartimiento del almacenamiento de carnes y alimentos secos Compartimientos de la puerta del congelador Congelador Zona de selección de frío Al cerrar la puerta, asegúrese de que la sección de la bisagra vertical se encuentre en la posición correcta para impedir que raye la otra puerta. Si la sección de la bisagra vertical está invertida, colóquela en la posición correcta y cierre la puerta. Algunas veces puede aparecer humedad en esta sección. La manija de la puerta puede aflojarse con el tiempo. Si esto sucede, ajuste los tornillos que se encuentran dentro de la puerta. Si cierra una puerta con mucha fuerza, la otra puerta puede abrirse. Cuando se abre la puerta, el disyuntor apaga automáticamente el motor sinfín de la fábrica de hielo por razones de seguridad. Si la lámpara LED interior o exterior se apagó, comuníquese con los agentes de servicio técnico de Samsung. DA68-03194D-00.indb 29
Español - 30
Remoción De Los Accesorios
Del Refrigerador
Precaución
Precaución

Español - 31 Funcionamiento
Limpieza Del Refrigerador
Advertencia
Reemplazo De Las Luces
Interiores
Lámpara de LED del congelador/ refrigeradorPrecaución

Español - 32 Solución de problemas
Problema
Solución
El refrigerador no funciona en absoluto o no enfría lo suficiente.
Español - 33 solución de problemas
Problema
Solución
La fábrica de hielo no funciona.
Garantía (EE. UU.)
Garantía Del Refrigerador Samsung
Garantía Limitada Para El Comprador Original
Este producto de marca Samsung, suministrado y distribuido por Samsung Electronics America, Inc. (Samsung) y entregado nuevo, en su caja de fábrica al comprador original, está garantizado por Samsung ante defectos de fabricación relacionados con los materiales y la mano de obra durante un período de garantía limitado a: Un (1) año para las piezas y la mano de obra del refrigerador Cinco (5) años para las piezas y la mano de obra exclusivamente del sistema hermético de refrigeración* Diez (10) años para las piezas y cinco (5) años para la mano de obra para el compresor Inverter digital (*Compresor, evaporador, condensador, deshumidificador, tuberías de conexión) Esta garantía limitada entra en vigencia en la fecha original de compra y solo es válida para productos adquiridos y utilizados en los Estados Unidos. Para recibir el servicio técnico bajo garantía, el comprador debe comunicarse con Samsung para determinar la naturaleza del problema y proceder a repararlo. El servicio de garantía solo puede realizarse a través de un Centro de Servicio autorizado Samsung. Debe presentarse la factura original de venta bajo solicitud de Samsung o del Centro de Servicio autorizado Samsung como prueba de compra. Samsung reparará o reemplazará cualquier pieza considerada defectuosa, a nuestra entera discreción y sin cargo, según lo estipulado en este documento, por piezas nuevas o reparadas durante el período de garantía limitada especificado anteriormente. Todas las piezas y productos reemplazados son propiedad de Samsung y deben devolverse a Samsung. Las piezas y los productos de repuesto quedarán bajo el período restante de garantía original, o noventa (90) días, lo que sea más extenso. La prestación de servicios en el hogar se realizará durante el período de garantía de la mano de obra, sujeto a disponibilidad dentro de los Estados Unidos. La prestación de servicios en el hogar no está disponible en todas las zonas. Para recibir la prestación de servicio en el hogar, el producto debe estar despejado y ser accesible al nivel del piso para el personal de servicio técnico. Si durante la prestación de servicios en el hogar no pudiera llevarse a cabo la reparación, podría ser necesario realizar el traslado, la reparación y posterior devolución del producto. Si la prestación de servicios en el hogar no está disponible, Samsung podría escoger, a nuestra entera discreción, proporcionar transporte a nuestra elección hasta y desde el Centro de Servicio autorizado Samsung. De lo contrario, el transporte hasta y desde el Centro de Servicio autorizado Samsung estará a cargo del comprador. Esta garantía limitada cubre defectos de fabricación en materiales y mano de obra bajo condiciones de uso normal, no comercial, del producto y no se aplicará en los siguientes casos, incluidos, aunque no limitados a: daños ocasionados durante el transporte; entrega e instalación; aplicaciones y usos para los que el producto no fue diseñado; producto o números de serie alterados; daños externos o del acabado exterior; accidentes, mal uso, negligencia, incendio, agua, rayos u otros fenómenos naturales; uso de productos, equipamiento, sistemas, servicios públicos, servicios generales, piezas, suministros, accesorios, aplicaciones, instalaciones, reparaciones, tuberías externas y fugas, cableado externo, disyuntores, fusibles o conectores no suministrados ni autorizados por Samsung o que dañen este producto u ocasionen problemas de servicio; voltaje incorrecto, fluctuaciones y sobrevoltaje del suministro eléctrico; adaptaciones y fallas por parte del cliente en el cumplimiento de las instrucciones de funcionamiento, limpieza, mantenimiento y cuidado del medio ambiente que se incluyen y establecen en el manual de instrucciones; pérdida de alimentos por descomposición; consumiblés, incluidos filtros y focos de iluminación. NO EXISTEN OTRAS GARANTÍAS EXPLÍCITAS ADEMÁS DE LAS MENCIONADAS Y DESCRITAS ANTERIORMENTE, ASÍ COMO TAMPOCO EXISTEN OTRAS GARANTÍAS EXPLÍCITAS O IMPLÍCITAS, INCLUIDAS, SIN LIMITACIÓN, TODAS LAS GARANTÍAS IMPLÍCITAS DE COMERCIABILIDAD O IDONEIDAD PARA UN FIN CONCRETO Y QUE SEAN PERTINENTES TRAS LOS PERÍODOS DE GARANTÍA EXPLÍCITA INDICADOS CON ANTERIORIDAD, Y NINGUNA GARANTÍA EXPLÍCITA U OFRECIDA POR PERSONAS, FIRMAS O EMPRESAS EN RELACIÓN CON ESTE PRODUCTO SERÁ LEGALMENTE VINCULANTE PARA SAMSUNG. SAMSUNG NO SERÁ LEGALMENTE RESPONSABLE DE LA PÉRDIDA DE INGRESOS O BENEFICIOS, LA FALTA DE AHORROS U OTROS BENEFICIOS, O DE NINGÚN OTRO DAÑO RESULTANTE ESPECIAL, ACCIDENTAL O INDIRECTO OCASIONADO POR EL USO, ABUSO O INCAPACIDAD DE USO DE ESTE PRODUCTO, INDEPENDIENTEMENTE DE LA TEORÍA LEGAL SOBRE LA QUE SE BASE EL RECLAMO, INCLUSO SI SAMSUNG HA SIDO ADVERTIDO DE LA POSIBILIDAD DE TALES DAÑOS. ASIMISMO, CUALQUIER TIPO DE INDEMNIZACIÓN EXIGIDA A SAMSUNG NO SUPERARÁ EL PRECIO DE COMPRA DEL PRODUCTO VENDIDO POR SAMSUNG Y QUE HAYA OCASIONADO EL SUPUESTO DAÑO. SIN LIMITAR LO INDICADO ANTERIORMENTE, EL COMPRADOR ASUME TODO EL RIESGO Y LA RESPONSABILIDAD DE CUALQUIER PÉRDIDA, DAÑO O LESIÓN A SÍ MISMO O A SU PROPIEDAD, ASÍ COMO A TERCEROS Y A SU PROPIEDAD, OCASIONADOS POR EL USO, ABUSO O INCAPACIDAD DE USO DE ESTE PRODUCTO VENDIDO POR SAMSUNG QUE NO HAYAN SIDO CAUSADOS DIRECTAMENTE POR NEGLIGENCIA DE SAMSUNG. ESTA GARANTÍA LIMITADA NO SERÁ VÁLIDA PARA PERSONAS AJENAS AL COMPRADOR ORIGINAL DE ESTE PRODCUTO, ADEMÁS ES INTRANSFERIBLE Y CONSTITUYE SU RECURSO EXCLUSIVO. Ciertos estados no permiten limitaciones en cuanto a la vigencia de una garantía implícita o la exclusión o limitación de daños accidentales o indirectos, de tal forma que las limitaciones o excepciones mencionadas tal vez no se apliquen a usted en particular. Esta garantía le otorga derechos legales específicos, e incluso puede otorgarle otros derechos que varíen de un estado a otro. Para obtener el servicio de garantía, pónganse en contacto con Samsung en el:Centro De Asistencia Al Cliente De Samsung
Samsung Electronics America, Inc. 85 Challenger Road Ridgefield Park, NJ 07660 1-800-SAMSUNG (1-800-726-7864) y www.samsung.com DA68-03194D-00.indb 34
Notas DA68-03194D-00.indb 35

Contáctese con SAMSUNG WORLD WIDE Si tiene alguna pregunta o comentario acerca de productos Samsung, contáctese con el servicio de atención al cliente de SAMSUNG.
País
Llame Al
O Visítenos En Línea En
Escriba A
Ee. Uu.
1-800-Samsung
(726-7864) www.samsung.com/us/support Samsung Electronics America, Inc. 85 Challenger Road Ridgefield Park, NJ 07660Canadá
1-800-Samsung
(726-7864) www.samsung.com/ca/support (Inglés) www.samsung.com/ca_fr/support (Francés) Samsung Electronics Canada Inc. 2050 Derry Road West, Mississauga, Ontario L5N 0B9 Canada DA68-03194D-00.indb 36
Réfrigérateur Guide d'utilisation un monde de possibilités Merci d'avoir choisi ce produit Samsung. Appareil amovible Ce guide est en papier recyclé à 100 %. DA68-03194D-00.indb 1

Français - 2
Consignes De Sécurité
Avertissement
Pratiques inadaptées ou dangereuses susceptibles de causer des blessures graves, voire la mort.Attention
Pratiques inadaptées ou dangereuses susceptibles de causer des blessures légères ou des dommages matériels. NE PAS essayer. NE PAS démonter. NE PAS toucher. Consignes de sécurité Table des matièresConsignes De Sécurité… ………………………………………………… 2
Installation De Votre Réfrigérateur… …………………………… 9
Fonctionnement De Votre Réfrigérateur Samsung…………
19Dépannage……………………………………………………………………
32 DA68-03194D-00.indb 2
Français - 3 consignes de sécurité Suivre scrupuleusement les consignes. Débrancher la fiche de la prise murale. S'assurer que l'appareil est relié à la terre afin d'éviter tout choc électrique. Communiquer avec le service d'assistance technique pour obtenir de l'aide. Remarque. Ces symboles d'avertissement ont pour but d'éviter tout risque de blessure. Respectez-les en toutes circonstances. Lisez attentivement la présente section et conservez le guide en lieu sûr afin de pouvoir le consulter ultérieurement.
Avertissement
Avertissements Importants
Concernant Le Transport Et
Le Lieu D’Installation
Avertissement
Avertissements Importants
Concernant L'Installation

Français - 4 le dos du réfrigérateur.
Attention
Installation En Toute Sécurité :

Français - 5 consignes de sécurité réparer votre réfrigérateur. -- Le non-respect de cette consigne risque d'entraîner un dysfonctionnement, un choc électrique, un incendie, une explosion ou des blessures corporelles.
Avertissement
Avertissements Importants
Concernant L'Utilisation

Français - 6 remettre en place la grille de séparation à l’aide des vis fournies si vous l’avez retirée du tiroir.
Attention
Utilisation En Toute Sécurité :

Français - 7 consignes de sécurité
Attention
Précautions Concernant Le
Nettoyage Et L'Entretien
Avertissement

Français - 8
Avertissement
Avertissements Importants
Concernant La Mise Au Rebut
Conseils Supplémentaires
Concernant L'Utilisation

Français - 9 Installation
Avant D'Installer Le
Réfrigérateur
Nous vous félicitons d’avoir choisi ce réfrigérateur Samsung. Nous espérons que vous apprécierez les fonctionnalités de pointe offertes par ce nouvel appareil. Choix du meilleur emplacement pour le réfrigérateur Choisissez :A
Bb
Cc
Dd
Profondeur « A » 28 7/8 po (733 mm) Largeur « B » 35 3/4 po (908 mm) Hauteur « C » 70 3/4 po (1797 mm) Hauteur totale « D » 71 7/8 po (1825 mm) 59 6/8 po (1519 mm) 12 po (305,5 mm) 125° 125° 2 po (50 mm) 35 3/4 po (908 mm) 24 po (610 mm) 2 6/8 po (72,3 mm) 1 3/4 po (43 mm) 42 1/4 po (1075 mm) 11 6/8 po (300 mm) 11 6/8 po (300 mm)
Français - 10 Déplacement du réfrigérateur Afin de ne pas endommager le sol, assurez-vous que les pattes réglables avant sont relevées (au- dessus du sol). Consultez la section « RÉGLAGE DU NIVEAU DU RÉFRIGÉRATEUR » du guide à la page 15. Sol Pour une installation correcte, vous devez placer le réfrigérateur sur une surface plane et dure située au même niveau que le reste du sol. Cette surface doit être suffisamment résistante pour supporter le poids d'un réfrigérateur plein. Afin de protéger la finition du plancher, coupez un grand morceau de carton et placez-le sous le réfrigérateur, à l’endroit où vous travaillez. Lors du déplacement du réfrigérateur, tirez-le et poussez-le directement vers l'avant ou vers l'arrière. Ne le basculez pas d'un côté à l'autre.
Retrait Des Portes Du
Réfrigérateur
Si le réfrigérateur est trop large pour passer facilement les portes de votre habitation, vous pouvez retirer les portes de l'appareil. Outils nécessaires (non fournis) Tournevis cruciforme (+) Tournevis plat (-) Clé à douille (10 mm) Pinces Clé hexagonale (4 mm) Clé hexagonale (5 mm)Attention

Français - 11 Installation
Démontage Des Portes Du
Réfrigérateur
A
B
D
C
B
E
E
F
Attention

Français - 12
Démontage Des Portes Du
Congélateur
Attention
A
B
C
D
E
Montage Des Portes Du
Réfrigérateur
Attention
A
B
DA68-03194D-00.indb 12
Français - 13 Installation
Attention
C
D
E
A
B
B

Français - 14
E
C
E
D
Attention
Maintenez les brides hors de portée des enfants et assurez-vous que ces derniers ne jouent pas avec elles ou ne les mettent pas dans leur bouche.Attention
E
DA68-03194D-00.indb 14
Français - 15 Installation
Réglage Du Niveau Du
Réfrigérateur Et De La
Hauteur Et De L'Intervalle
Des Portes
Réglage du niveau du réfrigérateur Afin d'éviter tout risque dû à une instabilité du réfrigérateur, veuillez installer ce dernier sur un support horizontal et de niveau respectant les instructions suivantes.Attention
Le non-respect de cette consigne risquerait de provoquer un basculement du réfrigérateur et des blessures corporelles. Si l'avant de l'appareil est légèrement plus haut que l'arrière, l'ouverture et la fermeture de la porte sont plus faciles. L'installation du réfrigérateur sur une surface irrégulière entraînera un alignement imparfait du réfrigérateur. -- Lors de l'installation du réfrigérateur, vous devez vous assurer que les pattes touchent le sol. -- Les pattes doivent se situer à l'arrière du dessous de chaque porte. Insérez un tournevis plat et serrez dans la direction de la flèche. Lorsque le réfrigérateur est placé sur un sol qui n'est pas de niveau, cela peut provoquer une différence de hauteur entre les portes.
Français - 16
Réglage De La Hauteur Des
Portes
Si l'une des portes est plus basse que l'autre :Attention
Réglage De L'Intervalle Des
Portes
Si l'intervalle entre les portes des compartiments gauche et droit du réfrigérateur n'est pas uniforme.
Français - 17 Installation
Installation Du Circuit Du
Distributeur D'Eau
Le distributeur d'eau avec filtre est l'une des caractéristiques très pratiques que vous offre votre nouveau réfrigérateur. Afin de préserver votre santé, le filtre supprime toutes les particules indésirables présentes dans l'eau. Toutefois, il ne permet pas de stériliser ni de détruire les micro-organismes. Pour cela, un purificateur d'eau est nécessaire. Le tuyau d’alimentation en eau est également connecté à la machine à glaçons. Pour que la machine à glaçons puisse fonctionner correctement, la pression de l'eau doit se situer entre 20 et 125 psi. Si le réfrigérateur est installé dans une zone où la pression de l'eau est faible (inférieure à 20 psi), vous pouvez installer une pompe de surpression pour compenser la faible pression. Après avoir raccordé le tuyau d'eau, assurez-vous que le réservoir d'eau à l'intérieur du réfrigérateur est bien rempli. Pour cela, appuyez sur le levier du distributeur d'eau jusqu'à ce que l'eau s'écoule par la sortie d'eau.
Français - 18
Attention
Caractéristiques Du Produit
• Triple Refroidissement
-- Séparez les condensateurs dans le congélateur, les aliments frais et les compartiments convertibles maintiennent une température et une humidité optimales dans chaque compartiment et empêchent les odeurs d’un compartiment de fuir dans un autre.• Tiroir Flexzone
-- Vous permet de stocker des aliments à des températures variées et que vous pouvez choisir (Freezer (Congélateur), Soft Freezing (Congélation indépendante), Chill (Réfrigération) et Cool (Refroidissement)).
Français - 19 Fonctionnement ( 1 ) Freezer (Hold 3 sec for Power Freeze) (Congélateur (Appuyer pendant 3 s pour activer la Congélation rapide)) Appuyez sur ce bouton pour régler la température souhaitée du congélateur. Vous pouvez régler la température entre -8 °F et 5 °F (entre -23 °C et -15 °C). Appuyez sur ce bouton pendant 3 secondes pour activer la fonction Power Freeze (Congélation rapide) et réduire le temps de congélation nécessaire des produits dans le congélateur. Cela peut s'avérer utile lorsque vous avez besoin de congeler rapidement des aliments qui se gâtent facilement ou en cas de surchauffe du congélateur. (Par exemple, si la porte est restée ouverte.) Pour annuler la fonction Power Freeze (Congélation rapide), appuyez à nouveau longuement sur le bouton Freezer/Power Freeze (3 sec) (Congélateur/Congélation rapide (3 s)), pendant 3 secondes. ( 2 ) Door Alarm (Hold 3 sec for °C↔°F) (Alarme de la porte (Appuyez pendant 3 s pour basculer °C↔°F)) Ce bouton a deux utilisations :
Utilisation Du Panneau De Commande
(1) (2) (3) (4) (5) (7) (8) (6) DA68-03194D-00.indb 19
Français - 20 ( 3 ) Energy Saver (Hold 3 sec for Control Lock) (Économiseur d’énergie (Appuyez pdt 3s pour Verr. de commande)) Ce bouton permet d’activer ou de désactiver ce mode. Lorsque ce mode est activé, l’icône correspondante s'allume. Lorsque ce mode est désactivé, l’icône correspondante s'éteint. La fonction Energy Saver (Économiseur d'énergie) est activée par défaut en usine. Si de la condensation ou des gouttes d'eau se forment sur les portes, désactivez le mode Energy Saver (Économiseur d'énergie). Ce bouton permet d’activer la fonction de verrouillage de commande et de verrouiller le panneau d’affichage lorsque vous appuyez dessus pendant 3 secondes; les boutons du distributeur deviennent donc inactifs. Appuyez pendant 3 secondes pour la déverrouiller. ( 4 ) Fridge (Hold 3 sec for Power Cool) (Réfrigérateur (Appuyez pdt 3 s pour activer réfr. rapide)) Appuyez sur ce bouton pour régler la température souhaitée du réfrigérateur. Vous pouvez régler la température entre 34 °F et 44 °F (entre 1 °C et 7 °C). Appuyez sur ce bouton pendant 3 secondes pour activer la fonction Power Cool (Refroidissement rapide) et réduire le temps de congélation nécessaire des produits dans le réfrigérateur. Cette fonction permet de faire refroidir rapidement des aliments qui se gâtent facilement ou en cas de surchauffe soudaine du réfrigérateur. (Par exemple, si la porte est restée ouverte.) ( 5 ) Cool Select+ (Zone Cool Select) Le bouton CoolSelect+ vous permet de régler la zone Cool Select au bas à droite de votre réfrigérateur sur l’un des quatre réglages : Freezer, Soft Freezing, Chill ou Cool (Congélateur, Congélation indépendante, Réfrigération ou Refroidissement). Appuyez sur le bouton CoolSelect+ pendant trois secondes pour activer la fonction Cool Select Room (Zone Cool Select), puis sélectionnez l’un des quatre réglages. Congélateur Sélectionnez Freezer (Congélateur) pour régler la même température que le congélateur.
(-5 °C).

Français - 21 Fonctionnement ( 6 ) Ice Type (Forme de la glace) Appuyez sur le bouton Ice Type (Forme de la glace) pour changer de forme de glace. À chaque pression sur le bouton Ice Type (Forme de la glace), le mode alterne entre glaçons et glace pilée et l’icône correspondante Cubed ou Crushed ice (Glaçons et Glace pilée) s’allume, indiquant votre sélection. Si vous n’avez pas besoin de glace, désactivez la fonction afin de réduire la consommation d’eau et d’énergie. (Reportez-vous à Ice Maker Off (Désactivation glace) ci-dessous.) Éclairage Appuyez sur le bouton Cubed (Glaçons) pendant trois secondes pour régler la DEL du distributeur (sous l’écran d’affichage) en mode continu, elle reste ainsi allumée. Si vous souhaitez que le voyant du distributeur s’allume uniquement lorsqu’il est en cours d’utilisation, appuyez à nouveau sur ce bouton pendant 3 secondes pour désactiver le mode continu. ( 7 ) Ice Maker Off (Hold 3 sec) (Désactivation glace (Appuyez pdt 3 s)) Appuyez sur le bouton Ice Maker Off (Désactivation glace) pendant 3 secondes jusqu’à ce que le voyant correspondant ( ) s’allume. ( 8 ) Filtre Usure du filtre à eau Cette icône s’allume lorsque vous devez remplacer le filtre, généralement après que le réfrigérateur a délivré 300 gallons d’eau environ (après environ 6 mois). Après avoir installé le filtre à eau neuf, maintenez enfoncé le bouton Crushed Ice (Glace pilée) pendant 3 secondes pour réinitialiser le filtre. -- Si l'eau ne s'écoule pas ou s'écoule très lentement, vous devez changer le filtre à eau, car cela signifie qu'il est obstrué. -- L'eau de certaines régions est fortement calcaire, ce qui peut expliquer que le filtre à eau s'obstrue plus rapidement. Annulation du mode Exhibition (Exposition)
Attention

Français - 22
Remplacement Du Filtre À Eau
Avertissement
Afin d'éviter les risques de fuite, n'utilisez JAMAIS de filtre à eau de marque générique dans votre réfrigérateur SAMSUNG.Utilisez Uniquement Des Filtres
À Eau De Marque Samsung.
SAMSUNG ne pourra être tenue responsable en cas de dommages, incluant, mais sans s’y limiter, les dommages matériels causés par une fuite d’eau provoquée par l’utilisation d’un filtre à eau d’une autre marque. (Rouge) Les réfrigérateurs SAMSUNG sont conçus pour fonctionner UNIQUEMENT avec un filtre à eauSamsung.
Le voyant Filter (Filtre) devient rouge lorsque la cartouche du filtre à eau a besoin d'être changée. Afin de vous laisser le temps de vous procurer un filtre neuf, le voyant rouge s'allume un peu avant que le filtre ne soit totalement usé. Remplacer le filtre à temps permet d'avoir toujours une eau fraîche et pure.
Français - 23 Fonctionnement Élimination de toute substance résiduelle présente à l'intérieur du tuyau d’alimentation en eau après l'installation du filtre à eau
Important :
La pression de l'eau sortant d'un système d'osmose inverse et arrivant dans le robinet d'adduction d'eau du réfrigérateur doit se situer entre 241 et 827 kPa. Si un système de filtration d'eau d'osmose inverse est raccordé à votre alimentation en eau froide, la pression de l'eau arrivant à ce système doit être de 276 à 414 kPa. Si la pression de l'eau arrivant au système d'osmose inverse est inférieure à 276 à 414 kPa :
Français - 24
Réglage De La Température
Températures recommandées pour les compartiments du réfrigérateur et du congélateur Les températures de base et qui sont recommandées pour les compartiments congélateur et réfrigérateur sont respectivement de 0 °F et 37 °F (-18 °C et 3 °C). Si la température des compartiments congélateur et réfrigérateur est trop élevée ou trop basse, réglez-la manuellement.Réglage De La Température
Du Congélateur
Température recommandée (congélateur) : 0 °F (-18 °C) Congélateur La température du congélateur peut être réglée entre -8 °F et 5 °F (ou entre -23 °C et -15 °C) en fonction de vos besoins. La température par défaut est de 0 °F (-18 °C). Appuyez sur le bouton Freezer (Congélateur) plusieurs fois jusqu’à ce que la température souhaitée s’affiche. La température change par paliers de 1 °F (ou 1 °C) à chaque pression dans l’ordre indiqué ci- dessous. Fahrenheit : 0 °F ➞ -1 °F ➞ -2 °F ➞ -3 °F ➞ -4 °F➞ -5 °F ➞ -6 °F ➞ -7 °F ➞ -8 °F ➞ 5 °F ➞ 4 °F ➞
3 °F ➞ 2 °F ➞ 1 °F ➞ 0 °F.
Celsius : -18 °C ➞ -19 °C ➞ -20 °C ➞ -21 °C ➞-22 °C ➞ -23 °C ➞ -15 °C ➞ -16 °C ➞ -17 °C ➞
-18 °C.

Français - 25 Fonctionnement
Réglage De La Température
Du Réfrigérateur
Température recommandée (réfrigérateur) : 37 °F (3 °C) La température du réfrigérateur peut être réglée entre 34 °F et 44 °F (ou entre 1 °C et 7 °C) en fonction de vos besoins. La température par défaut est de 37 °F (8 °C). Appuyez sur le bouton Fridge (Réfrigérateur) plusieurs fois jusqu’à ce que la température souhaitée s’affiche. La température change par paliers de 1 °F (ou 1 °C) à chaque pression dans l’ordre indiqué ci-dessous. Fahrenheit : 37 °F ➞ 36 °F ➞ 35 °F ➞ 34 °F ➞44 °F ➞ 43 °F ➞ 42 °F ➞ 41 °F ➞ 40 °F ➞ 39 °F
➞ 38 °F ➞37 °F.
Celsius : 3 °C ➞ 2 °C ➞ 1 °C ➞ 7 °C ➞ 6 °C ➞5 °C ➞ 4 °C ➞ 3 °C.
Fonctionnement Des
Distributeurs D’Eau Et De Glace
Appuyez sur le bouton Cubed Ice (Glaçons) pour obtenir des glaçons ou sur le bouton Crushed Ice (Glace pilée) pour obtenir de la glace pilée. Utilisation du levier distributeur de glace ( 1 ) Poussez doucement le levier distributeur ( 1 ) avec votre verre. Les glaçons sortiront du distributeur. Les boutons vous permettent de choisir la forme sous laquelle vous souhaitez que la glace apparaisse.Pas De Glace
Sélectionnez cette option si vous souhaitez désactiver la machine à glaçons Utilisation du levier distributeur d'eau ( 2 ) Poussez doucement le levier distributeur d’eau ( 2 ) avec votre verre. L’eau s’écoulera du distributeur. ( 1 ) ( 2 )
Français - 26 Utilisation simultanée du distributeur de glace et d'eau Pour obtenir à la fois de la glace et de l’eau, poussez le levier distributeur de glace ( 1 ), puis faites descendre votre verre et poussez le levier distributeur d'eau ( 2 ).
Entretien Du Bac À Glace
Production De Glaçons
Attention
Attention
Attention

Français - 27 Fonctionnement
Attention
Utilisation De La Fonction
Ice Off (Désactivation Glace)
Lorsque vous sélectionnez le mode Ice Off (Désactivation glace), retirez tous les glaçons du bac. Si vous laissez les glaçons dans le bac, ceux- ci risquent de former un bloc, rendant leur retrait difficile. Afin de retirer le bac à glace en toute sécurité et d'éviter toute blessure, maintenez le bas du bac avec une main et le côté avec l'autre. Puis, soulevez le bac à glaçons et tirez-le tout droit. Pour remettre le bac en place, poussez-le directement vers l'arrière.Attention
Si Vous Partez En Vacances…
Si vous devez vous absenter et que le distributeur d'eau et de glaçons restera inutilisé pendant une période prolongée : -- Fermez le robinet d'adduction d'eau afin d'éviter tout risque de fuite. -- Videz le réfrigérateur et le bac à glace. -- Débranchez le réfrigérateur. -- Essuyez l'excédent d'humidité à l'intérieur et laissez les portes ouvertes. Le non-respect de cette consigne pourrait engendrer le développement d'odeurs et de moisissure. DA68-03194D-00.indb 27
Français - 28
À Faire Et À Éviter Avec La
Machine À Glaçons
N'insérez jamais vos doigts, vos mains ou des objets dans le conduit d'écoulement ni dans le bac de la machine à glaçons. -- Vous pourriez vous blesser ou endommager le réfrigérateur. Ne mettez jamais vos doigts ou des objets dans l'ouverture du distributeur. -- Vous risqueriez de vous blesser. Ne tentez pas de démonter la machine à glaçons. Ne lavez pas le bac à glace et ne l'aspergez pas d'eau lorsqu'il est dans le réfrigérateur. Retirez-le pour le nettoyer.Attention

Français - 29 Fonctionnement
Pièces Et Caractéristiques
Cette page permet de vous familiariser avec les pièces et caractéristiques du réfrigérateur. Réfrigérateur Tablette fixe Tablette permettant un gain d'espace rapide Bac à œufs Filtre à eau Tablette pliante Machine à glaçons Compartiment multi- usage à rebords du réfrigérateur Tiroirs à fruits et légumes frais facile d'accès Tablette à coulissement aisé Bac à aliments secs et viande Bacs des portes du congélateur Congélateur Zone Cool Select Lorsque vous fermez la porte, assurez-vous que la section à charnière verticale est correctement positionnée afin d'éviter que l'autre porte ne soit rayée. Si la section à charnière verticale est inversée, remettez-la correctement en place et fermez la porte. Il se peut que de l'humidité apparaisse parfois sur la section à charnière verticale. Avec le temps, la poignée de la porte peut se desserrer. Si cela se produit, resserrez les boulons situés à l'intérieur de la porte. Si vous fermez une porte trop fort, il est possible que l'autre porte s'ouvre. Lorsque la porte s'ouvre, le commutateur d'interverrouillage éteint automatiquement le moteur à vis sans fin de la machine à glaçons pour des raisons de sécurité. Veuillez communiquer avec votre centre de service Samsung si l'ampoule DEL intérieure ou extérieure est grillée. DA68-03194D-00.indb 29
Français - 30
Retrait Des Accessoires Du
Réfrigérateur
Attention
Attention

Français - 31 Fonctionnement
Nettoyage Du Réfrigérateur
Avertissement
Remplacement Des
Ampoules Intérieures
Ampoules DEL du congélateur/du réfrigérateurAttention

Français - 32 Dépannage
Problème
Solution
Le réfrigérateur ne fonctionne pas du tout ou ne refroidit pas suffisamment.
Français - 33 dépannage
Problème
Solution
La machine à glaçons ne produit pas de glace.
Si votre réfrigérateur doit être réparé N'hésitez pas à appeler un centre de service autorisé Samsung proche en lui communiquant vos nom, adresse et numéro de téléphone lorsque votre appareil ne fonctionne pas correctement. Informations relatives à la garantie (CANADA) Garantie limitée à l'acheteur initial Cet appareil Samsung est garanti par Samsung Electronics Canada, Inc. (désigné ci-après par SECA) contre les défauts de fabrication matériels ou une malfaçon durant les périodes suivantes : Main d'œuvre : 1 an (à domicile) Pièces : 1 an Compresseur inverseur : 10 ans SECA garantit en outre que si cet appareil ne fonctionne pas correctement durant la période de garantie spécifiée et que le dysfonctionnement est dû à une malfaçon ou à un matériau défectueux, SECA réparera ou remplacera l'appareil à sa discrétion. Le service à domicile n'est pas offert partout. Communiquez avec nous pour savoir si le service à domicile est actuellement offert dans votre région en utilisant les coordonnées se trouvant au dos de votre garantie. Toutes les réparations ou tous les remplacements de pièces sous garantie doivent être effectués par un centre de service autorisé SECA. (Pour localiser le centre de service SECA le plus proche, appelez le 1 800 SAMSUNG (726-7864) ou visitez notre site Web à l'adresse www.samsung.com/ca) Obligation du propriétaire initial Le reçu de vente daté initial doit être conservé par le client et il s'agit de la seule preuve d'achat acceptable. Il doit être présenté au centre de service autorisé SECA au moment de la demande de service avant que les services de garantie ne soient rendus. Pour tous les modèles portatifs, le transport vers et depuis le centre de service autorisé relève de la responsabilité du client. Exclusions de la garantie Cette garantie ne couvre pas les dommages provoqués par un accident, un incendie, une inondation et/ou toutes autres catastrophes naturelles, une manipulation, une tension d'alimentation ou une installation incorrectes, des réparations incorrectes ou non autorisées, une utilisation commerciale ou enfin des dommages survenus au cours de l'expédition. Les ajustements de la part du client qui sont expliqués dans ce guide d'utilisation ne sont pas couverts par les dispositions de la présente garantie. Cette garantie sera automatiquement annulée pour tout appareil reçu avec un numéro de série manquant ou modifié. Cette garantie est valide uniquement pour les produits achetés et utilisés au Canada.
Samsung Service À La Clientèle
Samsung Electronics Canada Inc. 2050 Derry Road West, Mississauga, Ontario L5N 0B9 Canada1-800-Samsung (726-7864)
www.samsung.com/ca/support (English) www.samsung.com/ca_fr/support (French) DA68-03194D-00.indb 34
Mémo DA68-03194D-00.indb 35
